Contents
Manual Part 1 2
33
Before Using the Handset
F905i_E2kou
✔
INFORMATION
•
Forcing the UIM into or out of the terminal may damage UIM or
the tray.
•
If the tray is removed, press it straight along the guide rail inside
the UIM slot with the UIM left detached.
◆
Security code of UIM
Two security codes, "PIN code" and "PIN2 code", are set for
the UIM.
You can change the security codes by yourself.
➝
P108
◆
UIM operation restriction
This terminal is provided with the UIM operation restriction for
protecting your or copyright data or files.
•
When files or data are downloaded from websites or data
attached to mails are obtained to your terminal with the UIM
card equipped, the UIM operation restriction is
automatically set to these data or files.
•
With UIM replaced or no UIM inserted, data or files with the
UIM operation restriction set cannot be displayed or played.
For i-
α
ppli with the UIM operation restriction set, no
functions except deletion are available.
•
Data or files with the UIM operation restriction set cannot be
transferred over infrared communication or copied/moved
to microSD memory card.
•
Restricted data types are as follows :
- Videophone call message, Movie memo
- i-mode mail attachment files, images inserted to Deco-mail or
signature, mail template containing data subject to operation
restriction
- Screen memo
-i-
α
ppli (including i-
α
ppli stand-by display)
- Images (including GIF animations and Flash graphics), i-
motion, data compatible with contents transfer, melodies,
Chara-den, Word/Excel/PowerPoint files
- Kisekae Tool
- Chaku-uta
®
Full Track Music
*
"Chaku-uta" is a registered trademark of Sony Music Entertain-
ment (Japan) Inc.
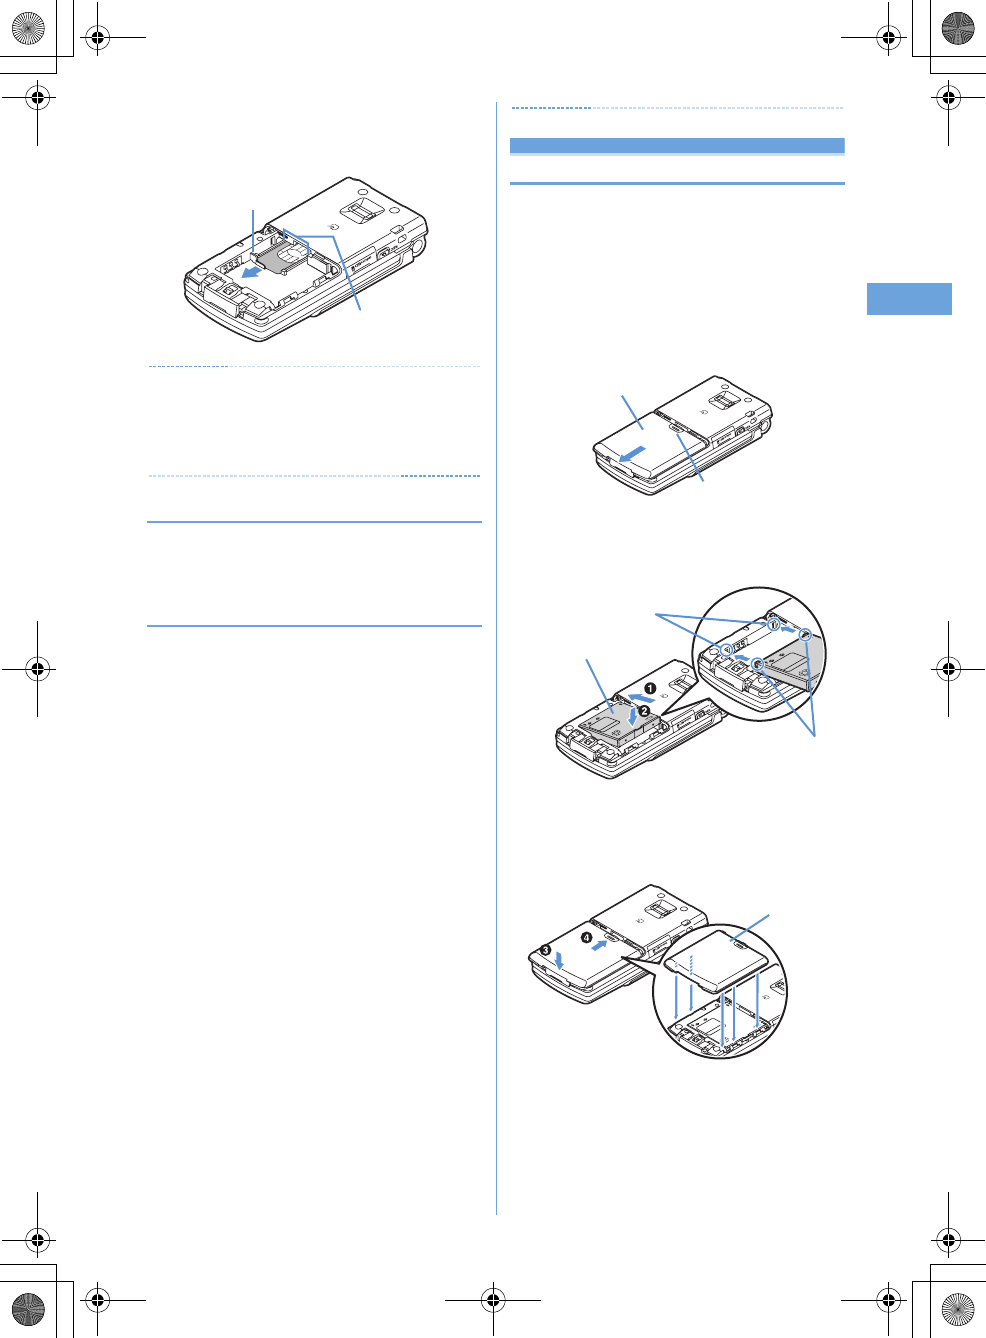
Attaching/removing battery pack
•
After turning the power OFF, fold the terminal and hold it
with your hand.
•
When the date and time is set with Auto time adjust set to
"OFF" in Date & time, removing the battery pack may delete
the date and time.
a
Holding the tab, pull out the tray until it clicks and
carefully remove UIM.
■
Removing
UIM slot
Tab
Press here with your thumb
Back Cover
■
Attaching
a
Remove the back cover by sliding it about 2 mm in
the direction of the arrow while pressing it with your
thumb.
Concave part
Battery Pack
Convex part
b
With the label side of the battery pack face up, align the
convex part of the battery pack with the concave part of
FOMA terminal, insert the battery pack in the direction
of
a
and press it in the direction of
b
until it fits.
c
Bring the 5 tabs of the back cover to meet the cuts in
FOMA terminal. Slide in the direction of
d
to fit in
while pressing in the direction of
c
so that no gap is
generated between FOMA terminal and the back cover.
Back cover
F905i.book Page 33 Monday, April 21, 2008 10:53 AM
34 Before Using the Handset
F905i_E2kou
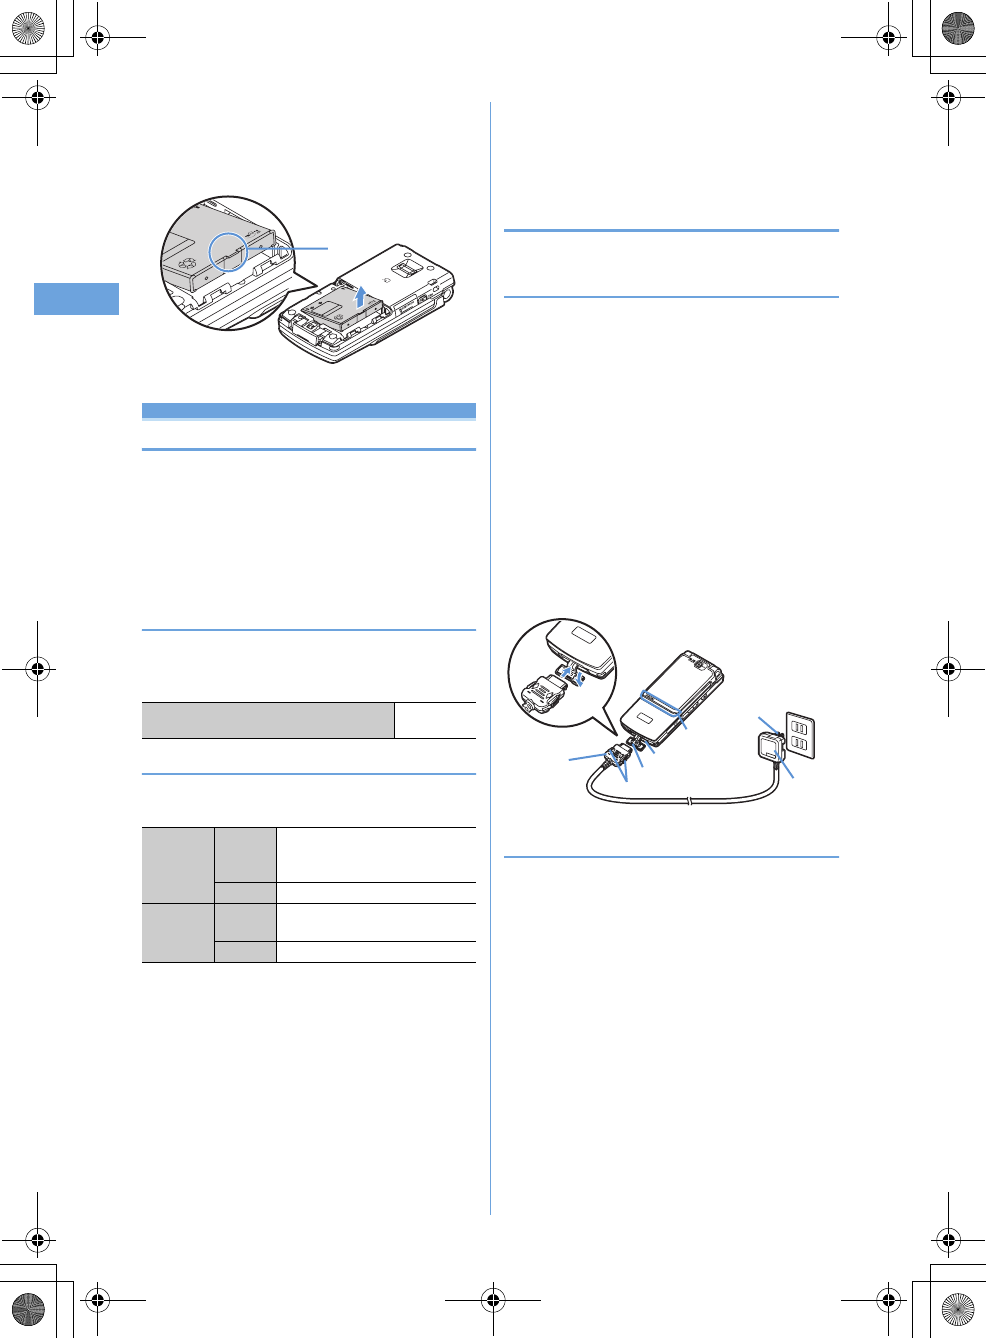
Charging the terminal
The battery pack does not have a full charge at time of
purchase. Use AC adapter for the terminal to charge the
battery before using the terminal.
•
To get the maximum performance from F905i, use battery
pack F10.
•
For handling the battery pack F10, see the battery pack
manual.
❖
Charging times (approximate)
The times below are the times for charging an empty battery
pack with F905i's power switched OFF. Charging with the
terminal ON or under low temperature requires longer time.
❖
Operation times on full charge (approximate)
The times below vary by the charging method and operating
environment.
•
Continuous call time indicates the approximate time that
the phone can send or receive radio waves normally.
•
Continuous stand-by time indicates the approximate time
that the phone can receive radio waves normally with F905i
closed. Call, communication or stand-by times may be
about half depending on factors such as the battery pack
charging condition, function settings, operating
environment such as ambient temperature, and signal
condition in the area of use (whether the signal is weak or
absent). Call, communication or stand-by times are
reduced by performing i-mode communication. And, even
with no voice calls or i-mode communications made, the
continuous call and continuous stand-by times are reduced
by creating i-mode mail, activating downloaded i-
α
ppli,
using i-
α
ppli stand-by display, performing data
communication or multiaccess, using camera, playing
movie/i-motion, obtaining or playing music with Music
player, or doing other operations.
❖
Battery charge
•
Use only the dedicated F905i AC adapter.
◆
Charging
When using optional AC Adapter,read the related operation
manuals beforehand.
•
The battery pack cannot be charged without an adapter.
When charging the battery pack, attach it to the terminal.
■
Charging with AC adapter
a
Open terminal cap (
a
) of the terminal, hold the connector
horizontally with the arrow facing upward and insert it to
terminal. (
b
)
b
Unfold the AC adapter's power plug and insert it into a
110V AC outlet.
c
After charging has completed, disconnect the AC adapter
from the outlet and press the release buttons on both sides
of the connector and remove the connector horizontally
from the terminal.
❖
Operations and precautions for charging
When charging starts, a charge start alert sounds, light turns
ON and the battery icon on the display or sub-display blinks.
When charging is over, a charge completion alert sounds, the
light turns off and the battery icon stops blinking.
•
When resuming the battery charging, the light turns on in
red. In some environments, the light may not light
immediately when charging starts; this is normal and not a
malfunction. However, if the light fails to light after a while,
disconnect the terminal from the AC adapter, and then
connect it again to start charging. Contact the sales outlet
such as FET Service Center if the light fails to light for a
while after charging starts.
•
If the light is used for mail reception, camera shooting, etc.
during charging, the light turns to a different color, but it is
lit in red soon.
When the light blinks while charging in cases except these
reasons
➝
P431 "Troubleshooting"
AC adapter Approx.
150 min.
Continuous
stand-by
time
3G
Stationary (Auto) : Approx. 505 H
Moving (Auto) : Approx. 330 H
Moving (3G static) : Approx. 360 H
GSM
Stationary (Auto) : Approx. 300 H
Continuous
call time
3G
Voice call : Approx. 190 min.
Videophone call : Approx. 110 min.
GSM
Approx. 200 min
■
Removing
Tab
a
Perform Step
a
in Attaching battery pack.
b
Hold and raise the battery pack tab in the direction
shown by the arrow to remove the battery pack.
a
b
<AC adapter>
Connector
Release button
Jack cap
Charging jack
AC
adapter
Power plug
100V AC
outlet
Lamp
F905i.book Page 34 Monday, April 21, 2008 10:53 AM
35
Before Using the Handset
F905i_E2kou
•
When attaching the fully charged battery pack to the
terminal and connecting it to the AC adapter, the light may
turn on for a moment and turn off. This is normal and not a
malfunction.
•
During a call or a communication, in Silent mode or with
Charge alert "OFF", the charge alert does not sound at start
or completion of charge.
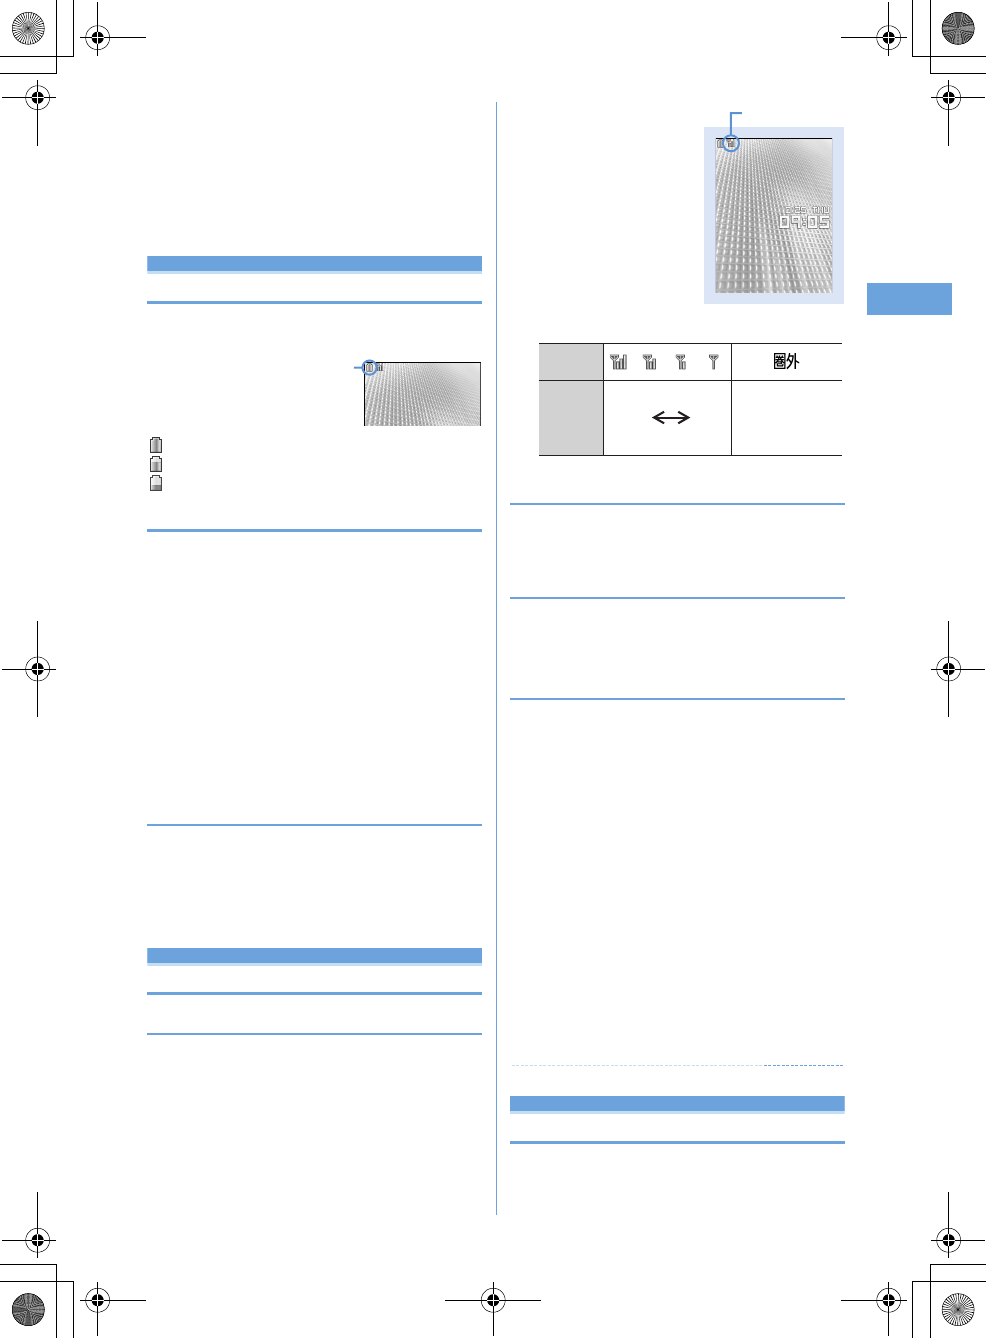
Remaining battery level
Checking remaining battery level
A battery icon appearing on the top of the display shows
an approximate remaining battery level.
(Battery level 3) : Ample charge
(Battery level 2) : Low charge.
(Battery level 1) : Battery level very low. Charging required
❖
When battery is almost exhausted
A message indicating low battery appears on the display.
Pressing any one of
g
,
c
,
f
keys deletes the
message temporarily. After a period of time, a battery alarm
sounds from the speaker and all icons on the top of the display
start blinking. The power is turned off after approximately 1
minute. These operations stop when charging starts; press
f
to immediately stop the battery alarm.
•
During a call, the message remains displayed and the
battery alarm keeps sounding from the earpiece. After
approximately 20 seconds, the call is terminated, the
battery alarm sounds from the speaker and all icons on the
top of the display blink.
◆
Checking remaining battery level by sound
and display <Battery level>
1
me8763
The battery level appears and the keypad sound
(
➝
P90) is emitted depending on the battery level. After
a while, the screen returns to the menu list.
Power ON/OFF
Turning power ON/OFF
❖
Turning power ON
1
f
(2 sec. or more)
❖
Turning power OFF
1
f
(2 sec. or more)
◆
Operations to perform after turning the
power ON for the first time
When turning the power ON for the first time, operate in the
order of "AdvancedMode setting"
➝
"Initial setting". The
settings made can be changed later.
❖
Default setting
MENU [Settings & NW services] 779
•
Always set Password. When
p
or
c
,
f
is pressed
before setting terminal security code, a confirmation screen
appears asking you to exit. If you exit by selecting "Yes",
this confirmation screen reappears when the power is
turned ON the next time.
1
Set the required items on the initial setting
screen
ep
Date & time :
Set the date and time.
➝
P40
Password :
Change the terminal security code, after
performing authentication.
➝
P107
Fingerprint :
After performing authentication, register a
fingerprint to be used for authentication.
➝
P109
Keypad sound :
Set a confirmation sound to be
generated when a key is pressed.
➝
P90
Text size :
Specify size of characters for Phonebook or
mail.
➝
P103
Select language
Switching to English
1
me
[Settings & NW
services]
e272e1
or
2
Battery icon
Stand-by display
Signal level icon
Icon
Received
signal
level
Outside the service
area and where
radio waves are
hard to reach
Strong Weak
F905i.book Page 35 Monday, April 21, 2008 10:53 AM
36 Before Using the Handset
F905i_E2kou
✔
INFORMATION
•
The setting of Select language are saved to UIM. When a UIM
is replaced, the setting switches to that saved in the inserted
UIM.
•
Even if this setting is set to "English", the displayed menu may
not be switched to English depending on the Kisekae Tool. Note
that, when a Kisekae Tool in "Preinstalled" folder is set, a menu
dedicated to "English" appears.
Date & time
Setting date and time
1
me
[Settings & NW
services]
e721e
Set the required
items
ep
Infomation
When you are setting the time and date, change the network
to GSM to set up the time automatically.
The following shows how to change the NW.
•me[Settings & NW services]e92eSelect
GSM
If network is not GSM, change the Automatic Time/Time-
Difference Correction to "OFF" and set up manually.
✔
INFORMATION
After setting the date and time with Auto time adjust set to "OFF",
removing the battery pack or leaving it exhausted for a long time
may cause the date and time to be deleted. In this case, set the
date and time again after charging the battery.
User information
Checking your own phone number
MENU [Phonebook & Logs] 9
You can check your phone number (My phone number),
Name, Mail address, etc.
1
me
[User information]
Check during a call, etc. :
s0
F905i.book Page 36 Monday, April 21, 2008 10:53 AM
37
F905i_E2kou
Voice/Videophone Calls
F905i.book Page 37 Monday, April 21, 2008 10:53 AM
38 Voice/Videophone Calls
F905i_E2kou
Making voice/videophone calls
Videophone
The videophone function is available between terminals
that support DoCoMo's videophone. Phone
conversations can be made between the terminals while
looking at the other party's image using videophone. It is
also possible to send still images, substitute images,
Chara-den, etc. instead of camera image.
•
Videophone calls are only available at 64 kbps.
•
DoCoMo videophone specifications are conforming to "3G-
324M
*2
, an international standard prepared by 3GPP
*1
".
The connection with the videophones of different
specifications cannot be established.
*1
3GPP (3rd Generation Partnership Project)
…
is an
area standardization organization established to
develop standard technology specifications for third
generation mobile communications system (IMT-
2000).
*2
3G-324M
…
An international standard for 3rd generation
mobile videophone
◆
Reading screen during a videophone call
a
Main screen
Display other party's image
b
Videophone icon
c
Speakerphone function
: ON No icon : OFF
d
Sub screen
Display your own image
e
Zooming
: Standard- : 2
×
(in-camera)
: Standard- : 16
×
(out-camera)
f
Status
: Sending camera image : Sending Camera-Off
image : Using Chara-den : Sending frame :
Sending still image : On hold : Respond and Hold
: Recording message : Recording movie memo
Action mode
: Action : Action of Parts
g
Shooting mode
: Standard : Backlight : Monotone : Sepia
h
Light
No icon : OFF : ON (out-camera)
i
Sending image quality
No icon : Normal : Prefer motion speed : Prefer
image quality
j
Sending/receiving status of audio/video
: Sending/receiving audio : Sending/receiving
video : Sending/receiving audio/video
Speakerphone volume/listen volume
- : Adjusting speakerphone volume/listen volume
k
Macro shooting
No icon : OFF : ON (out-camera)
l
Call duration
Displayed in the HH:MM:SS format
Making voice/videophone calls
1
Enter a phone number.
•
Always enter the area code even when calling from
the same city when calling to a general subscriber
phone.
•
Up to 80 digits can be entered.
c
: Delete 1 digit
c
(1 sec. or more) : Delete all digits
2
Select a call type.
Making a voice call :
n
Making videophone calls :
t
Your own image is displayed while the videophone call
is connected.
•
The charging begins when "Connected to
videophone." appears on the screen.
3
When ending the call,
f
.
a
m
d
cb
l
e-
F905i.book Page 38 Monday, April 21, 2008 10:53 AM
39
Voice/Videophone Calls
F905i_E2kou
✔
INFORMATION
<For videophone calls only>
•
The charges are based on the rate for digital communication not
for voice calls even when substitute image is sent instead of the
camera image.
•
Any videophone call from the terminal to emergency call (112)
with Auto redial as voice set to "ON" is automatically switched
to a voice call.
◆
Putting calls on hold <On hold>
Putting the call on hold during a call lets you talk to someone
without the caller hearing your voice.
•
The caller is charged for time spent on hold.
1
During a call,
g
.
•
To clear voice call on hold, press
g
or
n
.
•
To clear videophone call on hold, perform any of the
operations below :
g
: Redisplay the image sent before the call is put
on hold
t
/
n
: Camera image is sent
a
: Substitute image is sent
◆
Using speakerphone function
To make/receive videophone calls without using
Speakerphone, change the setting of Speakerphone in
Operation (Videophone settings).
1
Enter a phone number
en
(1 sec. or more)
or
t
appears at the top of the display.
•
The procedure is the same when operating from the
phonebook, Redial, Received calls, Recorded
messages or Voice memos.
•
Press and hold
t
for 1 second or more to make a
videophone call using speakerphone function with
Speakerphone in Operation (Videophone settings)
set to "OFF".
•
While making a call, ringing or talking on the phone,
you can switch the speakerphone function ON/OFF
by each pressing
n
.
◆
Adjust Listen volume during a call <Listen
volume>
•
The Listen volume adjusted during a call is reflected to
"Listen volume" of Adjust volume.
1
j
or side keys [
▲▼
] during a voice call
•
Volume can be adjusted only by side keys [
▲▼
]
during a videophone call.
◆
Using Voice clear/Voice slowing
❖
Switching Voice clear
Measure the noise level during a voice call, and if the noise
increases above the specified level, the other party's voice is
automatically emphasized to be heard clearly. And, the
volume is automatically increased also when your or other
party's voice is low.
•
This item is set to "ON" by default.
•
This function does not operate while using Speakerphone
function or in GSM/GPRS network.
•
The settings are retained after a call.
1
During a voice call,
me7
If you set Voice clear to ON, appears.
When this does not operate with ON, it is displayed in
gray.
❖
Switching Voice slowing
During a voice call, adjust the other party's voice to be heard
slowly by using the silence at intervals, to make it easier to be
heard. When the other party speaks without intervals, the
voice is heard at the normal speed.
•
This item is set to "OFF" by default.
•
If you set Voice slowing to ON, the quality of the other
party’s voice, music or time tone may change. In such a
case, set Voice slowing to OFF.
•
This function does not operate in overseas GSM/GPRS
network.
•
The settings are canceled after a call.
1
During a call,
a
.
If you set Voice slowing to ON, appears.
When this does not operate with ON, it is displayed in
gray.
Redial/Received calls
Making a call using Redial/Received
calls
MENU [Phonebook & Logs] 6
MENU [Phonebook & Logs] 5
This function records call log (Redial) and Received calls
of voice/videophone calls.
•
Up to 30 calls are recorded in each of Redial and Received
calls. If the maximum number of saved items is exceeded,
record is overwritten chronologically.
F905i.book Page 39 Monday, April 21, 2008 10:53 AM
40 Voice/Videophone Calls
F905i_E2kou
•
When calls are made to the same phone number, the latest
call is recorded in the redial list for each of "Unspecified",
"Notify", "Not notify" of Caller ID.
1
r
(Redial) or
l
(Received calls)
e
Place the
cursor on a party to redial
•
The details screen appears when placing the cursor
on a number to redial.
Reading Redial screen
a
Calling date/time (local date/time when staying
overseas)
b
Calling from overseas (except GMT+08:00)
*1
c
Types of outgoing call
: Voice call : International voice call
: Videophone call : International videophone
call
d
Notify/Not notify for a caller ID
: When Notify is set in Call option or Caller ID
settings for phonebook entry
: When Not notify is set in Call option or Caller ID
settings for phonebook entry
e
Phone number
*
2
/icon and name in the
phonebook (if saved in the phonebook)
*3
f
Name (if saved in the phonebook)
g
Phone number icon in the phonebook (if saved in
the phonebook), phone number
*2
h
Redial number/number of calls
*4
i
Image (if saved in the phonebook)
*5
j
Group icon
*1
This may not appear, for example, when calling date/
time is not recorded.
*2
For an international call, a plus sign "+" appears at the
beginning of the phone number.
*3
Displayed according to the settings of View preference.
Reading Received calls screen
a
Receiving date/time (local date/time when
staying overseas)
b
Receiving call in overseas (except GMT+08:00)
*1
c
Types of incoming call
: Voice call : International voice call
: Videophone call : International videophone
call
: 64K data communication
: International 64K data communication
d
Status icon
: Missed call (unchecked)
: Missed call (checked)
: Recorded messages (unchecked)
*2
: Recorded messages (checked)
*2
e
Ring time icon for missed call (details screen
only)
*3
, ring time for missed call (On a list screen,
"99
”
" appears for 100 or more seconds.)
*3
f
Phone number
*4
/phone number icon and name in
phonebook (if saved in the phonebook)/reason
for hiding caller ID
g
Name (if saved in the phonebook)/Reason for
hiding caller ID
h
Phone number icon in the phonebook (if saved in
the phonebook), phone number
*4
i
Received call number/number of calls
*5
Redial list screen Redial details screen
l
h
g
f
ad
c
b
ad
c
b
i
e
e
j
k
Received calls list
screen
Received calls details
screen
a
l
k
e
j
i
h
g
e
f
d
c
b
ad
c
b
m
F905i.book Page 40 Monday, April 21, 2008 10:53 AM
41
Voice/Videophone Calls
F905i_E2kou
j
Image (if saved in the phonebook)
*6
*1
This may not appear when, for example, the call recep-
tion date/time is not recorded.
*2
If a recorded message is deleted, it changes to the icon of
missed calls.
*3
For an international call, a plus sign "+" appears at the
beginning of the phone number.
*4
Displayed according to the settings of View preference.
2
n
or
t
•
Pressing
g
on the details screen makes a call in the
same way as the call type of the selected redial/
received calls.
❖
Using Redial/Received calls
Adding to phonebook :
a
Place the cursor on a party to add and
me2e1
or
2e1
or
2
b
Save the name or mail address, etc.
Phonebook new entry
➝
P75, 76
Creating an i-mode mail : Place the cursor on a
destination party and
a
Creating SMS : Place the cursor on the party and
a
(1
sec. or more).
Switching Redial/Received calls :
me4
Displaying Sent msg log/Received msg log :
p
❖
Switching details screen display <View
preference>
1
On the details screen,
me6e1
-
3
Setting items
➝
P79 "Switching details screen display"
❖
When you missed calls <Missed calls>
(the digit indicates the number of missed calls)
appears in the stand-by display. The incoming calls are
recorded as missed calls in Received calls.
◆
Deleting redial/received call logs <Delete
redial/received call log>
<Example> Deleting one entry
1
r
(Redial) or
l
(Received calls)
e
Place the
cursor on an entry to delete and
me31
Deleting selected entries :
r
(Redial) or
l
(Received calls)
eme32e
Select the
entries to delete
ep
Deleting all entries :
r
(Redial) or
l
(Received
calls)
eme33e
Authenticate
2
"Yes"
186/184
Setting to either Notify/Not notify
caller ID for each call
•
Caller ID is your important information. Carefully consider
whether you want to include caller ID information when
making a call.
F905i.book Page 41 Monday, April 21, 2008 10:53 AM

42 Voice/Videophone Calls
F905i_E2kou
•
The caller ID is displayed only when the phone of the other
party is a digital mobile phone, etc. enabled to display the
caller ID.
•
Priority of the method to notify a caller ID
➝
P41
Notify your caller ID : Enter a phone number
en
or
t
Not notify your caller ID :
#31#e
Enter a
phone number
en
or
t
Sending tone signal (DTMF)
Tone signals (DTMF) can be sent from the terminal to
operate the Voice Mail service or use various push-button
phone services at your home. By entering pause ("P") or
timed pause ("T") when making a voice call, tone signals
(DTMF) can be sent with digits in the phone number
separated.
•
Pause and timed pause are enabled only for voice calls.
❖
Entering pause "P"
Use for operating the answering system at home, reserving
tickets, etc. Tone signals are sent with the phone number
separated at the point where pause ("P") is entered.
1
Enter a phone number
e*
(1 sec. or
more)
e
Enter digits to send
en
When pressing
g
after the call is connected, the digits
after the pause ("P") are sent.
❖
Entering timed pause "T"
Timed pause ("T") is used to dial outside line number followed
by an extension. When timed pause ("T") is entered between
the phone and extension numbers, the extension number is
dialed with a pause of the predetermined seconds after the
phone number is dialed.
1
Enter a phone number
e#
(1 sec. or
more)
e
Enter an extension number
en
•
Timed pauses ("T") can be entered in succession.
•
Each timed pause ("T") is followed by an interval of
approximately 1 second.
❖
Sending tone signal (DTMF) during a
videophone call
•
The tone signal can be entered only while sending camera
image, while sending Camera-Off image or while Chara-
den is displayed.
1
During a call,
me0e
Enter digit to send
The number you pressed is displayed and the tone
signal is transmitted.
c
: Cancel sending
•
While sending camera image or Camera-Off image, a
tone signal can be sent only by pressing the keypad
without pressing
m0
.
•
A frame set on a camera image or a still image set as
a substitute image is canceled.
•
Because a tone signal is sent using keypads, actions
with pressing keypads are disabled while sending
Chara-den.
Call option
Making a call under set conditions
You can set calling conditions each time you make a
voice or videophone call.
•
Priority of the method to notify a caller ID
➝
P41
1
Enter a phone number
eme2e
Set the
required items
Call type :
Select any of "Voice call", "V.phone" or
"SMS".
Caller ID :
Set Notify/Not notify for a caller ID. When
"Unspecified" is set, the settings in Caller ID
notification are used.
Prefix :
Select Prefix to be added before phone number.
2
m
A call is made in the specified settings.
•
If "V.phone" is selected for "Call type", Chara-den to
display during a call can be set by pressing
t
.
Blinking
F905i.book Page 42 Monday, April 21, 2008 10:53 AM
43
Voice/Videophone Calls
F905i_E2kou
Sub address
Making a call specifying a sub
address
You can set if you call a specific phone or communication
device by specifying a sub address.
•
A sub address is a number used to call a specific device out
of multiple telephone sets and/or communication devices
assigned the same phone number (e.g. when multiple
devices with sub addresses are connected to an ISDN line).
It is also used to select contents in a movie delivery service
"V live".
1
me
[Settings & NW
services]
e563e1
or
2
❖
Making a call specifying a sub address
1
Enter a phone number
e*e
Enter a sub
address
en
or
t
Noise reduction
Suppressing ambient noise to
improve call quality
By setting the noise canceller function that suppresses
the ambient noise, your voice and the other party's voice
can be made clearer.
•
It is recommended that this function be used set to "ON"
normally.
1
me
[Settings & NW
services]
e571e1
or
2
Receiving voice/vi deophone calls
Receiving voice/videophone calls
1
A call is received.
j
: Ring alert volume
Side key [
▲
] : Stop the ring tone and the vibrator
operation
When the other party does not notify caller ID
Reason for hiding caller ID is displayed.
User unset :
When the caller selected not to send caller
ID
Payphone :
When the call was made from a payphone,
etc.
Unavailable :
The call was made under the situation
that does not allow sending the caller ID; e.g. a call
from overseas or a general subscriber phone via
forwarding services (caller ID may be sent by
connecting phone companies).
2
Select call reception type.
Receiving a voice call :
n
•
Voice calls can be answered also by pressing
g
or
a keypad (Any key answer).
Receiving videophone calls :
n
or
t
Your own image is displayed while the videophone call
is connected.
•
Any key answer is unavailable.
•
A switching confirmation screen to speaker appears
during Silent mode.
•
You can answer a videophone call using a substitute
image set in Image setting (Videophone image) by
pressing
a
instead of
n
or
t
. The substitute
image is sent to the other party when the videophone
call is connected.
3
When ending the call,
f
.
◆
Operations from submenu during receiving
call
When there is an incoming voice or videophone call, the
operations listed below can be performed from submenu.
When Arrival call act is "Answer", the same operations are
enabled also when there is another incoming voice call during
a voice session.
◆
When you hear beeps (call waiting ring
tone) while talking over a voice call
If you are a subscriber to Voice Mail service, Call waiting or
Call forwarding service, you hear beeps (the call waiting ring
tone) when receiving another incoming voice call while talking
over a voice call. You can perform any of the operations below
:
*
Selection from the submenu is enabled only when Arrival call act is
"Answer".
Submenu item Operation
a
Call Rejection
Disconnect without receiving a call
Service Operation
Catch Phone
(Call waiting service)
Put current voice call on hold and
answers second voice call
F905i.book Page 43 Monday, April 21, 2008 10:53 AM
44 Voice/Videophone Calls
F905i_E2kou
Any key answer
Enabling use of keypad to answer call
You can set if you answer a call by pressing
0
-
9
,
g
,
*
or
#
in addition to
n
.
•
The any key answer function is effective for a voice call. It
is unavailable to an incoming call during talking.
1
me
[Settings & NW
services]
e53e1
or
2
Close settings
Ending/putting on hold/continuing a
call by folding the terminal
•
This function does not operate during 64K data
communication, packet communication.
1
me
[Settings & NW
services]
e572e1
-
3
End the call :
Terminate the call.
On-hold :
Put the call on hold.
Continue(mute) :
Mute the sound without terminating
the call. However, when the speakerphone function is
active, your voice is not heard by the other party but
you hear the other party's voice from the speaker.
When you can/could not answer a voice/videophone call
Respond and Hold
Putting calls on hold when you cannot
answer immediately
•
The caller is charged for the time spent on hold.
1
While receiving a call,
f
.
The call is put on hold, and the other party hears a status
message.
For a videophone call, Response hold image for
videophone is displayed to you and the other party.
2
When you are ready to answer the call,
n
.
•
You can also answer a videophone call by pressing
t
. A substitute image is sent to the other party by
pressing
a
.
•
If the caller presses
f
or hangs up while on hold,
the call ends.
Status message
Setting status message
You can record a status message in your own voice.
•
1 message approximately 10 seconds long can be
recorded.
•
As default On-hold tone, "
對不起現在不能接電話,請稍後
或稍後在撥。
" is saved.
1
me
[Settings & NW
services]
e1161e
Select the
On-hold tone field
e2
•
Press
1
and go to Step 3 to restore preinstalled
guidance.
2
"Record" in the Edit message field
e
Record the
status message after the beep
Recording starts after a message appears.
•
An end tone (beep) sounds approximately 10
seconds after the start of recording.
•
Press
g
to stop recording halfway.
•
When a recorded status message is deleted, the
preinstalled message is reset.
•
Select "Play" to check the recorded status message.
3
p
An approximate guide of
the time for recording
F905i.book Page 44 Monday, April 21, 2008 10:53 AM
45
Voice/Videophone Calls
F905i_E2kou
Answer machine
Allowing the caller to record message
when you cannot answer call
By activating Answer machine, a greeting message is
played and the caller can record a message when you
cannot answer the call.
•
You can record up to 4 voice and videophone calls in total,
approximately 30 seconds for each call.
◆
Activating Answer machine
MENU [Phonebook & Logs] 71
You can set if you activate Answer machine.
•
Operate the terminal in open state.
1
Side key [
▲
] (1 sec. or more)
e1e1
or
2
appears on the stand-by display when Answer
machine is activated.
❖
Responding with Quick answer machine
<Quick answer machine>
When Answer machine is not active, you can activate it once
by pressing and holding side key [
▲
] for 1 second or more
while receiving a call. This operation does not set Answer
machine to active.
◆
Setting the response time before the
greeting starts <Greeting msg resp time>
MENU [Phonebook & Logs] 713
•
The default is "13 seconds".
1
Side key [
▲
] (1 sec. or
more)
e13e
Enter the response time
•
Set duration from 0 to 120 seconds.
◆
Setting the greeting message <Set greeting
message>
MENU [Phonebook & Logs] 714
You can record your own voice as greeting message.
•
1 message approximately 10 seconds long can be
recorded.
•
As default Greeting message, "
對不起現在不能接電話,
請廳到P聲響後在30秒鍾内留言。
" is saved.
1
Side key [
▲
] (1 sec. or
more)
e14e
Select the Greeting
message field
e2
•
Press
1
to restore preinstalled guidance and go
to Step 3.
2
"Record" in the Edit message field
e
Record the
greeting message after the beep
Recording starts after a message appears.
Supplementary description of recording message
➝
P57
Step 2 in "Setting status message"
3
p
Playing/deleting recorded messages
MENU [Phonebook & Logs] 72
◆
Playing recorded messages
1
Side key [
▲
] (1 sec. or more)
e2
a
Status icon
: Recorded message of voice call (unplayed)
: Recorded message of voice call (played)
: Recorded message of videophone call
(unplayed)
: Recorded message of videophone call (played)
b
Receiving call in overseas (except GMT+08:00)
*1
c
Receiving international call
d
Phone number
*2
/name (if saved in the
phonebook)/reason for hiding caller ID
e
Date/time of recording (local time when in
overseas) and phone number of party
*2
/reason
for hiding caller ID at cursor position
*1
This may not appear when, for example, the call recep-
tion date/time is not recorded.
*2
For an international call, a plus sign "+" appears at the
beginning of the phone number.
2
Select a recorded message.
•
During playing, the operations below are available :
j
/Side keys [
▲▼
] : Adjust volume
g
: Stop
n
: Switch the speakerphone function ON/OFF
(only when playing voice call message).
a
g
f
e
c
b
d
Playing voice call
message
Playing videophone
call message
An
approximate
guide of the
playing time
F905i.book Page 45 Monday, April 21, 2008 10:53 AM

46 Voice/Videophone Calls
F905i_E2kou
•
When videophone call message is being played, the
speakerphone function is set to ON. Switching the
speakerphone function is not available.
•
When videophone call message is played in Silent
mode, a sound playing confirmation screen appears.
Select "No" to play the message without sound.
Making a call : Place the cursor on the party and
n
or
t
•
To make a call specifying conditions, press
m3
.
➝
P51
Adding to phonebook :
a
Place the cursor on the party and
me4
or
5e1
or
2
•
When adding data to existing phonebook entry,
select the phonebook entry to add.
b
Save the name or mail address, etc.
Phonebook new entry
➝
P75, 76
3
Select if you delete the recorded message.
◆
Deleting recorded messages
1
Side key [
▲
] (1 sec. or more)
e2e
Place
the cursor on the recorded
messages
me2e1
or
2e
"Yes"
Videophone call settings
Using Chara-den
During a videophone call, a character can be sent instead
of camera image.
•
Displaying Chara-den
➝
P289
1
During a call,
me421e
Select a
folder
e
Select a Chara-den
•
The operations below are available during a
videophone call :
1
-
9
,
#
: Action
a
: List actions
0
: Stop the action
Setting images to send to the other
party during a call
1
Perform necessary operation during a call.
Switching your image and substitute image :
t
•
When Chara-den is set as the substitute image, the
Chara-den may not be displayed and the Default
image may be sent.
Switching in-camera/out-camera
*1
:
a
•
This item is set to "In-camera" by default.
•
Even when the camera is switched, settings of
Frames, Shooting mode, Brightness/Flicker
adjustment, etc. are kept.
Turn on/off the light
*2
:
a
(1 sec. or more)
If the light is turned on, the light turns on in white.
•
Rotating the display weakens the effect of the light.
•
Light may be temporarily turned off by setting
operations, etc. during a call.
Switching display magnifications of camera image
<Zoom>
*1
j
•
Each time you press
u
, the zoom scale switches in
the order below, and each time you press
d
, it
switches in the opposite order.
In-camera : Standard
➝
×
2
Out-camera : Standard
➝
2
×
➝
4
×
➝
6
×
➝
8
×
➝
10
×
➝
12
×
➝
16
×
•
Switching in-camera and out-camera cancels the
zoom.
Applying special effects to image <Scene mode/
effect>
*1
me2e1
-
4
Standard :
Standard image
Backlight :
Shooting subjects against the light
Monotone :
Shooting in monochrome mode
Sepia :
Shoot in sepia mode
Adjusting brightness of image
*1, *3
:
me31e
Adjust with
hep
•
This item is set to "Level 3" by default.
•
You can adjust at 5 levels.
Adjusting flicker
*1, *3
me32e1
-
3
The flicker may be reduced by selecting the settings that
match the power supply frequency of your area.
•
This item is set to "Auto" by default.
•
Reflected to the flicker adjustment settings of Camera
and Barcode reader.
Chara-den
F905i.book Page 46 Monday, April 21, 2008 10:53 AM
47
Voice/Videophone Calls
F905i_E2kou
Adding frame on image
*1
me41e
Select
frame
•
Only the frames of 176
×
144 or smaller can be
selected.
•
While In-camera is used, a mirror image (flip
horizontal) is displayed and a normal image (real
orientation) is sent to the other party. While Out-
camera is used, the image same as on the display is
sent to the other party.
•
Press
g
to cancel.
Sending Camera-Off images
me43
The substitute image set in Substitute image is sent.
•
When Chara-den is set as the substitute image, the
Default image is sent.
Sending still image
me44e
Select a
folder
e
Select a still image
•
Only still images that are 176
×
144 or smaller for
Image size and permitted to output from the terminal
can be set.
Images that inhibited to output from the terminal
➝
P304 "File restriction" in "List of display items and
changeability"
•
Press
g
to cancel.
Switching to Macro shooting
*2
me6
You can adjust the focus when sending images of very
close objects approximately 8-10 cm away.
•
Press
m6
to cancel.
Setting the quality of sending/receiving images
me8e1
or
2e1
—
3
Normal :
Standard quality
Prefer motion spd :
Motions become smoother in a
little lower-definition image.
Prefer img qual :
Motions become a little slower in a
higher-definition image.
•
You can also press
h
to switch the Sending image
quality .
*1
This item can be set only while sending camera image.
*2
This item can be set only when using Out-camera.
*3
The settings are retained after a call.
Operation
Changing videophone settings
You can set the operation to be performed when
videophone calls fail to get through and the screen to
appear during videophone calls.
1
me
[Settings & NW
services]
e63e
Set the required
items
ep
Auto redial as voice :
Set whether to redial a voice call
for unsuccessful videophone attempt.
Display setting :
Set one of the images ("My side" or
"Other side") or both of images ("Both sides") to
appear while a videophone call.
•
If you set "My side" or "Other side", Sub screen
cannot be set.
Sub screen :
Set one of the images ("My side" or "Other
side") to appear in the sub screen during a
videophone call.
Screen size :
Set the main screen view size.
Visual preference :
Set quality of an image to be
received from the other party.
Display light :
Set lighting of the display during
videophone calls.
•
If you set "Terminal settings", it depends on
settings of Display light of Display.
Speakerphone:
Set whether to use the speakerphone
function at the same time as the videophone call is
connected.
Image setting
Setting substitute and hold images for
videophone calls
MENU [Settings & NW services] 234
You can change the substitute image to be sent during
videophone calls, Answer machine image, Response
hold image, On-hold image or Movie memo image.
◆
Setting substitute image
<Example> Setting standard Chara-den
1
me
[Settings & NW
services]
e65e1e
Select the
Image field
2
1
Setting standard image :
2
Setting other Chara-den :
3e
Select the List
images field
e
Select a folder
e
Select a Chara-
den
Setting other still image :
4e
Select the List
images field
e
Select a folder
e
Select a still
image
3
p
◆
Changing image for recording msg/
response hold/On-hold/recording movie
memo
1
me
[Settings & NW
services]
e65e2
-
5
2
Select the Image field
e1
or
2ep
F905i.book Page 47 Monday, April 21, 2008 10:53 AM
48 Voice/Videophone Calls
F905i_E2kou
F905i.book Page 48 Monday, April 21, 2008 10:53 AM
49
F905i_E2kou
Phonebook
F905i.book Page 49 Monday, April 21, 2008 10:53 AM
50 Phonebook
F905i_E2kou
Phonebooks supported by the termi-
nal
F905i supports Terminal phonebook and UIM phonebook.
You can make voice/videophone call and send mail or
SMS from these phonebooks.
•
Items to be saved in Terminal phonebook and UIM
phonebook are as follows :
OK: Allowed
✕
: Not allowed
*1
The entries you can actually add may be less depending on the
content of each phonebook entry
*2
The items you can set are: birthday, note, postal code/address,
location information, company name, job title and URL.
•
Phonebook data saved in your UIM is available even when
it is inserted to another terminal.
Phonebook new entry
Adding entries into Terminal phone-
book
You can add phone numbers and mail addresses to the
Terminal phonebook.
•
Priority of the incoming/outgoing operation
➝
P96
•
Maximum number of recorded items
➝
P74
1
me
[Phonebook & Logs]
e2
2
Enter a name.
•
Up to 16 two-byte (32 one-byte) characters can be
entered.
3
Set the required items
ep
Item Terminal
phonebook
SIM card
(USIM)
phonebook
SIM card (SIM)
phonebook
Number of
entries in the
phonebook
Maximum 1000
entries *1
Maximum 200
entries
Maximum 140
entries
Entry Content
Phone
book No. OK
✕✕
Name 16 two-byte (32
one-byte)
characters
5 two-byte (12
one-byte)
characters
5 two-byte (12
one-byte)
characters
Zhuyin 16 Zhuyin (32
one-byte)
characters
5 Zhuyin (12
one-byte)
characters
✕
Image,
Movie
One per person
✕✕
Group "No group" or
30 groups
"No group" or
10 groups
✕
Phone
number
Five numbers per
person, maximum
of 3005 numbers in
the entire
phonebook *1
One number
per person
One number
per person
Phone
number
icon
OK
✕✕
Mail
address
Five addresses per
person, maximum
of 3005 addresses
in the entire
phonebook *1
One address
per person
✕
Mail
address
icon
OK
✕✕
Other
settings *2
OK
✕✕
F905i.book Page 50 Monday, April 21, 2008 10:53 AM
51
Phonebook
F905i_E2kou
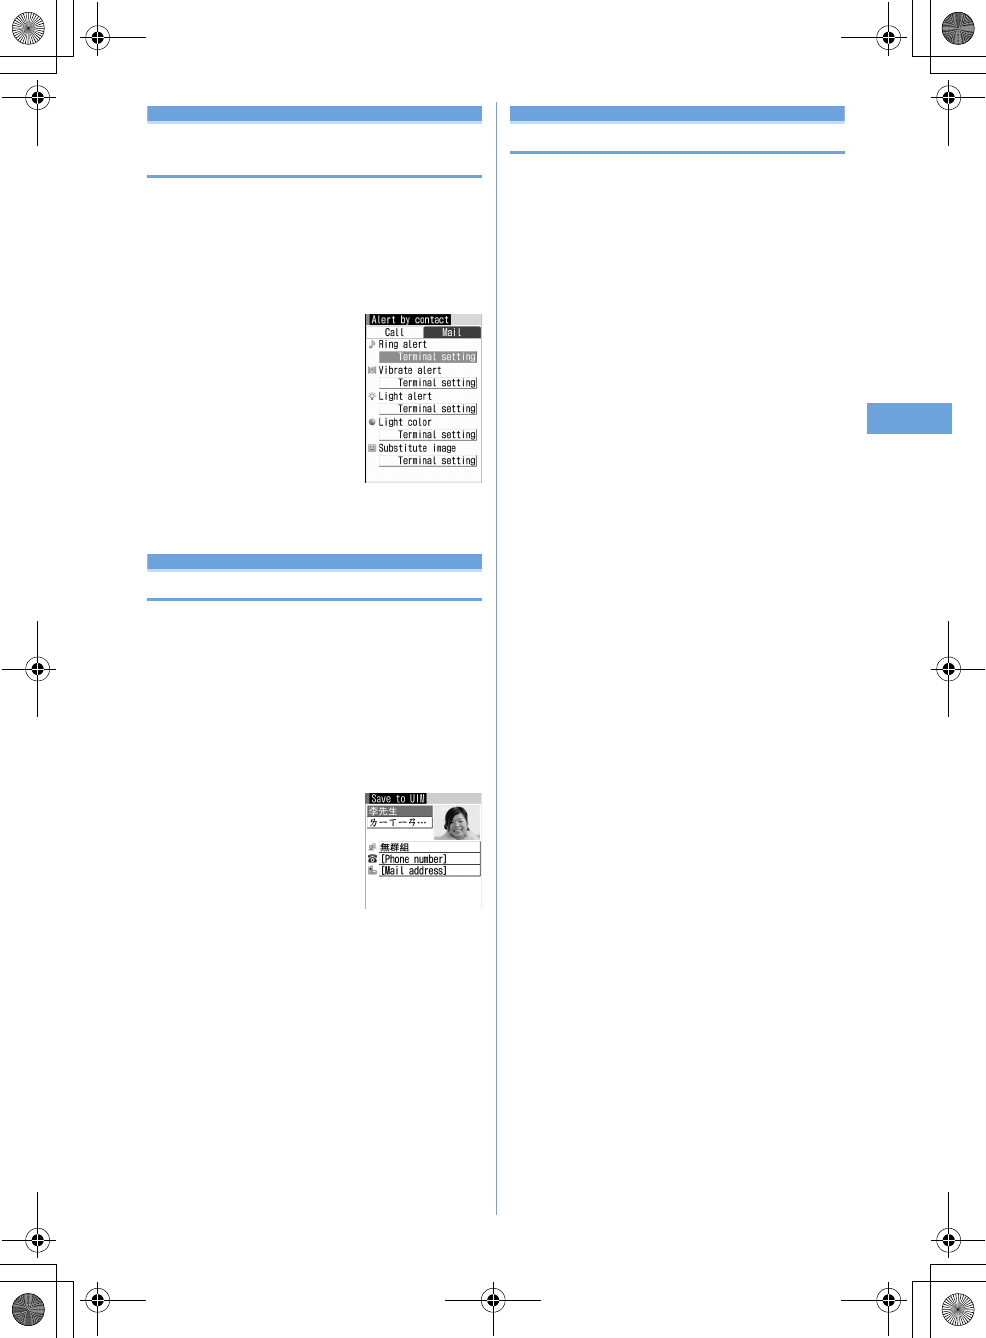
Alert by contact
Setting receiving actions for each
phonebook entry
•
Priority of incoming operation
➝
P88, 89, 102
1
pe
Search the phonebook
e
Place the
cursor on a phonebook entry to set and
me32e
Set the required items
ep
h
: Switching Call and Mail screens.
Phonebook(UIM) new entry
Adding to SIM card phonebook
•
Maximum number of recorded items
➝
P74
1
me
[Phonebook & Logs]
e3
2
Enter a name.
•
Up to 5 two-byte (12 one-byte) characters can be
entered.
3
Set the required items
ep
Group setting
Making group settings
<Example> Adding groups
1
me
[Phonebook & Logs]
e12
2
me2
Deleting a group : Place the cursor on the group and
me3e
Authenticate
e
"Yes"
•
Even in Privacy mode (when Phonebook & Logs is
"Hide set contact"), the phonebook entries with
secrecy are deleted.
•
For No group, only the phonebook entry in the group
is deleted.
Changing a group name : Place the cursor on the
group and
me4
•
For UIM phonebook, press
p
, place the cursor on
the group and press
m2
.
Changing the order of the groups : Place the cursor
on the group and
me6
or
7
3
Enter the group name
ep
Phone alert settings
screen
F905i.book Page 51 Monday, April 21, 2008 10:53 AM
52 Phonebook
F905i_E2kou
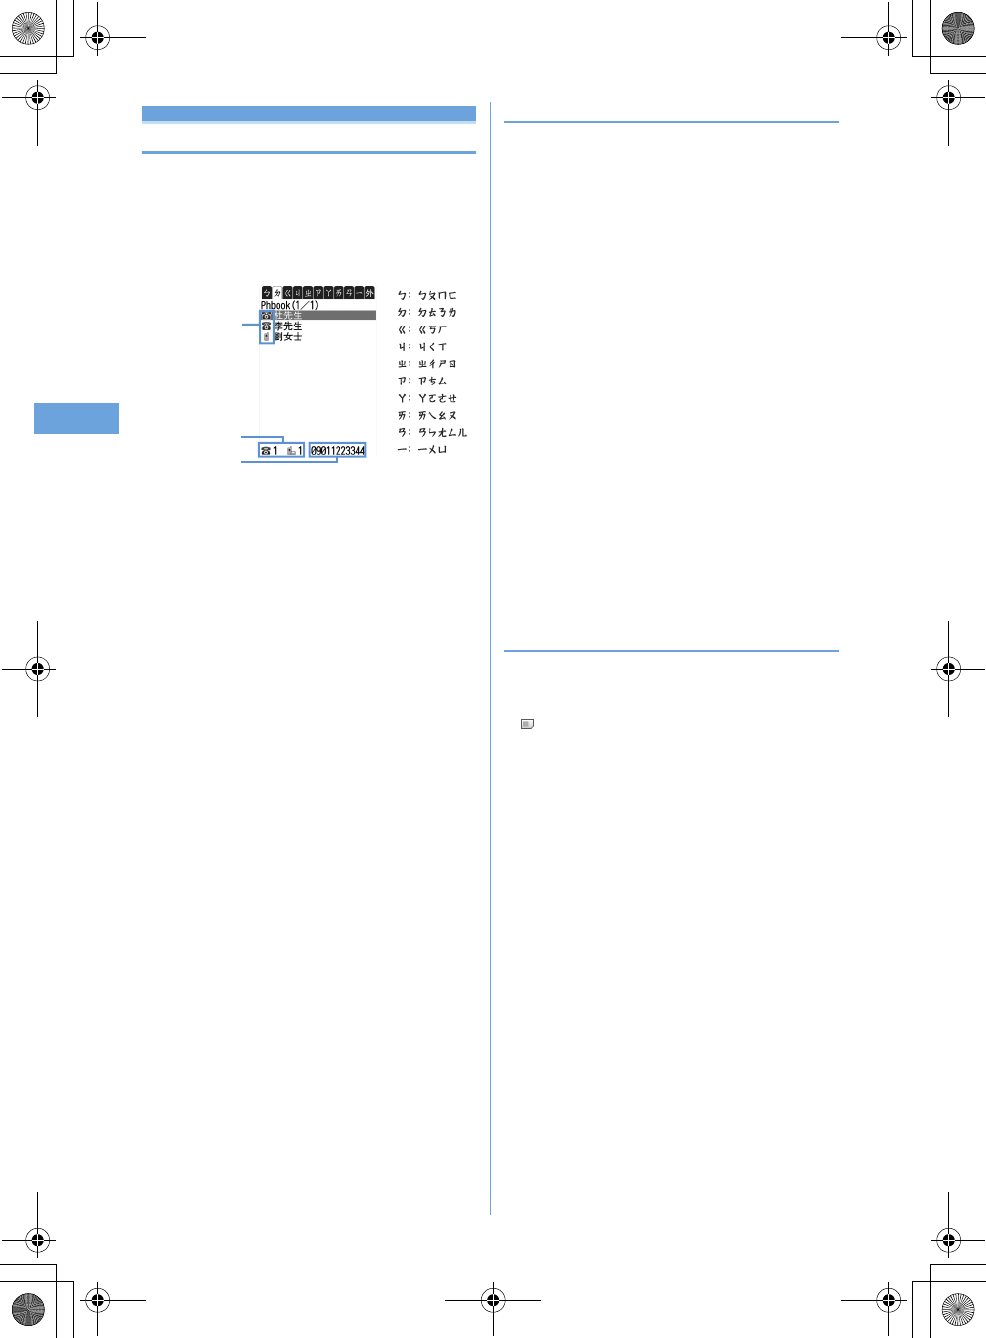
Phonebook search
Making calls using phonebook
•
In Privacy mode (when Phonebook & Logs is "Hide set
contact"), the phonebook entries or groups with secrecy
cannot be searched. The same applies to Quick dial, Quick
mail, Headset quick-dial and Search message.
1
pe
Search the phonebook
a
Icon set for first entry
b
Number of phone numbers and mail addresses
saved in entry at the cursor position
c
The first phone number of the party at the
cursor position
For example, if...
Name) Fujitsu
Zhuyin)
ㄈㄨㄕㄊㄨㄥ
Then it will be allocated to the "
ㄅ
" tab.
2
Place the cursor on the party and
n
or
t
❖
Using phonebook entries
Creating an i-mode mail : Place the cursor on the party to
send a mail to and
a
•
When operating from the details screen, display a mail
address and press
a
or
g
.
Creating and sending i-mode mail
➝
P170
Creating SMS : Place the cursor on the party and
a
(1
sec. or more)
•
When only the phone number is saved in the phonebook
entry of selected person, pressing
a
can also create
SMS.
•
When operating from the details screen, display a phone
number and press
a
.
Creating and sending SMS
➝
P205
Displaying sites : Place the cursor on the party and
me15e
"Yes"
•
Press
t
on the site connection confirmation screen to
display using Full Browser.
Attaching phonebook data to mail : Place the cursor on
the party and
me13
Creating and sending i-mode mail
➝
P170
Searching a received mail : Place the cursor on the party
and m
e16e1
or
2
•
For UIM phonebook, place the cursor on the party and
press
m15
, and press
1
or
2
.
◆
Searching by specifying the search method
•
In search method available for UIM phonebook, pressing
p
on a phonebook list switches the Terminal phonebook
list and UIM phonebook list.
•
is displayed on the left of each entry name in the UIM
phonebook list.
•
When a phonebook list extends to multiple pages, you can
switch pages using side keys [
▲▼
]. In a search method
except Show all names,
h
may also be used to switch
pages.
1
me
[Phonebook & Logs]
e1
2
Specify the search method.
Showing all names (Chinese syllabary) :
1e
Select the line to display by
h
•
It will be displayed in the order of Zhuyin
(
ㄅ ➝ ㄉ
➝ ... ➝ ㄧ
)
Others (alphabets, numbers, Zhuyin
beginning with a blank, symbols and no Zhuyin).
•
Each time you enter one Zhuyin character, an
address that has the closest Zhuyin will be searched
for in the address book.
a
b
c
Phonebook list
(Show all names)
F905i.book Page 52 Monday, April 21, 2008 10:53 AM
53
Phonebook
F905i_E2kou
Searching by group :
2e
Select a group
•
The entries in the specified group are displayed in the
order of the reading below :
Japanese syllabary order
➝
Alphabetical
order
➝
Number
➝
Entries starting with
blanks
➝
Symbol
➝
No reading
•
If one of the keypads of
0
-
9
,
#
,
*
is
pressed, the line to which the keypad is assigned is
displayed.
Searching by group :
2e
Select a group
•
The address book data within the same group will be
displayed in the following Zhuyin order.
•
The Zhuyin order
➝
Alphabetical order
➝
Number
➝
Beginning with a blank
➝
Symbols
➝
No
Zhuyin
Searching by frequency
*
:
3e1
or
2
Displayed in the order of number of calls or number of
mails.
•
The total numbers of calls and mails are counted up
to 9,999.
•
PushTalk communications are not counted.
•
When resetting total number of calls/mails, place the
cursor on the party, press
m93
and select
"Yes".
Searching by phonebook number
*
:
4e
Enter
phonebook number
ep
•
Zeroes before single- or double-digit phonebook
numbers can be omitted.
•
You can display the phonebook list in phonebook No.
order by pressing
p
with no input.
Searching by phone number :
5e
Enter part of
a phone number
ep
Search the phone numbers containing the entered
numbers, and phonebook data list of the Terminal
phonebook is displayed in the order of he phonebook
number, and the phonebook data list of the UIM
phonebook is displayed in the order of reading.
•
You can display the phonebook data list in the order
of phonebook No. or reading by pressing
p
with no
input.
Searching by secret attribute
*
:
6
The phonebook entries with secrecy appears in the
order of phonebook No.
*
This search method is unavailable for UIM phonebook.
◆
Setting preferred search method <Default
search setting>
Set the search method displayed when pressing
p
on the
stand-by display.
1
me
[Phonebook & Logs]
e1e
Place the
cursor on the search method and
m
•
Check mark appears after the specified search
method.
◆
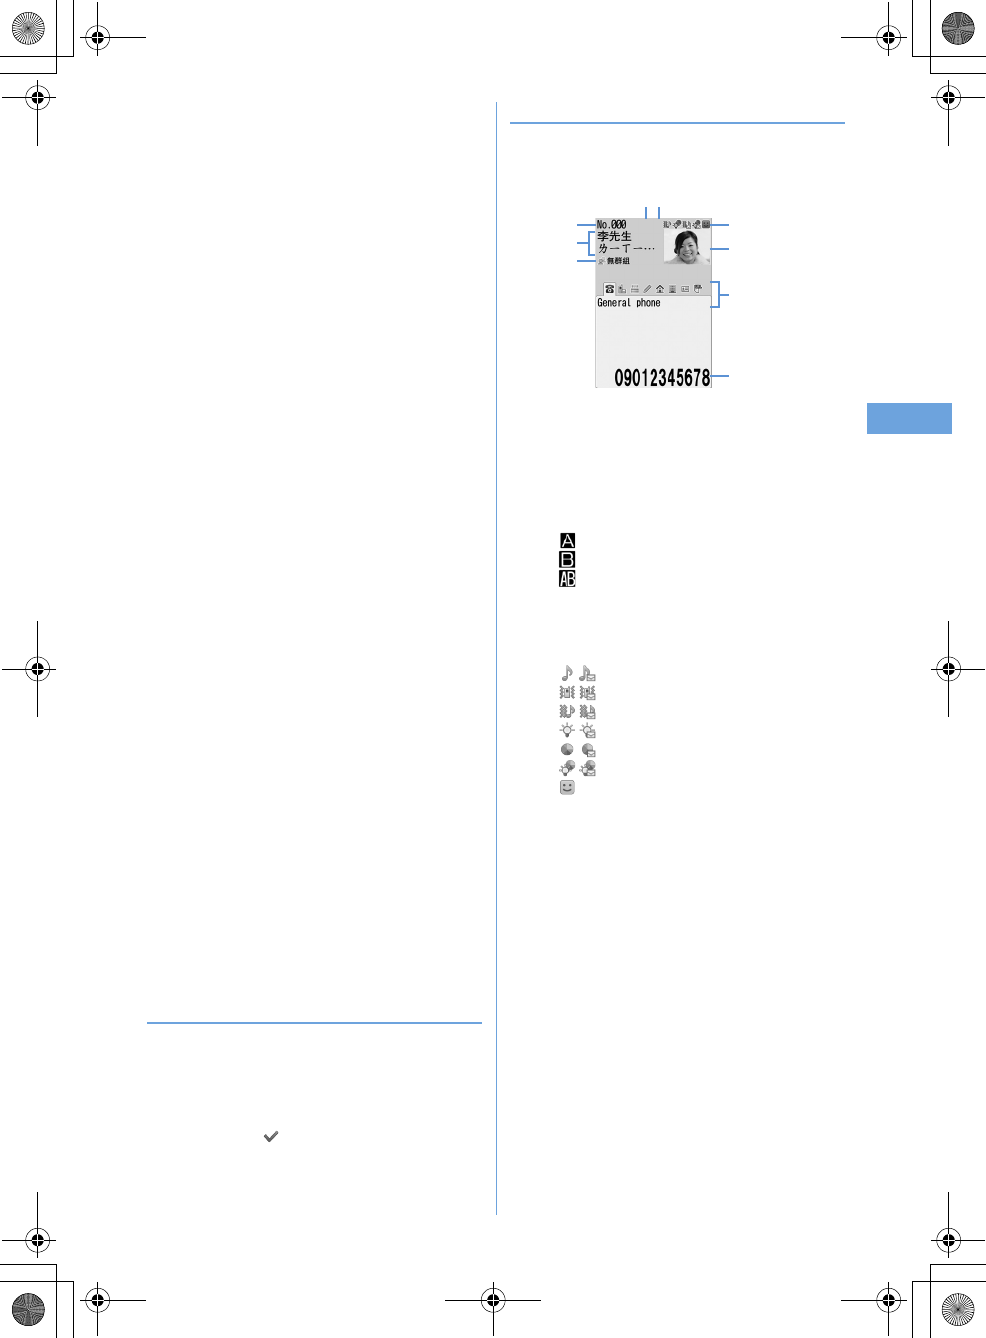
Checking phonebook details
1
pe
Search the phonebook
e
Select a
phonebook entry
a
Phonebook No.
b
Name and reading
c
Group icon, Group name
d
Icons set in Ph.book 2in1 setting (with 2in1 ON in
Dual mode) :
: Phonebook entries in A mode
: Phonebook entries in B mode
: Phonebook entries in both A and B modes
e
Set any of Accept/Reject call, Caller ID settings or
secret code
f
Icons indicating settings such as ring alert (call/
mail)
*1
/ : Ring alert
/ : Vibrate alert
/ : Ring alert and Vibrate alert
/ : Light alert
/ : Light color
/ : Light alert and Light color
: Substitute image (call only)
g
Image
*2
h
Saved icon, Icon type
FOMA terminal phonebook details screen
(Phone number)
a
i
h
f
g
c
b
de
L06.fm Page 53 Monday, April 21, 2008 11:16 AM
54 Phonebook
F905i_E2kou
i
Saved items
*1
Settings from Alert by contact are indicated with colored
icons.
*2
The display follows the settings of View preference.
j
: Display details screen of the previous/next
phonebook entry.
h
: Display the other items set.
•
Even when multiple phone numbers and/or mail
addresses are saved, the items can be displayed
by pressing
h
.
Viewing history information : On the phone number
or mail address detail screen,
p
.
The cumulative number and the date and time of last call
appear.
•
If you press
p
on the history information screen,
cumulation of calls and mails can be reset
collectively.
Viewing User information :
me81
The image, phonebook No. (Terminal phonebook only),
name, readings, group name, first phone number (with
icon type) and first mail address (with icon type)
registered in the phonebook appear.
The name and readings fully appear without cutting
down.
Edit phonebook
Editing phonebook entries
◆
Editing saved data
1
pe
Search the phonebook
e
Place the
cursor on a phonebook entry and
me31
2
Edit the phonebook entry.
3
p
◆
Copying saved data
Copied item can be pasted into screen input areas such as in
the mail creation screen or the phonebook data entry screen.
•
Copied items are recorded until the power is turned OFF,
and they can be pasted any number of times.
1
pe
Search the phonebook
e
Place the
cursor on a phonebook entry to copy and
me6e1
-
8
The data of appropriate items is recorded temporarily.
•
When operating from the UIM phonebook, press
m6
and
1
-
3
.
•
The first saved phone number and mail address are
copied.
•
To copy the second or subsequent phone number or
mail address, display the phone number or mail
address to be copied on the details screen, press
m6
and press
2
or
3
.
2
Display the character entry screen to
paste
e
Paste the characters
Pasting characters
➝
P367
F905i.book Page 54 Monday, April 21, 2008 10:53 AM
55
Phonebook
F905i_E2kou
Copying phonebook entries
Entries in Terminal phonebook are copied to UIM
phonebook and from UIM phonebook to Terminal
phonebook.
•
The Terminal phonebook also can be copied into microSD
memory card.
➝
P294
•
If the entries of the phonebook contain the same group
name as that in a copy destination phonebook, the data is
copied to that group.
•
The phonebook data item to be copied and the contents are
as follows :
•
If the number of characters exceeds the limit that can be
saved in UIM phonebook, the exceeding part is deleted.
◆
Copying data between Terminal phonebook
and UIM phonebook
<Example> Copying from Terminal phonebook to UIM
phonebook
1
pe
Search the
phonebook
eme71e
Select a
phonebook entry
ep
•
When copying from the UIM phonebook to Terminal
phonebook, press
m7
to select a phonebook
entry, and press
p
.
Delete phonebook
Deleting phonebook entries
•
When deleting all, all of the created groups are deleted.
•
The identical phonebook entries in PushTalk phonebook
are also deleted.
•
All entries in the UIM phonebook cannot be deleted at a
time.
<Example> Deleting a phonebook entry in the Terminal
phonebook
1
pe
Search the phonebook
2
Place the cursor on a phonebook entry and
me4e1
or
2e
"Yes"
•
When "All contacts" is selected, perform
authentication.
Deleting from UIM phonebook : Place the cursor on
a party and
me4e
"Yes"
Setting functions for phonebook
entries
◆
Setting Show/Hide caller ID to each phone
number <Caller ID settings>
•
This item is set to "No setting" by default.
•
Priority of the method to notify a caller ID
➝
P41
1
pe
Search the phonebook
e
Place the
cursor on a phonebook entry and
me342e
Authenticate
e
Select a
phone number
e1
-
3
Item
Terminal
phonebook
➝
SIM card
phonebook
SIM card
phonebook
➝
Terminal
phonebook
Name
5 two-byte (12 one-byte)
characters or less.
The entry content is
copied as it is
Zhuyin
5 Zhuyin (12 one-byte)
characters or less.
The entry content is
copied as it is
Phone
number
The first phonebook entry
(26 digits or less).
If the timer ("T") is
registered only the timer
("T") is deleted. The icon
will be replaced with
All
The icon is set as All .
Mail
address
The first mail address (38
one-byte characters or
less). The icon will be
replaced with All
The icon is set as All .
F905i.book Page 55 Monday, April 21, 2008 10:53 AM
56 Phonebook
F905i_E2kou
◆
Setting secret code to mail address <Secret
code>
When the other party saves a secret code for its mail address
(mobile phone number@imode.net.tw) and you set that secret
code for the mail address in your phonebook, the secret code
is automatically added to i-mode mail created by searching
the phonebook for that phone number.
1
pe
Search the phonebook
e
Place the
cursor on a phonebook
entry
me344e
Authenticate
e
Se
lect the mail address
2
Enter the secret code of 4 digits
.
Canceling : Delete the secret code
eg
Secret attribute
Making phonebook entries secret
You can set secrecy to phonebook entries or groups. In
Privacy mode (when Phonebook & Logs is "Hide set
contact"), the phonebook entries or groups with secrecy
are not displayed.
•
These functions cannot be set for phonebook entries or
groups in UIM phonebook.
•
If you change secrecy, a confirmation screen appears for
performing Apply secret attribute when you end the
phonebook and return to the stand-by display.
•
Setting Privacy mode
➝
P114
◆
Setting secret attribute for phonebook
entries
1
pe
Search the phonebook
e
Place the
cursor on a phonebook entry and
me341
•
flashes when the secret attribute is set for the entry
at the cursor position.
Canceling :
pe
Search the phonebook
e
Place
the cursor on a phonebook entry and
me341
✔
INFORMATION
•
When operating from the Terminal phonebook details screen,
press
m
and select "Edit/Settings"
➝
"Advanced
settings"
➝
"Secrecy ON".
◆
Setting secret attribute for group
•
Secret attribute is not set for phonebook entries in a group
with secret attribute. However, they function similarly to
those with secret attribute.
•
Secret attribute cannot be set for (No group).
1
me
[Phonebook &
Logs]
e12e
Place the cursor on the
group and
me8
•
When secret attribute is set for the group at the cursor
position, blinks.
Canceling :
me
[Phonebook &
Logs]
e12e
Place the cursor on the
group and
me8
Quick dial
Using simple dial to make calls
You can make calls by a simple operation to parties with
phonebook numbers 0-99 in the terminal's Phonebook.
•
When there are multiple phone numbers saved in a
phonebook entry, a call is made to the first phone number.
<Example> Making a voice call to the phone number
registered in phonebook number 2
1
Enter a phonebook number (
2
)
en
or
t
Blinking
F905i.book Page 56 Monday, April 21, 2008 10:53 AM

57
Phonebook
F905i_E2kou
F905i.book Page 57 Monday, April 21, 2008 10:53 AM
58 Phonebook
F905i_E2kou
F905i.book Page 58 Monday, April 21, 2008 10:53 AM
59
Phonebook
F905i_E2kou
F905i.book Page 59 Monday, April 21, 2008 10:53 AM

F905i_E2kou
F905i.book Page 60 Monday, April 21, 2008 10:53 AM
61
F905i_E2kou
Sound/Screen/Light Settings
F905i.book Page 61 Monday, April 21, 2008 10:53 AM
62 Sound/Screen/Light Settings
F905i_E2kou
Setting operations for incoming calls
and mail/messages
•
This setting is reflected to Call ring alert, Mail/Msg ring alert,
Incoming call/Videophone receiving of Call image, Vibrate
alert/effect or Light alert.
◆
Changing operations for incoming call
<Call alert/Videophone alert>
<Example> Setting operations for incoming calls
1
me
[Settings & NW
services]
e512e
Set the required
items
ep
Changing operations for incoming videophone calls
:
me
[Settings & NW
services]
e612e
Set the required
items
ep
◆
Changing operations for incoming mail
<Mail alert>
MENU [Mail] 011
1
ae*1e
Set the required items
ep
Sounds settings
Call ring alert/Mail ring alert
Changing ring alert for calls and
mails, etc.
•
When a movie/i-motion is set as a ring tone, a movie and/
or sound is played for incoming phone call or mail (Movie
ringtone).
•
This setting is reflected to ring alert in Call alert,
Videophone alert, Mail alert, and Chat mail alert.
<Example> Setting ring alert for incoming mail
1
me
[Settings & NW services]
e11
2
2
Setting ring alert for incoming voice/videophone
call :
1e1
-
3
3
Set the required items
ep
❖
Setting Music
Music (Full Track Music) can be set as a ring alert in two ways
: "Full song ring tone" for setting whole music and "Point ring
tone" for setting a section previously selected.
<Example> Setting Full song ring tone
1
Select "Music" at each setting
e
Select a folder
2
Select a music to set.
•
When music in microSD memory card is selected, a
confirmation screen appears. Select "Yes" to move
the music to the terminal and set to a ring alert.
Setting Point ring tone : Place the cursor on the data
to set and
ae
Select the item
•
When Full Track Music in microSD memory card
available to nonmember is selected, a confirmation
screen for cutting out the portion to set as the ring
alert and saving it in the i-motion folder appears.
Select "Yes", enter a display name and press
p
.
The cut out music is saved to "i-mode" folder of i-
motion as i-motion compatible with contents transfer.
When the maximum number of saved items/area is
reached
➝
P306
F905i.book Page 62 Monday, April 21, 2008 10:53 AM

63
Sound/Screen/Light Settings
F905i_E2kou
❖
Ring alert priority
When setting ring alerts for multiple functions, they sound in
order of the priority below.
a
Alert by contact of the Terminal phonebook
b
Alert/image by group of the Terminal phonebook
c
Call ring alert/V.phone ring alert/Mail ring alert/Call alert
(Incoming call)/Videophone alert (Videophone receiving)/
Mail alert
•
When the other party does not notify the caller ID, the ring
alert for voice call depends on Anonymous caller. A ring
alert for videophone call depends on the settings of
V.phone ring alert/Videophone alert.
•
When the sound or image data used in Anonymous caller
is deleted, the settings are changed. The sound actually
heard or the image actually displayed may differ from the
settings.
•
When movie/i-motion containing sound and image is set in
"Movie ringtone" for ring alert, ring alert and incoming
image set for "Movie ringtone" have precedence over
images or movie/i-motion set in phonebook. When setting
"Movie ringtone" of ring alert for music or movie/i-motion
containing only sound (i-motion without image such as the
one containing only voice of a singer), ring alert becomes
"Music" or "Movie ringtone", and receiving call image
becomes phonebook image.
Stereo sound effect
Setting Stereo/3D sound or Surround
•
This setting is also reflected to Surround of Settings for
movie/i-motion and Music player, and Stereo/3D sound of
Settings for Melody.
1
me
[Settings & NW
services]
e16e1
-
3e1
or
2
✔
INFORMATION
•
The 3D sound function creates sound that is 3-dimensional or
moves around in space, using stereo speakers (or stereo
earphone set). Using the 3D sound function, very realistic i-
α
ppli games and ring alerts and i-motion can be enjoyed. The
most realistic 3D sound can be enjoyed when the terminal is
held in front of the listener's face 20-30 cm away (varying
between individuals). 3D sound becomes less realistic when
the terminal is positioned off the center rightward or leftward or
at a distance more or less than 20-30 cm from the face.
•
There are differences in how the 3D sound effect is felt among
individuals.
Alarm sound
Setting alarm sound for Alarm clock
and Schedule reminder
<Example> Setting Alarm clock sound
1
me
[Settings & NW
services]
e113
2
1e
Select the Alarm clock field
e1
-
4
Setting Music
➝
P87
Setting sound for Schedule reminder :
2e
Select the Alarm on time field or Alarm in
advance field
e1
-
3
3
p
Adjust volume
Setting volume of various sounds
such as ring alert and alarm sound
1
me
[Settings & NW
services]
e12e1
-
7
•
When Alarm volume is selected, select
1
or
2
.
2
Side keys[
▲▼
] or
keg
Vibrate alert/effect
Using vibrator to signal incoming calls
and alarms
•
The operation of Vibrator for receiving 64K data
communication depends on the setting of incoming voice
call.
•
This setting is also reflected to settings for Vibrate alert or
Vibrate effect in Call alert, Videophone alert, Mail alert,
Chat mail alert and i-
α
ppli settings.
•
If the terminal is on the desk, etc. when the vibrator
operates, it may fall off because of the vibration.
<Example> When setting the vibrator for incoming
voice, videophone and PushTalk calls
1
me
[Settings & NW services]
e13
2
1e1
-
2
Setting the vibrator for incoming mail:
2
Setting the vibrator used together with Alarm clock
or Schedule reminder sounding :
3e1
or
2
Setting the vibrator used for i-
α
ppli : Press
4
.
3
1
-
5
F905i.book Page 63 Monday, April 21, 2008 10:53 AM

64 Sound/Screen/Light Settings
F905i_E2kou
❖
Vibrate alert priority
When setting Vibrator in multiple functions, it operates in order
of the priority below.
a
Alert by contact of the Terminal phonebook
b
Alert/image by group of the Terminal phonebook
c
Vibrate alert/effect/Call alert/Videophone alert/Mail alert
Operation sound
Setting operation sound
You can change the sound to be emitted when a key is
pressed (except side keys [
▲▼
],
M
or
P
) or the terminal
is opened or folded. Emission of the sound can also be
inhibited.
1
me
[Settings & NW
services]
e1141e1
-
4
Display turn sound
Setting sound to be emitted when
turning display
1
me
[Settings & NW
services]
e1142e
Select the
Turn sound field
e1
or
2
2
p
Shutter sound/Movie camera sound
Setting shutter sound
1
me
[Settings & NW
services]
e114e3
or
4e1
-
5
Charge alert
Setting alert sound for charging
1
me
[Settings & NW
services]
e115e1
or
2
On-hold tone
Setting on-hold tone
1
me
[Settings & NW
services]
e1162e1
-
3
Quality alarm
Alarm announcing that call is about to
be interrupted
•
If the signal quality deteriorates rapidly, the call may be
disconnected without sounding the alarm.
1
me
[Settings & NW
services]
e1163e1
-
3
✔
INFORMATION
•
To make settings during a voice call, press
m
and select
"Quality alarm".
Reconnect alarm
Setting alarm for reconnecting inter-
rupted call
1
me
[Settings& NW
services]
e1164e1
-
3
Low Battery alert
Setting Low Battery alert
You can set if you activate the alert when the battery is
low.
1
me
[Settings & NW
services]
e1165e1
or
2
Silent mode
Making the terminal silent
Sounds from the terminal can be disabled in order to
prevent disturbance to the people around you by
enabling the vibrator for incoming calls or muting the
keypad sound.
F905i.book Page 64 Monday, April 21, 2008 10:53 AM
65
Sound/Screen/Light Settings
F905i_E2kou
◆
Starting Silent mode
1
#
(1 sec. or more)
After Silent mode specified in Silent mode is activated,
(in General silent mode) or (in Personalized
silent mode) is displayed on the stand-by display.
•
By default, you can also start/cancel Silent mode by
pressing and holding Side key [
▲
] for 1 second or
more with the terminal folded. When Silent mode
starts, the light goes lit once in red and the vibrator
operates once. When Silent mode is canceled, the
light flashes twice in blue and the vibrator operates
twice.
•
When the terminal is folded, Silent mode can be
activated/deactivated from a menu on the sub-
display.
➝
P33
Canceling :
#
(1 sec. or more)
❖
When General silent mode is activated
An incoming call is notified with vibration, muting all sounds to
be emitted from the terminal such as ring tone, keypad sound,
terminal open/close sound, Display turn sound or Alarm.
Microphone is sensitized so that a call can be made in a small
voice.
•
In the cases below, the operation of vibrate alert is "Pattern
A".
- When receiving voice call, videophone call, mail or 64K data
communication
- When the time specified in Countdown timer elapses
- When the date and time specified in schedule comes
•
When the time specified in Alarm clock comes, vibrate
operates according to the setting of Alarm clock.
•
Melody is not played automatically even when sent/
received mail is displayed with "Auto play" set for
Attachment auto-play.
•
When playing a movie/i-motion with sound in Silent mode,
the sound playing confirmation screen appears. Select
"Yes" to play the sound and image. When "No" is selected
for a movie/ i-motion with image, only image is played.
•
When playing Music or Melody in Silent mode, the playing
confirmation screen appears. Select "Yes" to play.
✔
INFORMATION
•
Shutter sound is emitted even in Silent mode.
◆
Setting Personalized Silent mode <Silent
mode>
1
me
[Settings & NW services]
e14
2
2
Setting General silent mode :
1
3
Set the required items
ep
Displays/Lights sett ings
Timed theme
Changing stand-by display, Silent
mode, etc. according to lifestyles
MENU [Settings & NW services] 726
This function allows you to change the stand-by display
or activate Silent or Privacy mode at the specified time.
You can select the alarm to sound once only, repeat
everyday or sound on the same day every week.
•
Up to 18 codes can be registered.
1
me
[Settings & NW
services]
e33e
Select the title
is displayed at the left of the title for Timed theme set
to ON.
Setting/canceling the timed theme : Place the cursor
on the title and
m
2
Set the required items
ep
Stand-by display
Changing stand-by display
An image, movie/i-motion, Chara-den or i-
α
ppli can be set
on the stand-by display or images in a folder can be set
to appear at random on the stand-by display. The screen
can be customized to display the newly arrived
information, calendar, schedule, etc. Displaying clock
(
➝
P104
), battery and signal level icon (
➝
P101
) can also
be set.
•
Stand-by display for some of images, movies/i-motion,
Chara-den or i-
α
ppli are disabled if you do not insert the
same UIM as used in downloading the data (UIM operation
restriction).
•
If a data in "Preinstalled" folder is set, the set stand-by
display is displayed even in Personal data lock.
◆
Setting image/movie/i-motion/Chara-den as
stand-by display
Image, movie/i-motion or Chara-den downloaded from an i-
mode site or still image or movie shot with the terminal can be
F905i.book Page 65 Monday, April 21, 2008 10:53 AM