Contents
Manual Part 1 4
135
Mail
F905i_E2kou
❖
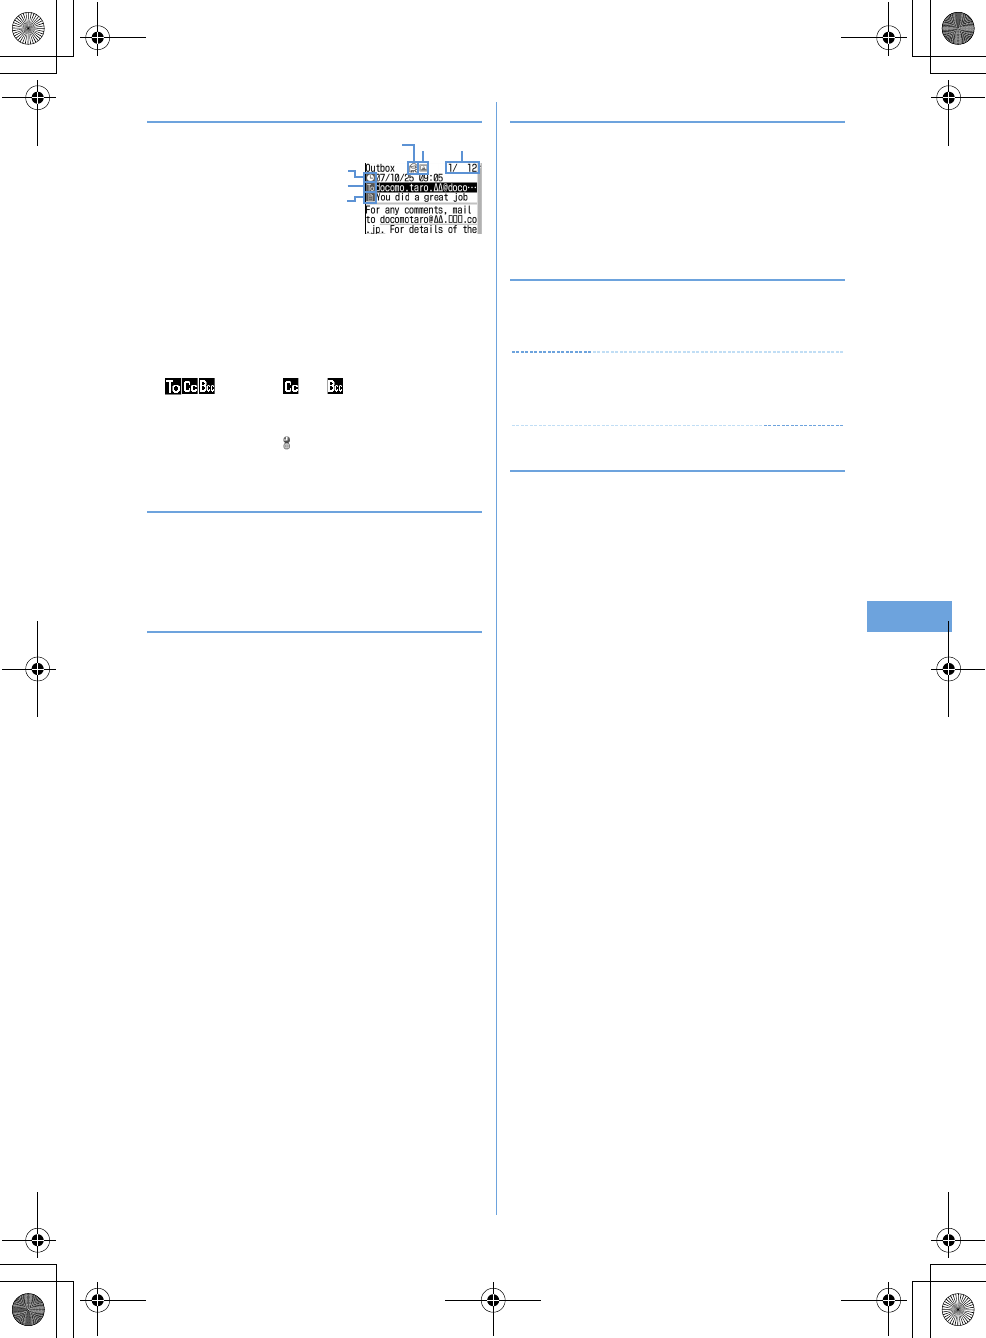
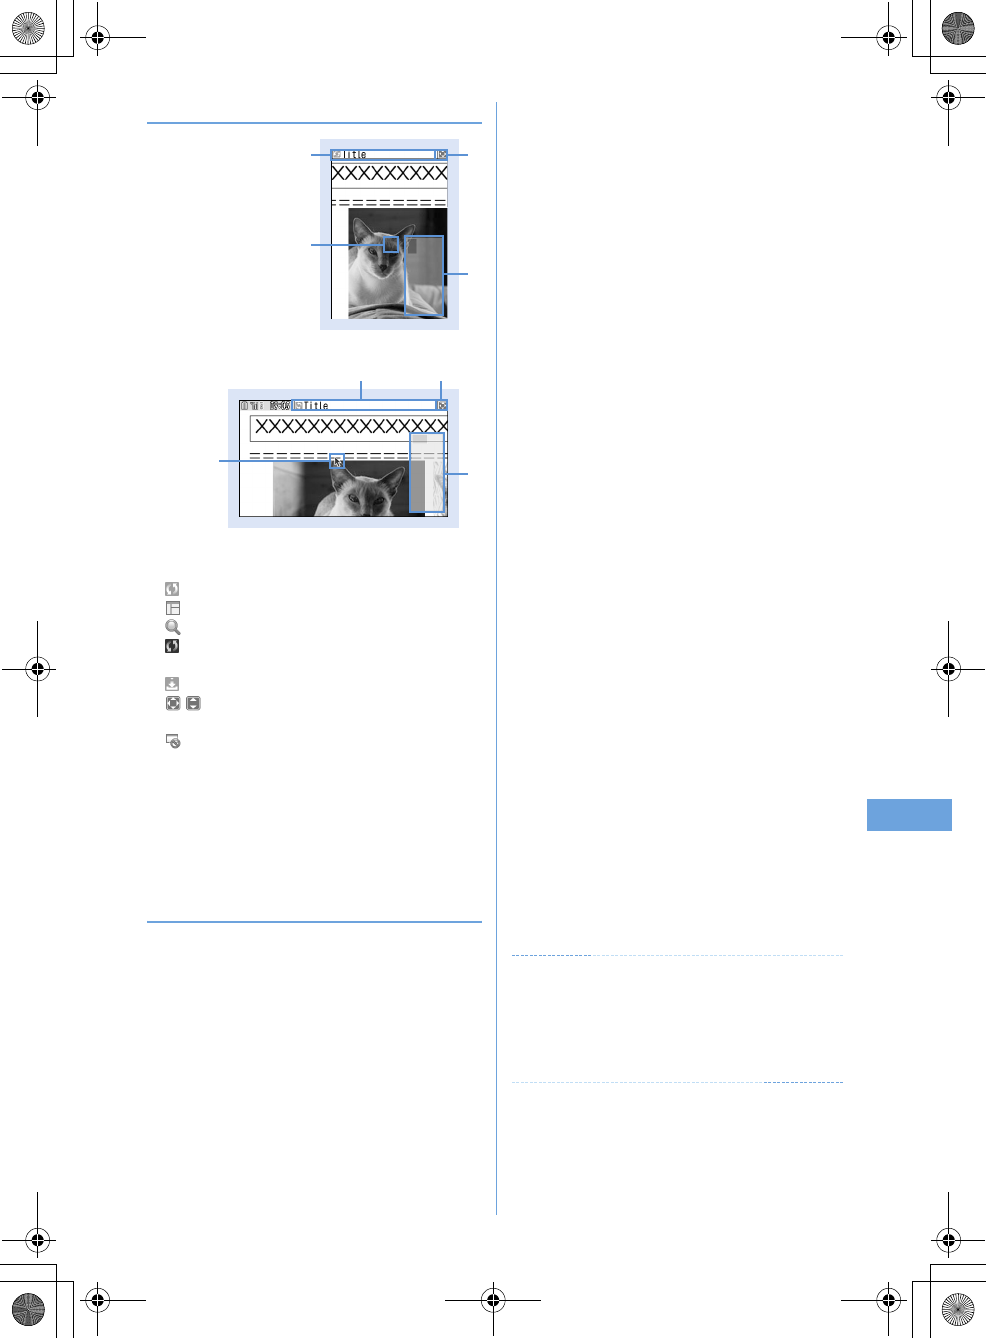
Sent message details screen
a
Status icon
➝
P186 "Outbox/Unsent messages list screen"
b
Attachment/SMS icon
➝
P186 "Received message details screen"
c
Mail No./No. of msgs
d
Sent date and time
e
Address type icon
: Receiver ( and only for i-mode mail)
f
Subject
•
When i-mode mail or SMS is sent while staying overseas
(except GMT+08:00), may appear succeeding the
sending date and time.
◆
Creating/deleting folders
•
You can set secret attribute to a created folder. In Privacy
mode (when Mail & Logs is "Hide secrecy fldrs"), folders
with Secret attribute "ON" are not displayed.
•
Setting Privacy mode
➝
P114
❖
Creating folders
•
In Inbox, up to 40 folders in addition to "Inbox" folder and
folder for Message i-
α
ppli can be created.
•
In Outbox or Unsent messages, up to 20 folders in addition
to "Outbox" "Unsent" folder and the folder for Message i-
α
ppli can be created respectively.
1
ae1
or
4
-
5
2
me1
Changing folder setting : Place the cursor on the
folder and
me3
Changing the order of the folder : Place the cursor
on the folder and
me7
or
8
3
Set the required items
ep
❖
Deleting folders
•
"Inbox", "Outbox" and "Unsent" folders cannot be deleted.
1
ae1
or
4
-
5e
Place the cursor on
the folder and
me2e
Authenticate
e
"Yes"
◆
Checking number of mail items <Check No.
of msgs>
1
ae1
or
4
-
5e
Place the cursor on
the folder and
me5
✔
INFORMATION
•
When operating from the mail list screen, press
m
, and select
"Display"
➝
"Check No. of items".
◆
Displaying mail address <Display address>
1
ae1
or
5e
Select a folder
e
Select a
mail
eme32
a
e
f
d
bc
F905i.book Page 135 Monday, April 21, 2008 10:53 AM
136 Mail
F905i_E2kou
◆
Moving received/sent/unsent mail to
another folder <Move message>
•
Mails can be copied to microSD memory card.
➝
P294
<Example> Moving a mail
1
ae1
or
4
-
5e
Select a folder
2
Place the cursor on the mail and
me411
Moving selected mails :
me412e
Select mails
ep
Moving all mails in a folder :
me413
3
ge
Select the destination folder
e
"Yes"
◆
Sorting received/sent mail <Sort>
The sorting order of the mail list in Inbox and Outbox can be
changed temporarily. When the list display is closed, sorting
is restored to "By date".
1
ae1
or
5e
Select a folder
2
me74
Sorting sent mails :
me5
3
1
-
4
The sorting order of the mail list changes temporarily.
◆
Changing read/unread state of received
mail
•
Read/unread state of received mails protected cannot be
changed.
<Example> Changing a mail from unread to read
1
ae1e
Select a folder
2
Place the cursor on the received mail to change
the state and
me51
Changing a mail from read to unread : Place the
cursor on the mail and
me52
Changing selected mails from unread to read :
me53e
Select mails
epe
"Yes"
Changing selected mails from read to unread :
me54e
Select mails
epe
"Yes"
Changing all mails in a folder to read :
me55e
"Yes"
Changing all mails in a folder to unread :
me56e
"Yes"
F905i.book Page 136 Monday, April 21, 2008 10:53 AM
137
Mail
F905i_E2kou
◆
Protecting received/sent mail <Protect
mail>
<Example> Protecting a mail
1
ae1
or
4
-
5e
Select a folder
2
Place the cursor on the mail and
me31
•
The status icon changes to one of the followings :
Inbox : (Read), (Unable to reply),
(Replied), (Forwarded)
Outbox :
Unsent message :
Protecting selected mails :
me32e
Select mails
ep
•
Each time you press
m
, you can select/deselect all
mails collectively.
Protecting all mails in a folder :
me33
Unprotecting a mail : Place the cursor on the mail
and
me34
Unprotecting selected mails :
me35e
Select mails
ep
Unprotecting all mails in a folder :
me36
◆
Deleting mail <Delete mail>
❖
Deleting received mail
1
ae1
•
To delete all mails, press
m46
, perform
authentication and go to Step 4.
2
Select a folder
eme2
•
To delete a received mail, place the cursor on the
received mail to delete and press
m2
.
3
1
-
7
Deleting selected mails :
2e
Select mails
ep
Deleting all mails in a folder :
4e
Authenticate
4
"Yes"
❖
Deleting sent/unsent mail
<Example> Deleting a mail
1
ae4
or
5
2
Select a folder
e
Place the cursor on the mail
and
me21
Deleting selected mails :
eme22e
Select mails
ep
Deleting all mails in a folder : Select a
folder
eme23e
Authenticate
Deleting all mails :
me42e
Authenticate
3
"Yes"
F905i.book Page 137 Monday, April 21, 2008 10:53 AM

138 Mail
F905i_E2kou
Useful functions of Mail
Mail logs
Using message logs
•
Up to 30 items can be recorded for each of sent mails and
received mails. When exceeding the limit, record is
overwritten chronologically.
◆
Displaying message logs
MENU [Phonebook & Logs] 81
MENU [Phonebook & Logs] 82
<Example> Displaying Sent message logs
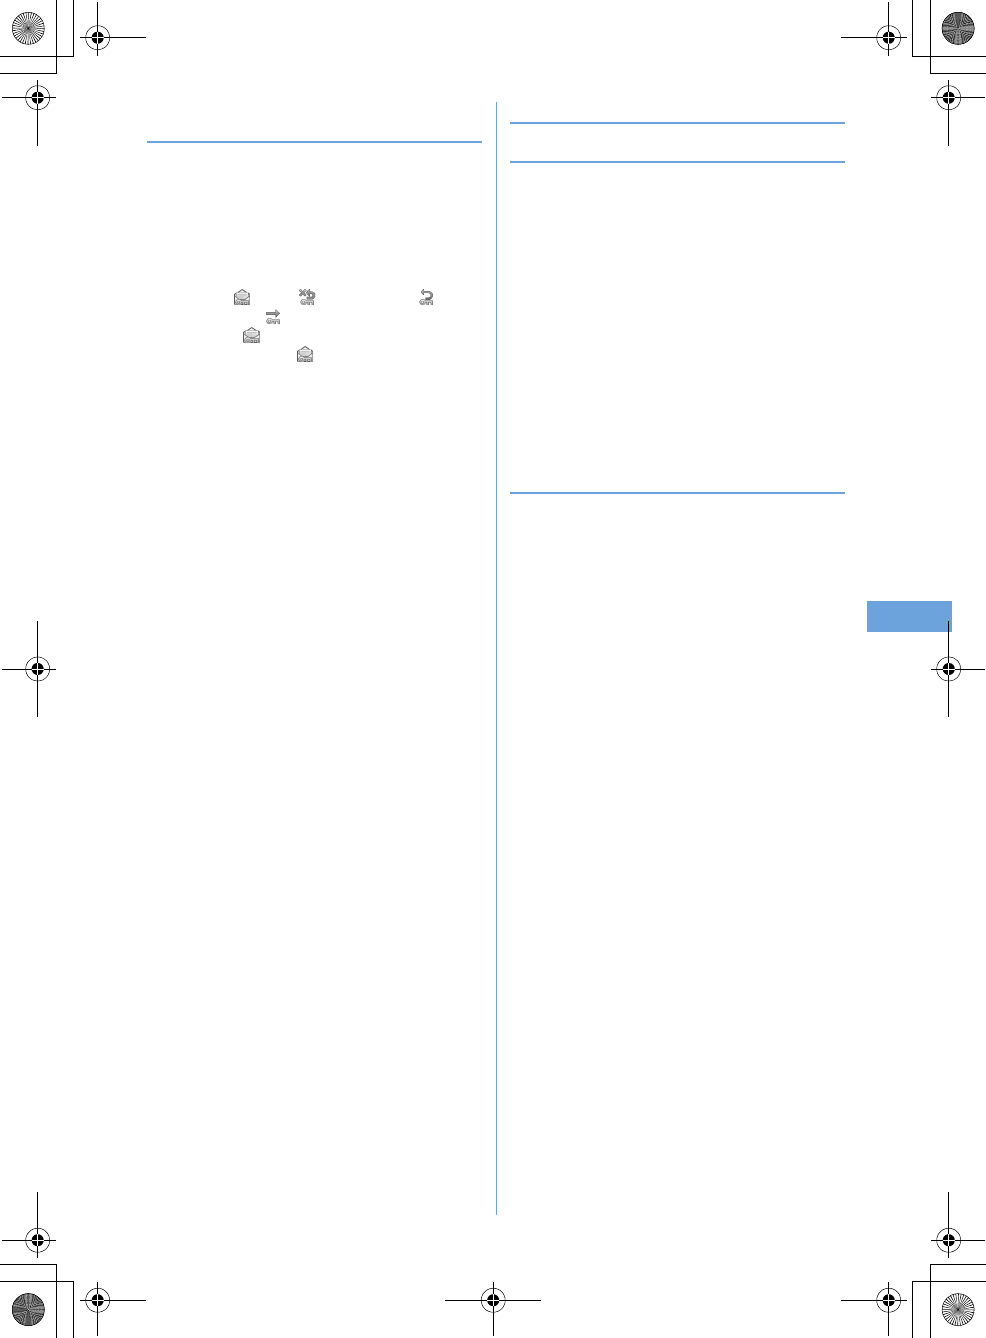
1
rep
•
Select the party to display details screen.
a
Page/Total pages (list screen), Log No./
Number of items (details screen)
b
Sent/received date and time (Local date and
time when staying overseas)
c
Message log type
: i-mode mail
: SMS
d
Sent msg log recorded while staying overseas
(except GMT+08:00)
Only a screen of sent message log appears.
•
This may not appear, for example, when
sending date and time is not recorded.
e
Mail address icon in Phonebook (i-mode mail)/
phone number icon (SMS) (if saved in
Phonebook), mail address (i-mode mail)/phone
number (SMS)
f
Name, Image
Displaying received message logs :
lep
❖
Using message logs
Creating i-mode mail : Place the cursor on the log to send
mail to and
ae
Edit the mail
ep
Creating SMS : Place the cursor on the log and
a
(1 sec.
or more)
e
Edit SMS
ep
Adding to phonebook :
a
Place the cursor on the log to add to Phonebook and
me4
•
To add data to an existing phonebook entry, press
m5
.
b1
or
2e
Save the name or mail address, etc.
Phonebook new entry
➝
P75, 76
Making calls :
n
or
t
Displaying redial/received call logs :
p
aa
cece
d
Sent msg log list Sent msg log details
f
d
b
g
F905i.book Page 138 Monday, April 21, 2008 10:53 AM
139
Mail
F905i_E2kou
◆
Deleting message logs
<Example> Deleting a mail
1
On the sent/received msg log details screen,
place the cursor on the message log to delete
and
me61
Deleting selected entries : On the sent/received msg
log details screen,
me62e
Select
message logs to delete
ep
Deleting all entries : On the sent/received msg log
details screen,
me63e
Authenticate
2
"Yes"
Useful functions of Mail
◆
Copying texts
You can copy characters in mail. Copied characters can be
pasted in entry fields in the mail creation screen or phonebook
data entry screen.
•
The last copied item is recorded until the power is turned
OFF and they can be pasted any number of times.
1
ae1
or
5e
Select a folder
e
Select a
mail
eme2
•
To copy a selected item, place the cursor on the item
to copy and press
m2
.
2
Select a copy option.
Copy text :
Copy a specified range of characters.
Copying
➝
P367 Step 2 and the following steps in
"Copying/cutting characters"
Copy title :
Copy the title.
Copy selected item :
Copy selected items (mail
address, phone number, etc.).
Pasting characters
➝
P367
◆
Making call from mail <Phone call>
For SMS or mail that the address is "phone
number@imode.net.tw", a call can be made without saving.
<Example> Making a call
1
ae1
or
4
-
5e
Select a
folder
e
Place the cursor on the mail and
me6
2
Set a condition for dialing
em
Making a call under set conditions
➝
P51
◆
Adding phone number, mail address and
URL in the phonebook
<Example> Adding a phone number
1
ae1
or
5e
Select a folder
e
Select a
mail
2
Place the cursor on the phone number and
me41e1
or
2
Adding to existing phonebook entry : Place the
cursor on a phone number and
me42e1
or
2e
Select
phonebook data
3
Save the name or mail address, etc.
Phonebook new entry
➝
P75, 76
◆
Adding URL as bookmark
1
ae1
or
5e
Select a folder
e
Select a
mail
e
Place the cursor on the URL and
me43e
Select a folder to add to
F905i.book Page 139 Monday, April 21, 2008 10:53 AM
140 Mail
F905i_E2kou
The next procedure
➝
P153 Step 2 in "Recording in
Bookmark"
SMS settings
Setting SMS
MENU [Mail] *7
You usually do not need to change SMSC, Address
and Type of Number settings.
1
ae*7e
Set the required items
ep
Font type :
Select message of Chinese or English
language to be sent. The maximum number of
characters that can be sent differs depending on the
font type.
SMS report request :
Select if you request SMS report
request when sending SMS.
Keep in SMS center :
Select the storage period of sent
SMS in the Short Message Center in cases the
receiver cannot receive the SMS.
SMSC :
Select SMSC when using SMS services except
DoCoMo.
Type of Number :
Select from "international" or
"unknown".
•
If selecting "Others" in SMSC field and setting
numbers for Address, Type of Number needs to be
set to "unknown".
Setting Mail
Mail settings
Setting mail function of the terminal
◆
Sorting mail automatically into designated
folders <Sort method>
MENU [Mail] *3
•
Up to 30 sort methods for Inbox and Outbox can be
registered.
•
Ordinary mails can also be sorted to the folder for Message
i-
α
ppli, but message i-
α
ppli sorting method takes
precedence.
❖
Enabling/disabling sorting automatically
1
ae*3e1e
Set the required
items
ep
❖
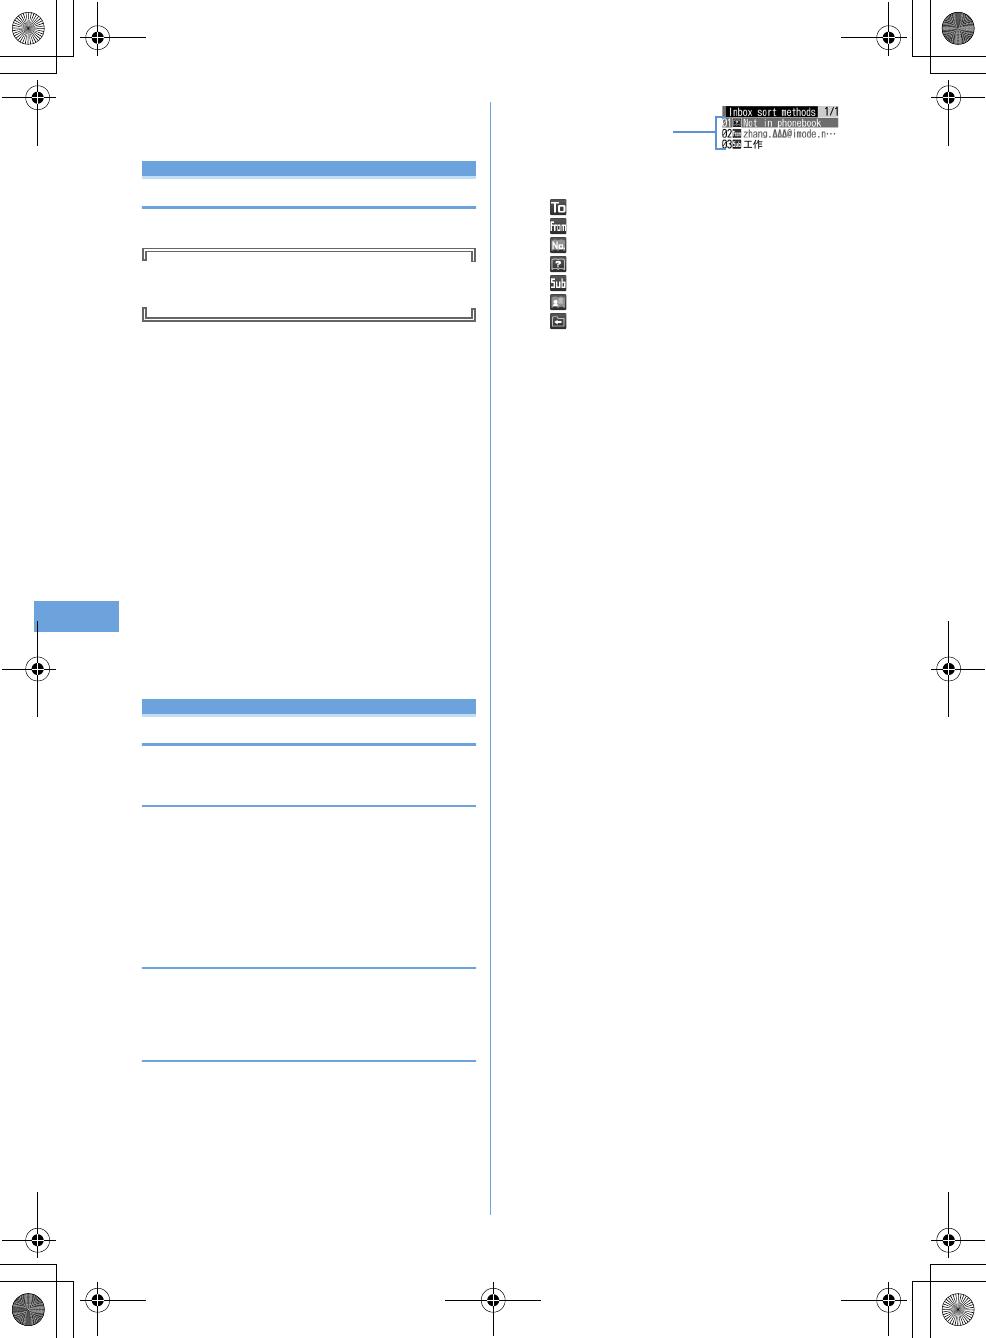
Setting sort methods
•
To set and activate sort method, turn Auto—sort ON/OFF
"ON".
➝
P194
1
ae*3e2
or
3
•
Icon definitions :
: Sent mail address
: Received mail address
: Ph.book number
: Not in phonebook
: Subject
: Ph.book group
: No method
Registered sort criteria
(In the order of priority levels)
F905i.book Page 140 Monday, April 21, 2008 10:53 AM
141
Mail
F905i_E2kou
2
pe
Set sort rule
Specifying mail address :
•
To select from message logs
a11
or
12e
Select a message
log
•
To select from Phonebook
a13e
Select the phonebook data
•
To enter directly
a14e
Enter a mail address
ep
Specifying subject :
a2e
Enter the subject
ep
Specifying Ph.book number :
a3e
Enter the phonebook
number
epeg
Specifying Ph.book group :
a4e1
or
2e
Select a group
Specifying Not in phonebook :
a5
Specifying No method :
a6
F905i.book Page 141 Monday, April 21, 2008 10:53 AM

142 Mail
F905i_E2kou
3
Select the folder to sort.
•
When the folder for Message i-
α
ppli is selected, a
message appears notifying the mails in the selected
folder is used for the i-
α
ppli. Select "Yes" to set the
folder for sorting.
4
Select a priority level.
A new method is added to the selected row.
•
To add the first method, select "Add last".
✔
INFORMATION
•
If multiple conditions are set, judgement is made from the
condition with higher priority and sorted to the folder that
matched for the condition first. A mail that was not matched for
any condition is saved in the "Inbox" or "Outbox" folder.
❖
Setting sort methods from sent/received mails
1
ae1
or
5e
Select a folder
e
Place
the cursor on the mail and
eme84e1
or
2e
Check
the saved contents
ep
The next procedure
➝
P195 Step 3 and the following
steps in "Setting sort methods"
•
When Auto-sort ON/OFF is "OFF", a confirmation
screen for setting to "ON" appears.
❖
Checking, changing or deleting sorting
methods
<Example> Checking
1
ae*3e2
or
3
2
Select sorting rule.
Changing sort methods :
a
Place the cursor on the sort method and
me2
Operations for specifying sort method
➝
P194 Step 2-
4 in "Setting sort methods"
b
"Yes"
Changing sort priority : Place the cursor on the sort
method and
me5e
Select the position to
move
Deleting :
a
Place the cursor on the sort method and
me3
or
4
b
"Yes"
◆
Setting mail signatures <Signature>
MENU [Mail] 03
❖
Setting whether to insert signature
automatically
1
ae*51e1
or
2
❖
Registering signature
1
ae*52ege
Enter the
Signature
ep
◆
Adding address to mail group <Mail group>
MENU [Mail] 05
•
Up to 20 mail groups can be added. Up to 5 mail addresses
can be added for 1 mail group.
1
ae*8
2
p
Creating a mail :
a
The next procedure
➝
P170
Editing mail group names : Place the cursor on the
mail group and
me2
Copying mail group : Place the cursor on the mail
group and
me3
Deleting mail group : Place the cursor on the mail
group and
me4e1
or
2e
"Yes"
Operating mail address registered in a mail group :
Select a mail group
e
Go to Step 5
3
Enter the mail group name
ep
F905i.book Page 142 Monday, April 21, 2008 10:53 AM

143
Mail
F905i_E2kou
4
Select a mail group for registering a mail
address.
5
ae
Set the required items
Editing registered mail address : Place the cursor
on the mail address (or name) and
me1e
Edit
Deleting a registered mail address : Place the cursor
on the mail address (or name) and
me2e
"Yes"
e
Go to Step 7
Displaying details of registered mail address :
me3e
When finishing checking
ge
Go
to Step 7
6
p
7
p
✔
INFORMATION
•
If no Address Type is set for TO, mail cannot be sent.
◆
Setting whether to quote message when
reply <Reply format>
MENU [Mail] 041
1
ae*61e
Set the required
items
ep
◆
Setting Quick reply <Activate quick reply>
MENU [Mail] *62
1
ae*62e1
or
2
◆
Registering quick reply format <Quick reply
presets>
MENU [Mail] *63
•
Up to 5 formats can be registered.
1
ae*63
2
Selecting a format
e
Enter a text
epe
"Yes"
Viewing the message text : Place the cursor on the
message text and
p
.
Deleting format : Place the cursor on the format and
me1e
"Yes"
Resetting all formats :
me2e
Authenticate
e
"Yes"
Adding new format : "<New reply format>"
e
Enter
a text
ep
◆
Setting display style of mail list <Message
list>
MENU [Mail] *2
1
ae*2e
Set the required items
ep
◆
Setting if you receive attachments
automatically <Incoming msg. attach>
MENU [Mail] *9
•
Files set not to receive automatically are received as
Receive option attachment files.
➝
P181
1
ae*9e
Select a file item to
receive
ep
•
"Tool data" indicates the data of phonebook,
bookmark and schedule.
•
"Other" indicates Excel, Word, PowerPoint or other
data.
✔
INFORMATION
•
Images or melodies attached to message text are automatically
received regardless of this setting.
◆
Setting whether to play melodies
automatically <Attachment auto-play>
MENU [Mail] *0
1
ae*0e1
or
2
F905i.book Page 143 Monday, April 21, 2008 10:53 AM

144 Mail
F905i_E2kou
◆
Selecting type of mail to display <By
display type>
You can display only the mails of specified type in the received
and sent mail lists temporarily. When the list display is closed,
sorting is restored to "Display all items".
1
ae1
or
5e
Select a
folder
eme72e1
or
2
◆
Changing mail font size <Font size>
Change the font size to display mails from among the 5 types
of "Larger", "Large", "Medium (Standard)", "Small" and
"Smaller".
1
ae1
or
5e
Select a folder
e
Select a
mail
eme31e1
-
5
◆
Setting mail reception notification for
terminal in operation <Display priority>
MENU [Mail] *4
You can set if you display a receiving screen, reception result
screen or Auto sending screen by priority when i-mode mail or
SMS is received during the terminal operation.
1
ae*4e1
-
3
Continue operation :
Display none of the receiving
screen, reception result screen and sending screen.
Show message :
Display the receiving screen,
reception result screen and sending screen.
Open:Cont/Close:Show :
Continue operation when
the terminal is open and prioritizes reception
notification when the terminal is folded.
F905i.book Page 144 Monday, April 21, 2008 10:53 AM
145
Mail
F905i_E2kou
SMS saved to UIM
Saving SMS in UIM
◆
Moving/Copying SMS into UIM
•
Maximum number of saved items
➝
P447
<Example> Moving a SMS
1
ae1
or
5e
Select a folder
2
Place the cursor on the SMS and
me421
Moving selected SMS :
me422e
Select the SMS
ep
Copying a SMS : Place the cursor on the SMS and
me431
Copying selected SMS :
me432e
Select the SMS
ep
3
"Yes"
◆
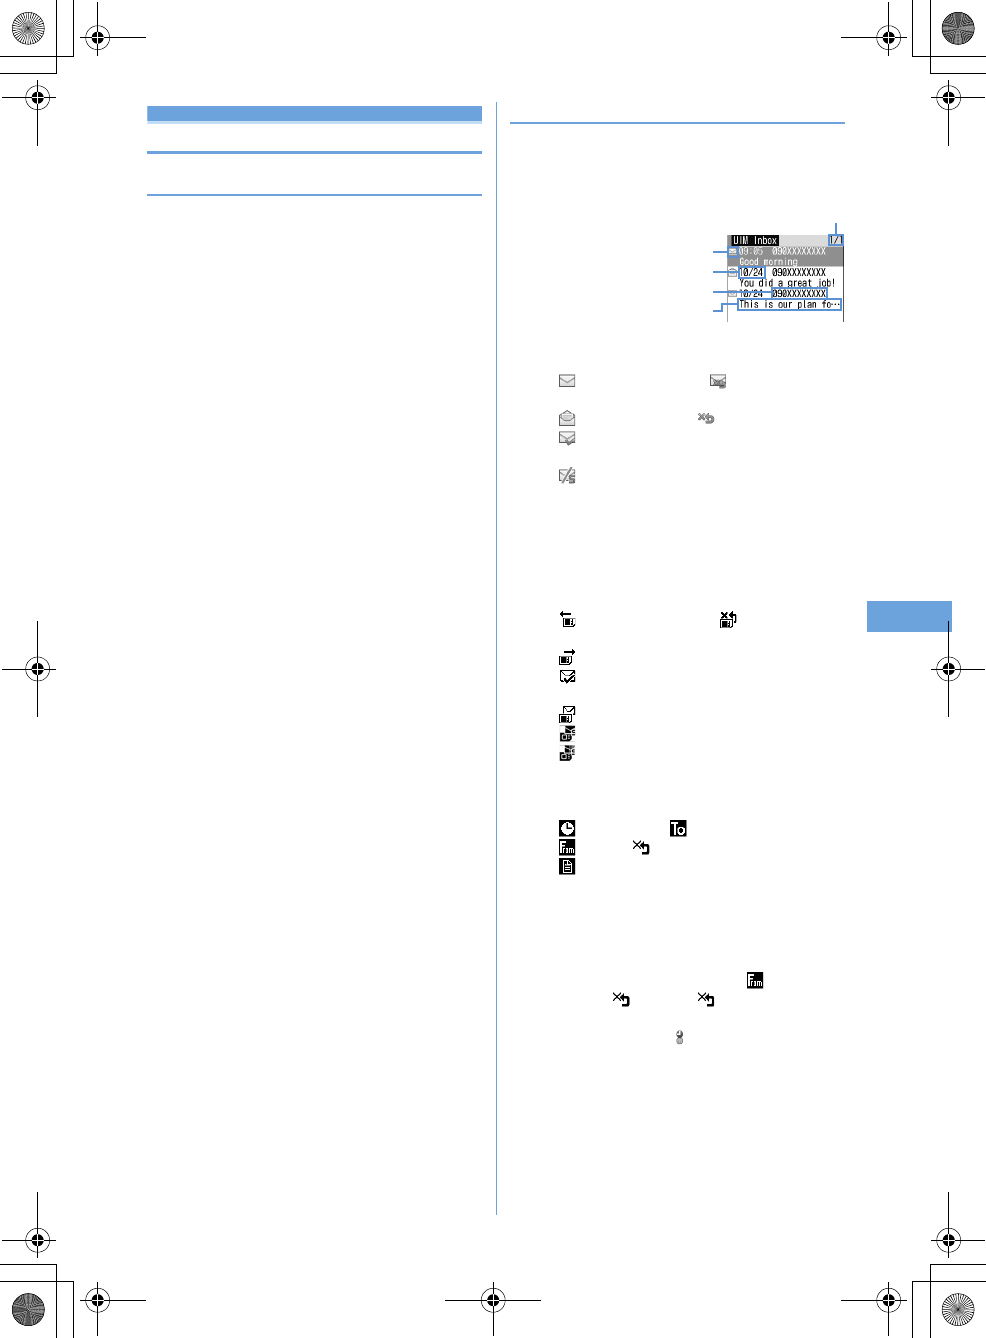
Displaying SMS in UIM
MENU [Mail] 812
MENU [Mail] 813
1
ae81e2
or
3
a
Page/Total pages
b
Status icon
: Unread (able to reply) : Unread (unable to
reply)
: Read (able to reply) : Read (unable to reply)
: SMS report request, Missed call notification or
Notify recorded message
: SMS error
c
Sent/received date and time
d
Sender/Receiver
e
Top of the message
2
Select SMS to display.
a
Icon
: Received (able to reply) : Received (unable
to reply)
: Sent
: SMS report request, Missed call notification or
Notify recorded message
: SMS in UIM
: SMS in SIM card (combined SMS)
: SMS in SIM card (combined SMS in an
incomplete status)
b
Mail No./No. of msgs
c
Icon
: Date and time : Receiver
: Sender : Sender (unable to reply)
: Subject "UIM Inbox" "UIM Outbox" "SMS report
request" "Notify missed call" "Answer videophone"
•
When sent SMS is moved or copied to UIM, the sent
date and time are deleted from the sent SMS in the
UIM. Note that for sent SMS with SMS report request
set, the sent date and time are displayed.
•
For the SMS which contains error, appears
instead of and except does not appear.
•
When SMS is received while staying overseas
(except GMT+08:00), may appear at the end of the
receiving date and time.
a
b
c
d
e
F905i.book Page 145 Monday, April 21, 2008 10:53 AM

146 Mail
F905i_E2kou
◆
Moving/Copying SMS in UIM to the terminal
<Example> Moving a SMS to the terminal
1
ae81e6
or
7
2
Place the cursor on the SMS and
me31
Moving selected SMS :
me32e
Select
the SMS
ep
Copying a SMS : Place the cursor on the SMS and
me33
Copying selected SMS :
me34e
Select
the SMS
ep
3
ge
Select the destination folder
e
"Yes"
✔
INFORMATION
•
When the memory is not enough or the maximum number of
saved items is reached, SMS cannot be moved or copied.
Unprotected i-mode mail and/or SMS, if any, are not
overwritten. Delete unnecessary i-mode mail and/or SMS from
folders of Inbox and Outbox.
◆
Deleting SMS from the UIM
•
When deleting a sent SMS, the corresponding SMS report
request in UIM is also deleted at the same time.
<Example> Deleting a SMS
1
ae81e6
or
7
2
Place the cursor on the SMS and
me21
Deleting selected SMS :
me22e
Select
the SMS
ep
Deleting all SMS :
me23e
Authenticate
Deleting all SMS report request :
me24e
Authenticate
3
"Yes"
F905i.book Page 146 Monday, April 21, 2008 10:53 AM
147
F905i_E2kou
i-
α
ppli
F905i.book Page 147 Monday, April 21, 2008 10:53 AM

148 i-αppli
F905i_E2kou
i-
α
ppli
Downloading i-
α
ppli from sites makes a terminal more
convenient. For instance, various games can be
downloaded to the i-mode terminal, direct registration to
phonebook and schedule from i-
α
ppli can be made or
Data Box including saving and obtaining image can be
operated with some i-
α
ppli.
✔
INFORMATION
•
Any image or movie saved by i-
α
ppli or i-
α
ppliDX is saved in "i-
mode", "Deco-mail picture" or "Deco-mail pict" folder of My
Picture, "i-mode" folder of i-motion or added album respectively,
or in the i-
α
ppli.
•
When ring tone is saved by i-
α
ppliDX, it is saved in "i-mode"
folder of Melody or in the i-
α
ppli.
Downloading i-
α
ppli
You can download i-
α
ppli from sites and store it in the
terminal.
•
Not saved if downloading of i-
α
ppli fails due to poor signal
quality, etc.
•
The maximum size of i-
α
ppli that can be saved is 1 Mbyte.
1
Displaying a site
e
Select an i-
α
ppli
The selected i-
α
ppli is downloaded.
•
While downloading, press
g
and select "Yes" to
stop downloading.
•
When download or communication is interrupted,
resuming confirmation screen may appear. Select
"Yes" to restart downloading; when "No" is selected,
partial saving confirmation screen appears if it is
possible. If partial saving is impossible, data already
downloaded is deleted. The rest of partially saved i-
α
ppli can be downloaded.
➝
P213 Step 3 in "Starting
i-
α
ppli"
When Software info disp. is "ON"
A confirmation screen of i-
α
ppli information and
downloading appears.
•
The detail information of the i-
α
ppli to be downloaded
can be displayed by pressing
p
.
Downloading i-
α
ppli that uses the saved data, the
serial number of your mobile phone/UIM card or
microSD memory card
Downloading confirmation screen appears.
•
With "Guide" displayed on the guide area, press
p
to check details of the data used by the i-
α
ppli.
When the selected i-
α
ppli is already downloaded.
A message indicating that the data is already
downloaded appears. When the new version of the i-
α
ppli is released, upgrading confirmation screen
appears.
When the selected i-
α
ppli is already downloaded
with a different UIM
Overwriting confirmation screen appears.
2
Select a destination to save.
•
Some i-
α
ppli shows setting screens for Set stand-by
disp. (i-
α
ppli stand-by) or Use network.
Setting items
➝
P215 Step 1 in "Setting operating
condition of i-
α
ppli"
3
"Yes"
The downloaded i-
α
ppli starts.
•
Select "No" to return to the site screen.
•
When setting "Set stand-by disp." to "Yes", setting
confirmation screen appears.
✔
INFORMATION
•
Even when downloading failed, deleted i-
α
ppli or data deleted
at the same time from microSD memory card are not restored.
◆
Viewing i-
α
ppli information when
downloading <Software info disp.>
You can set if you display i-
α
ppli information when
downloading i-
α
ppli.
1
me
[i-
α
ppli]
e23e1
or
2
F905i.book Page 148 Monday, April 21, 2008 10:53 AM

149
i-αppli
F905i_E2kou
Starting i-
α
ppli
MENU [i-
α
ppli] 1
1
d
(1 sec. or more)
2
Select a folder.
•
Icon definitions :
: Preinstalled folder without i-
α
ppli
: Preinstalled folder with i-
α
ppli
: Created folder without i-
α
ppli
: Created folder with i-
α
ppli
3
Select i-
α
ppli to start.
•
Icon definitions (Only marks with * are displayed in IC
card content.)
: Message i-
α
ppli
: i-
α
ppliDX
(orange) : i-
α
ppli
: i-
α
ppli setting available for i-
α
ppli stand-by
display
: i-
α
ppli set for i-
α
ppli stand-by display
: i-
α
ppli with Auto start setting
(Upper half in gray, lower half in orange) : i-
α
ppli
partially saved
*
: i-
α
ppli unavailable due to UIM operation
restriction
*
: i-
α
ppli of stopped condition by IP (Information
Provider)
*
: i-
α
ppli downloaded from SSL page
: i-
α
ppli set as one-key shortcut
- : i-
α
ppli set as two-key shortcut
// : Search by i-mode (Displayed in
preinstalled folder and IC card
•
Each time you press
t
, display view switched in
the order of graphical display
➝
list
display
➝
thumbnail display.
•
When "Confirm every session" is Set NW
transmission of the i-
α
ppli to be started, connection
confirmation screen appears.
•
When partially saved i-
α
ppli is selected, downloading
confirmation screen of the rest appears. The i-
α
ppli
can be started after the rest is downloaded; when
download is disabled, the i-
α
ppli partially saved may
be deleted.
•
To quit i-
α
ppli, operate in the procedure specified for
each i-
α
ppli. You can also quit i-
α
ppli by pressing
f
and then selecting "Yes".
✔
INFORMATION
•
Some i-
α
ppli may have different display area, screen mode may
not be changed by rotating the display.
•
i-
α
ppli that vertical and horizontal (or vice versa) size is less
than 432
×
240 dots are displayed with horizontal and vertical
size doubled.
•
On a full-screen or wide display giving 864 vertical or horizontal
dots, each pressing of side key [
S
] switches displaying and
hiding the battery icon.
•
The volume of sound emitted during i-
α
ppli operation can be
adjusted. Note that some i-
α
ppli have no sound.
➝
P88, 216
•
Images used on i-
α
ppli (shot using the camera from i-
α
ppli,
obtained using the i-
α
ppli infrared communication function) or
the data you entered may be sent to the server via Internet.
•
Partially saved i-
α
ppli is allowed displaying software
description, deletion and folder change.
•
i-
α
ppli that uses microSD memory card can save data in it. Data
saved in microSD memory card may not be available for other
models. i-
α
ppli that uses microSD memory card can be viewed
with "i-
α
ppli data".
➝
P299
Graphical display
<Software list> <IC card content>
F905i.book Page 149 Monday, April 21, 2008 10:53 AM
150 i-αppli
F905i_E2kou
•
i-
α
ppli may be interrupted when any of the conditions below
occur. Upon completion of the current operation, i-
α
ppli
restarts; selecting "i-
α
ppli" after pressing
s
allows to restart
i-
α
ppli while continuing the current operation (except for the
ones marked with *). Some i-
α
ppli may not return to the state of
interruption.
- When a voice call comes in
- When a videophone call comes in
*
- When Lock on close is activated
*
- When the function is switched over to another function
•
When you are out of service area or the saved data cannot be
used, i-
α
ppli may not start or not operate correctly.
•
For certain i-
α
ppli, the IP (Information Provider) may access i-
α
ppli saved in the mobile phone and directly set operation
disabled state. In such a case, i-
α
ppli startup, stand-by display
settings, upgrading, etc. are disabled, enabling only deletion
and software description display. To resume using i-
α
ppli,
notification of i-
α
ppli enabled must be received; contact the IP
(Information Provider).
•
For certain i-
α
ppli, the IP (Information Provider) may send data
to i-
α
ppli saved in the mobile phone.
◆
Displaying history when operation finishes
without using saved data <Security error
hist.>
When i-
α
ppli ended with an error because i-
α
ppli cannot use
the saved data, the name of the i-
α
ppli, date and time, and
cause of security error are recorded.
•
Up to 20 items can be recorded. When exceeding the limit,
record is overwritten chronologically.
1
me
[i-
α
ppli]
e33
•
To delete histories, press
p
and select "Yes".
◆
Displaying i-
α
ppli Description <Software
description>
1
d
(1 sec. or more)
e
Select a folder
e
Place
the cursor on the i-
α
ppli and
p
•
Displayed items differ depending on i-
α
ppli.
•
To check the site certificate of the i-
α
ppli downloaded
from SSL page, press
p
on the Software
description screen.
◆
Setting operating condition of i-
α
ppli
<Software settings>
1
d
(1 sec. or more)
e
Select a folder
e
Place
the cursor on the i-
α
ppli and
me6e
Set the required items
ep
✔
INFORMATION
•
If you set "No" for Set NW transmission, the i-
α
ppli may not be
started and timely information such as stock prices or weather
forecast may not be provided by i-
α
ppli.
•
If you set "Yes" for Use icons, since icons for unread messages,
remaining battery level, Silent mode, and antenna icon may be
sent to IPs (Information Providers) through the Internet, it may
give the information to a third party. Some i-
α
ppli requiring icons
may not operate when "No" is set.
◆
Setting operations while i-
α
ppli is active
❖
Setting Display light
1
me
[i-
α
ppli]
e24e1
or
2
Terminal Setting :
The light is turned ON according to
Display light of Display.
Software :
The light is turned ON according to the i-
α
ppli.
F905i.book Page 150 Monday, April 21, 2008 10:53 AM

151
i-αppli
F905i_E2kou
❖
Setting vibrator
Set if you allow the vibrator operation by i-
α
ppli.
1
me
[i-
α
ppli]
e25e1
or
2
❖
Setting power saving
Set brightness of the display, key lighting and volume.
<Example> Presetting
1
me
[i-
α
ppli]
e27
2
1e1
or
2
•
"Power saved mode" sets the brightness to
"Brightness 1", Key lighting to "OFF" and Effect sound
volume to "Level 1" (not changed if set to "Silent").
For "Default mode", this function resets each setting
to default state.
Changing brightness :
2e1
-
6
Changing Key lighting :
3e1
or
2
Changing volume :
4e
Side key [
ST
] or
keg
◆
Starting another i-
α
ppli from i-
α
ppli
Some i-
α
ppli can start specified i-
α
ppli and allow to enjoy i-
α
ppli without returning to the Software list.
1
Start another i-
α
ppli from i-
α
ppli
◆
Motion tracking
This terminal is compatible with feeling games, and
operations can by performed by tilting or shaking the terminal.
•
While playing the game, do not cover In-camera with your
hand, etc. Tilt, etc., may not be detected.
◆
Using preinstalled i-
α
ppli
(TBD)
Starting i-
α
ppli quickly
i-
α
ppli can be started by a simple operation from the
stand-by display.
◆
Setting i-
α
ppli to one-key/two-key shortcut
•
You can register one item of one-key shortcut.
•
You can register one item of two-key shortcut for each key
of keypad, up to 10 items in total.
<Example> Setting two-key shortcut
1
d
(1 sec. or more)
e
Select a folder
2
Place the cursor on the i-
α
ppli and
me82
Setting i-
α
ppli shortcut : Place the cursor on the i-
α
ppli to set and
me81
•
Same operations are required also for canceling.
3
Select a destination to save.
•
Icon numbers ( - ) correspond to keypads
(
0
-
9
) used to activate two-key shortcut.
•
When a destination already set is selected,
overwriting confirmation screen appears.
◆
Starting i-
α
ppli using one-key/two-key
shortcut
<Example> Starting i-
α
ppli using two-key shortcut
1
0
-
9ed
(1 sec. or more)
Starting i-
α
ppli using one-key shortcut :
g
(1 sec.
or more)
Automatically starting i-
α
ppli
◆
Specifying whether to start automatically
<Auto start>
Set all i-
α
ppli, which are set to "ON" for User in Set auto start
info., at once to start automatically.
1
me
[i-
α
ppli]
e22e1
or
2
◆
Setting date and time of Auto start <Set
auto start info.>
1
d
(1 sec. or more)
e
Select a folder
e
Place
the cursor on the i-
α
ppli to set and
me5e
Set the required items
ep
F905i.book Page 151 Monday, April 21, 2008 10:53 AM
152 i-αppli
F905i_E2kou
User :
Select if you perform Auto start with the
conditions below.
Time :
Enter the time to automatically start the i-
α
ppli.
Repeat :
Set the condition for repetitive Auto start of the
i-
α
ppli.
Weekly :
Set the day of the week for Auto start when
"Weekly" is set for Repeat.
Date :
Set the date for Auto start when "Onetime" is set
for Repeat.
Software :
Specify if you automatically start at the
intervals preset for the i-
α
ppli.
i-
α
ppli 1-4 :
Depending on i-
α
ppliDX, up to 4 conditions
of Auto start can be set while it is running. Specify if
you enable those settings.
✔
INFORMATION
•
Even with Auto start set, automatic activation does not occur in
the cases below, causing to appear on the stand-by display
and to be recorded in Start failure hist.
- When the screen except the stand-by display appears
- UIM operation restriction is set (except for preinstalled i-
α
ppli)
- When UIM cannot be detected
- When the interval of Auto start is too short
- When All lock, Personal data lock or Privacy mode is ON (when i-
α
ppli is "Authorized access")
- When the i-
α
ppli usage is stopped by IP (Information Provider)
•
Even if you change "Repeat" of multiple i-
α
ppli to set them start
automatically at the same time, only one of them can be
activated at one time. The information of the i-
α
ppli that failed to
be activated is recorded in Auto start failure log, however,
does not appear on the stand-by display.
◆
Displaying history when Auto start of i-
α
ppli fails <Start failure hist.>
When Auto start of the i-
α
ppli fails, appears on the stand-
by display and the name of the i-
α
ppli, date and time, and
causes are recorded.
•
Up to 20 items can be recorded. When exceeding the limit,
record is overwritten chronologically.
•
When displaying Start failure hist. or when the next Auto
start is successful, on the stand-by display disappears.
1
me
[i-
α
ppli]
e31
•
To delete histories, press
p
and select "Yes".
i-
α
ppli To
Starting i-
α
ppli from site or mail
1
Select a link item enabling to start i-
α
ppli of
the site or i-mode mail
e
"Yes"
✔
INFORMATION
•
i-
α
ppli not saved in the terminal cannot be started with i-
α
ppli
To. Some i-
α
ppli can be started immediately after being
downloaded from a site, without saving.
•
Partially saved i-
α
ppli cannot be started from mail with i-
α
ppli
To.
•
For i-
α
ppli starting just after downloading from sites,
communication confirmation screen while they are activated
may appear.
•
Some i-
α
ppli program may not be saved in the terminal.
•
If the i-
α
ppli is set not to start with i-
α
ppli To, the i-
α
ppli cannot
be started.ŮP215
i-
α
ppli stand-by display
Operating i-
α
ppli stand-by display
When the i-
α
ppli is set for the stand-by display, you can
start the i-
α
ppli from the stand-by display to operate.
F905i.book Page 152 Monday, April 21, 2008 10:53 AM
153
i-αppli
F905i_E2kou
•
While displaying i-
α
ppli stand-by display, or appears
on the top of the display in gray.
•
Setting i-
α
ppli stand-by display
➝
P94, 215
◆
Starting i-
α
ppli of i-
α
ppli stand-by display
1
On the i-
α
ppli stand-by display,
ce
Operate the i-
α
ppli
✔
INFORMATION
•
When the terminal is turned ON while setting the i-
α
ppli stand-
by display, activating confirmation screen of the i-
α
ppli stand-by
display appears. The display starts when "Yes" is selected or no
operations are performed for approximately 5 seconds.
Selecting "No" cancels i-
α
ppli stand-by display.
Note that when the power is turned ON by Auto power ON, the
i-
α
ppli stand-by display automatically appears, without
displaying the confirmation screen.
•
When setting i-
α
ppli that performs communication, to i-
α
ppli
stand-by display, it may not operate correctly depending on
conditions such as signal quality.
•
When an error that cancels the i-
α
ppli stand-by display occurs,
canceling confirmation screen for the i-
α
ppli stand-by display
appears. If you select "Yes", it is canceled and recorded in
Abnormal exit hist.
◆
Quitting i-
α
ppli and returning to the i-
α
ppli
stand-by display
1
While running i-
α
ppli,
fe
"End"
◆
Displaying exit history of i-
α
ppli stand-by
display <Abnormal exit hist.>
When an error that cancels i-
α
ppli stand-by display occurs,
the name of the i-
α
ppli, date and time can be recorded.
•
Up to 20 items can be recorded. When exceeding the limit,
record is overwritten chronologically.
1
me
[i-
α
ppli]
e32
•
To delete histories, press
p
and select "Yes".
Managing i-
α
ppli
Various functions such as i-
α
ppli upgrade, creating folder
and deleting unnecessary i-
α
ppli for easier use of i-
α
ppli
are available.
◆
Upgrading i-
α
ppli <Upgrade>
When the i-
α
ppli is updated, upgrade is available.
1
d
(1 sec. or more)
e
Select a folder
e
Place
the cursor on the i-
α
ppli and
me4e
"Yes"
✔
INFORMATION
•
When upgrading i-
α
ppli, data such as game scores stored in i-
α
ppli may be erased.
•
Some i-
α
ppli may inquire the server about the availability
depending on the length of time of use and number of times of
use. If the server gives a notice of the i-
α
ppli having been
updated, it can be upgraded after confirming if you upgrade it.
•
Some i-
α
ppli is automatically upgraded.
F905i.book Page 153 Monday, April 21, 2008 10:53 AM

154 i-αppli
F905i_E2kou
◆
Creating/deleting folders
❖
Creating folders
•
Up to 20 items can be registered.
1
d
(1 sec. or more)
2
me4
Changing folder setting : Place the cursor on the
folder and
me1
Changing the order of the folder : Place the cursor
on the folder and
me5
or
6
3
Enter a folder name
ep
❖
Deleting folders
•
Preinstalled folders cannot be deleted.
1
d
(1 sec. or more)
e
Place the cursor on the
folder and
me21
•
When i-
α
ppli is contained in the folder, perform
authentication.
2
"Yes"
◆
Moving i-
α
ppli to another folder
<Example> Moving 1 item
1
d
(1 sec. or more)
e
Select a folder
2
Place the cursor on the i-
α
ppli and
me31
Moving selected i-
α
ppli :
me32e
Select
an i-
α
ppli
ep
Moving all i-
α
ppli in the folder :
me33
3
Select a folder to move to
e
"Yes"
◆
Deleting i-
α
ppli
<Example> Deleting 1 item
1
d
(1 sec. or more)
e
Select a folder
2
Place the cursor on the i-
α
ppli and
me21
Moving selected i-
α
ppli :
me22e
Select
an i-
α
ppli
ep
Deleting all i-
α
ppli in the folder :
me23e
Authenticate
3
"Yes"
◆
Sorting i-
α
ppli <Sort software>
1
me
[i-
α
ppli]
e21e1
-
5
◆
Checking number of i-
α
ppli in folder
<Software in folder>
1
d
(1 sec. or more)
e
Place the cursor on the
folder and
p
Icon definitions
➝
P213 Step 3 in "Starting i-
α
ppli"
◆
Checking current settings of i-
α
ppli
<Software information>
The settings such as saved number of i-
α
ppli or i-
α
ppli stand-
by display can be checked.
1
d
(1 sec. or more)
ea
Software count :
Total number of i-
α
ppli saved is
displayed.
i-
α
ppli display :
Name and destination folder to save of
i-
α
ppli set as i-
α
ppli stand-by display are displayed.
One-key shortcut :
Name and destination folder to
save of i-
α
ppli registered for one-key shortcut are
displayed.
Auto start :
Name of i-
α
ppli, name of destination folder
to save i-
α
ppli and start time of i-
α
ppli set for the next
Auto start are displayed.
F905i.book Page 154 Monday, April 21, 2008 10:53 AM

155
i-αppli
F905i_E2kou
F905i.book Page 155 Monday, April 21, 2008 10:53 AM
156 i-αppli
F905i_E2kou
F905i.book Page 156 Monday, April 21, 2008 10:53 AM
157
i-αppli
F905i_E2kou
F905i.book Page 157 Monday, April 21, 2008 10:53 AM

158 i-αppli
F905i_E2kou
F905i.book Page 158 Monday, April 21, 2008 10:53 AM
159
F905i_E2kou
Full Browser
F905i.book Page 159 Monday, April 21, 2008 10:53 AM
160 Full Browser
F905i_E2kou
Full Browser
Viewing websites for PCs
MENU [i-mode] 7
You can connect to Internet to view websites created for
PCs.
Framed, CSS and SSL/TLS supporting websites can also
be viewed.
•
Communications of large-size data such as viewing
websites containing many images and downloading require
high charges.
When you connect to the full browser for the first time, a
warning message will be displayed.
If you select "YES" the message will not be displayed for
subsequentc connections.
•
Full Browser supports the functions and technologies
below :
Frame :
A frame for dividing a web page or a website
configured with frames. A website with some frame
configurations may not be fully displayed.
Cookie :
A function that saves website-specified
information such as the date and time the website
appears and the number of the times it is visited in the
terminal. Based on such information, various functions
on the website can be easily used.
CSS :
A standard that defines the layout of web pages.
JavaScript :
A language for creating websites.
Referer :
URL information of a website from which a link is
selected to move to a website specified in it.
SSL/TLS :
A technology for securing safe data
communications with authentication/encryption. A
website that supports SSL/TLS has URL beginning with
https://. In some cases, it is used in a part of a website.
<Example>
Connecting to website at specified address
(URL)
1
de7
2
31e
Enter a URL
ep
•
In alphabet input mode, repeatedly press
1
to
enter ".", "/", "-", etc. and
*
to enter
"@imode.net.tw", ".com", ".com.tw", ".net.tw",
".edu.tw", ".org.tw", ".gov.tw", "http://www.", "https://
www.", "www.", ".asp", ".html", ".htm" or ".php".
•
When "No" is set in Access setting such as by default,
the Access setting screen appears.
➝
P275
•
From the second time, the URL previously connected
appears.
•
Press
c
or
m9
to stop connecting or
m8
to stop connecting with multiple windows.
Connecting to Home :
1
Setting URL for Home connection
➝
P274
Displaying from bookmark :
2e
Select a
folder
e
Select a bookmark to display
Connecting from Entry URL log :
32e
Select a URL
eg
Connecting to Browser history :
4e
Select a
URL
eg
3
After reading a website,
fe
"Yes"
✔
INFORMATION
•
The functions below are not supported :
- Displaying Flash graphics
- Playing sound
- Plug-in
- Saving screen memos
- Phone To (AV Phone To), SMS To, Media To
•
Some websites may take extra time to be displayed or not be
displayed correctly.
•
When displaying a site including an image, the icons below may
appear instead of the image :
: When Image is set to "Not display" in Image display
: When the image data is invalid or the image cannot be
found, or when the image cannot be received because the
terminal goes out of service area during reception
: When the image cannot be displayed for an incorrect URL,
etc.
F905i.book Page 160 Monday, April 21, 2008 10:53 AM
161
Full Browser
F905i_E2kou
◆
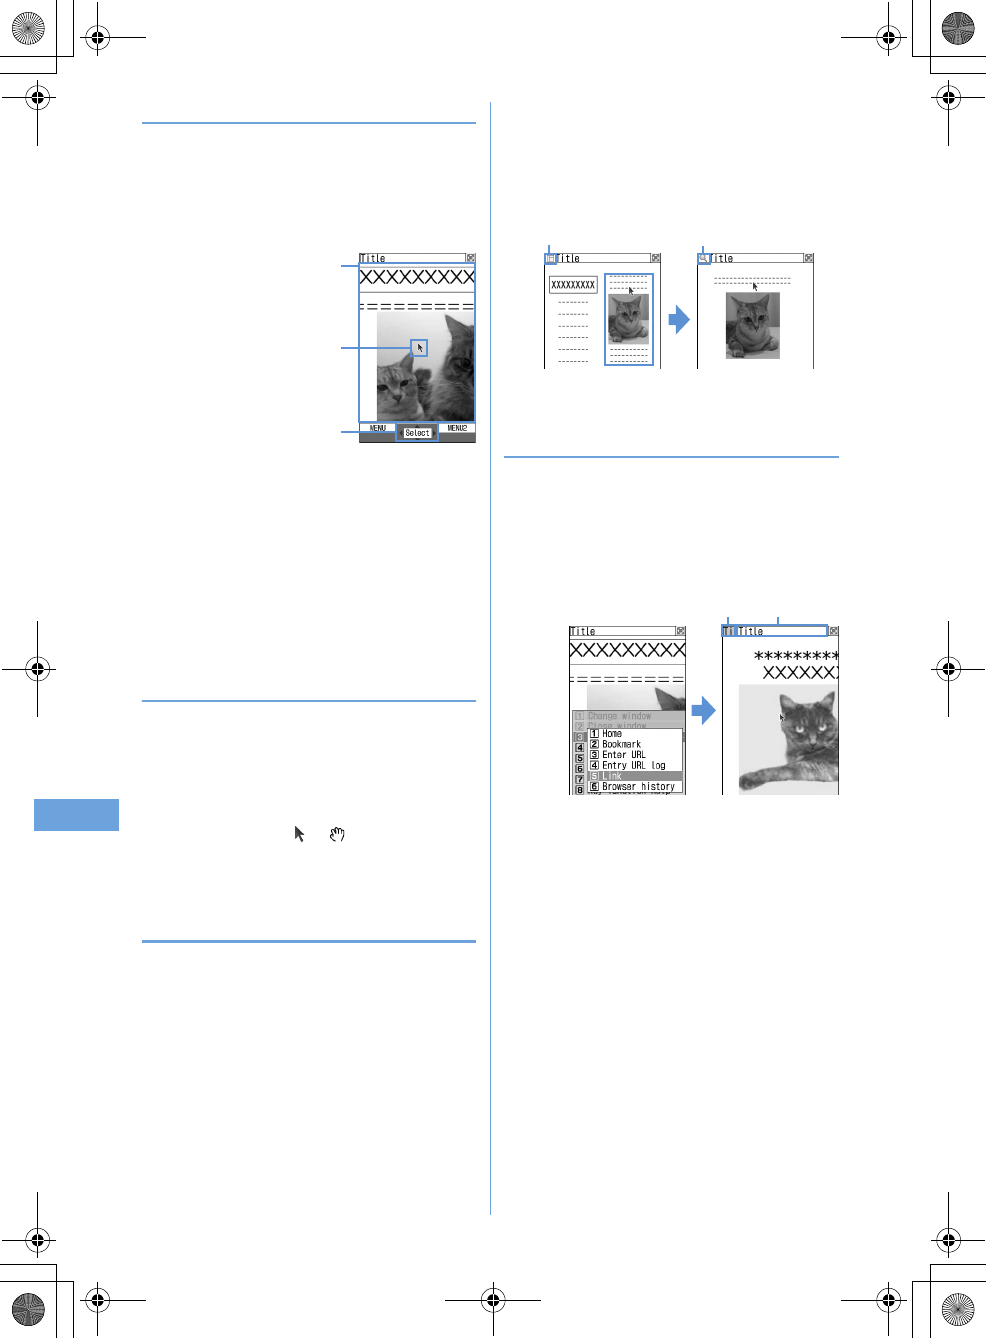
Viewing screen of Full Browser
a
Status display/Title or URL
(Light blue) : Acquiring
: In thumbnail display of framed website
➝
P272
: In frame enlarged display
➝
P272
(Dark blue) : Acquiring another frame during enlarged
display of current frame
: Downloading Word, Excel or PowerPoint files
b
/ : Display mode (PC mode (full scale)/Mobile
mode)
➝
P274
: In Window Open Guard
➝
P274
c
Pointer
➝
P272
d
Section map
The current position relative to the whole display appears
temporarily at connection or scrolling screen (except in
thumbnail display). The size of section map of PC mode
may change during downloading the page or vary by
websites.
❖
Key operations on Full Browser screen
k
,
1
-
4
,
6
-
9
: Scrolling
•
Depending on the display mode, keys available for
scrolling differ.
➝
P274
t
,
a
: Displaying previous/next pages
•
The operation is enabled only in PC mode with the
pointer hidden.
0
: Searching
➝
P273
5
: Switching zooming factor
•
Settings of zooming in/out remain after exiting Full Browser.
#
: Switching pointer display/hide
➝
P272
*
: In the horizontal display, switching displays with/
without the guide area
•
When "Full screen view" is selected in Screen view
setting, pressing
*
on the vertical display to switch
the guide area.
➝
P275
Switching display modes :
pe4
Display mode setting
➝
P274
Displaying key operation list :
pe8
Connecting to Home :
me1
Adding the displayed website as bookmark :
me21e
Select a folder to add to
Recording bookmark
➝
P153
Displaying from bookmark :
me22e
Select a
folder
Displaying from bookmark
➝
P153
Connecting by specifying URL :
me31e
Enter
the URL
ep
Connecting from Entry URL log :
me32e
Select a URL
eg
Connecting to Browser history :
me33e
Select a URL
eg
Reloading information :
me4
Creating message with the URL of the displayed website
pasted in the message text :
me6
Viewing information :
me8e1
-
3
Certificate
➝
P163
Setting image display :
me84
Image display
➝
P275
Switching character encode :
me851
•
Each pressing of
m851
causes to change
character encode as SJIS
➝
EUC
➝
JIS
➝
UTF8. Press
m852
to switch to "Auto switch".
Playing animation from the beginning :
me86
Making Window open guard valid/invalid :
me87e
"Yes"
Script setting
➝
P274
Checking section map :
me88
Setting color or display of section map :
me89e1
-
4
✔
INFORMATION
•
When you change the zooming factor while displaying multiple
websites with Multi window, the change applies only to the
currently active window.
•
Operations for selecting link destinations and items are the
same as those for i-mode.
➝
P150
Full Browser screen (Vertical display)
a
c
b
d
d
Full Browser screen (Horizontal display)
c
b
a
F905i.book Page 161 Monday, April 21, 2008 10:53 AM
162 Full Browser
F905i_E2kou
◆
Switching display of pointer
While displaying the pointer, you can move on a screen by
operating the pointer with
k
. Hold down to move quickly.
•
Settings of displaying/hiding the pointer remain after exiting
Full Browser.
1
On the Full Browser screen,
#
.
a
Moving range
The pointer can be moved in this range. On some
frames, the range the pointer can move may be
limited.
b
Pointer
When moving near the end of the window, the screen
scrolls.
c
Displayed when the item can be selected by the
pointer.
•
You can switch displaying/hiding the pointer each
time you press
#
.
❖
Switching to drag mode for operation
You can switch to drag mode during pointer display to operate
contents available in drag mode.
•
Operations available in drag mode vary by contents.
1
Move pointer onto contents
eg
(1 sec. or
more)
Pointer changes from to , and you can operate
contents with
k
.
•
Press and hold
g
(1 sec. or more) again to return to
pointer display.
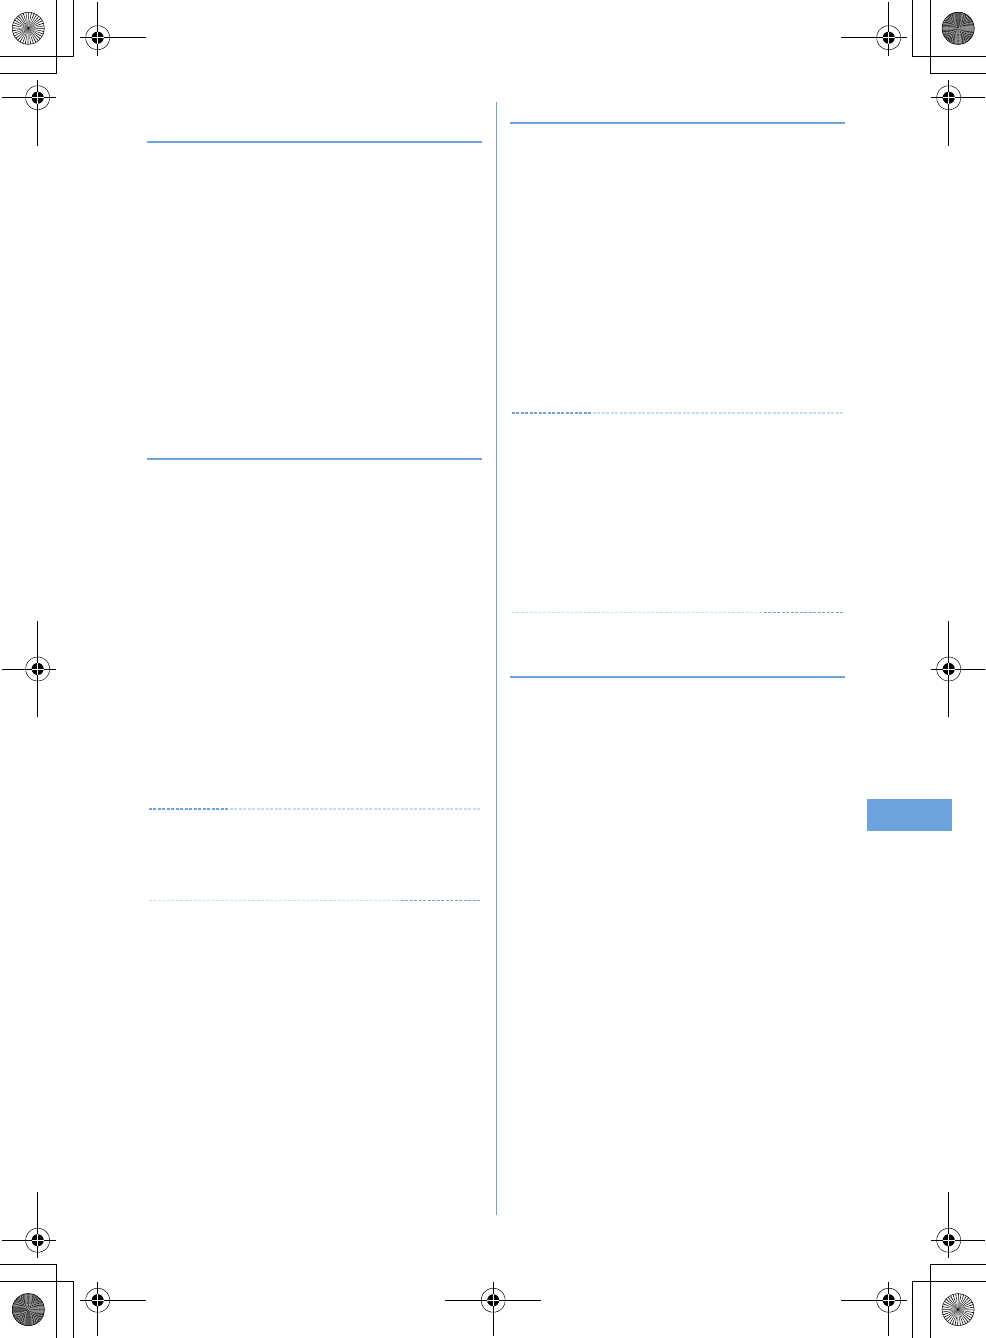
◆
Displaying a framed website
When a framed website appears, a thumbnail screen appears
allowing to view the entire configuration. Individual frames can
be enlarged for viewing.
•
During thumbnail display, the operations and settings
below are disabled :
- Scrolling screen
- Search
- Save image, Word, Excel or PowerPoint files
- Link display
- Section map check/setting
1
On the Full Browser screen containing
frames, select a frame to be enlarged.
•
Use
j
to move to the frame. In PC mode,
h
also
can be used to move to the frame.
•
While displaying the pointer, you can select the frame
to enlarge by operating the pointer with
k
.
•
Press
c
to return to the thumbnail screen.
◆
Displaying multiple websites <Multi
window>
You can view a website selected from a maximum of 5
websites displayed.
<Example> Displaying a website link on a new window
1
On the Full Browser screen, place the cursor
on the link and
pe35
•
Press side keys [
ST
] to switch a window. A window
to switch to can be selected from a window list by
pressing and holding side keys [
ST
] for 1 second or
more or pressing
p1
.
•
To close the current window, press
p2
and
select "Yes".
a
b
c
In thumbnail display In frame enlarged display
On stand-by Displaying
F905i.book Page 162 Monday, April 21, 2008 10:53 AM
163
Full Browser
F905i_E2kou
◆
Searching for a character string displayed
on website
1
On the Full Browser screen,
0e
Enter
characters in the search field
eg
The set character string is searched for and character
strings matching the entered string are highlighted.
•
Press
t
to move to the previous option and
a
to
move to the next option (matched string).
•
Press
p
to end searching.
Setting search method : On the Full Browser screen,
0eme
Set the required items
ep
Search method :
Select "Partial match" or "Exact
match" for Search method.
Case-sensitive :
Select if you make case-sensitive
search.
◆
Uploading images
You can upload images in GIF or JPEG format saved in the
terminal to a website.
•
The maximum allowable size of an image file uploaded is
80 Kbytes and the total size of images and character
strings, if contained, is limited to 100 Kbytes.
1
On the Full Browser screen, "Browse".
•
"Browse" button appears when the terminal can
upload images. It appears as a different mark when
the same website appears on a PC, etc.
2
Select a folder
e
Select an image to upload
•
When microSD memory card has been inserted,
select "Phone memory" or "microSD".
•
When editing or canceling the selected image, select
"Browse" button again and select "Change" or
"Cancel".
✔
INFORMATION
•
Procedures for uploading vary by websites.
•
You cannot upload images inhibited to output from the terminal
or data except images or character strings.
◆
Downloading images
You can save images in GIF, JPEG, PNG or BMP format
displayed on websites.
•
The maximum size of an image file that can be saved is 500
Kbytes.
•
PNG and BMP format images can be saved in "Other"
folder of microSD memory card, but cannot be displayed.
1
On the Full Browser screen
me5e
Select an image to be saved
The next procedure
➝
P157 Step 2 and the following
steps in "Downloading images"
•
When placing the cursor on the image to save, the
image is surrounded by frames and the title and the
file size are displayed.
✔
INFORMATION
•
Background images cannot be downloaded.
•
Images with horizontal and vertical (or vice versa) sizes larger
than 864
×
480 in GIF format or 1,728
×
2,304 in JPEG format
cannot be saved in the terminal. Some images cannot be saved
depending on the JPEG type.
•
Even a file of an allowable file type and size may not be saved
from some websites.
•
When exceeding maximum number of saved items/maximum
area
➝
P306
◆
Downloading Word, Excel or PowerPoint
files
You can save Word, Excel and PowerPoint files displayed on
websites.
•
The maximum size of data file that can be saved is 500
Kbytes.
•
Word, Excel or PowerPoint files can be downloaded only
when microSD memory card is inserted.
•
File of Word 2007, Excel 2007 or PowerPoint 2007 cannot
be downloaded.
1
On the Full Browser screen, select data to
download.
•
You can stop downloading by pressing
c
or
m9
and selecting "Yes". You can stop
downloading all data with multiple windows by
pressing
m8
.
2
"Save"
Displaying : "Preview"
Canceling saving : "Back"
e
"No"
F905i.book Page 163 Monday, April 21, 2008 10:53 AM
164 Full Browser
F905i_E2kou
3
Enter a display name
ep
•
When " " appears in the lower-left corner of the
guide area, the save destination can be switched by
pressing
t
.
•
Word, Excel or PowerPoint files are saved in a folder
of Other in the terminal or "Other" folder in microSD
memory card. If Other in the terminal has multiple
folders, a screen appears asking to select a saving
folder. The files are saved to a selected folder.
✔
INFORMATION
•
Downloading stops when the downloaded data size exceeds
500 Kbytes during downloading.
•
When exceeding maximum number of saved items/maximum
area
➝
P306
Setting for Full Browser
You can set various functions for Full Browser.
◆
Setting URL for Home connection <Home
URL>
MENU [i-mode] 751
1
de751e
Enter the URL
ep
✔
INFORMATION
•
To register the website while displaying on the Full Browser
screen, press
m
and select "Set as home URL"Å®"Yes".
◆
Making cookie settings <Cookie set/delete>
MENU [i-mode] 752
When Cookie is Valid, you can easily use functions of
websites displayed previously.
•
Some websites or contents services may not be correctly
displayed or used unless Cookie is Valid.
•
When Cookie is Valid, information such as the date and
time the website is displayed and the number of times it is
visited are transmitted. DoCoMo assumes no responsibility
liable if your information is known to third parties by Cookie
setting.
1
de752
2
Select the Cookie field
e1
-
3
•
When "Valid(notify)" is selected, select the Notify field
and then select the timing to notify of information
sending/receiving from "Sending", "Receiving" or
"Sending/receiving".
Deleting all Cookie data :
me
Authenticate
e
"Yes"
3
p
✔
INFORMATION
•
When UIM is replaced with another one, Cookie is set to
"Invalid". If "Valid" or "Valid(notify)" is set at this time, a
confirmation screen appears asking if you delete Cookie if
Cookie data saved in the terminal after authentication.
◆
Making Script settings <Script setting>
MENU [i-mode] 753
You can set if you validate operation of a website containing
JavaScript.
•
Some websites may not be correctly displayed unless
Script Setting is "Valid".
1
de753e
Select Script setting
field
e1
-
3
•
When "Valid(NotConfirm)" or "Valid (ConfirmAlways)"
is selected, select the Window Open Guard field and
select "Valid" or "Invalid".
With "Invalid" set for Window Open Guard, a
message appears asking if you open a new window
as specified by JavaScript. With "Valid" set, no new
windows open even if specified by JavaScript.
2
p
•
When "Valid(Not confirm)" is already selected, a
confirmation screen for registration appears.
◆
Selecting display mode <Display mode
setting>
MENU [i-mode] 754
You can set if you display a screen with the PC screen size
(PC mode(full scale)) or aligned with the lateral display size of
the terminal (Mobile mode).
1
de754e1
or
2
F905i.book Page 164 Monday, April 21, 2008 10:53 AM
165
Full Browser
F905i_E2kou
✔
INFORMATION
•
While displaying multiple websites with multi window, the
display mode is changed for all websites.
•
When the pointer is hidden in Mobile mode, press
h
to display
previous/next pages.
❖
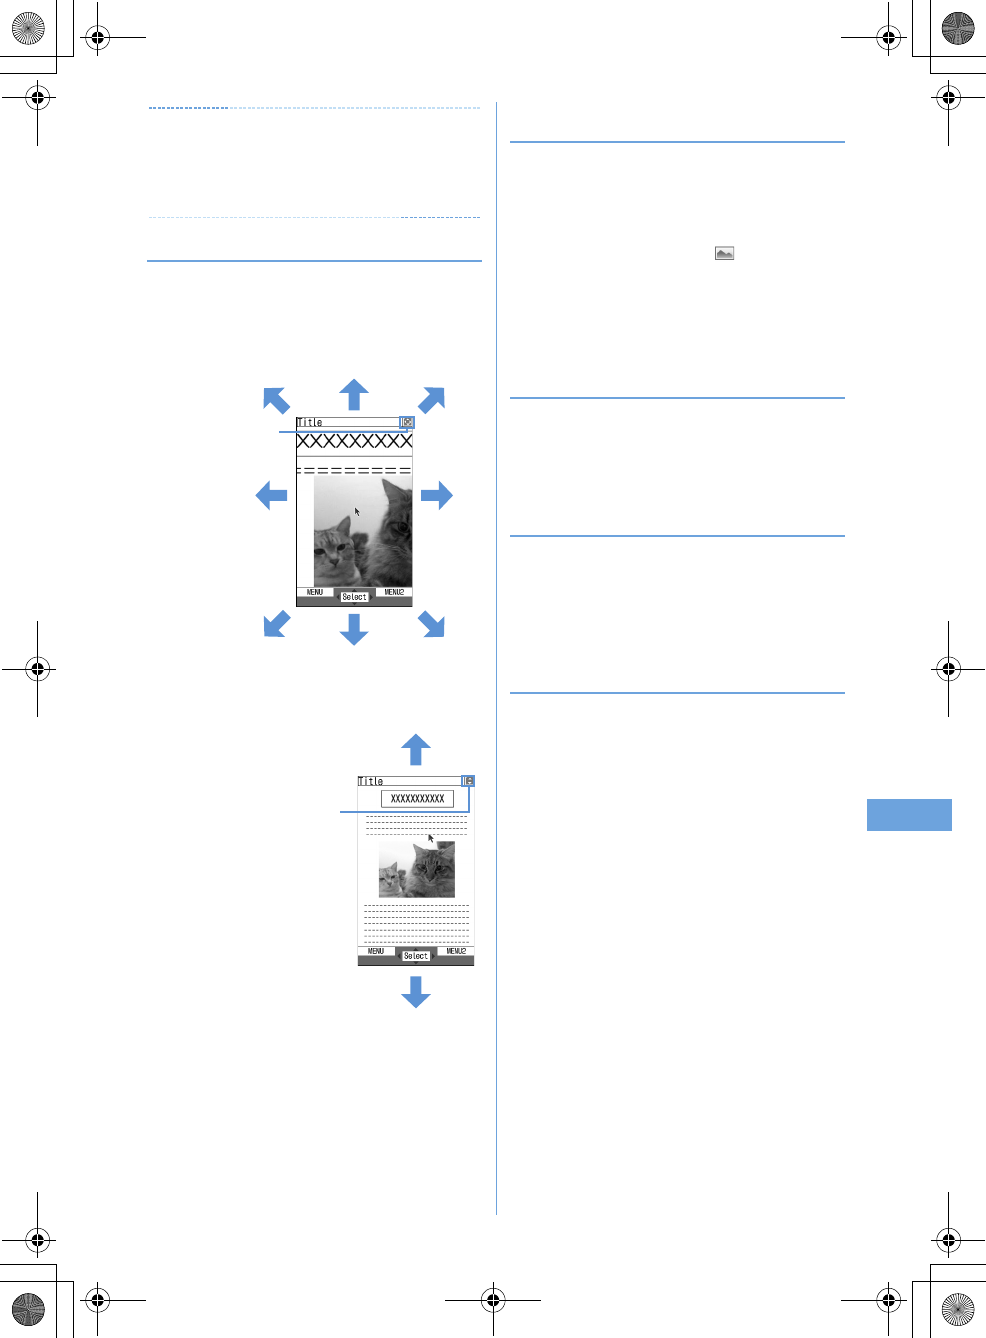
Scrolling screen
Scrolling in modes is as shown below.
•
Press any key except
k
to scroll the page by screen.
•
Hold down the key to scroll continuously.
■
PC mode(full scale)
■
Mobile mode
*
Only for hiding the pointer.
◆
Setting whether to display image and
animation <Image display>
MENU [i-mode] 755
1
de755e
Set the required
items
ep
Image :
Set if you display images.
•
When "Not display" is set, appears instead of
the image or animation.
Animation :
Set if you display animation.
•
When "Not display" is set, the first image of the
animation appears.
◆
Setting whether to use Full Browser
<Access setting>
MENU [i-mode] 756
•
When setting "Yes", check the notice.
1
de756e
"Yes" or "No"
◆
Setting whether to send Referer <Referer
setting>
MENU [i-mode] 757
•
DoCoMo assumes no responsibility if your information is
known to third parties by sending Referer.
1
de757e1
-
3
◆
Setting whether to display full screen
<Screen view setting>
MENU [i-mode] 758
Specify whether to activate full-screen display in vertical
display.
1
de758e1
or
2
u, 2
u, 8
13
l
4
r
6
79
PC mode
u, 1-3, t*
d, 7-9, a*
Mobile mode
F905i.book Page 165 Monday, April 21, 2008 10:53 AM

F905i_E2kou
F905i.book Page 166 Monday, April 21, 2008 10:53 AM
167
F905i_E2kou
Data Display/Edit/Management
F905i.book Page 167 Monday, April 21, 2008 10:53 AM