Fukuda Denshi Co DS7100 Patient Monitor User Manual DS71v1 1 FA 02 Operation 004
Fukuda Denshi Co Ltd Patient Monitor DS71v1 1 FA 02 Operation 004
Contents
User manual 3
2−11
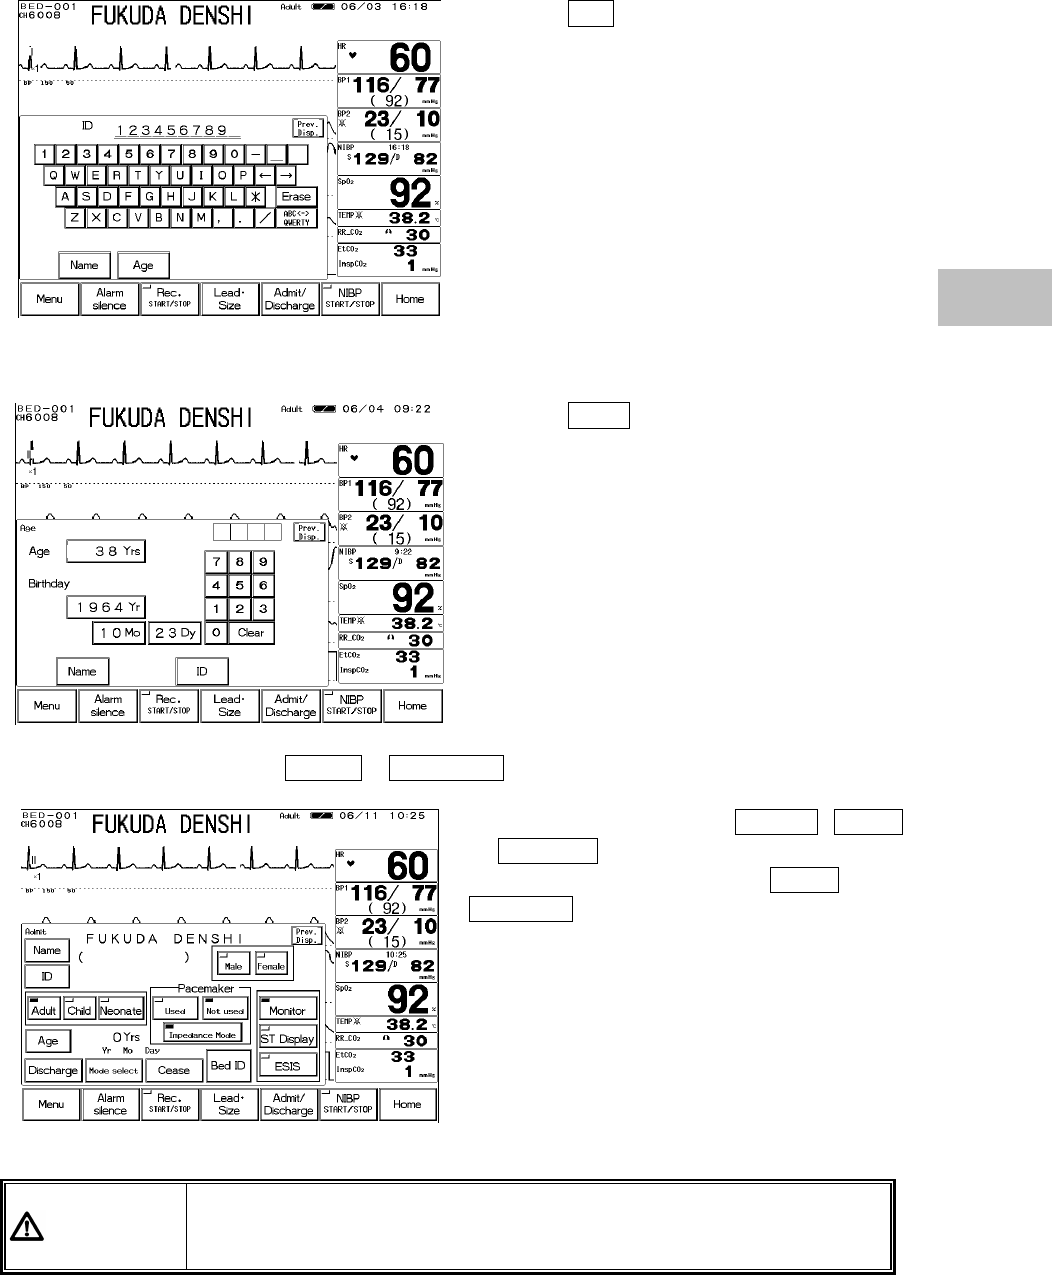
Press the ID key.
Enter the ID number using the numeric keypad.
3. Enter the patient’s birth date.
Press the Age key.
Enter the birth date using the numeric keypad.
4. Select the patient type, and Used / Not used of pacemaker use.
Select the patient type from Adult , Child ,
or Neonate .
Select the pacemaker use from Used ,
Not used .
WARNING The patient type and pacemaker use must be selected. The patient type
selection influences the precision of the QRS detection and NIBP
measurement. Make sure the correct selection is made.
2
To Start Monitoring
2−12
− Basic Operation −
Scale, Lead, Baseline Position Setup (Parameter Key)
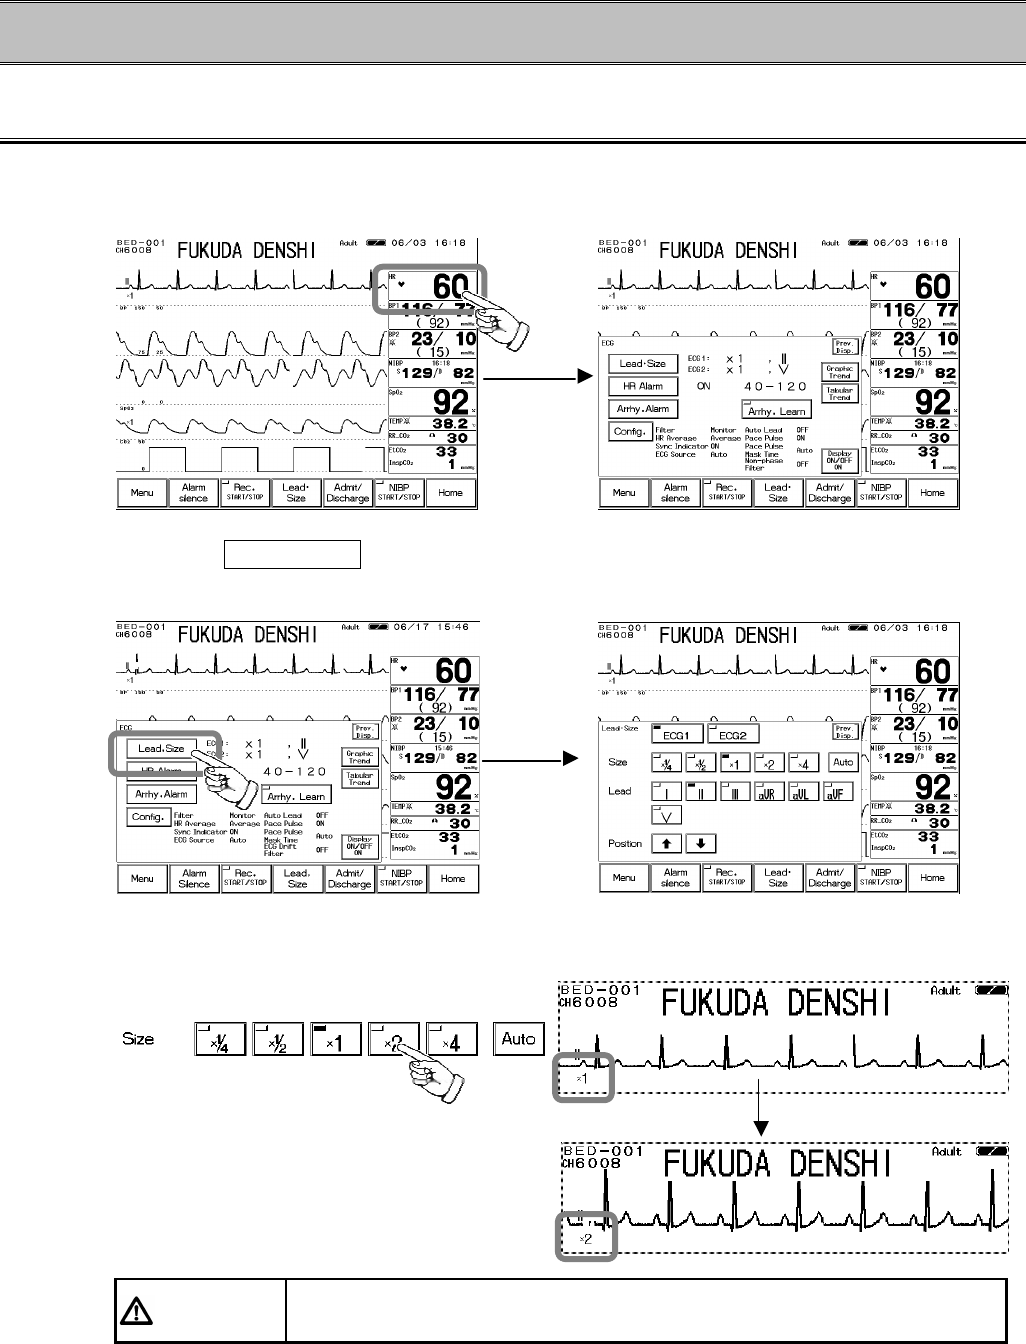
1. Select the parameter to set the scale / lead / baseline position. (Ex.: ECG)
Press the parameter key where heart rate is displayed.
2. Press the Lead・Size key. The menu to adjust size / lead / baseline position will be
displayed.
3. Adjust the waveform size.
Select an appropriate waveform size for the monitoring waveform.
CAUTION The arrhythmia detection level corresponds with the displayed waveform
size. Select an appropriate size for monitoring.
2−13
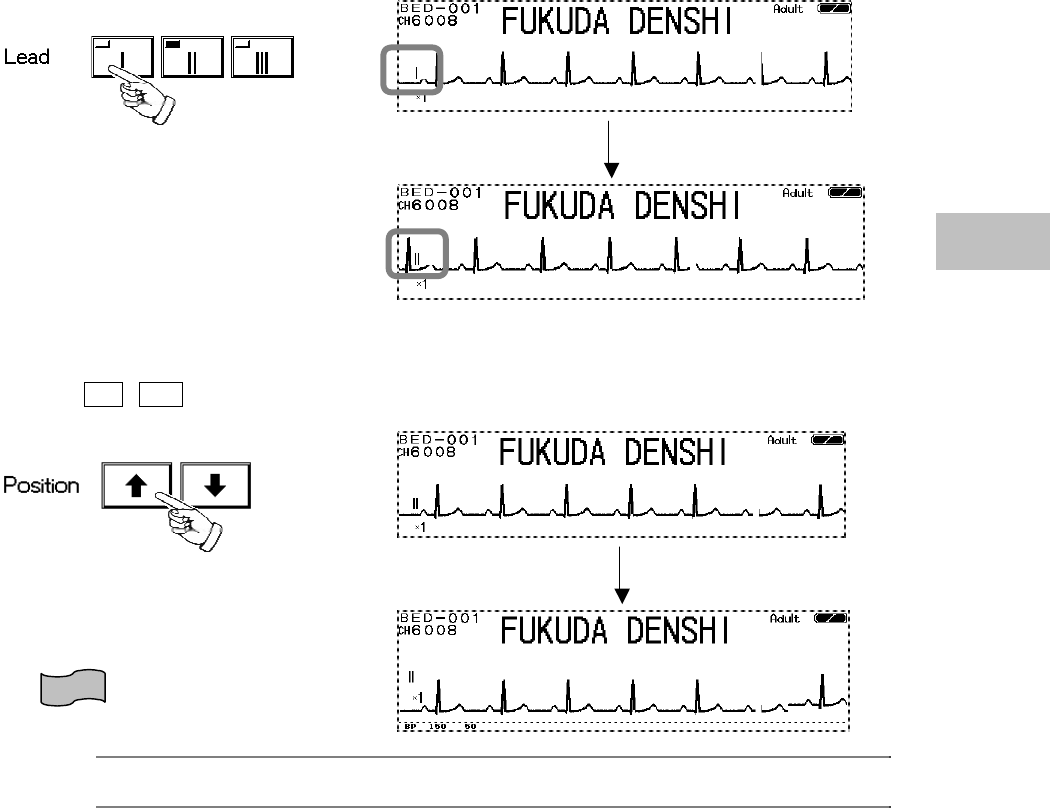
4. Select the lead.
Select an appropriate lead according to the monitoring purpose.
5. Adjust the baseline position.
Use the ? , ? keys to adjust the waveform baseline position.
Reference
Use the same procedure for each parameter.
Refer to section for each parameter in “6. Parameter Setup”.
2
Basic Operation
2−14
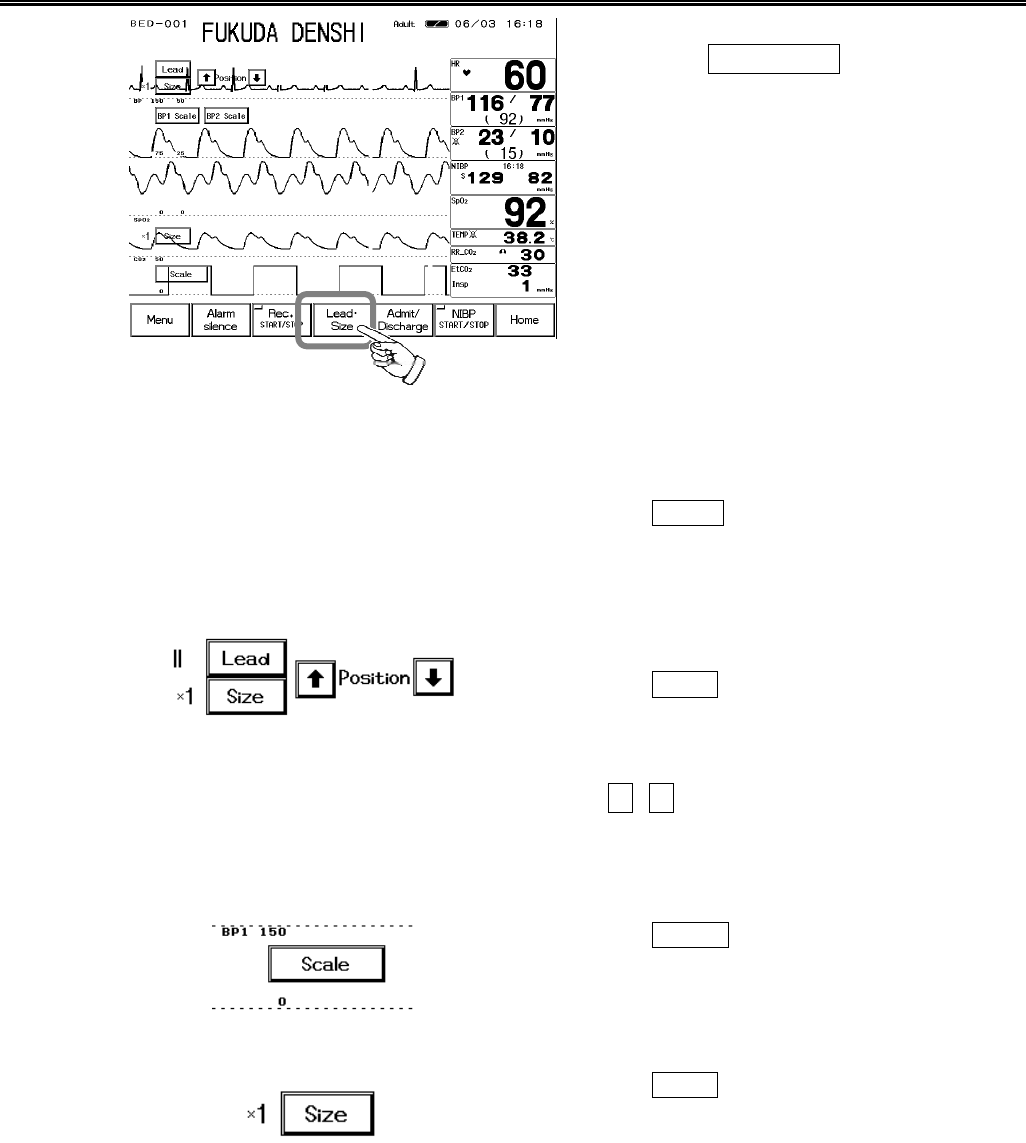
Scale, Lead, Baseline Position Setup (User Key)
Pressing the Lead・Size
key will display the
arrow keys on the home display to adjust
waveform size, scale, lead, baseline position.
1. Select the waveform size, lead, baseline position for ECG waveform.
Adjust the waveform suitable for monitoring.Pressing the Lead key will sequentially change
the lead.
3-electrode:Ⅰ→Ⅱ→Ⅲ→Ⅰ
4-electrode:Ⅰ→Ⅱ→Ⅲ→aVR→aVL→aVF→Ⅰ
5-electrode:Ⅰ→Ⅱ→Ⅲ→aVR→aVL→aVF→V→Ⅰ
Pressing the Size
key will sequentially change the
size.
×1/4→×1/2→×1→×2→×4→×1/4
Use the ↑, ↓ keys to adjust the baseline position
up or down.
2. Select the scale for BP, CO2 waveform.
Pressing the Scale key will sequentially switch the
scale.
3. Select the waveform size for impedance respiration waveform, SpO2 waveform.
Pressing the Size
key will sequentially change the
size.
×1/4→×1/2→×1→×2→×4→×1/4
2−15
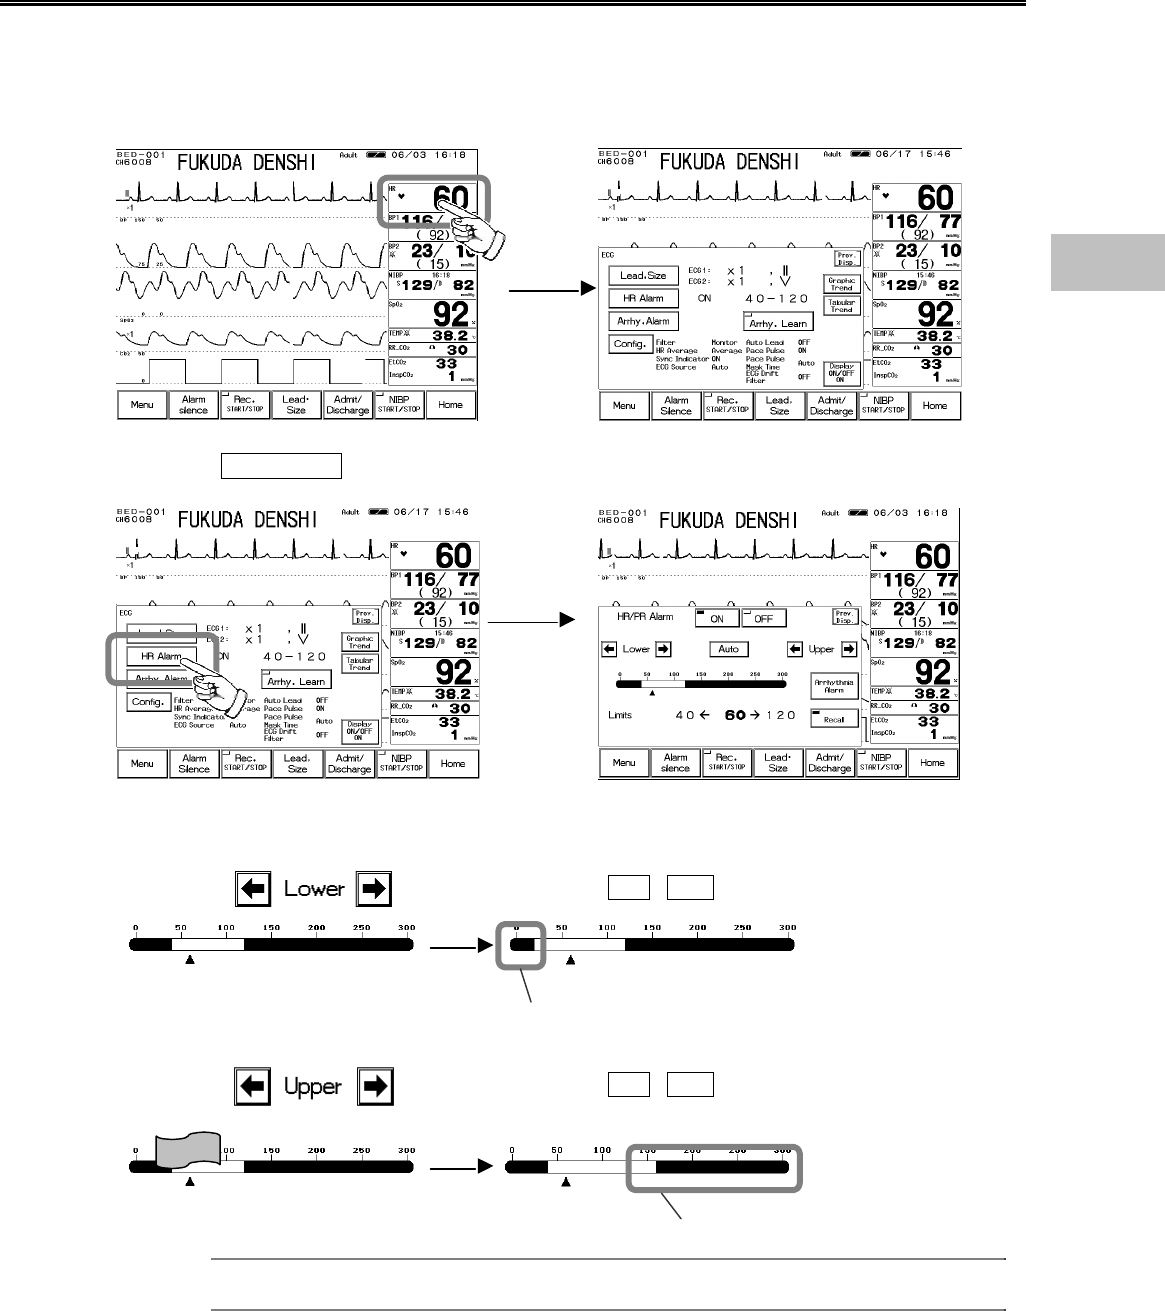
Alarm Setup for Each Parameter
The alarm can be set for each parameter. By pressing the selected parameter key, upper and
lower alarm limit and ON/OFF of alarm can be set.
1. Select the parameter to set the alarm. (Ex.: HR alarm)
2. Press the HR Alarm key. The menu to adjust the alarm limit will be displayed.
3. Set the upper and lower alarm limit.
Use the ? , ? keys to adjust the lower limit.
Use the ? , ? keys to adjust the upper limit.
Reference
Use the same procedure for the setup of each parameter.
Refer to section for each alarm in “6. Parameter Setup”
Lower Limit
Upper Limit
2
Basic Operation
2−16
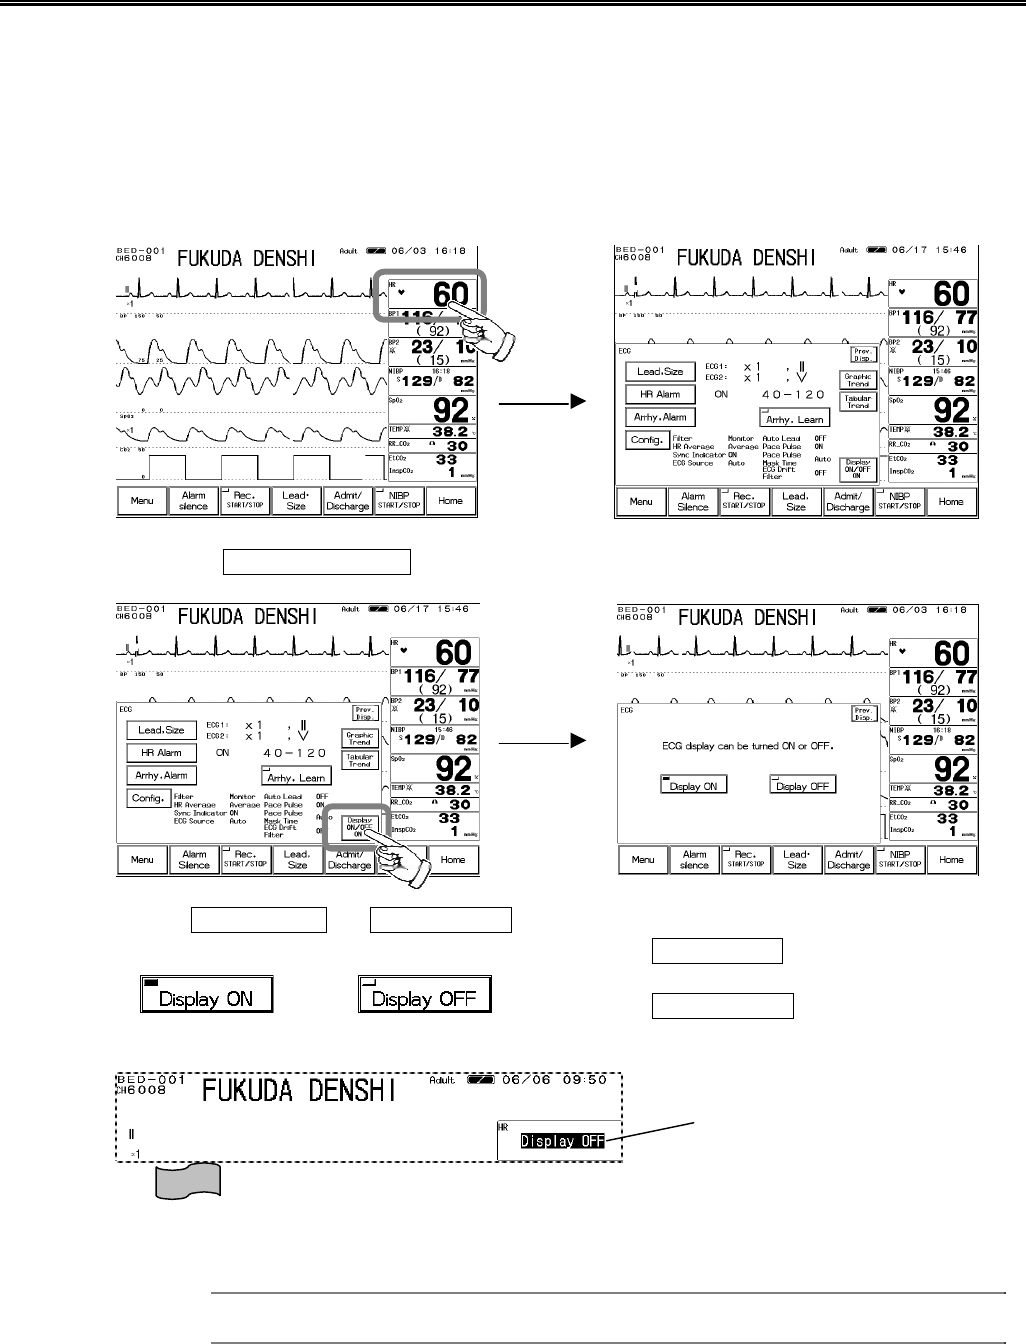
ON/OFF of Parameter Display Waveform/Numeric Data Display
The waveform and numeric data display for each parameter can be turned ON or OFF without
changing the display configuration. If not performing the ECG or SpO2 measurement while the
ECG cable or SpO2 sensor is connected to the monitor, the equipment status alarm such as “Lead
Off” will generate. Removing ECG or SpO2 from the display configuration will not generate such
alarm, but this function may be more useful as it allows to turn off the measurement without
changing the display configuration.
This function is not available for NIBP monitoring.
1. Select the parameter to turn off the display. (Ex.: ECG)
2. Press the Display ON/OFF key. The confirmation display for ON/OFF of ECG display
will appear.
3. Select Display ON or Display OFF .
Pressing the Display ON key will display the
waveform and numeric data.
Pressing the Display OFF key will not display the
waveform and numeric data.
4. Automatic reset
For ECG, impedance RESP, SpO2, CO2, properly connecting the sensor will automatically set the
display ON/OFF function to “Display ON”.
Reference
For automatic reset condition, refer to Display ON/OFF section for each parameter in
“6. Parameter Setup”.
The Display OFF message will be
displayed inside the parameter key.
2−17
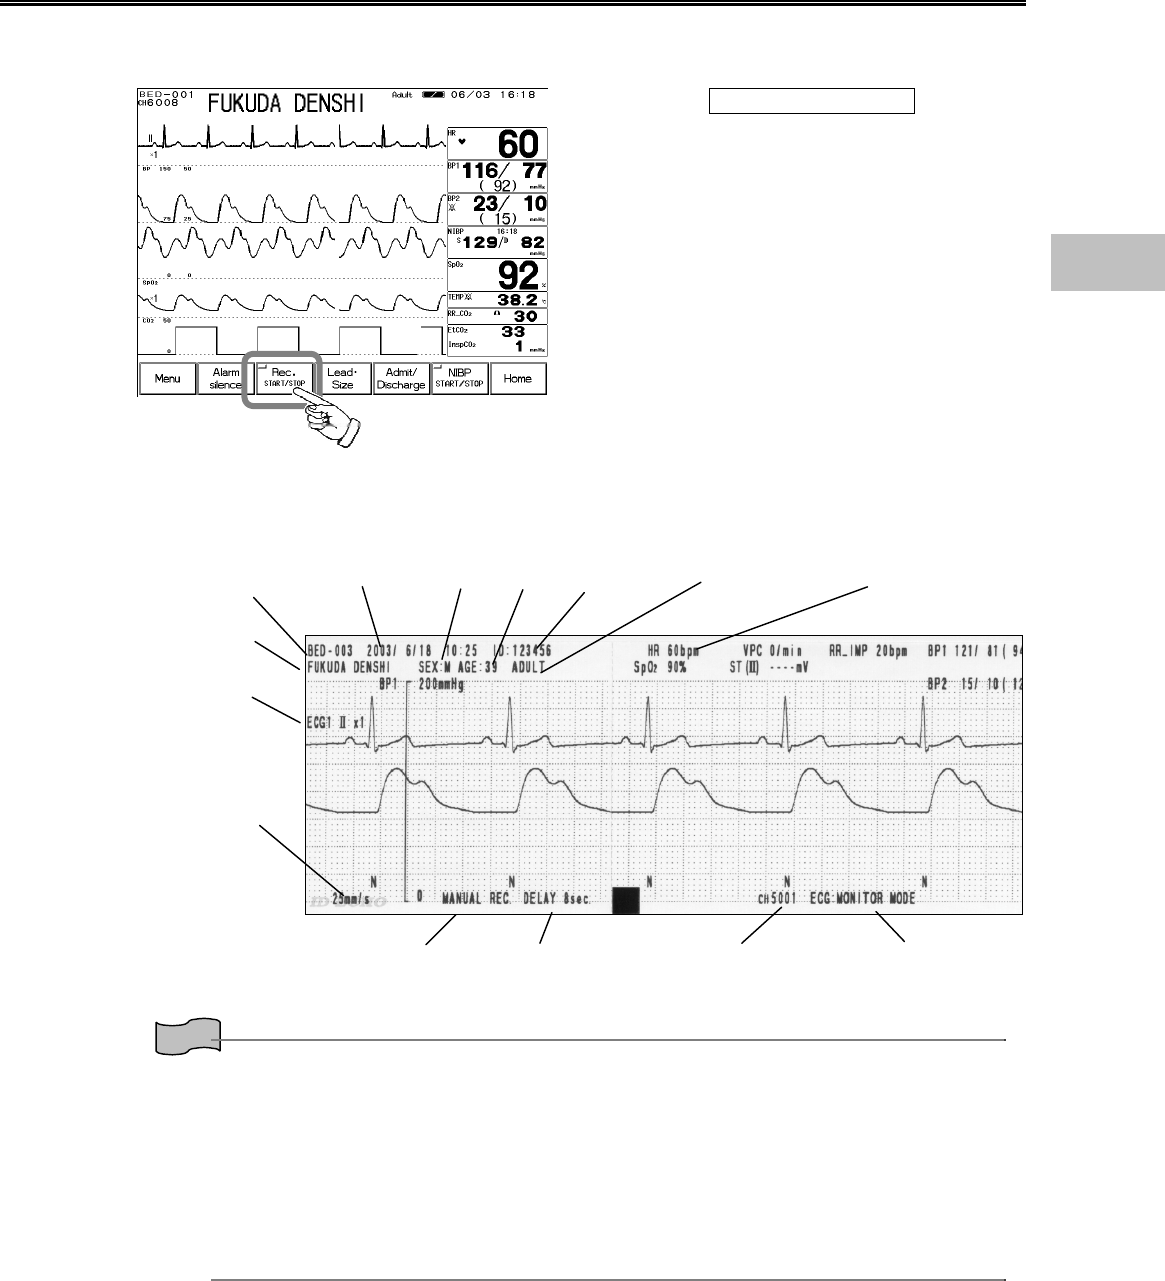
Recording
●Start / Stop of Waveform Recording
Pressing the Rec. START/STOP key on the
home display will start the waveform recording.
Up to 3 waveforms can be recorded.
【Example of Recording】
Reference
For the manual recording, number of recording waveforms and recording duration can be set.
Refer to “4. Monitoring Setup Manual Recording” for details.
For the alarm recording, number of recording waveforms, recording duration, alarm factor can be
set.
Refer to “4. Monitoring Setup Alarm Recording” for details
For the periodic recording, number of recording waveforms, recording duration, recording
intervals can be set.
Refer to “4. Monitoring Setup Periodic Recording” for details.
The monitoring data of the patient such as graphic trend and tabular trend can be recorded.
Refer to sections on graphic trend and tabular trend in “7. Function”.
Bed ID
Patient Name
Waveform Type, Lead, Size
Recording Speed
Rec. Mode Delay Time Telemetry Channel Filter Mode
Recorded Time Sex Age Patient ID Patient Type Measured Data
2
Basic Operation
2−18
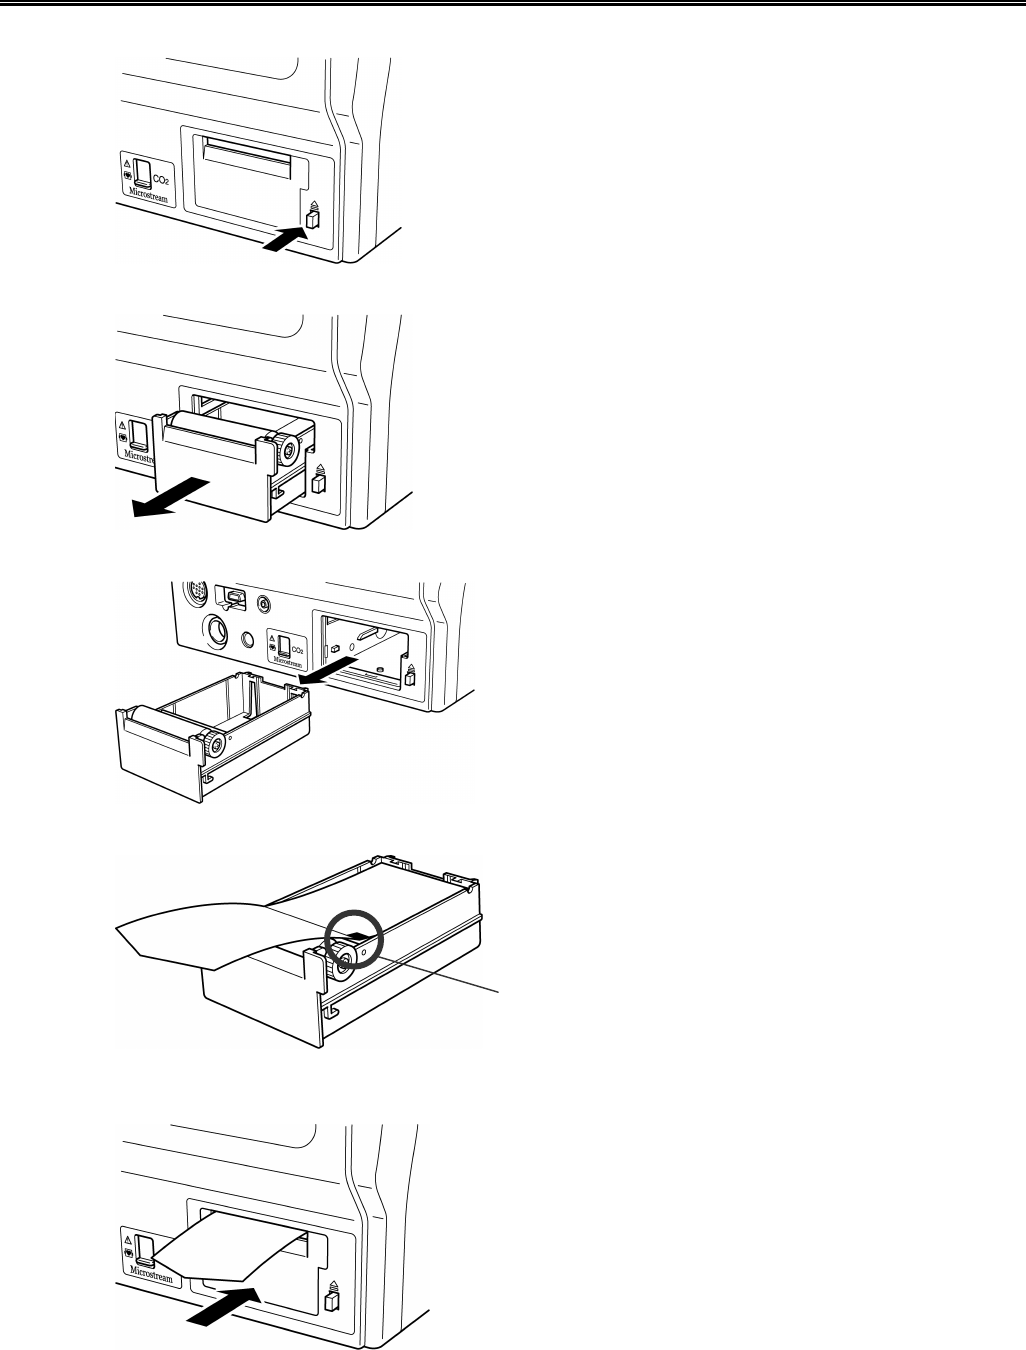
To Install the Paper
1. Press the button located at the right side of the recorder magazine.
2. The magazine will come out.
3. Pull out the magazine from the monitor.
4. Set the recording paper so that the mark printed on each paper comes to the right.
5. Place the magazine back into the monitor. Push in until it locks into place with a click
sound.
Mark
2−19
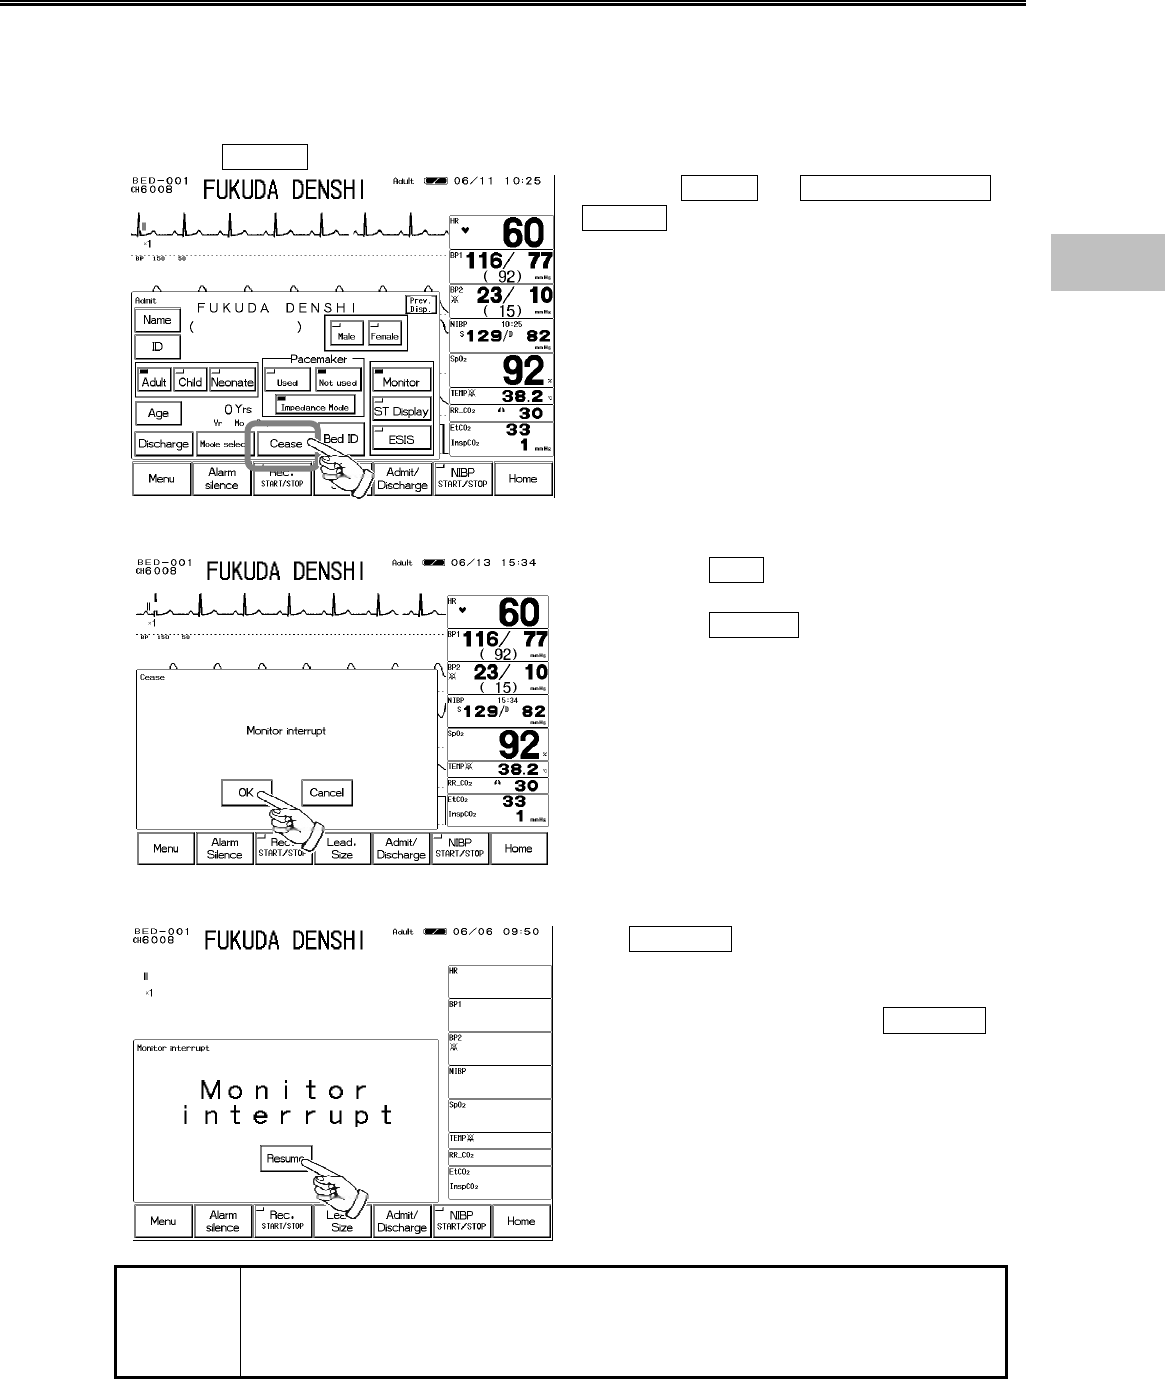
To Suspend Monitoring
When not monitoring for a while, turning OFF the power will erase the recall data, ST
measurement, OCRG data.
However, using the cease monitoring function allows suspension of data measurement, alarm
generation, automatic measurement, automatic recording without erasing the data or setup
details.
1. Press the Cease key on the admit / discharge menu.
Press the Menu → Admit / Discharge →
Cease key.
2. Suspend monitoring.
Pressing the OK key on the confirmation
display will interrupt monitoring.
Pressing the Cancel key will return to the
previous display.
3. Verify that the monitoring is suspended.
The Resume key will be displayed on the
home display. On the home display, numeric
data and waveform display will be ceased, and
all the key operation except the Resume
key will become ineffective.
NOTE
The telemetry transmission will cease when monitoring is suspended.
(for DS-7141, DS-7101LT)
Note that the square wave will be displayed on the central monitor indicating the
too far condition of the telemetry.
2
Basic Operation
2−20
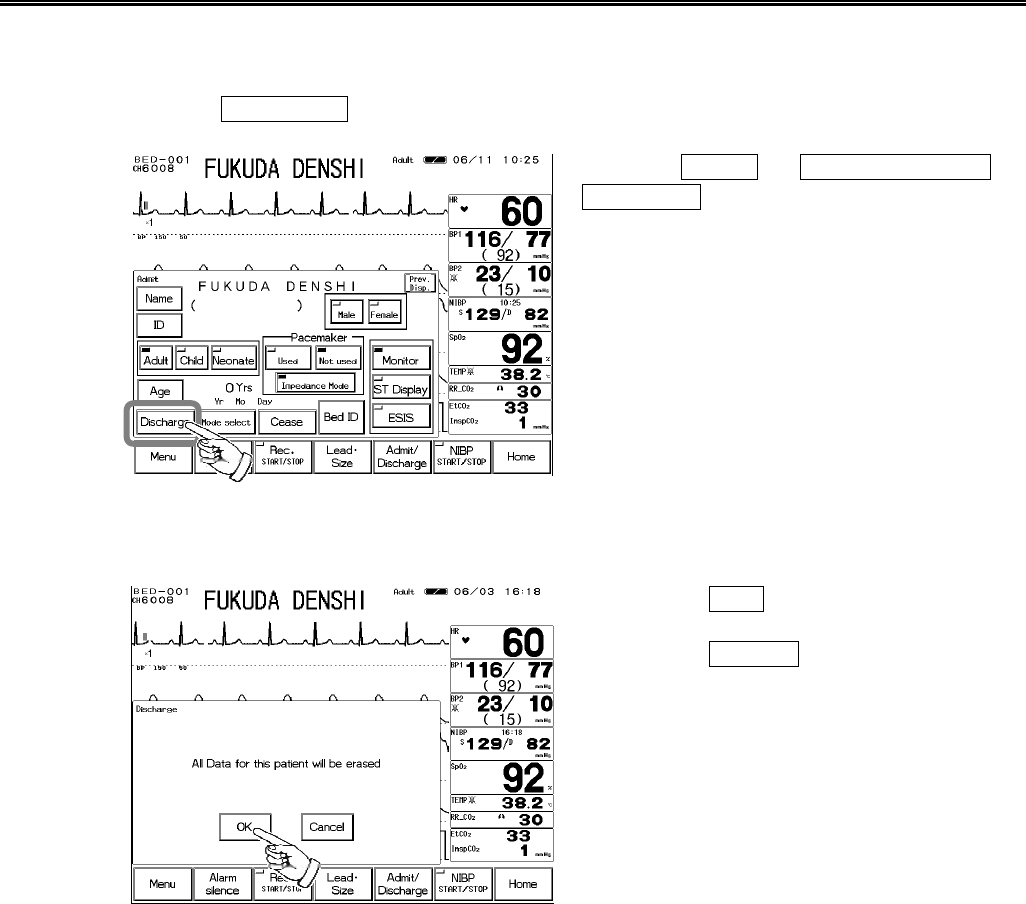
Discharging Procedure
This procedure will erase the past data, such as patient name, ID, age, tabular / graphic trend, and
recall.
1. Press the Discharge key on the admit / discharge menu.
Press the Menu → Admit / Discharge →
Discharge key.
2. Perform discharge procedure.
Pressing the OK key on the confirmation
display will discharge the patient.
Pressing the Cancel key will return to the
previous display.
2−21
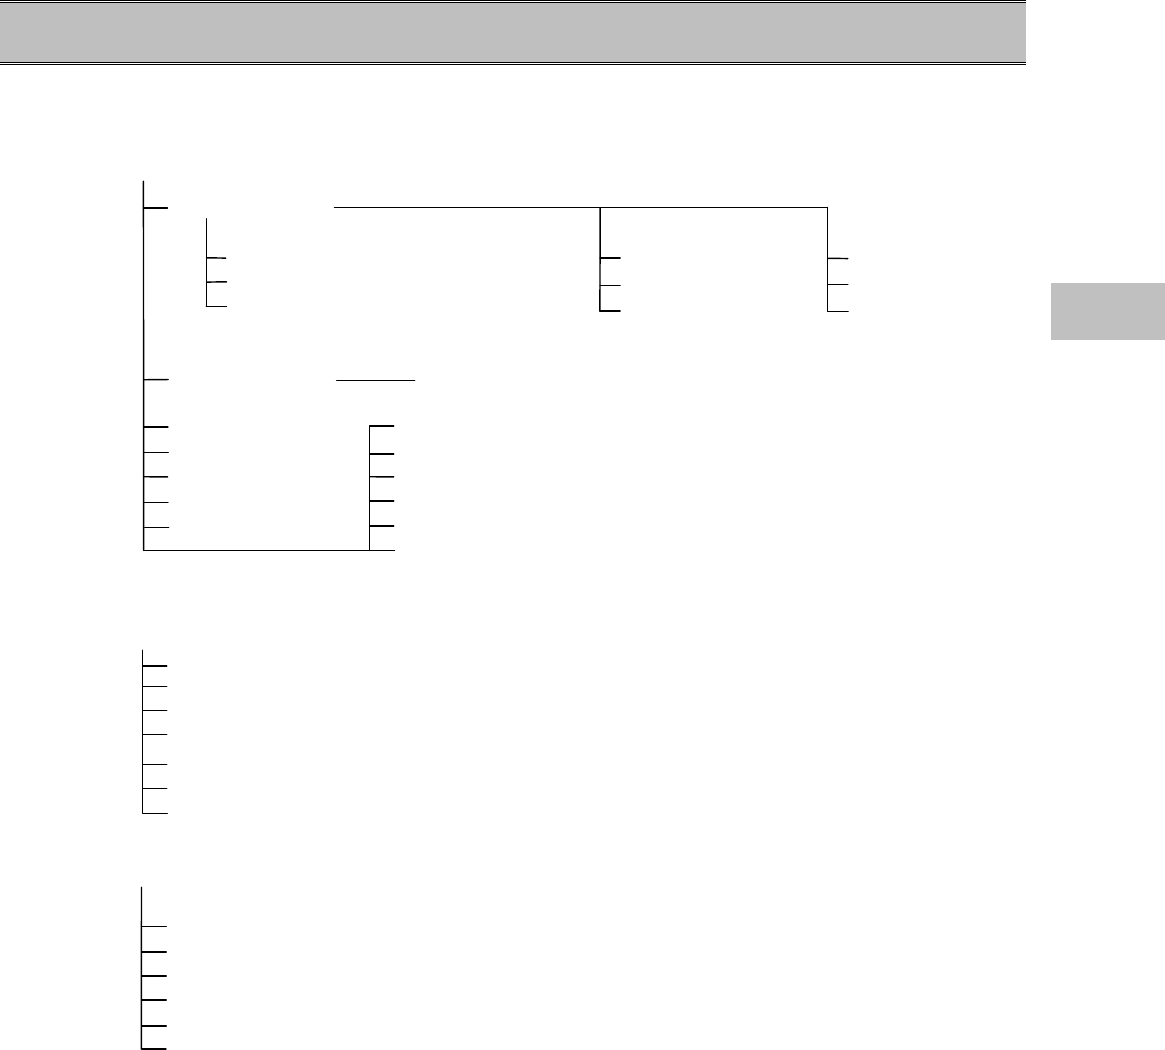
− Operation Flow −
The operation flow of this system is as follows.
【Menu】
Admit /Discharge
Patient Name / ID / Sex Discharge Room / Bed ID
Patient Type (Adult / Child / Neonate) Mode Selection Pacemaker
Age Cease Monitor Filter Mode
Parameter Setup Zero Balance
Graphic Trend OCRG
Tabular Trend Alarm Setup
NIBP List Volume Setup
Recall Display Configuration
ST Display Night Mode
Other Bed
【System Configuration】
Night Mode Setup
Record Setup
Sweep Speed
Brightness Setup
IC Card
Color Setup
Telemetry Waveform Setup
【Preset】
Alarm Mode Setup
Hospital Setup
Ward Setup
Monitor Setup
Display Mode Setup
Test Menu
2
Operation Flow
2−22
Blank Page