Getac Technology 007 Notebook PC User Manual chapter 1
Getac Technology Corp. Notebook PC chapter 1
Contents
chapter 1

A-760 Notebook Operator’s Manual Chapter 1
Rev.00 1-1
Chapter 1
System Overview
1-1 Introduction
A- 760 Series notebook computer is a new generation notebook computer. It is a
high-end rugged notebook computer which is an industrial notebook with some
rugged features such as vibration, shock, drop and drip-proof. It is designed for using
in vehicle or in the harsh environment.
The A-760 Series notebook computer implements the new technologies in the
industrial market. Large display panel, high capacity hard disk drive, PCI bus and
CD-ROM, etc. An Intel Pentium CPU with MMX is the heart of this notebook
computer. This chapter introduces and explains the A-760 Series notebook and its
computer parts.
1-2 System Description
The A-760 Series computer is a compact fully portable notebook computer. It
operates as a stand alone system for most applications.
It offers superior performance under harsh environmental and operating conditions. It
is fully compatible with the IBM PC/AT standard.
1-3 System Configuration
This section presents and explains possible notebook hardware configurations. Refer
to the nameplate on the notebook bottom for that system's configuration.
1-3.1 Standard Configuration
Table 1-1 lists the major common features of the standard A-760 systems.
The specifications in this table may be different from yours due to the optional items.
Please refer to the detailed specifications I ncluding the standard and optional
configuratons on page d.
Table 1-1 Standard A-760 Notebook Computer
Feature Description
CPU Intel Pentium II/III 333, 400 MHz or more
Storage device Removable 2.5-inch 6.4 GB hard disk drive ( or more )
Removable 3.5-inch 1.44 MB Floppy disk drive
Display 1. 12.1-inch color LCD, 64K color TFT, super VGA
2. 13.3-inch color LCD, SVGA TFT/DSTN 800x600
resoulation, integrated power conserve mode
Power source Rechargeable removable Ni-MH battery ( or other type )
Keyboard 87key shower proof rubber keyboard, Embedded two
button track pad
Expansion Two PCMCIA sockets (type II or one type III compatible)
I/O Devices One Parallel port, D-type 25-pin
One VGA External port, D-type 15 pin
Two Serial port , D-type 9 pin (COM1 & COM2)
One PS/2 Keyboard and One PS/2 mouse
One IrDA Port
A-760 Notebook Operator’s Manual Chapter 1
Rev.00 1-2
1-3.2 Options and Accessories
External FDD
EL-Backlight Keyboard
The EL-Backlight keyboard function keys is Fn+F8.
DVD
LS120
1-3.2.1 Carrying Bag
The carrying bag makes carrying the notebook and its peripherals easier. It has
compartments for up to four diskettes, this manual, the power supply, and all
notebook cables.
1-3.3 System Identification
The nameplate listing system information is at the bottom of the notebook. It con-
tains:
•Factory configuration
•Model number
•Serial number
1-4 Unpacking
Use this checklist to make sure all items included with the notebook are present in
good condition.
•Notebook computer
•Rechargeable battery pack
•AC adapter
•Power cord
•Operation Manual
•PCMCIA diskette
•TRACKPAD diskette
•VGA Driver diskette
If any items are missing or damaged, please contact the supplier.
1-5 Notebook Features
Figures from 1-1 through 1-11 identify the major notebook parts, indicators, and
controls.
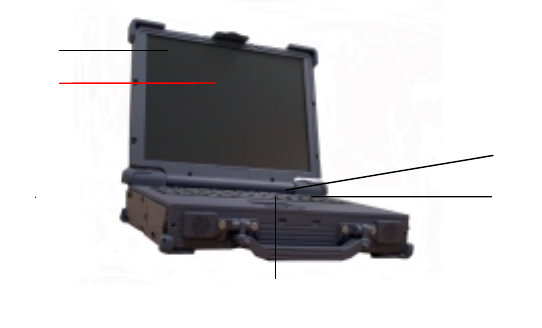
Figure 1-1 A-760 Notebook, Front View
1
2
3
5
4
A-760 Notebook Operator’s Manual Chapter 1
Rev.00 1-3
1-5.1 Cover
The notebook cover (Item 1, Figure 1-1) houses the display unit and its control
devices.
1-5.2 Display
The display have three types, one is 12.1” TFT 16 bit color LCD display (Item 2,
Figure 1-1) is selected in A320-Series notebook computer. The resolution of this
LCD display is 800 X 600 pixels (SVGA standard). But the connection mechanism
from LCD display to motherboard is designed flexibly for different venders of LCD
displays and different types. The other is 13.3” TFT 24 bit color LCD display , the
resolution is 1024 X 768.
1-5.3 Power Switch
The power switch (Item 5, Figure 1-1) turns the notebook power on and off.
1-5.4 Keyboard
The keyboard ( Item 3, Figure 1-1), is the primary tool for typing data and commands
into the notebook.
* About others language keyboard refer to the Appendix A.
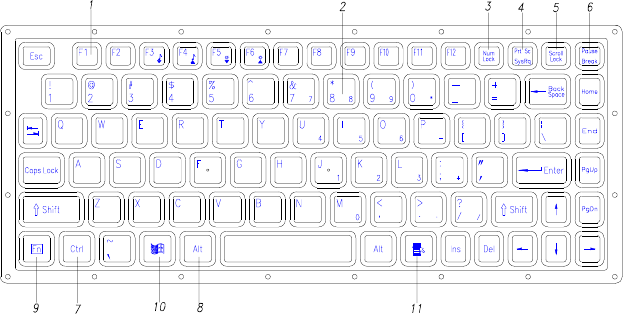
1-5.4.1 Function Keys
The function keys give special commands defined by software. The notebook BIOS
also uses function keys to set some configuration parameters.
The rubber keyboard has twelve function keys numbered from F1 through F12 (Item
1, Figure 1-2) and Fn (Item 9, Figure 1-2).
1-5.4.2 Embedded Numeric Keypad
(Item 2, Figure 1-2) These keys act like calculator keys when the NUM LOCK light
is on. When the numeric keypad is active, the notebook disables the alphabet keys
doubling as numeric keypad keys.
1-5.4.3 Num Lock
The Num Lock key (Item 3, Figure 1-2) activates and deactivates the embedded
numeric keypad. When the numeric keypad is active, the NUM LOCK indicator
Figure 1-2 Rubber Keyboard
A-760 Notebook Operator’s Manual Chapter 1
Rev.00 1-4
comes on and the alphabetic abilities of the embedded numeric keyboard are dis-
abled.
1-5.4.4 Prt Sc/Sys Rq
The Prt Sc/Sys Rq key (Item 4, Figure 1-2) sends a print message to an attached
printer to create a hard copy of data shown on the screen or makes other system
requests depending on the running software.
1-5.4.5 Scroll Lock
The scroll lock key (Item 5, Figure 1-2) works with some software to freeze the
display.
1-5.4.6 Pause/Break
The Pause/Break key (Item 6, Figure 1-2) temporarily or permanently stops a
program .
1-5.4.7 Ctrl and Alt Keys
(Item 7, Item 8, Figure 1-2) Some software programs use these keys in conjunction
with other typewriter keys to perform special functions. See the associated software
manual for details.
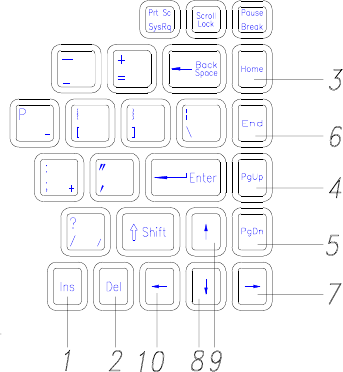
1-5.4.8 Cursor Control Keys
( Figure 1-3) Ten keys around the keyboard right edge work with many programs to
enhance editing and cursor placement. See the software manuals for their proper
operation. The cursor control keys are:
Insert (Item 1, Figure 1-3)
Delete (Item 2, Figure 1-3)
Home (Item 3, Figure 1-3 )
PgUp (Item 4, Figure 1-3 )
PgDn (Item 5, Figure 1-3)
End (Item 6, Figure 1-3 )
→ (Item 7, Figure 1-3 )
↓ (Item 8, Figure 1-3 )
↑ (Item 9, Figure 1-3)
← (Item 10, Figure 1-3)
Figure 1-3 Cursor Control Keys
A-760 Notebook Operator’s Manual Chapter 1
Rev.00 1-5
1-5.4.9 Windows 95 Keys
On the A-760 Series keyboard, you can find one Windows Logo key ( , Item 10,
Figure 1-2) and one Application key (Item 11, Figure 1-2). The two keys are used
with other keys to perform software specific functions.
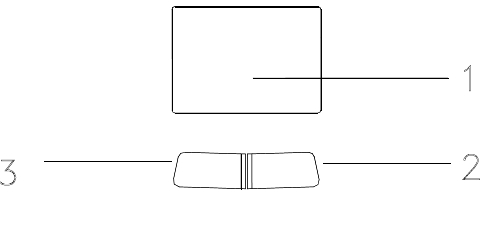
1-5.5 Pointing Device
Track pad is used as the pointing device of the A-760 Series notebook computer.
Using finger to control the movement of cursor. The advantages of track pad are
easily to clean and control the direction. The pointing device (Item 4, Figure 1-1)
moves the cursor about the screen to help work with data.
The track pad consists of three major components:
Track pad ( Item 1, Figure 1-4 )
Right input button ( Item 2, Figure 1-4 )
Left input button ( Item 3, Figure 1-4 )
1-5.6 Volume Control
The volume control is adjusted from the combination of function keys Fn+F3 ( é )
and Fn +F4 ( ê )
1-5.7 Brightness Control
The brightness control is adjusted from the combination of function keys Fn+F5
(Dimmer) and Fn+F6 (Brighter). Please press and hold Fn key, then repeat Fn key or
F6 key to adjust the brightness.
1-5.8 Keyboard Backlight (Option for Sound Card)
The Backlight of the Keyboard is toggle from combination of function keys Fn+F8.
1-5.9 CRT/LCD/Simulscan Toggle
The CRT/LCD/Simulscan toggle is changed from the combination of fucntion keys
Fn+F9.
1-5.10 Panel On/Off
The Panel on/off is toggle from the combination of function keys Fn+F10.
Figure 1-4 Track Pad Pointing Device
A-760 Notebook Operator’s Manual Chapter 1
Rev.00 1-6
1-5.11 Standby Mode
The system enter standby mode press the function keys Fn+F11.
1-5.12 Suspend Mode
The system enter suspend mode press the function keys Fn+F12.
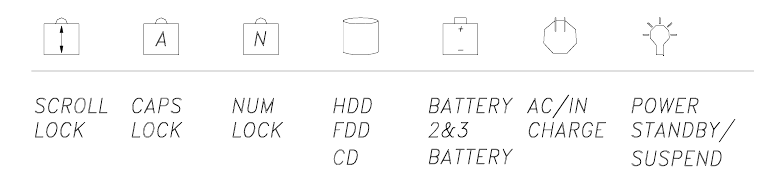
1-5.13 Status Row
The status row (Figure 1-5) shows the current operating condition of several key
notebook components. Figure 1-5 shows a close-up view.
1. Α.When the power is on, then Power LED (Green) is on.
Β. When the system enters Standby or Suspend mode, then the Standby/Suspend
LED (Orange) is on.
2. Α.When the AC power adaptor is connected, then the AC IN LED (Green) is on.
Β.When charging is in progress, then the CHARGE LED (Orange) is on.
3. Α.When any battery pack is present, then the BATTERY LED (Green) is on.
Β.When the optional battery pack ( Bay 1 or Bay 2) enters battery low status,
then the BATTERY LOW LED (Orange) is on. When if only the primary
battery and battery low status then speaker will beep.
4. Α.When the HDD, FDD or CD-ROM drive is active, then the HDD/FDD/CD
LED (Orange) is on.
5. The “Num Lock” key activates and deactivates the embedded numeric keypad.
When the numeric keypad is active, the “Num Lock” indicator come on and the
alphabetic of the embedded numeric keypad are disabled.
6. Press “Caps Lock” key will Charge the state of “Caps Lock” indicator between
on and off, if the Caps Lock indicator goes on, represents the all English
alphabet keys work in Upper Case state, otherwise the keys work in Lower Case
state.
7. The “Scroll Lock” key works with some software to freeze the display. Then
the cursor can move about the screen without the top bottom or any lines in
between moving.
1-5.14 Battery Pack
Battery Pack is an assembly of the batteries, a battery pack connector board in an
enclosed plastic case.
Figure 1-5 A-760 Status Row
A-760 Notebook Operator’s Manual Chapter 1
Rev.00 1-7
The battery is Ni-MH type. The capacity of each is 3800mAH or more. 1.2V, 14 cells
are used in one pack. The output voltage of battery pack is 16.8VDC, so the battery
pack provides 63.16 watts or more to notebook computer.
Battery pack connector board provides interface between battery cells and DC/DC
board. When the inside temperature of battery pack exceeds 55°C, the DC/DC
converter board detects it via thermal sensor and shut down the charging current.
1-5.15 Low Battery Indication
When all the batteries voltages are under the low battery status, the speaker will beep
and the Battery LED is on (Orange).
1-5.16 Battery Charger
The A-760 Series battery can be charged during power on and power off. The A-760
Series has three types of battery packs: the first is primary 14 pcs/pack battery, the
secondary is 9 pcs/pack battery and the third is 9 pcs/pack battery. The battery charge
status is as follows:
1. When the 1st and Bay 1(Bay 2) battery packs are installed simultaneously before
charging, the 1st battery pack has priority over the Bay 1 (Bay 2) one in charging
order.
2. If you turn off the computer while charging, the charger timer will be reset, so
that the CHARGE LED will flash 3 seconds then light statically.
3. The charge time is set to six hours for power on and power off charge.
4. Battery charge time period is as follow:
4.1 Primary batteries in power on, 30W consumption full charge time are about
4.5 hours. The primary batteries full charge voltages are about 21V (MIN).
4.2 The primary batteries in D/D power off, the charge time period are about 2
hours.
4.3 The Bay 1 batteries full charge time period in power on, 30W consumption
are about 3 hours. The Bay 1 batteries full charge voltage is about 13.4V
(min).
4.4 The primary, Bay 1 and Bay 2 batteries charge time period are about 3
hours in power off.
4.5 The primary battery discharge time period is 1 hour and 36 minutes in
power on 30W, but the Bay 1 discharge time period is 1 hour in power on
30W consumption.
1-5.17 CHARGE LED Indicator Status
1. When you insert the battery pack into the system and the AC power adapter is
already connected, the CHARGE LED (Orange) flashes three seconds or more
and then stays on all the time.
A-760 Notebook Operator’s Manual Chapter 1
Rev.00 1-8
2. When you connect the AC power adapter to the system, and the battery pack is
already inserted, the CHARGE LED (Orange) flashes three seconds or more and
then stays on all the time.
3. When you turn off the system during charging, the charge timer is reset, and the
CHARGE LED (Orange) flashes three seconds or more and then stays on all the
time.
4. When the battery is fully charged, the CHARGED LED (Orange) goes out.
5. When no battery pack is installed or the AC power adapter is not connected, the
CHARGE LED (Orange) is off.
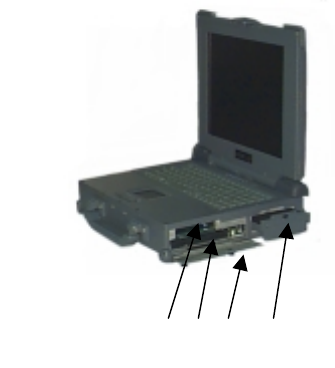
1-5.18 Diskette Drive and CD-ROM
(Item 2, Figure 1-6) The notebook has space for a 1.44 MB, 3.5-inch diskette drive
and CD-ROM drive. The space can put removable FDD drive or CD-ROM drives.
The diskette drive allows permanent data storage in a compact, transferable media.
Data stored on diskettes can be easily passed from one machine to another.
The A-760 Series diskette drive accepts 3.5-inch double-density (720 KB) and high
density (1.44 MB) diskettes.
1-5.19 PCMCIA Slot and Diskette Drive and CD-ROM Door
The PCMCIA slot and diskette drive and CD-ROM door (Item 3, Figure 1-6) protects
the PCMCIA interfaces and diskette drive from damage in harsh environments.
1-5.20 PCMCIA Slots
The notebook has two PCMCIA slots, (Item 1, Figure 1-6). Each supports a Type-II
PCMCIA card. Together, they support one Type-III PCMCIA card.
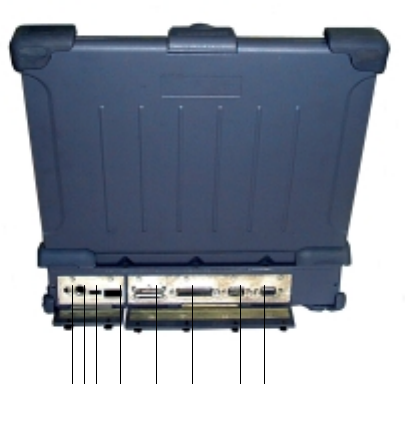
1-5.21 External Power Source Port
If the notebook will be in use for a long continuous period, connect an external power
source to the notebook here ( Item 8, Figure 1-7).
Figure 1-6 Diskette Drive and CD-ROM
1 2 3 4
A-760 Notebook Operator’s Manual Chapter 1
Rev.00 1-9
1-5.22 Serial Port
Two serial ports (Item 2, Figure 1-7) are 9-pin D-type connectors for the A-760
Series notebook. They are RS-232C interface set to the COM1 and COM2 addresses.
1-5.23 Printer Port
The printer port (Item 3, Figure 1-7) is a 25-pin D-type interface. Usually this
interface supports a parallel printing device.
1-5.24 VGA Port
This 15-pin (Item 1, Figure 1-7) analog port is for connecting in external monitor.
1-5.25 IrDA Port
This infrared port (Item 5, Figure 1-7) complies IrDA, and ASK Standards, which
allow you to connect your notebook to an IR device wirelessly.
1-5.26 USB Port
The USB port (Item 6, Figure 1-7) transfers at 1.2 or 1.5 Mbit/sec.
1-5.27 Keyboard/Mouse Port
The Keyboard/Mouse port (Item 7, Figure 1-7) for IBM PS/2 keyboard/Mouse.
1-5.28 External Power Adaptert
The A-760 external power adapter converts 100-240V, 50-60 Hz to 22.5VDC, 2.4A,
54 watts for the notebook & expansion unit.
Figure 1-7 Rear Side View
87 6 5 4 3 2 1
A-760 Notebook Operator’s Manual Chapter 1
Rev.00 1-10