Getac Technology 007 Notebook PC User Manual Chapter 3
Getac Technology Corp. Notebook PC Chapter 3
Contents
users manual 4 of 6

Rev. 00 3-1
Configuration Utility).
The SCU allows you to enter the system configuration information. This
information is needed by the system to identify the type of devices installed
and to set up special features. Typical configuration information includes
the date and time, the type of disk drives, and the amount of memory;
special features include Power Saving and Security.
The configuration information is stored in a special kind of memory called
CMOS (Complementary Metal Oxide Semiconductor) RAM. A RTC
backup battery backs up CMOS RAM data.
You may need to run SCU when:
! You see an error message on the screen requesting you to run
SETUP.
! You change factory default settings for some special features.
! You want to modify the configuration information.
3-2 Running SETUP and Moving Around
NOTE
1. All the SCU screens shown in this chapter are examples.
Your actual settings may vary from those shown here.
2. The SCU program may have been updated after this manual
was published.
Rev. 00 3-2
! Security — Contains the system security functions setup parameter.
! Power — Contains the system power management setup parameter.
! Exit — Contains various ways to exit the SETUP program.
Use the right & left Arrow keys & mouse to change display for each group.
3-2.1 Main
This section describes the main items of the SETUP program.
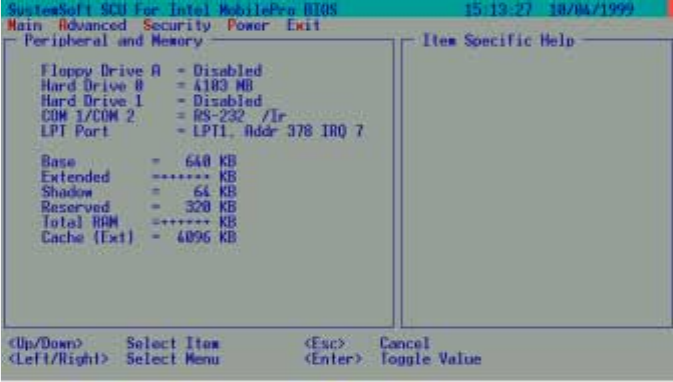
The SCU screen can be divided into four areas:
Setup Menu
Rev. 00 3-3
! The right column of the screen gives help information of the selected
item.
! The bottom lines of the screen give keyboard instructions for moving
around and making selections.
3-2.2 Moving Around and Making Selections
You must go through two or three levels to complete the setting for an
item. In most cases, there are three levels: menu title, pull-down menu, and
submenu.
To move around and make selections, you can use both the
touchpad/mouse and keyboard.
You’re advised to use the touchpad or mouse. It is more straightforward
than using the keyboard.
For most items, simply move the pointer with the touchpad/mouse and
click on your selection with the left button. To cancel your selection, click
the right button. For a few items, you will need to use the keyboard for
making selections.
Using the Keyboard
Keyboard information can be found at the bottom of the screen. You can
also use shortcut key, which is highlighted by a different color on the
screen.
Described below is the general procedure for using the keyboard to
complete setting of an item:
Rev. 00 3-4
3. Inside most submenus, press the [Tab] key to go to the entry field. Select
your desired option with the up/down arrow key or the shortcut key. To
complete the setting and leave the submenu, press [Enter] and select the
“OK” button. To cancel your selection, press [Esc] or select the
“Cancel” button.
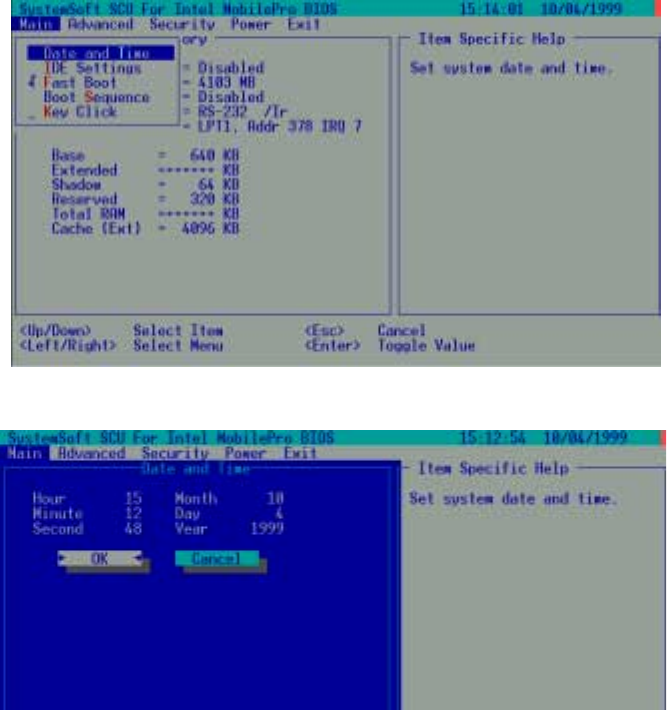
3.2.2.1 Main Menu
The Main pull-down menu, as shown below, contains the basic
configuration settings of the system.
Date and Time
The “Date and Time” item sets the system date and time.
When this item is selected, the submenu will display as shown below.
Rev. 00 3-5
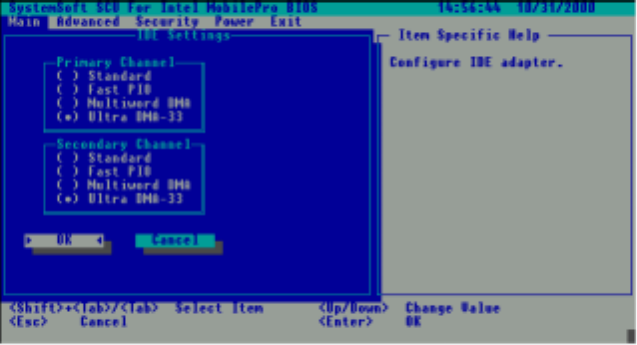
IDE Settings
The “IDE Settings” item sets the type of the hard disk drive in your system.
When this item is selected, the submenu will display as shown below.
Select the highest timing which system will set for the IDE drive or select
Standard to disable it.
If the drive cannot support this timing, system will choose available one.
Drive 0 is your primary and Drive 1 your secondary.
Rev. 00 3-6
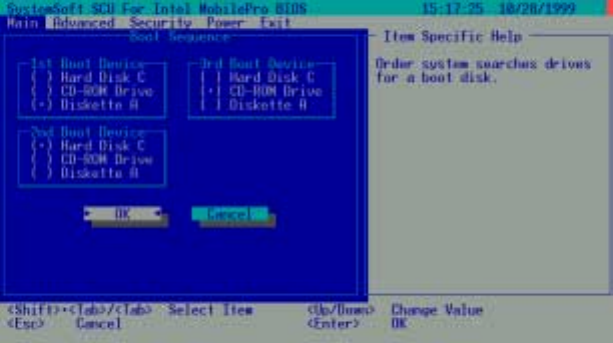
The “Boot Sequence” have three device item sets the sequence of booting.
When this item is selected, the submenu will display as shown below.
For
Exa
mple:
1st
Boot Device: Disk A
2nd Boot Device: Hard Disk C
3rd Boot Device: CD-ROM Drive
Descriptions of the available options are:
The system will try to boot from drive A then Hard Disk C then CD-ROM
Drive.
Key Click
The “Key Click” items sets if there will be a click sound whenever a key is
pressed.
Rev. 00 3-7
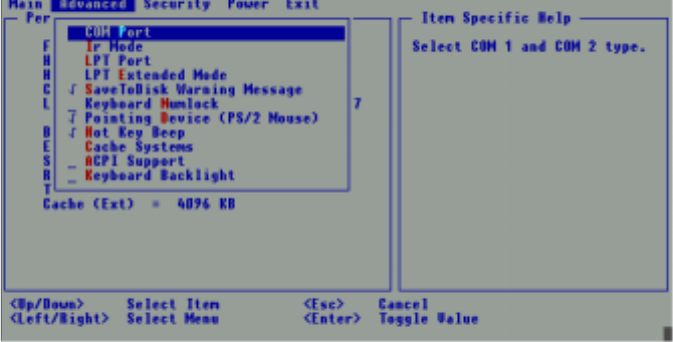
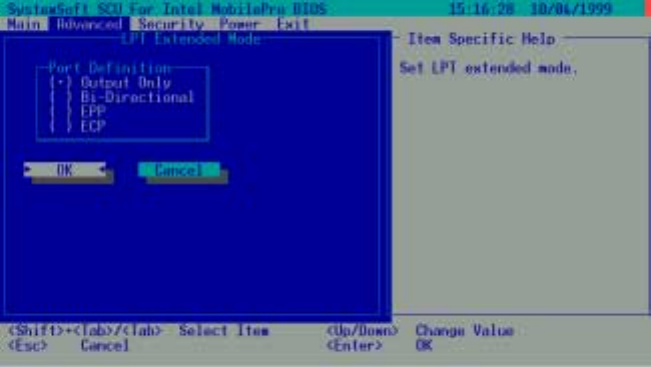
The followings describe in sequence all the items of the Advanced menu.
COM Port
The “COM Port” item allows you to assign COM1 and COM2 to specific
functions that you wish to use. In general, COM1 can be assigned to
RS-232 (the serial port) or touch screen ; COM2 can be assigned to IR.
When this item is selected, the submenu will display as shown below.
Select Disabled if you need the resources (3F8/IRQ4 of COM1 and
2F8/IRQ3 of COM2) for other devices.
User select the “TouchScn/Disabled” was assigned COM 1 to Touch
Screen.
User select the “TouchScn/Ir” was assigned COM 1 to TouchScn; Ir is
Enabled.

Rev. 00 3-8
IR Mode
The “IR Mode” item sets the communications compatibility mode for the
IR port.
When this item is selected, the submenu will display as shown below.
Select according to the type of device with which the notebook is to
communicate.
Rev. 00 3-9
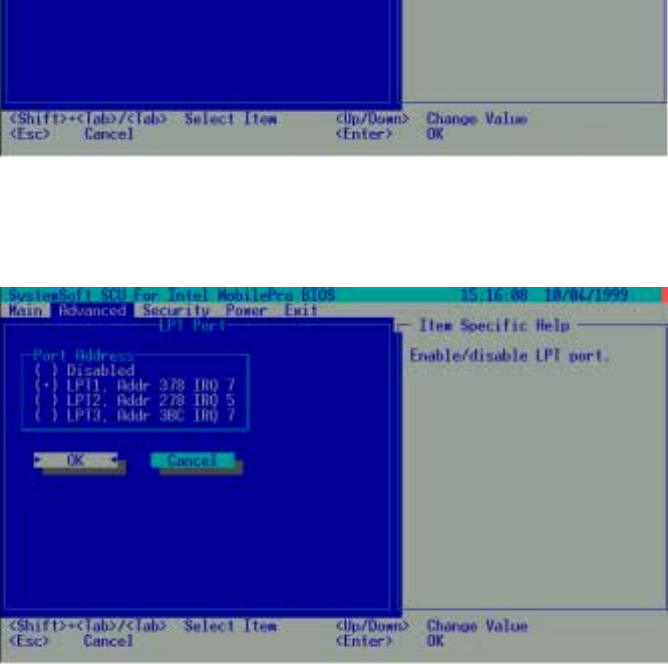
LPT Port
The “LPT Port” item sets the address for the LPT port (parallel port).
When this item is selected, the submenu displays as shown below.
Rev. 00 3-10
Save To Disk Warning Message
The “Save To Disk Warning Message”item sets if the warning message
will appear after system power on when there is no Suspend-to-Disk
partition on the hard disk.
When this item is selected, no submenu will display. A check mark (√)
indicates Enabled, an underline (_) indicates Disabled.
Keyboard Numlock
The “Keyboard Numlock” item sets if the Num Lock key will be
automatically activated after system startup.
When this item is selected, no submenu will display. A check mark (√)
indicates Enabled, an underline (_) indicates Disabled.
Rev. 00 3-11
Hot Key Beep
The “Hot Key Beep”item enables or disables the beep sound when hot keys
are pressed.
When this item is selected, no submenu will display. A check mark (√)
indicates Enabled; an underline (_) indicates Disabled.
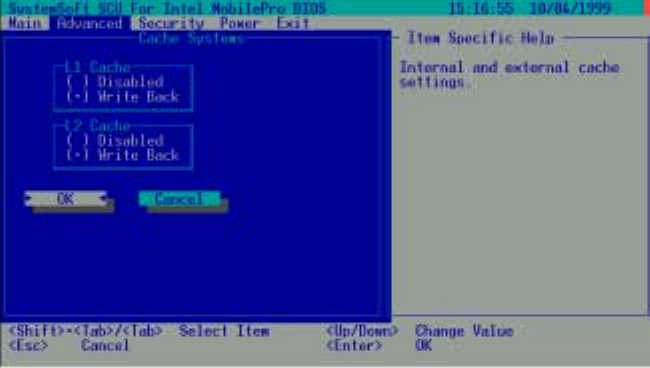
Cache Systems
When this item is selected, the submenu will display as shown below.
The “Cache Systems” item Write Back (enables) the cache of your system:
L1 cache (internal cache of CPU) and L2 cache (external 256KB or 512KB
cache). The cache feature enhances system performance because the most
Rev. 00 3-12
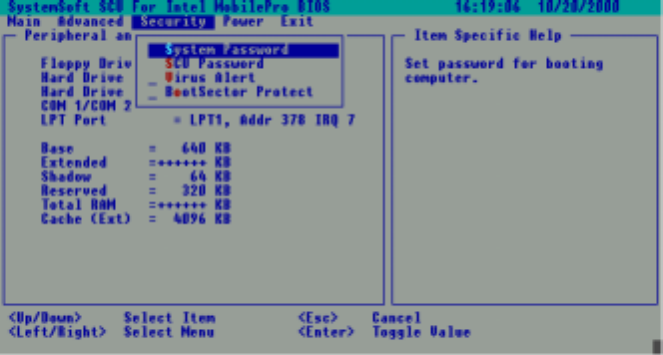
3-2.3 Security Menu
The Security pull-down menu, as shown below, contains the Security
settings that safeguard your system against unauthorized use.
The followings describe in sequence all the items of the Security menu.
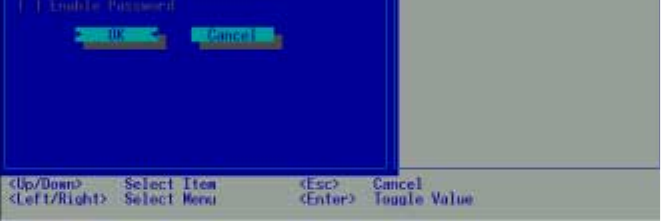
System Password
The “System Password”item allows you to set the password for your
system. The password is required for starting up the system and running
the SCU program.
When the item is selected, the submenu will display as shown below.
When setting a password, first make sure that Num Lock is off, then type
your password in the entry field and press [Enter]. Confirm your password
by typing it again and pressing [Enter].
Rev. 00 3-13
SCU Password
The “SCU Password”item allows you to set the password for your setting
SCU program security.
When the item is selected, the submenu will display as shown below.
When setting a password, first make sure that Num Lock is off, then type
your password in the entry field and press [Enter]. Confirm your password
by typing it again and pressing [Enter].
Rev. 00 3-14
Virus Alert
The “Virus Alert”item, when enabled, gives warning messages if the hard
disk boot sector (partition table) has been changed.
When this item is selected, no submenu will display. A check mark (√)
indicates Enabled; an underline (_) indicates Disabled.
BootSector Protect
The “BootSector Protect” item helps prevent computer viruses by
protecting the hard disk boots sectors (partition table) from any change.
When this item is selected, no submenu will display. A check mark (√)
indicates Enabled; an underline (_) indicates Disabled.
CAUTION
Disable this item before you install an operating
system,otherwise, the installation will fail.
Rev. 00 3-15
The followings describe in sequence all the items of the Power menu.
Enable Power Management
The “Enable Power Management” item is the master control for the Power
Management features.
When this item is selected, no submenu will display. A check mark (√)
indicates Enabled; an underline (_) indicates Disabled.
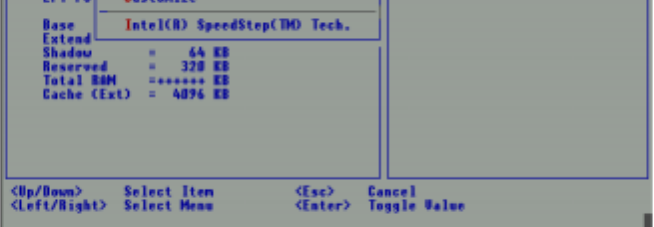
Max Performance/Balanced Power Saving/Max Power
Saving/Customize
These four item are mutually exclusive options. You can select one of
them. A check mark (√) indicates Enabled; an underline (_) indicates
Disabled.
Descriptions of the four options are:
1. Max Performance: Select this option for the pre-defined settings that
allow maximum performance but shortest battery life.
Rev. 00 3-16
NOTE
To know the pre-defined settings for the above three
options, you can select the next option to view the settings
in the submenu.
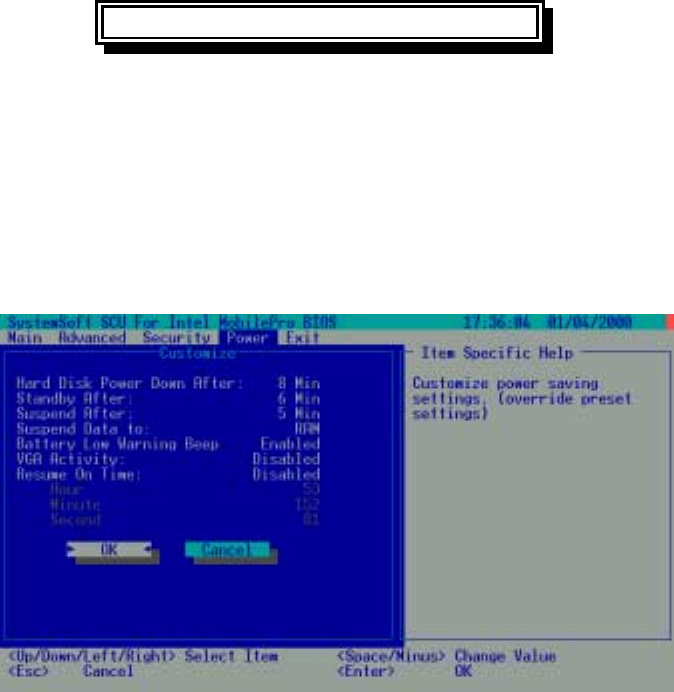
Customizing Power Management Features
To customize Power Management features, select “ Customize” from the
Power pull-down menu. The submenu will display as shown below.
Rev. 00 3-17
power up again when next accessed.
The available options are Disabled, 1 Min, 2 Min, 4 Min, 8 Min, 10 Min,
15 Min and 20 Min.
Standby After
The “Standby After” item sets the time-out period for initiating Standby
mode. If the notebook remains idle until the time-out period for Standby
mode has been reached, the notebook enters Standby mode.
In Standby mode, several system components go into standby or off mode
so that system power will be reduced. The system will wake up from
Standby mode when a key is pressed on the internal or external keyboard or
a button is pressed on internal or external PS/2 mouse.
The available options are Disabled, 1 Min, 2 Min, 4 Min, 6 Min, 8 Min, 12
Min and 16 Min.
Suspend After
The “Suspend After”item sets the time-out period for initiating Suspend
mode. It works in conjunction with the previous item “Standby After”.
After the notebook enters Standby mode, the Power Saving starts the
time-out for the Suspend mode. If the notebook remains in Standby mode
until the time-out period for Suspend mode has been reached, the notebook
enters Suspend mode.
The Suspend mode is determined by the next item, “Suspend Data to.” It
can be either Suspend-to-RAM or Suspend-to-Disk.
Rev. 00 3-18
When Suspend-to-Disk mode is initiated, the system preserves all the
running application programs as a file in a “Suspend-to-disk partition”on
the hard disk and then turns off automatically.
The available options are Disables, 1 Min, 2 Min, 5 Min, 10 Min and 15
Min.
Suspend Data to
The “Suspend Data to”item defines the Suspend mode of your system. The
available options are RAM and Disk.
Battery Low Warning Beep
The “Battery Low Warning Beep”items enables or disables the low battery
warning beep.
The available options are Enabled and Disabled.
VGA Activity
The “VGA Activity” items sets if obvious video activities (such as screen
savers) will prevent Power Management modes.
Descriptions of the available options are:
1. Enabled: Power Management will not take effect if there are VGA
activities.
2. Disabled: Power Management will ignore VGA activities.
Rev. 00 3-19
The “Hour”, “Minute”and “Second” items work in conjunction with the
previous item “Resume on Time”. It sets the alarm time for waking up the
system from Suspend-to-RAM mode.
Enter the value in each field by typing the number.
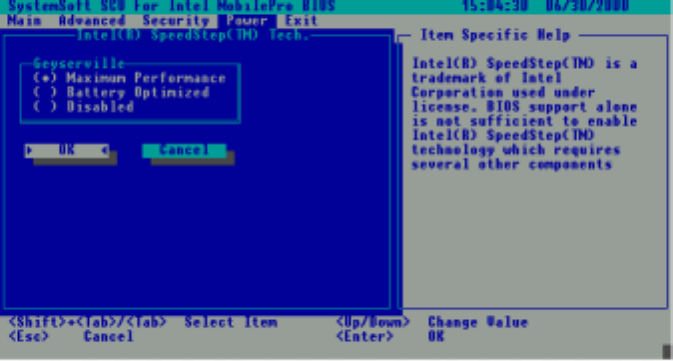
Intel® SpeedStep
Maximum Performance:
The select “Maximum Performance”field then CPU setup high-speed
mode.
Battery Optimized:
The select “Battery Optimized”field then CPU setup low-speed mode.
Rev. 00 3-20
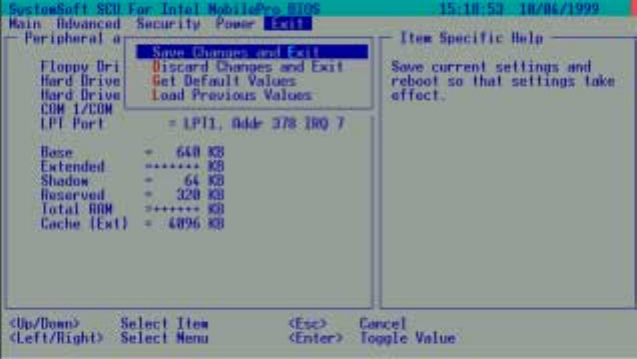
Descriptions of the Exit choices are:
1. Save Change and Exit: Save changes you have made and exit.
2. Discard Changes and Exit: Exit without saving the changes you has
made.
3. Get Default Values: Load factory default values for all the items.
4. Load Previous Values: Restore previous values for all the items.