NIKON TRIMBLE NT0001 Bluetooth module User Manual Spectra Precision Focus 4 Total Station User Guide
NIKON-TRIMBLE CO., LTD. Bluetooth module Spectra Precision Focus 4 Total Station User Guide
Contents
Host 1 user manual 3 of 4
Spectra Precision Focus 4 Total Station User Guide 73
Applications 4
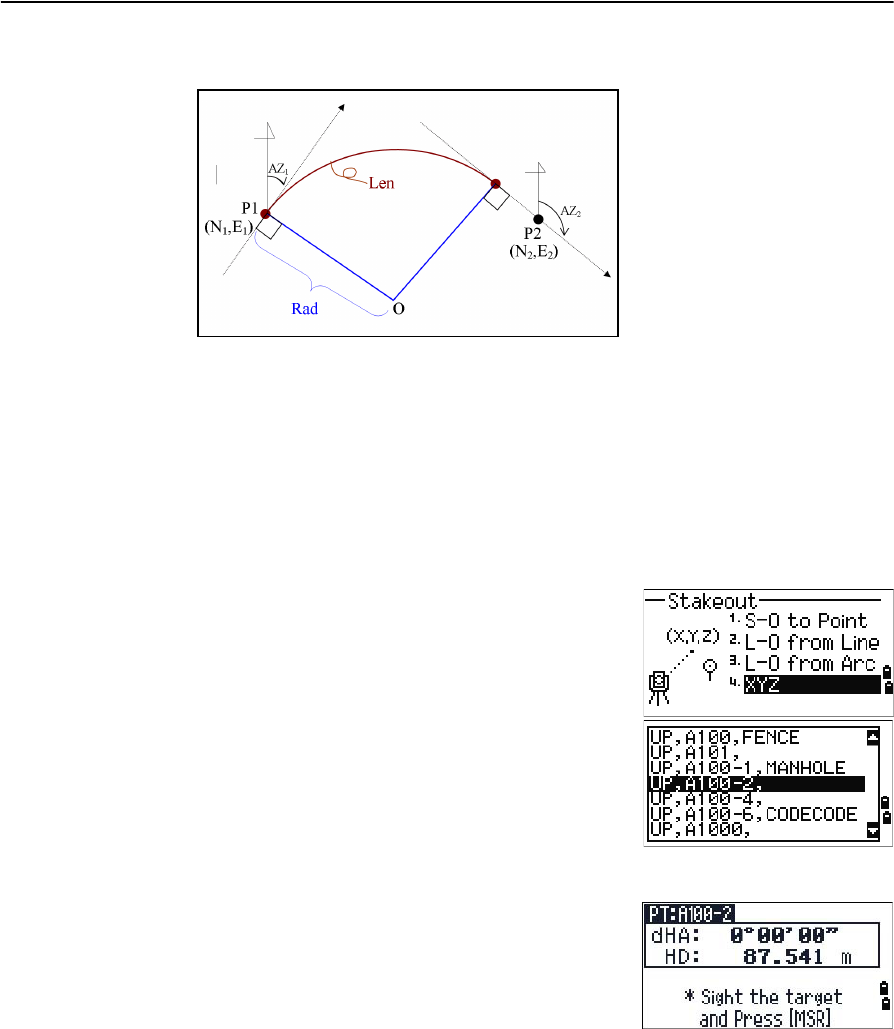
Once you entered all factors, the Focus 4W calculates the curve. If the curve
length (Len) is too large for a circle of the given radius, the curve is shortened.
Note – Press [DSP] to switch between display screens. See also page 90.
XYZ
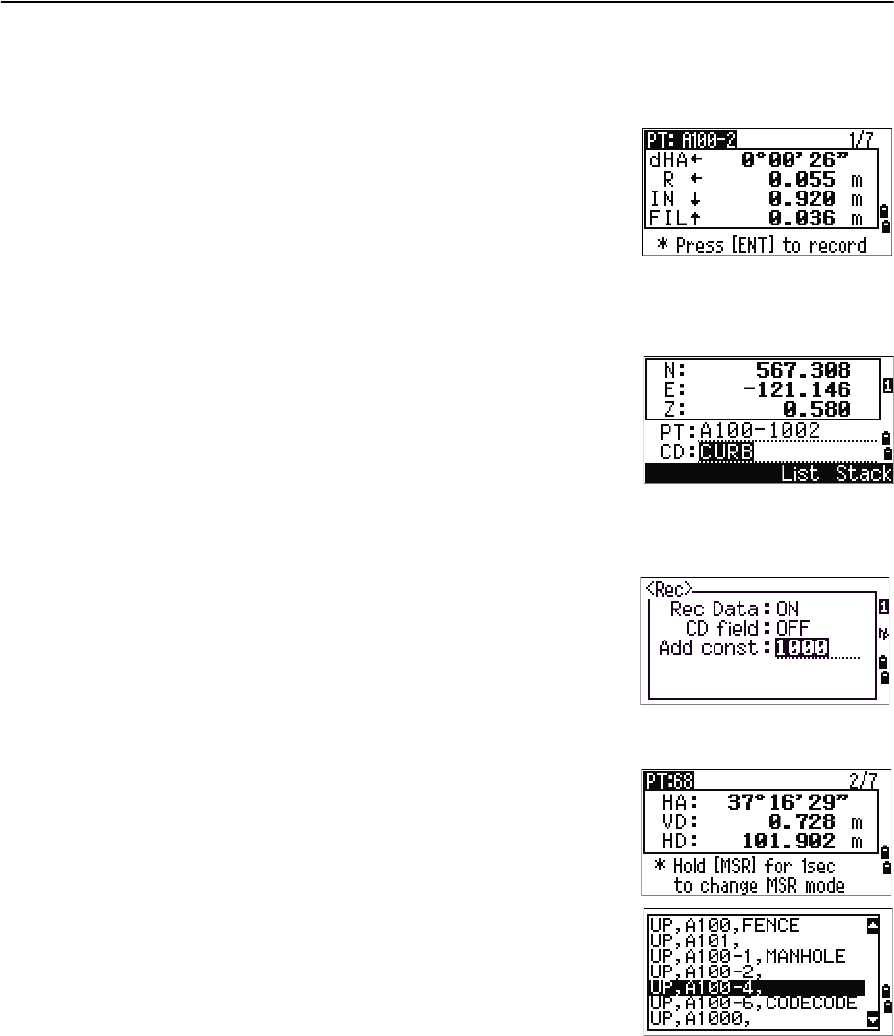
Select this option to specify the stakeout point by coordinates.
1. Press [4] or select XYZ in the Layout menu.
2. Do one of the following:
–Enter the point name that you want to
establish and then press [ENT].
–Specify the point by code or radius from the
Focus 4W. If several points are found, they
are displayed in a list. Press [^] or [v] to move
up and down the list. Use [<] to move up one
page, or [>] to move down one page.
3. Highlight a point in the list and then press [ENT].
The delta angle and the distance to the target are
shown.
4. Rotate the instrument until the dHA is close to
0°00'00". Press [MSR1] or [MSR2].
dHA Difference in horizontal angle to
the target point
HD Distance to the target point
4 Applications
74 Spectra Precision Focus 4 Total Station User Guide
5. Ask the rod person to adjust the target position. When the target is on the
intended position, the displayed errors become 0.000 m (0.000 ft).
Once a measurement is taken, the Cut/Fill value and Z coordinate are updated
as the VA is changed.
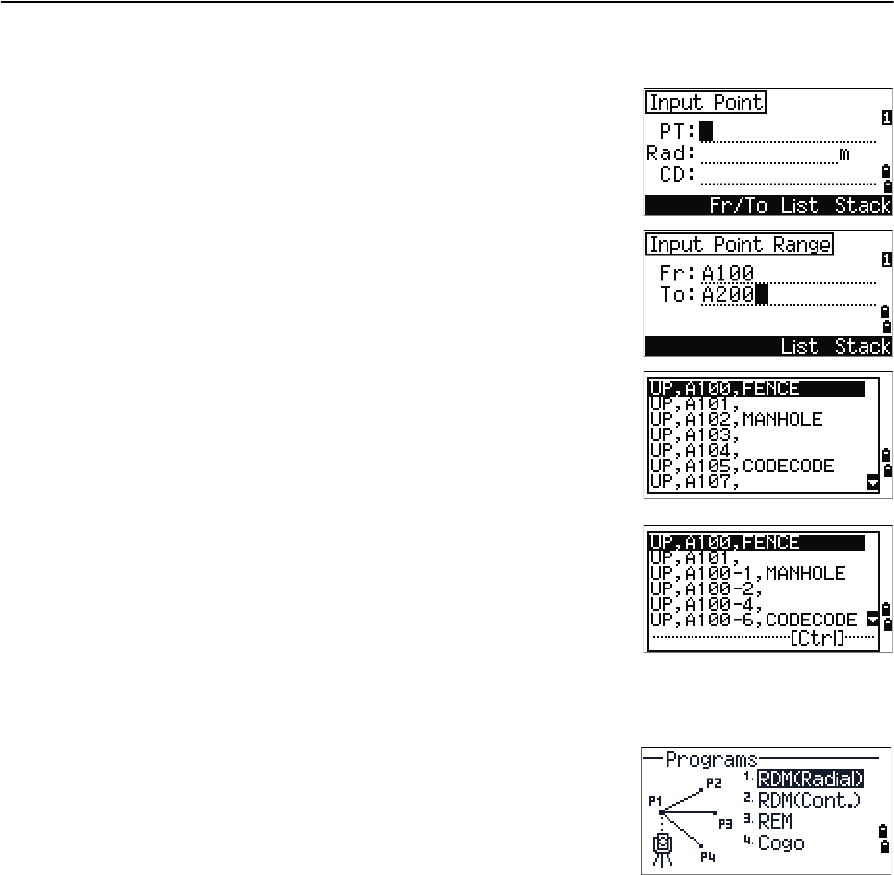
6. To record the point, press [ENT]. The PT field
defaults to the specified PT + 1000.
Press [MENU] and then select Settings / Rec.
Use the Add Constant field to specify an integer.
The integer is added to the point number that is
being laid out to generate a new number for
recording the layout point. The default value is
1000. For example, when you stake out PT3 with
an Add Constant of 1000, the default value in the
SO field (layout record) is 1003.
The display then returns to the observation
screen. Press [ESC]. The display returns to the
PT/CD/R input screen. If you entered the
stakeout point using a single point name, the PT
defaults to the last PT + 1.
7. If you selected a point from the list, the display
returns to the list, unless all points have been
selected. Press [ESC] to return to the point input
screen.
dHA Difference in horizontal angle to
the target point
R/L Right/Left (Lateral error)
IN/OUT In/Out (Longitudinal error)
CUT/FIL Cut/Fill
Spectra Precision Focus 4 Total Station User Guide 75
Applications 4
Advanced feature: Specifying a layout list by inputting points by range
1. Select the Fr/To softkey when the PT field is
selected.
2. Enter the start point (Fr) and the end point (To).
The range between Fr and To must be less than
1001 points.
–If existing points are found between Fr and
To, a point list appears.
To highlight a point in the list, press [^] or [v].
To go to the layout observation screen, press
[ENT].
–If you have assigned a control job, and
additional points are found in the control
job, the Ctrl softkey appears under the list.
Programs menu
To access the Programs menu , press [PRG] in the BMS.
To select a command from the Programs menu, press
the corresponding number key. Alternatively, press [^] or
[v] to highlight the command and then press [ENT].
The last function used is highlighted.
The Programs menu has the following options:
•RDM (Radial), page 77
•RDM (Cont), page 77
•REM, page 78
•Cogo, page 78
4 Applications
76 Spectra Precision Focus 4 Total Station User Guide
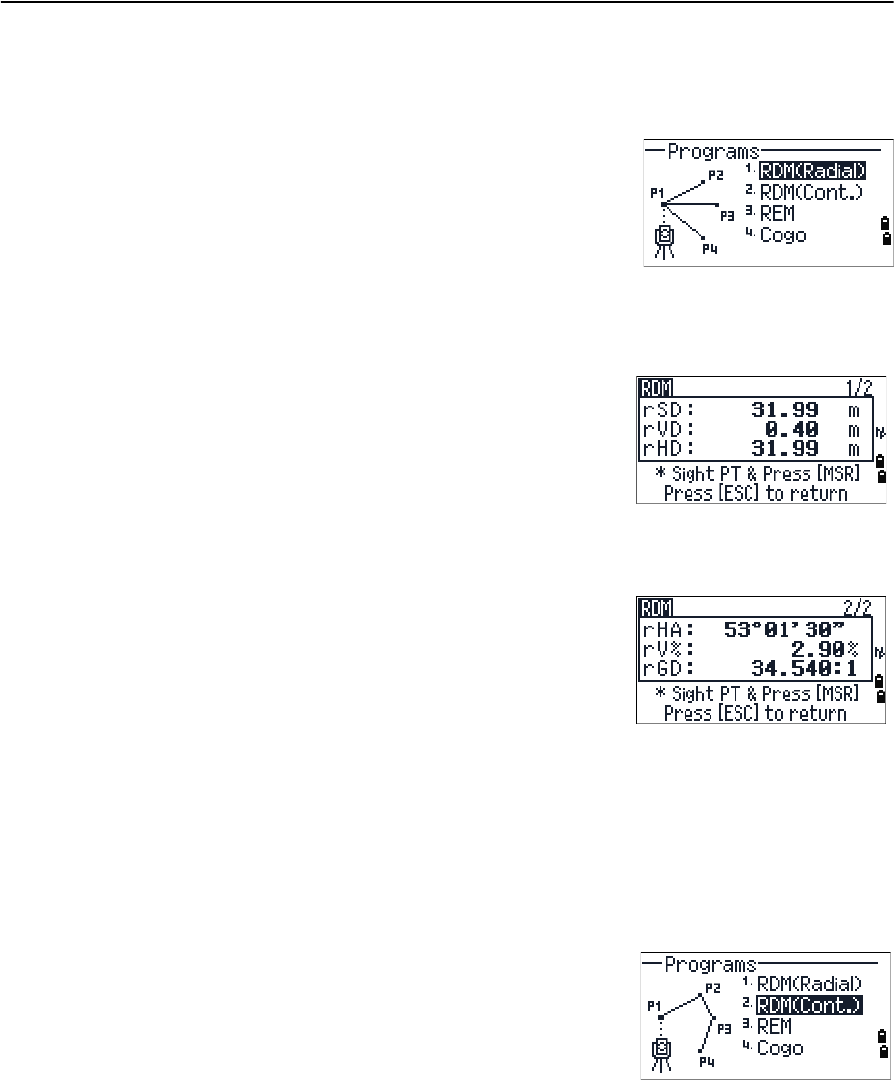
Remote distance measurement (RDM) - overview
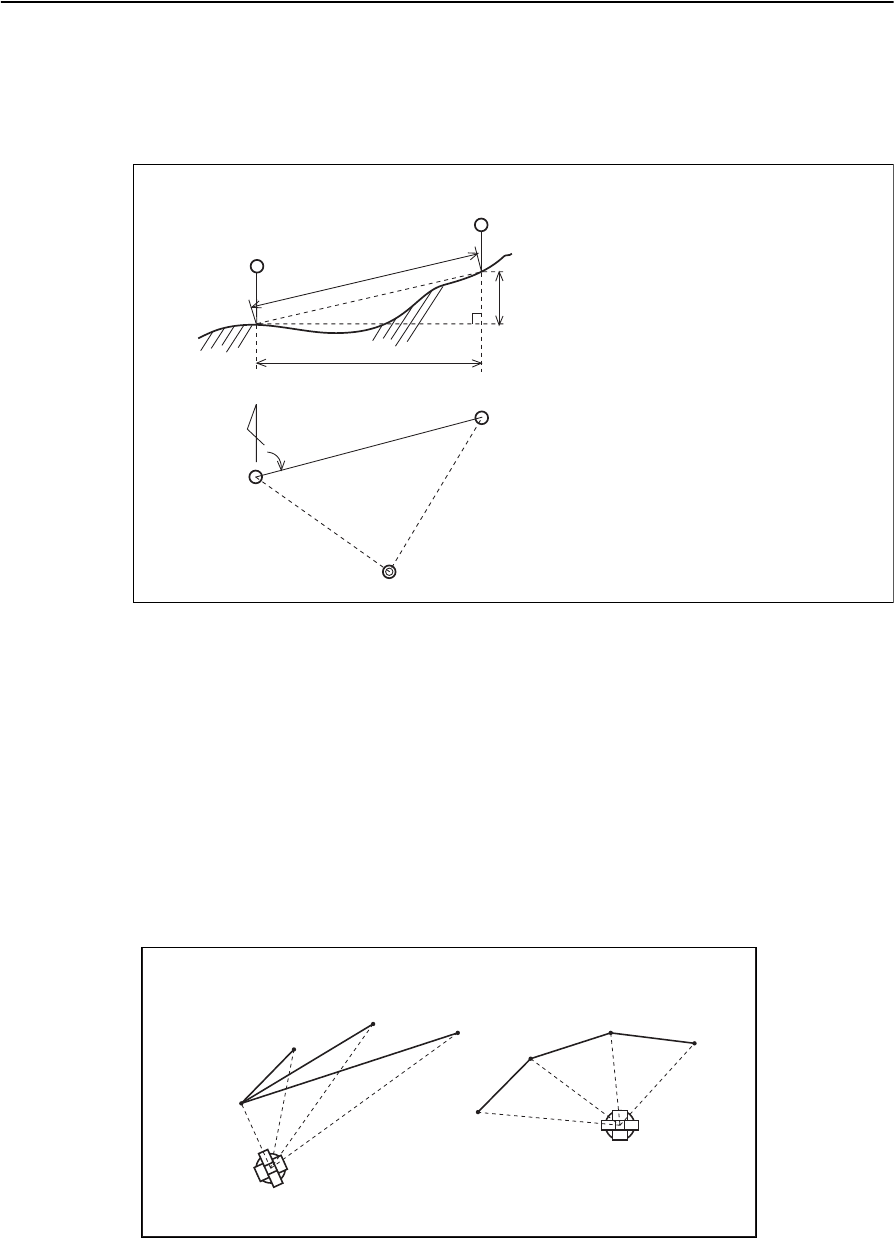
RDM or “Remote distance measurement” measures the horizontal distance, vertical
distance, and slope distance between two points.
Difference between RDM (Radial) and RDM (Cont) measurement methods
RDM (Radial) calculations are made with reference to the first point. RDM (Cont)
calculations are made with reference to the two preceding points.
rSD Slope distance between two points
rVD Vertical distance between two points
rHD Horizontal distance between two points
rV% Percentage of grade (rVD/rHD) × 100%
rGD Vertical grade (rHD/rVD):1
rAZ Azimuth from first point to second point
Second sighting point
rVD
Second sighting point
Station point
First sighting
First sighting
Horizontal angle 0 direction
rHA
rSD
rHD
point
point
RDM(Radial) RDM(Cont)
P1
P2
P3 P4
P1
P2
P3 P4
Spectra Precision Focus 4 Total Station User Guide 77
Applications 4
RDM (Radial)
Choose this option to measure between the current point and the first point measured.
1. Press [1] or select RDM(Radial) in the
Programs menu.
2. Sight the first point and press [MSR1] or [MSR2].
The distance from the station point to the first
point appears.
3. Sight the second point and press [MSR1] or [MSR2]. The distances between the first
and second point are displayed.
4. To change display screens, press [DSP].
5. Press [ESC] to exit.
RDM (Cont)
Choose this option to measure between the current point and the immediately
preceding point.
1. Press [2] or select RDM(Cont.)from the
Programs menu.
2. Follow the procedure as for a radial RDM
measurement. See also RDM (Radial), page 77.
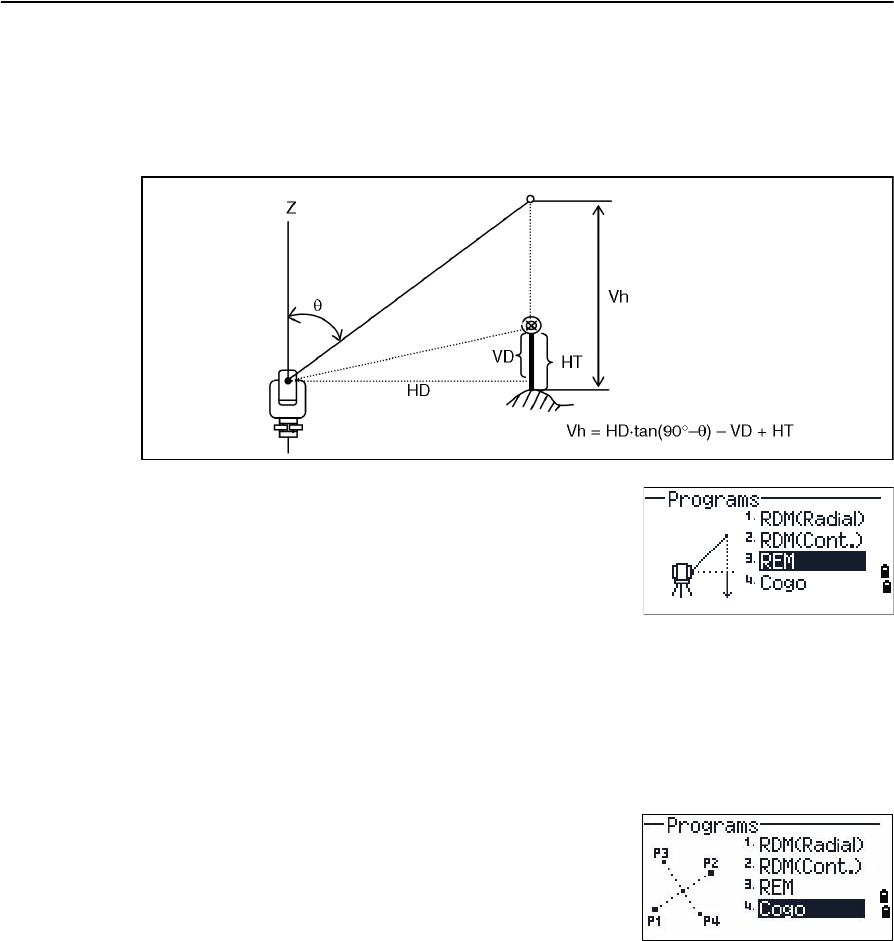
rSD Slope distance between two points
rVD Vertical distance between two
points
rHD Horizontal distance between two
points
rHA Azimuth from first point to second
point
rV% Percentage of grade (rVD/rHD) ×
100%
rGD Vertical grade (rHD/rVD): 1
4 Applications
78 Spectra Precision Focus 4 Total Station User Guide
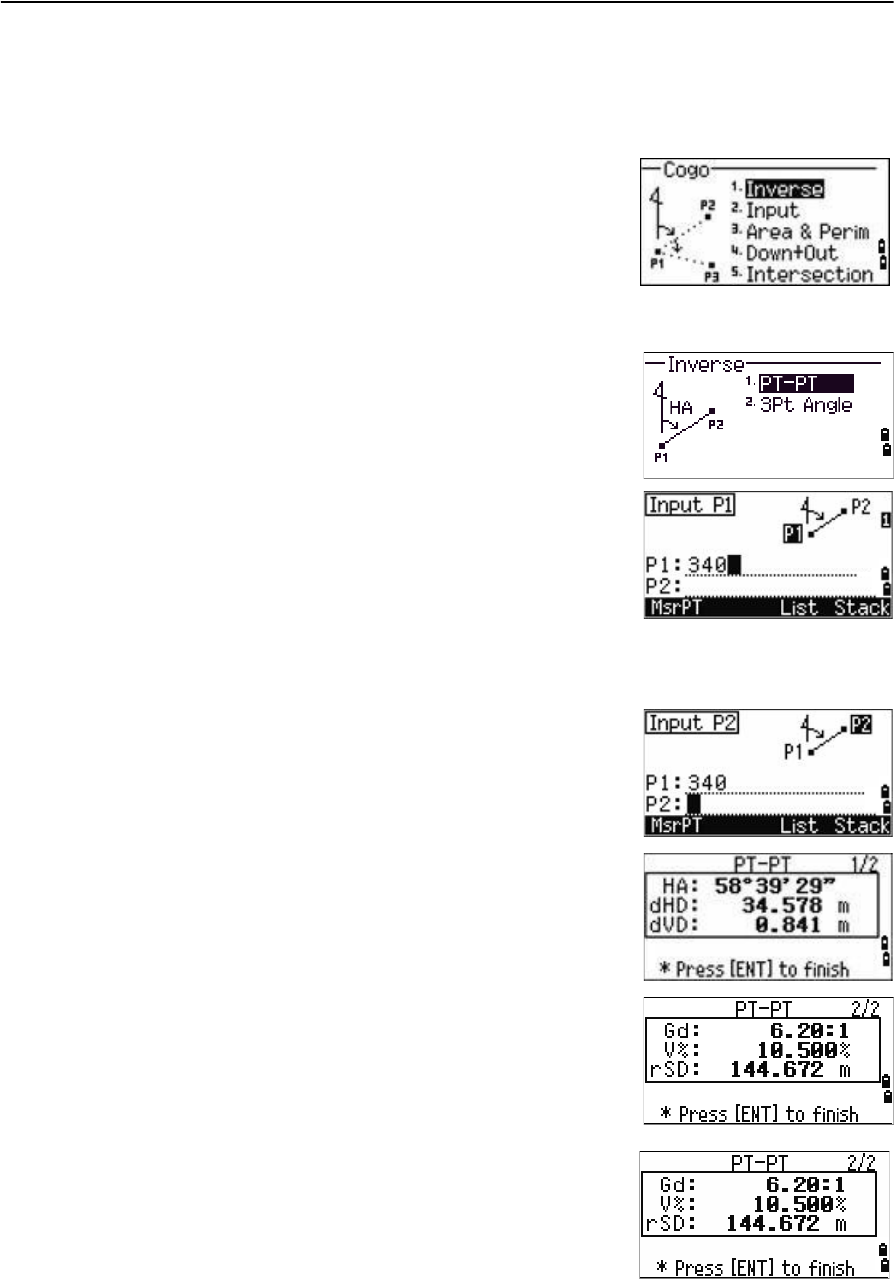
REM
Choose this option to measure a remote elevation.
Note – A prism is required only at the sighting (target) point.
1. Press [3] or select REM in the Programs menu.
2. Enter the height of the target.
3. Sight the target point and press [MSR1] or [MSR2].
4. Loosen the vertical clamp and then turn the
telescope to aim at an arbitrary point.
The difference in elevation (Vh) appears.
5. Press [ESC] to exit.
Cogo
Choose the Cogo option to perform coordinate
geometry (Cogo) calculations.
To open the Cogo menu, press [5] on the Programs
menu.
There are five items in the Cogo menu:
•Inverse, page 79
•Input, page 81
•Area & Perm, page 83
•Down+Out, page 84
•Intersection, page 85
Station point
Sighting point
Arbitrary point
Spectra Precision Focus 4 Total Station User Guide 79
Applications 4
Inverse
Choose this option from the Cogo menu to calculate angle and distance between two
coordinates.
Press [1] or select Inverse in the Cogo menu. The
Inverse menu appears.
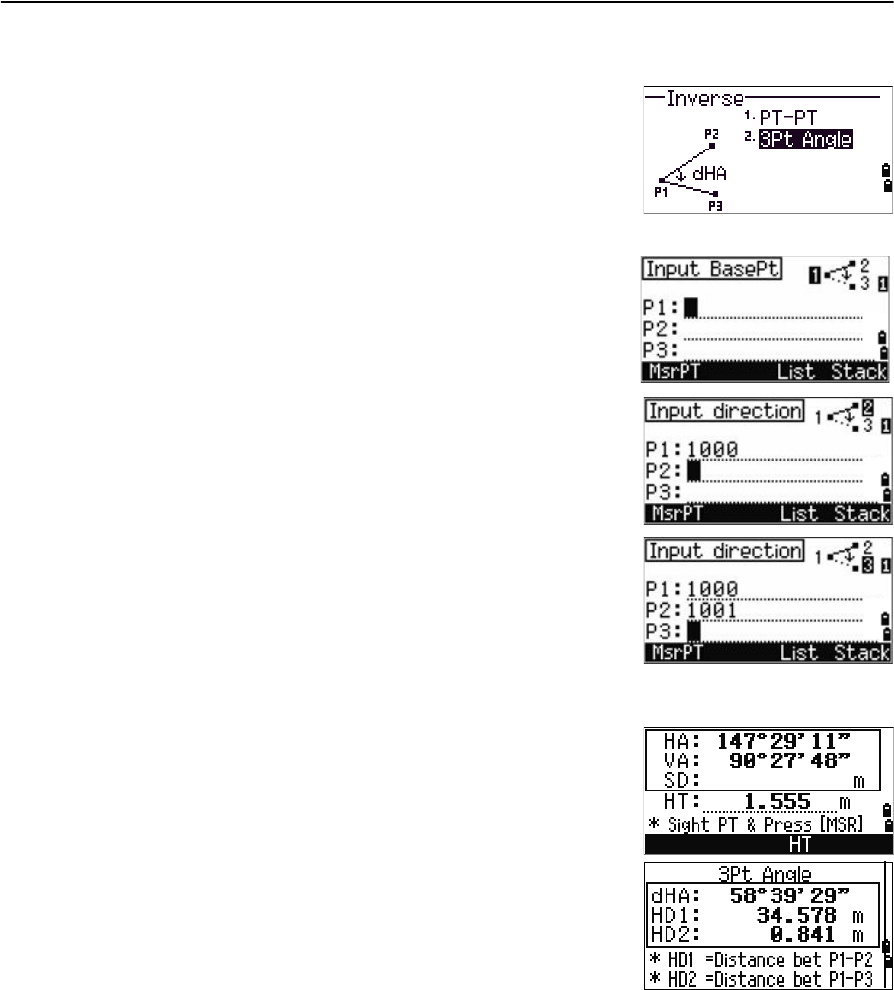
PT-PT inverse
PT-PT calculates the distance and the angle between
two input points.
To calculate a PT–PT inverse:
1. Press [1] or select PT-PT in the Inverse menu.
2. Enter the first point number or name, and then
press [ENT].
If you press [ENT] without entering a point name, a
coordinate input screen appears, and you can enter
coordinates. These coordinates are not stored to the database. If you want to store the
point, specify a new point name.
3. Type the second point number/name, and then
press [ENT]. If necessary select the MSR softkey to
shoot the point on the spot so that you can use it
in the calculation.
The azimuth, horizontal distance, and vertical
distance from the first point to the second point
are displayed.
4. Do one of the following:
–To return to the PT input screen, press [ESC].
–To return to the Cogo menu, press [ENT].
–To change the contents of the result screen,
press [DSP].
Gd Grade (HD/VD)
V% 100/Gd
rSD Slope distance PT1 to PT2
4 Applications
80 Spectra Precision Focus 4 Total Station User Guide
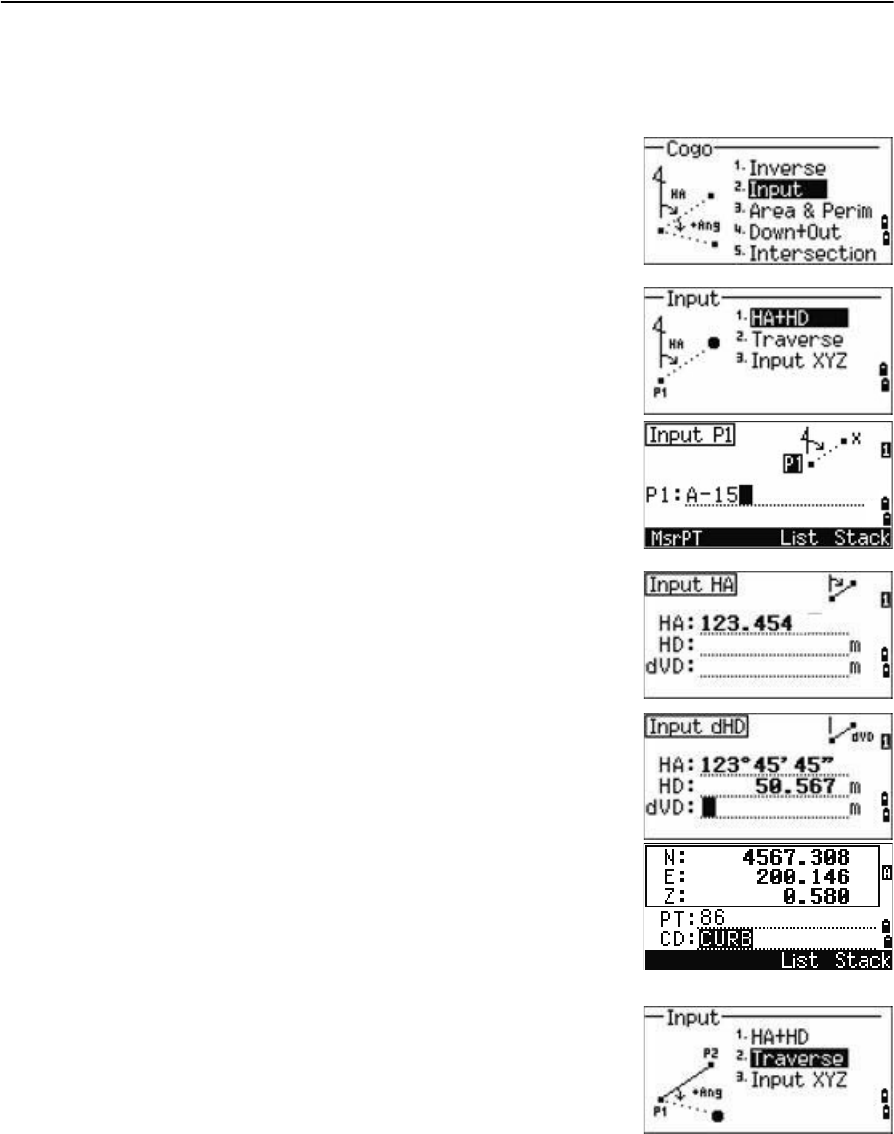
3Pt Angle
If you choose 3Pt Angle, the Focus 4W calculates the
angle between two lines defined by three points.
To calculate a 3Pt angle:
1. Press [2] or select 3Pt Angle from the Inverse
menu.
P1 is the base point. Two lines are to be defined
by P2 and P3, both from P1.
2. Enter the P1 point name. Alternatively, use the
MSR softkey to take a measurement to the point.
3. Enter the second point (P2) to define the
baseline, P1–P2. The angle (dHA) is measured
from the baseline.
4. Enter the third point (P3) to define the second
line, P1–P3.
When you press the MSR softkey, a temporary
measuring screen appears. Sight the target and
press [MSR1] or [MSR2] to take a measurement.
After the measurement, a recording point screen
appears. To store the measured point, enter the
PT, HT, and CD values and press [ENT]. To use the
point without recording it, press [ESC].
When you have entered three points, the
instrument calculates the angle and distances.
5. Do one of the following:
–To return to the Inverse menu, press [ENT].
–To return to the Input BasePt screen, press
[ESC].
Spectra Precision Focus 4 Total Station User Guide 81
Applications 4
Input
Choose this option from the Cogo menu to calculate and manually input coordinates.
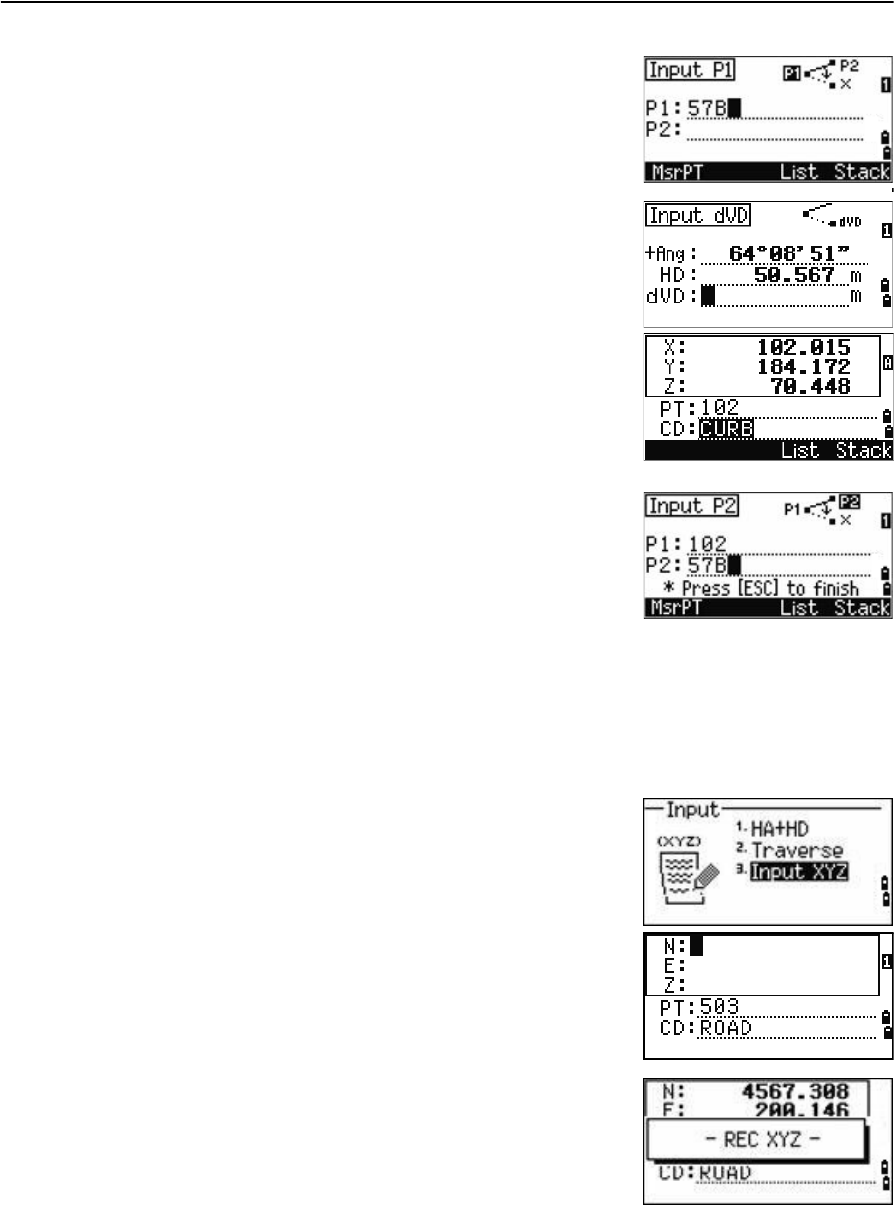
To enter the Input menu, press [2] or select Input from
the Cogo menu. There are three functions in this menu
for recording new coordinate points.
Azimuth+HD input
To calculate a coordinate by an angle and distance
input from the base point (P1), press [1] or select HA+HD
from the Input menu.
Enter the base point, P1. Type the point name and press
[ENT].
Enter the azimuth, horizontal distance, and vertical
distance. Then press [ENT].
For example, to enter 123°45'45", type 123.4545 and then
press [ENT].
If you do not enter a value in the dVD field, the value
0.0000 is used.
A recording point screen with the calculated
coordinates appears. The PT field defaults to the last
recorded point + 1.
Press [ENT] to store the point.
Traverse
To calculate a new point based on two defined points
and the angle, horizontal and vertical distances from
the line defined by those two points, use the Traverse
(2Pt Angle) function.
Press [2] or select Traverse in the Input menu.
4 Applications
82 Spectra Precision Focus 4 Total Station User Guide
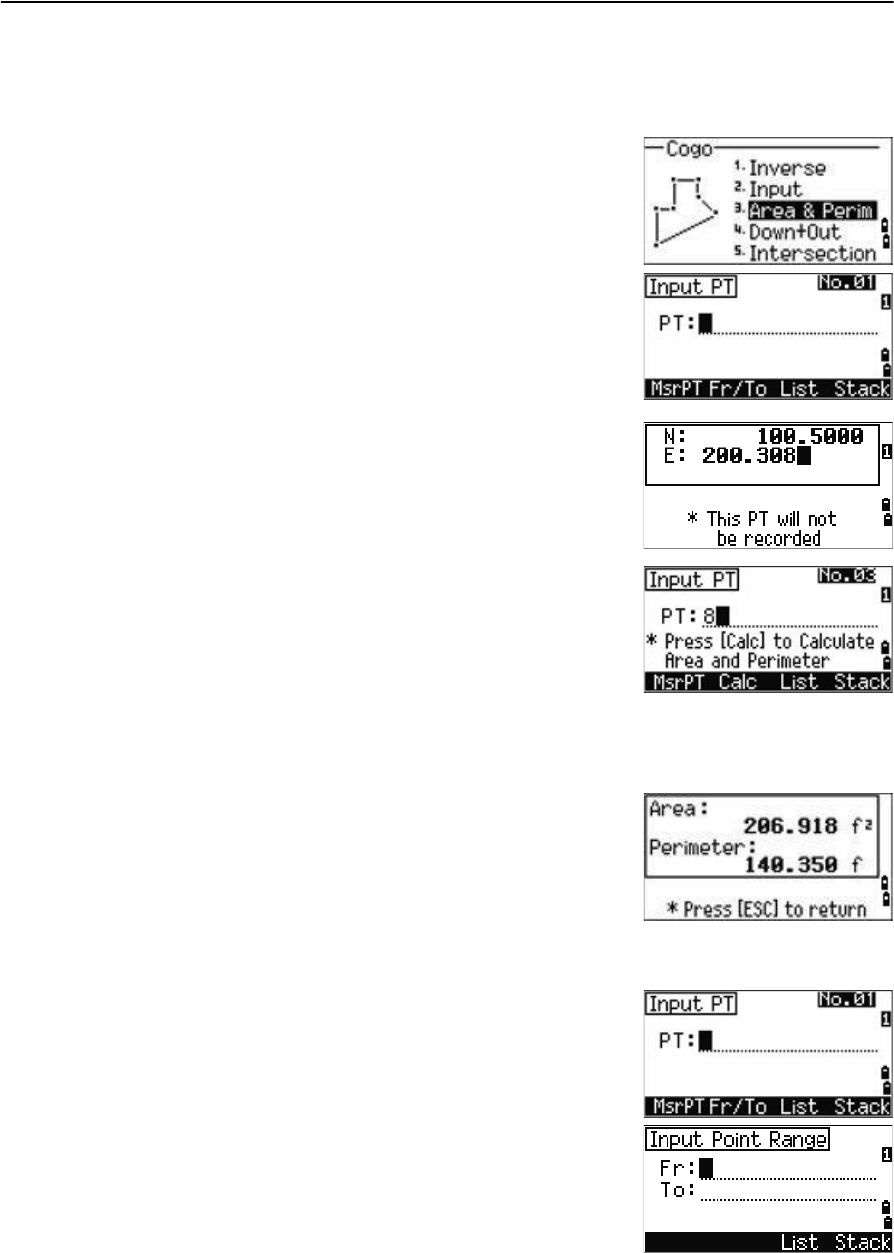
To enter P1 and P2, enter point names or take
measurements to targets.
Enter the plus-minus angle, horizontal distance, and
vertical distance from the baseline defined by P1–P2.
If you do not enter a value in the dVD field, the value
0.0000 is used.
When you press [ENT] in the dVD field, a new point is
calculated. The name in the PT field defaults to the last
recorded point, + 1.
To record the new point and return to the point input
screen, press [ENT].
P1 (the base point) defaults to the previously recorded
point value. P2 defaults to the previous P1 value.
BTip – To continuously calculate a new point, enter +Ang, HD, and dVD from the previous
bearing line. This is a convenient way to enter Traverse points.
Entering coordinates
To manually enter the XYZ coordinates, press [3] or
select Input XYZ from the Input menu.
The PT name defaults to the last recorded PT + 1.
Enter the coordinates using the numeric keys. To move
to the next field, press [ENT] or [v] in a field.
To store the point as an MP record and return to the
point input screen, press [ENT] in the Z field. The default
PT is incremented to the next value.
You can record NE, NEZ, or Z-only data.
Spectra Precision Focus 4 Total Station User Guide 83
Applications 4
Area & Perm
Choose this option from the Cogo menu to calculate area and perimeter.
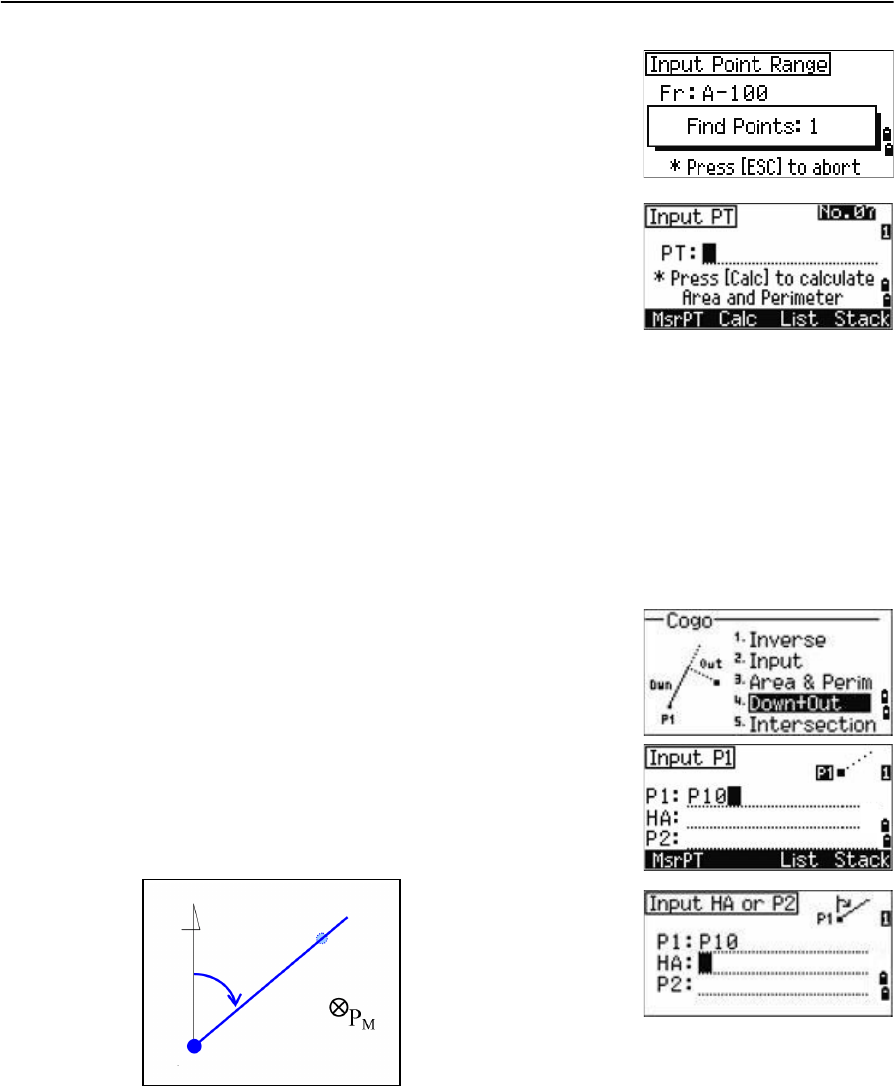
Press [3] or select Area & Perim in the Cogo menu.
To take a measurement, enter the first point and press
[ENT], or select the MSR softkey.
In the upper right corner of the screen, a counter
indicates how many points you have entered.
To input point numbers consecutively, use the Fr/To
softkey. See also Advanced feature: Entering a range of
points, page 83.
If you enter a new point name, you can enter new
coordinates and record the point. If you do not want to
record the point, press [ENT] without entering a value in
the PT field. An XY coordinate input screen appears.
Continue to enter points until you have defined all the
points in the lot. Then, press [v] to calculate the area and
perimeter.
The first and last points that you enter are joined to
close the area. You must enter the points in the order in which they define the lot. You
can enter up to 99 points.
Press [ENT] to exit from the function, or press [ESC] to
return to the previous screens one by one.
Advanced feature: Entering a range of points
To quickly enter a sequential range of points, use the
range input function. To access this function, select the
Fr/To softkey in the No. 01 or No. 02 input screens.
Enter the start point name in the Fr field and the end
point name in the To field. You can include letters and
hyphens in the point names, but the last character must
be numeric.
4 Applications
84 Spectra Precision Focus 4 Total Station User Guide
To start searching for matching points, press [ENT] in the
To field. The counter shows the number of matching
points found.
When the search is complete, you are returned to the
Input PT screen.
Select the Calc softkey to calculate the area and
perimeter, or enter point names in the PT field.
Press [ESC] to return to the Input PT screen where the
preceding point name appears.
Note – If you search for a point when a control job is specified, and the system cannot find
the point in the current job, the control job is also searched. If the point is found in the
control job, it is copied to the current job as a UP record. See also Setting the control job,
page 95.
Down+Out
Choose this option from the Cogo menu to calculate coordinates from Down and Out.
Press [4] or select Down & Out in the Cogo menu.
Enter the base point (P1).
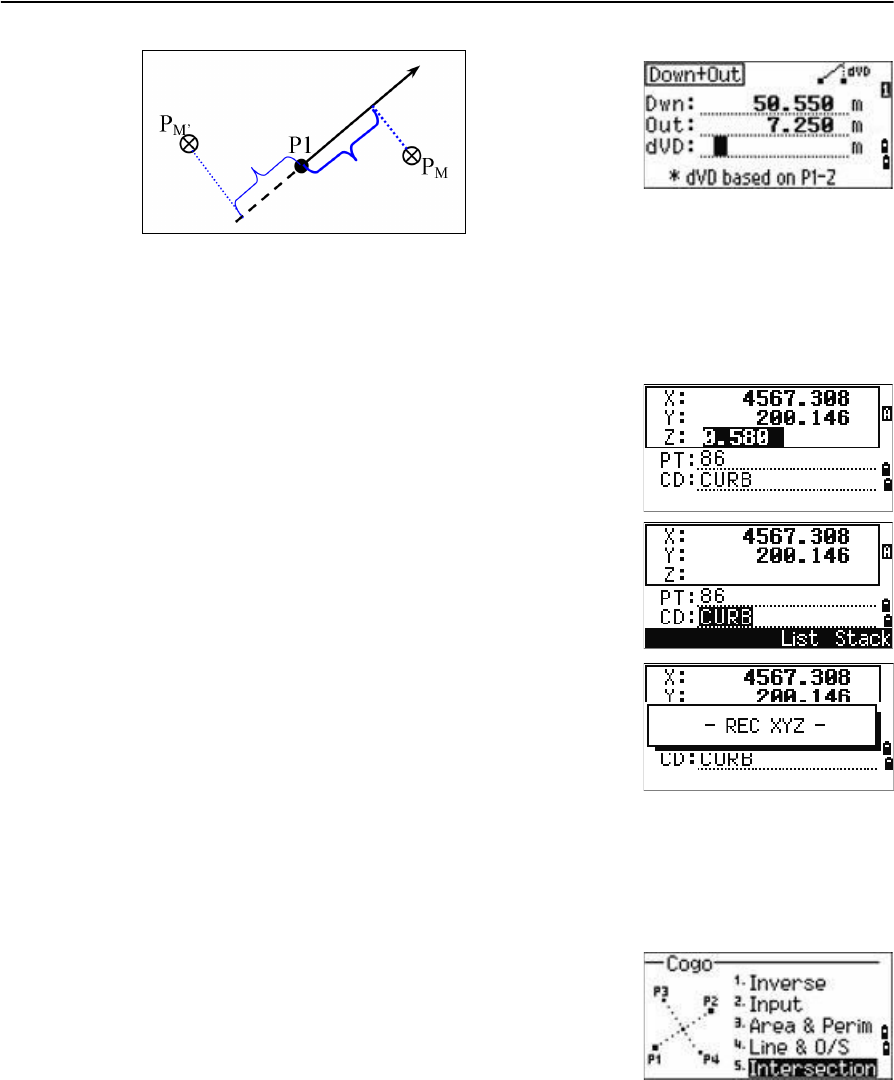
Specify the azimuth bearing. To do this, enter a value in
the HA or P2 field. P2 is a second point on the line.
Enter the horizontal distance along the baseline (Dwn), the horizontal distance
perpendicular to the line (Out), and the vertical distance (dVD).
HA
P2
P1
Spectra Precision Focus 4 Total Station User Guide 85
Applications 4
A negative value in the Dwn field means the opposite direction along the defined
bearing line.
A negative value in the Out field is for the left-hand side of the bearing line.
To calculate the coordinates of the point (PM), press
[ENT] in the dVD field. You can change the Z coordinate
here.
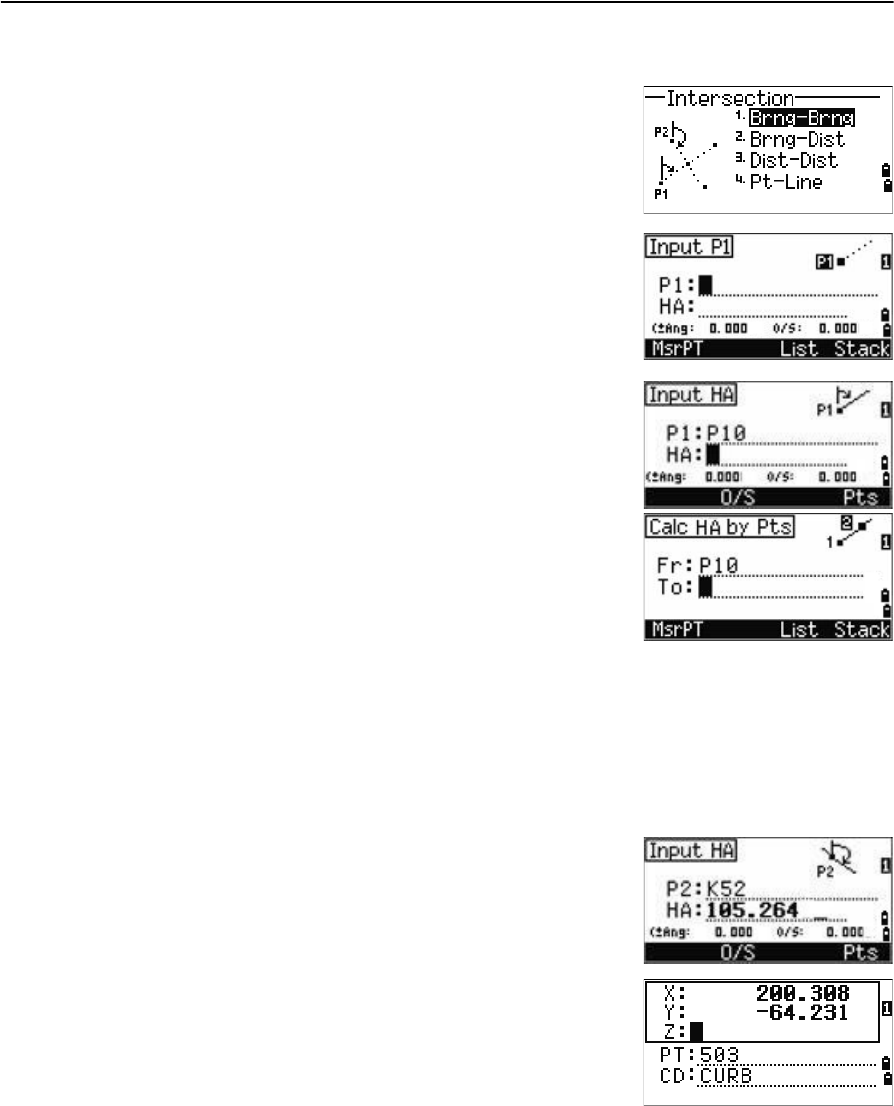
To record the point, press [ENT] in the CD field.
The coordinates are stored as a CC record.
Intersection
Choose this option from the Cogo menu to calculate coordinates using intersection
functions.
Press [5] or select Intersection in the Cogo menu.
The Intersection menu appears. It has four functions for
calculating coordinates.
Out(-)
Dwn(-)
Out(+)
Dwn(+)
4 Applications
86 Spectra Precision Focus 4 Total Station User Guide
Calculating a bearing-bearing intersection
A bearing-bearing intersection is the intersection point
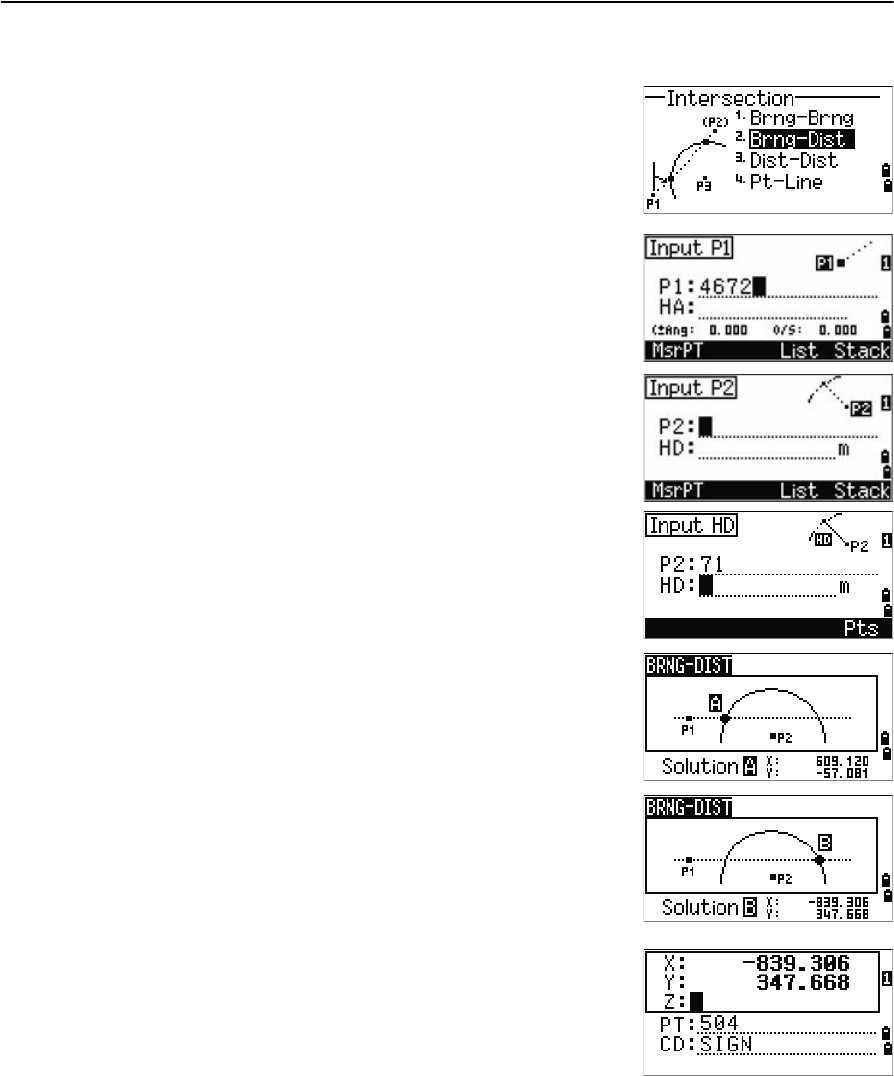
of two lines. To calculate a bearing-bearing intersection:
1. Press [1] or select Brng-Brng in the Intersection
menu.
2. Enter the first point name and press [ENT].
Alternatively, to measure directly to the point,
select the MSR softkey.
3. Define the first line by azimuth.
4. To define the line by two points, select the Pts
softkey. The Fr field defaults to the P1 point, but
you can change the selected point. In the To field,
enter or measure to the second point.
See also Advanced feature: Entering angle and
distance offsets, page 89.
5. Do one of the following:
–To return to the previous screen, press [ENT]. The calculated value appears in
the HA field.
–To go to the next screen, press [ENT].
6. Define the second line by two points or by P2 and
HA.
7. To calculate the coordinates of the intersection
point, press [ENT] in the HA field.
The calculated coordinates are displayed. You
can input a Z coordinate if necessary.
8. Enter a value in the PT field and in the CD field.
9. To record the point, press [ENT].
Spectra Precision Focus 4 Total Station User Guide 87
Applications 4
Calculating a bearing-distance intersection
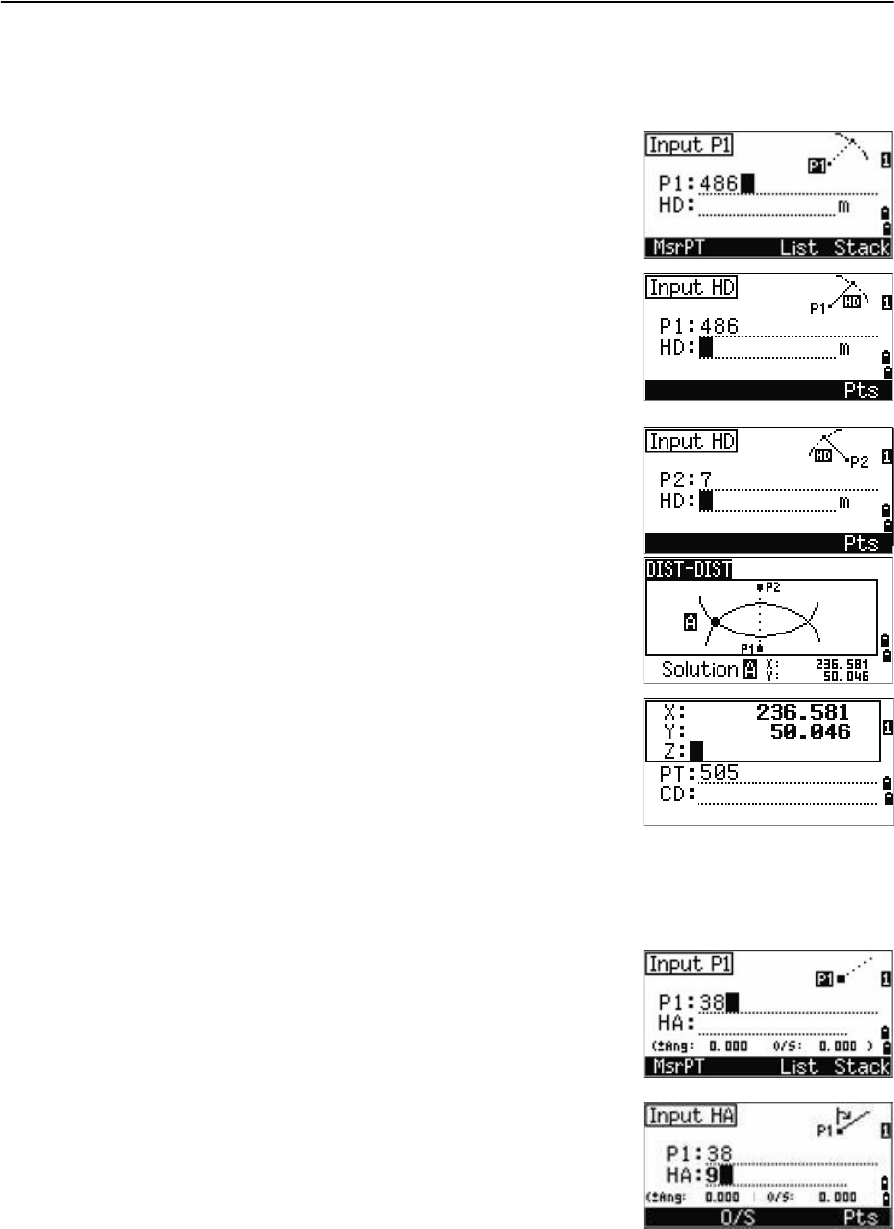
1. Press [2] or select Brng-Dist in the Intersection
menu.
Brng-Dist calculates the intersection point
formed by one line and one distance (radius).
2. Enter a point on the line.
The line can be defined by two points or by a
point and an azimuth.
3. Enter the second point (P2) as the center of the
circle.
4. Enter the distance from P2:
–To define the distance (HD) by two points,
select the Pts softkey.
–To calculate the coordinates of the
intersection point, press [ENT] in the HD field.
5. If there are two results, the first solution appears
graphically relative to the P1–P2 line. To display
the second solution, press [<] or [>].
6. To record the point, press [ENT] when the required
solution appears.
7. Enter a Z coordinate if necessary.
8. To move to the PT and CD fields, press [ENT].
4 Applications
88 Spectra Precision Focus 4 Total Station User Guide
Calculating a distance-distance intersection
1. Press [3] or select Dist-Dist in the Intersection menu.
2. Enter the first point name and press [ENT], or
select the MSR softkey to measure directly to the
point.
3. Enter the distance from P1 and press [ENT].
4. To define the distance (HD) by two points, select
the Pts softkey.
5. Enter P2 and the distance from P2 (HD).
6. To calculate the coordinates of the intersection
point, press [ENT] in the HD field.
7. Press [<] or [>] to display the second solution.
8. To record the point, press [ENT] when the required
solution appears.
9. Enter a Z coordinate if necessary.
10. Press [ENT] to move to the PT and CD fields.
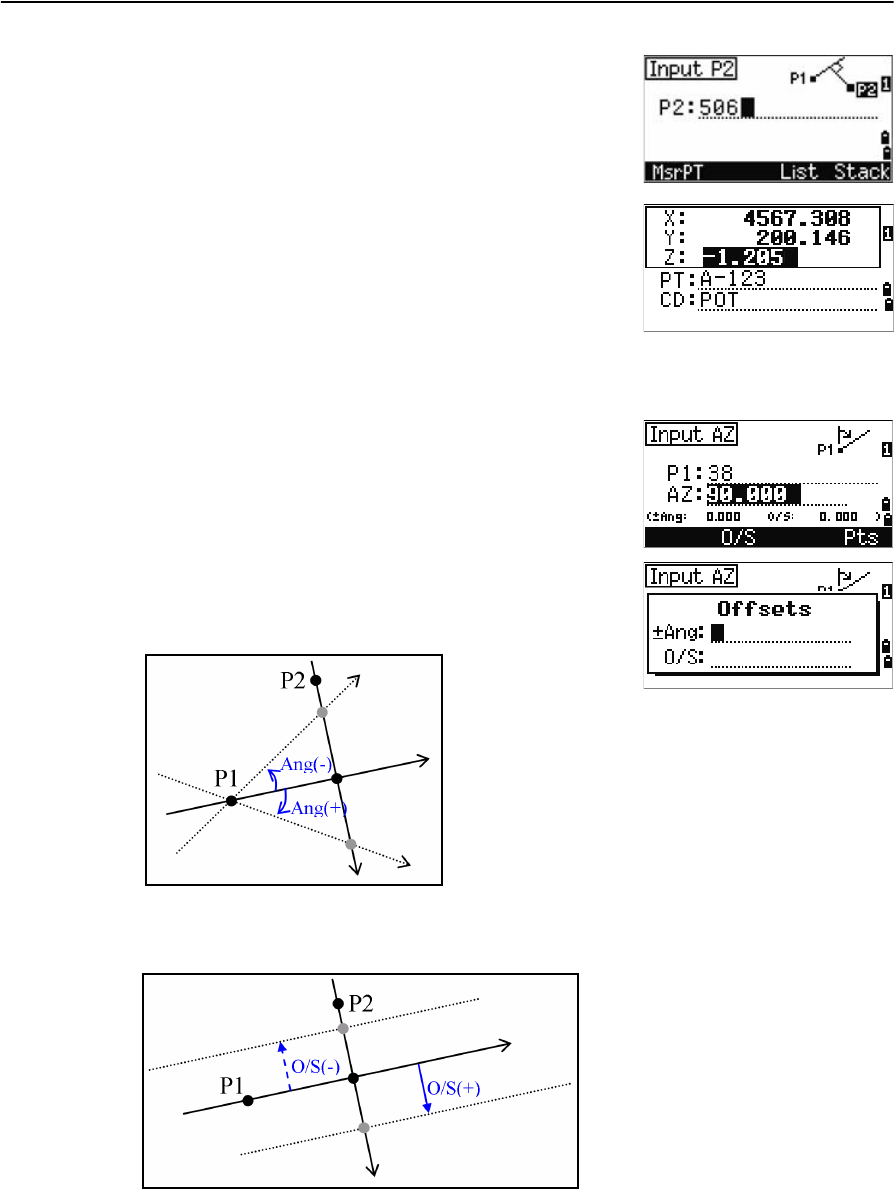
Calculating a point-line intersection
1. Press [4] or select Pt-Line in the Intersection menu.
2. Enter the first point name and press [ENT], or
select the MSR softkey to measure directly to the
point.
3. Enter the azimuth, or select the Pts softkey to
enter another point name on the line.
Spectra Precision Focus 4 Total Station User Guide 89
Applications 4
4. Enter the perpendicular point to the line, or
select the MSR softkey to take a measurement to
the point.
5. To calculate the coordinates of the intersection
point, press [ENT].
If P1 and P2 are 3D points, the Z coordinate of the
perpendicular point is calculated relative to the
P1–P2 slope.
6. Enter PT and CD then press [ENT] to record the
point.
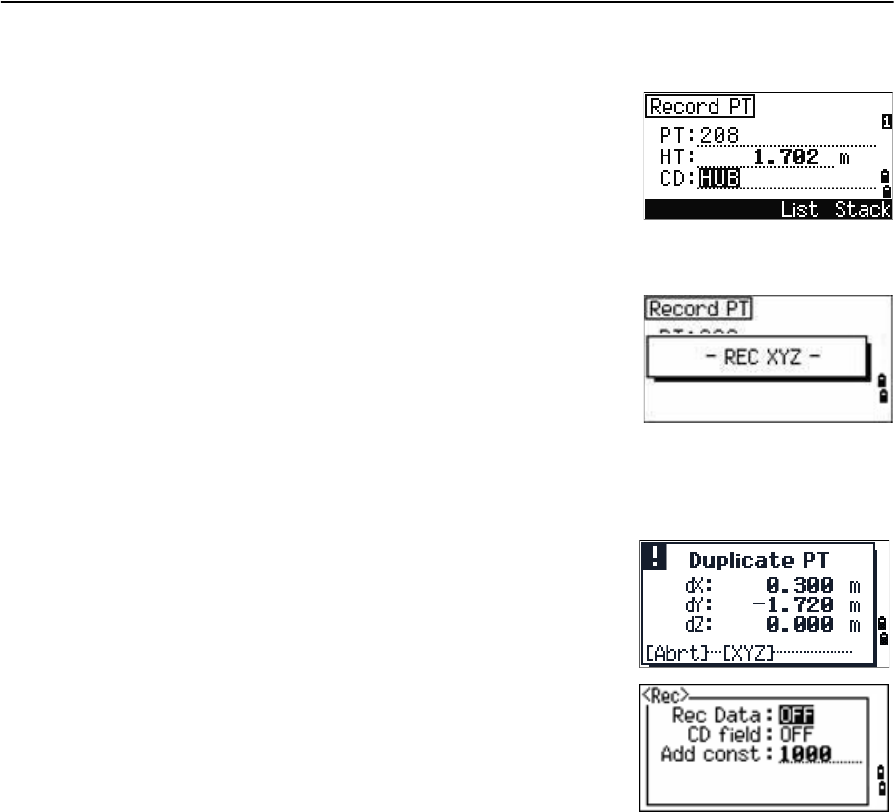
Advanced feature: Entering angle and distance offsets
To display the offset input screen, select the O/S
softkey.
In the Ang field, enter a positive value to rotate the line
clockwise. Enter a negative value to rotate the line
counter clockwise.
In the O/S field, enter a positive value to specify an offset to the right. Enter a negative
value to specify an offset to the left.
4 Applications
90 Spectra Precision Focus 4 Total Station User Guide
Recording measurement data
To record points from any observation screen, press
[ENT].
PT defaults to the last recorded PT, + 1.
You can enter the PT name from the point list or the
point stack. See Entering a point from the point list,
page 53, and Entering a point from the point stack, page 52.
To record the point, press [ENT] on the last field.
If HA or VA is moved after you take a measurement, but before you press [ENT], the
recalculated coordinates will be stored.
If the point name that you want to record already exists
in the job, an error message appears. Depending on the
type of existing record, you can overwrite the old record
with the new data. See Recording data, page 139.
If you do not need to record data, press [MENU] and set
Settings / Rec to OFF.
The default setting is OFF.
Switching between display screens
Press [DSP] to switch between display screens. See the [DSP] button, page 44. Each time
you press [DSP], the next screen appears. When you press [DSP] in the final screen, the
first screen appears.

CHAPTER
5
Spectra Precision Focus 4 Total Station User Guide 91
Menu Screen 5
In this chapter:
Job
Settings (basic job settings)
Data
Communication
1sec-Key
Calibration
Time
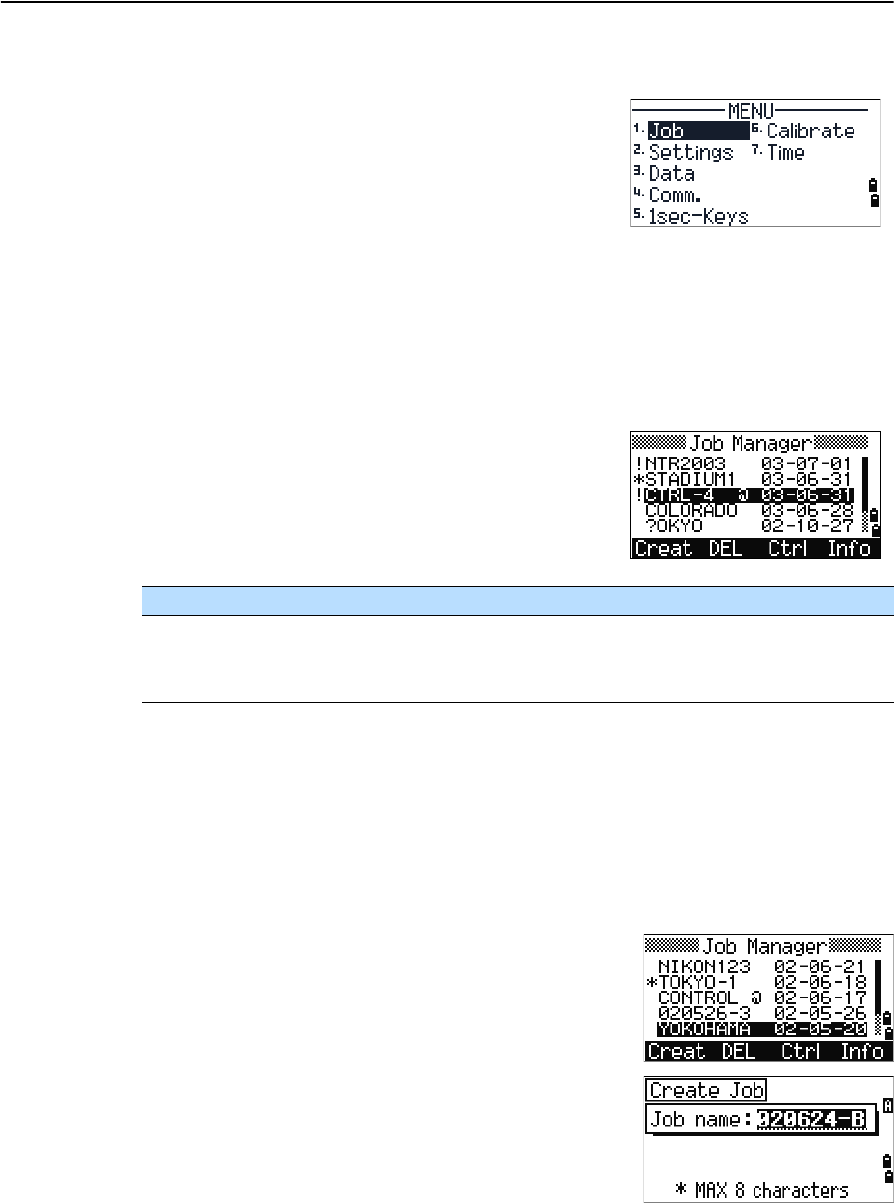
Use the MENU screen to access functions and
settings.
To display the MENU screen, press the [MENU] key.
5 Menu Screen
92 Spectra Precision Focus 4 Total Station User Guide
Job
Use the Job option to open, create, delete, and manage
jobs.
To open the Job Manager, press [1] or select Job from
the MENU screen.
If jobs are stored on the Focus 4 total station, the job
list appears. It shows all the stored jobs with the newest job at the top of the list. See
Opening an existing job, page 92.
If no jobs are stored, the Create Job screen appears. See Creating a new job, page 92.
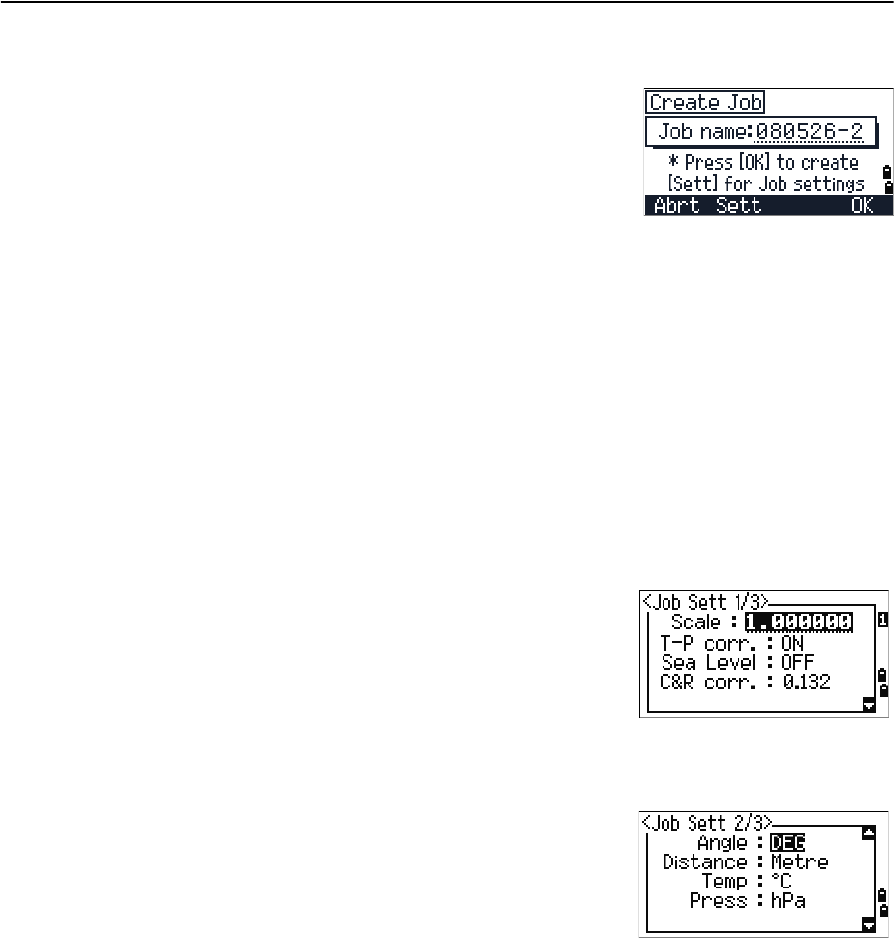
Opening an existing job
The job list shows all the jobs stored on the
instrument, in descending date order.
The following symbols provide extra information
about jobs:
Press [^] to move up or [v] to move down the job list. Press [ENT] to open the highlighted
job.
When you open a job, all job settings are automatically changed to match those used in
the open job.
Creating a new job
1. Select the Creat softkey in the job list.
2. Enter a job name of up to eight characters. Select
[ENT].
Symbol Meaning
* Current job
@ Control job
! Some of the job settings are different from the current job
Spectra Precision Focus 4 Total Station User Guide 93
Menu Screen 5
3. Do one of the following:
–To check the job settings, select the Sett
softkey.
–To create a new job using the current job
settings, press [ENT] or select the OK softkey.
Job settings
Job settings are separate from other temporary settings.
Job settings are established when a job is created, and cannot be changed. This ensures
that the data in a job is correctly stored in the database, and that all necessary
corrections are applied when you store each record.
To move between fields, press [^] or [v]. Alternatively, to move to the next field, press [ENT].
To change the setting in the selected field, press [<] or [>].
To confirm the job settings and create the job, press [ENT] in the last field.
Screen 1
Screen 2
Scale Factor 0.999600 to 1.000400
T-P correction ON / OFF
Sea Level ON / OFF
C&R correction OFF / 0.132 / 0.200
Angle unit DEG / GON /MIL
Distance unit Metre / US-Ft / I-Ft
Temp unit °C / °F
Press unit hPa / mmHg / inHg
5 Menu Screen
94 Spectra Precision Focus 4 Total Station User Guide
Screen 3
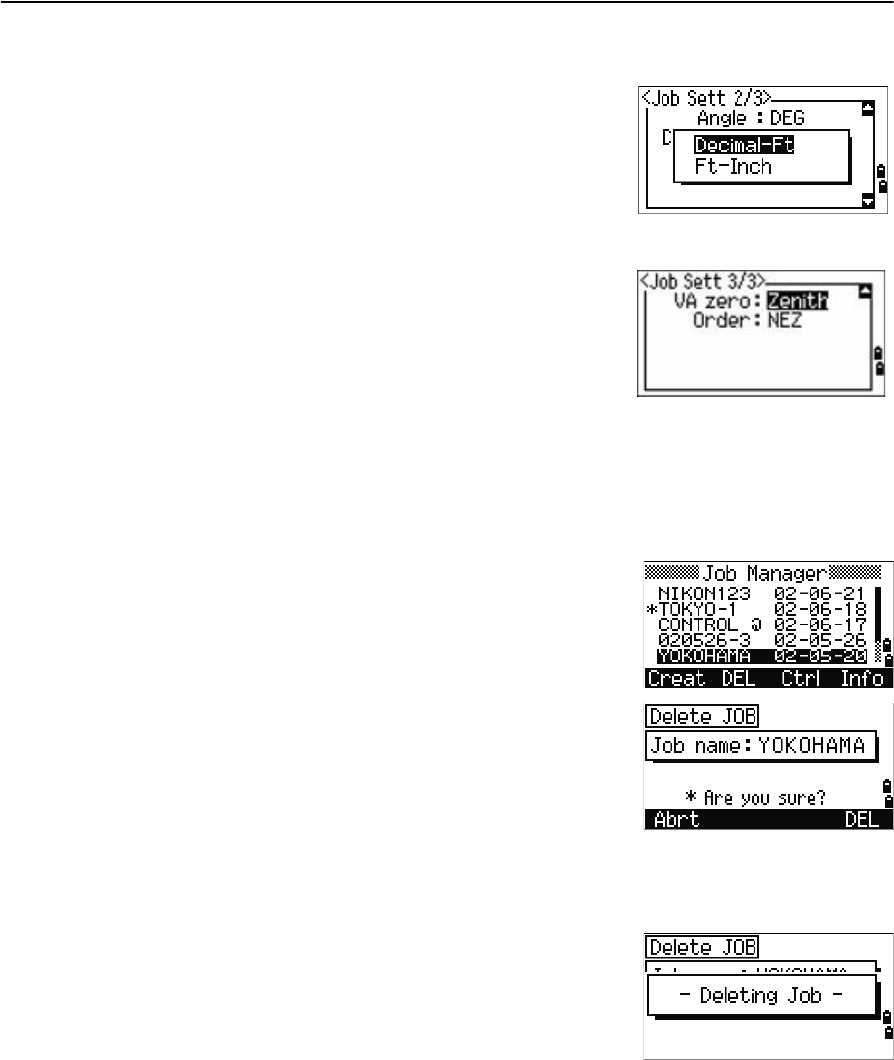
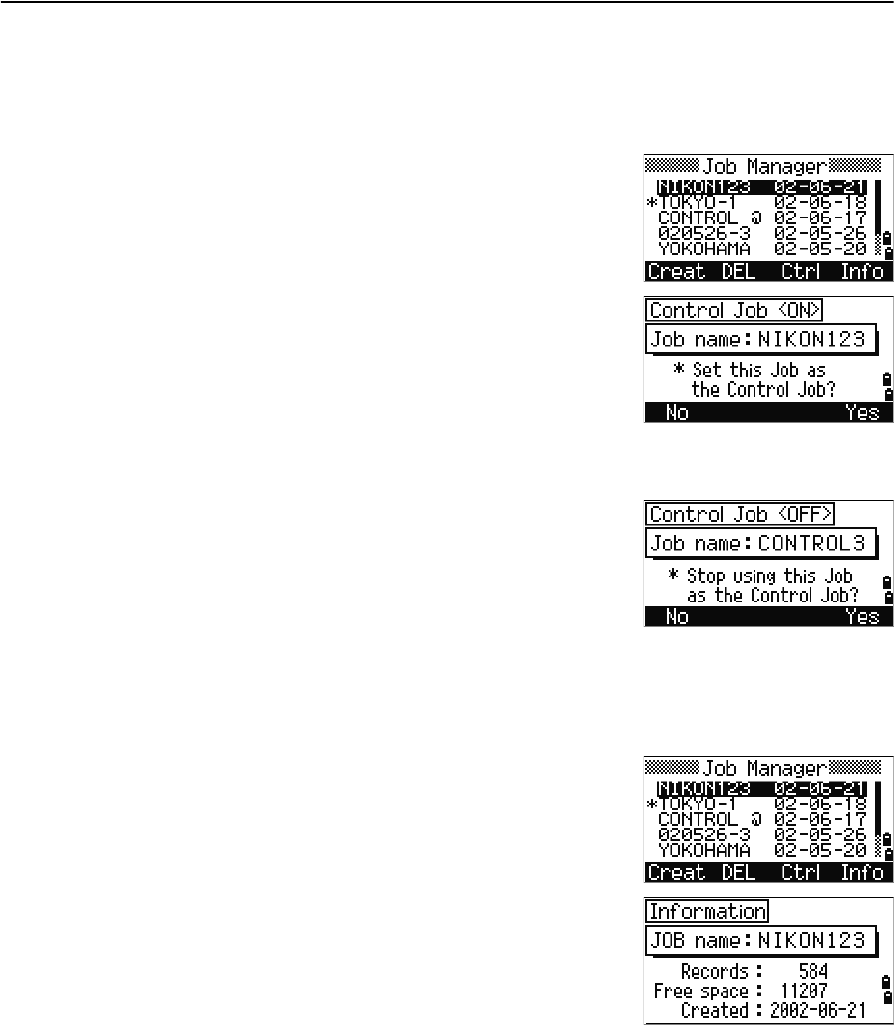
If you select US–Ft or I–Ft, an additional settings
screen appears. Use this screen to specify whether to
display values in Decimal–Ft or Ft–Inch.
Deleting a job
Note – There is no undelete function in Job Manager. Before you press [ENT] or select DEL,
make sure that the selected job is the one that you want to delete.
1. In the job list, highlight the job to delete.
2. Select the DEL softkey. A confirmation screen
appears.
3. Do one of the following:
–To delete the selected job, press [ENT] or
select the DEL softkey.
–To cancel the deletion and return to the previous screen, press [ESC] or
select the Abrt softkey.
After you delete a job, the job list appears.
VA zero Zenith / Horizon
Order NEZ / ENZ
Spectra Precision Focus 4 Total Station User Guide 95
Menu Screen 5
Setting the control job
A control job has the same format as a standard job. You can open and modify it like
any other job, and you can use it to record any measured data.
To set the control job:
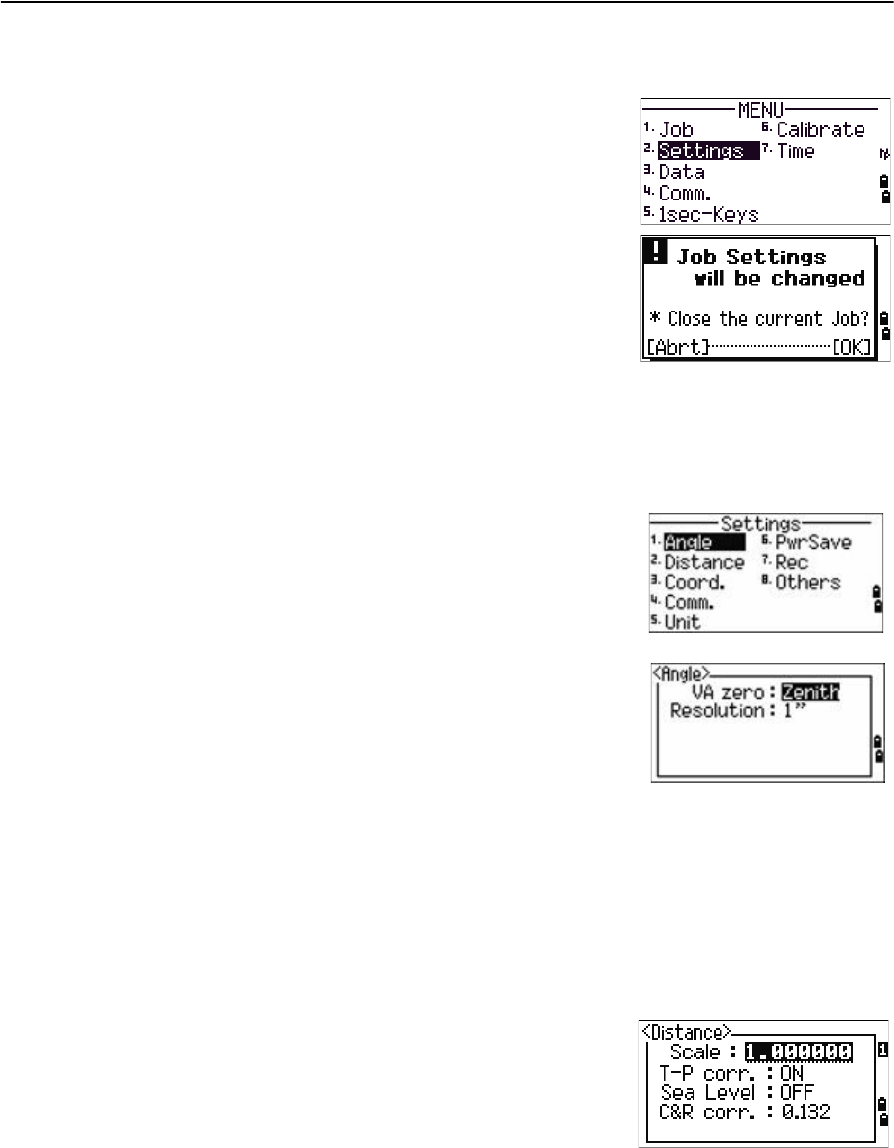
1. Highlight the job that you want to use as the
control job.
2. Select the Ctrl softkey.
A confirmation screen appears.
3. Do one of the following:
–To set the selected job as the control job,
press [ENT] or select the Yes softkey.
–To cancel the process, press [ESC] or select
the No softkey.
If a control job is already assigned, the newly
assigned control job replaces it as the control job.
To clear the selected control job, highlight the
current control job in the job list and select the
Ctrl softkey. Then press [ENT] or select the Yes
softkey.
Displaying job information
To display job information, highlight the job name and
then select the Info softkey.
The Information screen shows the number of records in
the job, the free space, and the date when the job was
created. Free space indicates how many points can be
stored in the job.
To return to the job list, press any button.
5 Menu Screen
96 Spectra Precision Focus 4 Total Station User Guide
Settings (basic job settings)
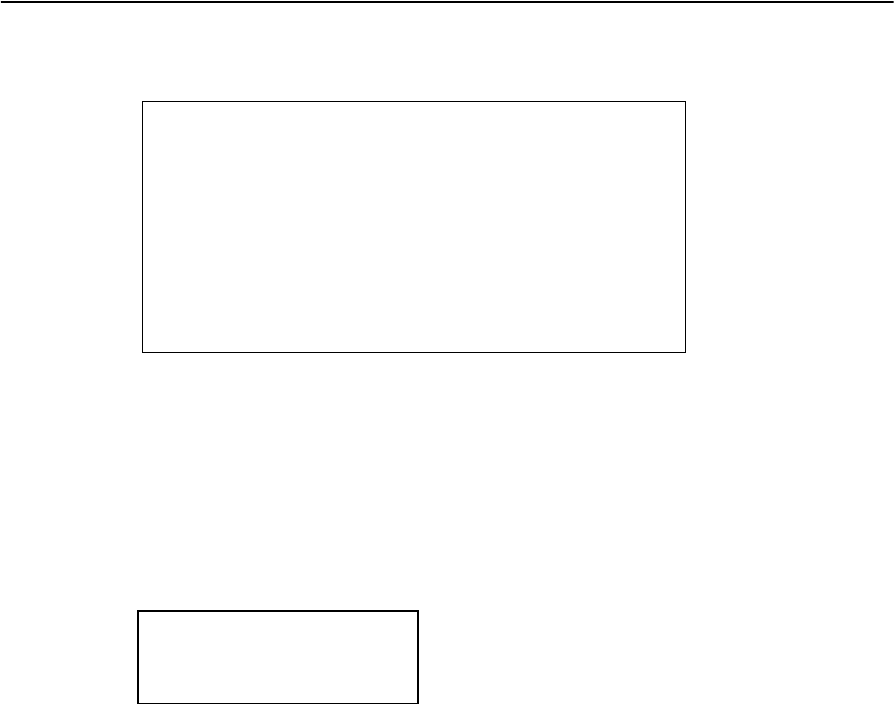
Use the Settings menu to configure the basic job
settings.
Press [2] or select Settings on the MENU screen.
Some job settings, as identified in the following
sections, cannot be changed once a job is created. If
you attempt to change any of these settings while a job
is open, a confirmation screen appears, asking you to
create a new job with the new settings, or to work with
the new settings without recording any data. See
Settings, page 141.
Angle
To change the angles, press [1] or select Angle in the
Settings menu.
The VA zero job setting cannot be changed once a job is created.
Distance
These settings cannot be changed once a job is created.
To change the distance, press [2] or select Distance in the Settings menu.
VA zero Zenith / Horizon
Resolution 1" / 5" / 10"
0.2/ 1/ 2mgon
0.005 / 0.02 / 0.05 mil
Scale Numeric value between 0.999600 and
1.000400
T-P corr ON / OFF
Sea Level ON / OFF
C&R corr OFF / 0.132 / 0.200
Spectra Precision Focus 4 Total Station User Guide 97
Menu Screen 5
Temperature and pressure corrections
Sea-level corrections
SD Slope dist. (before adj.)
SD' Slope dist. (after adj.)
K Compensation coefficient
P Pressure (hPa)
T Temperature (°C)
HD Horizontal dist. (before adj.)
HD' Horizontal dist. (after adj.)
ZSTN Instrument-Z
Re6370 km
K275
106 P 10000.0
13.5951 980.665×
---------------------------------------------
××
273 T+
---------------------------------------------------------------------------–=
SD' 1 K
1000000
---------------------+
SD×=
HD' HD Re
×
ReZSTN
+
------------------------=
5 Menu Screen
98 Spectra Precision Focus 4 Total Station User Guide
Curvature and refraction corrections
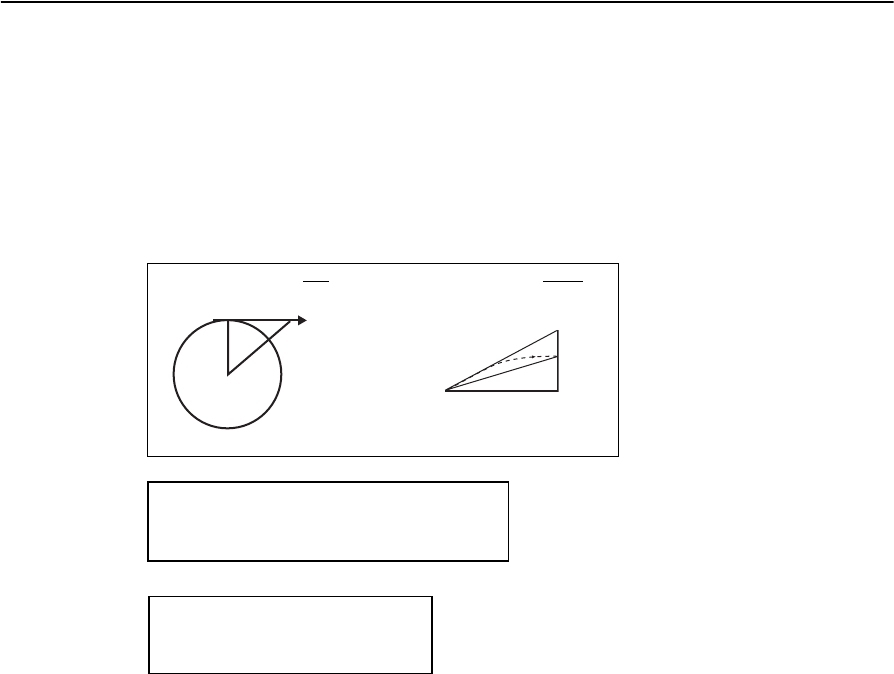
Because the surface of the earth is curved, the vertical difference (VD and Z) at the
measurement point, as referenced to the horizontal plane, inevitably includes some
error. This error is called curvature error. Also, because the density of the air
surrounding the earth decreases with altitude, light is refracted at different rates at
different altitudes. The error caused by this change in refraction is called refraction
error.
HD Horizontal dist. (before adj.)
HD' Horizontal dist. (after adj.)
VD Vertical dist. (before adj.)
VD' Vertical dist. (after adj.)
SD Slope dist
VA Vertical angle
Re6370 km
k C&R constant (0.132 or 0.200)
Curvature error (A A')Refraction error (A A1')
PA'Horizontal
direction
A
OP
A1'
A1
A'
HD' HD SD22VA()sin
2Re
----------------------------------- 1 k
2
---
=-
-
VD' VD HD2
2Re
-----------1 k()+= -
Spectra Precision Focus 4 Total Station User Guide 99
Menu Screen 5
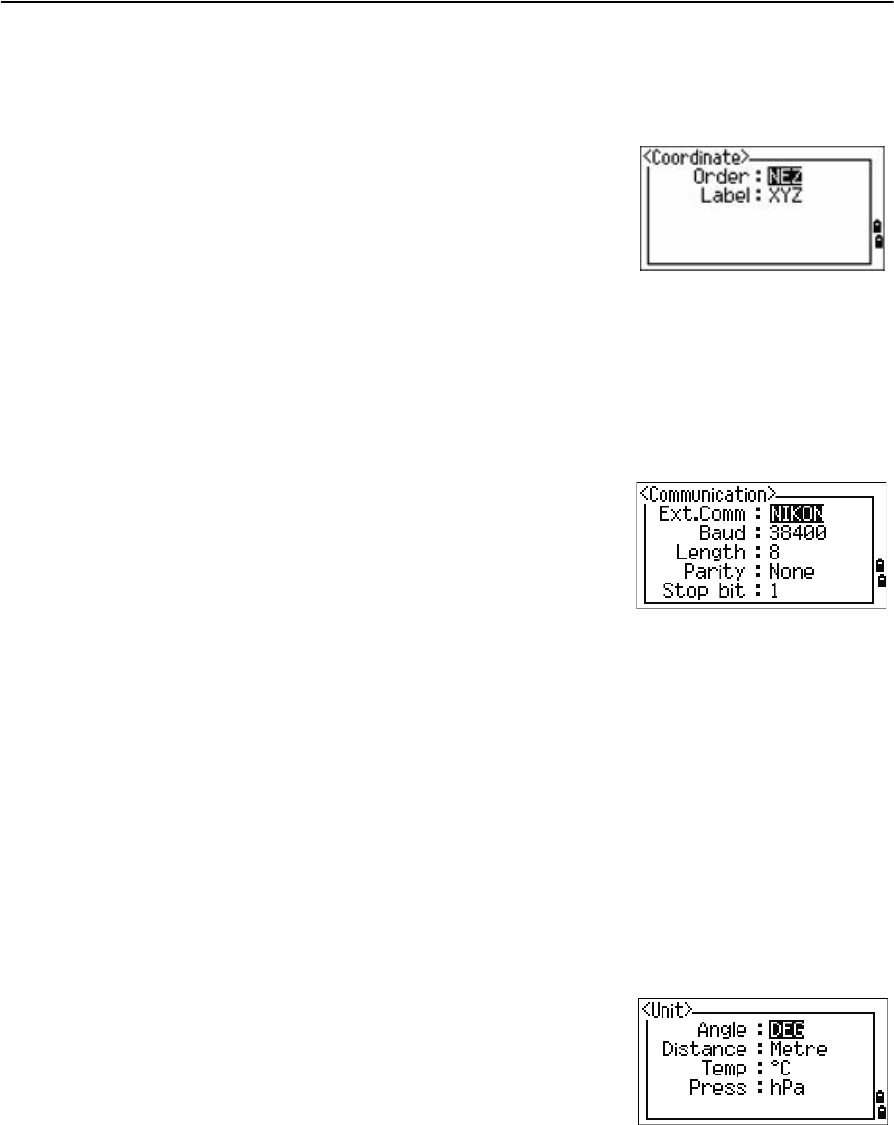
Coordinate
Press [3] or select Coord. in the Settings menu. The Coordinate menu appears.
The Order cannot be changed once a job is created.
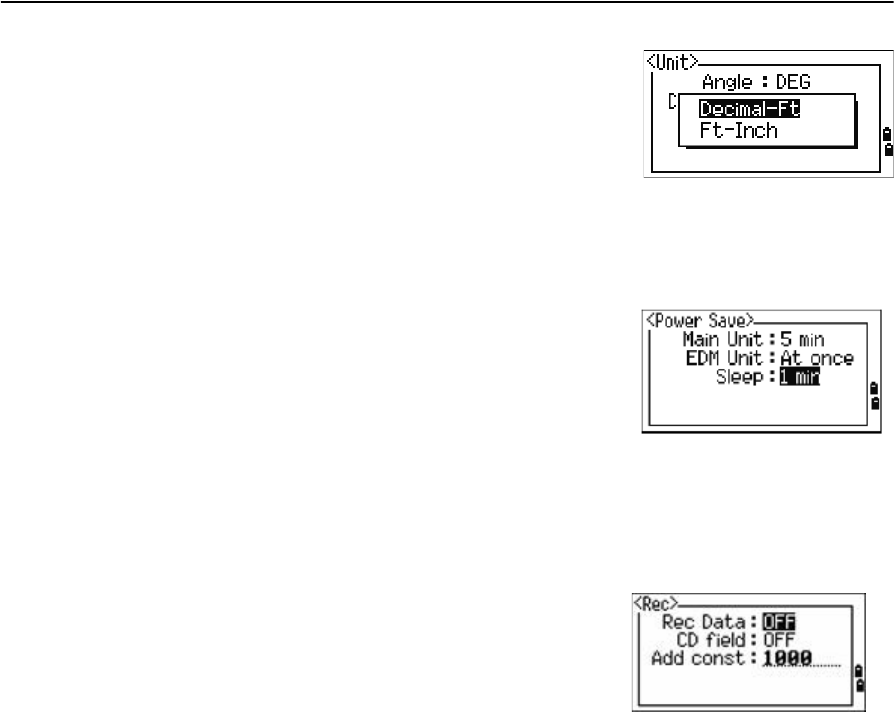
Communications
Press [4] or select Comm. in the Settings menu. The Communication menu appears.
See also Chapter 7, Transferring Coordinate Data.
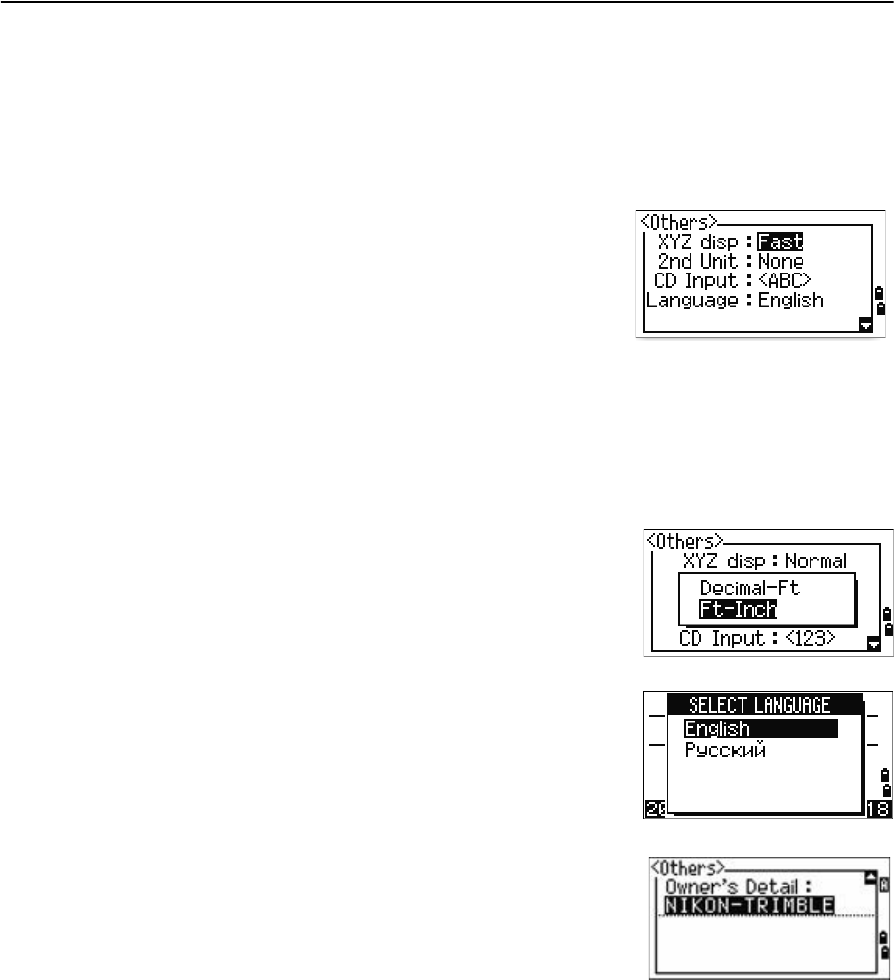
Unit
Note – The Angle, Distance, Temp, and Press job settings cannot be changed once a job is
created.
Press [5] or select Unit in the Settings menu. The Unit menu appears.
Order NEZ / ENZ
Label XYZ / YXZ / NEZ(ENZ)
Ext.Comm NIKON / SET
Port Serial/Bluetooth
Note – This field appears only when
the optional Bluetooth® wireless
technology is on-board.
Baud (bps) 1200 / 2400 / 4800 / 9600 / 19200 /
38400
Length 7 / 8
Parity EVEN / ODD / NONE
Stop bit 1 / 2
Angle DEG (Degree)
GON (GON)
MIL (Mil6400)
Distance Meter
US-Ft
I-F
Temp °C (Celsius)
°F (Fahrenheit)
Pressure hPa
mmHg
inHg
5 Menu Screen
100 Spectra Precision Focus 4 Total Station User Guide
If you select US-Ft or I-Ft, an additional settings screen
appears. Use this screen to specify whether to display
values in Decimal-Ft or Ft-Inch.
Power saving
To open the Power Save menu, press [6] or select PwrSave in the Settings menu.
Recording
Press [7] or select Rec in the Settings menu. The Rec Menu appears.
•If you need to record data from your observations, set the Rec Data field to ON.
Both raw and coordinate data is stored. If you set the Rec Data field to OFF, no
record is stored.
•If you would like to record a feature code when you record coordinate data, set
the CD field to ON. The CD field appears in the Recording PT screen.
•This field sets the default point number for the observed coordinate data when
you select Layout / XYZ.
Main unit OFF / 5 min / 10 min / 30 min .
EDM unit OFF / At Once / 0.1 min / 0.5 min / 3 min /
10 min
Sleep OFF / 1 min / 3 min / 5 min
Rec Data ON / OFF
CD field ON / OFF
Add const Integer between 1 and 999,999
Spectra Precision Focus 4 Total Station User Guide 101
Menu Screen 5
Other settings
Press [8] or select Other in the Settings menu. The Others menu appears.
<<Sorry, your instructions were not clear to me - do I need to replace the table below
and the snap with the
XYZ disp defines the speed to move to the next screen after showing XYZ of the input
point.
When the secondary unit is set to a unit, an extra display screen is available in the
BMS, layout observation screens, and L–O from line screens. The extra screen shows
the HD, VD, and SD in the secondary unit.
If you select US-Ft or I-Ft, an additional settings screen
appears. Use this screen to specify whether to display
values in Decimal-Ft or Ft-Inch.
The CD Input field sets the default input mode when a
CD field appears.
In the Language field, use [<] / [>] to open the language
screen and [v] / [^] to select the required language. Press
[ENT] to confirm. In the Reboot confirmation screen,
press [ENT] to restart the instrument. The instrument
reboots and displays the start-up screen in the selected
language.
The Owner’s Detail field allows you to enter your name
or the name of your company. If you enter a value in this
field, it appears when you start the Focus 4 total station.
To provide easier configuration for common regional
settings, you can quickly configure the Focus 4 total
station to a pre-set combination of default regional
settings. See also Regional configuration, page 49.
XYZ disp Fast / Normal / Slow / +ENT
2nd Unit None / Meter / US-Ft / I-Ft
CD input 123 / ABC
Language English / Russian
Owner’s Detail Up to 20 characters
5 Menu Screen
102 Spectra Precision Focus 4 Total Station User Guide
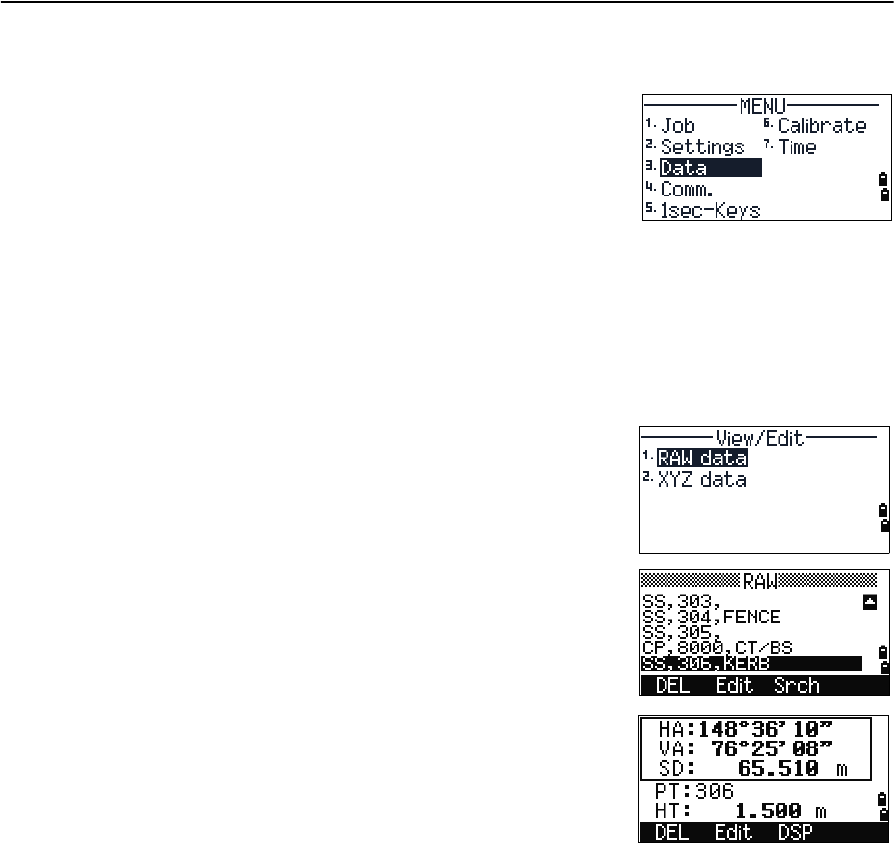
Data
Use the Data menu to view or edit records. To display
the Data menu, press [3] on the MENU screen.
Raw and coordinate data is stored when the Data Rec
setting is ON. If the Data Rec setting is OFF, no data is
recorded in [MENU] / Data / Data Rec.
Viewing records
BTip – You can view data at any time, even in an observation screen.
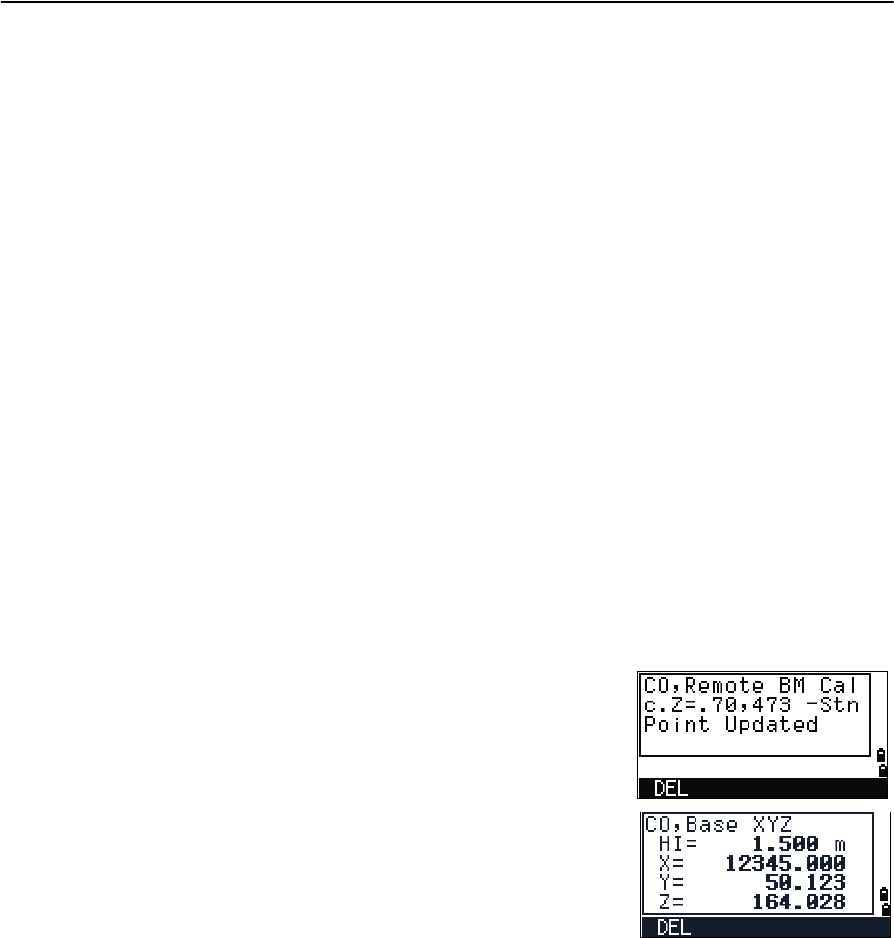
Viewing RAW data
To show the raw data records in a list, press [1] in the
Data menu.
The newest record is at the bottom of the screen.
To scroll through the records, press [^] or [v]. To move up
or down one page, press [<] or [>].
To view more detailed information for a selected
record, press [ENT]. To return to the record list, press
[ESC].
SS and F1 records
Raw SS and F1 records contain PT, HT, CD, HA, VA, and SD fields.
SS records are sideshots (topo shots). All shots taken from the Basic Measurement
Screen (BMS) are stored as SS records.
F1 records are backsight shots that are taken when you set up a station. Coordinates
are not available for an F1 record.
When you take more than one measurement to the same point and choose to
overwrite the XYZ data, the old raw record becomes raw data only. As a result, only
one SS (RAW) record keeps its corresponding SS(XYZ) record. Other SS(RAW) records
to the same point no longer have a record on their coordinates.
Spectra Precision Focus 4 Total Station User Guide 103
Menu Screen 5
ST records
ST (station) records contain ST, HI, BS, and AZ fields.
Press [DISP] to switch between the screens:
•The first screen shows ST, HI, BS, and AZ
•The second screen shows X, Y, Z, PT, and CD
SO records
SO records are layout (L-O) shots. There shots are recorded in stakeout functions.
Press [DISP] to switch between the screens:
•The first screen shows HA, VA, SD, PT, and HT
•The second screen shows X, Y, Z, PT, and CD
•The third screen shows dX, dY, dZ, PT, and CD
The dX, dY, and dZ fields store the difference between the actual position and the
planned position of the stakeout shot. These fields are downloaded as comment
records in Nikon RAW format.
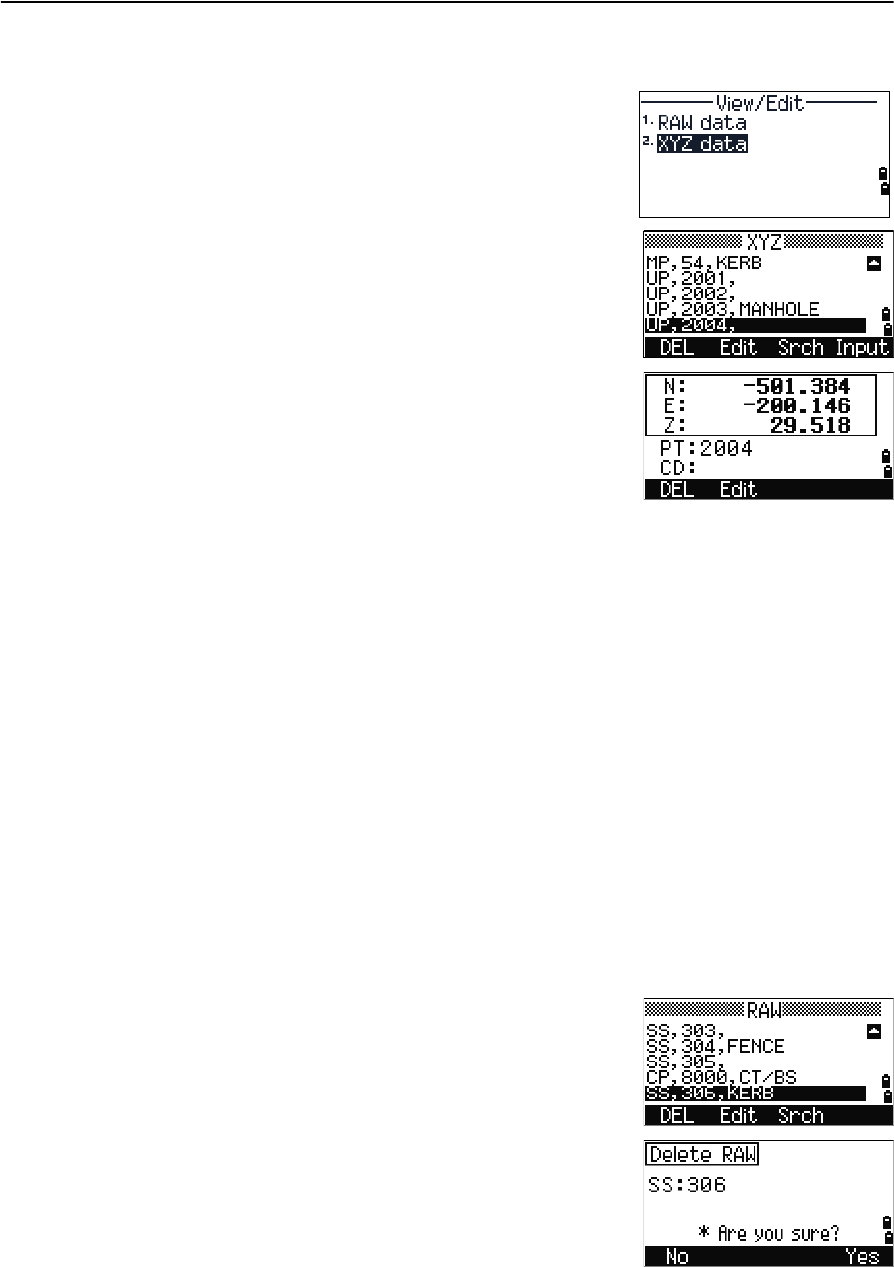
CO records
A CO record is a comment that is added to the job by the system.
For example, the system writes a comment record
when you use the Remote Benchmark function to
change the Stn-Z, or when you use the BSCheck
function to reset the horizontal angle.
When you enter a Stn-XYZ by Base-XYZ function, the
recorded station appears as a comment record.
5 Menu Screen
104 Spectra Precision Focus 4 Total Station User Guide
Viewing coordinate data
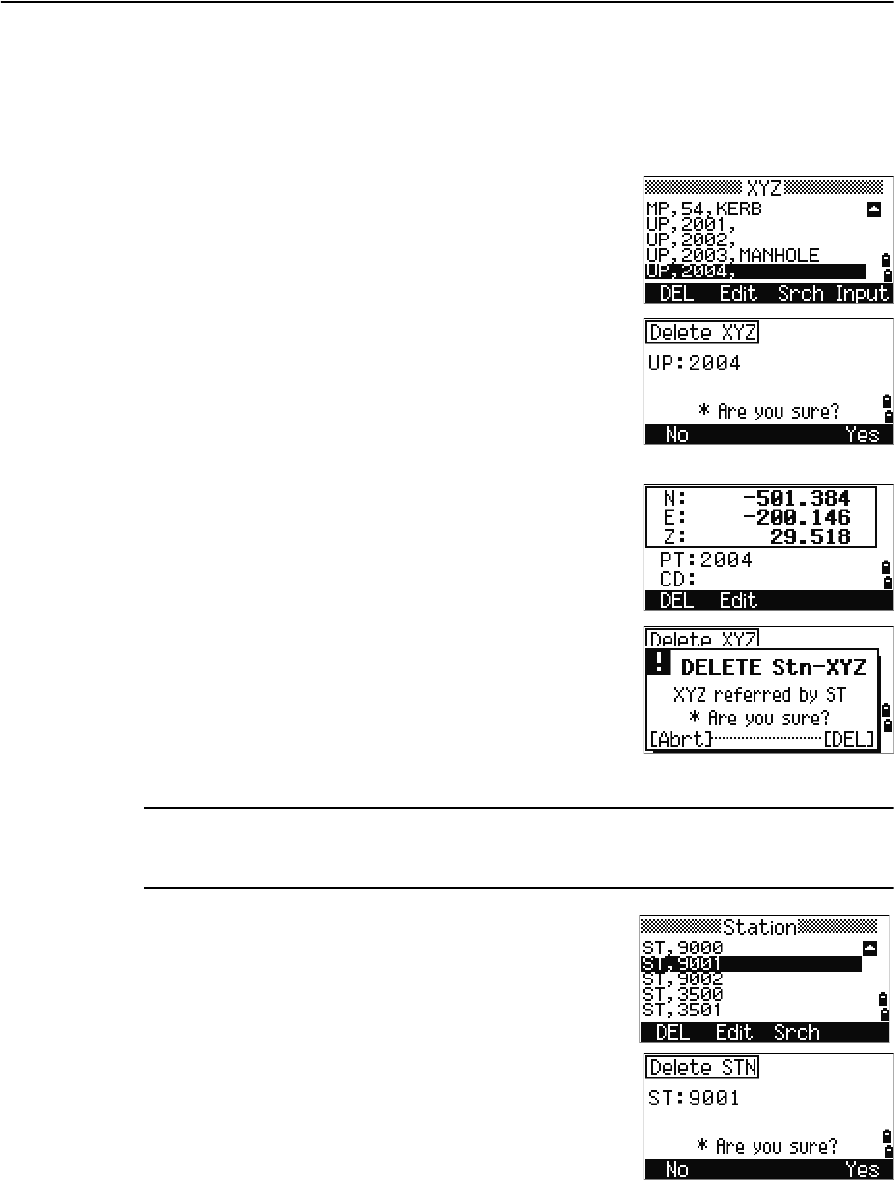
To show the coordinate data records in a list, press [2] in
the Data menu.
The newest record is at the bottom of the screen.
To scroll through the records, press [^] or [v]. To move up
or down one page, press [<] or [>].
Press [ENT] to see more detailed information about the
selected record.
The header (XYZ, YXZ, NEZ, or ENZ) depends on the Coord. Label setting in
[MENU] / Settings / Coord. See also Coordinate, page 99.
UP, MP, CC, and RE records
All coordinate records contain PT, CD, X, Y, and Z fields.
•UP records are uploaded point coordinates.
•MP records are manually input point coordinates.
•CC records are points calculated in Cogo.
•RE records are points calculated in Base Line and Resection station setup.
Deleting records
Deleting raw records
1. In the RAW screen, use [^] or [v] to highlight the
record that you want to delete. Then select the
DEL softkey.
2. A confirmation screen appears.
a. To delete the selected record, press [ENT] or
select the Yes softkey.
b. To cancel the deletion of data, press [ESC] or
select the No softkey.
Spectra Precision Focus 4 Total Station User Guide 105
Menu Screen 5
The system also deletes the corresponding coordinate data when you delete an SS or
SO record.
Deleting coordinate records
1. In the XYZ screen, use [^] or [v] to highlight the
record that you want to delete. Then select the
DEL softkey.
2. A confirmation screen appears.
a. To delete the selected record, press [ENT] or
select the Yes softkey.
b. To cancel the deletion of data, press [ESC] or
select the No softkey.
Alternatively, delete coordinate data by selecting the
DEL softkey in the detailed display screen for the
record.
If the record that you want to delete is referred by any
ST record, a warning message appears.
Deleting station records
CCAUTION – There is no undelete function on the instrument. Before you confirm the
deletion by pressing the DEL softkey, make sure that you have selected the correct
station record.
1. In the Station screen, use [^] or [v] to highlight the
record that you want to delete. The select the
DEL softkey.
2. A confirmation screen appears.
a. To delete the selected record, press [ENT] or
select the Yes softkey.
b. To cancel the deletion of data, press [ESC] or
select the No softkey.
5 Menu Screen
106 Spectra Precision Focus 4 Total Station User Guide
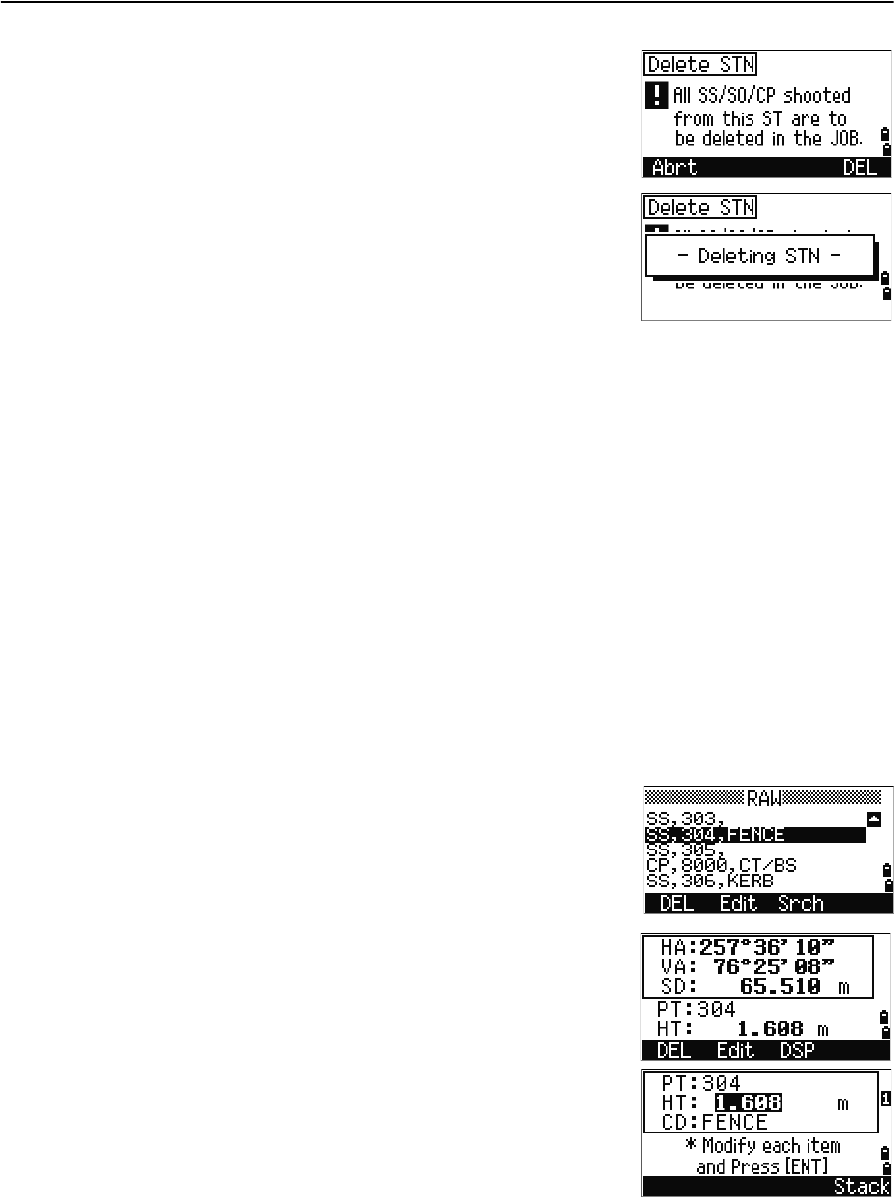
3. If you select Yes, a warning screen appears.
Select the DEL softkey to confirm the deletion.
Note – You cannot press [ENT] in this screen.
All observations from the station that you
selected are deleted.
Editing raw records
For any point record, you can edit the following:
•Point name (PT)
•Feature code (CD)
•Height of target (HT)
•Height of instrument (HI)
•Backsight point (BS)
•Backsight azimuth (AZ)
You cannot edit the following:
•The CD field for SO and F1 records
•HA, VA, or SD values
1. Do one of the following:
–In the RAW screen, use [^] or [v] to highlight
the record to edit. Then select the Edit
softkey.
–In the detailed data screen, select the Edit
softkey.
2. Use [^] or [v] to highlight a field. Then modify the
value in the selected field.
Note – When you change the HT of an SS or SO
measurement record, the Z coordinate is recalculated.
Spectra Precision Focus 4 Total Station User Guide 107
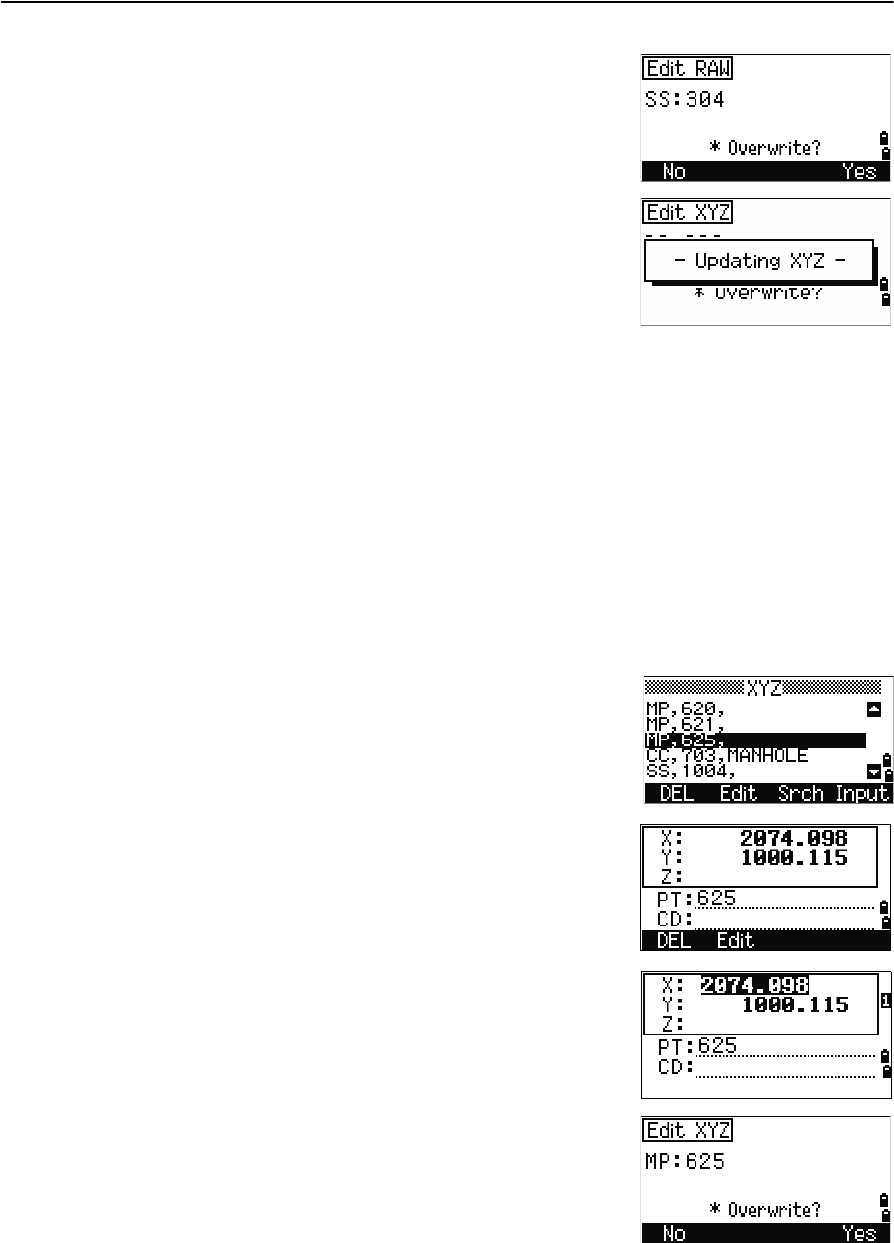
Menu Screen 5
3. Press [ENT] in the last line of the edit screen. A
confirmation screen appears.
4. Do one of the following:
–To accept the changes and return to the
data view screen, press [ENT] or select the
Yes softkey.
–To return to the Edit screen, press [ESC] or
select the No softkey.
Editing coordinate records
You can edit PT, CD, and coordinate values.
You cannot edit:
•The coordinate record for the current station
•SS and SO records
•Record referred by Station
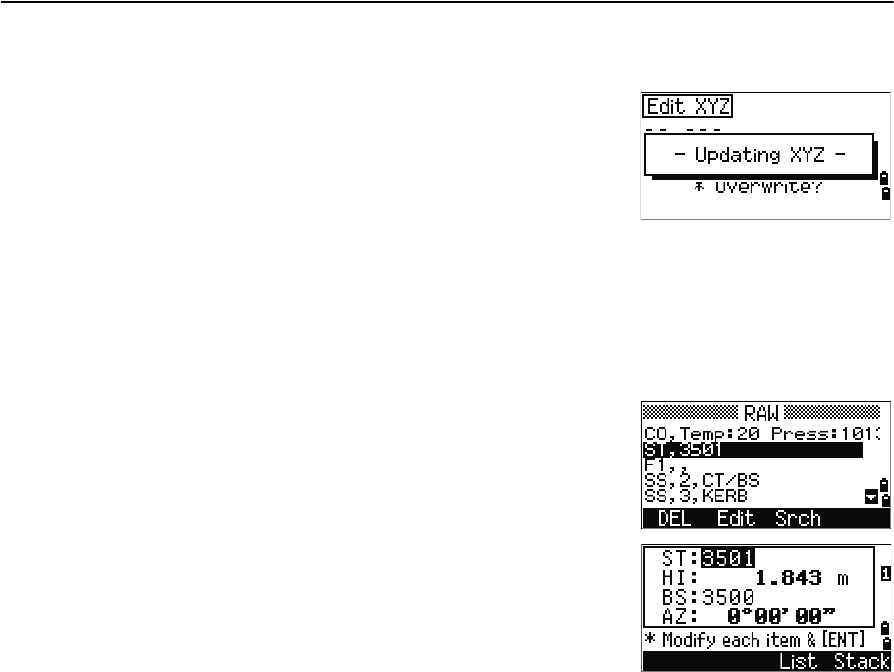
To edit coordinate records:
1. Do one of the following:
–In the XYZ screen, use [^] or [v] to highlight
the record to edit. Then select the Edit
softkey.
–In the detailed data screen, select the Edit
softkey.
2. Use [^] or [v] to highlight a field. Then modify the
value in the selected field.
3. To finish editing, press [ENT] in the CD field. A
confirmation screen appears.
5 Menu Screen
108 Spectra Precision Focus 4 Total Station User Guide
4. Do one of the following:
–To accept the changes and return to the
data view screen, press [ENT] or select the
Yes softkey.
–To return to the Edit screen, press [ESC] or
select the No softkey.
Editing station records
Note – The system will not recalculate measurements if you change the station record. You
will need to recalculate all coordinate and raw data that was collected from an edited
station record in your postprocessing software.
1. In the RAW screen, use [^] or [v] to highlight the
station record to edit. Then select the Edit
softkey.
2. Use [^] or [v] to highlight a field. Then modify the
value in the selected field. You can edit any field
in the ST record, but the instrument does not
recalculate the measurements from this station.
3. To finish editing, press [ENT] in the AZ field.
If you change the ST and HI values, the
coordinates of observation points are not recalculated. A comment record is
stored to record the change. The following is a comment record for a changed HI
value: CO, HI changed at ST:9012 Old HI = 1.3456m
If you change the BS or AZ values, raw records are not recalculated. A comment
record is stored to record the change.