NIKON TRIMBLE NT0001 Bluetooth module User Manual Spectra Precision Focus 4 Total Station User Guide
NIKON-TRIMBLE CO., LTD. Bluetooth module Spectra Precision Focus 4 Total Station User Guide
Contents
Host 1 user manual 4 of 4
Spectra Precision Focus 4 Total Station User Guide 109
Menu Screen 5
Searching records
You can search for records by their type, point name, code, or by any combination of
these values.
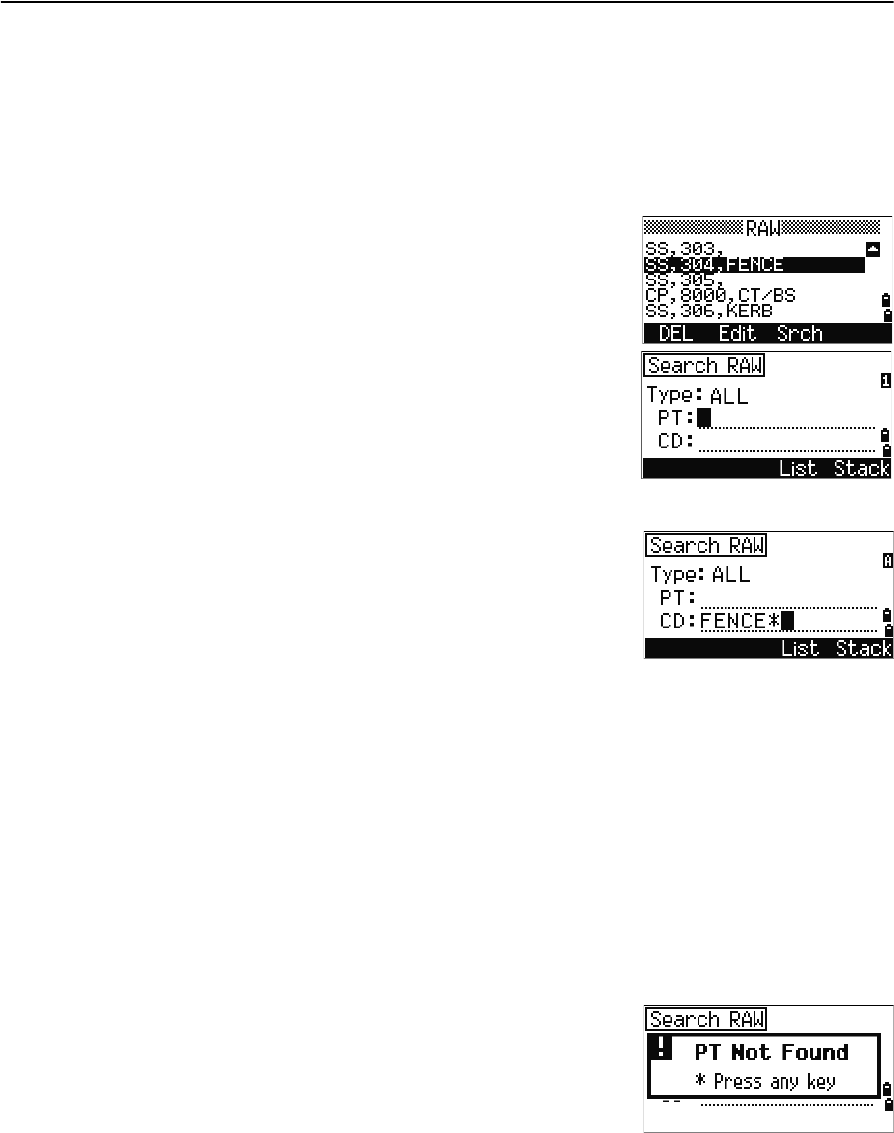
Searching raw records
In the RAW screen, select the Srch softkey to access
the raw data search function.
•To find a point by name, enter the name in the
PT field and press [ENT] twice.
You can use the asterisk (*) as a wildcard. For
example, when you enter 30* in the PT field, the
search matches the points named 300, 301, 302,
3000A2, and 3010.
•To find a record by point type, move to the Type
field and use [<] or [>] to change the selected point
type. The options are ALL, ST, SS, SO, and CO.
You can then enter a value in the Code field.
–If you select ST or SO in the Type field, you
do not have to enter a value in the CD field.
Press [ENT] in the PT field to start the search.
–If you select CO in the Type field, you cannot enter a value in the PT or CD
fields. Press [ENT] in the Type field to start the search.
If more than one point matches the specified criteria, the matching points are
displayed in a list. Use [^] or [v] to highlight the point that you want to use and then press
[ENT] to select it.
Detailed data for the selected record appears. Do one of the following:
•To change the fields, select the DSP softkey.
•To return to the list, press [ENT].
•If no point matches the specified criteria, an
error screen appears. Press any button to return
to the data screen.
5 Menu Screen
110 Spectra Precision Focus 4 Total Station User Guide
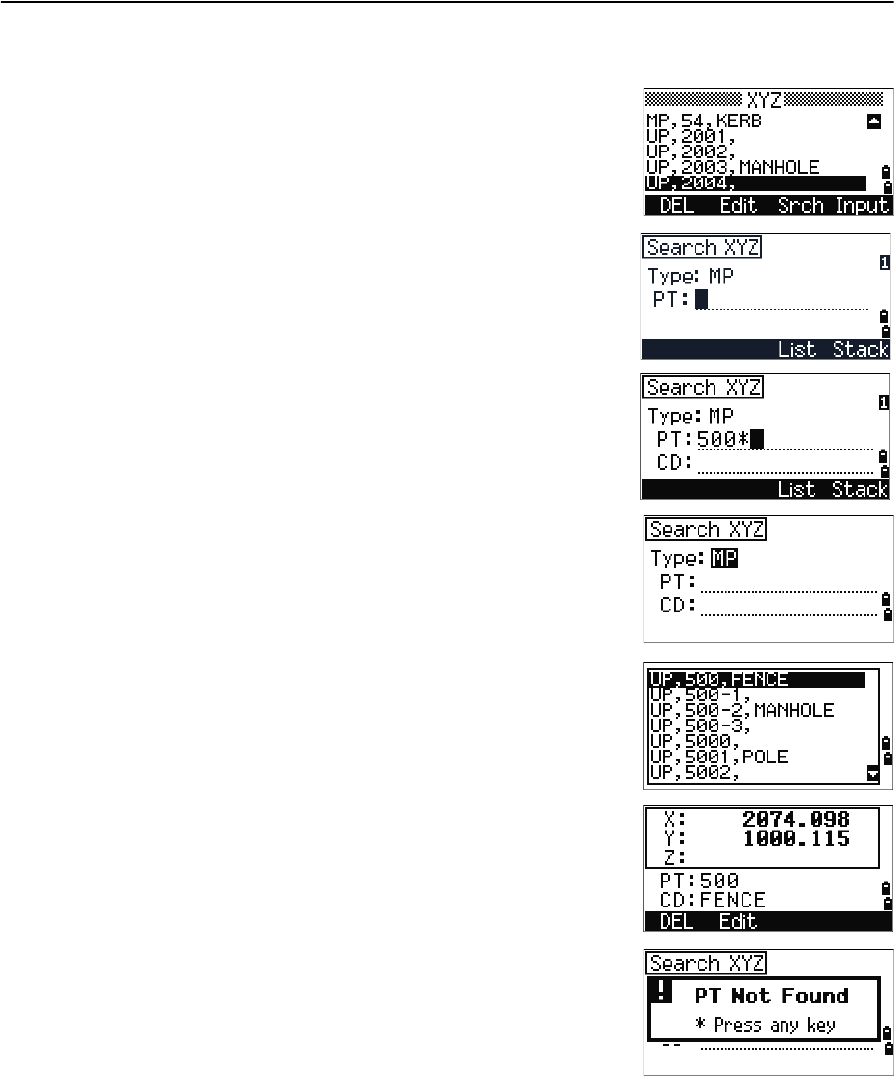
Searching coordinate records
In the XYZ screen, select the Srch softkey to access the
XYZ data search function.
•To find a coordinate by name, enter the point
name in the PT field and press [ENT] twice.
You can use the asterisk (*) as a wildcard. For
example, when you enter 500* in the PT field, the
search matches the points named 500, 500-1,
500-A, and 5000.
•To search for a record by point type, move to the
Type field and use [<] or [>] to change the selected
point type. The options are ALL, SS, SO, MP, UP,
and CC.
If more than one point matches the search
criteria, the matching points are displayed in a
list. Use [^] or [v] to highlight the point you want to
use and then press [ENT] to select it.
If no point matches the specified criteria, an error
screen appears. Press any button to return to the data
screen.
Spectra Precision Focus 4 Total Station User Guide 111
Menu Screen 5
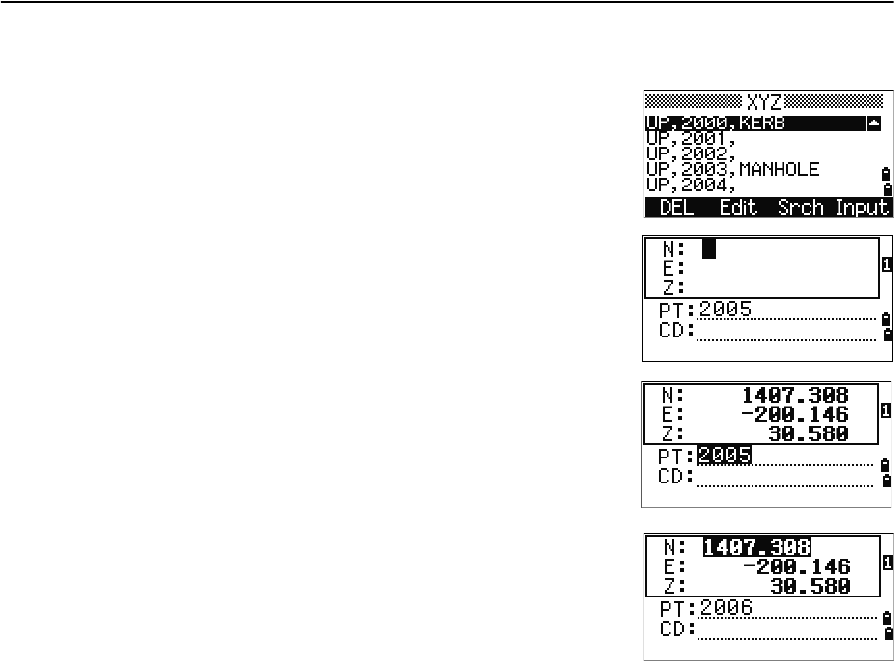
Entering coordinates
1. In the XYZ screen, select the Input softkey. A
new input point screen appears.
The PT field defaults to the last recorded PT + 1,
but you can change the value shown.
2. Use the numeric keys to enter the coordinates.
Press [ENT] or [v] in each field to move to the next
field.
When you press [ENT] in the CD field, the point is
stored as an MP record.
After you have recording a point, the next point input
screen is shown with the updated default PT.
You can record NE, NEZ, or Z-only data in the database.
5 Menu Screen
112 Spectra Precision Focus 4 Total Station User Guide
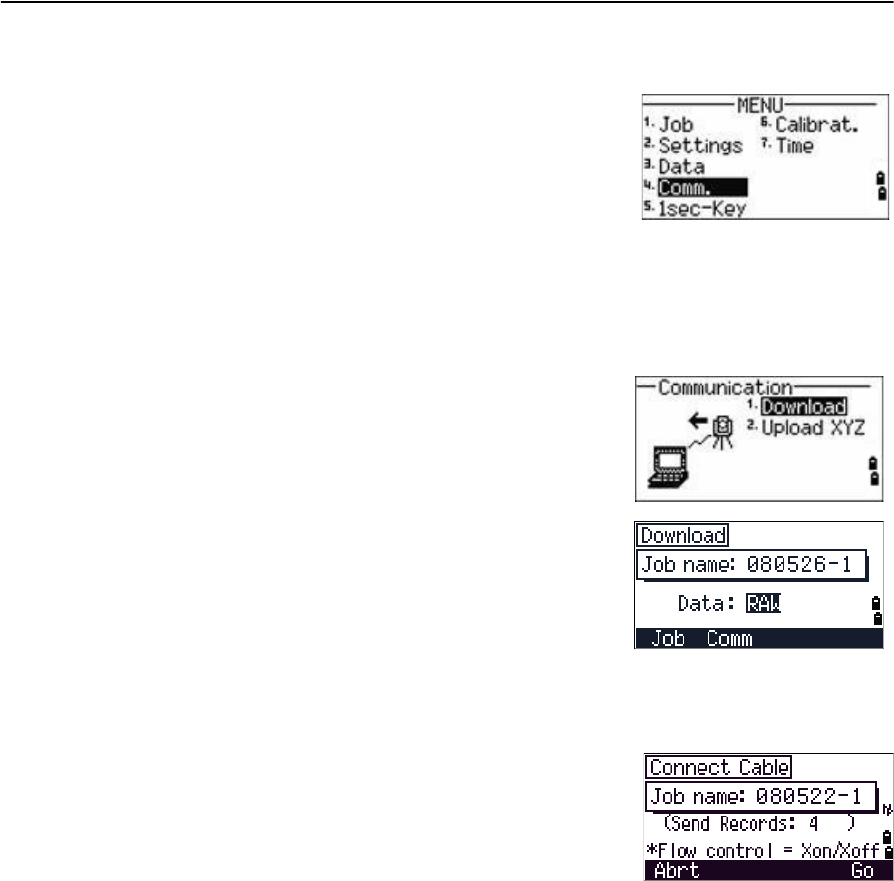
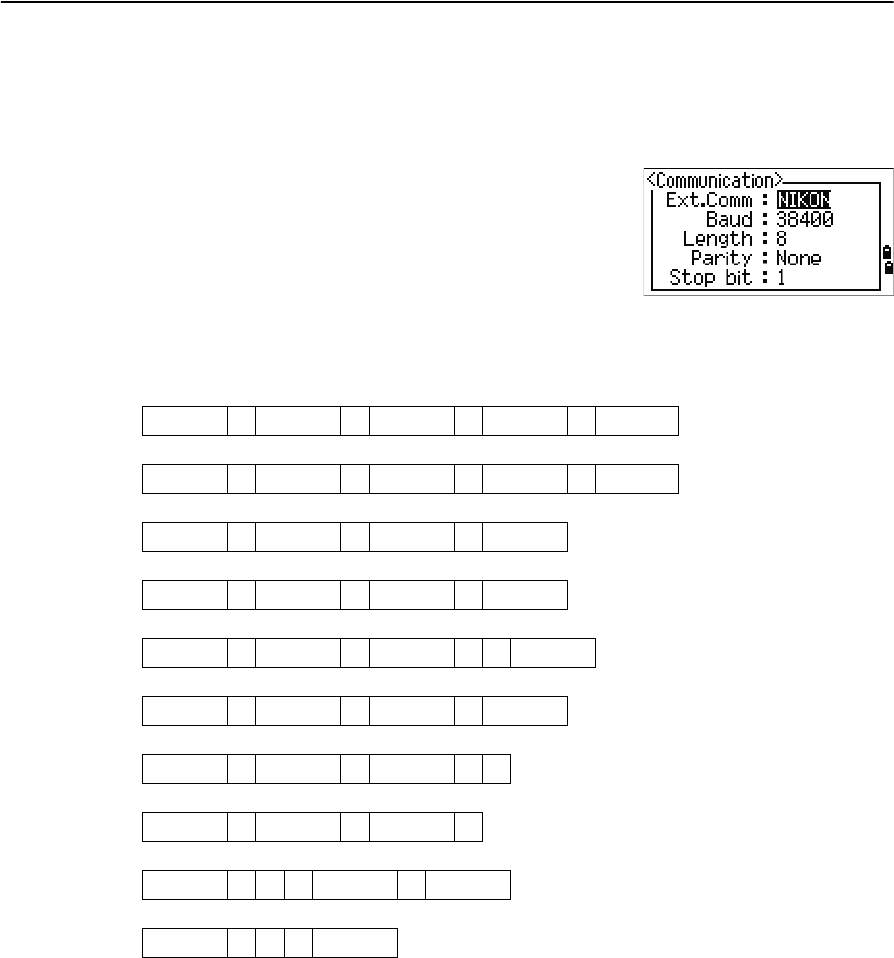
Communication
Use the Communication menu to download or upload
data. To access it, press [4] or select Comm. on the
MENU screen.
Downloading coordinate data
To change the download settings, press [1] or select Download in the Communication
menu.
To display the total number of records that will be downloaded, press [ENT] in the Data
field.
As each record in the current job is output from the
Focus 4 total station, the current line number is
updated.
Once transferring is completed, you can choose
whether to delete the current job:
•To delete the current job, press [4].
•To return to the Basic Measurement Screen (BMS) without deleting the current
job, press [ESC] or select the Abrt softkey.
Format NIKON (Fixed)
Data RAW
Coordinate

Spectra Precision Focus 4 Total Station User Guide 113
Menu Screen 5
Optional Bluetooth function
When the optional Bluetooth wireless technology
function is installed, a Port selection screen appears
when you press the Comm softkey.
Uploading coordinate data
To upload coordinate data from a computer, press [2] or
select Upload XYZ in the Communication menu.
The default data format appears.
To change the order of data fields, select the Edit
softkey. See also Advanced feature: Editing the data
order for upload, page 114.
Otherwise, press [ENT].
Select the Job softkey to go to the Job Manager screen. See also Job, page 92.
To change the communication settings, select the Comm
softkey. The serial port settings must match the settings
used by the terminal software on the computer.
Use an RS-232C cable to connect the Focus 4 total
station to the computer. In the terminal program, set
flow control to Xon/Xoff.
The Free space field shows the number of points that
can still be stored on the Focus 4 total station.
Press [ENT] to put the Focus 4 total station in receive mode. On the computer, choose
the Send Text File command in the terminal program to start sending data.
As each point is received by the instrument, the value in the Records field is
incremented.
5 Menu Screen
114 Spectra Precision Focus 4 Total Station User Guide
If you press [ESC] during data upload, the upload is canceled and the display returns to
the Communication menu. Records that were received before you pressed [ESC] are
stored in the job.
During upload, the system will truncate any code that is longer than 16 characters.
If the existing point is a UP, CC, or MP record, and it is not referred to by any station or
backsight, it is automatically overwritten by the uploaded point. No error message
appears.
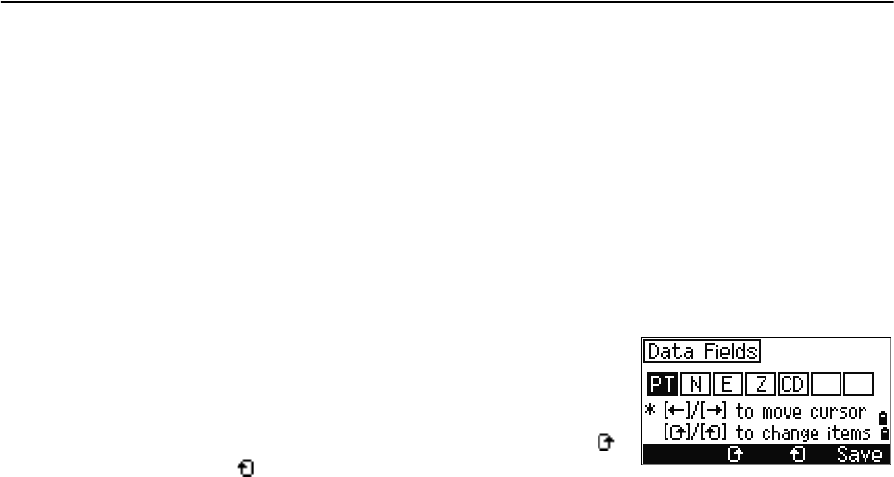
Advanced feature: Editing the data order for upload
1. Select the Edit softkey. The Data Fields screen
appears.
2. To move between the fields, press [<] or [>].
3. To change the selected item in a field, use the
and softkeys. The options are PT, N, E, Z, CD,
or blank.
4. To save your changes and return to the previous screen, select the Save softkey.
For example, if your original data is as follows:
1, 30.000, 20.000, L1
and you set the data fields to PT N E CD, then the uploaded data is:
PT=1, N=30.000, E=20.000, CD=L1
For more information about coordinate data, see Transferring coordinate data to the
total station, page 124.
Uploading coordinates without points
You can upload data without points. If you do not include a point in the format
definition, each line of data is automatically assigned the next available point number.
To help you to select points in the field, make sure that you store an identifier in the CD
field.
The data format cannot include duplicate items. Use PT, N, E, Z, and CD once each in
the data format.
To skip an item in your original file, set the corresponding field to blank.
Spectra Precision Focus 4 Total Station User Guide 115
Menu Screen 5
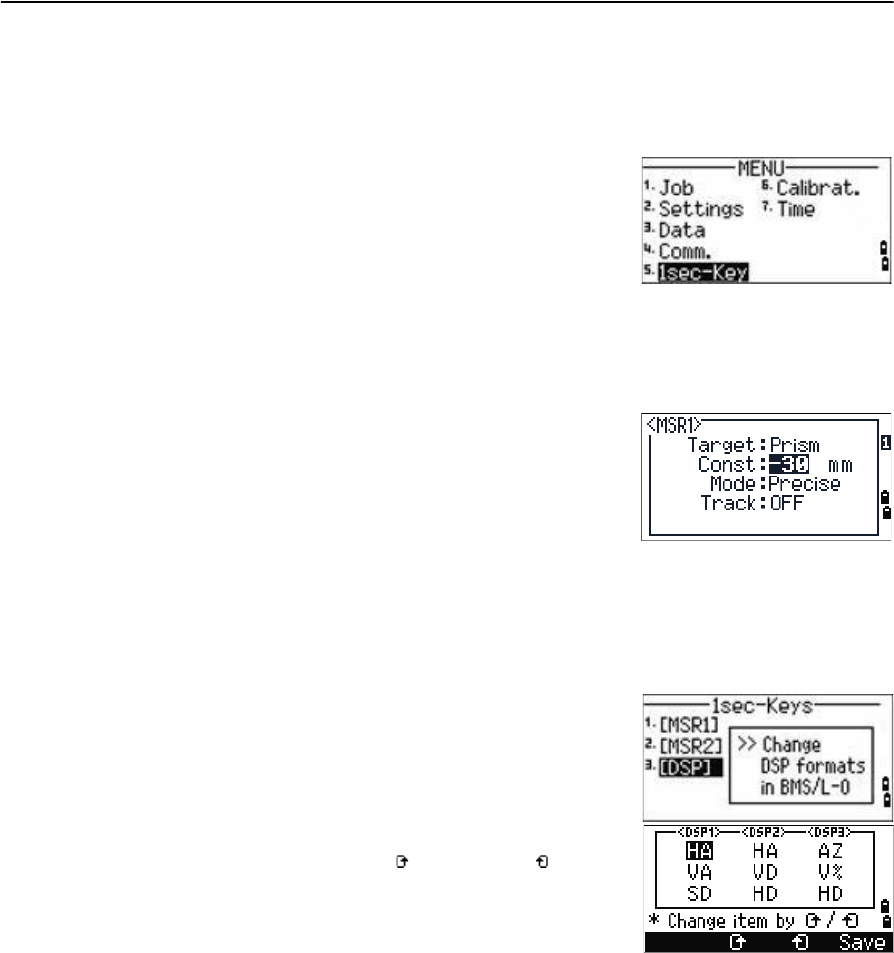
1sec-Key
Use the 1sec-Key menu to configure the settings for the one-second buttons, [MSR1],
[MSR2], and [DSP].
To access it, press [5] or select 1sec-Keys in the
MENU screen.
[MSR] button settings
There are two [MSR] buttons:
•To change the settings for the [MSR1] button, press [1] or select MSR1.
•To change the settings for the [MSR2] button, press [2] or select MSR2.
Each [MSR] button has four settings.
In the Const and Track field, use the numeric keys to
enter values. In the other fields, use [<] or [>] to change
the settings.
BTip – To quickly access the settings screen, hold down [MSR1] or [MSR2] for one second.
[DSP] button settings
To change the display items in the BMS and in Layout
observation screens, press [2] or select [DSP] in the
1sec-Keys menu.
To move the cursor, use [<], [>], [^] or [v]. To change the
display item, press either the softkey or the softkey.
To save the changes, press [ENT] from the last line of
<DSP3> or select the Save softkey.
BTip – To quickly access the DSP settings screen, hold down [DSP] for one second.

5 Menu Screen
116 Spectra Precision Focus 4 Total Station User Guide
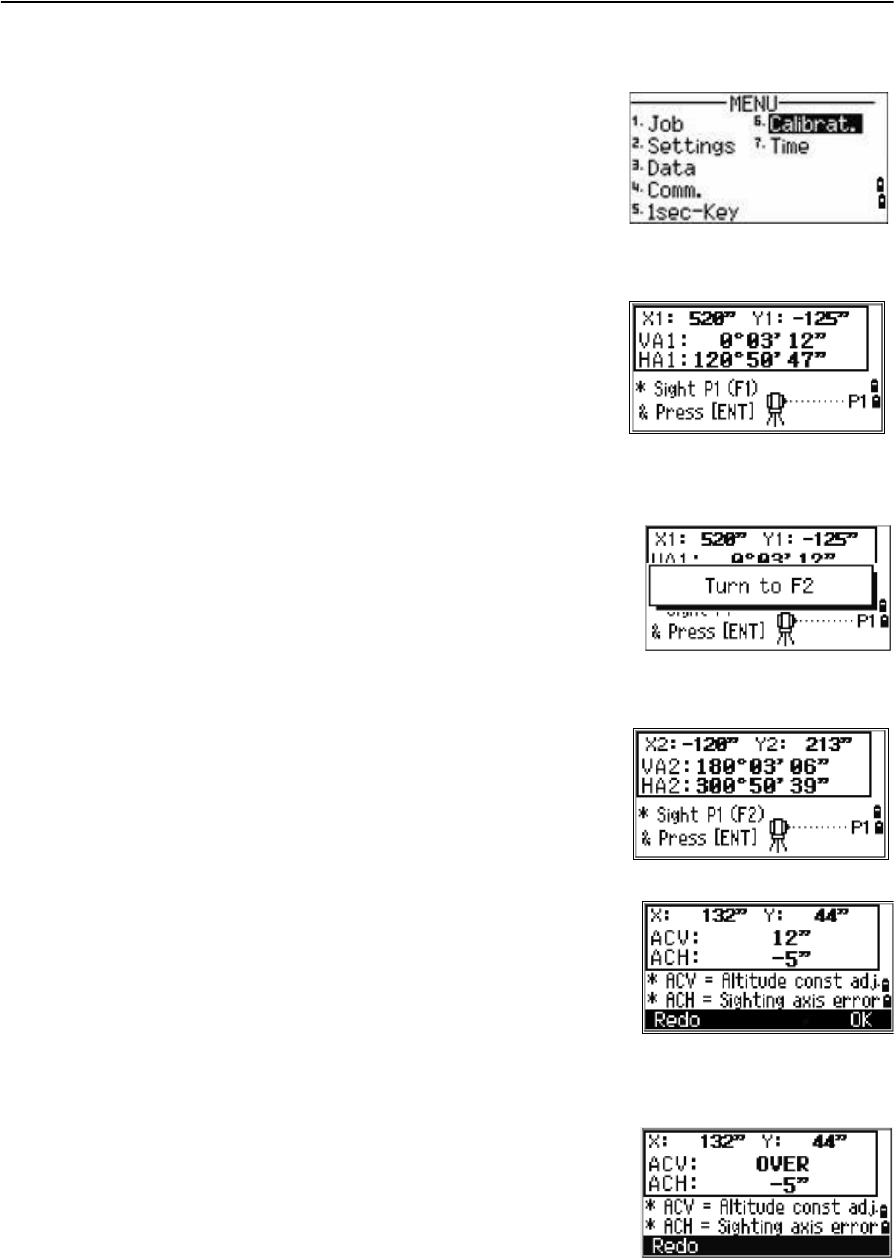
Calibration
Use the Calibration screen to calibrate the instrument if
required. To access the Calibration screen, press [6] or
select Calibrat from the MENU screen.
See also Adjusting the calibration, page 120.
Time
Use the Date & Time screen to set the current date and
time.
1. Press [7] or select Time on the MENU screen. The
Date & Time screen appears.
The current date and time settings are displayed.
2. Enter the date in Year-Month-Day format. For example, to change the date to
August 15, 2006 press [2] [0] [0] [6] [ENT] [8] [ENT] [1] [5] [ENT].
If the highlighted part of the field ( for example, the year) is already correct, press
[ENT] to use the current value. For example, if the date is already set to August 20,
2006, and you want to change the date to August 25, 2006, press [ENT] [ENT] [2] [5]
[ENT].
3. To move to the Time field, press [ENT] from the
Date field:
4. Enter the time in 24-hour format. For example, to
set the time to 4:35 PM, press [1] [6] [ENT] [3] [5] [ENT].
5. Do one of the following:
–To finish setting the date and time, press [ENT] in the Minutes field.
–To cancel the changes, press [ESC].

CHAPTER
6
Spectra Precision Focus 4 Total Station User Guide 117
Checking and Adjusting 6
In this chapter:
Adjusting the electronic level
Checking and adjusting the
circular level
Checking and adjusting the
optical/laser plummet
Zero point errors of vertical scale
and horizontal angle corrections
The instrument constant
Checking the laser pointer
This chapter describes how to check the
accuracy of the Focus 4 total station, and if
necessary, adjust the required settings.
6 Checking and Adjusting
118 Spectra Precision Focus 4 Total Station User Guide
Adjusting the electronic level
To adjust the electronic level, Zero point errors of vertical scale and horizontal angle
corrections are used. See page 119.
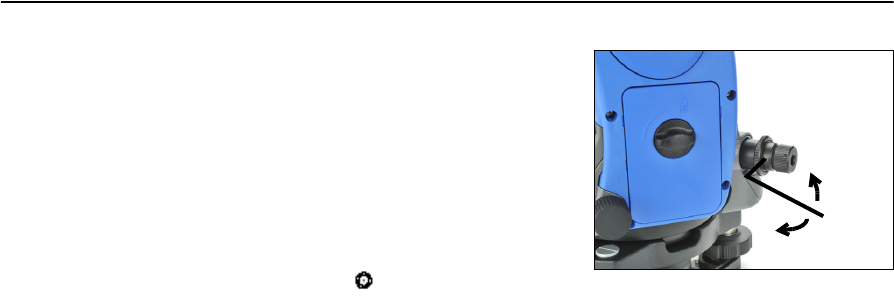
Checking and adjusting the circular level
Once you have checked and adjusted the
electronic level, check the circular level.
If the bubble is not in the center of the level, use
the adjusting pin to rotate the three adjustment
screws of either circular level on the instrument
main body or tribrach until the bubble is centered.
Checking and adjusting the optical/laser plummet
The optical axis of the plummet must be aligned with the vertical axis of the
instrument.
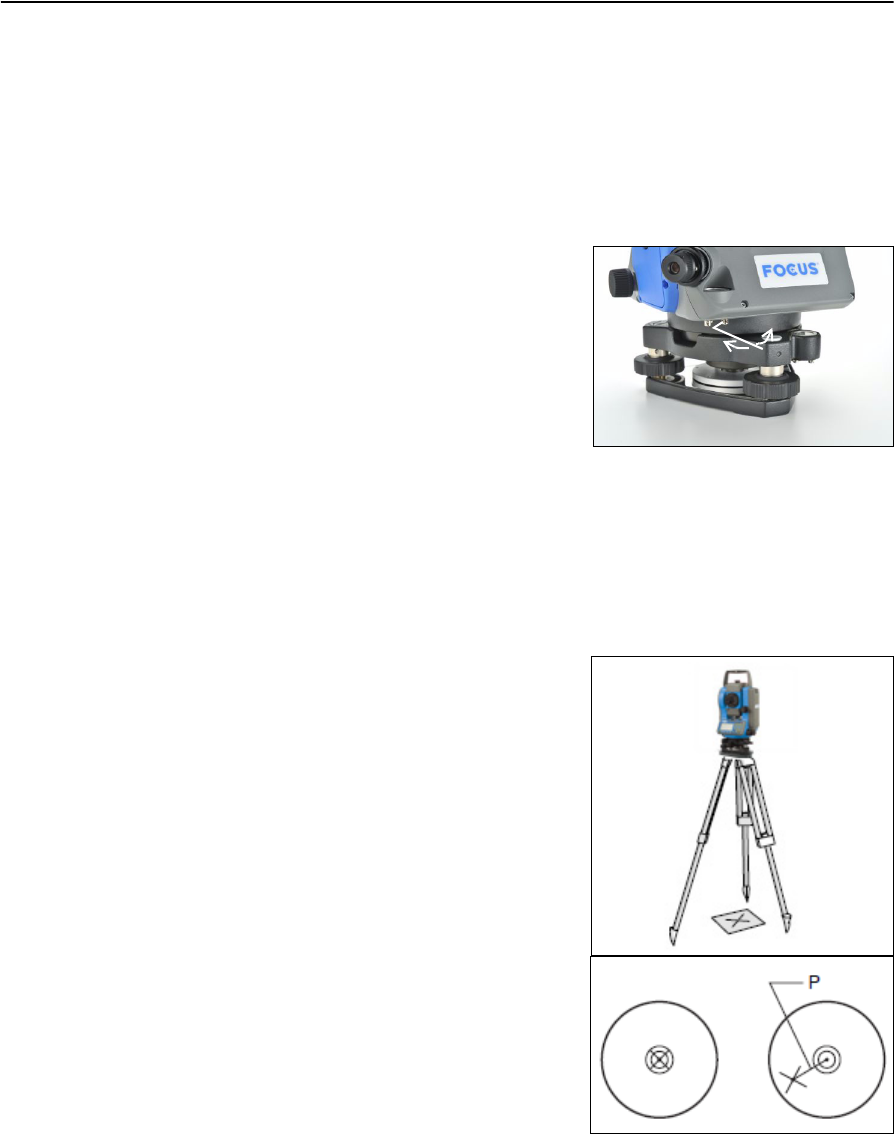
To check and adjust the optical/laser plummet:
1. Place the instrument on the tripod. You do not have to level the instrument.
2. Place a thick sheet of paper marked with an
X on the ground below the instrument.
3. Do the following:
–Look through the optical plummet
and then adjust the leveling screws
until the image of the X is in the center
of the reticle mark .
–For the laser plummet, adjust the laser
pointer to the X.
4. Rotate the alidade by 180°.
–If the marked image is in the same
position in the center of the reticle
mark, no adjustment is required.
–For the laser plummet, if the laser
pointer is on the X, no adjustment is
required.
Spectra Precision Focus 4 Total Station User Guide 119
Checking and Adjusting 6
5. If the image or laser pointer is not in the
same position, adjust the optical or laser
plummet:
a. Use the supplied hexagonal wrench to
turn the adjustment screws until the
image of the X is in Position P. Position
P is the center point of the line
connecting the X and the center of the
reticle mark .
b. Repeat from Step 2. For laser plummet adjustment, you must remove a cap.
Zero point errors of vertical scale and horizontal angle
corrections
Checking the calibration
1. Set up the instrument on the tripod.
2. Follow the leveling procedures described in Leveling the instrument, page 31.
3. Flip the telescope to the Face-1 position. The display and tangent screws are
facing towards you.
4. Sight a target that is within 45° of the horizontal plane.
5. Read the vertical angle from the VA1 field in the Basic Measurement Screen
(BMS).
6. Rotate the instrument 180° and flip the telescope to the Face-2 position. The
display and tangent screws are turned away from you.
7. Read the vertical angle from the VA2 field.
8. Add the two vertical angles together, VA1 + VA2.
–No adjustment is required if the zero reference for vertical angles (VA zero
setting) is set to Zenith, and VA1 + VA2 equals 360°.
–No adjustment is required if the zero reference for vertical angles (VA zero
setting) is set to Horizon, and VA1 + VA2 is either 180° or 540°.
–An adjustment is required if VA1 + VA2 is not one of the values listed above.
Note – The difference between the vertical angle reading the relevant angle (either 360° for
Zenith, or 180° or 540° for Horizon) is called the altitude constant.
6 Checking and Adjusting
120 Spectra Precision Focus 4 Total Station User Guide
Adjusting the calibration
1. Press [MENU] and [7]. The calibration screen
appears.
2. The Focus 4 total station has two-axis level
compensation. Take an F1 measurement to a
target on the horizon. Press [ENT].
The calibration fields for F1 are:
The vertical angle is shown in the V0 dir= Horiz setting.
When you have taken the measurement, the
message on the bottom line changes from DO
NOT TOUCH! to Turn to F2.
3. Take an F2 measurement to the same target.
Press [ENT].
The calibration values for F2 are:
When the observation on F2 is completed, four
parameters are displayed.
4. Do one of the following:
–To return to the first observation screen,
press [ESC] or select the Redo softkey.
–To set parameters on the instrument, press
[ENT] or select the OK softkey.
5. If ACV, ACH, or Tilt is out of range, OVER
appears. Press any key to return to the first
observation screen.
VA1 Face-1 vertical angle (tilt-off value)
HA1 Face-1 horizontal angle (tilt-off
value)
X1 Face-1 X-axis tilt value
Y1 Face-1 Y-axis tilt value
VA2 Face-2 vertical angle (tilt-off value)
HA2 Face-2 horizontal angle (tilt-off
value)
X2 Face-2 X-axis tilt value
Y2 Face-2 Y-axis tilt value
Spectra Precision Focus 4 Total Station User Guide 121
Checking and Adjusting 6
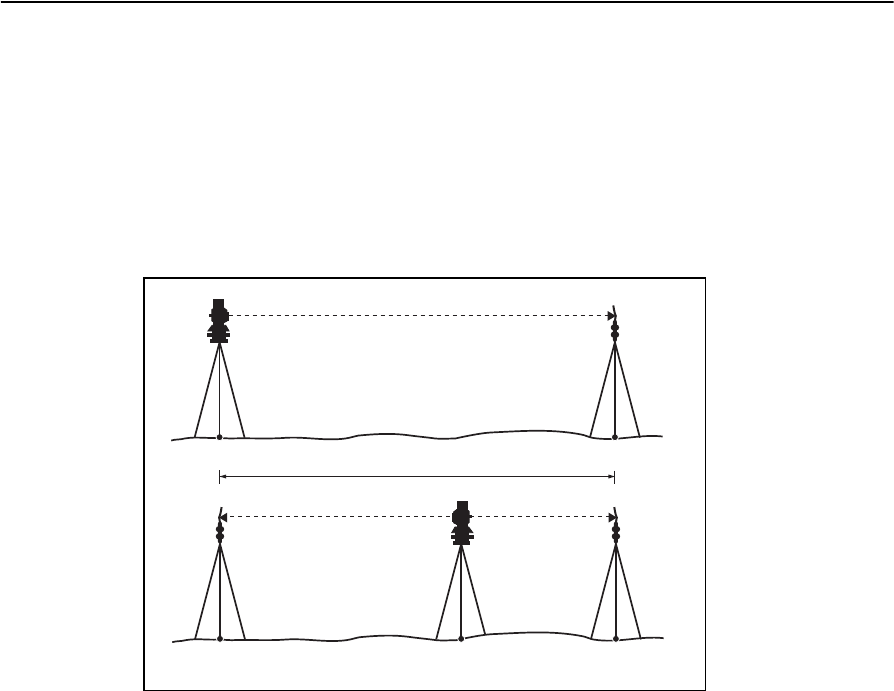
The instrument constant
The instrument constant is a numerical value used to automatically correct for the
displacement between the mechanical and electrical centers when measuring
distances. The instrument constant is set at the factory. However, to ensure the highest
operational accuracy, we recommend that you check the instrument constant several
times a year.
The following figure shows the setup to check the instrument constant.
To check the instrument constant:
1. Set up the instrument at Point P, in as flat an area as possible.
2. Set up a reflector prism at Point Q, 100 m away from Point P. Make sure that you
take the prism constant into account.
3. Measure the distance between Point P and Point Q (PQ).
4. Install a reflector prism on the tripod at Point P.
5. Set up another tripod at Point R, on the line between Point P and Point Q.
6. Transfer the Focus 4 total station to the tripod at Point R.
7. Measure the distance from Point R to Point P (RP), and the distance from Point
R to Point Q (RQ).
8. Calculate the difference between the value of PQ and the value of RP + RQ.
9. Move the Focus 4 total station to other points on the line between Point P and
Point Q.
10. Repeat Step 5 through Step 9 several times (about ten times).
11. Calculate the average of all the differences. The error range is within 3 mm. If the
error is out of range, contact your dealer.
About 100 m
PQ
PRQ

6 Checking and Adjusting
122 Spectra Precision Focus 4 Total Station User Guide
Checking the laser pointer
The Focus 4 total station uses a red laser beam to a laser pointer. The laser pointer is
coaxial with the line of sight of the telescope. If the instrument is well adjusted, the red
laser pointer coincides with the line of sight. External influences such as shock or large
temperature fluctuations can displace the red laser pointer relative to the line of sight.

CHAPTER
7
Spectra Precision Focus 4 Total Station User Guide 123
Transferring Coordinate Data 7
Transferring coordinate data to
the total station
Transferring coordinate data
from the total station
The Focus 4 uses lists of coordinate data. This
chapter describes how to transfer data between
the Focus 4 total station and the office computer.
7 Transferring Coordinate Data
124 Spectra Precision Focus 4 Total Station User Guide
Transferring coordinate data to the total station
Settings
To configure the transmission speed and other settings,
press [MENU] and then select Settings / Comm. See
also Communications, page 99.
Record format
You can transfer coordinate records to the Focus 4 total station in the following
formats:
PT ,X ,Y ,Z ,CD
PTXYZCD
PT ,X ,Y ,Z
PTXYZ
PT ,X ,Y ,,CD
PTXYCD
PT ,X ,Y ,,
PT ,X ,Y ,
PT ,,,Z ,CD
PT ,,,Z
Spectra Precision Focus 4 Total Station User Guide 125
Transferring Coordinate Data 7
The formats use the following codes:
Data example
20100,6606.165,1639.383,30.762,RKBSS
20104,1165611.6800,116401.4200,00032.8080
20105 5967.677 1102.343 34.353 MANHOLE
20106 4567.889 2340.665 33.444 PT1
20107 5967.677 1102.343 34.353
20109,4657.778,2335.667,,PT2
20111,4657.778,2335.667
20113 4657.778 2335.667
20115,,,34.353,MANHOLE
20117,,,33.444
Transferring coordinate data from the total station
Settings
To configure the transmission speed and other settings,
press [MENU] and then select Settings / Comm. See
also Communications, page 99.
Data examples
Nikon coordinate data format
1,100.0000,200.0000,10.0000,
2,200.0000,300.0000,20.0000,
3,116.9239,216.9140,11.8425,TRAIN PLATFORM
4,126.6967,206.2596,11.2539,RAMP
11,100.0045,199.9958,10,0000,
13,116.9203,216.9113,11.7157,
14,126.6955,206.2579,10.9908,
21,100.0103,199.9958,10.0000,
31,100.0013,200.0005,10.0000,
41,100.0224,200.0331,9.9000,
43,116.9263,216,9165,11.8016,CURB
44,126.7042,206.2871,10.8193,DITCH
45,116.9266,216.9160,11.8028,
46,126.7046,206.2845,10.8213,CP POINT
Code Description Length
PT Point number Up to 20 digits
X Actual X coordinate Variable length
Y Actual Y coordinate Variable length
Z Actual Z coordinate Variable length
CD Feature code Up to 16 characters

7 Transferring Coordinate Data
126 Spectra Precision Focus 4 Total Station User Guide

APPENDIX
A
Spectra Precision Focus 4 Total Station User Guide 127
Specifications A
In this chapter:
Main body
Standard components
External device connector
This appendix details the specifications and
standard components of the Focus 4 total
station. It also describes the connector that is
used to connect the instrument to an external
power source or to communicate with an
external device.

A Specifications
128 Spectra Precision Focus 4 Total Station User Guide
Main body
Telescope
Measurement range
Distances shorter than 1.5 m (4.92 ft) cannot be measured with this EDM.
Notes –
The target should not receive direct sunlight.
“Reference target” refers to a white, highly reflective material (KGC 90%).
In reflectorless mode, the maximum measurement range is 500 m (1,640 feet).
Tube length 125 mm (4.91 inch)
Magnification 30×
Effective diameter of objective 45 mm (1.77 inch)
EDM 50 mm (1.97 inch)
Image Erect
Field of view 1°20'
2.3 m at 100 m (2.3 ft at 100 ft)
Resolving power 3.0"
Focusing distance 1.5 m to infinity (59 inch to infinity)
Measurement range with no haze, visibility over 40 km (25 miles)
Prism mode
Reflector sheet (5 cm x 5 cm) 300 m (984 ft)
Standard prism (1P) 5,000 m (16,400 ft)
Reflectorless mode
Reference target 300 m (984 ft)

Spectra Precision Focus 4 Total Station User Guide 129
Specifications A
Distance measurement precision
Measurement intervals
Measurement intervals may vary with the measuring distance or weather conditions;
At the initial measurement, it may take a few more seconds.
Angle measurement
Precise mode
Prism mode ± (3 + 2 ppm × D) mm
–10 °C through +40 °C (+14 °F through +104 °F)
± (3 + 3 ppm × D) mm
–20 °C through –10 °C, +40 °C through +50 °C
(–4 °F through +14 °F, +104 °F through +122 °F)
Reflectorless mode ± (3 + 2 ppm × D) mm
–10 °C through +40 °C (+14 °F through +104 °F)
± (3 + 3 ppm × D) mm
–20°C to –10°C, +40°C through +50°C
(–4 °F through +14 °F), (+104 °F through +122 °F)
Normal mode
Prism mode ± (10 + 5 ppm × D) mm
Reflectorless mode ± (10 + 5 ppm × D) mm
Precise mode
Prism mode 1.5 sec.
Reflectorless mode 1.8 sec.
Normal mode
Prism mode 0.8 sec.
Reflectorless mode 1.0 sec.
Prism offset correction –999 mm to +999 mm (1 mm step)
Reading system Absolute encoder
Diameterial reading on HA
Single reading on VA
Minimum display increment
360° 1"/5"/10"
400G 0.2 mgon / 1 mgon / 2 mgon
MIL6400 0.005 mil / 0.02 mil / 0.05 mil
DIN18723 accuracy 5"/ 1.5 mgon

A Specifications
130 Spectra Precision Focus 4 Total Station User Guide
Tilt sensor
Tangent screws
Tribrach
Level
Optical plummet
Optical laser plummet (option)
Display and keypad
Method Liquid-electric detection (dual axis)
Compensation range ±3’
Type Friction clutch endless fine motion
Type Detachable
Electronic level Displayed on the LCD
Circular level vial Sensitivity 10' / 2 mm
Image Erect
Magnification 3x
Field of view 5°
Focussing range 0.5 m (1.6 ft) to infinity
Wave length 635 nm
Laser class Class 2
Focusing range
8
Laser diameter Approximately 2 mm
Display type Graphical LCD
Resolution 128 × 64
Display illumination Backlight
Keys 25

Spectra Precision Focus 4 Total Station User Guide 131
Specifications A
Connections in the base of instrument
Battery pack
Note – Tested at 25 °C (77 °F) (normal temperature). Operation times may vary depending
on the condition and deterioration of the battery.
Environmental performance
Dimensions
Weight
Communications
Type RS-232C
Maximum baud rate 38400 bps asynchronous
External power supply
input voltage
4.5 V through 5.2 V DC
Output voltage 3.8 V DC rechargeable
Continuous operation time
Continuous distance/angle
measurement
10 hours
Distance/angle measurement every
30 seconds
16 hours
Continuous angle measurement 30 hours
Operating temperature range –20 °C through +50 °C
(–4 °F through +122 °F)
Storage temperature range –25 °C through +60 °C
(–13 °F through +140 °F)
Main unit 149 mm W x 145 mm D x 306 mm H
(5.87 inch W x 5.7 inch D x 12.0 inch H)
Carry case 435 mm W x 206 mm D x 297 mm
(17.1 inch W x 8.1 inch D x 11.7 inch H)
Main unit (without battery) Approximately 3.5 kg (7.7 lbs)
Battery Approximately 0.1 kg (0.22 lbs)
Carry case Approximately 2.4 kg (5.3 lbs)
Charger and AC adaptor Approximately 0.4 kg (0.88 lbs)

A Specifications
132 Spectra Precision Focus 4 Total Station User Guide
Environmental protection
Standard components
•Instrument main body
•Battery pack (x 2)
•Universal Charger, power cord, and adaptors
•Adjustment pin, Allen wrench
•Vinyl cover
•The Spectra Precision Focus 4 Total Station User Guide (this document)
•Carry case
External device connector
This connector can be used to connect to an external power source or to
communicate with an external device.
Before using the external device connector, make sure that the external device meets
the specifications below.
CCAUTION – Except when connected as shown in the System diagram, page 18, use of the
Hirose HR10A-7P-6P or HR10-7P-6P is at your own risk.
CCAUTION – Use only the male connectors specified above. Using other connectors will
damage the instrument.
Watertight/dust-proof protection IP66
Input voltage 4.5 V DC to 5.2 V DC
System RS-232C
Signal level ±9 V standard
Maximum baud rate 38400 bps asynchronous
Compatible male connector Hirose HR10A-7P-6P or HR10-7P-6P
Spectra Precision Focus 4 Total Station User Guide 133
Specifications A
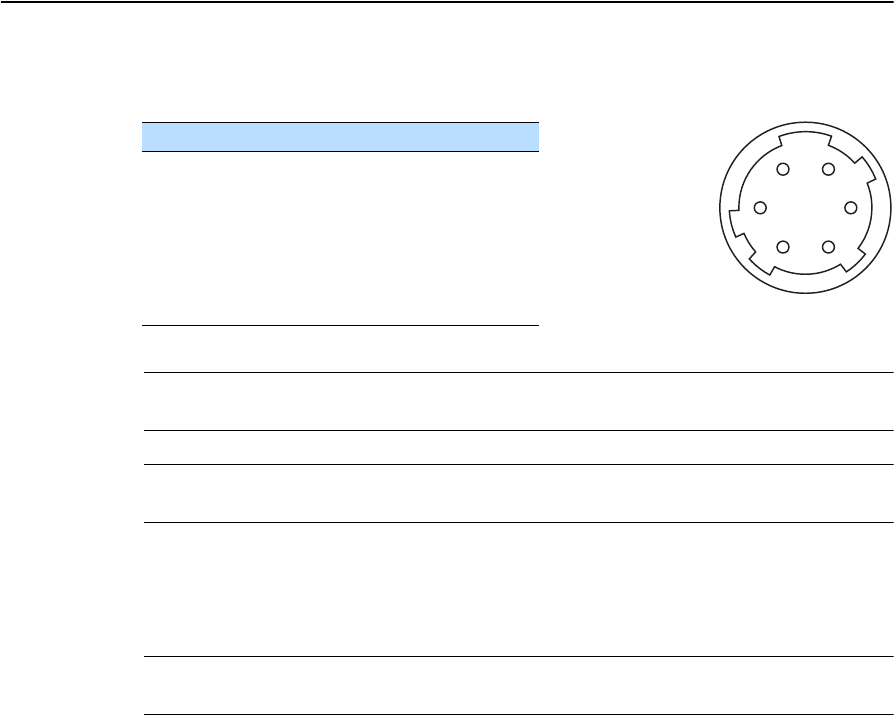
The external device connector is a Hirose HR 10A-7R-6S female connector. The
pinouts for connecting the Focus 4 to an external device connector are shown below:
CCAUTION – Only use the pin connections shown above. Using other connections will
damage the instrument.
CCAUTION – The Focus 4 total station has different pin assignments from other Spectra
Precision total stations.
To connect to an external power source, supply power to Pin 4 (power terminal) and
Pin 5 (ground terminal) on the instrument. The instrument will use the external power
source even if the internal battery packs is attached.
CCAUTION – Make sure that the power supplied is within the rated input range (4.5 V to
5.2 V, 1 A maximum). Power supplied outside this range will damage the instrument.
To communicate with an external device, connect the RS-232C signal from the
external device to Pin 1 (input terminal) and to Pin 2 (output terminal) on the Focus 4.
Cap the data output/external power input connector securely when the Focus 4 is not
in use. The instrument is not watertight if the cap is detached or not attached securely,
or when the data output/external power input connector is in use.
The Focus 4 can be damaged by static electricity from the human body discharged
through the data output/external power input connector. Before handling the
instrument, touch any other conductive material once to remove static electricity.
Pin Signal Description
1 RxD Receive data (Input)
2 TxD Send data (Output)
3 NC No connection
4VPower
5 GND Ground
6 NC No connection
HRS
16
25
34

A Specifications
134 Spectra Precision Focus 4 Total Station User Guide

APPENDIX
B
Spectra Precision Focus 4 Total Station User Guide 135
Error Messages B
In this chapter:
Cogo
Communications
Data
Job manager
Stakeout
Programs
Recording data
Searching
Settings
Station setup
System error
The appendix describes the error messages that
may appear when you use the Focus 4 total
station.

B Error Messages
136 Spectra Precision Focus 4 Total Station User Guide
Cogo
NO Result
The system was unable to calculate an area because points were not entered in the
correct order.
Press any key to return to the Cogo menu. Then enter the points in the correct order.
Same Coordinate
The point or coordinate that you entered is identical to the previous input point.
Press any key to return to the point input screen. Then use a different point.
XY-coordinate is required
The input point does not have XY (NE) coordinates.
Press any key to return to the point input screen. Then enter a point that has X and
Ycoordinates.
Communications
If an error is detected while data is being transferred to the Focus 4 total station, the
Focus 4 total station stops the transfer and displays one of the following messages:
Check Data
There are errors in the data that is being transferred to the Focus 4 total station, such
as an alphabetic character in a coordinate field.
Press any key. Then check the specified line in the data.
DUPLICATE PT
CCAUTION – If the existing point is a UP, CC, or MP record, and the point is not referred to
by ST or BS, the existing point will be overwritten by the uploaded record. No error
message appears.
The uploaded data contains a duplicate PT.
Press any button. Then check the specified point in the data.
PT MAX20 chars
The uploaded data contains a PT with a name or number that is longer than 20 digits.
Press any button. Then check the specified line in the data.
XYZ OVERRANGE
The uploaded data contains a coordinate that is longer than 13 digits.
Press any button. Then check the specified line in the data.

Spectra Precision Focus 4 Total Station User Guide 137
Error Messages B
Data
Can't Edit Current ST
You have tried to edit the current ST.
You cannot edit the current ST.
Note – Old ST records can be edited, but no recalculation can be performed on the
instrument.
Press any key to return to the code/layer name input screen.
Can't Edit ST/BS refer to this PT
You have tried to edit a coordinate that the current ST or BS refers to. You cannot
change a coordinate if the current ST or BS refers to it.
Press any key to return to the Data view screen.
Can't Edit XYZ from measurement
You have tried to change the coordinates of an SO, SS, or CP record. You cannot change
the coordinates of these records.
Press any button to return to the previous screen.
DELETE Stn-XYZ
You have tried to delete a coordinate record that the current ST or BS refers to. You
must confirm that you want to delete this record.
Job manager
Cannot Assign
You have tried to set the current job as the control file.
Press any button to return to the previous screen. Then select a different job.
Can't Create
There is no space available to create a job or record a point.
Press any button to return to the Job Manager. Then select the DEL softkey to delete
old jobs.
Existing Job
You have entered an existing job name for a new job.
Press any button and then change the name for the new job.
To... Press...
delete XYZ the DEL softkey
return to the previous screen without deleting XYZ [ESC] or the Abrt softkey

B Error Messages
138 Spectra Precision Focus 4 Total Station User Guide
MAX 32Jobs
You are trying to create a new job when the maximum number of jobs (32) is already
stored.
Press any button to return to the Job Manager. Then select the DEL softkey to delete
old jobs.
Stakeout
Input Error
The point name style used in the Fr field is not the same as the style used in the To
field. For example, the Fr field style is 1, and the To field style is A200.
Press any button to return to the Fr/To input screen. Then re-enter the point name,
using the same naming style in both fields.
NO Stn Setup
You did not perform a station setup or BS check before entering the Stakeout function.
CCAUTION – Selecting Continue does not resume the last ST record. You should only
use the Continue option if you are sure that the previous ST coordinates and the
current HA orientation are correct. Otherwise, records in the Stakeout function may not
be correct.
To... Press...
go to the Stn Setup menu [2] or select Stn Setup
return to the Basic Measurement
Screen (BMS)
[ESC]
go to the Stakeout menu [1] or select Continue

Spectra Precision Focus 4 Total Station User Guide 139
Error Messages B
Programs
NO Stn Setup
CCAUTION – Selecting Continue does not resume the last ST record. You should only
use the Continue option if you are sure that the previous ST coordinates and the
current HA orientation are correct. Otherwise, records in the Programs function may
not be correct.
You did not perform a station setup or BS check before entering the Programs
function.
Recording data
DATA FULL
The data storage is full.
Press any button to return to the Basic Measurement Screen (BMS). Then:
DUPLICATE PT
The input PT you are trying to record already exists in the current job. An existing
coordinate record cannot be overwritten by measured data.
Press any button to return to the point input screen. Change the setting in the PT field.
Duplicate PT
The input PT you are trying to record already exists in the current job as an SS, SO, or
CP record. An existing SS, SO, or CP record can be overwritten by measured data.
To... Press...
go to the Stn Setup menu [2] or select Stn Setup
return to the BMS [ESC]
go to the Programs menu [1] or select Continue
To... Press...
delete unnecessary data [MENU] and select Data
delete jobs [MENU] and select Job
To... Press...
return to the PT input screen [ESC] or the Abrt softkey
record RAW data and update XYZ
data
the XYZ softkey
record RAW data only the RAW softkey
B Error Messages
140 Spectra Precision Focus 4 Total Station User Guide
No Open Job
No job is open.
NO Stn Setup
There is no station record in the current job, or a station setup or BS check has not
been done since the program was rebooted.
OVER RANGE
You are trying to record a coordinate with more than 13 digits.
Press any button to return to the previous screen. Then check the setting for the
current ST coordinate.
Searching
PT Not Found
There is no point that matches the criteria entered.
Press any button to return to the point input screen.
This message may appear in any function where the PT/CD is input, such as Station
Setup or Stakeout.
To... Press...
open the job list, if there are existing
jobs
[1] or select Select job
create a new job [2] or select Create job
return to the previous screen [ESC]
To... Press...
continue recording [1] or select Continue. If there is already an ST
record in the job, the message CO, Use
current orientation appears.
go to the Stn Setup menu [2] or select STN Setup
return to the previous screen [ESC]

Spectra Precision Focus 4 Total Station User Guide 141
Error Messages B
Settings
Job Settings will be changed
You have changed one or more of the following job settings:
•VA zero or HA in the Angle screen (see Angle, page 96)
•Scale, T-P, Sea Lvl, or C&R in the Distance screen (see Distance, page 96)
•Coord or Az Zero in the Coordinates screen (see Coordinate, page 99)
•Angle, Dist, Temp, or Press in the Unit screen (see Unit, page 99)
Note – To record a point using the new settings, create a new job using the new settings.
Station setup
Same Coordinate
The input PT or coordinate is identical to the current station in STN/2:Known, or the
same coordinate or point name/number is found in Resection.
Press any button to return to the PT input screen. Then use a different PT.
Space LOW
There is not enough space to record a station when you start any of the Station Setup
functions.
XY-coordinate is required
The input point for ST/BS does not have N/E coordinates.
Press any button to return to the PT input screen. Then use a PT that has N/E
coordinates.
To... Press...
discard the changes to the job
settings
[ESC] or the Abrt softkey. The current job remains
open.
close the current job and save the
changes to the job settings
[ENT] or the OK softkey.
To... Press...
return to the BMS press [ESC] or select the Abrt softkey. Select the DEL
softkey in Job Manager to delete old jobs.
continue press [ENT] or select the OK softkey. You may not be
able to record the whole process.

B Error Messages
142 Spectra Precision Focus 4 Total Station User Guide
Z-coordinate is required
The input point for Benchmark does not have a Z coordinate.
Press any button to return to the PT input screen. Then use a PT that has a
Z coordinate. See page 68.
System error
=SYSTEM ERROR=
The system has detected an internal error that is related to the lower-level system.
Press any key to turn the instrument off. The system will reboot when this error is
reported. If you still have more points to shoot in the site, turn the instrument on and
repeat the open a job and station setup procedures.
Data stored before this error will be kept safely in the Job file. If the error appears
frequently, please contact your dealer or Trimble Support and report the message that
appears below the =SYSTEM ERROR= line.

Spectra preciSion
10355 Westmoor Drive, Suite #100
Westminster, CO 80021
USA
+1-720-587-4700 Phone
888-477-7516 (Toll Free in USA)
www.spectraprecision.com