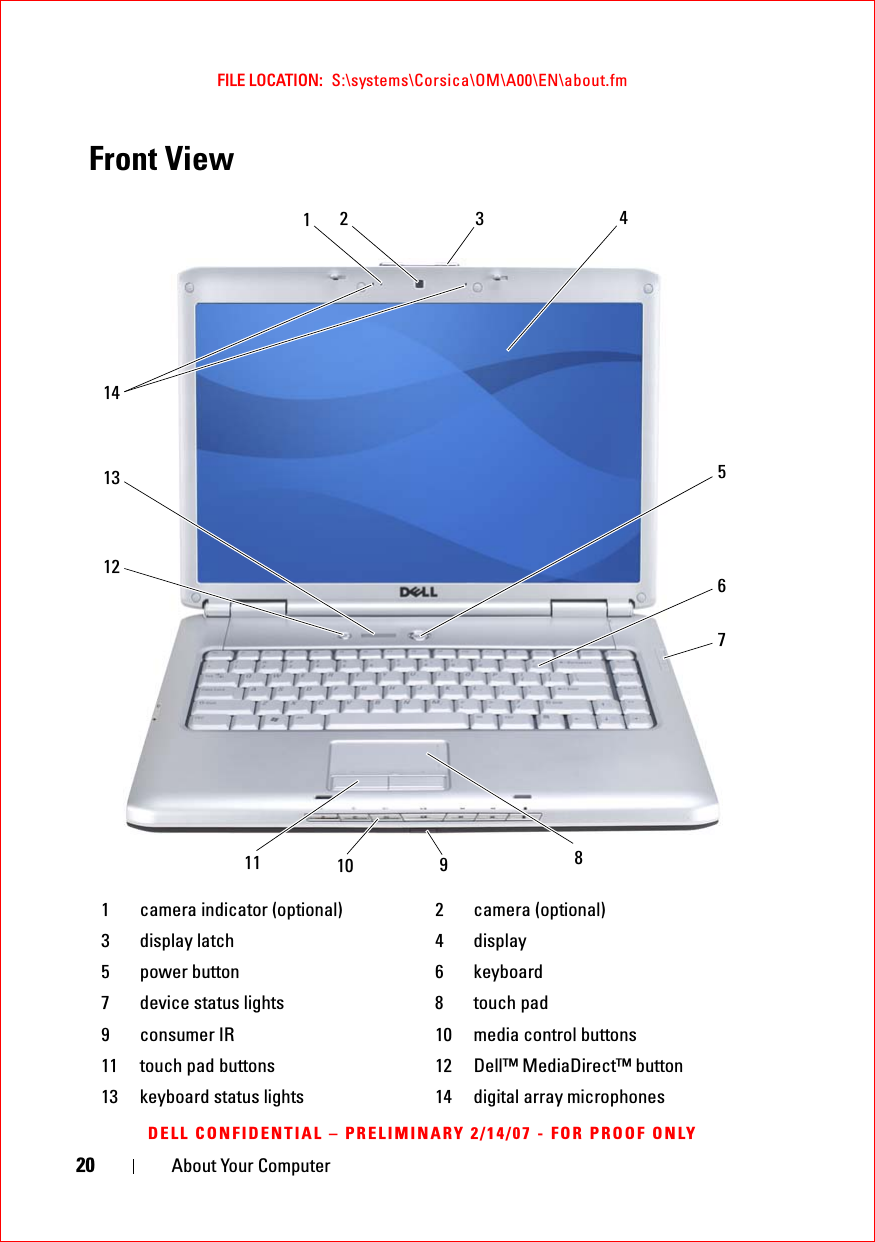
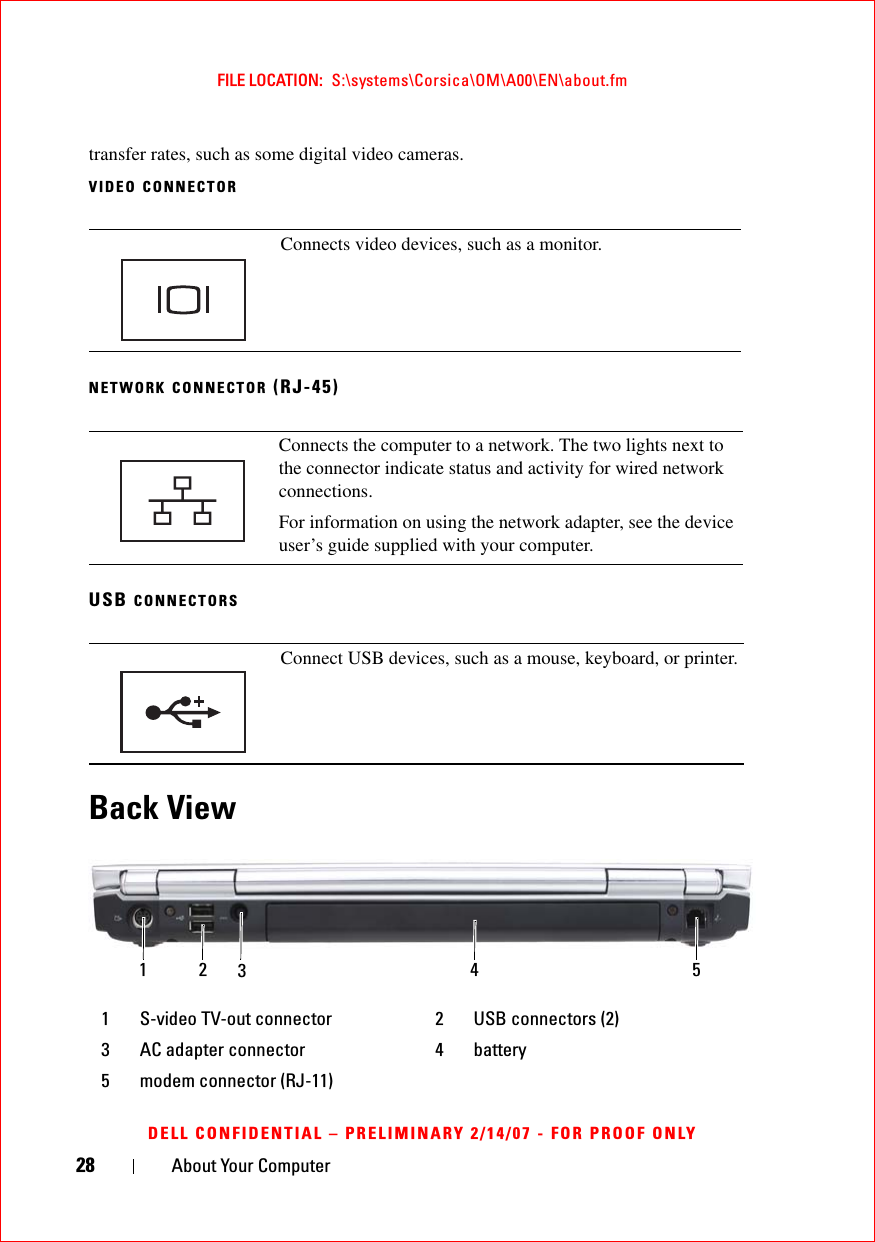
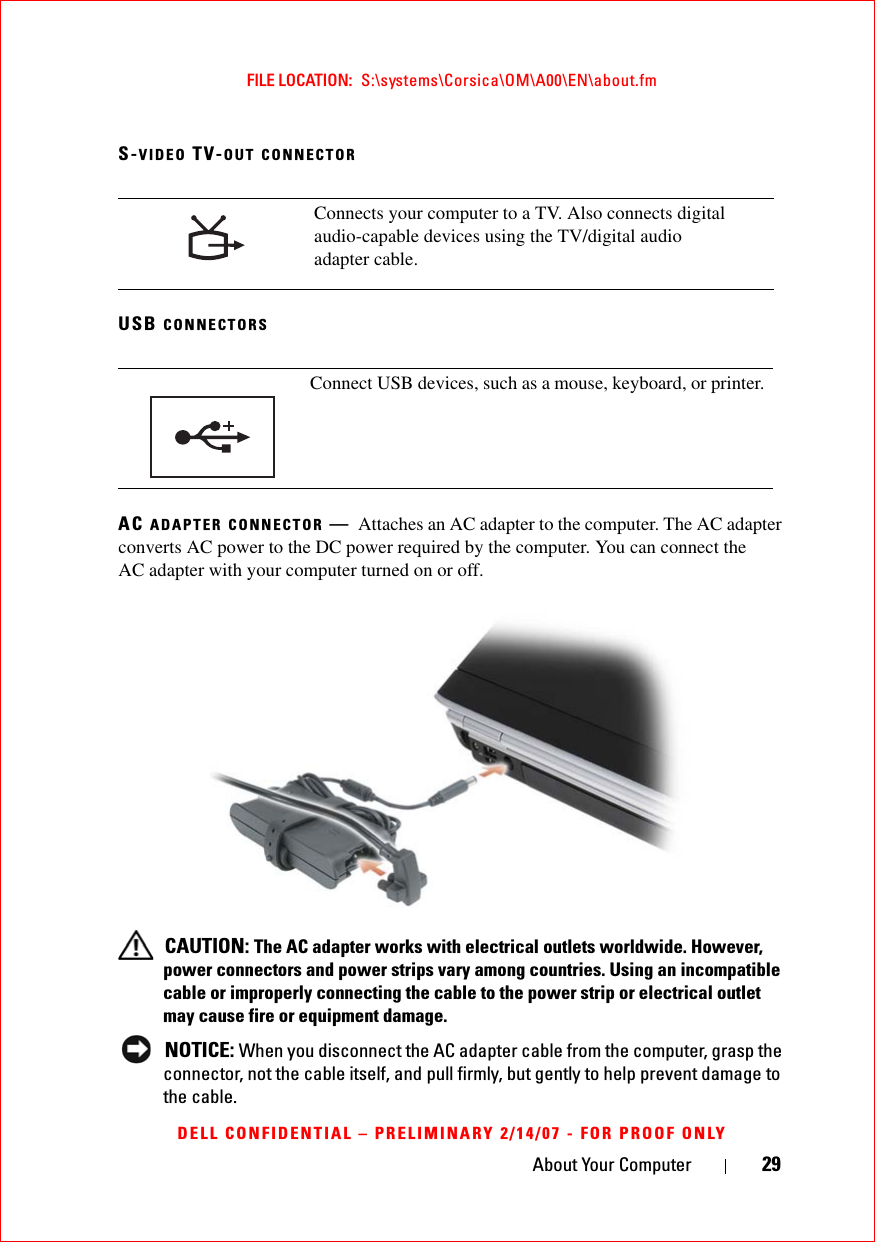
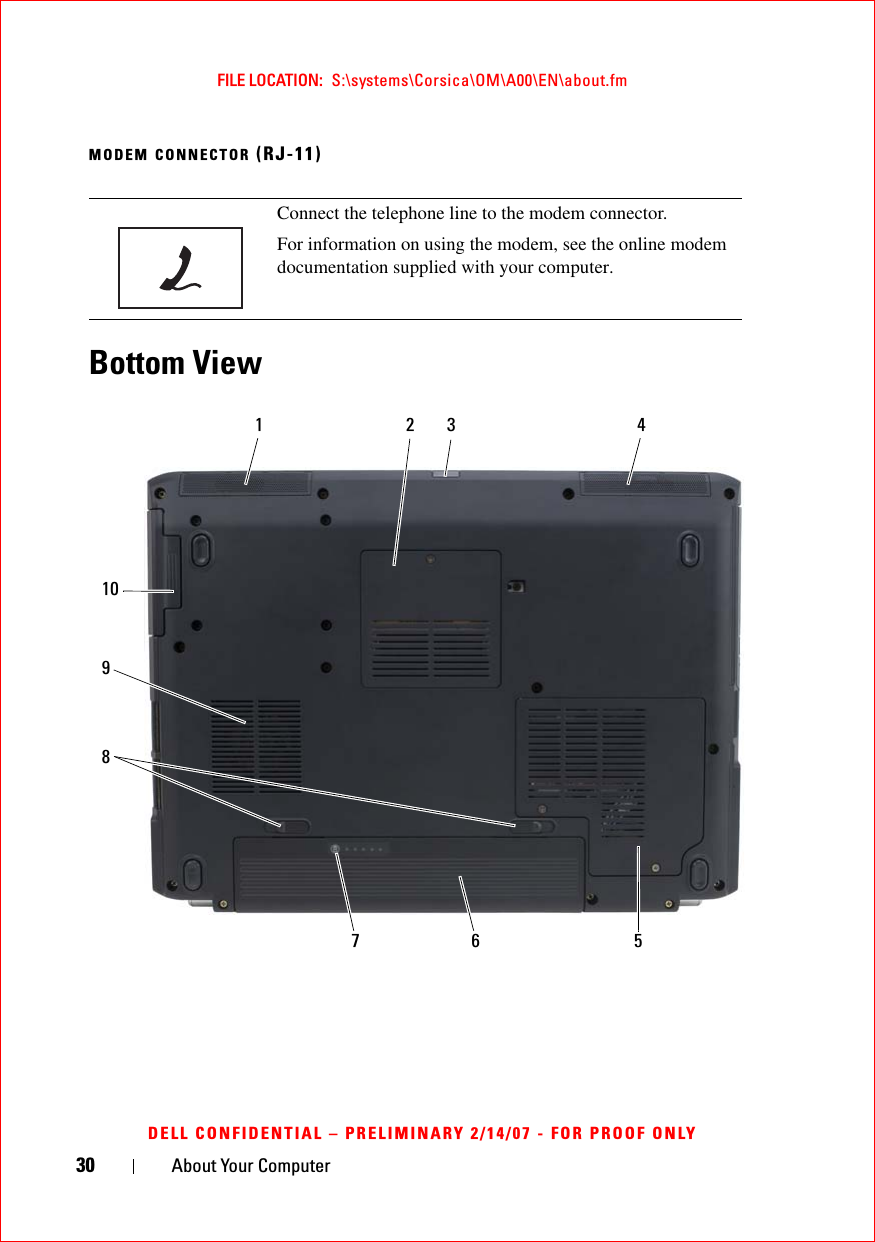
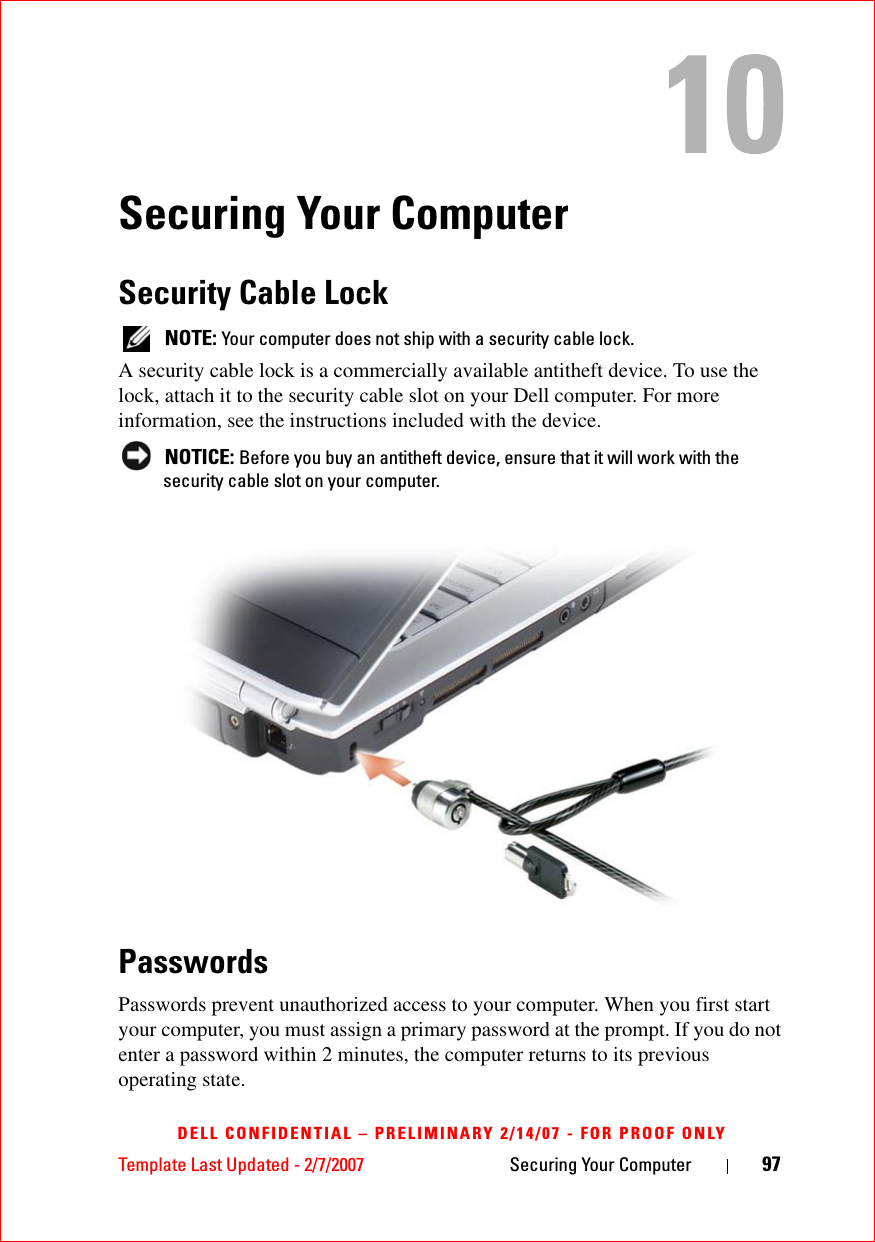
Novatel Wireless NRM-EU860D Dual Band Licensed Modular Transmitter User Manual book
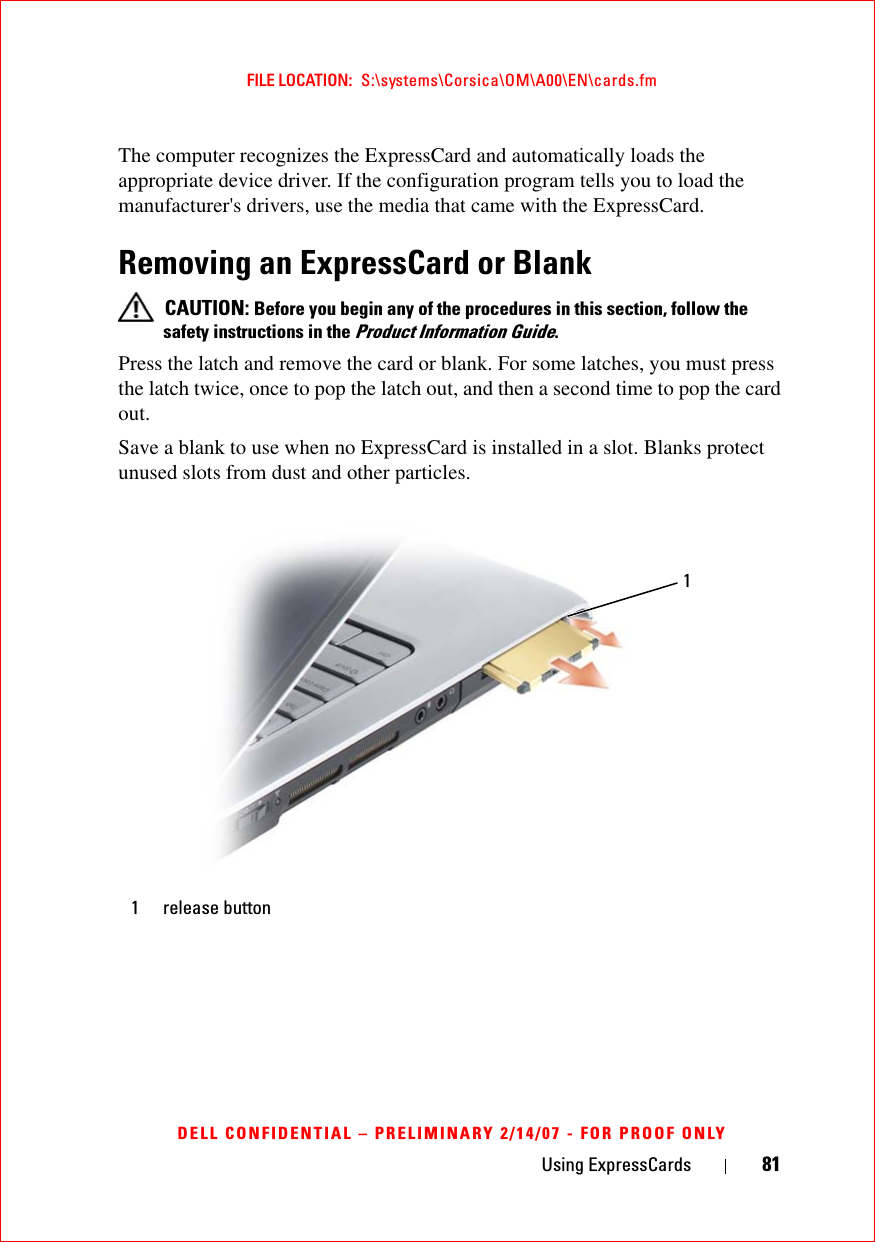
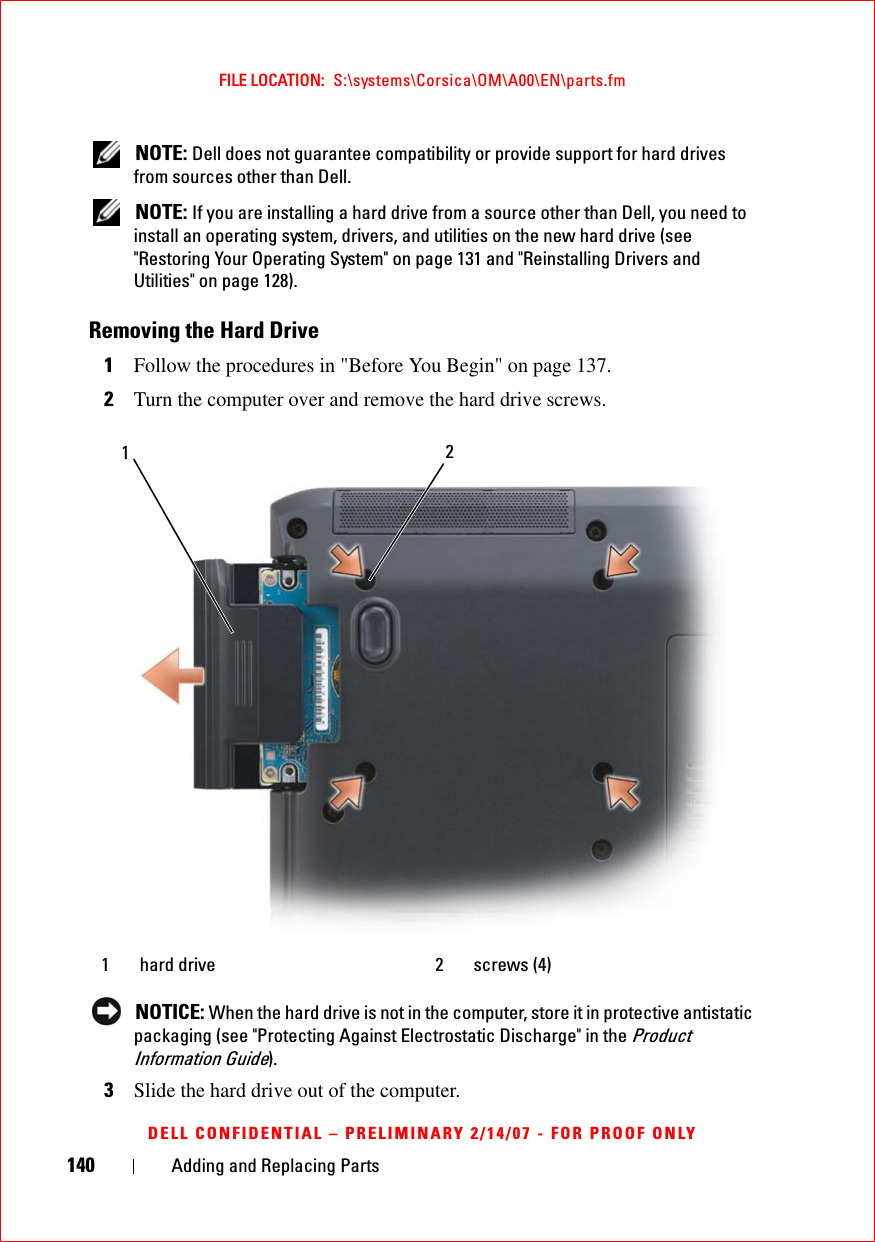
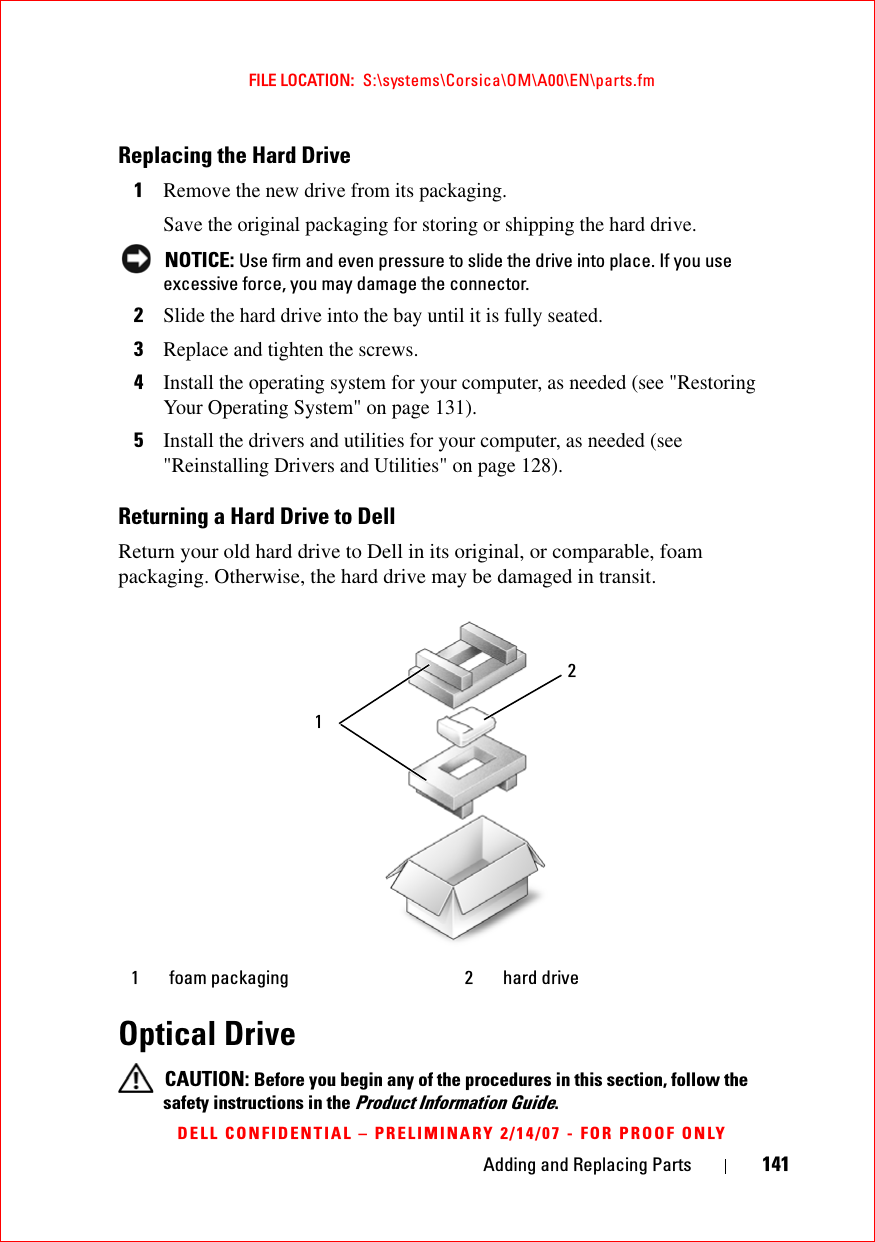
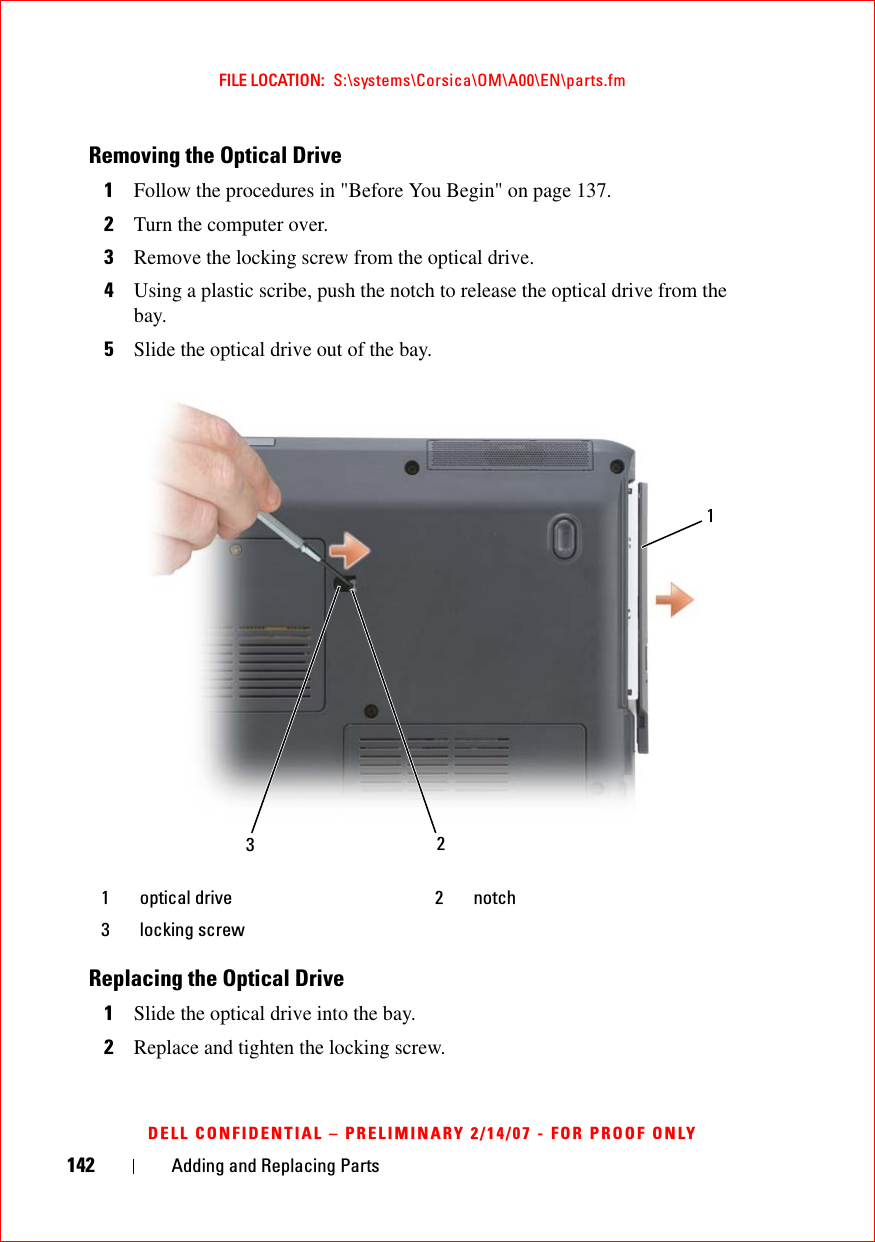
Novatel Wireless, Inc. Dual Band Licensed Modular Transmitter book
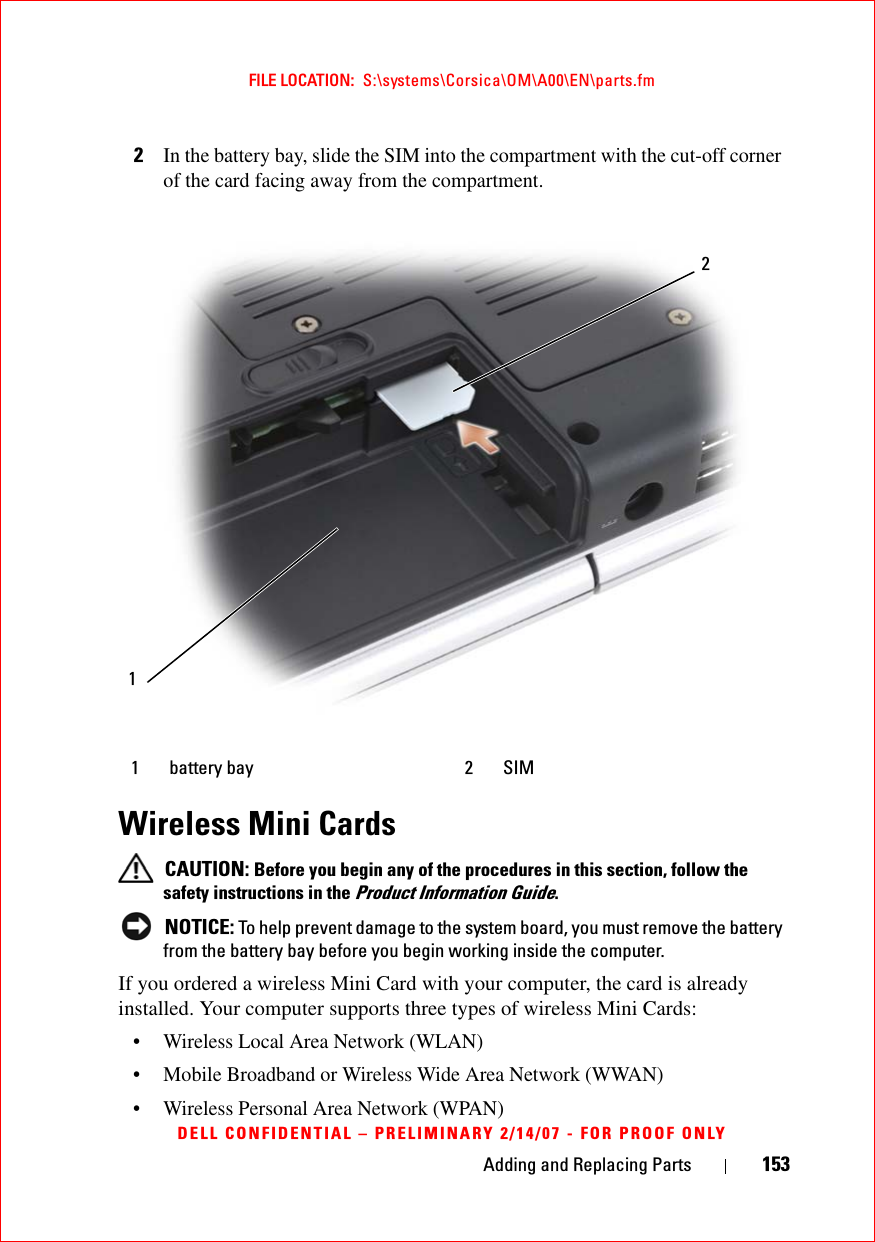
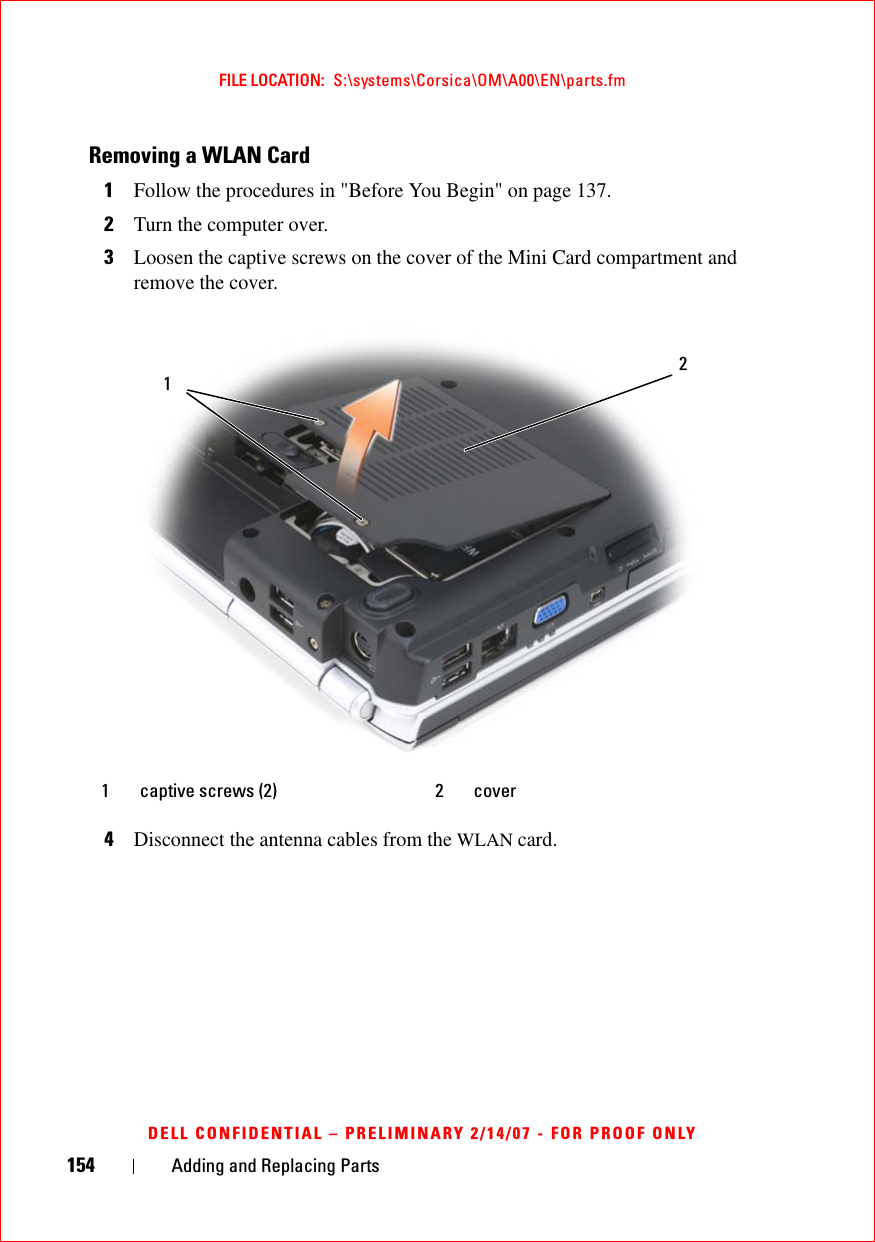
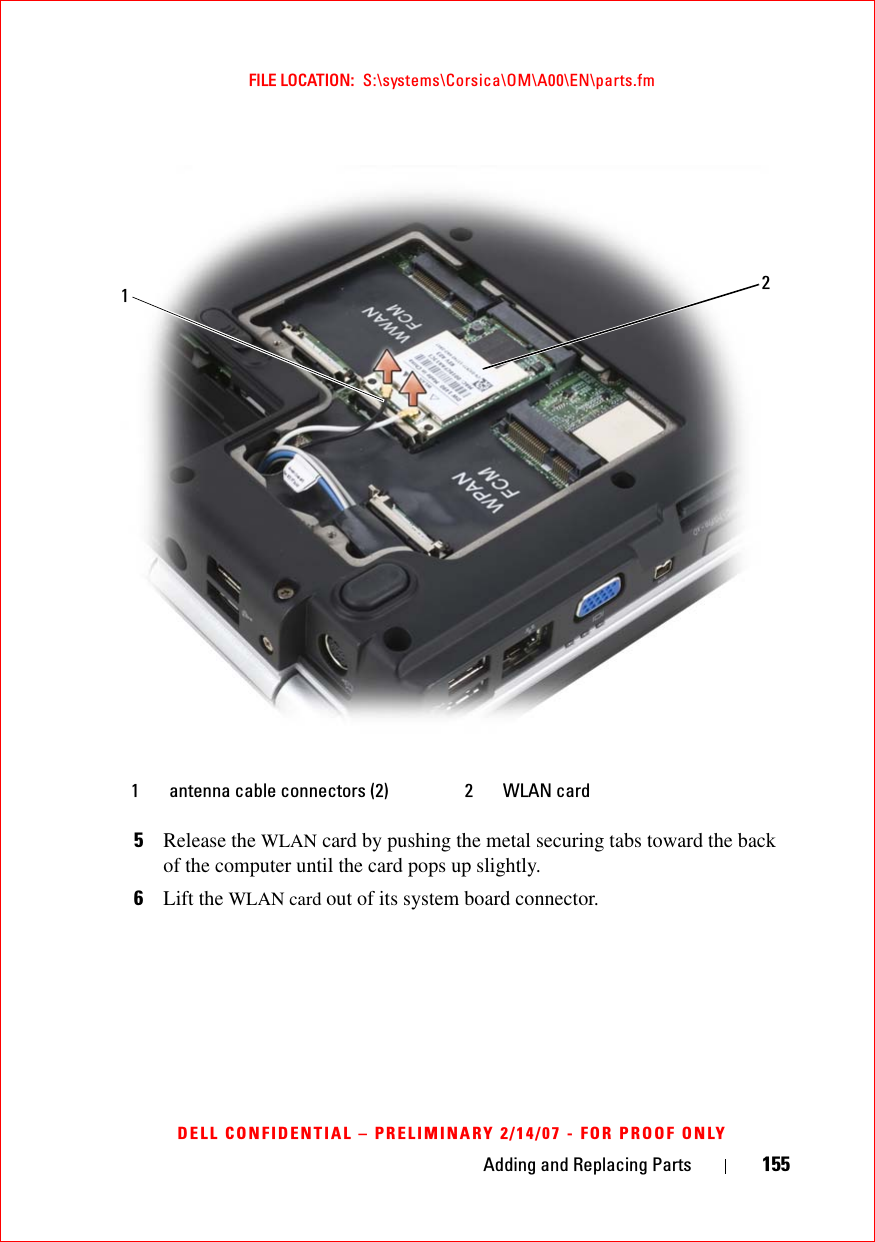
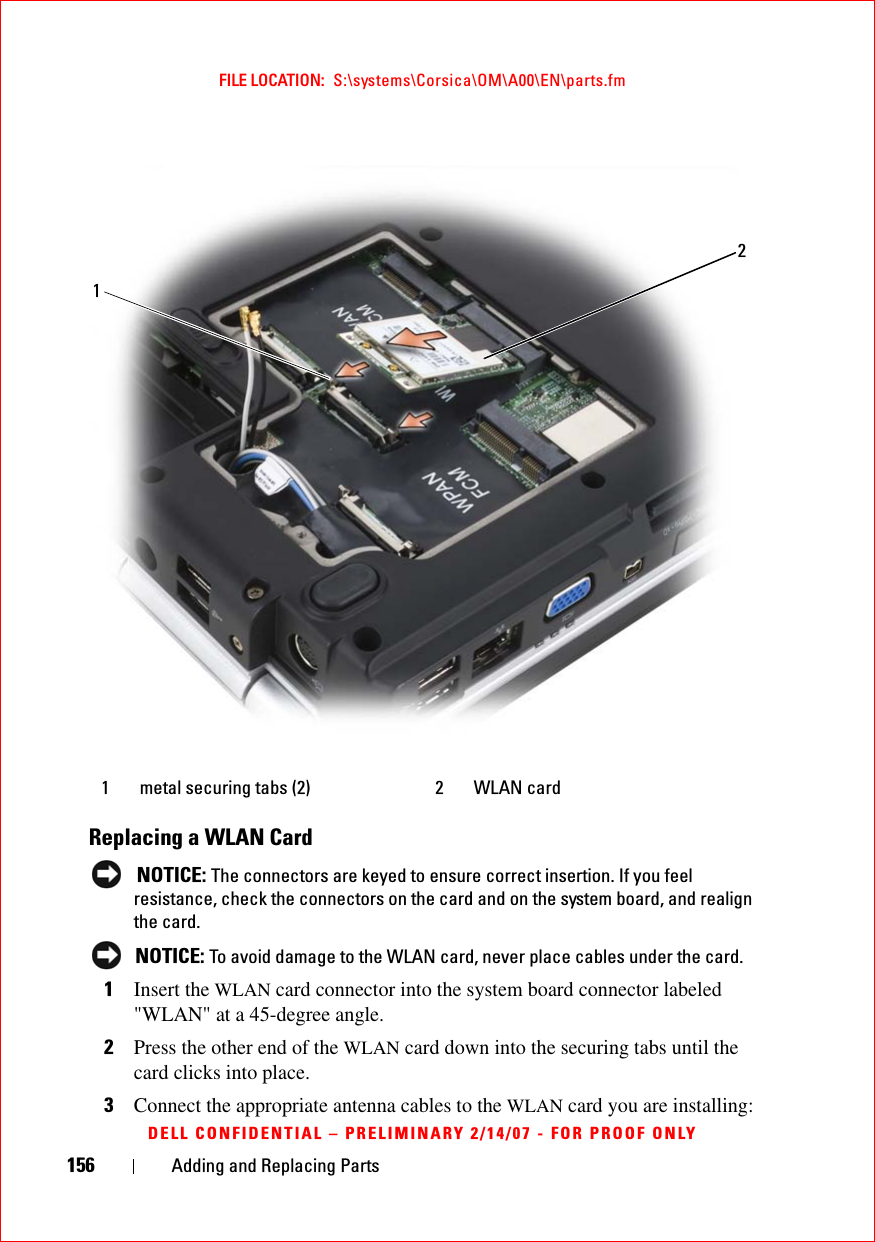
Contents
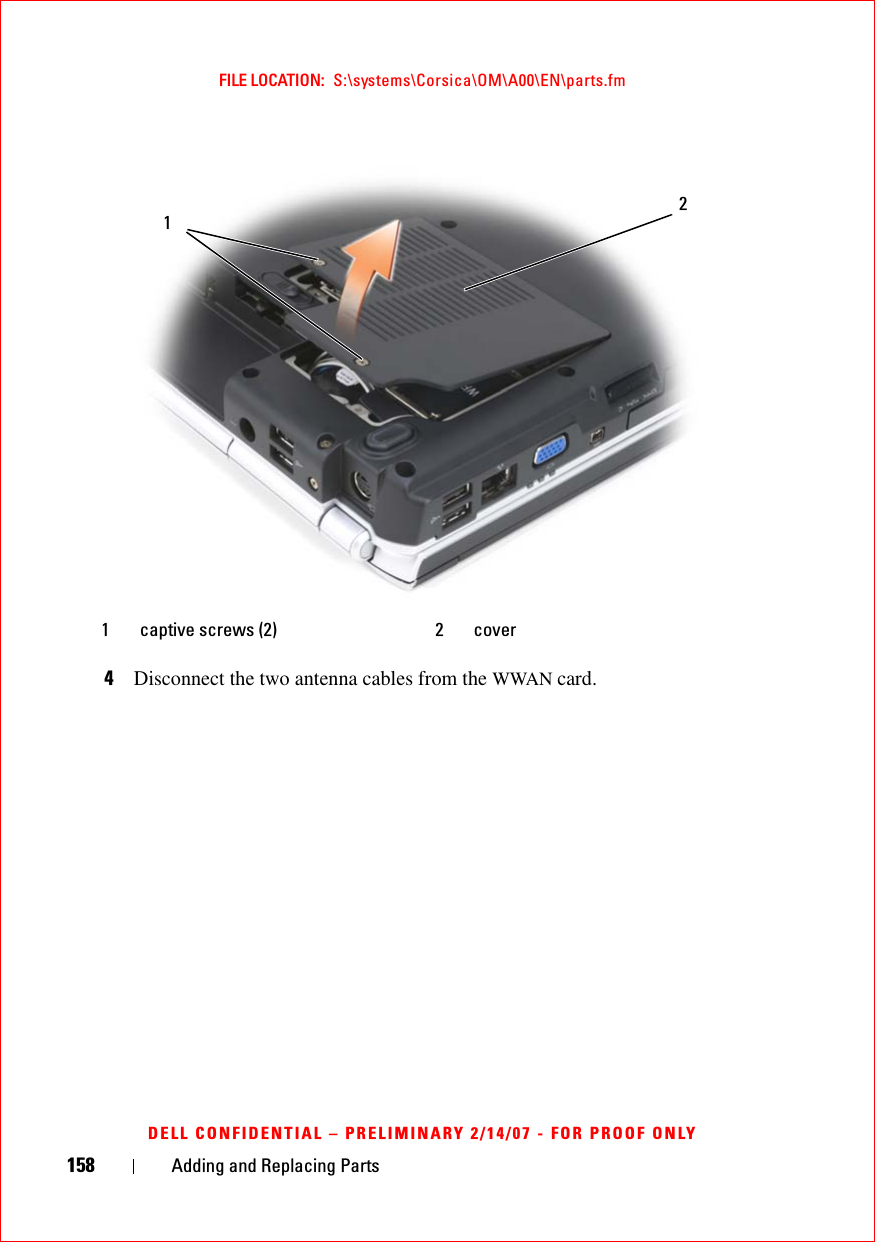
- 1. Part 1
- 2. Part 2
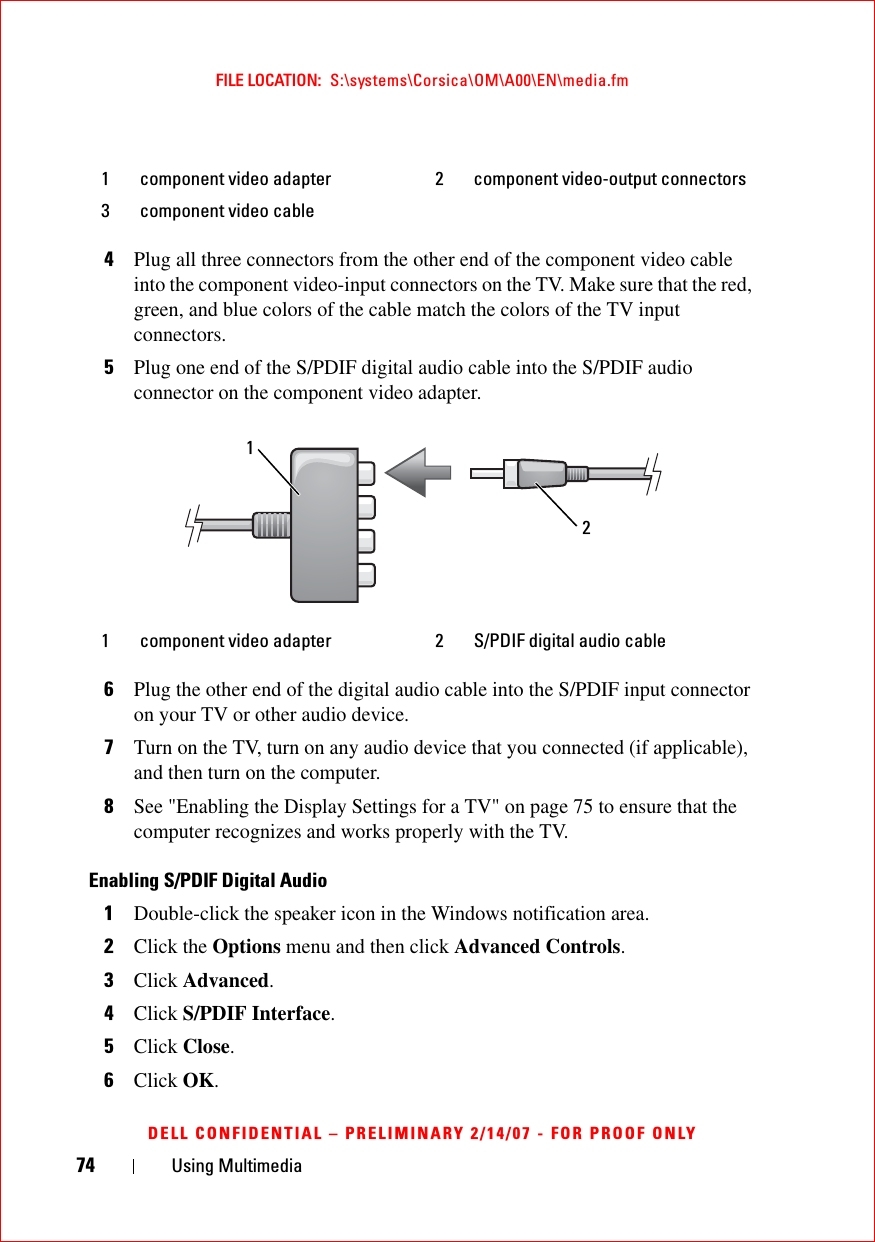
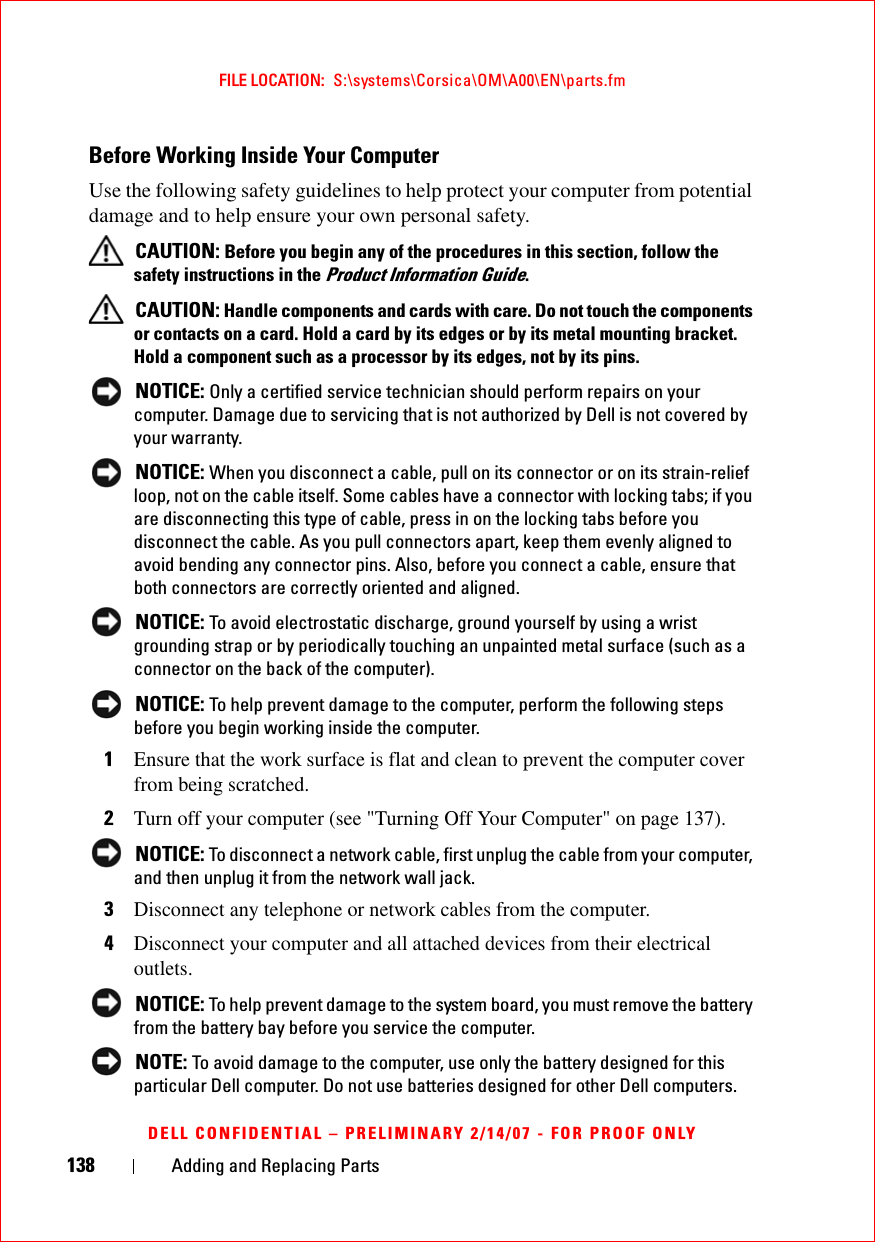
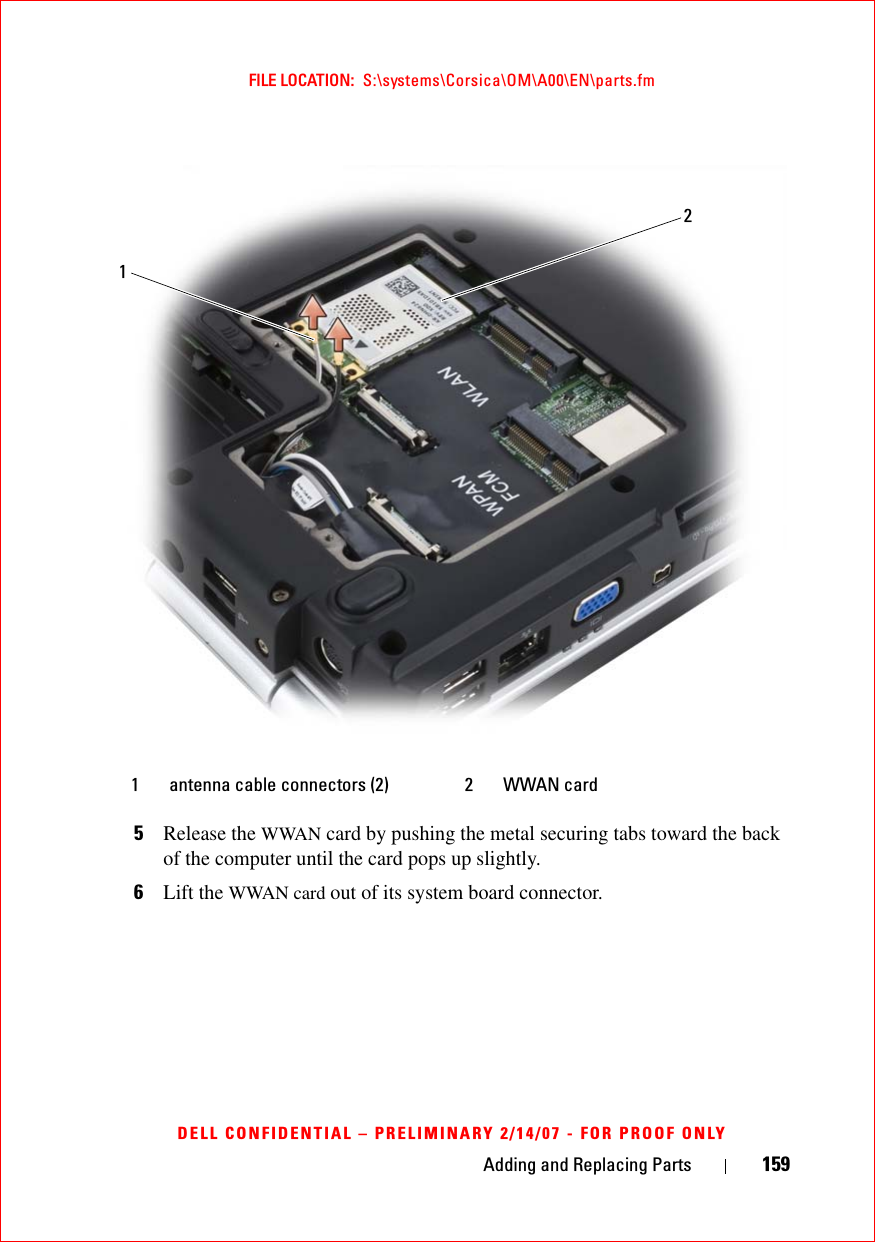
- 3. Manual 1
- 4. Manual 2
- 5. Manual 3
- 6. Manual 4
- 7. User Manual 1
- 8. User Manual 2
- 9. User Manual M1210
- 10. User Manual D430
- 11. User Manual D420
- 12. User Manual Corsica
- 13. User Manual Sapporo
- 14. User Manual Vostro 1
- 15. User Manual Vostro 2
- 16. Users Manual Vostro 3
- 17. Users Manual Vostro 4
- 18. User Manual 3
- 19. User Manual 4
- 20. User Manual Gilligan
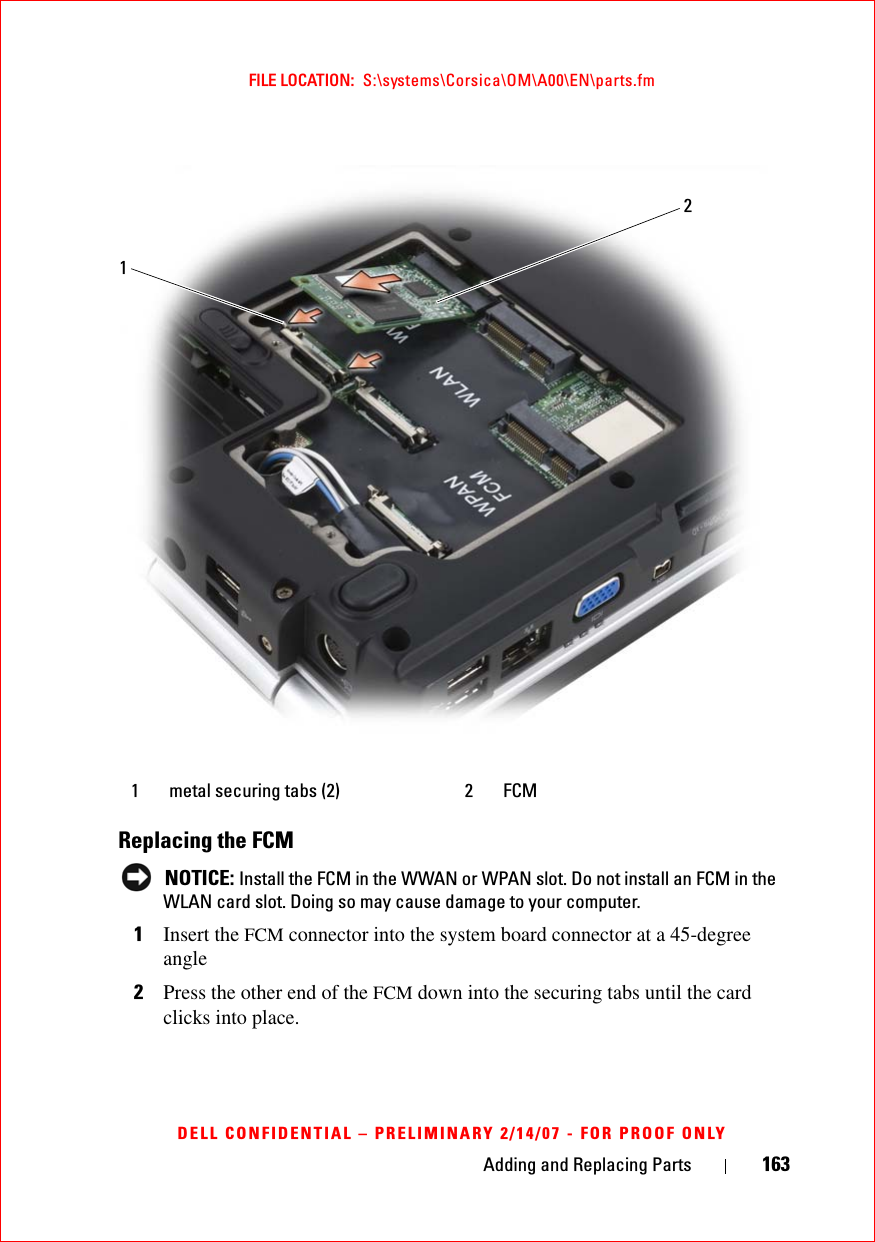
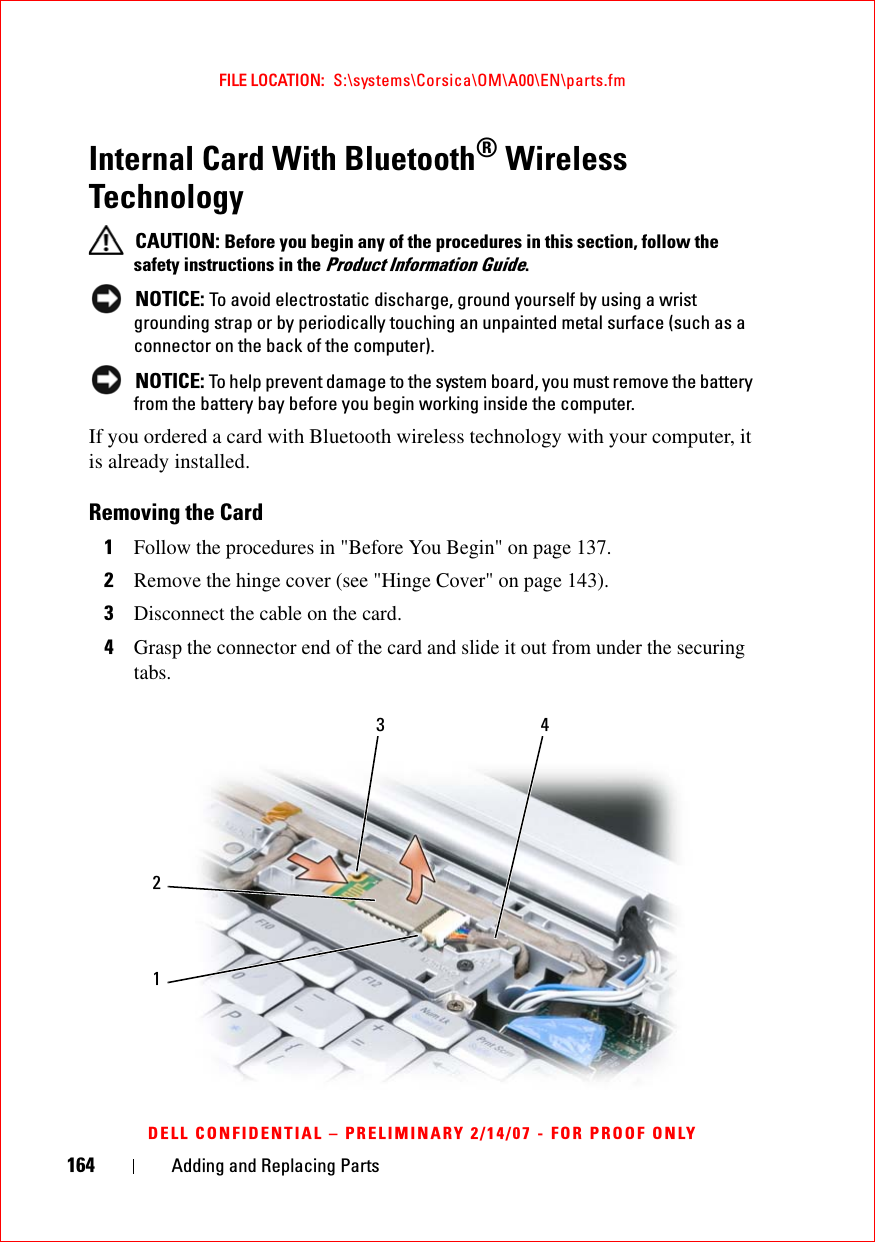
User Manual Corsica
![FILE LOCATION: S:\systems\Corsica\OM\A00\EN\bookTOC.fm8ContentsA program stops responding or crashes repeatedly 117A program is designed for an earlier Microsoft® Windows® operating system . . . . . . . . . . . . . . . . . . 117A solid blue screen appears . . . . . . . . . . . . 118Dell MediaDirect problems . . . . . . . . . . . . . 118Other software problems . . . . . . . . . . . . . . 118Memory Problems . . . . . . . . . . . . . . . . . . . . 119Network Problems . . . . . . . . . . . . . . . . . . . . 120Mobile Broadband (Wireless Wide Area Network [WWAN]) 120Power Problems . . . . . . . . . . . . . . . . . . . . . 121Printer Problems . . . . . . . . . . . . . . . . . . . . . 122Scanner Problems . . . . . . . . . . . . . . . . . . . . 123Sound and Speaker Problems . . . . . . . . . . . . . . 123No sound from integrated speakers . . . . . . . . 124No sound from external speakers . . . . . . . . . 124No sound from headphones . . . . . . . . . . . . 124Touch Pad or Mouse Problems . . . . . . . . . . . . . 125Video and Display Problems . . . . . . . . . . . . . . 125If the display is blank . . . . . . . . . . . . . . . . 126If the display is difficult to read . . . . . . . . . . 126If only part of the display is readable . . . . . . . 127Drivers . . . . . . . . . . . . . . . . . . . . . . . . . . 127What Is a Driver? . . . . . . . . . . . . . . . . . . 127Identifying Drivers . . . . . . . . . . . . . . . . . 128Reinstalling Drivers and Utilities . . . . . . . . . . 128Troubleshooting Software and Hardware Problems . . 130Restoring Your Operating System . . . . . . . . . . . . 131](https://usermanual.wiki/Novatel-Wireless/NRM-EU860D.User-Manual-Corsica/User-Guide-791629-Page-8.png)


![114 TroubleshootingFILE LOCATION: S:\systems\Corsica\OM\A00\EN\trouble.fmDELL CONFIDENTIAL – PRELIMINARY 2/14/07 - FOR PROOF ONLYTIME-OF-DAY CLOCK STOPPED —The reserve battery that supports the system configuration settings may require recharging. Connect your computer to an electrical outlet to charge the battery. If the problem persists, contact Dell (see "Contacting Dell" on page 177).TIME-OF-DAY NOT SET-PLEASE RUN THE SYS TEM SETUP PROGRAM —The time or date stored in the system setup program does not match the system clock. Correct the settings for the Date and Time options (see "Using the System Setup Program" on page 187).TIMER CHIP COUNTER 2 FAILED —A chip on the system board may be malfunctioning. Run the System Set tests in the Dell Diagnostics (see "Dell Diagnostics" on page 101).UNEXPECTED INTERRUPT IN PROTECTED MODE —The keyboard controller may be malfunctioning, or a memory module may be loose. Run the System Memory tests and the Keyboard Controller test in the Dell Diagnostics (see "Dell Diagnostics" on page 101).X:\ IS NOT ACCESSIBLE. THE DEVICE IS NOT READY —Insert a disk into the drive and try again.WARNING: BATTERY IS CRITICALLY LOW —The battery is running out of charge. Replace the battery, or connect the computer to an electrical outlet; otherwise, activate hibernate mode or shut down the computer.ExpressCard Problems CAUTION: Before you begin any of the procedures in this section, follow the safety instructions in the Product Information Guide.CHECK THE EXPRESSCARD —Ensure that the ExpressCard is properly inserted into the connector.CHECK THAT THE CARD IS RECOGNIZED BY WINDOWS —Double-click the Safely Remove Hardware icon in the Windows taskbar. Some cards do not support this feature. If the card supports this Windows feature, the card will be listed.IF YOU HAVE PROBLEMS WITH A DELL-PROVIDED EXPRESSCARD —Contact Dell (see "Contacting Dell" on page 177). Also, for Mobile Broadband (WWAN) ExpressCards, see "Mobile Broadband (Wireless Wide Area Network [WWAN])" on page 120.IF YOU HAVE PROBLEMS WITH AN EXPRESSCARD NOT PROVIDED BY DELL —Contact the ExpressCard manufacturer.](https://usermanual.wiki/Novatel-Wireless/NRM-EU860D.User-Manual-Corsica/User-Guide-791629-Page-114.png)

![120 TroubleshootingFILE LOCATION: S:\systems\Corsica\OM\A00\EN\trouble.fmDELL CONFIDENTIAL – PRELIMINARY 2/14/07 - FOR PROOF ONLY• Reseat the memory modules to ensure that your computer is successfully communicating with the memory (see "Memory" on page 146).• Ensure that you are following the memory installation guidelines (see "Memory" on page 146).• Run the Dell Diagnostics (see "Dell Diagnostics" on page 101). Network ProblemsFill out the "Diagnostics Checklist" on page 176 as you complete these checks. CAUTION: Before you begin any of the procedures in this section, follow the safety instructions in the Product Information Guide.CHECK THE NETWORK CABLE CONNECTOR —Ensure that the network cable is firmly inserted into both the network connector on the back of the computer and the network jack.CHECK THE NETWORK LIGHTS ON THE NETWORK CONNECTOR —No light indicates that no network communication exists. Replace the network cable.RESTART THE COMPUTER AND LOG ON TO THE NETWORK AGAINCHECK YOUR NETWORK SETTINGS —Contact your network administrator or the person who set up your network to verify that your network settings are correct and that the network is functioning.Mobile Broadband (Wireless Wide Area Network [WWAN]) NOTE: The Dell Mobile Broadband Card Utility user’s guide and the Mobile Broadband ExpressCard user’s guide are available through Windows Help and Support (click Start → Help and Support). You can also download the Dell Mobile Broadband Card Utility user’s guide from support.dell.com. NOTE: The icon appears in the notification area if the computer has a Dell WWAN device installed. Double-click the icon to launch the utility.ACTIVATE THE MOBILE BROADBAND EXPRESSCARD —You must activate the Mobile Broadband ExpressCard before you can connect to the network. Position the mouse over the icon in the notification area to verify the status of the connection. If the card is not activated, follow the card activation instructions located within the Dell Mobile Broadband Card Utility. To access the utility, double-click the icon located in the taskbar, at the lower-right corner of your screen. If your ExpressCard is not a Dell-branded card, see the manufacturer’s instructions for your card.](https://usermanual.wiki/Novatel-Wireless/NRM-EU860D.User-Manual-Corsica/User-Guide-791629-Page-120.png)
![128 TroubleshootingFILE LOCATION: S:\systems\Corsica\OM\A00\EN\trouble.fmDELL CONFIDENTIAL – PRELIMINARY 2/14/07 - FOR PROOF ONLY• Connect or install a new device.Identifying DriversIf you experience a problem with any device, identify whether the driver is the source of your problem and, if necessary, update the driver.1Click Start , and then right-click Computer.2Click Properties, and then click Device Manager. NOTE: The User Account Control window may appear. If you are an administrator on the computer, click Continue; otherwise, contact your administrator to continue.Scroll down the list of devices and check for an exclamation point (a circle with a [!]) next to the device name. If an exclamation point is next to the device name, you may need to reinstall the driver or install a new driver (see "Reinstalling Drivers and Utilities" on page 128).Reinstalling Drivers and Utilities NOTICE: The Dell Support website at support.dell.com and your Drivers and Utilities media provide approved drivers for Dell computers. If you install drivers obtained from other sources, your computer might not work correctly.Using Windows Device Driver RollbackIf a problem occurs on your computer after you install or update a driver, use Windows Device Driver Rollback to replace the driver with the previously installed version.1Click Start , and then right-click Computer.2Click Properties, and then click Device Manager. NOTE: The User Account Control window may appear. If you are an administrator on the computer, click Continue; otherwise, contact your administrator to enter the Device Manager.3Right-click the device for which the new driver was installed and click Properties.4Click the Drivers tab, and then click Roll Back Driver.](https://usermanual.wiki/Novatel-Wireless/NRM-EU860D.User-Manual-Corsica/User-Guide-791629-Page-128.png)


![FILE LOCATION: S:\systems\Corsica\OM\A00\EN\glossary.fmDELL CONFIDENTIAL – PRELIMINARY 2/14/07FOR PROOF ONLY196 Glossaryeffect these settings have on the computer, do not change them. Also referred to as system setup.bit — The smallest unit of data interpreted by your computer.Bluetooth® wireless technology — A wireless technology standard for short-range (9 m [29 feet]) networking devices that allows for enabled devices to automatically recognize each other.boot sequence — Specifies the order of the devices from which the computer attempts to boot.bootable CD — A CD that you can use to start your computer. In case your hard drive is damaged or your computer has a virus, ensure that you always have a bootable CD or floppy disk available. Your Drivers and Utilities media is a bootable CD.bootable disk — A disk that you can use to start your computer. In case your hard drive is damaged or your computer has a virus, ensure that you always have a bootable CD or floppy disk available.bps — bits per second — The standard unit for measuring data transmission speed.BTU — British thermal unit — A measurement of heat output.bus — A communication pathway between the components in your computer.bus speed — The speed, given in MHz, that indicates how fast a bus can transfer information.byte — The basic data unit used by your computer. A byte is usually equal to 8 bits.CC — Celsius — A temperature measurement scale where 0° is the freezing point and 100° is the boiling point of water.cache — A special high-speed storage mechanism which can be either a reserved section of main memory or an independent high-speed storage device. The cache enhances the efficiency of many processor operations.L1 cache — Primary cache stored inside the processor.L2 cache — Secondary cache which can either be external to the processor or incorporated into the processor architecture.carnet — An international customs document that facilitates temporary imports into foreign countries. Also known as a merchandise passport.CD-R — CD recordable — A recordable version of a CD. Data can be recorded only once onto a CD-R. Once recorded, the data cannot be erased or written over.CD-RW — CD rewritable — A rewritable version of a CD. Data can be written to a CD-](https://usermanual.wiki/Novatel-Wireless/NRM-EU860D.User-Manual-Corsica/User-Guide-791629-Page-196.png)