Novatel Wireless NRM-EU860D Dual Band Licensed Modular Transmitter User Manual book

Novatel Wireless, Inc. Dual Band Licensed Modular Transmitter book

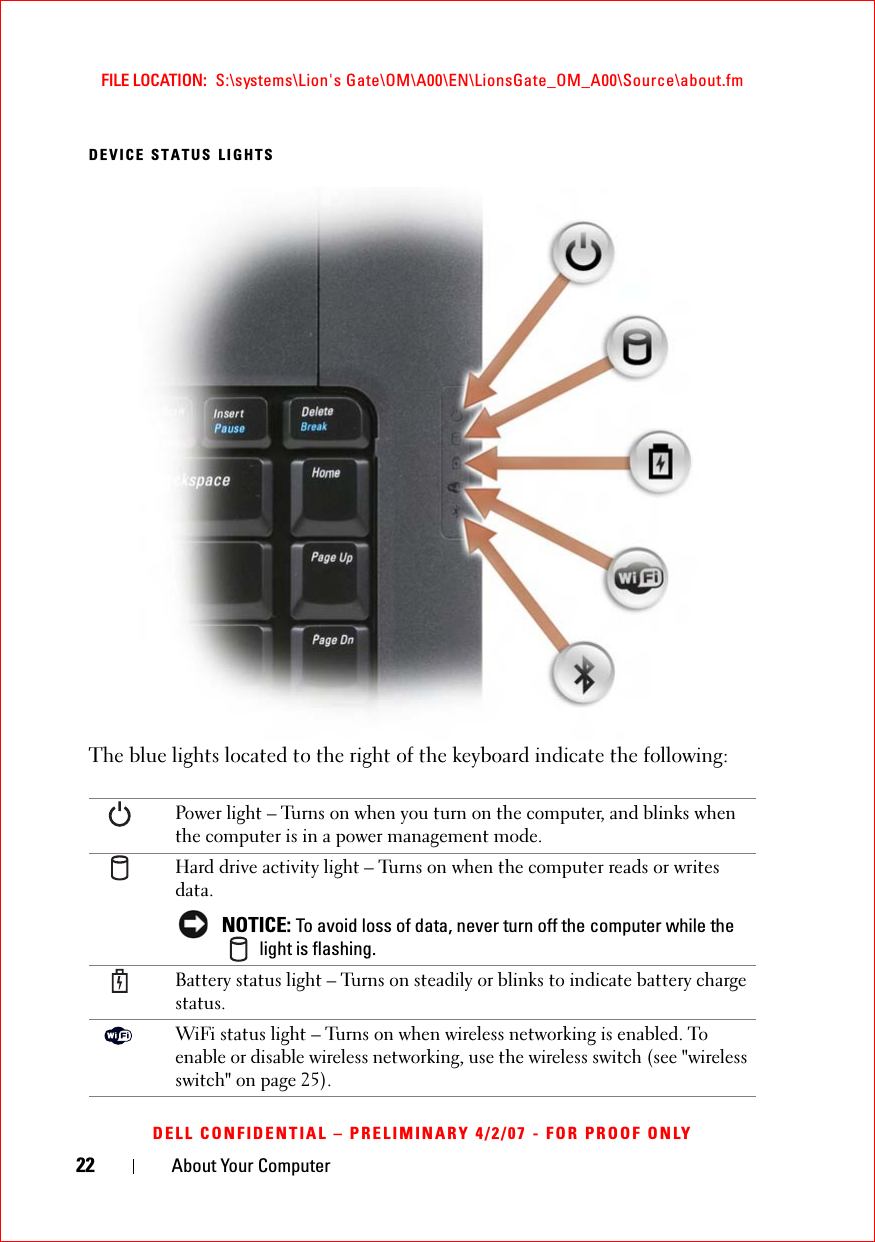
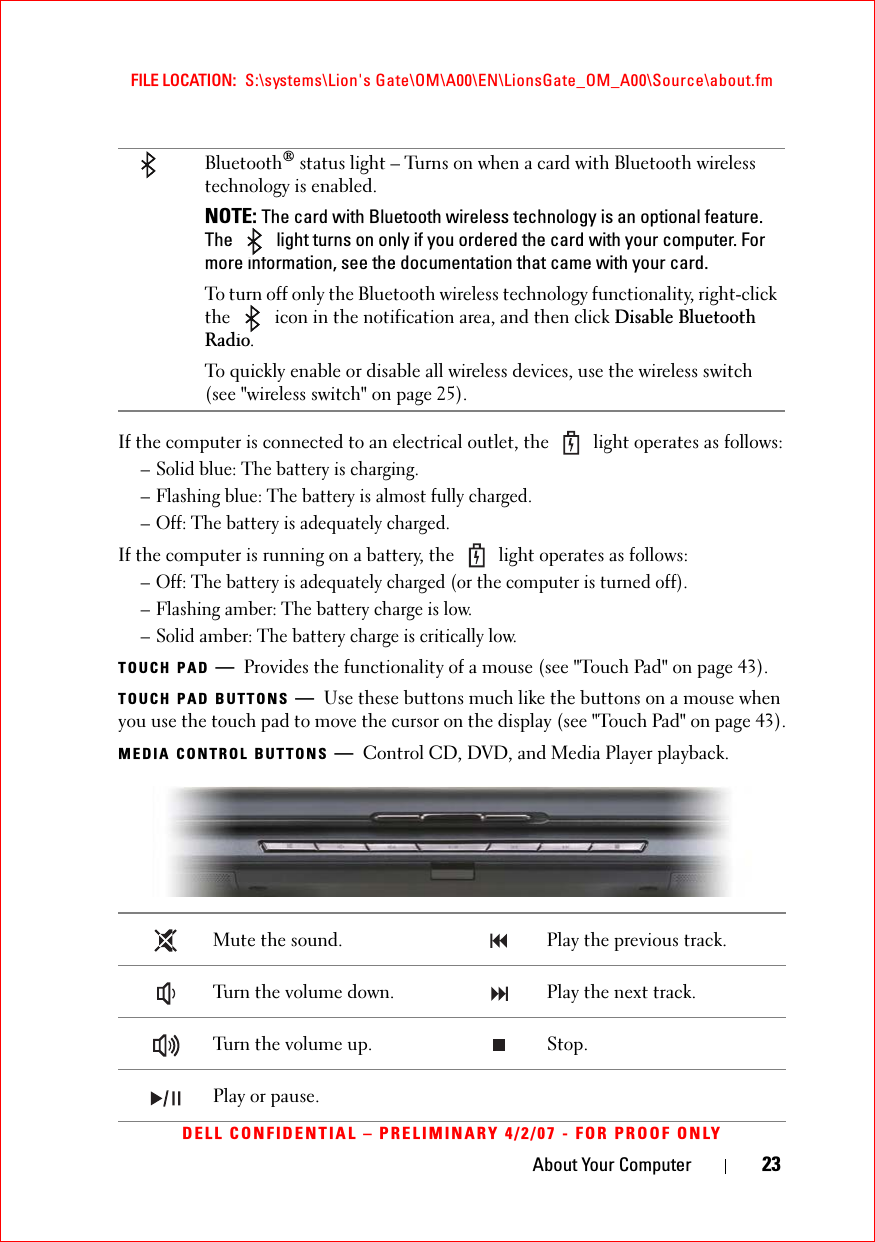
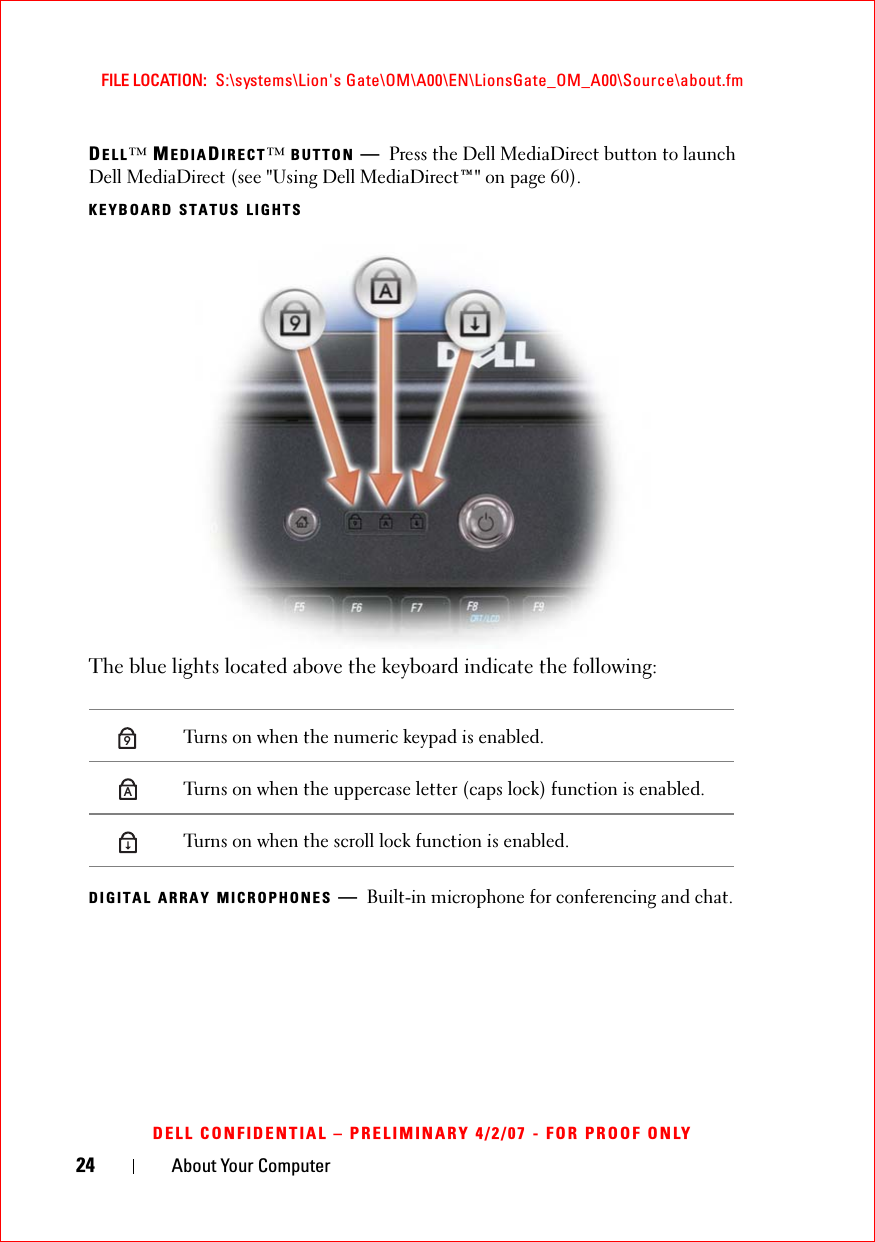
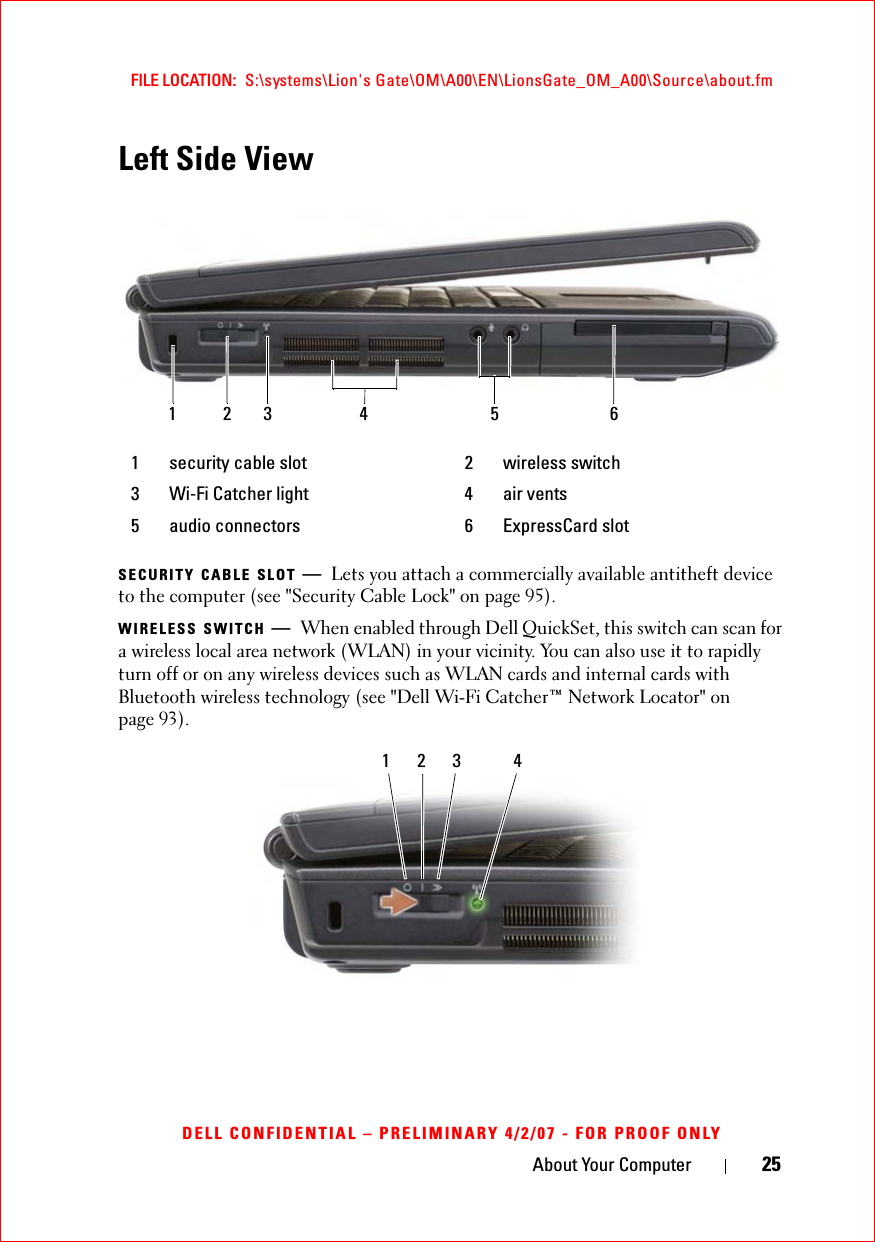
User Manual Vostro 1

www.dell.com | support.dell.comDell™ Vostro™ 1500 Owner’s ManualModel PP22L
Notes, Notices, and CautionsNOTE: A NOTE indicates important information that helps you make better use of your computer.NOTICE: A NOTICE indicates either potential damage to hardware or loss of data and tells you how to avoid the problem.CAUTION: A CAUTION indicates a potential for property damage, personal injury, or death.____________________Information in this document is subject to change without notice.© 2007 Dell Inc. All rights reserved.Reproduction in any manner whatsoever without the written permission of Dell Inc. is strictly forbidden.Trademarks used in this text: Dell, the DELL logo, Vostro,Wi-Fi Catcher, and Dell MediaDirect are trademarks of Dell Inc.; Intel is a registered trademark and Core is a trademark of Intel Corporation; Microsoft,Windows, and Windows Vista are either trademarks or registered trademarks of Microsoft Corporation in the United States and/or other countries; Bluetooth is a registered trademark owned by Bluetooth SIG, Inc. and is used by Dell under license.Other trademarks and trade names may be used in this document to refer to either the entities claiming the marks and names or their products. Dell Inc. disclaims any proprietary interest in trademarks and trade names other than its own.Model PP22LMay 2007 P/N TT979 Rev. A00
FILE LOCATION:  S:\systems\Lion's Gate\OM\A00\EN\LionsGate_OM_A00\Source\bookTOC.fmTemplate Last Updated - 1/7/2007 Contents 31 Finding Information . . . . . . . . . . . . . . . . .  132 About Your Computer  . . . . . . . . . . . . . . .  19Determining Your Computer’s Configuration . . . . . .   19Front View . . . . . . . . . . . . . . . . . . . . . . . .   20Left Side View . . . . . . . . . . . . . . . . . . . . . .   25Right Side View . . . . . . . . . . . . . . . . . . . . .   27Back View . . . . . . . . . . . . . . . . . . . . . . . .   29Bottom View . . . . . . . . . . . . . . . . . . . . . . .   313 Setting Up Your Computer . . . . . . . . . . . .  33Connecting to the Internet  . . . . . . . . . . . . . . .   33Setting Up Your Internet Connection . . . . . . . .   34Transferring Information to a New Computer  . . . . .   35Windows Easy Transfer  . . . . . . . . . . . . . .   35Setting Up a Printer . . . . . . . . . . . . . . . . . . .   35Printer Cable . . . . . . . . . . . . . . . . . . . .   36Connecting a USB Printer  . . . . . . . . . . . . .   36Power Protection Devices  . . . . . . . . . . . . . . .   37Surge Protectors . . . . . . . . . . . . . . . . . .   37Line Conditioners . . . . . . . . . . . . . . . . . .   38Uninterruptible Power Supplies  . . . . . . . . . .   38
FILE LOCATION:  S:\systems\Lion's Gate\OM\A00\EN\LionsGate_OM_A00\Source\bookTOC.fm4Contents4 Using the Display  . . . . . . . . . . . . . . . . . .  39Adjusting Brightness  . . . . . . . . . . . . . . . . . .   39Switching the Video Image From Your Computer Display To a Projector . . . . . . . . . . . . . . . . . . . . . . . . .   39Setting Display Resolution and Refresh Rate . . . . . .   395 Using the Keyboard and Touchpad . . . . .  41Numeric Keypad . . . . . . . . . . . . . . . . . . . . .   41Key Combinations . . . . . . . . . . . . . . . . . . . .   42System Functions . . . . . . . . . . . . . . . . . .   42Display Functions . . . . . . . . . . . . . . . . . .   42Battery  . . . . . . . . . . . . . . . . . . . . . . .   42Power Management  . . . . . . . . . . . . . . . .   42Microsoft® Windows® Logo Key Functions  . . .   43Dell™ QuickSet Key Combinations . . . . . . . . .   43Adjusting Keyboard Settings . . . . . . . . . . . .   43Touch Pad  . . . . . . . . . . . . . . . . . . . . . . . .   43Customizing the Touch Pad . . . . . . . . . . . . .   446 Using a Battery  . . . . . . . . . . . . . . . . . . . .  47Battery Performance  . . . . . . . . . . . . . . . . . .   47Checking the Battery Charge  . . . . . . . . . . . . . .   48Dell QuickSet Battery Meter . . . . . . . . . . . .   48Microsoft® Windows® Battery Meter . . . . . . .   49Charge Gauge  . . . . . . . . . . . . . . . . . . .   49Low-Battery Warning  . . . . . . . . . . . . . . .   50
FILE LOCATION:  S:\systems\Lion's Gate\OM\A00\EN\LionsGate_OM_A00\Source\bookTOC.fmTemplate Last Updated - 1/7/2007 Contents 5Conserving Battery Power  . . . . . . . . . . . . . . .   50Configuring Power Management Settings . . . . .   50Using the Sleep Power State  . . . . . . . . . . .   51Charging the Battery  . . . . . . . . . . . . . . . . . .   51Replacing the Battery . . . . . . . . . . . . . . . . . .   52Storing a Battery  . . . . . . . . . . . . . . . . . . . .   537 Using Multimedia  . . . . . . . . . . . . . . . . . .  55Playing Media . . . . . . . . . . . . . . . . . . . . . .   55Copying CD and DVD Media  . . . . . . . . . . . . . .   56How to Copy a CD or DVD  . . . . . . . . . . . . .   57Using Blank CD and DVD Media . . . . . . . . . .   57Helpful Tips . . . . . . . . . . . . . . . . . . . . .   58Adjusting the Volume . . . . . . . . . . . . . . . . . .   59Adjusting the Picture  . . . . . . . . . . . . . . . . . .   59Using Dell MediaDirect™ . . . . . . . . . . . . . . . .   60Connecting Your Computer to a TV or Audio Device . .   61S-Video and Standard Audio . . . . . . . . . . . .   63S-Video and S/PDIF Digital Audio  . . . . . . . . .   64Composite Video and Standard Audio . . . . . . .   66Composite Video and S/PDIF Digital Audio  . . . .   68Component Video and Standard Audio  . . . . . .   70Component Video and S/PDIF Digital Audio . . . .   72Enabling the Display Settings for a TV . . . . . . .   75
FILE LOCATION:  S:\systems\Lion's Gate\OM\A00\EN\LionsGate_OM_A00\Source\bookTOC.fm6Contents8 Using ExpressCards  . . . . . . . . . . . . . . . .  77ExpressCard Blanks . . . . . . . . . . . . . . . . . . .   77Installing an ExpressCard . . . . . . . . . . . . . . . .   78Removing an ExpressCard or Blank . . . . . . . . . . .   799 Using the Memory Card Reader  . . . . . . .  81Memory Card Blanks  . . . . . . . . . . . . . . . . . .   81Installing a Memory Card . . . . . . . . . . . . . . . .   81Removing a Memory Card or Blank . . . . . . . . . . .   8310 Setting Up and Using Networks  . . . . . . .  85Connecting a Network or Broadband Modem Cable . .   85Setting Up a Network  . . . . . . . . . . . . . . . . . .   86Wireless Local Area Network  . . . . . . . . . . . . .   86What You Need to Establish a WLAN Connection .86Checking Your Wireless Network Card  . . . . . .   87Setting Up a New WLAN Using a Wireless Router and a Broadband Modem . . . . . . . . . . . . . . . . .   88Connecting to a WLAN . . . . . . . . . . . . . . .   89Mobile Broadband (or Wireless Wide Area Network) .90What You Need to Establish a Mobile Broadband Network Connection . . . . . . . . . . . . . . . . . . . . .   91Checking Your Dell Mobile Broadband Card . . . .   91Connecting to a Mobile Broadband Network  . . .   92Enabling/Disabling the Dell Mobile Broadband Card 93
FILE LOCATION:  S:\systems\Lion's Gate\OM\A00\EN\LionsGate_OM_A00\Source\bookTOC.fmTemplate Last Updated - 1/7/2007 Contents 7Dell Wi-Fi Catcher™ Network Locator . . . . . . . . .   9311 Securing Your Computer . . . . . . . . . . . . .  95Security Cable Lock . . . . . . . . . . . . . . . . . . .   95Passwords . . . . . . . . . . . . . . . . . . . . . . . .   95If Your Computer Is Lost or Stolen  . . . . . . . . . . .   9612 Troubleshooting  . . . . . . . . . . . . . . . . . . .  99Dell Technical Update Service . . . . . . . . . . . . .   99Dell Diagnostics . . . . . . . . . . . . . . . . . . . . .   99Dell Support Utility  . . . . . . . . . . . . . . . . . . .  103Drive Problems  . . . . . . . . . . . . . . . . . . . . .  104Optical drive problems . . . . . . . . . . . . . . .  105Hard drive problems . . . . . . . . . . . . . . . .  106E-Mail, Modem, and Internet Problems  . . . . . . . .  106Error Messages  . . . . . . . . . . . . . . . . . . . . .  108ExpressCard Problems  . . . . . . . . . . . . . . . . .  113IEEE 1394 Device Problems . . . . . . . . . . . . . . .  113Keyboard Problems  . . . . . . . . . . . . . . . . . . .  114External Keyboard problems . . . . . . . . . . . .  114Unexpected characters  . . . . . . . . . . . . . .  115Lockups and Software Problems . . . . . . . . . . . .  115The computer does not start . . . . . . . . . . . .  115The computer stops responding . . . . . . . . . .  115
FILE LOCATION:  S:\systems\Lion's Gate\OM\A00\EN\LionsGate_OM_A00\Source\bookTOC.fm8ContentsA program stops responding or crashes repeatedly 116A program is designed for an earlier Microsoft® Windows®operating system . . . . . . . . . . . . . . . . . .  116A solid blue screen appears . . . . . . . . . . . .  116Dell MediaDirect problems . . . . . . . . . . . . .  116Other software problems . . . . . . . . . . . . . .  117Memory Problems . . . . . . . . . . . . . . . . . . . .  118Network Problems . . . . . . . . . . . . . . . . . . . .  119Mobile Broadband (Wireless Wide Area Network [WWAN]) 119Power Problems . . . . . . . . . . . . . . . . . . . . .  120Printer Problems . . . . . . . . . . . . . . . . . . . . .  121Scanner Problems . . . . . . . . . . . . . . . . . . . .  122Sound and Speaker Problems . . . . . . . . . . . . . .  122No sound from integrated speakers . . . . . . . .  123No sound from external speakers  . . . . . . . . .  123No sound from headphones  . . . . . . . . . . . .  123Touch Pad or Mouse Problems  . . . . . . . . . . . . .  124Video and Display Problems  . . . . . . . . . . . . . .  125If the display is blank . . . . . . . . . . . . . . . .  125If the display is difficult to read  . . . . . . . . . .  125If only part of the display is readable  . . . . . . .  126Drivers . . . . . . . . . . . . . . . . . . . . . . . . . .  126What Is a Driver? . . . . . . . . . . . . . . . . . .  126Identifying Drivers  . . . . . . . . . . . . . . . . .  127Reinstalling Drivers and Utilities . . . . . . . . . .  127Troubleshooting Software and Hardware Problems . .  130Restoring Your Operating System . . . . . . . . . . . .  130
FILE LOCATION:  S:\systems\Lion's Gate\OM\A00\EN\LionsGate_OM_A00\Source\bookTOC.fmTemplate Last Updated - 1/7/2007 Contents 9Using Microsoft Windows System Restore  . . . .  131Using Dell PC Restore by Symantec . . . . . . . .  131Using the Operating System Media  . . . . . . . .  13413 Adding and Replacing Parts . . . . . . . . .  137Before You Begin  . . . . . . . . . . . . . . . . . . . .  137Recommended Tools . . . . . . . . . . . . . . . .  137Turning Off Your Computer . . . . . . . . . . . . .  137Before Working Inside Your Computer . . . . . . .  138Hard Drive . . . . . . . . . . . . . . . . . . . . . . . .  139Removing the Hard Drive  . . . . . . . . . . . . .  140Replacing the Hard Drive  . . . . . . . . . . . . .  141Returning a Hard Drive to Dell . . . . . . . . . . .  142Optical Drive  . . . . . . . . . . . . . . . . . . . . . .  142Removing the Optical Drive  . . . . . . . . . . . .  142Replacing the Optical Drive  . . . . . . . . . . . .  143Hinge Cover  . . . . . . . . . . . . . . . . . . . . . . .  143Removing the Hinge Cover . . . . . . . . . . . . .  144Replacing the Hinge Cover . . . . . . . . . . . . .  144Keyboard . . . . . . . . . . . . . . . . . . . . . . . . .  145Removing the Keyboard  . . . . . . . . . . . . . .  145Replacing the Keyboard  . . . . . . . . . . . . . .  146Memory  . . . . . . . . . . . . . . . . . . . . . . . . .  146Removing the DIMM A Memory Module  . . . . .  147Replacing the DIMM A Memory Module  . . . . .  148Removing the DIMM B Memory Module  . . . . .  149Replacing the DIMM B Memory Module  . . . . .  151Subscriber Identity Module . . . . . . . . . . . . . . .  152
FILE LOCATION:  S:\systems\Lion's Gate\OM\A00\EN\LionsGate_OM_A00\Source\bookTOC.fm10 ContentsWireless Mini Cards . . . . . . . . . . . . . . . . . . .  153Removing a WLAN Card  . . . . . . . . . . . . . .  154Replacing a WLAN Card  . . . . . . . . . . . . . .  156Removing a Mobile Broadband or WWAN Card . .  157Replacing a WWAN Card  . . . . . . . . . . . . .  160Removing a WPAN Card  . . . . . . . . . . . . . .  161Replacing a WPAN Card . . . . . . . . . . . . . .  162Flash Cache Module . . . . . . . . . . . . . . . . . . .  162Removing the FCM . . . . . . . . . . . . . . . . .  162Replacing the FCM . . . . . . . . . . . . . . . . .  163Internal Card With Bluetooth® Wireless Technology  . 164Removing the Card . . . . . . . . . . . . . . . . .  164Replacing the Card . . . . . . . . . . . . . . . . .  165Coin-Cell Battery  . . . . . . . . . . . . . . . . . . . .  165Removing the Coin-Cell Battery  . . . . . . . . . .  166Replacing the Coin-Cell Battery  . . . . . . . . . .  16614 Dell™ QuickSet Features  . . . . . . . . . . .  16715 Traveling With Your Computer . . . . . . . .  169Identifying Your Computer . . . . . . . . . . . . . . . .  169Packing the Computer . . . . . . . . . . . . . . . . . .  169Travel Tips . . . . . . . . . . . . . . . . . . . . . . . .  170Traveling by Air . . . . . . . . . . . . . . . . . . .  17016 Getting Help . . . . . . . . . . . . . . . . . . . . . .  171Obtaining Assistance  . . . . . . . . . . . . . . . . . .  171
FILE LOCATION:  S:\systems\Lion's Gate\OM\A00\EN\LionsGate_OM_A00\Source\bookTOC.fmTemplate Last Updated - 1/7/2007 Contents 11Technical Support and Customer Service . . . . .  172DellConnect  . . . . . . . . . . . . . . . . . . . .  172Online Services  . . . . . . . . . . . . . . . . . .  172AutoTech Service  . . . . . . . . . . . . . . . . .  173Automated Order-Status Service  . . . . . . . . .  173Problems With Your Order  . . . . . . . . . . . . . . .  173Product Information . . . . . . . . . . . . . . . . . . .  174Returning Items for Warranty Repair or Credit . . . . .  174Before You Call  . . . . . . . . . . . . . . . . . . . . .  175Contacting Dell  . . . . . . . . . . . . . . . . . . . . .  17717 Specifications . . . . . . . . . . . . . . . . . . . .  17918 Appendix . . . . . . . . . . . . . . . . . . . . . . . .  189Using the System Setup Program . . . . . . . . . . . .  189Viewing the System Setup Screen . . . . . . . . .  190System Setup Screen  . . . . . . . . . . . . . . .  190Commonly Used Options . . . . . . . . . . . . . .  190Cleaning Your Computer  . . . . . . . . . . . . . . . .  192Computer, Keyboard, and Display  . . . . . . . . .  192Touch Pad  . . . . . . . . . . . . . . . . . . . . .  192Mouse  . . . . . . . . . . . . . . . . . . . . . . .  193Media . . . . . . . . . . . . . . . . . . . . . . . .  193Dell Technical Support Policy (U.S. Only)  . . . . . . .  194Definition of "Dell-Installed" Software and Peripherals 195Definition of "Third-Party" Software and Peripherals 195
FILE LOCATION:  S:\systems\Lion's Gate\OM\A00\EN\LionsGate_OM_A00\Source\bookTOC.fm12 ContentsFCC Notice (U.S. Only) . . . . . . . . . . . . . . . . . .  195FCC Class B . . . . . . . . . . . . . . . . . . . . .  195Macrovision Product Notice  . . . . . . . . . . . . . .  196Glossary 197Index . . . . . . . . . . . . . . . . . . . . . . . . . . . . . .  215
Finding Information 13Finding InformationNOTE: Some features may be optional and may not ship with your computer. Some features may not be available in certain countries.NOTE: Additional information may ship with your computer.What Are You Looking For? Find It Here• A diagnostic program for my computer• Drivers for my computer• Device documentation• Notebook System Software (NSS)Drivers and Utilities MediaDocumentation and drivers are already installed on your computer. You can use the Drivers and Utilities media to reinstall drivers (see "Reinstalling Drivers and Utilities" on page 127) or run the Dell Diagnostics (see "Dell Diagnostics" on page 99).Readme files may be included on your Drivers and Utilities media to provide last-minute updates about technical changes to your computer or advanced technical-reference material for technicians or experienced users.NOTE: Drivers and documentation updates can be found at support.dell.com.• Warranty information• Terms and Conditions (U.S. only)• Safety instructions• Regulatory information• Ergonomics information• End User License AgreementDell™ Product Information Guide• How to set up my computerSetup Diagram
14 Finding Information• Service Tag and Express Service Code•Microsoft® Windows® Product KeyService Tag and Microsoft Windows Product KeyThese labels are located on your computer.• Use the Service Tag to identify your computer when you use support.dell.com or contact support.• Enter the Express Service Code to direct your call when contacting support.NOTE: As an increased security measure, the newly designed Microsoft Windows license label incorporates a "security portal," which looks like a missing portion of the label, to discourage removal of the label.What Are You Looking For? Find It Here
Finding Information 15• Solutions — Troubleshooting hints and tips, articles from technicians, online courses, and frequently asked questions• Community — Online discussion with other Dell customers• Upgrades — Upgrade information for components, such as the memory, hard drive, and operating system• Customer Care — Contact information, service call and order status, and warranty and repair information• Service and support — Service call status, support history, service contract, and online discussions with support• Dell Technical Update Service — Proactive e-mail notification of software and hardware updates for your computer• Reference — Computer documentation, details on my computer configuration, product specifications, and white papers• Downloads — Certified drivers, patches, and software updates• Notebook System Software (NSS) — If you reinstall the operating system on your computer, you should also reinstall the NSS utility. NSS automatically detects your computer and operating system, and installs the updates appropriate for your configuration, providing critical updates for your operating system and support for Dell 3.5-inch USB floppy drives, Intel®processors, optical drives, and USB devices. NSS is necessary for correct operation of your Dell computer.Dell Support Website — support.dell.comNOTE: Select your region or business segment to view the appropriate support site.To download Notebook System Software:1Go to support.dell.com, select your country/region, and then click Drivers & Downloads.2Enter your Service Tag or product model, and then click Go.3Select your operating system and language, and then click Find Downloads, or under DownloadsSearch, search for the keywordNotebook System Software.NOTE: The support.dell.com user interface may vary depending on your selections.What Are You Looking For? Find It Here
16 Finding Information• Software upgrades and troubleshooting hints — Frequently asked questions, hot topics, and general health of your computing environmentDell Support UtilityThe Dell Support Utility is an automated upgrade and notification system installed on your computer. This support provides real-time health scans of your computing environment, software updates, and relevant self-support information. Access the Dell Support Utility from the icon on the taskbar. For more information, see "Dell Support Utility" on page 103.• How to use Microsoft Windows Vista™• How to work with programs and files• How to personalize my desktopWindows Help and Support1Click the Windows Vista Start button , and then click Help and Support.2In Search Help, type a word or phrase that describes your problem, and then press <Enter> or click the magnifying glass.3Click the topic that describes your problem.4Follow the instructions on the screen.• Information on network activity, the Power Management Wizard, hotkeys, and other items controlled by Dell QuickSetDell QuickSet HelpTo view Dell QuickSet Help,right-clickthe Dell QuickSet icon in the Windows notification area.For more information on Dell QuickSet, see "Dell™ QuickSet Features" on page 167.What Are You Looking For? Find It Here
Finding Information 17• How to reinstall my operating systemOperating System MediaThe operating system is already installed on your computer. To reinstall your operating system, use one of the following methods:• Microsoft Windows System Restore —Microsoft Windows System Restorereturns your computer to an earlier operating state without affecting data files.• Dell PC Restore — Dell PC Restorereturns your computer to its original operating state. Dell PC Restore may not ship with your computer.• Operating System Installation Media — If you received operating system media with your computer, you can use it to restore your operating system.For more information, see "Restoring Your Operating System" on page 130.After you reinstall your operating system, use the Drivers and Utilities media to reinstall drivers for the devices that came with your computer.Your operating system product key label is located on your computer.NOTE: The color of your operating system installation media varies according to the operating system you ordered.What Are You Looking For? Find It Here
18 Finding Information
Template Last Updated - 2/7/2007 About Your Computer 19DELL CONFIDENTIAL – PRELIMINARY 4/2/07 - FOR PROOF ONLYAbout Your ComputerDetermining Your Computer’s ConfigurationBased on selections that you made when purchasing your computer, your computer has one of several different video controller configurations. To determine your computer’s video controller configuration: 1ClickStart, and then clickHelp and Support.2UnderPick a Task, click Use Tools to view your computer information and diagnose problems.3UnderMy Computer Information, select Hardware.From the My Computer Information - Hardware screen, you can view the type of video controller installed in your computer, as well as the other hardware components.
20 About Your ComputerFILE LOCATION:  S:\systems\Lion's Gate\OM\A00\EN\LionsGate_OM_A00\Source\about.fmDELL CONFIDENTIAL – PRELIMINARY 4/2/07 - FOR PROOF ONLYFront View1 camera indicator (optional) 2 camera (optional)3 display latch 4 display5 power button 6 keyboard7 device status lights 8 touch pad9 consumer IR 10 media control buttons11 touch pad buttons 12 Dell™ MediaDirect™ button13 keyboard status lights 14 digital array microphones4513361287142111 910
About Your Computer 21FILE LOCATION:  S:\systems\Lion's Gate\OM\A00\EN\LionsGate_OM_A00\Source\about.fmDELL CONFIDENTIAL – PRELIMINARY 4/2/07 - FOR PROOF ONLYCAMERA INDICATOR —Indicates that the camera is on. Based on configuration selections you made when ordering your computer, your computer may not include a camera.CAMERA —Built-in camera for video capture, conferencing, and chat. Based on configuration selections you made when ordering your computer, your computer may not include a camera.DISPLAY LATCH —Keeps the display closed.DISPLAY —For more information about your display, see "Using the Display" on page 39.POWER BUTTON —Press the power button to turn on the computer or exit a power management mode (see "Configuring Power Management Settings" on page 50).NOTICE: To avoid losing data, turn off your computer by performing a Microsoft®Windows®operating system shutdown rather than by pressing the power button.If the computer stops responding, press and hold the power button until the computer turns off completely (may take several seconds).KEYBOARD —For more information about the keyboard, see "Using the Keyboard and Touchpad" on page 41.
22 About Your ComputerFILE LOCATION:  S:\systems\Lion's Gate\OM\A00\EN\LionsGate_OM_A00\Source\about.fmDELL CONFIDENTIAL – PRELIMINARY 4/2/07 - FOR PROOF ONLYDEVICE STATUS LIGHTSThe blue lights located to the right of the keyboard indicate the following:Power light – Turns on when you turn on the computer, and blinks when the computer is in a power management mode. Hard drive activity light – Turns on when the computer reads or writes data.NOTICE: To avoid loss of data, never turn off the computer while the  light is flashing.Battery status light – Turns on steadily or blinks to indicate battery charge status.WiFi status light – Turns on when wireless networking is enabled. To enable or disable wireless networking, use the wireless switch (see "wireless switch" on page 25).
About Your Computer 23FILE LOCATION:  S:\systems\Lion's Gate\OM\A00\EN\LionsGate_OM_A00\Source\about.fmDELL CONFIDENTIAL – PRELIMINARY 4/2/07 - FOR PROOF ONLYIf the computer is connected to an electrical outlet, the   light operates as follows:– Solid blue: The battery is charging.– Flashing blue: The battery is almost fully charged.– Off: The battery is adequately charged.If the computer is running on a battery, the   light operates as follows:– Off: The battery is adequately charged (or the computer is turned off).– Flashing amber: The battery charge is low.– Solid amber: The battery charge is critically low.TOUCH PAD —Provides the functionality of a mouse (see "Touch Pad" on page 43).TOUCH PAD BUTTONS —Use these buttons much like the buttons on a mouse when you use the touch pad to move the cursor on the display (see "Touch Pad" on page 43).MEDIA CONTROL BUTTONS —Control CD, DVD, and Media Player playback.Bluetooth® status light – Turns on when a card with Bluetooth wireless technology is enabled.NOTE: The card with Bluetooth wireless technology is an optional feature. The   light turns on only if you ordered the card with your computer. For more information, see the documentation that came with your card.To turn off only the Bluetooth wireless technology functionality, right-click the   icon in the notification area, and then click Disable Bluetooth Radio.To quickly enable or disable all wireless devices, use the wireless switch (see "wireless switch" on page 25).Mute the sound.  Play the previous track.Turn the volume down. Play the next track. Turn the volume up. Stop. Play or pause.
24 About Your ComputerFILE LOCATION:  S:\systems\Lion's Gate\OM\A00\EN\LionsGate_OM_A00\Source\about.fmDELL CONFIDENTIAL – PRELIMINARY 4/2/07 - FOR PROOF ONLYDELL™ MEDIADIRECT™BUTTON —Press the Dell MediaDirect button to launch Dell MediaDirect (see "Using Dell MediaDirect™" on page 60).KEYBOARD STATUS LIGHTSThe blue lights located above the keyboard indicate the following:DIGITAL ARRAY MICROPHONES —Built-in microphone for conferencing and chat.Turns on when the numeric keypad is enabled.Turns on when the uppercase letter (caps lock) function is enabled.Turns on when the scroll lock function is enabled.9A
About Your Computer 25FILE LOCATION:  S:\systems\Lion's Gate\OM\A00\EN\LionsGate_OM_A00\Source\about.fmDELL CONFIDENTIAL – PRELIMINARY 4/2/07 - FOR PROOF ONLYLeft Side ViewSECURITY CABLE SLOT —Lets you attach a commercially available antitheft device to the computer (see "Security Cable Lock" on page 95).WIRELESS SWITCH —When enabled through Dell QuickSet, this switch can scan for a wireless local area network (WLAN) in your vicinity. You can also use it to rapidly turn off or on any wireless devices such as WLAN cards and internal cards with Bluetooth wireless technology (see "Dell Wi-Fi Catcher™ Network Locator" on page 93).1 security cable slot 2 wireless switch3 Wi-Fi Catcher light 4 air vents5 audio connectors 6 ExpressCard slot12563 41 2 3 4
26 About Your ComputerFILE LOCATION:  S:\systems\Lion's Gate\OM\A00\EN\LionsGate_OM_A00\Source\about.fmDELL CONFIDENTIAL – PRELIMINARY 4/2/07 - FOR PROOF ONLYCAUTION: Do not block, push objects into, or allow dust to accumulate in the air vents. Do not store your computer in a low-airflow environment, such as a closed briefcase, while it is running. Restricting the airflow can damage the computer or cause a fire.AIR VENTS —The computer uses an internal fan to create airflow through the vents, which prevents the computer from overheating. The computer turns the fan on when the computer gets hot. Fan noise is normal and does not indicate a problem with the fan or the computer.AUDIO CONNECTORS1off Disables wireless devices.2on Enables wireless devices.3momentary Scans for WLAN networks (see "Dell Wi-Fi Catcher™ Network Locator" on page 93).4Wi-Fi Catcher light• Flashing green: Searching for networks• Solid green: Strong network found• Solid yellow: Weak network found• Flashing yellow: Error• Off: No signal foundAttach headphones to the   connector. Attach a microphone to the   connector.
About Your Computer 27FILE LOCATION:  S:\systems\Lion's Gate\OM\A00\EN\LionsGate_OM_A00\Source\about.fmDELL CONFIDENTIAL – PRELIMINARY 4/2/07 - FOR PROOF ONLYEXPRESSCARD SLOT —Supports one ExpressCard. The computer ships with a plastic blank installed in the slot. For more information, see "Using ExpressCards" on page 77.Right Side ViewOPTICAL DRIVE —For more information about the optical drive, see "Using Multimedia" on page 55.EJECT BUTTON —Press the eject button to open the optical drive.8-IN-1 MEMORY CARD READER —Provides a fast and convenient way to view and share digital photos, music, and videos stored on a memory card. The computer ships with a plastic blank installed in the slot. The 8-in-1 memory card reader reads the following digital memory cards:• Secure Digital (SD) memory card• SDIO card• MultiMediaCard (MMC)• Memory Stick • Memory Stick PRO • xD-Picture Card 1 battery status light 2 hard drive activity light3 power light 4 optical drive5 eject button 6 8-in-1 memory card reader7 IEEE 1394 connector 8 video connector (VGA)9 network connector (RJ-45) 10  USB connectors (2)4 6 7 91085123
28 About Your ComputerFILE LOCATION:  S:\systems\Lion's Gate\OM\A00\EN\LionsGate_OM_A00\Source\about.fmDELL CONFIDENTIAL – PRELIMINARY 4/2/07 - FOR PROOF ONLY• Hi Speed-SD• Hi Density-SDIEEE 1394 CONNECTOR —Connects devices supporting IEEE 1394 high-speed transfer rates, such as some digital video cameras.VIDEO CONNECTORNETWORK CONNECTOR (RJ-45)USB CONNECTORSConnects video devices, such as a monitor.Connects the computer to a network. The two lights next to the connector indicate status and activity for wired network connections.For information on using the network adapter, see the device user’s guide supplied with your computer.Connect USB devices, such as a mouse, keyboard, or printer.
About Your Computer 29FILE LOCATION:  S:\systems\Lion's Gate\OM\A00\EN\LionsGate_OM_A00\Source\about.fmDELL CONFIDENTIAL – PRELIMINARY 4/2/07 - FOR PROOF ONLYBack ViewS-VIDEO TV-OUT CONNECTORUSB CONNECTORSAC ADAPTER CONNECTOR —Attaches an AC adapter to the computer. The AC adapter converts AC power to the DC power required by the computer. You can connect the AC adapter with your computer turned on or off.NOTE: If your computer has the discrete video configuration, you must use the 90 W AC adapter that is shipped with your computer. Using the incorrect AC adapter will prevent optimal system performance and produce a BIOS warning.NOTE: Ensure the power cord is firmly attached to the AC adapter. A green LED light on the AC adapter indicates a proper connection.1 S-video TV-out connector 2 USB connectors (2)3 AC adapter connector 4 battery5 modem connector (RJ-11)Connects your computer to a TV. Also connects digital audio-capable devices using the TV/digital audio adapter cable.Connect USB devices, such as a mouse, keyboard, or printer. 1 2 354
30 About Your ComputerFILE LOCATION:  S:\systems\Lion's Gate\OM\A00\EN\LionsGate_OM_A00\Source\about.fmDELL CONFIDENTIAL – PRELIMINARY 4/2/07 - FOR PROOF ONLYCAUTION: The AC adapter works with electrical outlets worldwide. However, power connectors and power strips vary among countries. Using an incompatible cable or improperly connecting the cable to the power strip or electrical outlet may cause fire or equipment damage.NOTICE: When you disconnect the AC adapter cable from the computer, grasp the connector, not the cable itself, and pull firmly, but gently to help prevent damage to the cable.MODEM CONNECTOR (RJ-11)Connect the telephone line to the modem connector.For information on using the modem, see the online modem documentation supplied with your computer.
About Your Computer 31FILE LOCATION:  S:\systems\Lion's Gate\OM\A00\EN\LionsGate_OM_A00\Source\about.fmDELL CONFIDENTIAL – PRELIMINARY 4/2/07 - FOR PROOF ONLYBottom ViewLEFT SPEAKER —To adjust the volume of the integrated speaker, press the volume control buttons or the mute button.MEMORY MODULE/COIN-CELL BATTERY COMPARTMENT —Compartment that contains the DIMM B memory module and the coin-cell battery. For additional information, see "Adding and Replacing Parts" on page 137.CONSUMER IR — Receives the signal from the Dell travel remote controller for basic 1 left speaker 2 memory module/coin-cell battery compartment3 consumer IR 4 right speaker5 wireless mini card compartment 6 battery7 battery charge/health gauge 8 battery-bay latch releases (2)9 fan 10 hard drive23410716895
32 About Your ComputerFILE LOCATION:  S:\systems\Lion's Gate\OM\A00\EN\LionsGate_OM_A00\Source\about.fmDELL CONFIDENTIAL – PRELIMINARY 4/2/07 - FOR PROOF ONLYmultimedia navigation control. RIGHT SPEAKER —To adjust the volume of the integrated speaker, press the volume control buttons or the mute button.WIRELESS MINI CARD COMPARTMENT —Compartment for wireless Mini Cards (WLAN, WWAN, or WPAN), or a Flash Cache Module (FCM) (see "Wireless Mini Cards" on page 153 and "Flash Cache Module" on page 162).BATTERY —When a battery is installed, you can use the computer without connecting the computer to an electrical outlet (see "Using a Battery" on page 47).BATTERY CHARGE/HEALTH GAUGE —Provides information on the battery charge (see "Checking the Battery Charge" on page 48).BATTERY-BAY LATCH RELEASES —Releases the battery (see "Replacing the Battery" on page 52 for instructions).FAN —The computer uses a fan to create airflow through the vents, which prevents the computer from overheating. The computer turns the fan on when the computer gets hot. Fan noise is normal and does not indicate a problem with the fan or the computer.HARD DRIVE —Stores software and data.
Setting Up Your Computer 33Setting Up Your ComputerConnecting to the InternetNOTE: ISPs and ISP offerings vary by country.To connect to the Internet, you need a modem or network connection and an Internet service provider (ISP). Your ISP will offer one or more of the following Internet connection options:• DSL connections that provide high-speed Internet access through your existing telephone line or cellular telephone service. With a DSL connection, you can access the Internet and use your telephone on the same line simultaneously.• Cable modem connections that provide high-speed Internet access through your local cable TV line.• Satellite modem connections that provide high-speed Internet access through a satellite television system.• Dial-up connections that provide Internet access through a telephone line. Dial-up connections are considerably slower than DSL, cable, and satellite modem connections.• Wireless Wide Area Network (WWAN) or Mobile Broadband technology provides a connection to the Internet using cellular technology at broadband rates.• Wireless Local Area Network (WLAN) connections use high-frequency radio waves to communicate. Typically, a wireless router is connected to the broadband cable or DSL modem that broadcasts the Internet signal to your computer.If you are using a dial-up connection, connect a telephone line to the modem connector on your computer and to the telephone wall jack before you set up your Internet connection. If you are using a DSL, cable, or satellite modem connection, contact your ISP or cellular telephone service for setup instructions.
34 Setting Up Your ComputerSetting Up Your Internet ConnectionTo set up an Internet connection with a provided ISP desktop shortcut:1Save and close any open files, and exit any open programs.2Double-click the ISP icon on the Microsoft® Windows® desktop.3Follow the instructions on the screen to complete the setup.NOTE: If you are having problems connecting to the Internet, see "E-Mail, Modem, and Internet Problems" on page 106. If you cannot connect to the Internet, but have successfully connected in the past, the ISP may have a service outage. Contact your ISP to check the service status, or try connecting again later.NOTE: Have your ISP information ready. If you do not have an ISP, the Connect to the Internet wizard can help you obtain one.If you do not have an ISP icon on your desktop or if you want to set up an Internet connection with a different ISP:1Save and close any open files, and exit any open programs.2ClickStart, and then click Control Panel.3Under Network and Internet, click Connect to the Internet.The Connect to the Internet window appears.4Click either Broadband (PPPoE),Wireless, or Dial-up, depending on how you want to connect:• Choose Broadband if you will use a DSL modem, cable TV modem, or satellite modem.• Choose Wireless if you will use a wireless connection through a WLAN card.• Choose Dial-up if you will use a dial-up modem or ISDN.NOTE: If you do not know which type of connection to select, click Help me choose or contact your ISP.5Follow the instructions on the screen and use the setup information provided by your ISP to complete the setup.
Setting Up Your Computer 35Transferring Information to a New ComputerYou can transfer the following types of data from one computer to another:• E-mail messages• Toolbar settings•Window sizes• Internet bookmarksUse one of the following methods for transferring data:• Windows Easy Transfer wizard, an Easy Transfer Cable, and a USB port• Over a network• Removable media, such as a writable CDWindows Easy Transfer1ClickStart→All Programs→Accessories→System Tools→ Windows Easy Transfer.2In the User Account Control dialog box, click Continue.3ClickNext.4ClickStart a new transfer or Continue a transfer in progress.5Follow the instructions in the Windows Easy Transfer wizard.Setting Up a PrinterNOTICE: Complete the operating system setup before you connect a printer to the computer.See the documentation that came with the printer for setup information, including how to:• Obtain and install updated drivers.• Connect the printer to the computer.• Load paper and install the toner or ink cartridge.For technical assistance, refer to the printer owner's manual or contact the printer manufacturer.
36 Setting Up Your ComputerPrinter CableYour printer connects to your computer with a USB cable. Your printer may not come with a printer cable, so if you purchase a cable separately, ensure that it is compatible with your printer and computer. If you purchased a printer cable at the same time you purchased your computer, the cable may arrive in the computer’s shipping box.Connecting a USB PrinterNOTE: You can connect USB devices while the computer is turned on.1Complete the operating system setup if you have not already done so.2Attach the USB printer cable to the USB connectors on the computer and the printer. The USB connectors fit only one way.1 USB connector on computer 2 USB connector on printer3 USB printer cable321
Setting Up Your Computer 373Turn on the printer, and then turn on the computer.If the Add New Hardware Wizard window appears, click Cancel.4ClickStart, and then click Network. 5ClickAdd a printer to start the Add Printer Wizard.NOTE: To install the printer driver, see "Reinstalling Drivers and Utilities" on page 127 and the documentation that came with your printer.6ClickAdd a local printer or Add a network, wireless, or Bluetooth printer.7Follow the instructions in the Add Printer Wizard.Power Protection DevicesSeveral devices are available to protect against power fluctuations and failures:• Surge protectors• Line conditioners• Uninterruptible power supplies (UPS)Surge ProtectorsSurge protectors and power strips equipped with surge protection help prevent damage to your computer from voltage spikes that can occur during electrical storms or after power interruptions. Some surge protector manufacturers include warranty coverage for certain types of damage. Carefully read the device warranty when choosing a surge protector. A device with a higher joule rating offers more protection. Compare joule ratings to determine the relative effectiveness of different devices.NOTICE: Most surge protectors do not protect against power fluctuations or power interruptions caused by nearby lightning strikes. When lightning occurs in your area, disconnect the telephone line from the telephone wall jack and disconnect your computer from the electrical outlet.Many surge protectors have a telephone jack for modem protection. See the surge protector documentation for modem connection instructions.NOTICE: Not all surge protectors offer network adapter protection. Disconnect the network cable from the network wall jack during electrical storms.
38 Setting Up Your ComputerLine ConditionersNOTICE: Line conditioners do not protect against power interruptions.Line conditioners are designed to maintain AC voltage at a fairly constant level.Uninterruptible Power SuppliesNOTICE: Loss of power while data is being saved to the hard drive may result in data loss or file damage.NOTE: To ensure maximum battery operating time, connect only your computer to a UPS. Connect other devices, such as a printer, to a separate power strip that provides surge protection.A UPS protects against power fluctuations and interruptions. UPS devices contain a battery that provides temporary power to connected devices when AC power is interrupted. The battery charges while AC power is available. See the UPS manufacturer documentation for information on battery operating time and to ensure that the device is approved by Underwriters Laboratories (UL).
Using the Display 39Using the DisplayAdjusting BrightnessWhen a Dell™ computer is running on battery power, you can conserve power by setting the display brightness to the lowest comfortable level.• Press <Fn> and the up-arrow key to increase brightness on the integrated display only (not on an external monitor).• Press <Fn> and the down-arrow key to decrease brightness on the integrated display only (not on an external monitor).NOTE: Brightness key combinations only affect the display on your portable computer, not monitors or projectors that you attach to your portable computer or docking device. If your computer is connected to an external monitor and you try to change the brightness level, the Brightness Meter may appear, but the brightness level on the external device does not change.Switching the Video Image From Your Computer Display To a ProjectorWhen you start the computer with an external device attached (such as an external monitor or projector) and turned on, the image may appear on either the computer display or the external device.Press <Fn><F8> to switch the video image between the display only, the external device only, or the display and the external device simultaneously.Setting Display Resolution and Refresh RateNOTE: If you change the display resolution from the current settings, the image may appear blurry or text may be hard to read if you change the resolution to one not supported by your computer and display. Before you change any of the display settings, make a note of the current settings so you can change back to the previous settings if needed.
40 Using the DisplayYou can enhance the legibility of text and change the appearance of images on the screen by adjusting display resolution. As you increase resolution, items appear smaller on the screen. In contrast, lower resolution causes text and images to appear larger and can benefit people with vision impairments. To display a program at a specific resolution, both the video card and the display must support the program, and the necessary video drivers must be installed.NOTE: Use only the Dell-installed video drivers, which are designed to offer the best performance with your Dell-installed operating system.If you choose a resolution or color palette that is higher than the display supports, the settings adjust automatically to the closest supported values.To set the display resolution and refresh rate for your display:1ClickStart→Control Panel.2UnderAppearance and Personalization, click Adjust screen resolution.3In the Display Settings window, under Resolution, move the slide bar to the left or right to decrease/increase the screen resolution.NOTE: For additional instructions, click How do I get the best display?
Using the Keyboard and Touchpad 41Using the Keyboard and TouchpadNumeric KeypadThe numeric keypad functions like the numeric keypad on an external keyboard. Each key on the keypad has multiple functions. The keypad numbers and symbols are marked in blue on the right of the keypad keys. To type a number or symbol, hold down <Fn> and press the desired key.• To enable the keypad, press <Num Lk>. The   light indicates that the keypad is active.• To disable the keypad, press <Num Lk> again. numeric keypad9
42 Using the Keyboard and TouchpadKey CombinationsSystem FunctionsDisplay FunctionsBatteryPower Management<Ctrl><Shift><Esc> Opens the Task Manager window.<Fn><F8> Displays icons representing all currently available display options (display only, external monitor or projector only, both display and projector, etc). Highlight the desired icon to switch the display to that option.<Fn> and up-arrow key Increases brightness on the integrated display only (not on an external monitor).<Fn> and down-arrow key Decreases brightness on the integrated display only (not on an external monitor).<Fn><F3> Displays the Dell™ QuickSet Battery Meter (see "Dell QuickSet Battery Meter" on page 48).<Fn><Esc> Activates a power management mode. You can reprogram this keyboard shortcut to activate a different power management mode using the Advanced tab in the Power Options Propertieswindow (see "Configuring Power Management Settings" on page 50).
Using the Keyboard and Touchpad 43Microsoft® Windows® Logo Key FunctionsDell™ QuickSet Key CombinationsIf Dell QuickSet is installed, you can use other shortcut keys for functions such as the Battery Meter or activating power management modes. For more information about Dell QuickSet key combinations, right-click the QuickSet icon in the notification area, and then click Help.Adjusting Keyboard SettingsTo adjust keyboard operation, such as the character repeat rate:1ClickStart, and then click Control Panel.2ClickHardware and Sound.3ClickKeyboard.Touch PadThe touch pad detects the pressure and movement of your finger to allow you to move the cursor on the display. Use the touch pad and touch pad buttons as you would use a mouse.Windows logo key and <m> Minimizes all open windows.Windows logo key and <Shift><m>Restores all minimized windows. This key combination functions as a toggle to restore minimized windows following the use of the Windows logo key and <m> combination. Windows logo key and <e> Starts Windows Explorer.Windows logo key and <r> Opens the Run dialog box.Windows logo key and <f> Opens the Search Results dialog box.Windows logo key and <Ctrl><f>Opens the Search Results-Computer dialog box (if the computer is connected to a network).Windows logo key and <Pause> Opens the System Properties dialog box.
44 Using the Keyboard and Touchpad• To move the cursor, lightly slide your finger over the touch pad.• To select an object, lightly tap once on the surface of the touch pad or use your thumb to press the left touch pad button.• To select and move (or drag) an object, position the cursor on the object and tap twice on the touch pad. On the second tap, leave your finger on the touch pad and move the selected object by sliding your finger over the surface. • To double-click an object, position the cursor on the object and tap twice on the touch pad or use your thumb to press the left touch pad button twice.Customizing the Touch PadYou can use the Mouse Properties window to disable the touch pad or adjust the touch pad settings.1ClickStart, and then click Control Panel.2ClickHardware and Sound.1 touch pad 2 silk screen depicting scrolling capabilities12
Using the Keyboard and Touchpad 453ClickKeyboard.4In the Mouse Properties window:• Click the Device Select tab to disable the touch pad.• Click the Touch Pad tab to adjust touch pad settings.5ClickOK to save the settings and close the window.
46 Using the Keyboard and Touchpad
Using a Battery 47Using a BatteryBattery PerformanceNOTE: For information about the Dell warranty for your computer, see the ProductInformation Guide or separate paper warranty document that shipped with your computer.For optimal computer performance and to help preserve BIOS settings, operate your Dell™ portable computer with the main battery installed at all times. One battery is supplied as standard equipment in the battery bay.NOTE: Because the battery may not be fully charged, use the AC adapter to connect your new computer to an electrical outlet the first time you use the computer. For best results, operate the computer with the AC adapter until the battery is fully charged. To view battery charge status, place the mouse cursor over the battery icon in the Windows notification area.NOTE: Battery operating time (the time the battery can hold a charge) decreases over time. Depending on how often the battery is used and the conditions under which it is used, you may need to purchase a new battery during the life of your computer.NOTE: It is recommended that you connect your computer to an electrical outlet when writing to media.Battery operating time varies depending on operating conditions. Operating time is significantly reduced when you perform operations including, but not limited to, the following:• Using optical drives.• Using wireless communications devices, ExpressCards, memory cards, or USB devices.• Using high-brightness display settings, 3D screen savers, or other power-intensive programs such as complex 3D graphics applications.• Running the computer in maximum performance mode (see "Configuring Power Management Settings" on page 50 for information about accessing Windows Power Options Properties or Dell QuickSet, which you can use to configure power management settings).
48 Using a BatteryYou can check the battery charge before you insert the battery into the computer. You can also set power management options to alert you when the battery charge is low.CAUTION: Using an incompatible battery may increase the risk of fire or explosion. Replace the battery only with a compatible battery purchased from Dell. The battery is designed to work with your Dell computer. Do not use batteries from other computers with your computer. CAUTION: Do not dispose of batteries with household waste. When your battery no longer holds a charge, call your local waste disposal or environmental agency for advice on disposing of a lithium-ion battery (see "Battery Disposal" in the Product Information Guide).CAUTION: Misuse of the battery may increase the risk of fire or chemical burn. Do not puncture, incinerate, disassemble, or expose the battery to temperatures above 65°C (149°F). Keep the battery away from children. Handle damaged or leaking batteries with extreme care. Damaged batteries may leak and cause personal injury or equipment damage. Checking the Battery ChargeYou can check the battery charge on your computer using any one of the following methods:• Dell QuickSet Battery Meter• Microsoft Windows battery meter icon   located in the notification area• Battery charge/health gauge located on the battery• Low-battery warning pop-up windowDell QuickSet Battery MeterTo view the Dell QuickSet Battery Meter:• Double-click the Dell QuickSet icon in the taskbar, and then click BatteryMeteror• Press <Fn><F3>The Battery Meter displays the status, battery health, charge level, and charge completion time for the battery in your computer.
Using a Battery 49For more information about QuickSet, right-click the QuickSet icon, and then click Help.Microsoft® Windows® Battery MeterThe battery meter indicates the remaining battery charge. To check the battery meter, double-click the   icon in the notification area. Charge GaugeBy either pressing once or pressing and holding the status button on the battery charge gauge, you can check:• Battery charge (check by pressing and releasing the status button)• Battery health (check by pressing and holding the status button)The battery operating time is largely determined by the number of times it is charged. After hundreds of charge and discharge cycles, batteries lose some charge capacity—or battery health. Therefore, a battery can show a status of charged, but maintain a reduced charge capacity (health).Check the Battery ChargeTo check the battery charge, press and release the status button on the battery charge gauge to illuminate the charge indicator lights. Each light represents approximately 20 percent of the total battery charge. For example, if the battery has 80 percent of its charge remaining, four of the lights are on. If no lights are on, the battery has no charge.Check the Battery HealthNOTE: You can check battery health in one of two ways: by using the charge gauge on the battery, as described below, and by using the Battery Meter in Dell QuickSet. For information about QuickSet, right-click the QuickSet icon in the notification area, and then click Help.To check the battery health using the charge gauge, press and hold the status button on the battery charge gauge for at least 3 seconds to illuminate the health indicator lights. Each light represents incremental degradation. If no lights appear, the battery is in good condition, and more than 80 percent of its original charge capacity remains. If five lights appear, less than 60 percent of
50 Using a Batterythe charge capacity remains, and you should consider replacing the battery (see "Battery" on page 185 for more information about the battery operating time).Low-Battery WarningNOTICE: To avoid losing or corrupting data, save your work immediately after a low-battery warning, then connect the computer to an electrical outlet. If the battery runs completely out of power, Sleep state begins automatically.A pop-up window warns you when the battery charge is approximately 90 percent depleted. The computer enters Sleep state when the battery charge is at a critically low level.You can change the settings for the battery alarms in Dell QuickSet or the Power Options window (see "Configuring Power Management Settings" on page 50).Conserving Battery PowerTo conserve battery power on your portable computer, do any of the following:• Connect the computer to an electrical outlet when possible; battery life is largely determined by the number of times the battery is used and recharged.• Configure the power management settings using either Dell QuickSet or Microsoft Windows Power Options to optimize your computer’s power usage (see "Configuring Power Management Settings" on page 50). • Use the Sleep power state when you leave the computer unattended for long periods of time (see "Using the Sleep Power State" on page 51).Configuring Power Management SettingsYou can use Dell QuickSet or Windows Power Options to configure the power management settings on your computer.• For information on how to use the Dell QuickSet Power Management wizard, right-click the QuickSet icon in the notification area, click Help,and then select Power Management.

Navigation menu