Samsung Electronics Co SCHI300 Dual-Band Analog/PCS Phone (AMPS/CDMA) User Manual
Samsung Electronics Co Ltd Dual-Band Analog/PCS Phone (AMPS/CDMA) Users Manual
Contents
Users Manual Part 7
296 SETTING PREFERENCES FOR YOUR SMARTPHONE
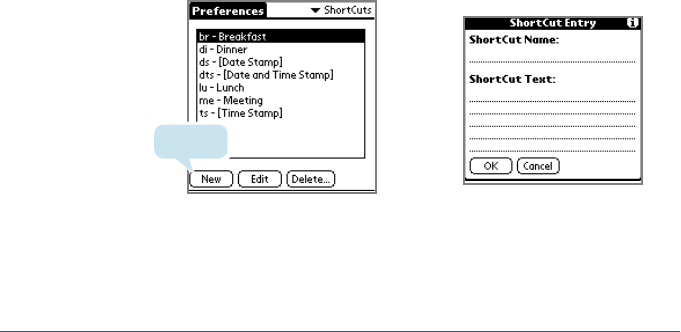
ShortCuts Preferences
The ShortCuts Preferences screen enables you to define
abbreviations for entering text with Graffiti strokes. This section
describes how to create, edit, and delete a ShortCut. See
Chapter x for more information on the use of ShortCuts.
Creating a ShortCut
You can create a ShortCut for any words, letters, or numbers. All
ShortCuts you create appear on the list in the ShortCut
Preferences screen. All the ShortCuts are available in any of your
Smartphone applications and are backed up on your computer
when you perform a HotSync operation.
To create a ShortCut:
1. Tap New.
2. On the ShortCut name line, enter the letters you want to use
to activate the ShortCut.
Tap New
➜
➜

SETTING PREFERENCES FOR YOUR SMARTPHONE 297
13
3. Tap the ShortCut Text area and enter the text that you want to
appear when you write the ShortCut characters.
Tip: You may want to add a space (space character) after the last word in
your ShortCut text. This way, a space automatically follows the
ShortCut text.
4. Tap OK.
Tip: To use a ShortCut, draw the ShortCut stroke followed by the ShortCut
characters. When you draw the ShortCut stroke, the ShortCut symbol
appears at the insertion point to show that you are in ShortCut
mode.
Editing a ShortCut
After you create a ShortCut, you can modify it at any time.
To edit a ShortCut:
1. Tap the ShortCut you want to edit.
2. Tap Edit.
3. Make the changes you want and tap OK.
ShortC

298 SETTING PREFERENCES FOR YOUR SMARTPHONE
Deleting a ShortCut
If you no longer need a ShortCut, you can delete it from the list
of ShortCuts.
To delete a ShortCut:
1. Tap the ShortCut you want to delete.
2. Tap Delete.
3. Tap Yes.

INSTALLING AND REMOVING APPLICATIONS 299
Installing and Removing
Applications
Your Smartphone comes with many applications installed. You
can also install additional applications, such as games and other
software. There are many third-party applications available for
your Smartphone. To learn more about these applications, go to
the web site: http://www.palm.com.
Each of these applications takes up some of the Smartphone’s
memory. Periodically, you’ll want to add new applications or
remove old ones. This chapter explains how to install and remove
applications on your Smartphone and how to remove Palm
Desktop software from your computer.
CHAPTER14
14

300 INSTALLING AND REMOVING APPLICATIONS
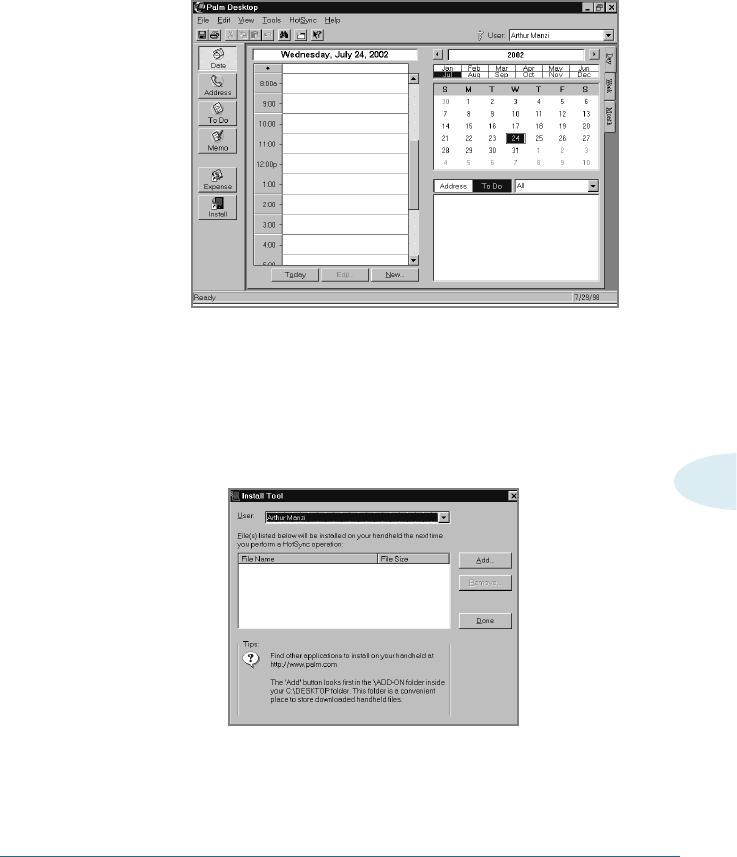
Installing Applications
The Install Tool makes it quick and easy to install software on the
Smartphone. You install new applications during the process of
synchronizing your Smartphone and your computer.
Considerations:
•
Be aware that any application you install on the
Smartphone resides in memory. A hard reset of the
Smartphone automatically deletes these applications; you
can also delete them manually.
•
Install only applications from reliable sources. It is
recommended that you use only Palm-certified or Platinum-
certified applications.
To install software on your Smartphone:
1. Copy the application you want to install into the Add-on
folder (inside the Palm Desktop folder) on your computer.
If you prefer to copy the application into another folder, you
must navigate to that folder before you complete step 5.
2. Double-click the Palm Desktop icon on your Windows
desktop (or select Palm Desktop from the Start menu) to
open the Palm Desktop software.
INSTALLING AND REMOVING APPLICATIONS 301
14
3. Click Install.
Note: You can also select the Install Tool dialog box by selecting Install
Tool from the Palm Desktop program group or by double-clicking
any file with a PRC file extension.
4. In the User drop-down list, select the user name that
corresponds to your Smartphone; then click Add.

302 INSTALLING AND REMOVING APPLICATIONS
5. In the file list of the Add-on folder, select the application from
that you want to install on your Smartphone; then click Open.
The file appears in the Palm Install Tool dialog box.
Note: If you decide not to install an application, select it in the list of
files in the Palm Install Tool dialog box and click Remove. The
application is removed from the dialog box list, but not from your
computer.
6. Click Done. A message appears to indicate that the application
or applications will be installed the next time you perform a
HotSync operation.
7. Perform a HotSync operation to install the applications. See
Chapter x, “Exchanging and Updating Data using HotSync
Operations” for more information.
Removing Applications
You can remove add-on applications, patches, and extensions
from your Smartphone if you run out of memory or no longer
need them.
You cannot remove the built-in applications that reside in the
ROM portion of your device, including the Date Book, Address
Book, To Do List, Memo Pad, Expense, Calculator, and Mail
applications.
INSTALLING AND REMOVING APPLICATIONS 303
14
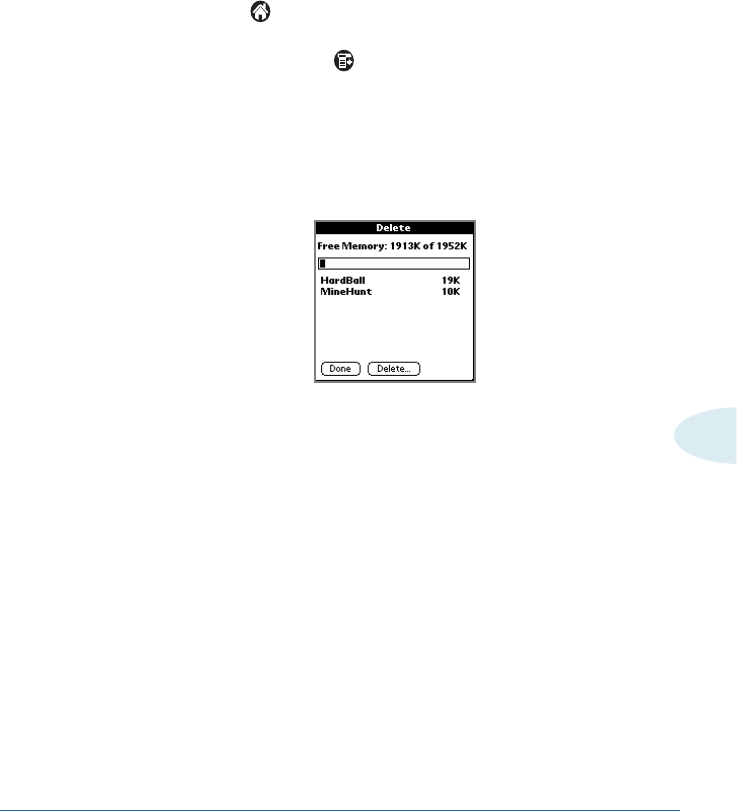
To remove an add-on application:
1. Tap the icon to open the Applications Launcher.
2. Tap the Menu icon to open the Applications Launcher
menus.
3. Tap App, then tap Delete.
4. In the Delete dialog box, tap the application you want to
remove.
5. Tap Delete.
6. Tap Yes to confirm that you want to remove the application
from your Smartphone.
7. Tap Done.

304 INSTALLING AND REMOVING APPLICATIONS
Removing Palm Desktop Software
If you no longer want to use Palm Desktop software, you can
remove it from your computer.
To remove Palm Desktop software:
1. In Windows, from the Start menu, choose Settings, and then
Control Panel.
2. Open the Add/Remove Programs icon.
3. On the Install/Uninstall tab, select Palm Desktop software;
then click Add/Remove.
4. Click Yes to confirm you want to remove the application.
Note: You must retain the HotSync Manager from the installation CD to
synchronize data with another PIM.

MAINTAINING YOUR SMARTPHONE 305
Maintaining Your Smartphone
This chapter provides information on the following:
• Proper care of your smartphone
• Prolonging battery life
• Resetting your smartphone
Caring for Your Smartphone
Your smartphone is designed to be rugged and reliable and to
provide years of trouble-free service. Please observe the
following general tips when using your smartphone:
• Take care not to scratch the screen of your smartphone. Keep
the screen clean. When working with your smartphone, use
the supplied stylus or plastic-tipped pens intended for use with
a touch-sensitive screen. Never use an actual pen or pencil or
other sharp object on the surface of the smartphone screen.
APPENDIX A
A

306 MAINTAINING YOUR SMARTPHONE
• Your smartphone is not waterproof and should not be exposed
to rain or moisture. Under extreme conditions, water may enter
the circuitry through the front panel buttons. In general, treat
your smartphone as you would a pocket calculator or other
small electronic instrument.
• The touch-sensitive screen of your smartphone contains a
glass element. Take care not to drop your smartphone or
subject it to any strong impact. Do not carry your smartphone
in your back pocket: if you sit on it, the glass may break.
• Protect your smartphone from temperature extremes. Do not
leave your smartphone on the dashboard of a car on a hot day,
and keep it away from heaters and other heat sources.
• Do not store or use your smartphone in any location that is
extremely dusty, damp, or wet.
• Use a soft, damp cloth to clean your smartphone. If the surface
of the smartphone screen becomes soiled, clean it with a soft
cloth moistened with a diluted window-cleaning solution.
Battery Considerations
Please note the following considerations for the battery in your
smartphone:
• Under normal conditions, your smartphone battery should
remain charged by placing it in the cradle for just a few
minutes each day. You can conserve battery life by minimizing
the use of the backlight feature, and changing the Auto-off
setting that automatically turns the smartphone off after a
period of inactivity. See “General preferences” in Chapter x.

MAINTAINING YOUR SMARTPHONE 307
A
• If the battery becomes low in the course of normal use, an
alert appears on the smartphone screen describing the low
battery condition. If this alert appears, perform a HotSync ®
operation to back up your data; then recharge the unit. This
helps prevent accidental data loss.
• If the battery drains to the point where your smartphone does
not operate, it stores your data safely for about a week. In this
case, there is enough residual energy in the battery to store
the data, but not enough to turn on your smartphone. If your
smartphone does not turn on when you press the power
button, you should recharge the unit immediately.
• If your battery drains and you have the unit in an uncharged
state for an extended period of time, you can lose all of the
stored data.
• There are no serviceable parts inside your smartphone, so do
not attempt to open the unit. You never need to replace the
battery, even if the charge runs out.
• If you ever dispose of your smartphone, please dispose of it
without damaging the environment. Either return your
smartphone to the service representative, or take it to your
nearest environmental recycling center.
308 MAINTAINING YOUR SMARTPHONE
Resetting Your Smartphone
Under normal circumstances, you will not have to use the reset
button. On rare occasions, however, your smartphone may no
longer respond to buttons or the screen. In this case, you need to
perform a reset to get your smartphone running again.
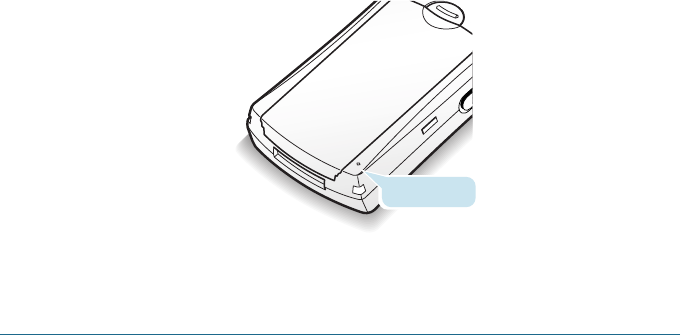
Performing a Soft Reset
A soft reset tells your smartphone to stop what it’s doing and
start over again. All records and entries stored in your
smartphone are retained with a soft reset. After a soft reset, the
Dialer screen appears.
To perform a soft reset::
• Use the reset tip tool, or the tip of an unfolded paper clip (or
similar object without a sharp tip), to gently press the reset
button inside the hole on the back panel of your smartphone.
Reset button

MAINTAINING YOUR SMARTPHONE 309
A
Performing a Hard Reset
With a hard reset, all records and entries stored in your
smartphone are erased. Never perform a hard reset unless a soft
reset does not solve your problem.
Note: You can restore any data previously synchronized with your computer
during the next HotSync operation.
To perform a hard reset:
1. Hold down the power button on the fright side of the
smartphone.
2. While holding down the power button, use the tip of an
unfolded paper clip (or similar object without a sharp tip) to
gently press the reset button.
3. Release the power button.
4. When a message appears on the smartphone screen warning
that you are about to erase all the data stored on your
smartphone, do one of the following:
Press the Up button on the front panel of the smartphone to
complete the hard reset and display the Setup screen.
Press any other button to cancel the procedure.
Note: With a hard reset, the current date and time are retained. Formats
Preferences and other settings are restored to their factory default
settings.

FREQUENTLY ASKED QUESTIONS 311
Frequently Asked Questions
If you encounter a problem with your smartphone, do not call
Technical Support until you have reviewed the following list of
frequently asked questions, and you have also reviewed the
following:
• The README file and HelpNotes located in the folder where
you installed the Palm™ Desktop software on your computer
(or on your installation CD or diskettes)
• The Palm Desktop online Help
If you are still having problems, contact Technical Support. For
US and International telephone numbers, see ??????.
Note: Thousands of third-party add-on applications have been written for
the Palm Computing ®platform. Unfortunately, we are not able to
support such a large number of third-party applications. If you are
having a problem with a third-party application, please contact the
developer or publisher of that software.
APPENDIX B
B
312 FREQUENTLY ASKED QUESTIONS
Problem Solution
Software Installation Problems
When I install Palm™
Desktop software I get
an error that a modem
is attached to my serial
port, but there is no
modem attached.
Take your smartphone out of the cradle
and install again.
Problem Solution
Operating Problems
My smartphone won’t
turn on.
Try each of these in turn:
• Press the contrast control button and
adjust the contrast.
• Recharge the unit. If your smartphone
still does not operate, try a soft
reset. See “Resetting your
smartphone” in Appendix A.
I get a warning
message telling me my
smartphone memory is
full.
• Purge Date Book and To Do List. This
deletes To Do List items and past
Date Book events from the memory
of your smartphone. See “Purging
records” in Chapter x. You may need
to perform a HotSync ® operation to
recover the memory.
FREQUENTLY ASKED QUESTIONS 313
B
Problem Solution
• Delete unused memos and records. If
necessary, you can save these
records. See “Deleting records” in
Chapter x.
• If you have installed additional
applications on your smartphone,
remove them to recover memory. See
“Removing applications” in Chapter x.
My smartphone keeps
turning itself off.
I get a warning
message telling me my
smartphone memory is
full. (continued)
Your smartphone is designed to turn
itself off after a period of inactivity.
This period can be set at one, two, or
three minutes. Check the Auto-off
setting. See “General preferences” in
Chapter x.
My smartphone is not
making any sounds.
Check the System Sound setting. See
“General preferences” in Chapter x.
My smartphone has
frozen.
Perform a soft reset. See “Resetting
your smartphone” in Appendix A.
I don’t see anything on
my Smartphone's
screen.
• Change the contrast settings.
• Check the battery power. If
necessary, recharge the unit.
314 FREQUENTLY ASKED QUESTIONS
Problem Solution
Tapping and Writing Problems
When I tap the buttons
or screen icons, my
smartphone activates
the wrong feature.
Calibrate the screen. See “Digitizer
preferences” in Chapter x.
When I tap the Menu
icon , nothing
happens.
Not all applications or screens have
menus. Try changing to a different
application.
I can’t get my
smartphone to
recognize my
handwriting.
• For your smartphone to recognize
handwriting input with the stylus,
you need to use the Graffiti ®
writing. See “Using Graffiti writing to
enter data” in Chapter x.
• Make the Graffiti character strokes in
the Graffiti writing area, not on the
display part of the screen.
• Write Graffiti strokes for letters in
the left-hand side, and the strokes
for numbers in the right-hand side of
the Graffiti writing area.
• Make sure that Graffiti is not shifted
into extended or punctuation modes.
See “Using Graffiti writing to enter
data” in Chapter x.
FREQUENTLY ASKED QUESTIONS 315
B
Problem Solution
Application Problems
Problem Solution I
tapped the Today
button, but it does not
show the correct date.
Your smartphone is not set to the
current date. Make sure the Set Date
box in the General Preferences screen
displays the current date. See “General
preferences” in Chapter x for more
information.
I know I entered some
records, but they do
not appear in the
application.
• Check the Categories pick list (upper-
right corner of the screen). Choose
All to display all of the records for
the application.
• Check Security and make sure that
the Private Records setting is set to
Show private records.
I am having problems
listing memos the way
I want to see them.
• If you cannot manually arrange the
order of the memos in the List
screen, check the Memo Preferences
setting. Make sure that Sort by is set
to Manual.
• If you choose to view your memos
alphabetically on Palm Desktop
software and then perform a HotSync
operation, the memos on your
smartphone still appear in the order
defined in the Memo Preferences
setting. In other words, the sort
settings that you use with Palm
Desktop software are not transferred
to your smartphone.
316 FREQUENTLY ASKED QUESTIONS
I created an event in
Date Book, but it
doesn’t appear in the
Week View.
In the Week View, you cannot select
overlapping events that have the same
start time. If you have two or more
events with the same start time,
choose the Day View for the particular
day to see the overlapping events.
Problem Solution
HotSync Problems
I cannot do a HotSync
operation; what should
I check to make sure I
am doing it correctly?
• Check the Windows tray to make
sure the HotSync Manager is
running. If it is not, open Palm
Desktop software.
• Click the HotSync Manager, choose
Setup and click the Local tab. Check
the Serial Port setting displays the
correct COM port where your cradle
is attached.
• Make sure the cradle is connected
securely.
I did a HotSync
operation, but one of
my applications did not
synchronize.
Click the HotSync Manager and choose
Custom. Check the correct conduit is
active.
Problem Solution

FREQUENTLY ASKED QUESTIONS 317
B
I am using Outlook as
my PIM, but I cannot
do a HotSync
operation.
• Click the HotSync Manager and
choose Custom. Check the correct
conduit is active.
• Check the correct conduit is installed.
Reinstall the HotSync Manager and
make sure the correct conduit is
selected.
I cannot launch the
HotSync Manager.
• Make sure you are not running
another program, such as America
Online, CompuServe, or WinFax, that
uses the serial port you selected in
the Setup dialog box.
• Reinstall the Palm Desktop software.
I tried to do a local
HotSync operation, but
it did not complete
successfully.
Try each of these in turn:
• Make sure HotSync Manager is
running. If HotSync Manager is
running, exit and restart it.
• Make sure you selected Local from
the HotSync Manager menu or the
Palm Desktop software menu.
• Check the cable connection between
the cradle and the serial port on your
computer.
• Make sure you selected the correct
serial port on the Local tab in the
Setup dialog. It should be set to the
port where you connected the cradle.
• Try a lower baud rate setting on the
Local tab in the Setup dialog.
Problem Solution
Problem Solution
318 FREQUENTLY ASKED QUESTIONS
• Make sure you are not running
another program, such as America
Online, CompuServe, or WinFax, that
uses the serial port you selected in
the Setup dialog box.
• Read the HotSync Log for the user
account for which you are performing
a HotSync operation.
• Make sure your smartphone is seated
in the cradle correctly.
• Make sure the gold-plated
connectors on the cradle and your
smartphone are clean. Use a pencil
eraser to clean them.
I tried to do a modem
HotSync operation, but
it did not complete
successfully.
I tried to do a local
HotSync operation, but
it did not complete
successfully.
(continued)
Check the following on your computer:
• Make sure your computer is turned
on and that it does not shut down
automatically as part of an energy-
saving feature.
• Make sure the modem connected to
your computer is turned on and is
connected to the outgoing phone
line.
• Make sure Modem is checked in the
HotSync Manager menu.
• Make sure the modem you are using
with your smartphone has an on-off
switch. Your smartphone cannot
“wake up” a modem that has an
auto-off feature.

FREQUENTLY ASKED QUESTIONS 319
B
Problem Solution
• Make sure the modem is connected
properly to a serial port on your
computer and is connected to the
incoming phone line.
• Confirm that the Setup String in the
Setup dialog box configures your
modem correctly. You may need to
select a different Modem Type or
enter a custom Setup String. Most
modems have a Setup String that
causes them to send initial
connection sounds to a speaker. You
can use these sounds to check the
modem connection.
• Confirm that the Speed setting in the
Setup dialog box is appropriate for
your modem.
• If you have problems using the As
Fast As Possible option or a specific
speed, try using a slower speed.
• Make sure you selected Modem from
the HotSync Manager menu.
• Make sure you are not running
another program, such as America
Online, CompuServe, or WinFax, that
uses the serial port you selected in
the Setup dialog box.
• Make sure your modem resets before
you try again. (Turn off your modem,
wait a minute, then turn it back on.)
I tried to do a modem
HotSync operation, but
it did not complete
successfully.
(continued)
320 FREQUENTLY ASKED QUESTIONS
Problem Solution
Check the following on your
smartphone:
• Confirm that your modem is turned
on.
• Make sure the dialing instruction
dials the correct phone number.
• If you need to dial an outside line
prefix, make sure you selected the
Dial Prefix option on your smartphone
and entered the correct code.
• If the telephone line you are using
has Call Waiting, make sure you
selected the Disable call waiting
option under Modem Sync Phone
Setup on your smartphone and
entered the correct code.
• Make sure the telephone line you are
using is not noisy, which can
interrupt communications.
• Make sure you are not running
another program, such as America
Online, CompuServe, or WinFax, that
uses the serial port you selected in
the Setup dialog box.
• Make sure your modem resets before
you try again. (Turn off your modem,
wait a minute, then turn it back on.)
I tried to do a modem
HotSync operation, but
it did not complete
successfully.
(continued)
FREQUENTLY ASKED QUESTIONS 321
B
Problem Solution
Network Problems
I cannot get e-mail on
my smartphone.
• To receive e-mail wirelessly, you
must have over-the-air digital data
coverage in your area. Connect your
service provider.
• If you have digital data coverage, you
can send and receive e-mail on the
smartphone by using the application
and keeping all of your mail
messages on a server. The Mail
application does not support over-
the-air data.
• If you do not have digital data
coverage, you must send and receive
e-mail on your computer e-mail
program. You can then transfer
messages to Palm Mail using a
HotSync operation. Once the
messages have been transferred, you
can read them answer them, and
compose new messages on the
smartphone. These messages are
transferred back to your computer
during your next HotSync operation
and sent to their recipients by the
computer e-mail program. See
“Chapter x Mail”.
322 FREQUENTLY ASKED QUESTIONS
Problem Solution
• To access the Internet, you must have
over-the-air digital data coverage in
your area. Contact your wireless
telephone service provider.
• Before you can open a Web side on
your smartphone, the Network
Preferences must be set up. This is
usually done by your service provider.
See “Chapter x Setting Network
Preferences.”
I cannot surf the Web
on my smartphone.
Problem Solution
Beaming Problems
Recharging problems
Problem Solution I
cannot beam data to
another Palm
Computing ®
connected device.
• Confirm that your smartphone and
the other device are between ten
centimeters (approximately 4") and
one meter (approximately 39") apart,
and that the path between the two
devices is clear of obstacles.
Beaming distance to other Palm
Computing ® connected device may
be different.
• Move your device closer to the
receiving device.
FREQUENTLY ASKED QUESTIONS 323
B
Problem Solution
Your smartphone requires at least twice
the amount of memory available as the
data you are receiving. For example, if
you are receiving a 30K application, you
must have at least 60K free.
When someone beams
data to my
smartphone, I get a
message telling me it
is out of memory.
Problem Solution
Recharging Problems
When I place my
smartphone in the
cradle, the cradle light
does not go on.
• Confirm that your smartphone is well
seated in the cradle.
• Confirm that your recharger cable is
properly connected to the back of the
cradle’s serial (COM) port connector
that plugs into your computer.
• Confirm that your recharger is
plugged into an AC outlet and that
the AC outlet has power.

324 FREQUENTLY ASKED QUESTIONS
Problem Solution
Password Problems
I forgot the password,
and my smartphone is
not locked.
I forgot the password
and my smartphone is
locked.
You can use Security to delete the
password. If you do this, your
smartphone deletes all entries marked
as private. You can, however, perform a
HotSync operation before you delete
the password: the HotSync process
backs up all entries, whether or not
they are marked private. In this case,
the following procedure restores your
private entries and lets you access
them:
1. Use the Palm Desktop software and
the cradle to synchronize your data.
2. Tap Forgotten Password in Security
to remove the password and delete
all private records.
3. Perform a HotSync operation to syn-
chronize your data and restore the
private records by transferring them
from your computer to your
smartphone.
If you assign a password and lock your
smartphone, you must perform a hard
reset to continue using your it. See
“Performing a hard reset” in Appendix
A for more information.

FREQUENTLY ASKED QUESTIONS 325
B
Technical Support
If, after reviewing the sources listed at the beginning of this
appendix, you cannot solve your problem, contact your regional
technical support office by e-mail, phone, or fax.
Before requesting support, please experiment a bit to reproduce
and isolate the problem. When you do contact support, please be
ready to provide the following information:
• The name and version of the operating system you are using
• The actual error message or state you are experiencing
• The steps you take to reproduce the problem
• The version of smartphone software you are using and
available memory
To get version and memory information:
1. Tap to Open the Applications Launcher.
2. Tap the Menu icon .
3. Tap App, and then tap Info.
Note: Thousands of third-party add-on applications have been written for
the Palm Computing platform. Unfortunately, we are not able to
support such a large number of third-party applications. If you are
having a problem with a third-party application, please contact the
developer or publisher of that software.

CREATING A CUSTOM EXPENSE REPORT 327
Creating a Custom
Expense Report
This section explains how to modify existing Expense application
templates and how to create your own custom expense report
templates for use with the Expense application.
Note: This section assumes that you are familiar with Microsoft Excel or a
similar spreadsheet application. If you are not familiar with Microsoft
Excel, consult your company’s Information Services department or
another experienced user.
APPENDIX C
C

328 CREATING A CUSTOM EXPENSE REPORT
About Mapping Tables
Before creating or modifying an Expense template, it’s important
to understand the function of the Palm™ Desktop software
Expense application. In simple terms, the Expense application is
designed to move Expense data from your smartphone into a
Microsoft Excel spreadsheet.
Each Expense item stored in your smartphone represents a group
of related data. The following data can be associated with an
expense item:
• Category • Payment Currency
• Date • Vendor
• Expense Type • City
• Amount • Attendees
• Payment Method • Note
When you perform a HotSync ® operation between your
smartphone and Palm Desktop software on your computer, the
Expense data is stored on your computer (in a file named
Expense.txt). When you open the Expense application in Palm
Desktop software, an Excel macro starts, and populates an
expense template with your data based on the rules specified in
a spreadsheet file named Map table.xls.
The Map table.xls file is an editable spreadsheet that functions
as a “mapping table.” The function of the mapping table is to
guide the Excel macro in extracting the Expense data. The
mapping table tells the Excel macro how large the spreadsheet is
and provides the data-cell layout of the Excel template used for
the Expense Report.
CREATING A CUSTOM EXPENSE REPORT 329
C
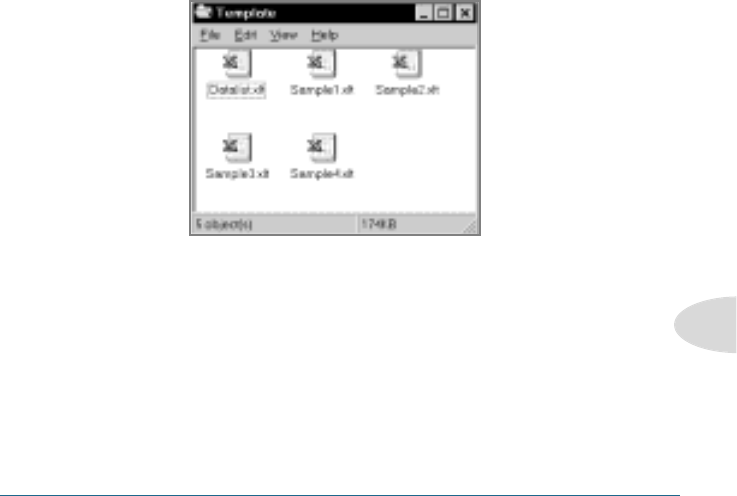
Customizing Existing Sample Templates
Four sample Expense Report templates come with Palm Desktop
software. These templates are stored in the Template folder
(which is in the same folder as the Palm Desktop software
application).
If the layout of one (or more) of these templates is appropriate
for your reporting needs, you can easily customize the templates
with your company name and other information.
To customize a sample Expense Report template:
1. Make a backup copy of the contents of the Template folder.
2. Double-click the name of the sample template you want to
modify to open it in Microsoft Excel.
3. Make any changes that you want to the names (or other
information) in the sample template.

330 CREATING A CUSTOM EXPENSE REPORT
Important: Do not insert rows or columns in the sample
template. Doing so changes the way your Expense data maps to
the template and causes errors. If you want to move the cells to
a different location or add or delete rows or columns, you have to
make changes to the Map table.xls file.
Note: You can insert your own company logo without changing the Map
table.xls file. If you change the file name, however, you need to
make a corresponding change in the Map table.xls file.
You can also rename cells without changing the Map table.xls file,
provided that the expense type corresponds to your smartphone data.
For example, you can change “Snack” to “Munchies,” and then all
items entered on your smartphone as “Snack” map to the cell(s)
labeled “Munchies.”
4. From the File menu, choose Save As.
5. Click the Save as type drop-down list and choose Template
(*.xlt).
6. Navigate to the Template folder (in the Palm Desktop software
directory).
Note: If you do not need to change the Map table.xls file, save the
template file with its original file name (e.g., Sample2.xlt).
If you do need to change the Map table.xls file, give your
modified template a unique name. Be sure to use the .xlt file
suffix, which defines the file as a Microsoft Excel template.
7. Click Save to save your modified template and make it
available for future use.

CREATING A CUSTOM EXPENSE REPORT 331
C
Note: If you need to modify the Map table.xls file, you must do this before
you can use the modified template with your Expense data. To modify
the Map table.xls file for your new template, see “Programming the
mapping table” later in this appendix. Read all of the sections of this
appendix before making changes to the Map table.xls file.
Determining the Layout of the Expense Report
This section describes the layout considerations for the Expense
Report and explains the terms used for creating the report.
Labels
There are two kinds of labels that you need to define for your
report: day/date and expense type. Each kind of label can be
either Fixed or Variable. A Fixed label means that the label
always appears as a header at the beginning of a row or column.
If a label is not Fixed, it is variable.
For example, a list table of expenses could have variable labels
in the rows for day/date, and variable labels in the columns for
expense type. In this case, neither day/date or expense type
information would be “fixed” (as a header). Instead, the date and
expense type information would be filled into the cells of the
spreadsheet as appropriate.
Examples of both Fixed and Variable labels appear in the sample
expense templates.
332 CREATING A CUSTOM EXPENSE REPORT
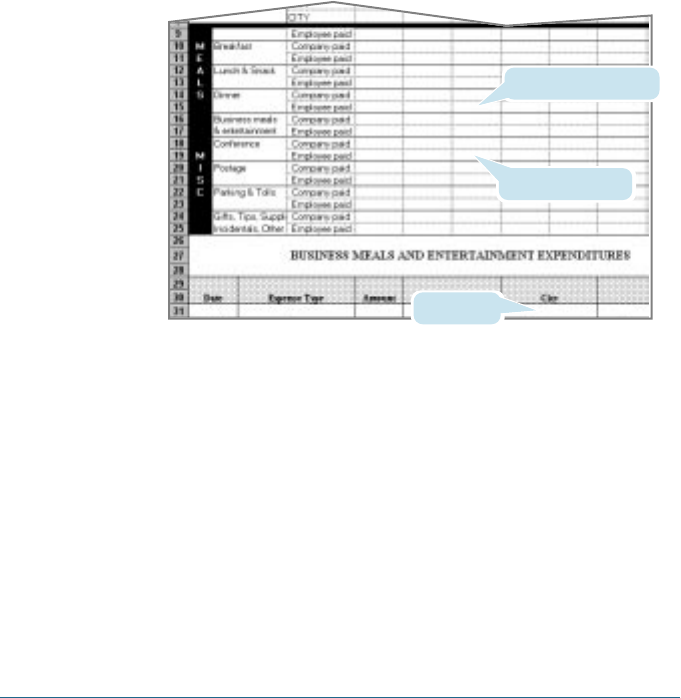
Sections
A Section is an area of the report that has common formatting. It
is common for an Expense report to have more than one Section.
For example, the following sample Expense Report named
Sample3.xlt contains several Sections.
Because your Expense data maps to row and column areas of
your final report, different Sections require different definitions
for the data mapping. To create additional Sections with different
mapping, you create corresponding additional lines to the
mapping table file named Map table.xls. This procedure is
explained later in this appendix.
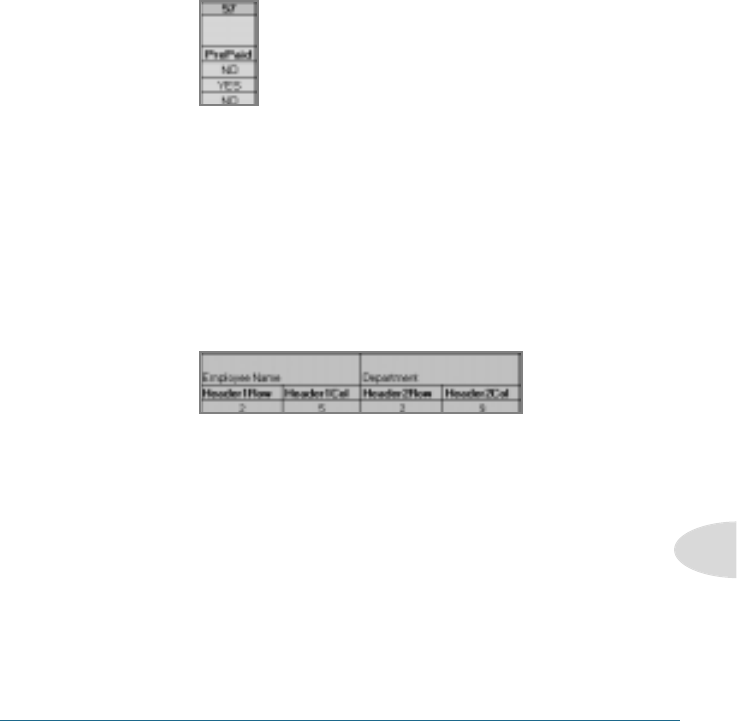
If a section contains cells for prepaid (company paid) expenses,
you need to create an additional line in the mapping table for
“prepaid.” This will count as an additional section in the mapping
table. The only data that differs in the prepaid section (from the
non-prepaid section) is the row/column numbers for the expense
type.
Section 1 (not prepaid)
Section 2 (prepaid)
Section 3

CREATING A CUSTOM EXPENSE REPORT 333
C
Analyzing Your Custom Expense Report
If you already have a custom Excel expense report, you can use it
with a modified mapping table. However, before you can create a
Map table.xls file that corresponds to your custom Expense
Report, you must first analyze the characteristics of your report.
Perform the following before you begin a custom mapping
table:
• Print a copy of your custom expense report. Activate the Row
and Column Headings option in the Sheet settings of the Page
Setup command. This enables you to quickly determine the
size of the Section(s), as well as the numbers for the start
rows and columns.
• On the printed copy, identify the data Sections. A Section is an
area of data with common row and column formatting. A
yellow highlighter marking pen can make it easy to see the
Sections as you work with programming the mapping table.
Your custom Expense Report can contain any number of
Sections, and the same data can be repeated in any Section.
• On the printed copy, identify the type of Labels that apply to
each Section. Each Section can have only one kind of Fixed or
Variable Label for rows. Likewise, each Section can have only
one kind of Fixed or Variable Label for columns.
• Place a copy of your custom Expense Report in the Template
folder (in the Palm Desktop software directory). Change the file
name so it has the file extension .xlt (which defines it as a
Microsoft Excel template). Make a note of the exact file name
so it can be defined in the mapping table file.
334 CREATING A CUSTOM EXPENSE REPORT
Programming the Mapping Table
Once you have analyzed the components of your custom Expense
Report, you can program the mapping table to fill the report with
data from the smartphone.
To program a new custom mapping table:
1. Open a copy of the Map table.xls file in Microsoft Excel.
Note: This file is located in the same folder as the Palm Desktop software
application. Make a backup copy of this file before you make your
modifications.
2. Mapping a new template. Scroll to where you find the name of
the original template that you chose for your modifications.
The name of the template will appear in column B of the Map
table.xls file, next to the cell highlighted in green that reads
“Template Name:”. If you did not modify an existing template,
move to any table in the Map table.xls file.
3. Select all the rows associated with the template name. To
select the rows, click and drag on the row numbers (left side),
so they appear highlighted.
All rows associated with
template are selected
CREATING A CUSTOM EXPENSE REPORT 335
C
4. From the Edit menu, choose Copy.
5. Scroll down to a blank area of the Map table.xls file (below
the rows used for Sample4.xlt), and click on a row number to
select a blank row.
6. From the Edit menu, choose Paste. A copy of the rows you
selected in step 3 is pasted into the Map table.xls file.
7. Name the table. In the cell immediately to the right of the cell
entitled Template Name, enter the exact file name of your
custom Expense Report template.
8. Define the number of Sections. Each row in a table defines
how your smartphone data will be placed in a Section of your
custom Expense Report. Note that the prepaid portion of a
section has its own row and counts as a separate section for
map table purposes, even though it is not a separate section in
your template.
You may add or delete rows as necessary so that the total
number of rows corresponds to the number of Sections in your
custom Expense Report. To clear all of the existing settings in
a row, click to select the row and press Ctrl+Delete. Name
each row to correspond to a Section of your custom Expense
Report.
Table with four
sections
336 CREATING A CUSTOM EXPENSE REPORT
9. Determine the Label settings. The orientation of the data fields
(Row, Column) appears in the yellow section of the table.
Determine whether the Rows will contain expense or date
information, and place an “x” in the appropriate cell. When
you do this, you also define whether the label is Fixed or
Variable. You can place only one “x” in the Row section
(columns 2–5).
Determine whether the Columns will contain expense or date
information, and place an “x” in the appropriate cell. When
you do this, you also define whether the label is Fixed or
Variable. You can place only one “x” in the Column section
(columns 6–9).
10. Define the dimensions of the Section. The dimensions of the
Section appear in the green columns (10–13).
# of Represents the total number of columns in the
Rows Section, excluding any header or total columns.
Another words, this includes only the number of
columns in the Section where your smartphone
data will be placed.
# of Represents the total number of rows in the
Columns Section, excluding any header or total rows. In
other words, this includes only the number of
rows in the Section where your smartphone data
will be placed.
CREATING A CUSTOM EXPENSE REPORT 337
C
Start Is the number of the first row of the Section that
Row will be filled with your smartphone data.
Start Is the number of the first column of the Section
Columns that will be filled with your smartphone data.
11. Define the Dates and Intervals. The dates and intervals
between dates appears in the light blue columns (14–17).
In the Date cell, enter the row or column number where all
the date information will be placed.
In the Dates cell, enter the number of blank columns (or rows)
separating the date fields. If there are no blank columns (or
rows) between date entries, leave this number set to zero.
In the Start Day cell, enter the day of the week that starts the
expense reporting period. Enter a three-character abbreviation
for the day (e.g., Sun, Mon, Tue).
In the Day cell, enter the row or column number where all the
day information will be placed. If the dates are in a row, enter
the row number. If the dates are in a column, enter the
column number.
12. Define whether the Section is in list format. This setting
appears in the light purple columns (18–19).
338 CREATING A CUSTOM EXPENSE REPORT
If the Section will present the data in a list format, enter the
word “yes”. Otherwise, enter the word “no”. The following
diagram shows data presented in a list format:
Only if your section is in list format: In the Expense Type cell,
enter the number of the row or column where the expense
description will be placed. Expense amounts can be entered
in several different columns or rows if required by your
template. Expense type labels must all appear in the same
column.
13. Enter the row or column numbers for the expense types that
appear in the Section. These settings appear in the aqua
columns (20–48).
For these settings, simply enter the row or column number for
the expense types that you want to appear in the Section.
Note that the same row or column number can be used more
than once. An example of this would be meals that
encompass breakfast, lunch, dinner, and snacks. In the
previous example, all expense items would be populated into
row/column 4 of the custom Expense Report.
14. Complete the table. All of the remaining columns (49–57) in
the table are used to define the column or row number that
corresponds to the description.
CREATING A CUSTOM EXPENSE REPORT 339
C
15. Mark a Section for prepaid expenses (yellow column). If a
row in the map table is for prepaid (company paid) expenses,
type a “yes” in the cell on that Section’s row. Type “no” in all
the cells of this column that do not pertain to prepaid
expenses.
16. Repeat steps 9 through 15 for each Section that you have
defined for your custom Expense Report.
17. Map Expense Report Options dialog (magenta section). The
Expense Report Options dialog has five fields where you can
fill in data for the header on your expense report. Use this
section to specify the row and column on your template where
this information will be mapped.
Because header data is not related to any particular Section,
you have to fill in only one row. If the item does not appear
on your template, leave these cells blank.

340 CREATING A CUSTOM EXPENSE REPORT
Using Applications Other than Microsoft Excel
You can use applications other than Microsoft Excel (such as
Lotus 1-2-3 or Quattro Pro) to open and manipulate the Expense
data on your computer. The data file is named “Expense.txt,” and
is stored in the Expense folder, within the folder containing the
smartphone user data.
Expense data in the Expense.txt file is in tab-delimited format.
Expense File Details
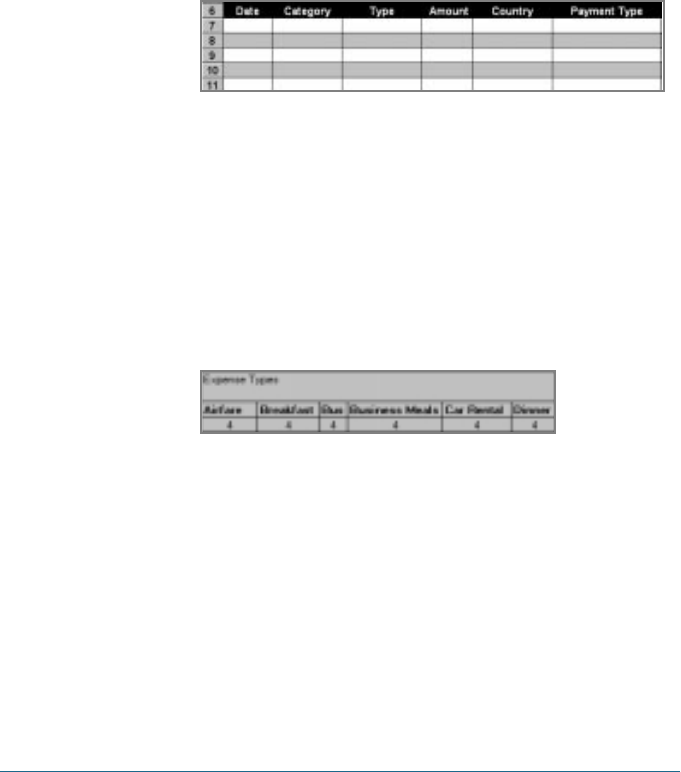
The Expense.txt file contains four groups of data. It will be easier
to see these four distinct groups of data if you open the file with
a spreadsheet application.
Trips Shows the number of Expense application categories,
and lists each one followed by an “end” statement.
Currency Shows how many currencies were used for the
Expense data, and lists the countries that correspond
to that currency.
Trip Shows the number of expenses by category, and lists
the expenses for each category.
Expenses Shows the total number of expenses, and lists them
chronologically.

NON-ASCII CHARACTERS FOR LOGIN SCRIPTS 341
Non-ASCII Characters
for Login Scripts
The following information enables you to create custom login
scripts that require non-ASCII characters. It is provided for
advanced users who understand the use and requirements of
such characters in a custom login script.
Use of ^char
You may use the caret ( ^ ) to transmit ASCII command
characters. If you send ^char, and the ASCII value of char is
between @ and _, then the character is automatically translated
to a single-byte value between 0 and 31.
For example, ^M is converted to a carriage return. If char is a
value between a and z, then the character sequence is translated
to a single-byte value between 1 and 26. If char is any other
value, then the character sequence is not subject to any special
processing.
APPENDIX D
D

342 NON-ASCII CHARACTERS FOR LOGIN SCRIPTS
For example, the string “Joe^M” transmits Joe, followed by a
carriage return.
Carriage Return and Line Feed
You may include carriage return and line feed commands as part
of the login script, when entered in the following format:
<cr> Sends or receives a carriage return
<lf> Sends or receives a line feed
For example, the string “waitfor Joe<cr><lf>” waits to receive
Joe followed by a carriage return and line feed from the remote
computer before executing the next command in the script.
Literal Characters
The backslash ( \ ) character defines that the next character is
transmitted as a literal character, and is not subject to any
special processing ordinarily associated with that character.
Examples:
\^ Includes a caret as part of the string
\< Includes a < as part of the string
\\ Includes a backslash as part of the string

INDEX 343
Index
A
Address Book
categorizing entries 51
changing display 51
creating entries 48
custom fields 52
displaying different listings 51
opening 48
private entries 51
re-displaying last category 52
top-of-list entry 49
addresses
displaying entries 50
editing 50
entering 48
selecting 50
sorting 51
alarm, setting 41
applications
categorizing 25
changing button assignment 26
customizing for HotSync 107
Expense 62
getting information on 81
installing add-on 28
installing games 29
opening 4
removing 30
selecting 25
setting preferences 26
switching 25
Applications Launcher
changing display 26
using 25
auto shut-off, setting 9
B
backlight, turning off 9
beamed information
receiving 102
sending 101
beaming
applications 102
business cards 101
records 101
blind courtesy copy 89
business cards
beaming 101
buttons
assigning applications to 26
Calculator 60
C
calculations
in memory 61
recent 61
Calculator 60
calibrating screen 3
characters
accented 19
extended 19
Tentative

344 INDEX
non-English 19
writing 14
commands, choosing 5
computers
preparing for HotSync 108
conflicting events 44
D
data
entering 6
importing 22, 112
date
formatting 8
setting 8
Date Book
adding address information 39
changing event display 46
changing view 43
Day view 37
displaying 37
time slot display 47
views 37
Day view 37
compressing 46
event conflicts 44
Deleted folder 93
desktop software
removing 31
device
customizing 7
locking 33
displaying tips 6
DNS numbers
setting 120
downloading e-mail
using filters 96
E
Edit menu 72
e-mail application
preferences 92
setting up 83
synchronizing with HotSync 95
e-mail items
adding details 89
blind courtesy copy 89
categorizing 94
confirming delivery 89
confirming read 89
creating 86
creating signature 90
deleting 93
drafting 92
editing unsent 91
filing 93
filtering 97
lookup up addresses 88
priority 89
purging deleted 94
replying to 87
restoring deleted 94
retrieving high priority 96
Tentative

INDEX 345
sorting 94, 95
storing unsent 91
truncating 97
end time 47
entering data 6
events
changing display 46
continuous 40, 41
repeating 40, 41
rescheduling 41
scheduling 37
spotting conflicts 44
timed 37
untimed 39
Expense application 62
changing display 65
using with Microsoft Excel 68
expense reports
creating 68
templates 69
expenses
autofilling type 65
changing currency display 66
creating items 62
customizing currency 67
date 63
printing reports 68
receipt details 64
recording 62
saving entry 63
sorting 66
transferring to Microsoft Excel 67
type 63
F
File Link 112
Filed folder 93
filters
defining e-mail strings 97
e-mail 96
fonts, choosing 80
formatting
date, time, and numbers 8
full-screen pen stroke 28
G
games
installing 29
Graffiti
accented characters 19
alphabet 16
capital letters 16
extended characters 19
navigating 20
non-English characters 19
numbers 17
punctuation marks 18
ShortCuts 20
symbols 19
tips 15
using 14
writing 14
Tentative

346 INDEX
H
HotSync
conduits 110
controlling e-mail 95
customizing applications 107
File Link 112
setting up 105
setting up Mail options 84
synchronizing e-mail 84
user profile 105
HotSync buttons
preferences 27
HotSync operations
initializing 103
via modem 108, 110
via network 111
I
importing data 22
interface elements 5
IP addresses
setting 120
K
keyboard
computer 21
onscreen 13
L
locking device 33
login script 121
M
Macintosh system requirements 2
Mail application
opening 85
turning off 84
Mail list 85
Memo List 58
Memo Pad, using 57
memos
creating 57
moving through 58
reviewing 58
sorting 59
menus
choosing comands 5
Microsoft Excel
editing expense data 69
transferring expenses to 68
modem
HotSync conduits 110
preferences 115
preparing for HotSync 109
Month view 45, 46
Tentative

INDEX 347
C
D
N
network
preferences 116
service templates 118
Network Log 123
non-ASCII characters in login scripts 122
notes
using 79
numbers
formatting 8
writing 17
O
opening applications 4
P
password
assigning 32
changing or deleting 32
recovering 33
personalizing device 7
phone numbers
displaying different type 50
preferences
buttons 26
Date Book 43
Digitizer 3
e-mail 92
general 9
HotSync buttons 27
modem 115
network 116
owner 7
setting 7
setting date 8
ShortCuts 21
To Do List 56
priority
e-mail items 89
punctuation marks
writing 18
purging records 73
R
receipt details 64
records
attaching notes 79
categorizing 74
creating 71
deleting 73
editing 72
finding 76
private 78
purging 73
sorting 78
remote connections
configuring 115
login script 121
making 122
Tentative

348 INDEX
troubleshooting 123
removing
applications 30
desktop software 31
retrieving priority e-mail 96
S
screen
calibrating 3
securing records 78
security
setting options 31
Service Connection Progress messages 123
ShortCuts
creating 21
editing 21
Graffiti 20
sorting
expenses 66
To Do List items 56
sorting e-mail 95
sounds
volume 9
start time 47
stylus
replacing 3
symbols
writing 19
system requirements 1, 2
T
tapping, using stylus 3
TCP/IP software
about 115
connecting via 122
telephone numbers, selecting 50
time
formatting 8
setting 7
time bars 44, 46
tips
displaying 6
To Do List
changing display 56
changing due dates 55
changing priorities 55
checking off items 55
creating items 53
opening 53
private entries 55
recording completion date 56
setting priorities 54
sorting items 56
truncating e-mail 97
W
Week view 43
Windows system requirements 1, 2
Tentative