Samsung Electronics Co SCHI300 Dual-Band Analog/PCS Phone (AMPS/CDMA) User Manual
Samsung Electronics Co Ltd Dual-Band Analog/PCS Phone (AMPS/CDMA) Users Manual
Contents
Users Manual Part 1

SCH-I300(Dual-Band Tri-Mode)
CONFIDENTIAL
February 15,2001
8.USERSMANUAL

SCH-I300(Dual-Band Tri-Mode)
CONFIDENTIAL
February 15,2001
8.USERSMANUAL

ELECTRONICS
Printed in Korea
Code No. : GHxxxxxxxxA
English. 2000/09. Rev.1.0
World Wide Web
http://www.samsungmobile.com

Samsung Smartphone
SCH-i300
User’s Guide

I Contents
CHAPTER 1
Getting Started.................................. 1
Unpacking ................................................................................... 2
Your Smartphone ........................................................................ 3
Front View ............................................................................... 3
Rear View ............................................................................... 5
Connecting the Cradle ................................................................ 7
Installing and Charging the Battery ............................................ 8
Viewing the Remaining Battery Power ................................ 10
Palm Desktop Software ............................................................ 11
System Requirements .......................................................... 12
Installing Palm Desktop Software ............................................ 12
Calibrating the Screen and First Setup .................................... 14
Adjusting Screen Contrast ........................................................ 18
Using the Backlight ................................................................... 19
CHAPTER 2
Entering Data in Your Smartphone ..... 21
Using the Onscreen Keyboard .................................................. 21
Entering Data Using Graffiti ..................................................... 23
Writing Graffiti Characters ................................................... 23
Graffiti Tips............................................................................ 25
The Graffiti Alphabet ............................................................ 26
Writing Capital Letters ......................................................... 27
Writing Numbers .................................................................. 28
Writing Punctuation Marks .................................................. 29
Writing Symbols and Extended Characters ......................... 30
Writing Accented Characters ............................................... 31
Contents

CONTENTS II
Additional Non-English Characters ...................................... 31
Navigations Strokes ............................................................. 32
Using Graffiti ShortCuts ........................................................... 32
Using Your Computer Keyboard ................................................ 33
Importing Data .......................................................................... 34
CHAPTER 3
Using Phone and Messaging ............. 37
Turning the Phone On and Off .................................................. 38
Turning the Phone On ........................................................... 39
Turning the Phone Off ........................................................... 40
Opening the Phone Screen ....................................................... 41
Features on the Phone Screen ............................................. 42
Features on the Phone LCD .................................................. 43
Making a Call ............................................................................ 44
Correcting the Number ......................................................... 45
Advanced Calling Features ....................................................... 45
Voice Dialing ......................................................................... 45
Speed Dialing ....................................................................... 47
Redialing the Last Number .................................................. 49
Using the Address Book ....................................................... 49
Using Call History ................................................................. 50
Using Four-digit Dial ............................................................. 52
Making Emergency Calls ...................................................... 53
Using Speakerphone ............................................................ 54
Answering Calls ........................................................................ 55
In-Call Options .......................................................................... 56
Record ................................................................................... 56
Mute .................................................................................... 56
Silent Key ............................................................................. 56
DTMFs Send ......................................................................... 57
Tone List ................................................................................ 57
Call Waiting .......................................................................... 58
Making a Conference Call .................................................... 59

III Contents
Advanced Phone Features ........................................................ 60
Viewing Missed Calls ........................................................... 60
Viewing Air Time .................................................................. 61
Using Keyguard .................................................................... 62
Voice Recorder .......................................................................... 63
SMS (Short Message Service) ................................................. 66
Sending a Short Message .................................................... 66
Receiving Messages ............................................................ 69
Sorting the Message List ..................................................... 72
Deleting a SMS Message .................................................... 73
Setting Phone Preferences ....................................................... 74
Phone Sound ......................................................................... 75
Phone Display ....................................................................... 77
Phone Setup ......................................................................... 78
Setting Data Service Preferences ............................................ 79
Setting Security Options ........................................................... 80
Masking and Hiding Records ............................................... 81
Assigning and Editing Passwords ........................................ 81
Locking Your Smartphone ..................................................... 83
Restricting Calls ................................................................... 84
Registering Emergency Call ................................................. 84
Resetting Your Phone ........................................................... 85
CHAPTER 4
Working with Applications ................ 87
Using the Applications Launcher .............................................. 87
Opening an Application ........................................................ 88
Displaying Applications by Category ................................... 89
Changing the Applications Launcher Display ...................... 90
Assigning Applications to Buttons ........................................ 91
Elements of the Applications Screen........................................ 92

CONTENTS IV
CHAPTER 5
Address Book ................................ 117
Creating an Address Book Entry ............................................. 118
Setting Address Details .......................................................... 120
Setting Speed Dial .................................................................. 122
Setting Voice Dial ................................................................... 124
Viewing Address Book Entries ............................................... 126
Duplicating an Entry ............................................................... 129
Selecting Types of Phone Numbers ........................................ 130
Editing Address Book Entries ................................................. 131
Changing the Address Book Display ...................................... 133
Address Book Menus .............................................................. 136
Using Menus ............................................................................. 94
Opening the Menu Bar ......................................................... 94
Choosing a Menu ................................................................. 95
Graffiti Menu Commands ..................................................... 95
Displaying Online Tips .............................................................. 97
Common Tasks .......................................................................... 97
Creating Records .................................................................. 97
Editing Records ..................................................................... 98
Deleting Records ................................................................ 100
Purging Records .................................................................. 101
Categorizing Records ........................................................... 102
Finding Records ....................................................................... 106
Sorting Records .................................................................. 109
Making Records Private ..................................................... 111
Hiding Private Records ....................................................... 112
Attaching Notes ................................................................. 113
Choosing Fonts ................................................................... 114
Getting Information on an Application .............................. 115

V Contents
CHAPTER 7
Date Book .................................... 143
Opening the Date book ........................................................... 144
Scheduling Events ................................................................... 145
Scheduling Timed Events ................................................... 145
Adding Address Book Information to an Event .................. 149
Scheduling Untimed Events ............................................... 149
Scheduling Repeating or Continuous Events ..................... 150
About Scheduling Repeating or Continuous Events .......... 152
Rescheduling Events ............................................................... 153
Setting the Alarm ................................................................... 154
Setting an Alarm for an Event ............................................ 154
Setting Alarm Options ........................................................ 156
Changing the Date Book View ................................................ 157
Working in Week view ....................................................... 158
Tips for Using Week View .................................................. 159
Spotting Event Conflicts ..................................................... 160
Working in Month View ..................................................... 161
Tips for Using Month View ................................................ 162
Working in Agenda View ................................................... 162
Tips for Using Agenda View ............................................... 163
Changing the Date Book Display of Events ............................ 163
Date Book Menus ............................................................... 165
CHAPTER 8
Using the Expense Application ........ 169
Opening Expense Application ................................................. 170
Recording Expenses ................................................................ 170
CHAPTER 6
Calculator ..................................... 139
Opening the Calculator ........................................................... 140
Using the Calculator Buttons .................................................. 140
Displaying Recent Calculations .............................................. 141

CONTENTS VI
Creating Expense Items ...................................................... 170
Changing the Date of an Expense Item ............................. 171
Entering Receipt Details ..................................................... 172
Filling in the Expense Type Automatically ......................... 174
Changing the Expense List Display ........................................ 175
Changing the Currency and Symbols Display .................... 176
Customizing Currency Symbols .......................................... 178
Transferring Your Data to Microsoft Excel ............................. 179
Creating and Printing an Expense Report .......................... 179
Using Expense Report Templates ....................................... 182
Expense Menus .................................................................. 184
CHAPTER 9
Mail ............................................. 185
Managing Desktop E-mail Away from Your Desk .................. 186
Setting Up Mail on the Desktop ............................................. 187
Synchronizing Mail with Your E-mail Application................... 190
Creating, Viewing, and Replying to E-mail ............................. 190
Viewing E-mail Items ......................................................... 191
Creating E-mail Items ......................................................... 192
Looking Up an Address ...................................................... 195
Adding Details to E-mail Items .......................................... 196
Adding a Signature for Your Message ............................... 198
Storing and Editing E-mail Items ............................................ 199
Storing and Editing Unsent E-mail Items ........................... 199
Drafting E-mail ................................................................... 201
Filing an E-mail Item .......................................................... 202
Deleting E-mail Items ............................................................. 203
Categorizing and Sorting E-mail Items ................................... 206
Managing Your E-mail Application with HotSync .................. 208
Using Filters to Control Downloading ................................ 210
Defining Filter Strings ........................................................ 212
Mail Menus ............................................................................. 215
Beaming Information .............................................................. 216

VII Contents
CHAPTER 10
Memo Pad .................................... 221
Opening the Memo Pad .......................................................... 222
Creating Memos ..................................................................... 222
Reviewing Memos .................................................................. 223
Making a Private Memo ......................................................... 225
Deleting a Memo .................................................................... 225
Memo Pad Menus .................................................................. 226
CHAPTER 11
To Do List ..................................... 227
Opening the To Do List ........................................................... 228
Creating To Do List Items ....................................................... 229
Setting Priorities ................................................................. 230
Checking Off To Do List Items ............................................ 231
Changing Priorities and Due Dates ........................................ 232
Displaying Completed and Due Items .................................... 234
To Do List Menus .................................................................... 235
CHAPTER 12
Exchanging and Updating Data Using
HotSync®Operations ...................... 237
Performing a HotSync Operation for the First Time ............... 239
Creating a User Profile ....................................................... 242
Selecting HotSync Setup Options .......................................... 244
Customizing HotSync Application Settings ............................ 247
Conducting a HotSync Operation Via Modem ....................... 250
Preparing Your Computer ................................................... 250
Preparing Your Smartphone ............................................... 252
Selecting Conduits for a Modem HotSync Operation ....... 253
Performing a HotSync Operation Via a Modem ..................... 255
Performing a HotSync Operation Via a Network ................... 256
Using File Link ......................................................................... 259

CONTENTS VIII
CHAPTER13
Setting Preferences for
Your Smartphone ........................... 261
Buttons Preferences ................................................................ 262
Pen Preferences .................................................................. 263
HotSync Buttons Preferences ................................................. 265
Digitizer Preferences ............................................................... 266
Formats Preferences ............................................................... 266
Country Default ................................................................. 266
Time, Date, Week Start, and Numbers Formats ................ 267
General Preferences ............................................................... 268
Setting the Current Time .................................................... 268
Setting the Current Date .................................................... 269
Auto-off Delay .................................................................... 270
System, Alarm, and Game Sounds .................................... 271
Beam Receive ..................................................................... 271
Connection Preferences .......................................................... 272
Sample Connection for Remote IR HotSync Operations ... 273
Network Preferences and TCP/IP Software ........................... 275
Selecting a Service ............................................................. 276
Entering a User Name ........................................................ 277
Entering a Password ........................................................... 278
Selecting a Connection ...................................................... 279
Adding Telephone Settings ................................................ 280
Entering a Prefix ................................................................. 281
Disabling Call Waiting ....................................................... 281
Using a Calling Card ........................................................... 282
Connecting to Your Service ................................................ 283
Creating Additional Service Templates .............................. 284
Adding Detailed Information to a Service Template ......... 285
Login Scripts ....................................................................... 289
Creating a Login Script on Your Organizer ......................... 290
Plug-in Applications ........................................................... 292
Deleting a Service Template .............................................. 292

IX Contents
CHAPTER 14
Installing and Removing Applications 299
Installing Applications ............................................................ 300
Removing Applications ........................................................... 302
Removing Palm Desktop Software ......................................... 304
APPENDIX A
Maintaing Your Smartphone ............ 305
Caring for Your Smartphone ................................................... 305
Battery Considerations ........................................................... 306
Resetting Your Smartphone .................................................... 308
Performing a Soft Reset ..................................................... 308
Performing a Hard Reset .................................................... 309
APPENDIX B
Frequently Asked Questions ............ 311
Software Installation Problems .............................................. 312
Operating Problems ................................................................ 312
Tapping and Writing Problems ............................................... 314
Application Problems .............................................................. 315
HotSync Problems ................................................................... 316
Network Preferences Menu Commands ............................ 293
TCP/IP Troubleshooting ...................................................... 293
Owner Preferences ................................................................. 295
ShortCuts Preferences ............................................................ 296
Creating a ShortCut ............................................................ 296
Editing a ShortCut .............................................................. 297
Deleting a ShortCut ............................................................ 298

CONTENTS X
Network Problems .................................................................. 321
Beaming Problems .................................................................. 322
Recharging Problems ...............................................................323
Password Problems ................................................................. 324
Technical Support ................................................................... 325
APPENDIX C
Creating a Custom Expense Report .. 327
About Mapping Rables ........................................................... 328
Customizing Existing Sample Templates ................................ 329
Determining the Layout of the Expense Report ..................... 331
Labels .................................................................................. 331
Sections .............................................................................. 332
Analyzing Your Custom Expense Report ................................. 333
Programming the Mapping Table ........................................... 334
Using Applications Other than Microsoft Excel ..................... 340
Expense File Details ............................................................... 340
APPENDIX D
Non-ASCII Characters for
Login Scripts ................................. 341
Use of ^char ............................................................................ 341
Carriage Return and Line Feed ............................................... 342
Literal Characters .................................................................... 342
Index ........................................................................................ 343

GETTING STARTED 1
Getting Started
Congraturations on your purchase of the Smartphone. Your
Smartphone combines two leading edge technologies, giving you
the convenience of a digital phone and an electronic organizer in
a single handset.
This chapter explains the physical buttons and controls on your
Smartphone, how to use the Smartphone for the first time, and
how to install the Palm Desktop Software.
As you use your Smartphone, you’ll soon appreciate its many
time saving features.
CHAPTER1
1
Cradle
2GETTING STARTED
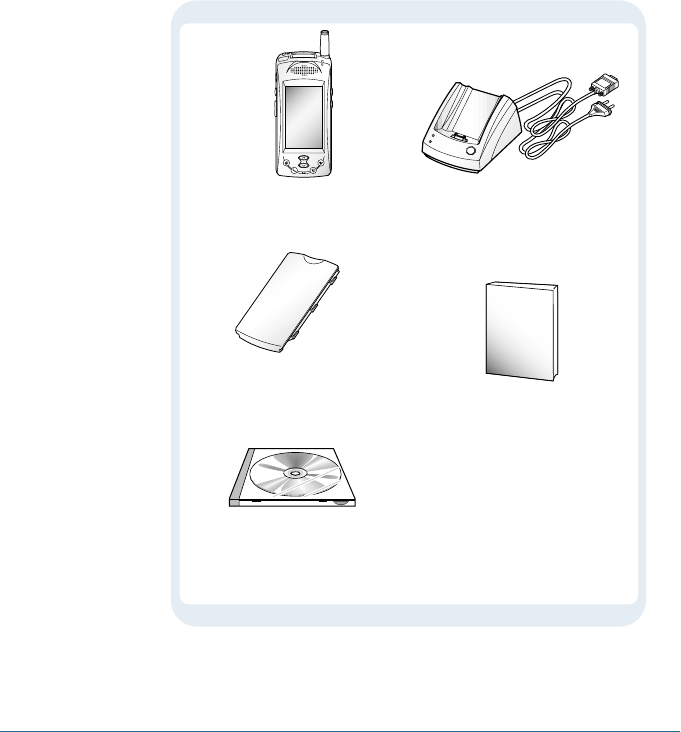
Unpacking
Check to make sure that all of the following items are included in
the box when you unpack it.
Smartphone with a stylus
Standard battery
This guide
Palm Desktop
CD-ROM
GETTING STARTED 3
1
Your Smartphone
The following illustrations show the main elements of your
phone.
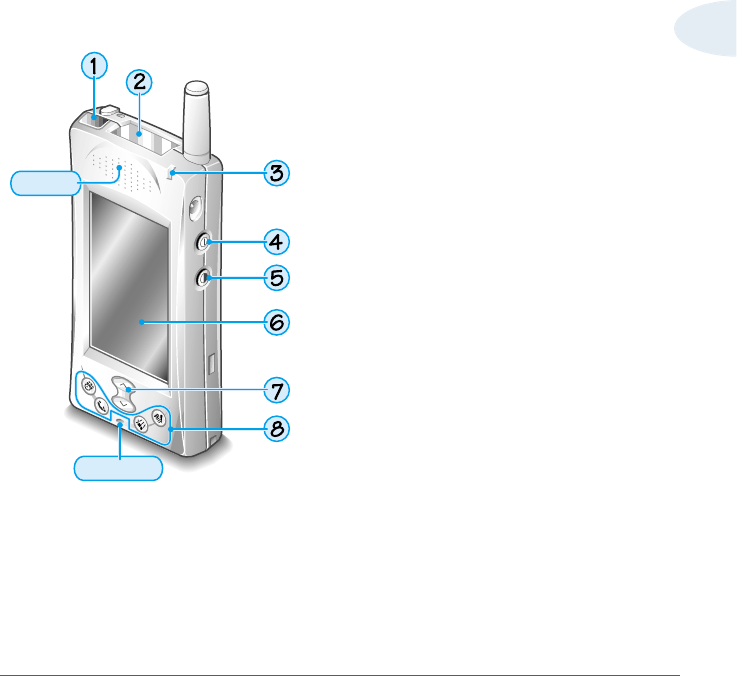
Front View
1. Infrared port : Uses infrared technology
to transmit data to and receive data from
other Palm Computing connected devices.
See “Beaming information” on page xx for
more information.
2. Phone LCD : Turns on when the phone’s
power is on. Displays signal strength
indicator.
3. Lamp : Flashes to indicate an incoming
call or message. Also lights up for a few
seconds when you reset the phone.
4. Power button : Turns the main screen on
or off and controls the backlight feature. If
the screen is turned off, pressing the
power button turns the screen on and
returns you to the last screen you viewed.
If the Smartphone screen is turned on,
pressing the power button turns the
screen off. Holding the power button
down for about two seconds turns the
backlight on or off.
Earpiece
Microphone
4GETTING STARTED
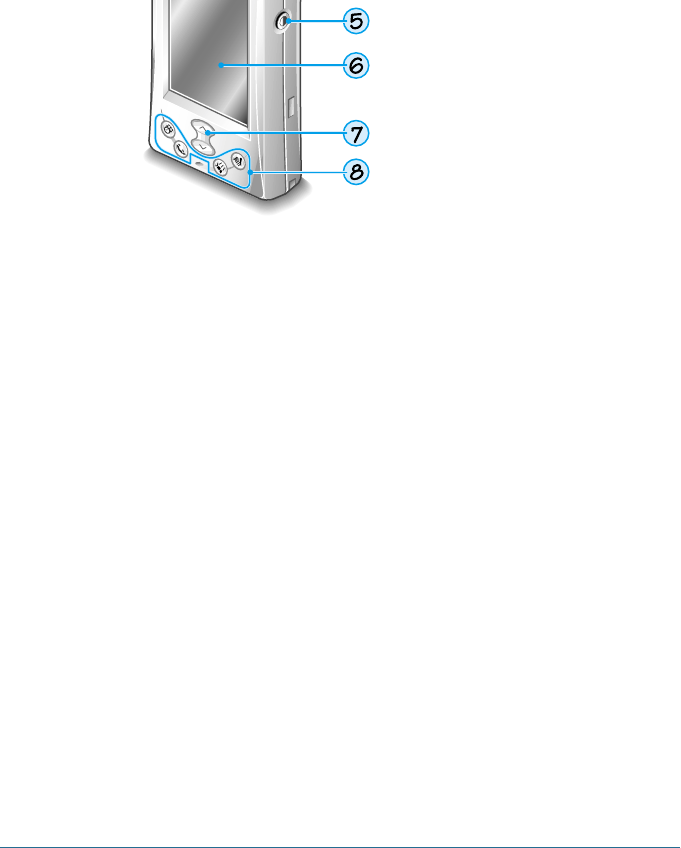
5. Contrast button : Shows the
onscreen contrast control so you
can adjust the screen for the
clearest screen display as
required by the lighting conditions
or temperature of the environment
where you use your Smartphone.
See “Adjusting Screen Contrast”
later in this chapter for more
information.
6. Smartphone screen : Displays the applications stored in your
Smartphone. It is touch-sensitive and responds to the stylus or
your finger.
7. Scroll buttons : Displays text and other information that
extends beyond the area of the Smartphone screen. Pressing the
button scrolls down to view information below the viewing
area, and pressing the button scrolls up to view the
information above the viewing area.
8. Application buttons : Activate the individual Smartphone
applications that correspond to the icons on the buttons: Date
Book, Address Book, To Do List, and Phone. See “Buttons
Preferences” on page xx for details on reassigning these buttons
to activate any application on your Smartphone.
Tip: If your Smartphone is turned off, pressing any application button
activates the Smartphone and opens the corresponding application.
>
>
GETTING STARTED 5
1
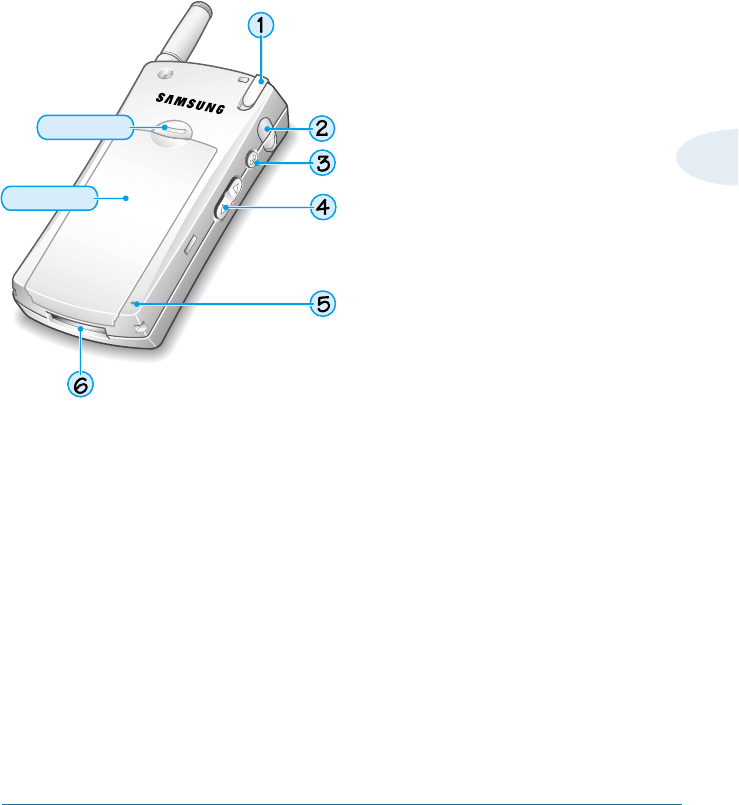
Rear View
1. Stylus : The stylus is stored in this
slot. Slide it in and out of this slot.
Hold it as you would a pen or
pencil.
Like using a mouse to click
elements on a computer screen,
using the stylus to tap elements on
the Smartphone touch-screen is the
basic action that gets things done
on your Smartphone.
Important:
Always use the point of the stylus
for tapping or making strokes on the
Smartphone screen. Never use an
actual pen, pencil, or other sharp
object on write on the touch-
sensitive screen.
With your Smartphone screen turned on, you can tap the
screen to do many operations, such as the following:
• Open applications
• Choose menu commands
• Initiate a global Find operation
• Select options in dialog boxes
• Open the onscreen keyboards
Just as you can drag the mouse to select text or move objects
on your computer, you can also drag the stylus to select text.
You can also use the stylus to drag the slider of any scroll bar.
Cover lock
Battery cover
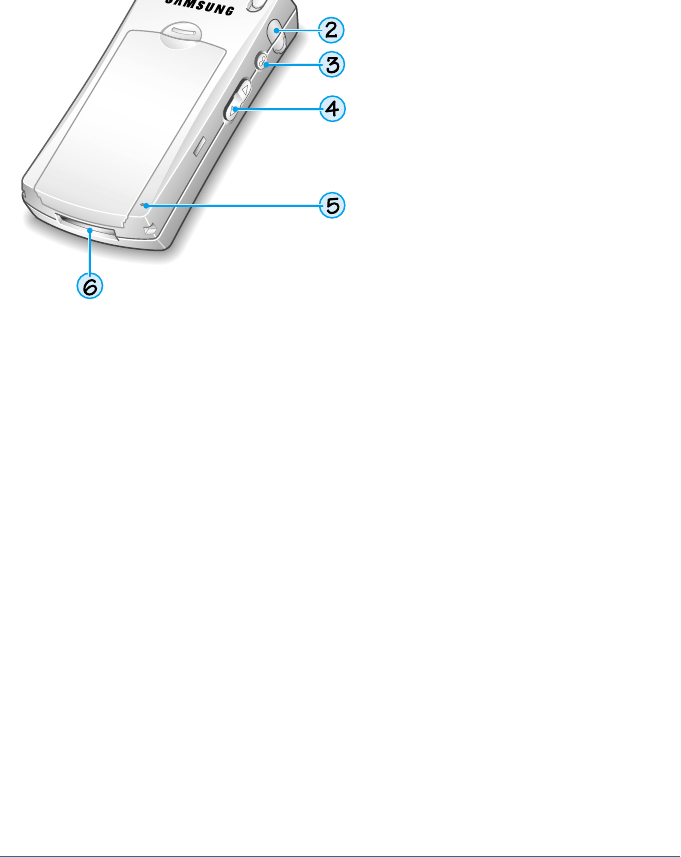
6GETTING STARTED
2. Ear-microphone jack : Connects
to the optional ear-microphone
which allows you to converse
without using your hands.
3. Voice record button : In Standby
mode, press and hold to record up
to 60 seconds of voice memo.
During a call, press it to record
phone conversation. A total of 12
memos including phone
conversation can be recorded.
4. Volume buttons: Adjusts voice volume during a phone
conversation. In Standby mode, press to adjust key beep
volume.
5. Reset button : Under normal use, you should not have to use
the reset button. See page xx for information about when and
how to use the reset button.
6. Serial connector : Connects your Smartphone to the cradle,
which in turn connects to the back of your computer and
through the AC adapter to the wall current. This allows you to
recharge your Smartphone as well as update the information
between your Smartphone and computer using HotSync
technology.
GETTING STARTED 7
1
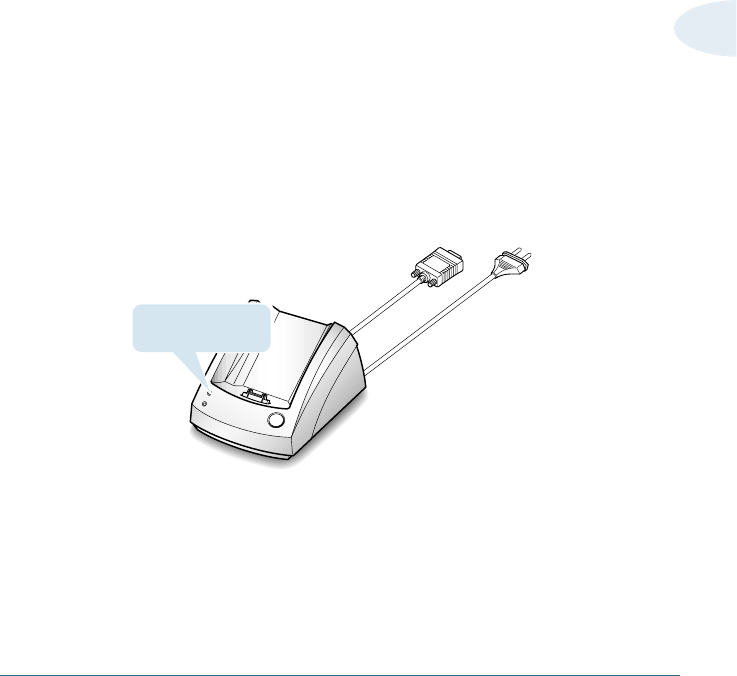
Connecting the Cradle
Your package includes a cradle for storing the Smartphone,
recharging its battery, and synchronizing information with your
computer. If you don’t plan to synchronize your Smartphone with
a computer, use the cradle to recharge the battery.
If you are planning to synchronize data between the Smartphone
and your computer, refer to Chapter 12 “Exchanging and Updating
Data Using HotSync Operations.”
To connect the cradle to AC power:
Plug the power cable from the cradle into a power outlet. When
the power is connected properly, the battery charge indicator
lights on the cradle blink once.
Blinks briefly when
connected to power.
To computer ❿
➛To AC outlet
8GETTING STARTED
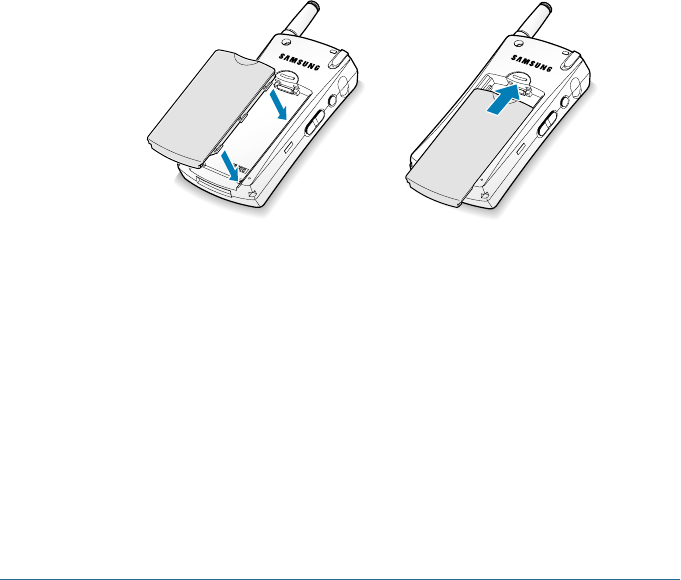
3. Slide it up gently until it snaps into place.
Note: In addition to the main battery you just installed, the Smartphone
has an internal backup battery. During shipment, this backup
battery may have become discharged. If so, the Smartphone will
not power up immediately after you install the main battery. Just
put the phone in the cradle as explained in the next section; the
backup battery will recharge in five to ten minutes.
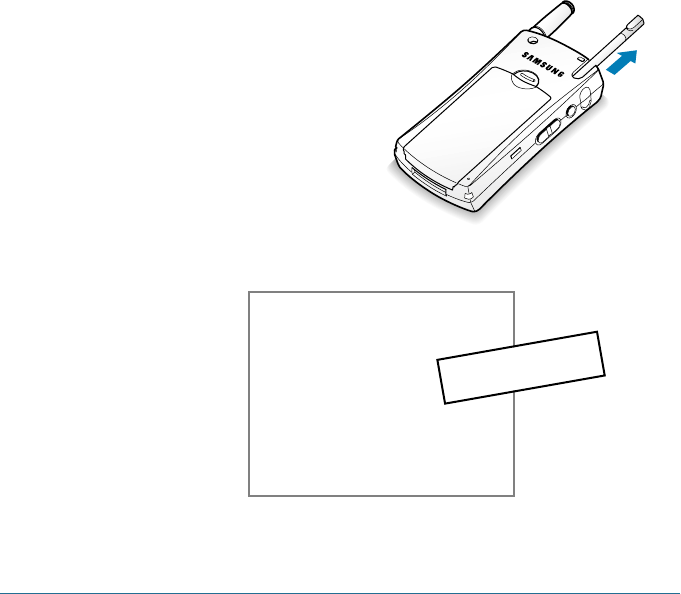
Installing and Charging the Battery
The battery in a new Smartphone is delivered partially charged.
Before first use, you must install the battery. Place the
Smartphone in the cradle, and fully charge the battery.
To install the battery:
1. Hold the Smartphone so the keypad faces away from you.
2. Put the battery into the battery slot.
➜
➜
GETTING STARTED 9
1
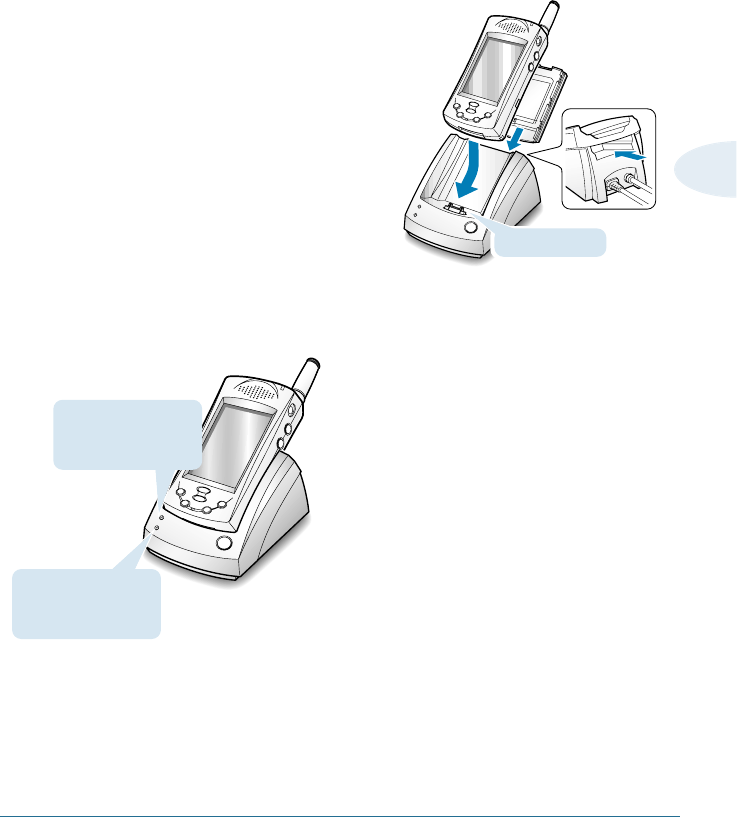
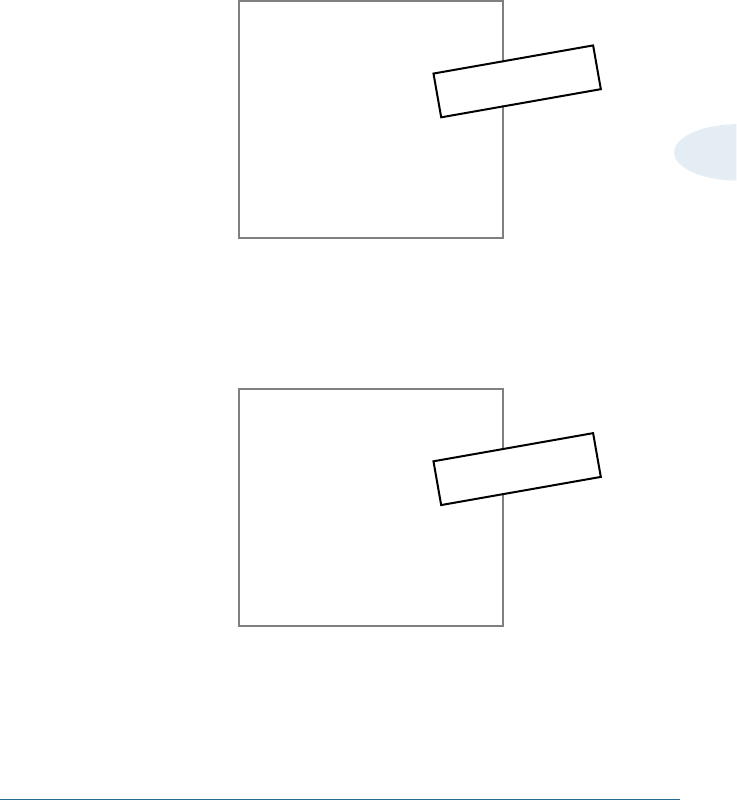
To charge the battery:
1. Select one of the following options:
• Slide the entire phone with
battery attached into the front
compartment of the cradle,
bottom first, over the data
connector.
• Slide a single battery (alone,
not attached to the phone)
into the rear compartment
of the cradle.
2. The battery charge indicators on the left side of the cradle
come on.
The light is red while the battery is charging. It turns green
when the battery is fully charged. Charging the main battery
completely takes two to three hours.
Phone’s battery (on the
front compartment)
indicator light Charge indicator light
Red=The battery is charging.
Green=The battery is fully charged.
Yellow=The battery is waiting to be charged.
Battery (on the rear
compartment) indicator
light
Data connector
10 GETTING STARTED
3. When the indicator light turns green, remove the phone from
the cradle by gently pulling it straight up.
Once the battery is charged, you can use the Smartphone in
the cradle or out of the cradle for all functions. If you have
purchased an extra battery, you can charge it in the cradle
while you are using the Smartphone.
Note: Leaving the battery in the cradle once it is fully charged does not
harm the battery. For more information on battery safety, see page
xx.
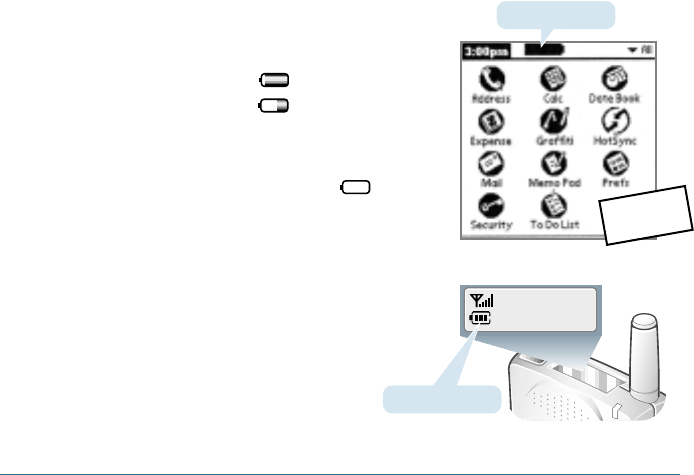
Viewing the Remaining Battery Power
• The battery charge level is displayed at the top of the main
screen.
• The number of blocks represent the
battery charge level.
Example: Battery fully charged
Battery low
• When the battery drops to a low
level, the phone beeps and the
battery icon turns to .
• When the battery is fully
discharged, a warning tone sounds
three times and the power turns off.
• When the phone application turns
power on, the small phone LCD at
the top of the Smartphone also
shows the battery
indicator.
Battery indicator
12:39P
Dec 31
Battery indicator
Tentative

GETTING STARTED 11
1
Palm Desktop Software
Palm Desktop software includes the same main applications as
your Smartphone. Address Book, Date Book, To Do List, Memo
Pad, Expense, and desktop e-mail connectivity. You can use the
HotSync feature of this software to back up and exchange data
between your Smartphone and your computer.
It’s a good idea to back up your data in case something happens
to the data on your Smartphone. Changes you make on your
Smartphone or Palm Desktop software appear in both places
after you synchronize.
With Palm Desktop software, you can do the following:
• Work with your Smartphone applications on your computer.
Palm Desktop software duplicates the Date Book, Address
Book, To Do List, and Memo Pad applications on your
Smartphone, so that you can view, enter, and modify any data
stored on your Smartphone.
• Back up the data stored on your Smartphone with HotSync
technology and synchronize the data on your Palm Desktop
software. Synchronization is a one-step procedure that ensures
your data is always safe and up-to-date. See “Exchanging and
Updating Data: HotSync Operations” in Chapter x for more
information.
• Import and export data, so you can easily transfer data from
other desktop applications into any of your main applications.
See “Importing Data” in Chapter x for more information.
• Print your Date Book, Address Book, To Do List, and Memo Pad
information on any printer.

12 GETTING STARTED
System Requirements
To install and operate Palm Desktop software on Windows, your
computer system must meet the following requirements:
• Windows 95 or later, Windows NT 4.0.
• IBM-compatible 486 computer or higher.
• 8 MB RAM (memory) minimum, 16 MB recommended (required
with Windows NT 4.0).
• 20 MB available hard disk space.
• VGA monitor or better (the Palm Quick Tour requires a 256
color video display).
• CD-ROM drive (you can also download the Palm Desktop
software from http://www.palm.com), or order 3.5-inch floppy
disks from ???.
• Mouse pointing device.
• One available serial port.
In addition, the following equipment is optional:
• Palm Modem .
• Windows-compatible printer.
Installing Palm Desktop Software
The following instructions guide you through installing Palm
Desktop software so that you can transfer data from your
computer to your Smartphone.
After installation, refer to the online Help in Palm Desktop
software for information on how to use the software.

GETTING STARTED 13
1
To ensure a safe and uninterrupted installation of Palm Desktop
software, do the following before installing:
• Turn off your computer and connect the cradle to it. Do not
place your Smartphone in the cradle until instructed.
• If you are installing from floppy disks (rather than the CD
included in the box), make sure that the original Palm Desktop
software disks are write-protected, and then make backup
copies of them. When you have finished, use the copies to
install the software, and store the original disks in a safe
place. Refer to your computer’s manual or operating system
documentation for information on locking or copying diskettes.
• Do not copy the Palm Desktop software files to your
computer’s hard disk. You must use the installer to place the
files in their proper locations and to decompress the files.
To install Palm Desktop software:
• Exit any open programs, including those that run at startup
such as Microsoft Office, and disable any virus-scanning
software.
• Insert the Palm Desktop software CD into the computer’s CD-
ROM drive (or insert the Setup disk into the floppy disk drive).
• When the Palm Desktop software Installer Menu screen
appears, click the Install button to begin the installation
procedure.
• Follow the onscreen instructions to complete the installation.
When prompted, insert your Smartphone into the cradle.
14 GETTING STARTED
Calibrating the Screen and First Setup
The first time you use your Smartphone, the Setup screen
appears automatically. Follow the instructions to calibrate the
screen, then set the date and time.
Calibration aligns the internal circuitry of the Smartphone with
its touch-sensitive screen so your Smartphone can detect the
task you want to perform when you tap an element on the screen
1. The stylus is stored in a slot on
the top left side of the Smartphone.
Remove it from its slot. Use your
thumb to push it firmly upward.
2. Using the stylus, tap anywhere on the screen.
Note: To prevent scratches, never use a pen, pencil, or other sharp object
to tap or write on the smartphone screen.
Setup screen 1
GETTING STARTED 15
1
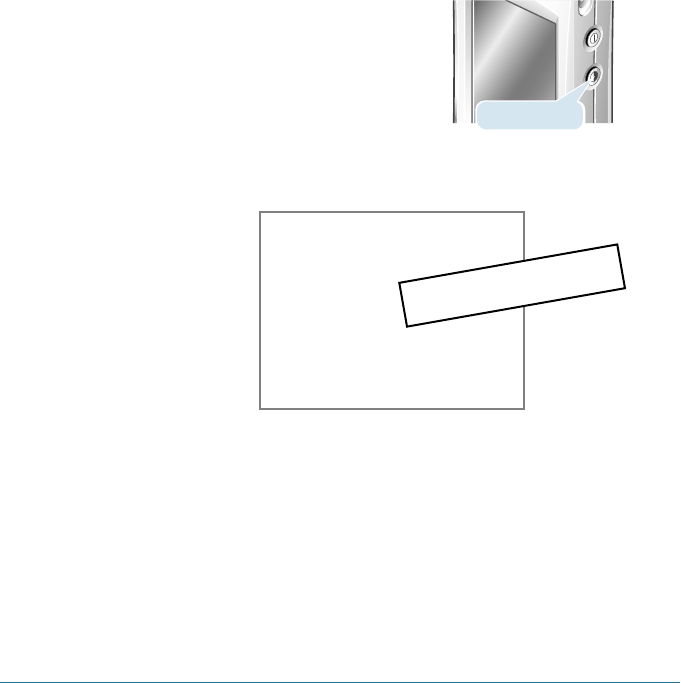
3. The calibration screen appears. Tap the exact center of each
target that appears on the screen.
Note: After the first setup, if you want to recalibrate the screen
manually at any time, see page xx.
4. After you have aligned three targets, the next setup screen
appears.
5. If you want to set the country default, tap the country name
pick list, and tap the setting you want.
Setup screen 2
Setup screen 3
16 GETTING STARTED
6. If you want to set the time manually, tap the Set Time box.
a. Tap ❷or %in the Set Time dialog to change the hour.
b. Tap the first minute box. Tap the arrows to change the
minute. Tap the second minute box. Tap the arrows to
change the number as necessary.
c. Tap AM or PM. Then tap OK.
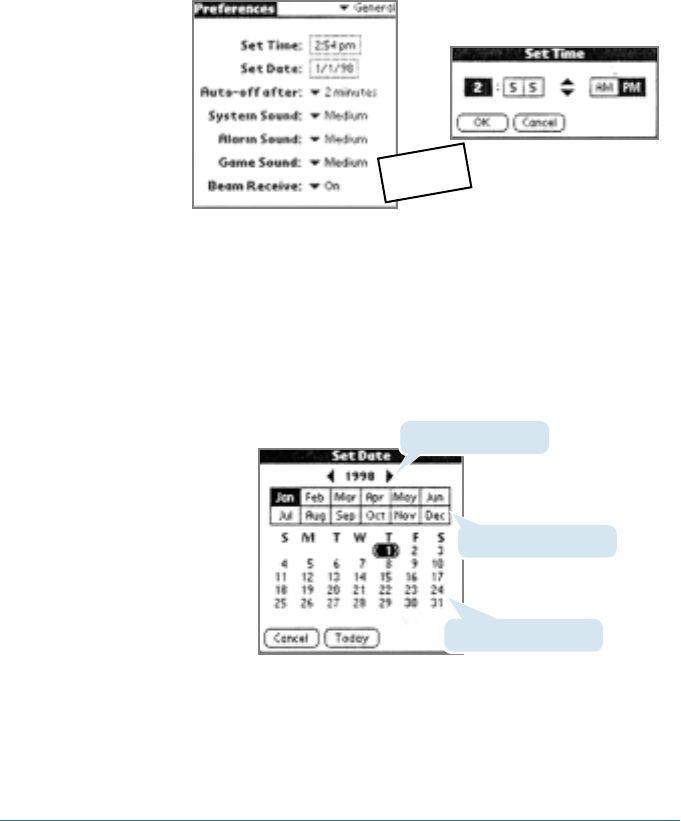
7. If the date is not correct, tap the Set Date box to open the
calendar.
➜
➜
Tentative
Tap to select the year.
Tap to select the month.
Tap to select the date.
a. Tap ➛or ❿to select the year.
b. Tap the month, then the date.
GETTING STARTED 17
1
8. Tap Next to complete setup.
9. If you want to learn entering text on your phone now, tap Next
to view the online help.
To return to Standby mode, tap Done.
Note: After the first setup, if you want to set date and time, or country
default manually at any time, refer to “General Preference” on
page xx.
Setup screen 4
18 GETTING STARTED
Adjusting Screen Contrast
You can adjust the brightness of your screen to make it easy to
see in a variety of lighting conditions.
To adjust the contrast:
1. Press the Contrast button.
2. To change the contrast in small increments, tap to the left or
right of the slider.
To change the contrast in larger increments, drag the slider to
the left or right.
Tip: You can also press the scroll button to move the slider incrementally.
3. Tap Done.
Tip: You can adjust screen contrast using the menu instead of the Contrast
button. See page xx.
Contrast button
Adjust Contrast screen

GETTING STARTED 19
1
Power button
Using the Backlight
If you have difficulty seeing the information on your Smartphone,
you can use the backlight to illuminate your screen.
To activate the backlight:
Press the power button and hold it down for about two seconds.
Release the button when the backlight turns on.
To turn off the backlight:
Press and hold the power button for about two seconds. The
backlight also turns off automatically (after a period of inactivity)
with the Auto-off feature.

ENTERING DATA IN YOUR SMARTPHONE 21
Entering Data in Your Smartphone
You can enter data into your Smartphone by using the onscreen
keyboard, writing with the stylus in the Graffiti®writing area,
using the computer keyboard, or by importing data from another
application.
Using the Onscreen Keyboard
You can open the onscreen keyboard anytime you need to enter
text or numbers on your Smartphone. You cannot enter Graffiti
characters while using the onscreen keyboard.
To use the onscreen keyboard:
1. Open any application (such as the Address Book). For more
information on opening applications, see page xx.
2. Tap any record, or tap New.
CHAPTER2
2
22 ENTERING DATA IN YOUR SMARTPHONE
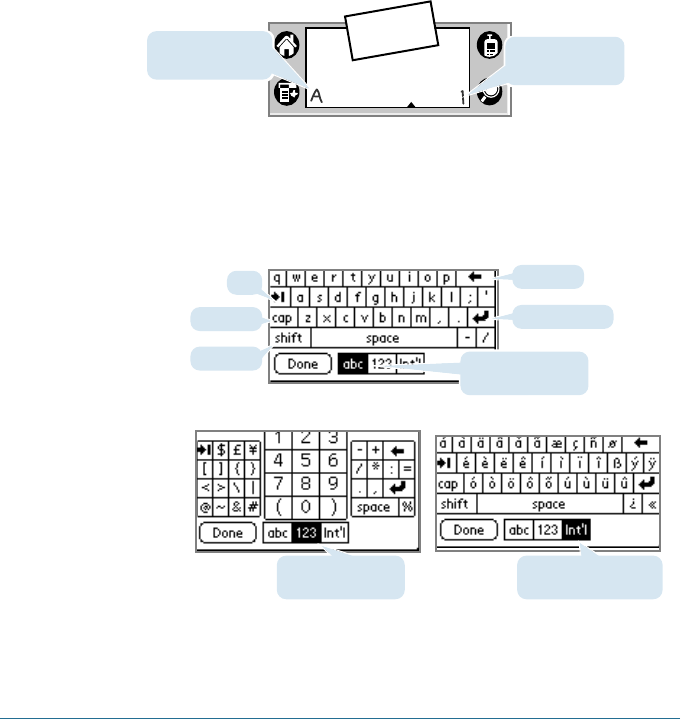
3. Choose one of the following to display the alphabetic or
numeric keyboard:
• Tap Ain the Graffiti writing are a on the front of your
Smartphone to display the alphabetic keyboard.
• Tap 1in the Graffiti writing are a to display the numeric
keyboard.
4. To display the international keyboard, tap either Aor 1on the
front of your Smartphone, and then tap Int’l at the bottom of
the keyboard display.
5. Tap the desired characters or numbers; then tap Done to enter
the text or numbers.
Tap 1for numeric
keypad.
Tap Afor alphabet
keyboard.
Tab
❷Alpha
❷Numeric
Caps Lock
Backspace
Carriage return
Tap here to display
alphabetic keyboard
Tap here to display
numeric keyboard
❷International
Tap here to display
international keyboard
Caps Shift
Tentative

ENTERING DATA IN YOUR SMARTPHONE 23
2
Entering Data Using Graffiti
You can use Graffiti writing commands to create letters,
numbers, punctuation, and symbols. The Graffiti writing strokes
include all letters, numbers, and symbols found on a standard
keyboard.
Writing Graffiti Characters
With only a few minutes of practice, you’ll find it easy to enter
accurate text and numbers using Graffiti writing strokes. Follow
these guidelines to learn and use Graffiti writing strokes
successfully:
• To achieve 100% accuracy, practice
drawing characters exactly as they
appear in the tables later in this
chapter.
• The heavy dot on each shape indicates where to start the
stroke. Some characters have similar shapes, but different
starting and ending points. Always start the stroke at the
heavy dot. (Do not draw the heavy dot; it is there only as a
guideline.)
• Most characters require only a single stroke. When you lift the
stylus from the Graffiti writing area, your Smartphone
recognizes and displays the text character immediately. The
Graffiti writing strokes for letters closely resemble uppercase
letters of the standard English alphabet, and many Graffiti
strokes are part of their standard alphabet equivalents.
24 ENTERING DATA IN YOUR SMARTPHONE
To write Graffiti letters:
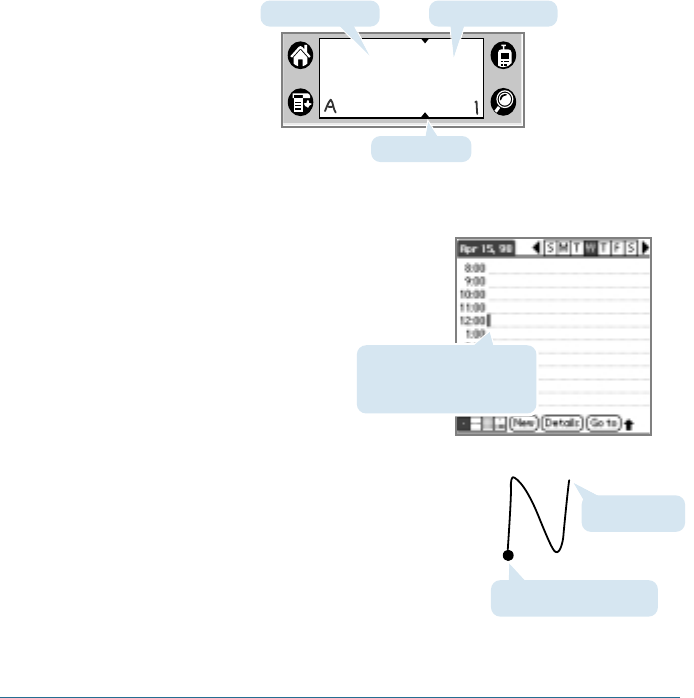
1. Tap the screen where you want to
write text, for example, on a line
next to a time in the Date Book.
2. Use the tables on the page xx to find
the stroke shape for the letter you
want to write. For example, the stroke
shown below creates the letter n.
You use the same shape to create both
the uppercase and lowercase version
of a letter.
Write letters here
Division marks
Write numbers here
A blinking cursor appears
on the screen before you
can begin writing text.
Lift stylus here.
Start stroke at heavy dot.
• The Graffiti writing area is divided into two parts, one for
writing letters and one for writing numbers. The small marks at
the top and bottom of the Graffiti writing area indicate the two
areas. To have your Smartphone recognize characters and
numbers, you must begin character strokes on the left side,
and number strokes on the right side of the Graffiti writing
area.

ENTERING DATA IN YOUR SMARTPHONE 25
2
3. Position the stylus in the left hand side of the Graffiti writing
area.
4. Start your stroke at the heavy dot, and draw the stroke shape
as it appears in the tables.
5. Lift the stylus from the screen at the end of the stroke shape.
Your Smartphone recognizes your stroke immediately and
displays the letter at the insertion point onscreen. As soon as
you lift the stylus from the screen, you can begin the stroke for
the next character you want to write.
Graffiti Tips
When using Graffiti writing, keep the following tips in mind:
• For greater accuracy, draw letters with large strokes; strokes
that nearly fill the Graffiti writing area are easily interpreted.
• To delete characters, set the insertion point to the right of the
character you want to delete, and draw the Backspace stroke
(a line from right to left) in the Graffiti writing area.
• Write at natural speed. Writing too slowly can produce errors.
• Do not write at a slant. Keep vertical strokes should be parallel
to the sides of the Graffiti writing area.
• When letters and numbers can be written using two different
strokes, use the one that’s easiest for you.
• Press firmly.
26 ENTERING DATA IN YOUR SMARTPHONE
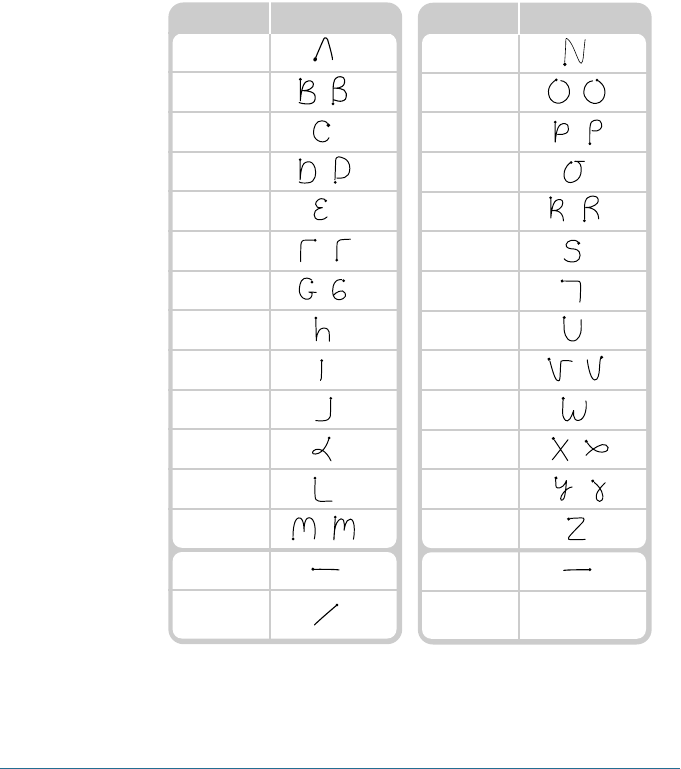
The Graffiti Alphabet
Draw Graffiti letters according to the following alphabet.
Letter Strokes
A
B
C
D
E
F
G
H
I
J
K
L
Space
Carriage
Return
M
Letter Strokes
N
O
P
Q
R
S
T
U
V
W
X
Y
Backspace
Period Tap twice.
Z
ENTERING DATA IN YOUR SMARTPHONE 27
2
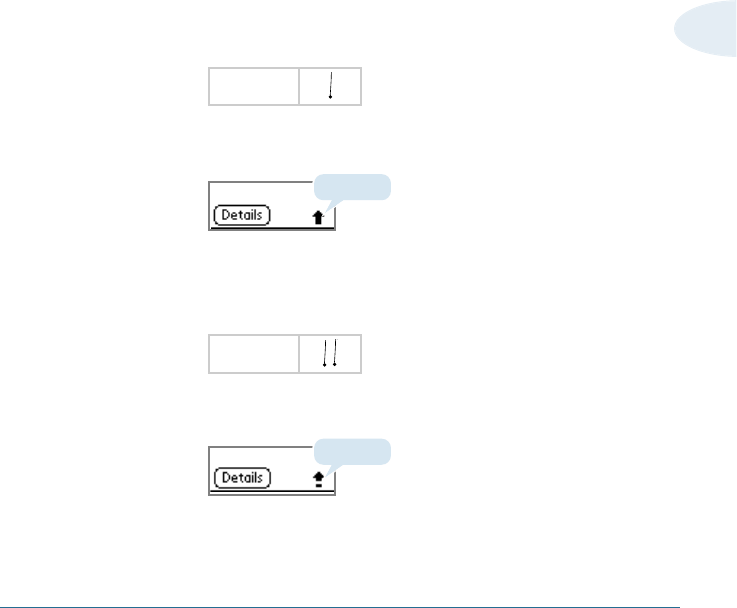
Writing Capital Letters
Graffiti writing automatically capitalizes the first letter of a new
record or sentence. To write additional capital letters, you must
first write a command to shift to Caps mode— just as you press
the Shift key on a keyboard—and then write the desired
character stroke.
To write capital letters:
1. Choose from the following options:
• To enter a single capital letter, write the Shift stroke. Then
write the character stroke.
When Caps Shift is active, an Up arrow appears in the
lower right corner of the screen.
• To enter all capital letters (Caps Lock), write the Caps Lock
stroke, as shown below. All subsequent letters are
capitalized.
When Caps Lock is active, an underlined Up arrow appears
in the lower right corner of the screen.
2. To return to lowercase or release the Caps Lock, press
Backspace or draw the Caps Shift stroke again.
Caps Shift
Caps Lock
Caps Shift
Caps Lock
28 ENTERING DATA IN YOUR SMARTPHONE
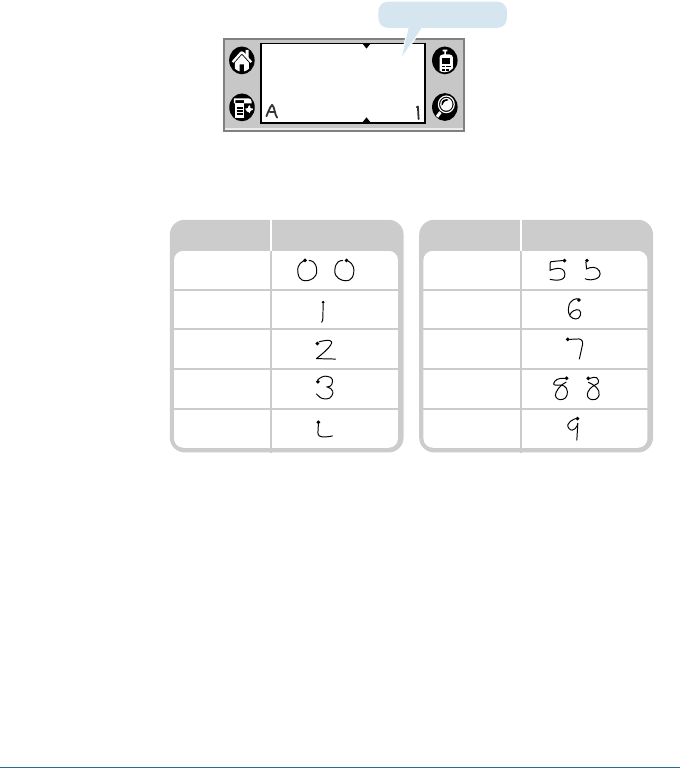
Writing Numbers
To write numbers using Graffiti strokes, draw in the right side of
the Graffiti writing area.
Draw numbers using the following strokes.
Number Strokes
0
1
2
3
4
Number Strokes
5
6
7
8
9
Write numbers here
ENTERING DATA IN YOUR SMARTPHONE 29
2
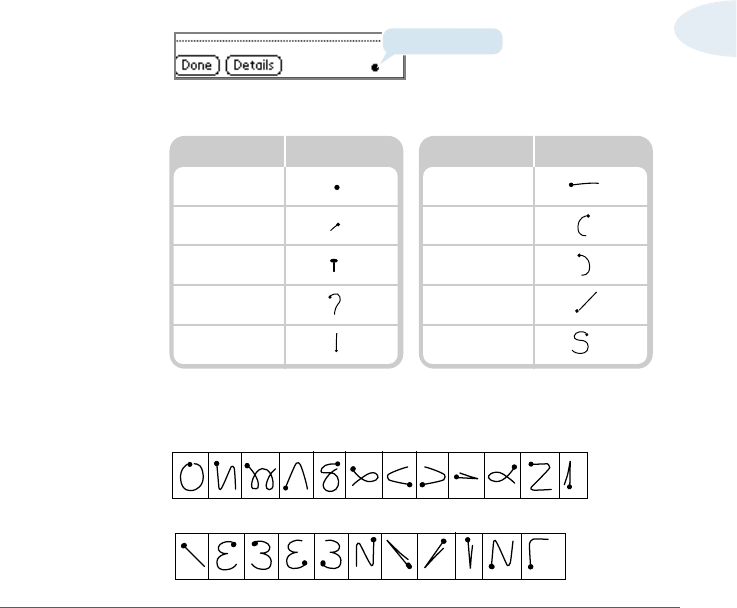
Writing Punctuation Marks
You can create any punctuation symbol available from a standard
keyboard using Graffiti writing.
All punctuation marks begin with a single tap on the Graffiti
writing area. This tap activates the Punctuation Shift, indicated
by a dot displayed above the writing area. The next stroke you
make with the stylus creates a punctuation mark. When
Punctuation Shift is active, you can write a symbol stroke on
either side of the Graffiti writing area (the letter or number side).
Create punctuation marks using the following strokes:
Additional Graffiti punctuation includes the following:
Symbol Stroke
Period .
Comma ,
Apostrophe ‘
Question ?
Exclamation !
Symbol Stroke
Dash –
Left Paren (
Right Paren )
Slash /
Dollar $
@ # % ^ & * < > – + = |
\ { } [ ] ~ ` ; : " tab
Punctuation Shift
30 ENTERING DATA IN YOUR SMARTPHONE
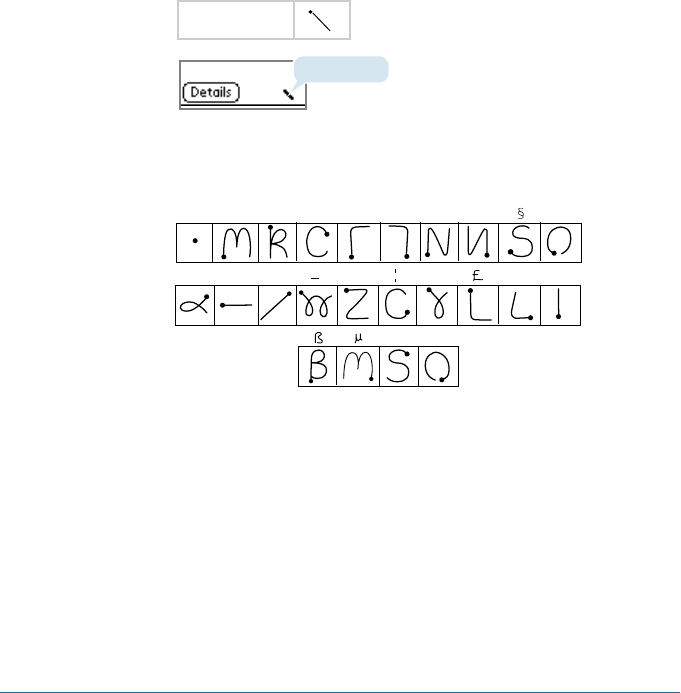
Writing Symbols and Extended Characters
To write symbols and extended characters, you start by activating
Symbol Shift. When Symbol Shift is active, a slanted shift symbol
appears in the lower right corner of the screen. The next stroke
you make creates the symbol or extended character.
Draw symbols or extended characters using the following
strokes:
Symbol Shift
•
,
,
,
,
,.
,
+±X:==
cY
?
!
ƒ∅
Symbol Shift
ENTERING DATA IN YOUR SMARTPHONE 31
2
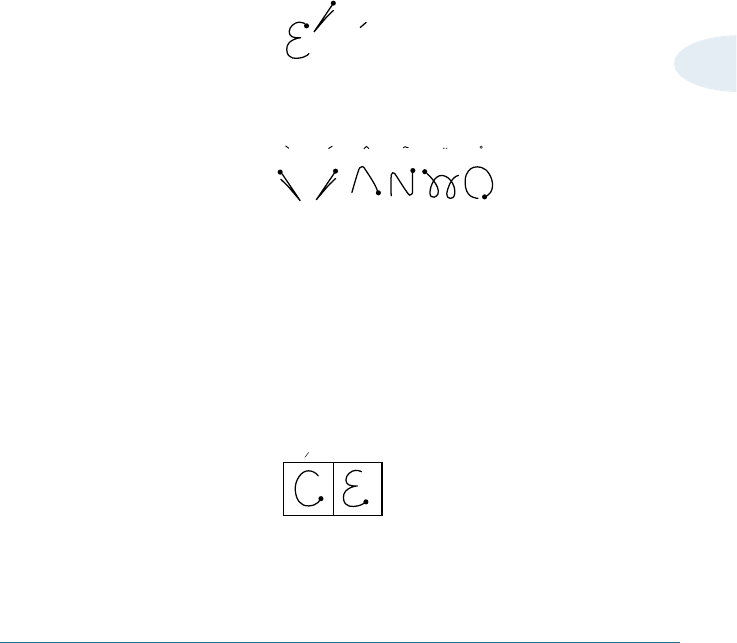
Writing Accented Characters
To draw accented characters, you first draw the stroke for the
letter, and then draw the accent stroke. Graffiti writing then adds
the accent to the letter.
For example, the following illustration shows the strokes required
to draw an accented “e”.
Using these accent strokes, you can write the following accented
letters:
à á â ã ä å è é ê ì í î ï ò ó ô õ ö ù ú û
ü ÿ ∆ñ
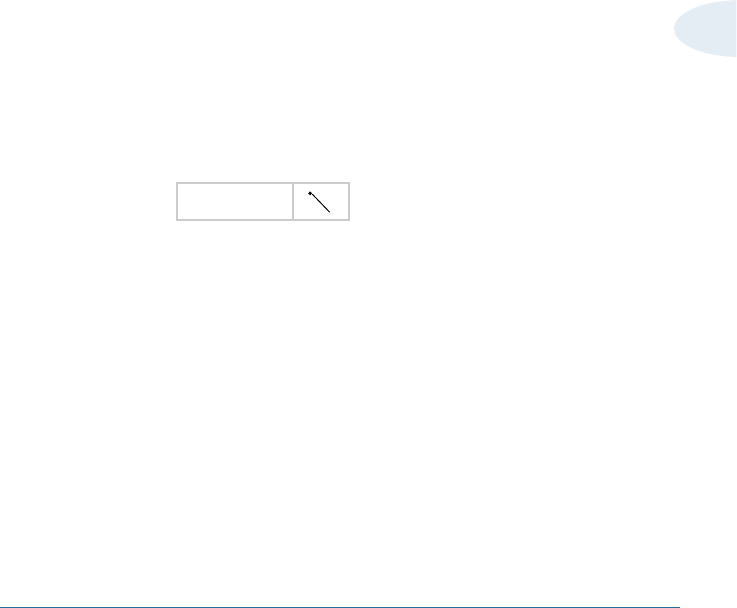
Additional Non-English Characters
You can write the following characters in the lowercase alphabet
mode without special punctuation or shifting.
Note: You must write these non-English characters in the left side of the
Graffiti writing area.
= e
cae
a a a a a a
32 ENTERING DATA IN YOUR SMARTPHONE
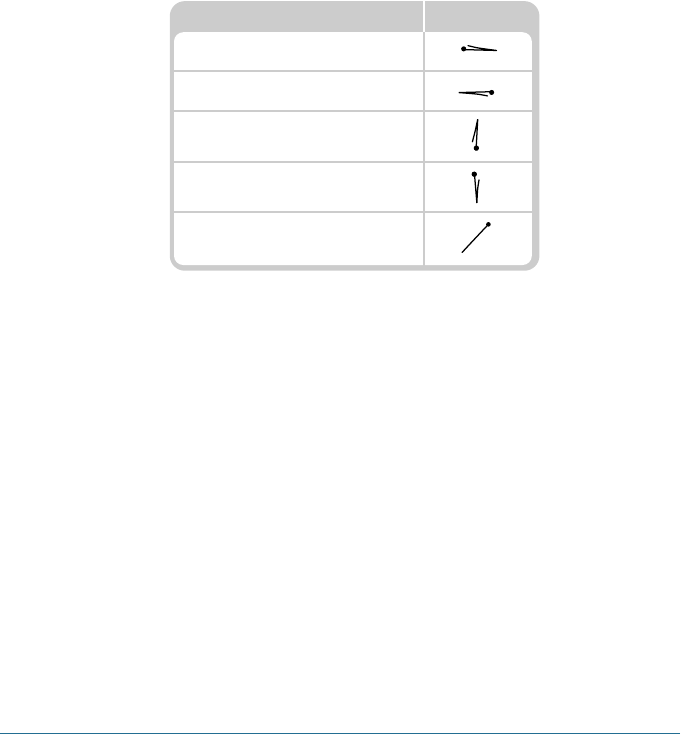
Navigation Strokes
Graffiti writing includes additional strokes for navigating within
text or fields in your applications.
Using Graffiti ShortCuts
Graffiti ShortCuts let you quickly and easily enter commonly used
words or phrases. ShortCuts are similar to the Glossary or
Autotext features of some word processors. Graffiti writing
comes with several predefined ShortCuts. You can also create
your own, for any words, letters, or numbers.
You can create ShortCuts, with up to 45 characters, using the
ShortCut preferences. For example, you could create a ShortCut
for your name or for the header of a memo. See “ShortCuts
Preferences” on page xx to learn about creating your own
shortcuts.
Command Strokes
Move cursor right
Move cursor left
Previous field
(Address Book only)
Next Field
(Address Book only)
Open Address Record
(Address Book only)
ENTERING DATA IN YOUR SMARTPHONE 33
2
Your Smartphone includes the following predefined Graffiti
ShortCuts for common entries:
• ds—Date stamp
• ts—Time stamp
• dts—Date/time stamp
• me—Meeting
• br—Breakfast
• lu—Lunch
• di—Dinner
To use a ShortCut:
Draw the ShortCut stroke followed by the ShortCut character or
characters.
When you draw the ShortCut stroke, the ShortCut symbol
appears at the insertion point.
ShortCut
Using Your Computer Keyboard
If you have a lot of data to enter, or prefer to use the computer
keyboard, you can use PalmTM Desktop software or any supported
PIM to enter information and then perform a HotSync®operation
to synchronize it with your Smartphone. All the main applications
on your Smartphone are also available in Palm Desktop software
and in most PIMs, so you don’t need to learn different
applications.
Refer to Palm Desktop online Help for more information on
entering data on your computer.

34 ENTERING DATA IN YOUR SMARTPHONE
Importing Data
If you have data stored in computer applications such as
spreadsheets and databases, or if you want to import data from
another device, you can transfer the data to your Smartphone
without having to key it in manually. Save the data in one of the
file formats listed below, import it into Palm Desktop software,
and then perform a HotSync operation to transfer the data to
your Smartphone.
Palm Desktop software can import data in the following file
formats:
• Comma delimited (.csv, .txt): Address Book and Memo Pad
only.
• Tab delimited (.tab, .tsv, .txt): Address Book and Memo Pad
only.
• CSV (Lotus Organizer 2.x/97 Mapping): Address Book only.
• Date Book archive (.dba).
• Address Book archive (.aba).
• To Do List archive (.tda).
• Memo Pad archive (.mpa).
Archive formats can only be used with Palm Desktop software.
Use the archive file formats to share information with other
people who use devices based on the Palm Computing®platform
or to create a copy of your important Palm Desktop information.
ENTERING DATA IN YOUR SMARTPHONE 35
2
To import data:
1. Open Palm Desktop software. For details, see page xx.
2. Click the application into which you want to import data.
3. If you are importing records that contain a field with category
names, do the following:
• Select All in the Category box.
• Make sure that the same categories that appear in the
imported file also exist in the application. If the categories
do not exist, create them now; otherwise, the records will
be imported into the Unfiled category.
4. Choose File > Import; then select the file you want to import,
and click Open.
Screen position
36 ENTERING DATA IN YOUR SMARTPHONE
5. To import data into the correct Palm Desktop fields, drag fields
in the left column so that they are opposite the corresponding
imported field on the right.
6. To exclude a field from being imported, deselect the field’s
check box.
7. Click OK. The imported data is highlighted in the application.
8. To add the imported data to your Smartphone, perform a
HotSync operation.
See Palm Desktop online Help for more information on importing
and exporting data.
Screen position

USING PHONE AND MESSAGING 37
Using Phone and Messaging
The Smartphone’s advanced phone and messaging capabilities
make it easy to make a phone call, receive a page, see who left
voice mail, and participate in a conference (three-way) call.
This chapter explains how to use your Smartphone as an
intergrated phone and message manager.
CHAPTER3
3