Samsung Electronics Co SCHI300 Dual-Band Analog/PCS Phone (AMPS/CDMA) User Manual
Samsung Electronics Co Ltd Dual-Band Analog/PCS Phone (AMPS/CDMA) Users Manual
Contents
Users Manual Part 6
EXCHANGING AND UPDATING DATA USING HOTSYNC®OPERATIONS 245
12
• Manual monitors requests only when you select HotSync
Manager from the Start menu.
Tip: If you’re not sure which option to use, keep the default setting, Always
Available.
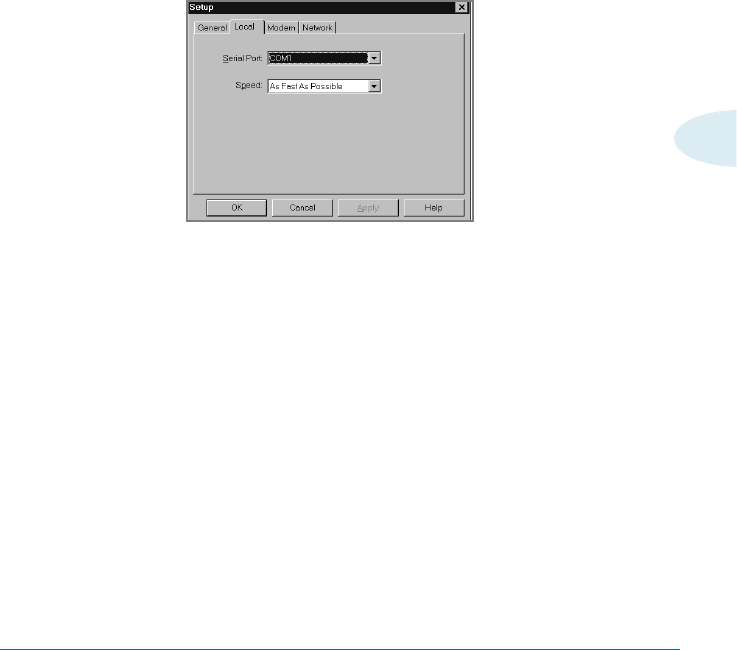
4. Click the Local tab to display the settings for the connection
between your computer and the Smartphone cradle.
5. If needed, choose another serial port to identify the port that
Palm Desktop software uses to communicate with the cradle.
This selection should match the number of the port to which
you connected the cradle.
Note: Your Smartphone cannot share this port with an internal modem or
other device.

246 EXCHANGING AND UPDATING DATA USING HOTSYNC®OPERATIONS
6. If needed, set the speed to determine the speed at which data
is transferred between your Smartphone and Palm Desktop
software.
Try the As Fast As Possible rate first, and adjust downward if
you experience problems. This setting allows Palm Desktop
software and your Smartphone to find and use the fastest
speed.
7. Click the Modem tab to display the modem settings and adjust
the options as needed. See “Performing a HotSync operation
via modem” later in this chapter for more information.
8. If you are attached to a network, click the Network tab to
display the network settings and adjust the options as needed.
See “Performing a HotSync operation via a network” later in
this chapter for more information.
9. Click OK.

EXCHANGING AND UPDATING DATA USING HOTSYNC®OPERATIONS 247
12
Customizing HotSync Application Settings
For each application, you can define a set of options that
determines how records are handled during synchronization.
These options are called a “conduit.” By default, a HotSync
operation synchronizes all files between the Smartphone and
Palm Desktop software.
In general, you should leave the settings to synchronize all files.
The only reason you might want to change these settings is to
overwrite data on either your Smartphone or Palm Desktop
software, or to avoid synchronizing a particular type of file
because you don’t use it.
In addition to the conduits for Date Book, Address Book, To Do
List, Memo Pad, and Expense, Palm Desktop software includes
System and Install conduits. The System conduit backs up the
system information stored on your Smartphone, including
Graffiti®ShortCuts. The Install conduit installs applications on
your Smartphone.
248 EXCHANGING AND UPDATING DATA USING HOTSYNC®OPERATIONS
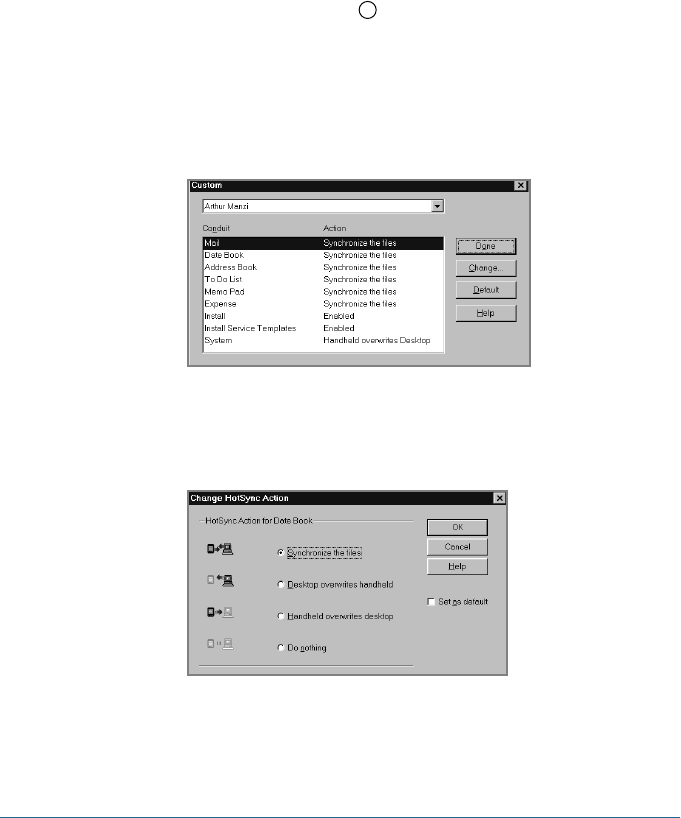
3. Select the appropriate user name from the list.
4. Select an application in the Conduit list. Click Change.
5. Click the direction in which you want to write data, or click Do
Nothing to skip data transfer for an application.
To customize HotSync application settings:
1. Click the HotSync icon in the Windows system tray (bottom
right corner of the taskbar).
Tip: You can also click the HotSync command on the Palm Desktop
software menu bar.
2. From the HotSync Manager menu, choose Custom.

EXCHANGING AND UPDATING DATA USING HOTSYNC®OPERATIONS 249
12
6. Choose how long the setting will remain in effect:
• To have the setting affect only the next HotSync operation,
deselect Set As Default. Thereafter, the HotSync Actions
revert to their default settings.
• To use a new setting as the default, select the Set As
Default option. Thereafter, whatever you selected as the
default setting is used when you click the Default button in
the Custom dialog.
7. Click OK.
8. Repeat steps 4 through 7 to change conduit settings for other
applications.
9. Click Done to activate your settings.

250 EXCHANGING AND UPDATING DATA USING HOTSYNC®OPERATIONS
Conducting a HotSync Operation Via Modem
You can use a modem, such as the modem, to synchronize your
Smartphone when you are away from your computer.
Note: The first HotSync operation must be local, using the cradle. After that, you
can perform a modem HotSync operation.
To perform a HotSync operation via modem you must complete the
following steps:
• Connect a modem to your computer.
• Configure the Palm Desktop software for use with your modem.
• Connect a modem to your organizer.
• Configure the Modem preferences on your Smartphone for use
with your modem. See page xx for details.
Preparing Your Computer
You must perform a few steps to prepare your computer for a modem
HotSync operation. Be sure to perform these steps before you leave
your office so that your computer is ready to receive a call from your
Smartphone.
To prepare your computer for a modem HotSync operation:
1. Confirm that the computer modem is connected and turned on, and
that no communications applications, such as fax or telephony
software, are running on a COM port.
Note: Make sure that the computer is disconnected from all online services,
such as America Online (AOL) and CompuServe, to avoid conflicts with
the COM port.
EXCHANGING AND UPDATING DATA USING HOTSYNC®OPERATIONS 251
12
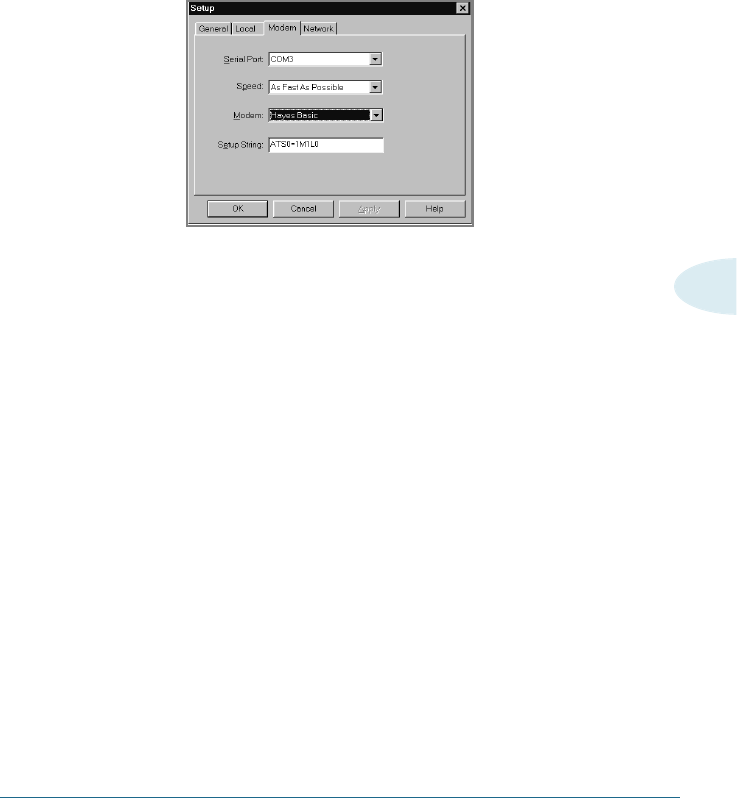
2. Start HotSync Manager if it is not already running, and from
the HotSync Manager menu, choose Modem.
3. Adjust the following options as needed:
• Serial Port to identify the port for the modem. If you are
unsure of the port assignment, look at the Modem
Properties in the Windows Control Panel.
• Speed to determine the speed at which data is transferred.
Try the As Fast As Possible rate first, and adjust downward
if you experience problems. This setting lets Palm Desktop
software and your Smartphone find and use the fastest
speed.
• Modem to identify the modem type or manufacturer. Refer
to your modem manual or face plate for its type or settings.
If you’re not sure of your modem type or your modem
doesn’t match any that appear in the list, select Hayes
Basic.
• Setup String to identify the setup string for your particular
modem. Not all modems require a setup string. Refer to your
modem manual and enter the setup string if recommended
by the manufacturer.
4. Click OK.
252 EXCHANGING AND UPDATING DATA USING HOTSYNC®OPERATIONS
Preparing Your Smartphone
In addition to preparing your computer, you must perform a few
steps to prepare your Smartphone for a modem HotSync
operation.
To prepare your Smartphone for a modem HotSync
operation:
1. Tap to open the Applications Launcher.
2. Tap the HotSync icon .
3. Tap the Enter Phone # field.
Note: If you plan to connect to your company’s dial-in server (network
modem) instead of connecting to a computer modem, see
“Performing a HotSync operation via a network” later in this
chapter.
4. Enter the telephone number to access the modem connected
to your computer.

EXCHANGING AND UPDATING DATA USING HOTSYNC®OPERATIONS 253
12
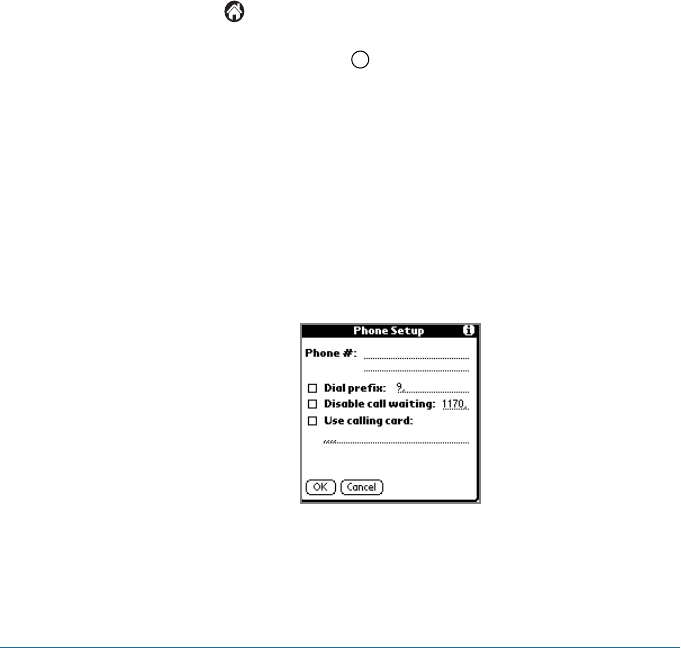
5. If needed, enter a dial prefix (such as “9”) to access an outside
line, and then tap the Dial Prefix check box.
Tip: You can enter a comma in the field to introduce a “pause” in the
dialing sequence.
6. If the phone line you’re using for the Smartphone has Call
Waiting, select the Disable call waiting check box to avoid an
interruption during the modem HotSync operation.
7. If you want to use a calling card to place the call, select the
check box and enter the calling card number.
8. Tap OK.
9. Tap the Menu icon .
10. Tap Options, and then tap Modem Setup.
11. Enter the Modem Preference settings as described in
“Modem Preferences.”
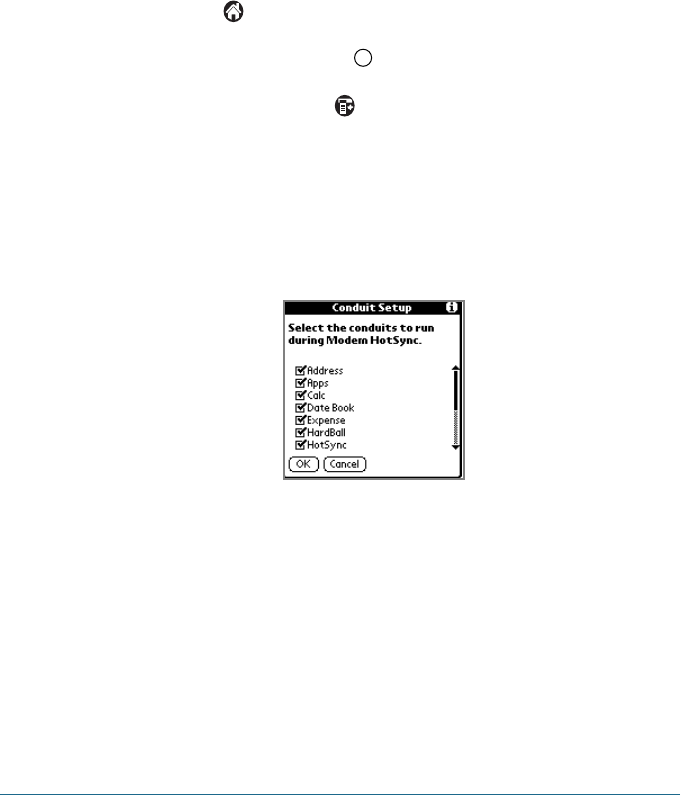
Selecting Conduits for a Modem HotSync Operation
You can define which files, applications, or both on your
Smartphone synchronize during a modem HotSync operation, to
minimize the time required to synchronize data with a Palm
Modem accessory. To define what synchronizes, you use the
Conduit Setup dialog box.
254 EXCHANGING AND UPDATING DATA USING HOTSYNC®OPERATIONS
To define which files or applications on your device
synchronize during a HotSync operation:
1. Tap to open the Applications Launcher.
2. Tap the HotSync icon .
3. Tap the Menu icon to open the HotSync menus.
4. Tap Options, and then tap Conduit Setup.
5. In the Conduit Setup dialog box, tap the check boxes to
deselect the files and applications that you do not want to
synchronize during a modem HotSync operation. The default
setting is to synchronize all files.
6. Tap OK.

EXCHANGING AND UPDATING DATA USING HOTSYNC®OPERATIONS 255
12
Performing a HotSync Operation Via a Modem
After you prepare your computer and your Smartphone, and
select your Conduit Setup options, you are ready to perform a
modem HotSync operation.
To perform a modem HotSync operation:
1. Tap to open the Applications Launcher.
2. Tap the HotSync icon .
3. Tap the Modem icon to dial the Palm Desktop modem and
synchronize the applications.
4. Wait for the HotSync operation to complete.

256 EXCHANGING AND UPDATING DATA USING HOTSYNC®OPERATIONS
Performing a HotSync Operation Via a
Network
When you use the Network HotSync software, you can take
advantage of the LAN and WAN connectivity available in many
office environments. The Network HotSync software lets you
perform a HotSync operation by dialing in to a network or by
using a cradle that is connected to any computer on your LAN or
WAN (provided that the computer connected to the cradle also
has the Network HotSync software installed, your computer is
on, and the HotSync Manager is running).
The Network HotSync software requires the following:
• Your computer has TCP/IP support installed.
• Both your company’s network system and its remote access
server support TCP/IP. (Your system administrator has this
information.)
• You have a remote access account. (If you don’t have an
account, consult your system administrator.)
Everything you need to connect to your company’s dial-in server
(network modem) is included with Palm Desktop software and
Smartphone software. You need to activate the feature, however,
on both Palm Desktop software and your Smartphone.
To prepare your computer for a network HotSync
operation:
1. Click the HotSync Manager icon in the Windows system tray.
The Windows system tray is usually in the lower right corner
on your computer display. The location may vary depending on
the location of the taskbar and the version of Windows you
are using.
EXCHANGING AND UPDATING DATA USING HOTSYNC®OPERATIONS 257
12
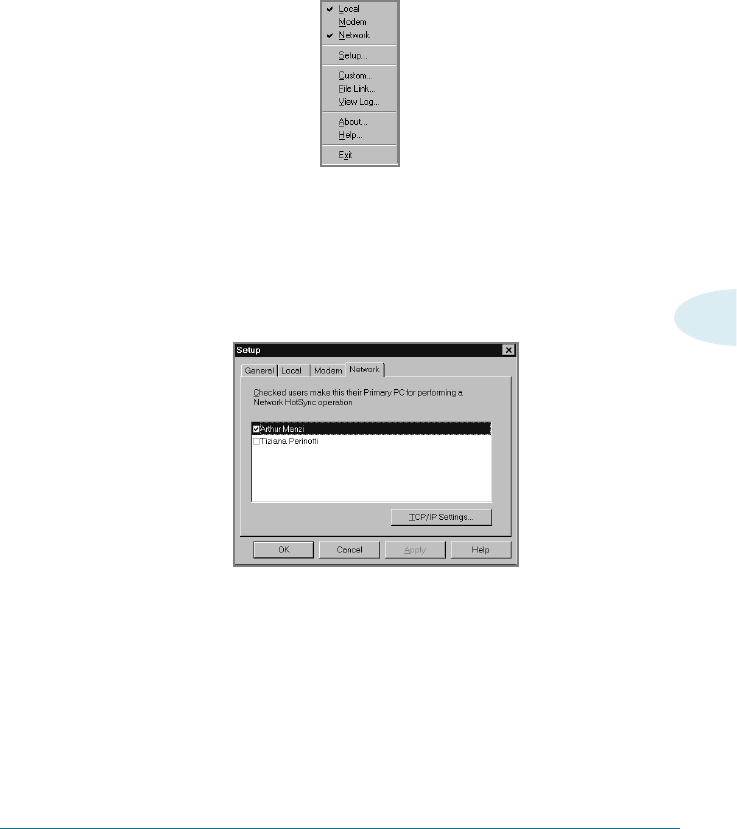
2. From the HotSync Manager menu, choose Network.
3. From the HotSync Manager menu, choose Setup.
4. Click the Network tab and make sure that a check mark
appears next to your user name. If no check mark appears,
select the check box next to your user name.
5. Click OK.
6. Place your Smartphone in the cradle, and perform a HotSync
operation.
The HotSync operation records network information about your
computer on your Smartphone. With this information, your
Smartphone can locate your computer when you perform a
HotSync operation over the network.

258 EXCHANGING AND UPDATING DATA USING HOTSYNC®OPERATIONS
To prepare your device for a network HotSync operation:
1. Tap to open the Applications Launcher.
2. Tap the HotSync icon .
3. Tap the Menu icon to open the HotSync menus.
4. Tap Options, then tap Modem Sync Prefs.
5. Tap Network.
6. Tap OK.
Note: For more information on the Network HotSync feature, see page
xx for information on configuring Network HotSync preferences.

EXCHANGING AND UPDATING DATA USING HOTSYNC®OPERATIONS 259
12
Using File Link
The File Link feature lets you import Address Book and Memo
Pad information into your Smartphone from a separate external
file such as a company phone list. HotSync Manager stores the
data in a separate category on your Palm Desktop software and
your Smartphone. You can set the File Link feature to check for
changes to the external file when you perform a HotSync
operation.
With File Link, you can import data stored in any of the following
file formats:
• Comma delimited (.csv).
• Tab delimited (.tsv).
• Memo Pad archive (.mpa).
• Address Book archive (.aba).
• Text (.txt).
For information on how to set up a file link, see the Palm Desktop
online Help.

SETTING PREFERENCES FOR YOUR SMARTPHONE 261
Setting Preferences for
Your Smartphone
The Preferences screens enable you to customize the
configuration options on your Smartphone.
In the Preferences screens, you can do the following:
General Set the current date and time, the auto shut-off
interval, the Stay on in cradle feature, the Beam
Receive feature, and the system, alarm, and game
sounds.
Formats Set the country default and the formats for dates,
times, calendar, and numbers.
Modem Configure your Smartphone for use with a modem.
Owner Assign your name, phone number, and other owner
information to your Smartphone.
Buttons Assign different applications to the buttons on the
front panel of your Smartphone and the HotSync®
button on the cradle, and reassign the full-screen
pen stroke command.
CHAPTER13
13

262 SETTING PREFERENCES FOR YOUR SMARTPHONE
ShortCuts Define a list of Graffiti®abbreviations.
Digitizer Calibrate the screen on your Smartphone.
Network Configure your Smartphone for use with a network.
To open the Preferences screens:
1. Tap the icon to open the Applications Launcher.
2. Tap the Preferences icon .
3. Tap the pick list in the upper-right corner of the screen.
4. Select the Preferences screen you want to view.
Buttons Preferences
The Buttons Preferences screen enables you to associate
different applications with the buttons on the front of the
Smartphone.
For example, if you find that you seldom use To Do List and often
use Expense, you can assign the To Do List button to start
Expense.
Any changes you make in the Buttons Preferences screen
become effective immediately; you do not have to change to a
different screen or application.
If you assign a different application to a button, you can still
access the original application using the Applications Launcher.
SETTING PREFERENCES FOR YOUR SMARTPHONE 263
13
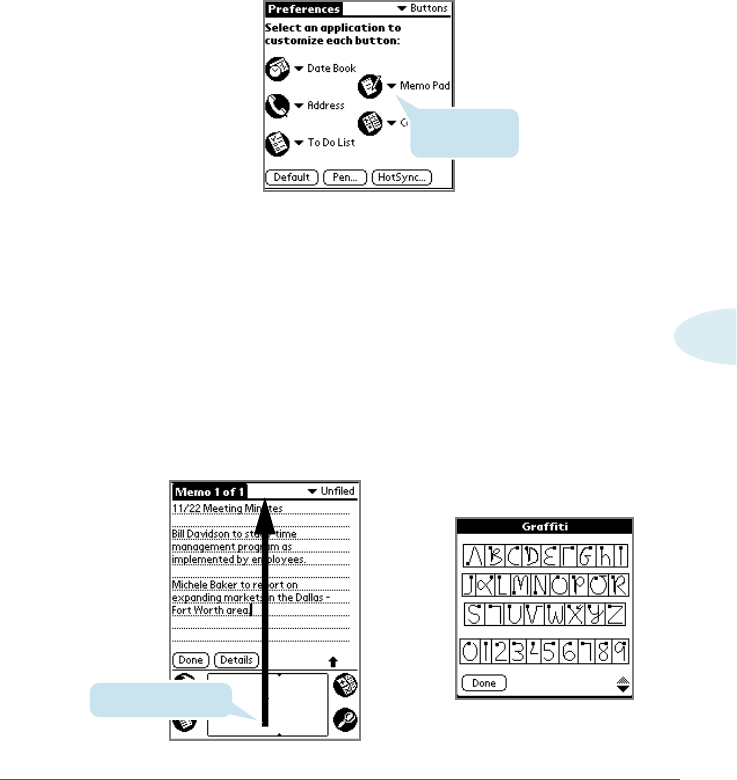
To change the Buttons preferences:
1. Tap the pick list next to the button you want to re-assign.
2. Tap the application that you want to assign to the button.
Tip: To restore all of the buttons to their factory settings, tap Default.
Pen Preferences
The Buttons Preferences screen enables you to change the
assignment of the full-screen pen stroke. By default, the full-
screen pen stroke activates Graffiti Help.
Tap arrow to
show pick list
Drag to top of screen
➜
➜
264 SETTING PREFERENCES FOR YOUR SMARTPHONE
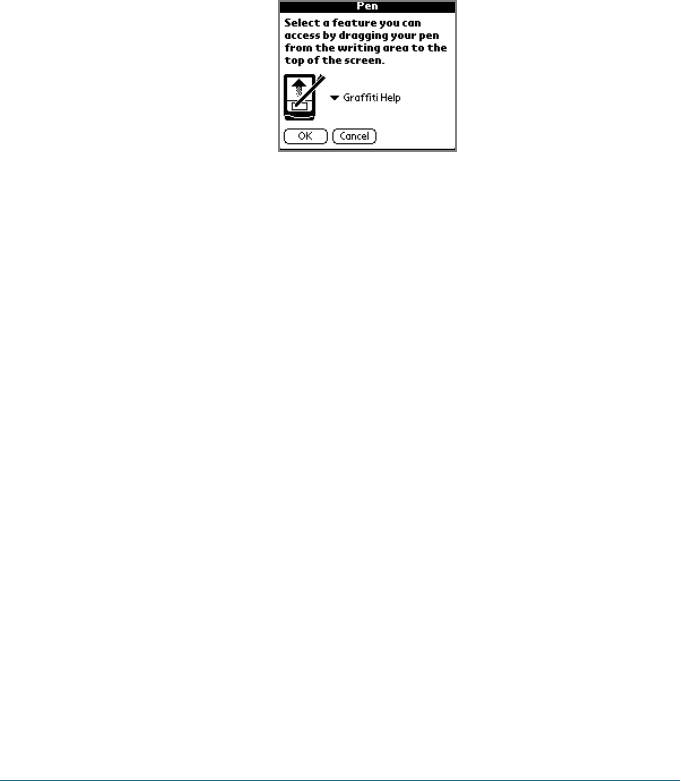
To change the Pen preferences:
1. Tap Pen.
2. Tap the pick list and select one of the following settings for
the full-screen pen stroke:
Backlight Turns on the backlight of your Smartphone.
Keyboard Opens the onscreen keyboard for entering
text characters.
Graffiti Help Opens a series of screens that show the
complete Graffiti character set.
Turn Off & Turns off and locks the Smartphone. You must
Lock assign a password to lock the Smartphone.
When locked, you need to enter the password
to use your Smartphone.
Beam Data Beams the current record to another Palm
Computing®connected smartphone.
3. Tap OK.
SETTING PREFERENCES FOR YOUR SMARTPHONE 265
13
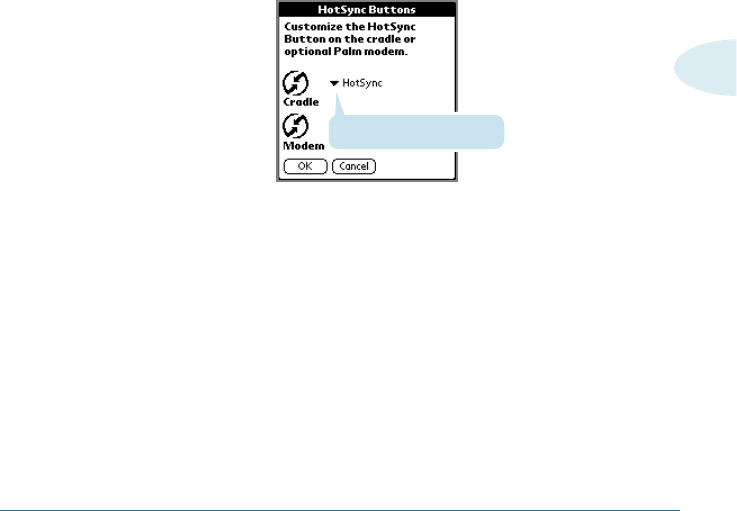
HotSync Buttons Preferences
The Buttons Preferences screen also enables you to associate
different applications with the HotSync button on the cradle and
the HotSync button on the optional Palm Modem. Any changes
that you make in the HotSync Buttons dialog box become
effective immediately; you do not have to change to a different
screen or application.
To change the HotSync buttons preferences:
1. Tap HotSync.
2. Tap the pick list next to the button you want to assign.
3. Tap the application that you want to assign to each button.
The default setting for each button is the HotSync setting,
which means the cradle and optional modem perform
their normal HotSync functions.
4. Tap OK.
Tap arrow to show pick list

266 SETTING PREFERENCES FOR YOUR SMARTPHONE
Digitizer Preferences
The Digitizer Preferences screen opens the digitizer calibration
screen. This is the same screen that appears when you start your
Smartphone for the first time.
You can recalibrate your screen after a hard reset, or if your
digitizer drifts.
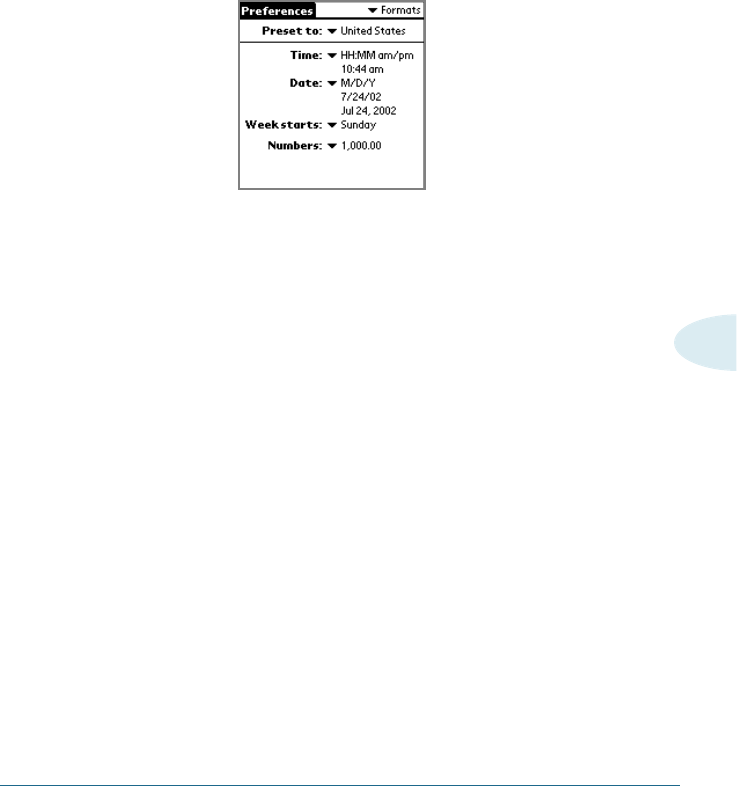
Formats Preferences
Use the Formats Preferences screen to set the country default
and the display format of the dates, times, and numbers on your
Smartphone.
Country Default
The country default sets date, time, week start day, and number
conventions based on geographic regions where you might use
your Smartphone. For example, in the United Kingdom, time often
is
expressed using a 24-hour clock. In the United States, on the
other hand, time is expressed using a 12-hour clock with an AM
or PM suffix.
All your Smartphone applications use the Country default
settings. You can, however, customize your own preferences as
described in the “Time, date, week start, and numbers formats”
section later in this chapter.
SETTING PREFERENCES FOR YOUR SMARTPHONE 267
13
To set the country default:
1. Tap the country name pick list.
2. Tap the setting you want to use.
Time, Date, Week Start, and Numbers Formats
The Time setting defines the format for the time of day. The time
format that you select appears in all applications on your
Smartphone.
To select the time, date, week start, and numbers format:
1. Tap the Time pick list and select a format.
2. Tap the Date pick list and select a format.
3. Tap the Week starts pick list, and select whether you want the
first day of the week to be Sunday or Monday.
Note: This setting controls the Day, Week, and Month views in Date Book
and all other aspects of your Smartphone that display a calendar.
4. Tap the Numbers pick list, and select formats for the decimal
point and thousands separator.
268 SETTING PREFERENCES FOR YOUR SMARTPHONE
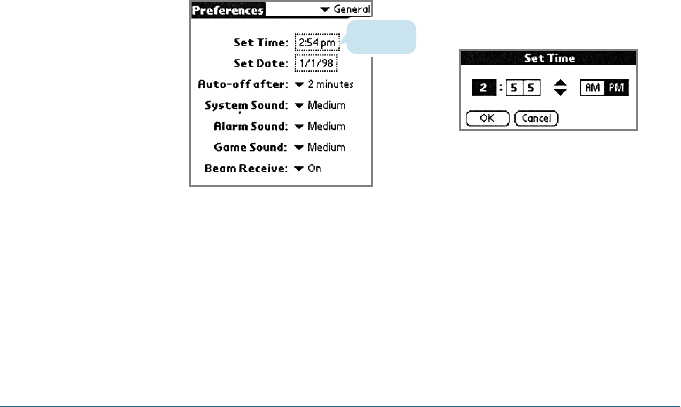
General Preferences
The General Preferences screen enables you to set the time,
date, auto shutoff interval, and sounds for your Smartphone.
Tip: When you first start up the Smartphone, you are also guided to set date
and time.
Setting the Current Time
Use the Set Time button in the General Preferences screen to set
the current time for your Smartphone.
To set the current time:
1. Tap the time in the General Preferences screen to open the Set
Time dialog.
2. Tap the up or down arrows to change the number for the hour.
3. Tap the minutes numbers, and then tap the arrows to adjust
the settings for the current time.
Tap here
➜
➜
SETTING PREFERENCES FOR YOUR SMARTPHONE 269
13
4. Tap the AM or PM box to select the time of day.
Note: Your Smartphone can also display time based on a 24-hour clock.
See the “Formats Preferences” section in this chapter.
5. Tap the OK button to close the Set Time dialog and return to
the General Preferences screen.
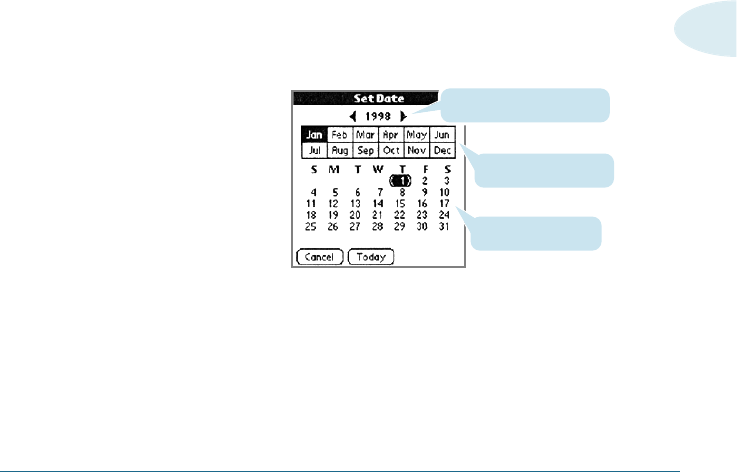
Setting the Current Date
Use the Set Date button in the General Preferences screen to set
the current date for your Smartphone.
To set the current date:
1. Tap the date in the General Preferences screen to open the Set
Date dialog.
2. Tap the arrows at the top to select the current year.
3. Tap a month box to select the current month.
4. Tap the current date to set the date, close the Set Date dialog
and return to the General Preferences screen.
Tap arrows to select year
Tap to select month
Tap to select date

270 SETTING PREFERENCES FOR YOUR SMARTPHONE
Auto-off Delay
Your Smartphone has an automatic shutoff feature that turns off
the power and backlight after a period of inactivity. This feature
helps conserve battery power in case you forget to turn off your
Smartphone.
If you find that your Smartphone shuts itself off before you finish
reviewing the information on the screen, you should increase the
time setting of the automatic shutoff feature.
To set the Auto-off delay:
1. Tap the Auto-off after pick list.
2. Tap the setting you want to use for the automatic shutoff
feature: 1minute, 2 minutes, or 3 minutes.

SETTING PREFERENCES FOR YOUR SMARTPHONE 271
13
System, Alarm, and Game Sounds
Your Smartphone uses a variety of sounds. The System, Alarm,
and Game Sound settings enable you to turn the sounds on or
off, and to adjust the volume level.
To set the system and alarm sounds:
1. Tap the System Sound pick list and select the sound level.
Note: When you turn off the System Sounds, you also turn off the
“chime” tones associated with the HotSync operation.
2. Tap the Alarm Sound pick list and select the sound level.
3. Tap the Game Sound pick list and select the sound level.
Note: The Game Sound setting works only with games that are
programmed to respond to this setting. Older games typically do
not respond to this setting.
Beam Receive
You can choose to turn off the Beam Receive feature. This
prohibits anyone from beaming information to your Smartphone.
It also results in a slight saving of battery power.
To change the Beam Receive setting:
Tap the Beam Receive pick list and select On or Off.
272 SETTING PREFERENCES FOR YOUR SMARTPHONE
Connection Preferences
The Connection Preferences screen enables you to define the
settings used to perform different types of HotSync operations.
The screen displays a list of available configurations that are
ready to be further defined; the list varies depending on the kind
of software you’ve added to your organizer.
For example, a modem connection appears on the list. If you have
this modem, you only need to specify the phone setup (and
network connection — if required) to complete the configuration.
Note: You can purchase a modem for use with your organizer.
See http://www.palm.com.
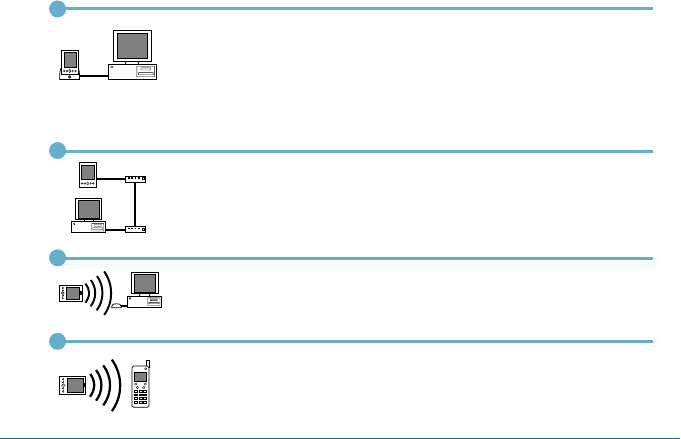
You can also create custom configurations. There are four
possible kinds of connections.
Serial to PC: A local HotSync connection: the direct serial
connection between your organizer and your desktop computer.
Your organizer is connected by its serial port to the cradle, and
the cradle is attached by its cable to a serial (COM) port of your
desktop computer.
Serial to Modem: A connection between a modem attached to
the serial port of your organizer and a modem that is part of your
computer or laptop.
IrCOMM to PC: A connection between the IR port of your
organizer and the infrared device of your computer or laptop.
IrCOMM to Modem: A connection between the IR port of your
organizer and a modem. The modem can be attached to a
computer or some other device containing an IR port.
SETTING PREFERENCES FOR YOUR SMARTPHONE 273
13
Sample Connection for Remote IR HotSync Operations
The following sample configuration would enable you to perform
an IR HotSync operation by sending data through the IR port of a
modem attached to a cell phone, which then dials a modem
attached to your desktop computer, to synchronize with your
Desktop application. For this example, you use the IrCOMM to
Modem connection.
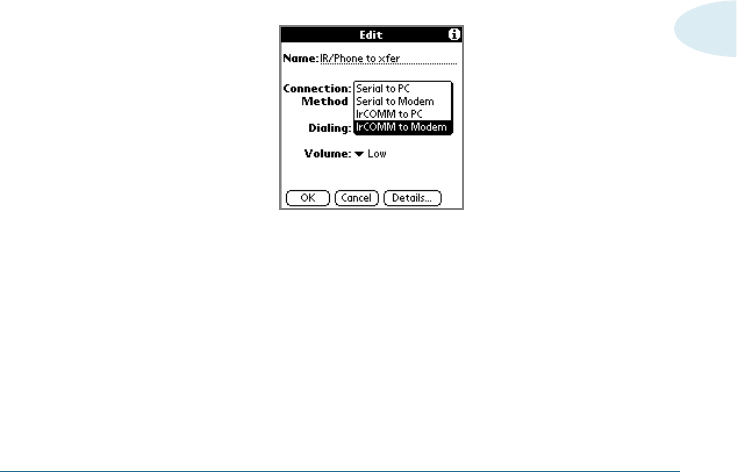
To create an IrCOMM to Modem connection:
1. Tap New.
2. Enter a name to identify this configuration.
3. Tap the Connection Method pick list and select IrCOMM to
Modem.
4. Tap the Dialing pick list and select TouchTone or Rotary.
5. Tap the Volume pick list and select the speaker volume you
want to use.

274 SETTING PREFERENCES FOR YOUR SMARTPHONE
6. Tap Details.
7. Enter the initialization string supplied by the documentation for
the modem attached to your cell phone.
8. Tap OK, and then tap OK again to save the configuration.
After you create the configuration, you need to set up the
HotSync Manager of your Desktop application and the HotSync
application of your organizer to perform a modem HotSync
operation.
➜
➜
Your new configuration appears
in the list of available
configurations
Tap here

SETTING PREFERENCES FOR YOUR SMARTPHONE 275
13
Network Preferences and TCP/IP Software
The Network Preferences settings enable you to use the TCP/IP
software that is included in the Smartphone operating system.
You can use the TCP/IP software to connect with Internet Service
Providers (ISPs) or dial-in (remote access) servers. Because the
TCP/IP software is a feature of the operating system, you
configure all parameters relating to it from the Preferences
application.
To use TCP/IP, you must configure both the Connection
Preferences and then create Network Preferences settings.
Note: Connection Preferences screen enables you to use the modem to
communicate with remote devices. For example, you can communicate
with your ISP server, or with your computer if you are away on travel.
See “Connection Preferences” earlier in this chapter for a complete
explanation on how to create modem parameters.
After you configure both the Network and Connection
Preferences, you can establish a PPP (Point-to-Point Protocol),
SLIP (Serial Line Internet Protocol), or CSLIP (Compressed Serial
Line Internet Protocol) connection with your ISP or dial-in server.
You can do this either by using menu commands from the
Network Preferences screen or by using a third-party application.
Note: TCP/IP provides the ability to connect to your ISP or dial-in server
with applications that allow you to view the transmitted data.
276 SETTING PREFERENCES FOR YOUR SMARTPHONE
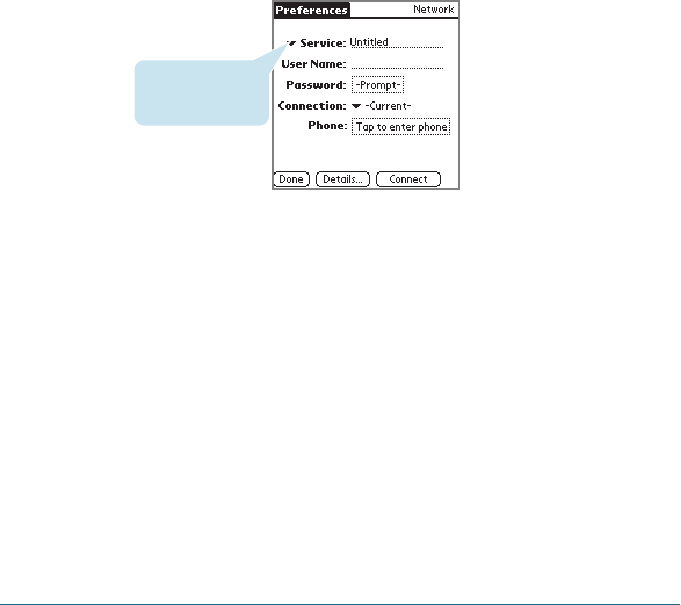
Selecting a Service
Use the Service setting to select the service template for your
Internet Service Provider or a dial-in server. Service templates are
a set of ISP and dial-in server configuration settings that you can
create, save, and reuse.
To select a service:
1. Tap the Service pick list.
2. Tap the predefined service template you want to use.
Tap here to display
a list of service
templates
SETTING PREFERENCES FOR YOUR SMARTPHONE 277
13
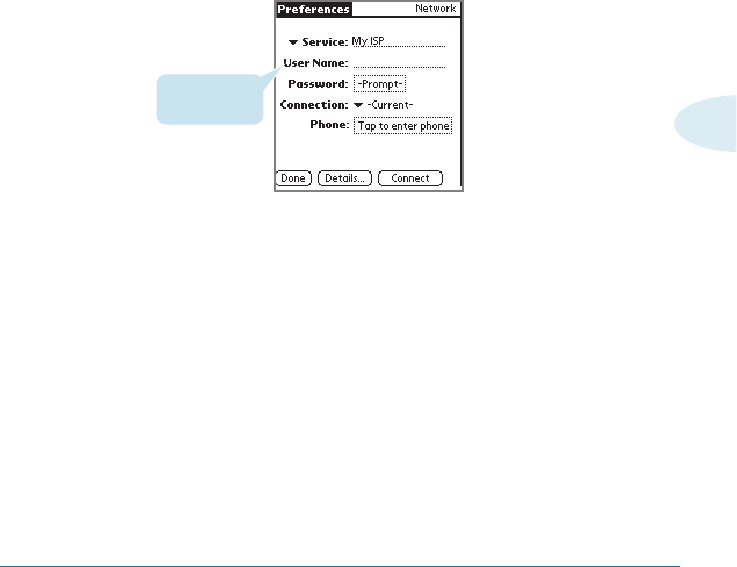
Entering a User Name
The User Name setting identifies the name you use when you log
into your Internet Service Provider or your dial-in server. Although
this field can contain multiple lines of text, only two lines appear
onscreen.
To enter a user name:
1. Tap the User Name field.
2. Enter your user name.
Note: Most dial-in servers do not accept spaces in the user name.
Enter your user
name here
278 SETTING PREFERENCES FOR YOUR SMARTPHONE
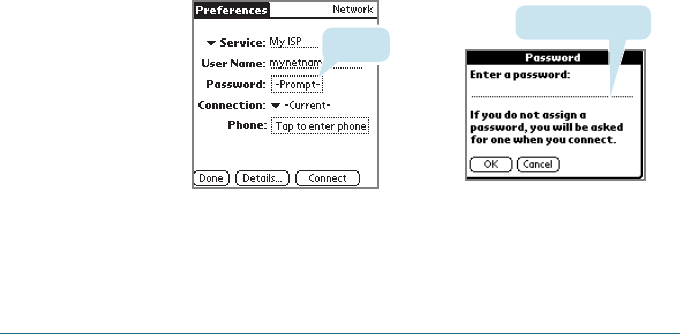
Entering a Password
The Password box identifies the password you use to log into
your server or ISP. Your entry in this field determines whether
your Smartphone prompts you to enter a password each time you
log into your network:
• If you do not enter a password, your Smartphone displays the
word “Prompt” in this field and asks you to enter a password
during the login procedure.
• If you enter a password, your Smartphone displays the word
“Assigned” in this field and does not prompt you to enter a
password during the login procedure.
Note: If you are concerned about security, select the Prompt option and
do not enter a password.
To enter a password:
1. Tap the Password field.
2. Enter the password you use to log into your server.
3. Tap OK.
Note: The Password field updates to display the word “Assigned.”
Tap here
Enter password here
➜
➜
SETTING PREFERENCES FOR YOUR SMARTPHONE 279
13
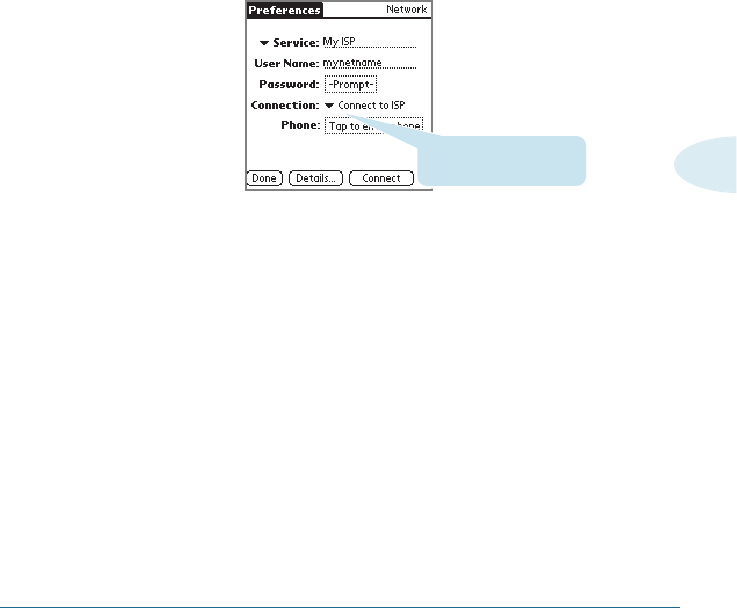
Selecting a Connection
Use the Connection setting to select the method you want to use
to connect to your Internet Service Provider or a dial-in server.
See “Connection preferences” earlier in this chapter for
information about creating and configuring connection settings.
To select a connection:
1. Tap the Connection pick list.
2. Tap the connection you want to use.
Tap here to display a list
of available connections.
280 SETTING PREFERENCES FOR YOUR SMARTPHONE
3. If you need to enter a prefix or disable Call Waiting, skip to
those procedures. Otherwise, tap OK.
Enter your ISP phone
number here
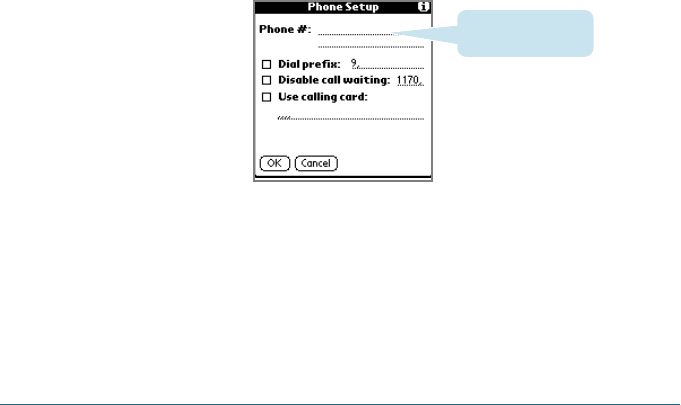
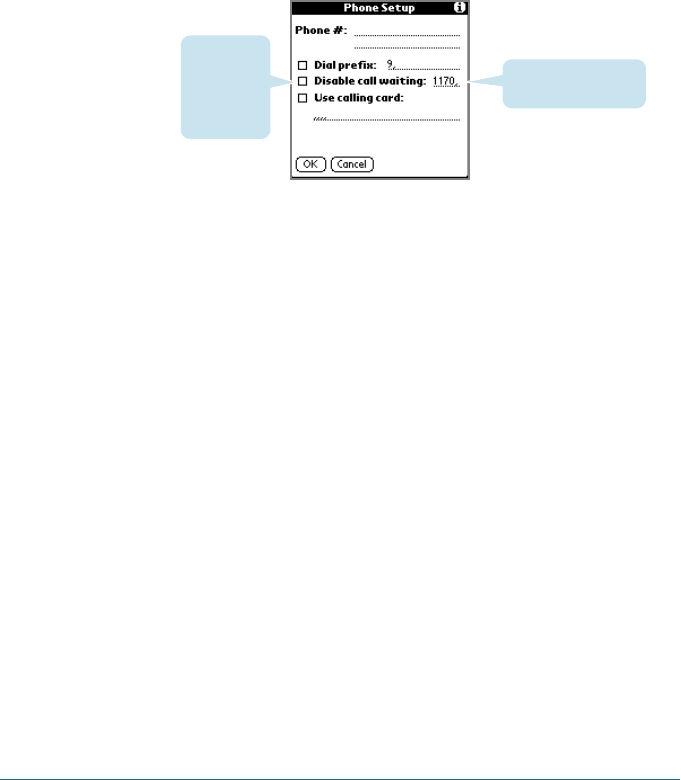
Adding Telephone Settings
When you select the Phone field, your Smartphone opens a
dialog box in which you define the telephone number you use to
connect with your ISP or dial-in server. In addition, you can also
define a prefix, disable Call Waiting, and give special instructions
for using a calling card.
Note: The Phone Setup dialog box works correctly for AT&T and Sprint long-
distance services. However, because MCI works differently, MCI
customers need to put the calling card number in the Phone # field
and the phone number in the Use calling card field.
To enter your server phone number:
1. Tap the Phone # field.
2. Enter the phone number you use to reach your ISP or dial-in
server.
SETTING PREFERENCES FOR YOUR SMARTPHONE 281
13
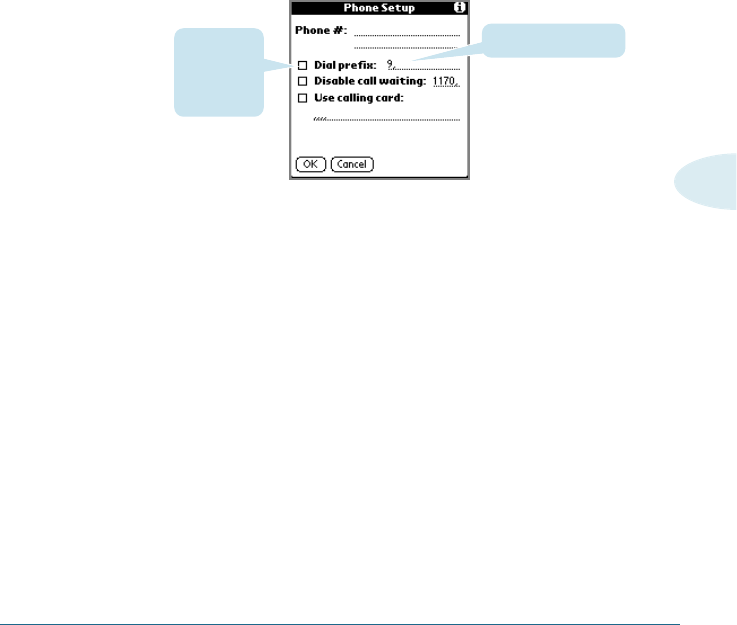
Entering a Prefix
A prefix is a number that you dial before the telephone number
to access an outside line. For example, many offices require that
you dial “9” to dial a number outside the building.
To enter a prefix:
1. Tap the Dial Prefix check box to select it.
Enter your prefix here
Select this
box if you
need to use
a prefix
2. Enter the prefix.
3. Tap OK.
Disabling Call Waiting
Call Waiting can cause your session to terminate if you receive a
call while you are connected. If your telephone has Call Waiting,
you need to disable this feature before logging into your ISP or
dial-in server.
282 SETTING PREFERENCES FOR YOUR SMARTPHONE
To disable Call Waiting:
1. Tap the Disable call waiting check box to select it.
2. Enter the code to disable Call Waiting on the Disable call
waiting line.
Note: Each telephone company assigns a code to disable Call Waiting.
Contact your local telephone company for the code that is
appropriate for you.
3. Tap OK.
Using a Calling Card
The Use calling card field enables you to use your calling card
when dialing your ISP or Intranet server. Keep in mind that there
is usually a delay before you enter your calling card number.
When you define your calling card number, you need to add
commas at the beginning to compensate for this delay. Each
comma delays transmission of your calling card number for two
seconds.
Enter your disable
code here
Select this
box if you
need to
disable Call
Waiting

SETTING PREFERENCES FOR YOUR SMARTPHONE 283
13
To use a calling card:
1. Tap the Use calling card check box to select it.
2. Enter your calling card number on the Use calling card line.
Note: It’s a good idea to add at least three commas at the beginning of
your calling card number to compensate for the cue delay.
3. Tap OK.
Connecting to Your Service
After you set your Connection and Network Preferences,
establishing a connection to your Internet Service Provider (ISP)
or your company’s network (dial-in server) is easy.
Note: If you are connecting to an ISP, you need a third-party application,
such as a web browser or news reader, to take advantage of this
connection. For information about third-party applications that support
TCP/IP, check the web site http://www.palm.com.
Enter your calling
card number here
Select this
box to use a
calling card

284 SETTING PREFERENCES FOR YOUR SMARTPHONE
To establish a connection:
Tap Connect to dial the current service and display the Service
Connection Progress messages.
Tip: To see expanded Service Connection Progress messages, press the
Down scroll button.
To close a connection:
Tap Disconnect to terminate the connection between your
Smartphone and your service.
Creating Additional Service Templates
You can create additional service templates from scratch or by
duplicating existing templates and editing information. After you
create a new or duplicate template, you can add and edit
settings.
To add a new service template:
1. Tap the Menu icon .
2. Tap Service, and then tap New. A new service template (called
Untitled) is added to the Service pick list.
To duplicate an existing service template:
1. Tap the Service pick list.
2. Tap the predefined service template you want to duplicate.
3. Tap the Menu icon .
4. Tap Service, and then tap Duplicate. A copy of the service
template is added to the Service pick list.
SETTING PREFERENCES FOR YOUR SMARTPHONE 285
13
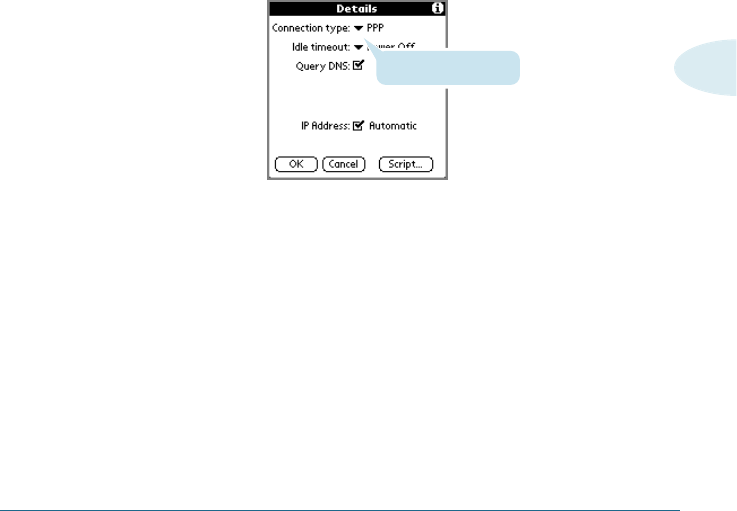
Adding Detailed Information to a Service Template
If you are using one of the predefined service templates, you
probably only need to enter your user name and telephone
number. If you are creating a new service template, you may
need to provide additional information to your ISP or dial-in
server. You use the Details dialog box to add additional
information to a selected service template.
To select a connection type:
1. Tap the service field.
2. Tap Details.
3. Tap the Connection type pick list and select one of the
following connection types:
PPP Point-to-Point protocol
SLIP Serial Line Internet Protocol
CSLIP Compressed Serial Line Internet Protocol
Note: If you are not sure, try PPP; if that doesn’t work, ask your Internet
service provider or your system administrator for the correct
connection type.
Select connection type

286 SETTING PREFERENCES FOR YOUR SMARTPHONE
Idle timeout
The Idle timeout setting defines how long your Smartphone waits
before dropping the connection with your ISP or dial-in server
when you switch out of a TCP/IP application.
To set the Idle timeout:
1. Tap the Idle timeout pick list and select one of the following
options:
Immediate Drops the connection to your ISP immediately
when you switch to another application.
1 minute Waits one minute for you to open another
application before it drops the connection.
2 minutes Waits two minutes.
3 minutes Waits three minutes.
Power Off Keeps your PPP or SLIP connection until you
turn off your Smartphone (or until it times out).
This option works best with the modem.
2. Tap OK.

SETTING PREFERENCES FOR YOUR SMARTPHONE 287
13
Defining primary and secondary DNS
The Domain Naming System (DNS) is a mechanism in the
Internet for translating the names of host computers into IP
addresses. When you enter a DNS number (or IP address), you
are identifying a specific server that handles the translation
services.
Each IP address has four sections, separated by periods. In the
Details dialog box, you enter each section separately. Each
section of an IP address is made up of a number from 0 to 255;
numbers are the only allowable characters in this field.
Ask your Internet service provider or system administrator for the
correct Primary or Secondary DNS IP numbers.
Tip: Many systems do not require that you enter a DNS. If you are not sure,
leave the DNS field blank.
To enter a primary and secondary DNS:
1. Tap the Query DNS check box to deselect it.
2. Tap the space to the left of the first period in the Primary DNS
field, and then enter the first section of the IP address.
Note: Each section must be a number from 0 to 255.
3. Repeat step 2 for the second, third, and last sections of the
Primary DNS field.
4. Repeat steps 2 and 3 for the Secondary DNS number.
5. Tap OK.
288 SETTING PREFERENCES FOR YOUR SMARTPHONE
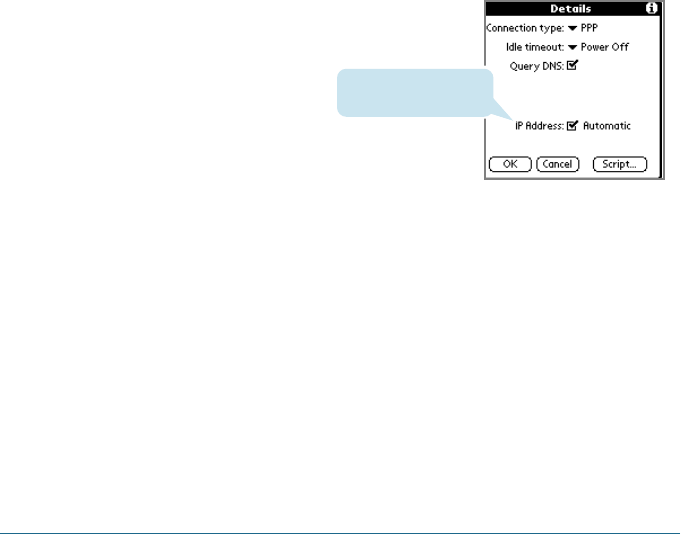
To enter a permanent IP address:
1. Tap the IP Address check box to deselect it and display a
permanent IP address field below the check box.
2. Tap the space to the left of the first period then enter the first
section of the IP address.
Note: Each section must be a number from 0 to 255.
3. Tap and enter the remaining sections of the IP address.
4. Tap OK.
IP address
Everyone who logs on to the Internet needs to have a unique
identifier(an IP address), whether permanent or temporary. Some
networks dynamically assign a temporary IP address when clients
log in. The IP Address field lets you identify whether your
network provides automatic (dynamic) temporary IP addressing.
Note: If your IP address is permanently assigned, you need to get that
information from your system administrator. If you are not sure,
select Automatic.
To identify dynamic IP addressing:
Tap the IP Address check box to select it.
Tap to select automatic
IP address
SETTING PREFERENCES FOR YOUR SMARTPHONE 289
13
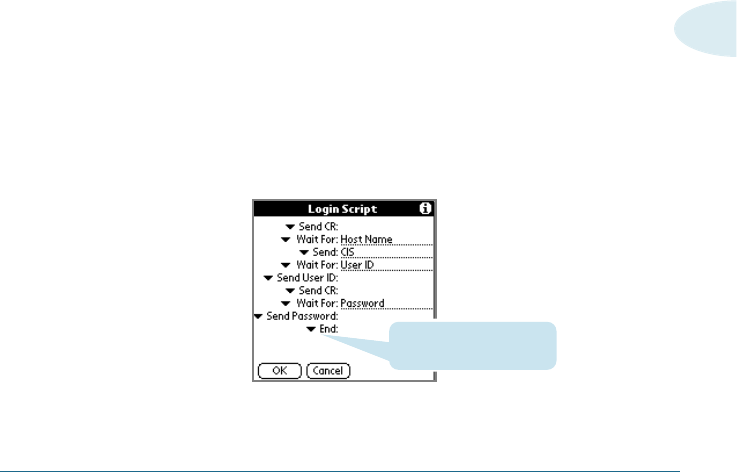
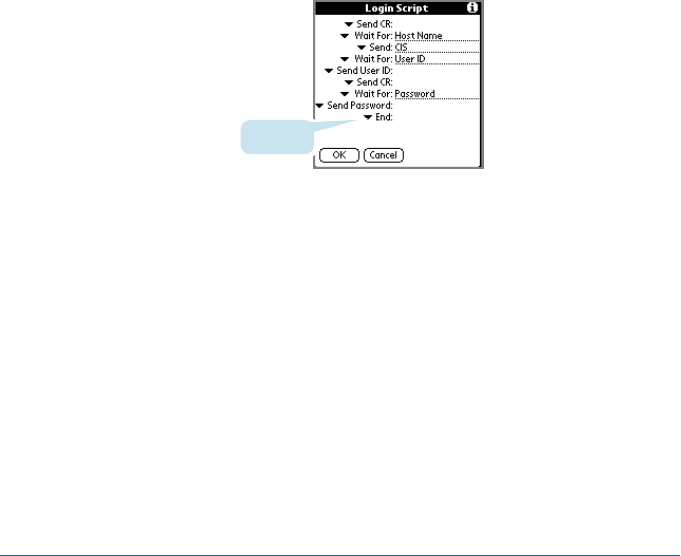
Login Scripts
A login script is a series of commands that automates logging in
to a network server, for example, your corporate network or your
Internet Service Provider (ISP). A login script is associated with a
specific service template created in Network Preferences.
A login script is something that you are likely to receive from
your IS System Administrator if your company has a system in
which you log in to the corporate servers from your organizer
using a modem or network connection. The script is generally
prepared by the System Administrator and distributed to users
who need it. It automates the events that must take place in
order to establish a connection between your organizer and the
corporate servers.
You can create login scripts in two ways:
• In a text editor on your desktop computer, in which you create
a file with the extension PNC, which you then install on your
organizer using the Install Tool (this method is not available to
Macintosh users)
• In the Login Script dialog box on your organizer, accessed from
the Details dialog box in Network Preferences
Note: You can also use non-ASCII and literal characters in your login
script. See Appendix D for more information.
Tap here to see the list of
available commands.
290 SETTING PREFERENCES FOR YOUR SMARTPHONE
Creating a Login Script on Your Organizer
You can create login scripts by selecting commands from the
Command pick list in the Login Script dialog. Some commands,
such as Send, require you to supply additional information. Those
commands have a parameter field so that you can add the
necessary data.
To create a login script:
1. Tap Script.
2. Tap the End pick list.
3. Tap the command you want from the Command list. If the
command requires additional information, a field appears to the
right of it for you to enter the information. The following
commands are available:
Wait For Tells your Smartphone to wait for specific
characters from the TCP/IP server before executing
the next command.
Wait For Detects a challenge-response prompt coming
Prompt from the server and then displays the dynamically
generated challenge value. You then enter the
challenge value into your token card, which in turn
generates a response value for you to enter on your
organizer. This command takes two arguments,
separated by a vertical bar (|) on the input line.
Tap here

SETTING PREFERENCES FOR YOUR SMARTPHONE 291
13
Send Transmits specific characters to the TCP/ IP
server to which you are connecting.
Send CR Transmits a carriage return or LF character to
the TCP/IP server to which you are connecting.
Send User ID Transmits the User ID information entered in
the User ID field of the Network Preferences
screen.
Send Transmits the password entered in the
Password Password field of the Network Preferences
screen. If you did not enter a password, this
command prompts you to enter one. The
Password command is usually followed by a
Send CR command.
Delay Tells your Smartphone to wait a specific
number of seconds before executing the next
command in the login script.
Get IP Reads an IP address and uses it as the IP
address for your Smartphone. This command is
used with SLIP connections.
Prompt Opens a dialog box and prompts you to enter
text of some kind (for example, a password or
a security code).
End Identifies the last line in the login script.
4. Repeat steps 2 and 3 until the login script is complete.
5. Tap OK.

292 SETTING PREFERENCES FOR YOUR SMARTPHONE
Plug-in Applications
You can create plug-in applications containing script commands
that extend the functionality of the built-in script commands. A
plug-in application is a standard PRC application that you install on
your organizer just like any other application. After you install the
plug-in application, you can use the new script commands in a
login script.
Plug-in applications have the following characteristics:
• Written in C language
• Compiled into a device executable
• Called properly from a login script
• Able to return control to a login script after it terminates
• Created using a development environment that supports the
Palm OS®software, such as Metrowerks CodeWarrior for Palm
Computing Platform.
Deleting a Service Template
There is only one way to delete a service template: use the Delete
command from the Service menu.
To delete a service template:
1. Tap the Service pick list.
2. Tap the service template you want to delete.
3. Tap the Menu icon .
4. Tap Service, and then tap Delete.
5. Tap OK.
SETTING PREFERENCES FOR YOUR SMARTPHONE 293
13
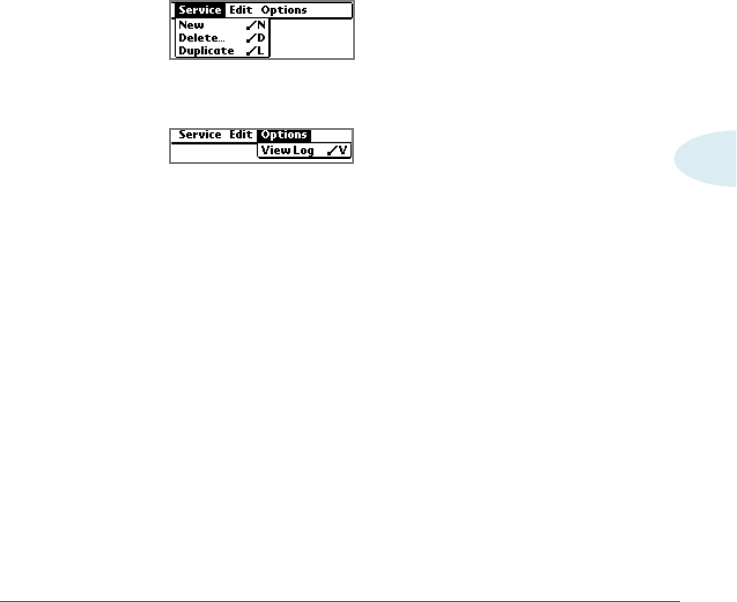
Network Preferences Menu Commands
The Network Preferences screen includes menu commands to
make it fast and easy to create and edit service templates.
TCP/IP application menus are show here for your reference.
See “Using menus” in Chapter x for more information about
choosing menu commands.
Service menu
Options menu
TCP/IP Troubleshooting
If you are having a problem establishing a network connection
using TCP/IP, check this section and try the suggestions listed.
Displaying expanded Service Connection Progress
messages
It’s helpful to identify at what point in the login procedure the
connection fails. An easy way to do this is to display the
expanded Service Connection Progress messages. Expanded
Service Connection Progress messages describe the current
stage of the login procedure. Press the Down scroll button at any
point during login to display these messages.

294 SETTING PREFERENCES FOR YOUR SMARTPHONE
Viewing the Network Log
If viewing the expanded Service Connection Progress messages
does not give you enough information to find out why you cannot
connect to your ISP or dial-in server, take a look at the Network
Log. The Network Log lists all of the communication that occurs
between your modem and your dial-in server during the login
procedure. The information in the Network Log can help your ISP
or your System Administrator pinpoint where the login procedure
communication fails and why.
To view the Network Log:
1. Tap Options, and then tap View Log.
2. Tap the up and down arrows of the scroll bar to see the entire
Network Log.
3. Tap Done.
Adding a DNS number
If your ISP or dial-in server requires a DNS number and you did
not enter that information in the Network Preferences screen, it
will appear that you successfully logged into your network. When
you try to use an application or look up information, however, the
connection fails. If this occurs, try adding a DNS number. Ask
your ISP or your system administrator for the correct Primary and
Secondary DNS IP numbers.

SETTING PREFERENCES FOR YOUR SMARTPHONE 295
13
Owner Preferences
The Owner Preferences screen enables you to record a name,
company name, phone number, or any other information that you
want to associate with your Smartphone.
If you use the Security application to turn off and lock your
Smartphone with a password, information that you put in the
Owner Preferences displays the next time you turn on your
Smartphone. See “Security” for more information.
To enter the Owner preferences:
Enter the text that you want to associate with your Smartphone
in the Owner Preferences screen. If you enter more text than can
fit on one screen, a scroll bar automatically appears on the right
side of the screen.
If you assign a password with the Security application, the
information in the Owner Preferences screen cannot be changed.
In this case, an Unlock button appears at the bottom of the
screen.
To unlock the Owner Preferences screen:
1. Tap Unlock.
2. Enter the password that you defined in the Security
application.
3. Tap OK.