Samsung Electronics Co SCHI300 Dual-Band Analog/PCS Phone (AMPS/CDMA) User Manual
Samsung Electronics Co Ltd Dual-Band Analog/PCS Phone (AMPS/CDMA) Users Manual
Contents
Users Manual Part 3
88 WORKING WITH APPLICATIONS
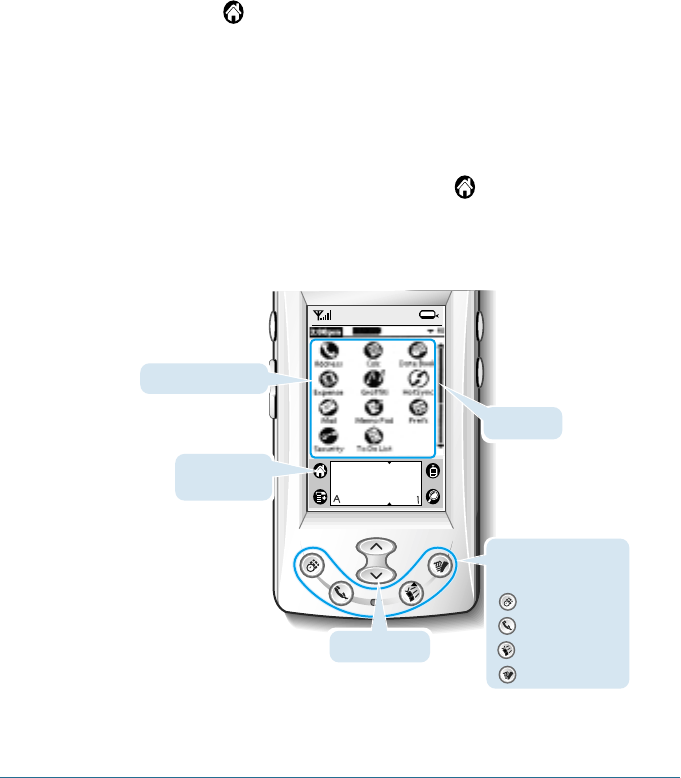
Opening an Application
Choose from the following options:
• Tap to open the Applications Launcher, and then tap the
icon of the application you want to open. If you have many
applications installed on your Smartphone, tap the scroll bar
on the screen or press the scroll buttons or on the front
panel to move between screens.
• Press an application button on the front panel to display the
selected application immediately.
• To switch between applications, tap or press an
application button on the front panel of your Smartphone.
Your Smartphone automatically saves your work in the current
application and displays it when you return to that application.
Applications
Launcher
Application buttons.
Default settings are:
Data Book
Address
To Do
Phone
Scroll buttons
>
>
Scroll bar
Applications icons

WORKING WITH APPLICATIONS 89
4
Displaying Applications by Category
You can put the applications on your Smartphone into categories
so they are easier to see. For example, you could put all the
phone applications into a category called Phone. After assigning
applications to categories, you can choose to look at a single
category or to see all your applications.
1. Tap to open the Applications Launcher.
2. Tap to open the Applications Launcher menus.
3. Tap App, then tap Category.
4. Tap the pick list next to each application to select to a
category.
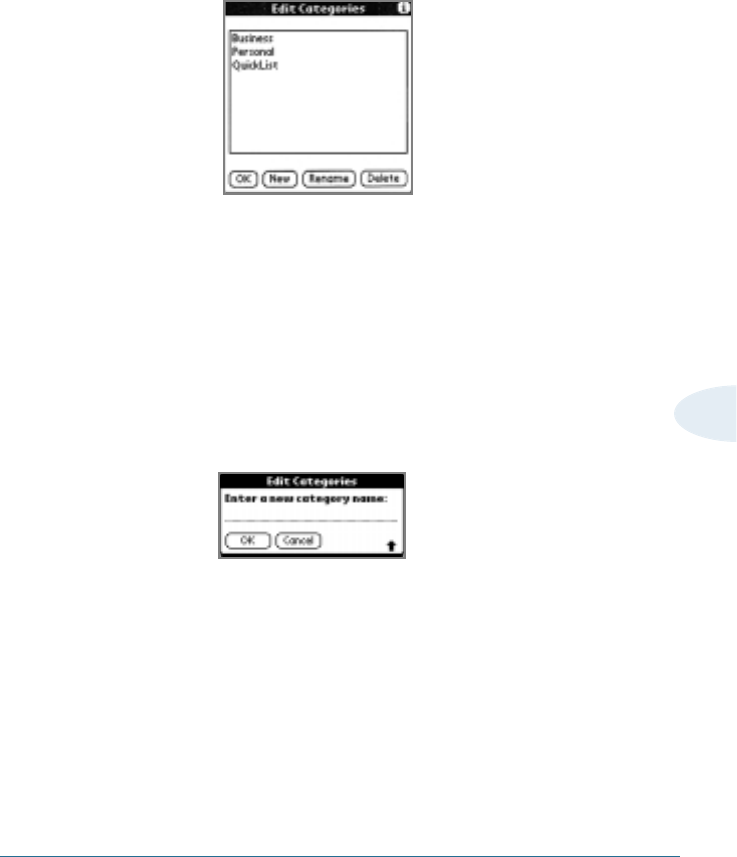
Note: You can create your own categories. Tap Edit Category in the pick
list. In the Edit Categories dialog, tap New and enter the category
name. Tap OK to add the category. Tap OK again to close the
dialog.
5. Tap Done to return to the Applications Launcher.
6. Tap the pick list in the upper-right corner of the screen. From
the pick list, tap the application category you want to see.
You can also tap to scroll through the application
categories.
90 WORKING WITH APPLICATIONS
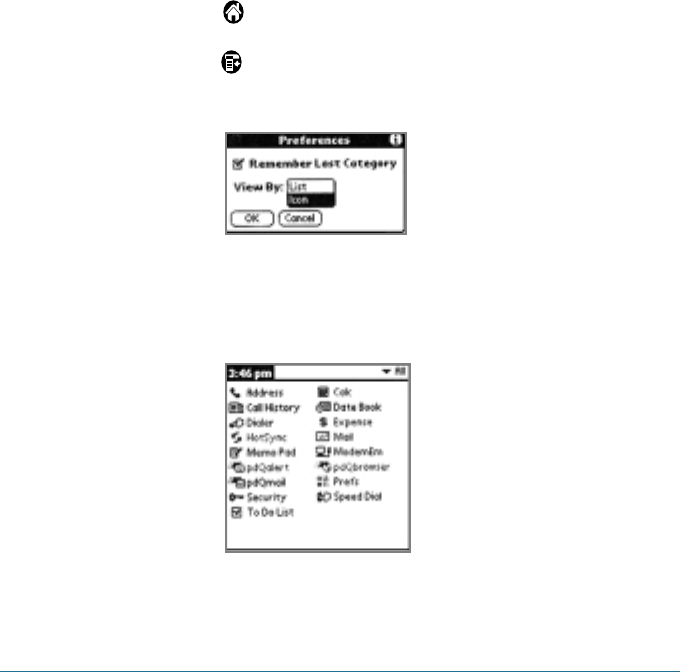
Changing the Applications Launcher Display
By default, the Applications Launcher displays each applications
as an icon. If you prefer, you can display applications as a list of
names.
To change the view of applications:
1. Tap to open the Applications Launcher.
2. Tap to open the Applications Launcher menus.
3. Tap Options, then tap Preferences.
4. In the View By pick list, tap List.
5. Tap OK to display the Applications Launcher in list format.

WORKING WITH APPLICATIONS 91
4
Tip: In addition to displaying applications by icon or list, you can set an
option to display the last-selected category of applications each time
you open the Applications Launcher. To display the last-selected category
of applications, tap Remember Last Category checkbox in the
Preferences dialog box shown at step 3. If you do not select the
Remember Last Category option, all applications are displayed when
you select the Applications Launcher.
Assigning Applications to Buttons
Buttons preferences let you assign different applications to the
Application buttons on the front of the Smartphone, and to the
HotSync button on the cradle and on an optional modem. For
example, if you find that you seldom use the To Do List and often
use Expense, you can assign the To Do List button to start the
Expense application.
You can also change whether the full-screen pen stroke activates
the Graffiti Help application or one of your Smartphone controls
using Buttons preferences.
If you assign a different application to a button, you can still
select the original application using the Applications Launcher.
Changes made in the Buttons Preferences screen or HotSync
Buttons dialog box take effect immediately. For details on
Buttons Preferences, see page xx.
92 WORKING WITH APPLICATIONS
Elements of the Applications Screen
Menu bar A set of commands that are specific to the
application. Not all applications have a menu bar.
Command Tap icons or write a Graffiti shortcut to initiate a
bar command instead of tapping a command in the
menu bar. The icons displayed in the Command
bar very within each application.
Pick list
Scroll bar
Command bar
Previous/next arrows
Check box
Icons
Command buttons
Menu bar

WORKING WITH APPLICATIONS 93
4
Command Tap a button to perform a command. Command
buttons buttons appear in dialog boxes and at the bottom
of application screens.
Icons Tap the icons to open applications, menus,
Calculator, and to find text anywhere in your data.
AWith the cursor in an input field, tap the dot to
activate the alphabetic keyboard.
1With the cursor in an input field, tap the dot to
activate the numeric keyboard.
Check box When a check mark appears in a check box, the
corresponding option is active. If a check box is
empty, tapping it inserts a check mark. If a check
box is checked, tapping it removes the check
mark.
Pick list Tap the arrow to display a list of choices, and
then tap an item in the list to select it.
Scroll bar Drag the slider, or tap the top or bottom arrow, to
scroll the display one line at a time. To scroll to
the previous page, tap the scroll bar just above
the slider. To scroll to the next page, tap the scroll
bar just below the slider.
You can also scroll to the previous and next
pages by pressing the upper and lower portions
of the scroll button on the front panel of the
Smartphone.
Next/ Tap the up and down arrows to display the
previous previous and next page of information; tap the
arrows left and right arrows to display the previous and
next record.
94 WORKING WITH APPLICATIONS
Using Menus
Menus on your Smartphone are easy to use. Once you have
mastered them in one application, you can use them the same
way in all other applications.
The menus of each application are described in the
corresponding application’s chapter, with the exception of the
Edit menu. For information on Edit menu command, see “Using
the Edit Menu” on page xx.
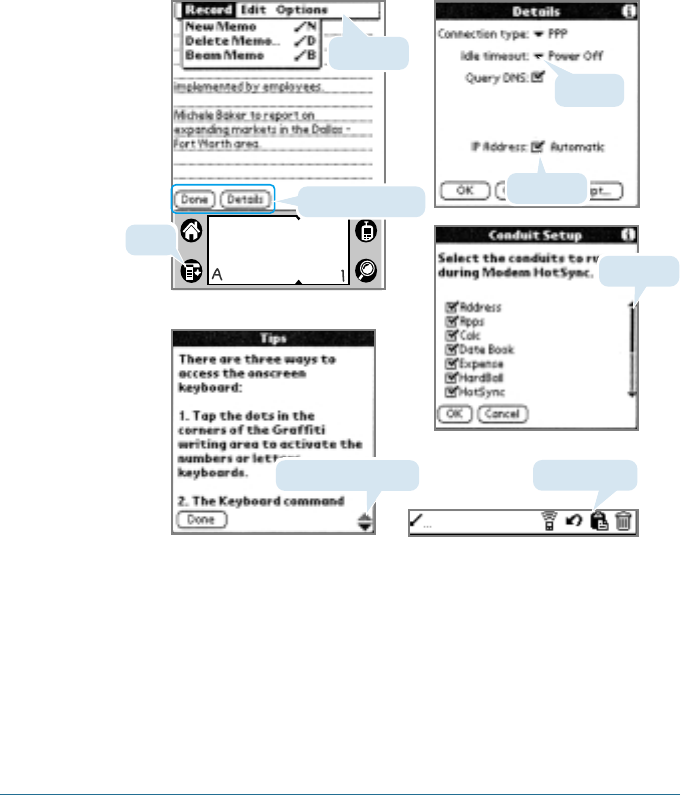
Opening the Menu Bar
1. Open an application (such as Memo Pad).
2. Choose one of the following:
• Tap the Menu icon .
• Tap on the inverted title area at the top of the screen.
Tap the Menu icon
Tap the tile area
➜
➜
WORKING WITH APPLICATIONS 95
4
In this example, three menus are available: Record, Edit, and
Options. The Record menu is selected and contains the
commands New Memo, Delete Memo, and Beam Memo.
Choosing a Menu
After you open the menu bar for an application, tap the menu
that contains the command you want to use.
The menus and menu commands that are available depend on
the application that is currently open. Also, the menus and menu
commands vary depending on which part of the application
you’re currently using. For example, in Memo Pad, the menus are
different for the Memo List screen and the Memo screen.
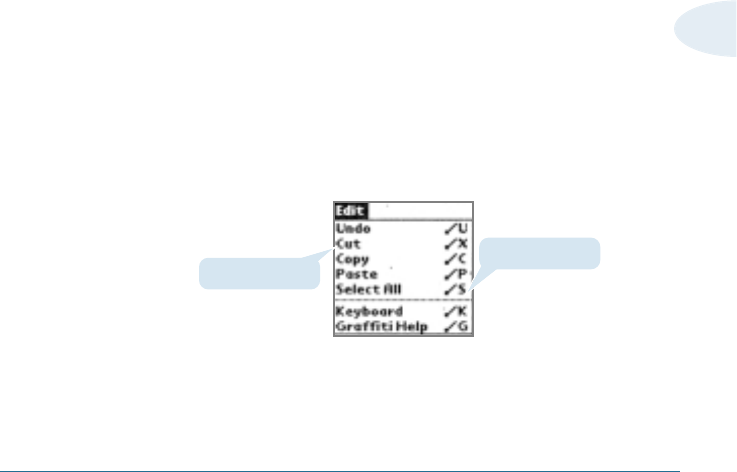
Graffiti Menu Commands
Most menu commands have an equivalent Graffiti Command
stroke, which is similar to the keyboard shortcuts used to execute
commands on computers. The command letters appear to the
right of the command names.
To use the Graffiti menu commands, the menu bar must be
closed.
Command letters
Menu commands
96 WORKING WITH APPLICATIONS
Draw the Command stroke anywhere in the Graffiti area, and
immediately write the corresponding command letter in the
Graffiti letter area. When you draw the Command stroke, the
word “Command” appears just above the Graffiti writing area to
indicate that you are in Command mode.
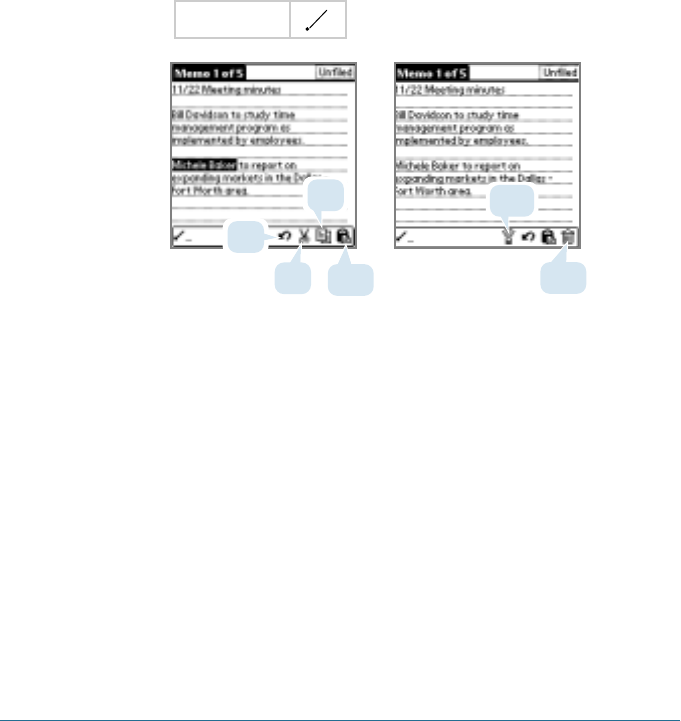
The command toolbar displays context sensitive menu commands
for the current screen. For example, if text is selected the menu
icons displayed may be undo, cut, copy, and paste. Tap on an
icon to select the command, or immediately write the
corresponding command letter for an appropriate command in the
Graffiti writing area.
For example, to choose Select All in the Edit menu, draw the
Command stroke, followed by the letter “s”.
Note: Command mode is active for approximately two seconds, so you must
write the command letter immediately to choose the menu command.
Command
Undo
Copy Beam
Cut Paste Delete

WORKING WITH APPLICATIONS 97
4
Displaying Online Tips
Many of the dialog boxes that appear on your Smartphone
contain an online Tips icon in the upper-right corner. Online tips
anticipate questions you have in a dialog box, provide shortcuts
of using the dialog box, or give you other useful information.
To display an online tip:
1. Tap the Tips icon .
2. After you review the tip, tap Done.
Common Tasks
The tasks described in this section use the term “records” to
refer to an individual item in any of the basic applications: a
single Data Book event, Address Book entry, To Do List item,
Memo Pad memo, or Expense item.
Creating Records
You can use the following procedure to create a new record in
Date Book, Address Book, To Do List, Memo Pad, Mail, SMS, and
Expense.
i
➜
➜
online tip icon

98 WORKING WITH APPLICATIONS
To create a record:
1. Select the application in which you want to create a record.
2. Tap New. In the Date Book only, select start and end times for
your appointment and tap OK.)
3. Enter text for the record.
Note: The Smartphone automatically capitalizes the first letter of each
field (except numeric and e-mail fields).
4. As an option, tap Details to select attributes for the record.
5. In the Address Book and Memo Pad only, tap Done.
Your Smartphone saves the new record automatically.
Editing Records
After you create a record, you can change, delete, or add new
information at any time. When the screen is in edit mode, a
blinking cursor appears within the information, and the
information appears on a dotted gray line called an edit line.
You can enter text in any of the ways described in Chapter 2,
“Entering Data in Your Smartphone.”
Cursor
Edit line
Tentative

WORKING WITH APPLICATIONS 99
4
The Edit menu is available from any screen where you enter or
edit text. As a general rule, the Edit menu commands affect
selected text.
To use the Edit menu:
1. Do one of the following to display the Edit menu:
• Tap the Menu icon in the working application; then tap
the Edit menu to display the commands in the menu.
• Tap on the inverted title area at the top of the screen; then
tap the Edit menu to display the commands in the menu.
• In the text Graffiti area, drag a diagonal line from the lower
left to upper right to display the Command toolbar. To select
a command, either tap the icon representing a command on
the Command toolbar, or draw the Graffiti shortcut in the
text area of your screen.
2. Choose from the following commands, depending on the
application you’re using:
Undo Reverses the last action taken.
Cut Removes a selection from its current location to
memory. You can then paste the text into another
area of the current application or into a different
application.
Copy Copies a selection and moves it to memory. You can
paste the selection into another area of the current
application or into a different application.
Paste Inserts a selection from memory into an area you
select. Paste produces no result if you have not used
the Cut or Copy commands.

100 WORKING WITH APPLICATIONS
Select All Selects all the text in the current record or
screen.
Keyboard Opens the on the screen keyboard. Tap Done
to close the keyboard.
Graffiti Help Opens the Graffiti character stroke screen.
Deleting Records
You can delete records in any of the basic applications.
To delete a record in any of the basic applications:
1. Select the record you want to affect.
2. Do one of the following:
• Tap the Menu icon , open the Record menu, and then
tap the Delete command.
The Delete command differs depending on the application
you’re using, for example, Delete Event appears in the
Record menu while you’re in the Date Book, and Delete Item
appears when you’re using the To Do List.
• Tap on the inverted title area at the top of the screen, open
the Record menu, and then select the desired Delete
command.
• In the Details dialog box of the application, tap Delete, and
then tap OK.
• Delete the text of the record.
Note: In the Date Book, deleting the text of a repeating event deletes
all instances of the event.

WORKING WITH APPLICATIONS 101
4
• In the text Graffiti area, drag a diagonal line from the lower
left to upper right to display the Command toolbar; then tap
the Delete icon or draw a Graffiti ’D’ in the text area.
3. To archive a copy of the deleted file on your PC, select the
Save Archive option. If you choose the archive option, the
record is transferred to the archive file on your PC the next
time you perform a HotSync operation.
4. Tap OK to delete the record.
Purging Records
Over time, as you use Date Book, To Do List, and Expense, you
may accumulate records that are no longer useful. For example,
events that occurred months ago remain in the Date Book, and
completed To Do List items and Expense items remain in the list.
Outdated records take up memory on your Smartphone, so it’s a
good idea to remove them by using Purge. If you think Date Book
or To Do List records might prove useful later, you can purge
them from your Smartphone and save them in an archive file.
Purging is also available in Mail. See Chapter x for more
information. Purging is not available in Address Book or Memo
Pad; delete records from these applications manually.
To purge records:
1. Open the application from which you want to purge records.
Delete icon
A confirmation dialog box appears.

102 WORKING WITH APPLICATIONS
2. Choose from the following options:
• Tap the Menu icon , open the Record menu, and then
tap Purge. A confirmation dialog box appears.
• Tap on the inverted title area at the top of the screen, open
the Record menu, and select Purge.
3. Choose from the following options:
• For the Date Book, select the Delete Events Older Than pick
list and select an option—1 week, 2 weeks, 3 weeks or 1
month.
• For the Date Book or To Do list, select Save Archive Copy on
PC to save a copy of purged records in an archive file on
your desktop. Selecting this option transfers purged records
to an archive file the next time you perform a HotSync
operation. Tap OK.
• For the Expense application, tap a category and tap Purge.
Tap Yes to confirm the deletion, and then tap Done.
Categorizing Records
You can categorize records in the Address Book, To Do List,
Memo Pad, and Expense applications for easy retrieval. (The
Date Book, Mail, and SMS do not have categories.) When you
create a record, it is automatically assigned to the currently
displayed category. For example, if the All category is displayed,
the record is assigned to the Unfiled category. A record can
remain unfiled or it can be assigned to a category at any time.
Each application has a default set of categories:
• The Address Book includes a Business, Personal, and QuickList
category.
WORKING WITH APPLICATIONS 103
4
• The To Do List includes a Business, Personal, and All category.
• The Memo Pad includes a Business, Personal, and All category.
• The Expense application includes a New York, Paris, and All
category.
You can rename or delete the default categories, and you can
create new categories. Each application can have up to 15
categories.
To move a record into a category:
1. Select the record you want to categorize.
2. In Address Book only: Tap Edit.
3. Tap Details.
4. In the Details dialog box, tap the Category pick list, select the
desired category, and then tap OK.
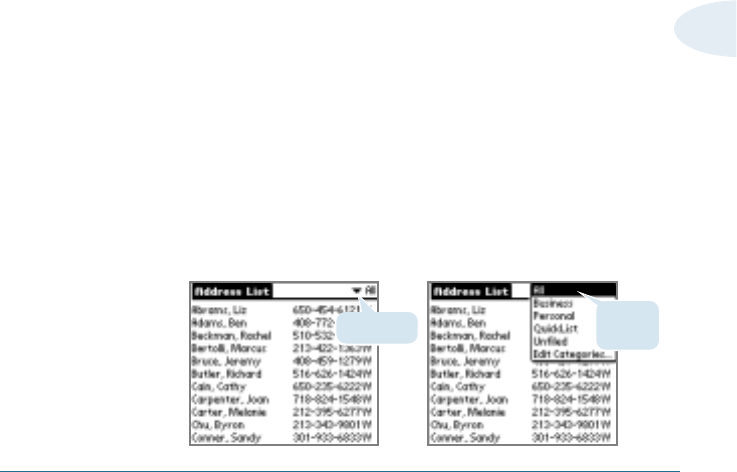
To display a category of records:
1. Open one of the following applications: the Address Book, the
To Do List, the Memo Pad, or the Expense application.
2. Tap the pick list in the upper right corner of the screen; then
tap the category you want to display.
Tap pick list Select a
category
➜
➜
104 WORKING WITH APPLICATIONS
Tip: Pressing the application button on the front panel of that Smartphone
toggles through all the categories assigned to the application,
respectively.
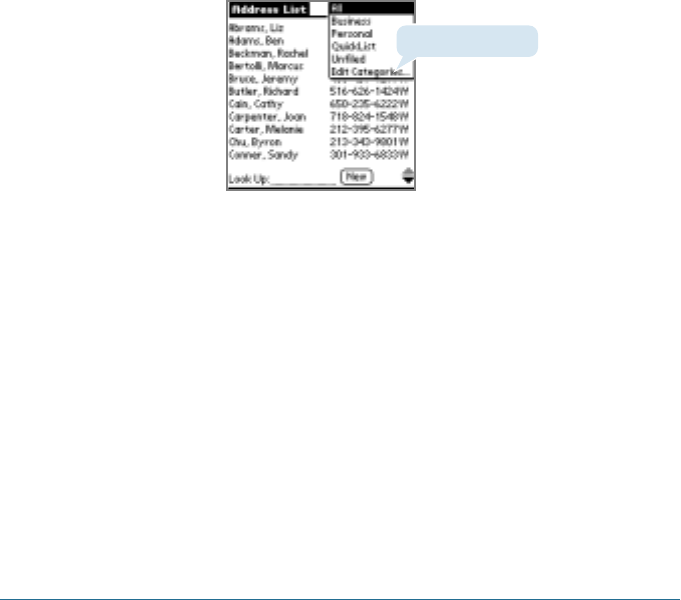
To add or edit application categories:
1. In the Address Book, To Do List, Memo Pad, or Expense
application, choose from the following options:
• Tap the pick list in the upper right corner of the screen, and
tap Edit Categories.
Tap “Edit Categories”.
• In the Address Book, select a record and tap Edit; then tap
Details. In the Category pick list, tap Edit Categories.
• In the Memo Pad and To Do List, select a record from the list,
and tap Details. In the Category pick list, tap Edit Categories.
2. Select any of the following options:
• To create a new category, tap New, and enter a new name in
the Graffiti writing area. Tap OK.
• To rename a category, tap it in the list to select it. Tap Rename,
enter a new name in the Graffiti writing area, and tap OK.
• To delete a category, tap it in the list to select it. Tap Delete.
WORKING WITH APPLICATIONS 105
4
3. Tap OK.
To rename a category:
1. Tap the pick list in the upper right corner of the screen; then tap
Edit Categories.
2. Select the category you want to rename; then tap Rename.
3. Enter the new name for the category, and tap OK.
4. Tap OK to exit the Edit Categories dialog box.
Tip: You can move records from multiple categories into a single category
by renaming all discrete categories with a single category name.

106 WORKING WITH APPLICATIONS
Finding Records
Your Smartphone lets you find information in several ways:
• All applications: Find locates any text that you specify,
always starting with the current application.
• Data Book, To Do List, Memo Pad: Phone Lockup displays
the Address list screen and lets you add the information that
appears in this list to a record.
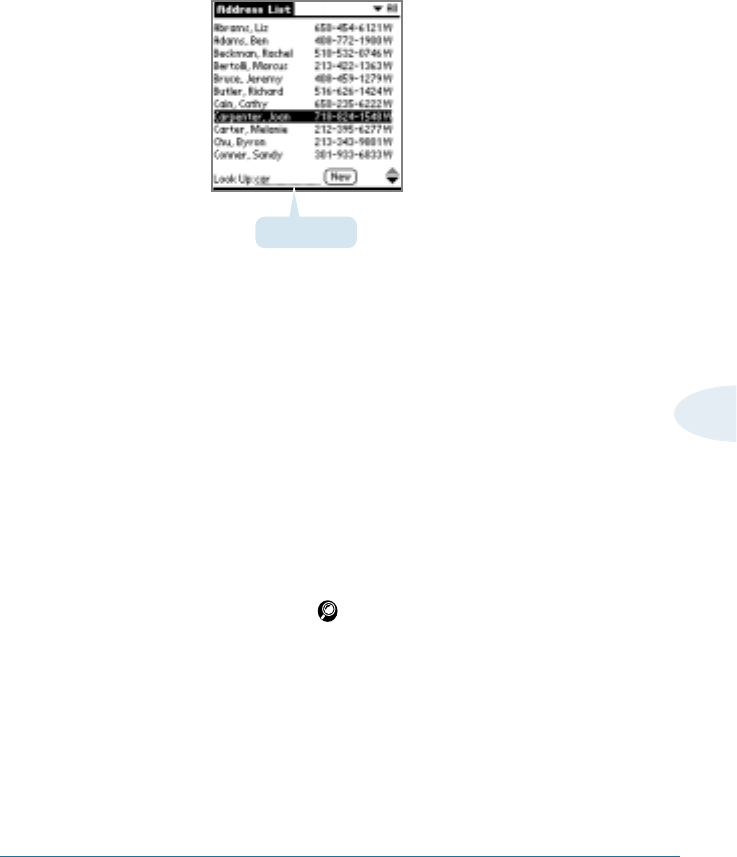
• Address Book: The Look Up line lets you enter the first
letters of a name to scroll immediately to that name.
• Expense: Lookup displays the names in your Address Book
that have data in the Company field. You can add these names
to a list of attendees associated with an Expense record.
• Mail: Lookup displays the e-mail addresses.
Looking up Address Book records
You can look up Address Book records using the scroll button on
the front panel of your device or by typing the first few letters of
a name in the Look Up option at the bottom of the address
screen.
To look up an Address Book record:
1. Do one of the following:
• From the Address screen, enter the first few letters of the
name you want to locate.
WORKING WITH APPLICATIONS 107
4
• Use the scroll button on the front of the device to scroll a
screen at a time. Holding down the scroll button accelerates
scrolling.
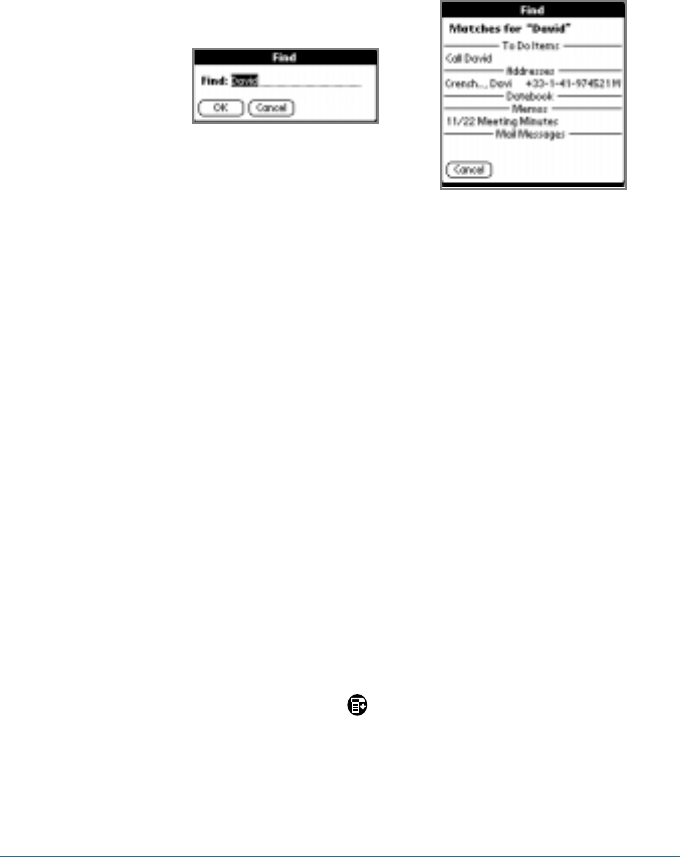
Using the Find option
The Find option lets you locate text in any or all applications. For
example, if the text dog appears in the Address Book and the
Date Book, the Find option displays both occurrences in the Find
dialog box.
To use the Find option:
1. Tap the Find icon .
2. Enter the text you want to find; then tap OK.
Note: Find option is not case sensitive; searching for “davidson” also
finds “Davidson.”
Tip: Select text in an application before tapping Find to automatically
place the text in the Find dialog box. Find searches for the text in all
records and all notes within all applications.
Look Up option
108 WORKING WITH APPLICATIONS
As your Smartphone searches for the text, you can tap Stop to stop the
search at any time. To continue the search after tapping Stop, tap Find
More.
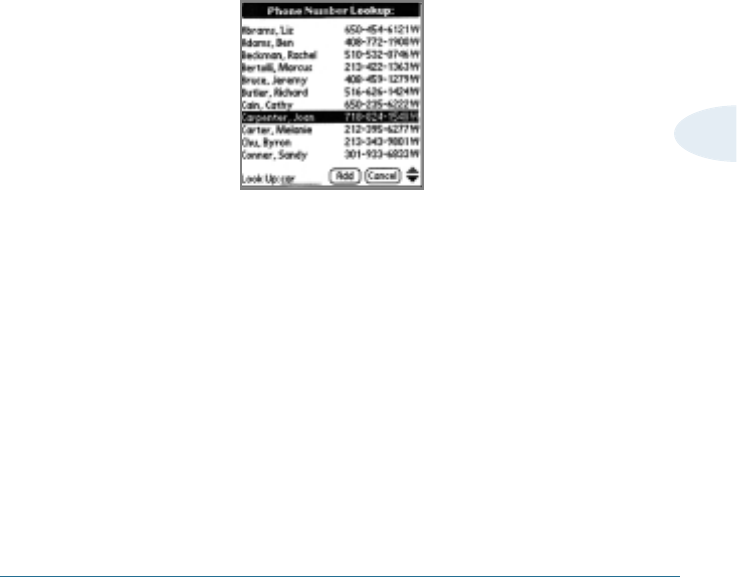
Using Phone Lookup
The Phone Lookup option lets you add a telephone number from
the Address list to an entry in another application. For example,
you can add your dentist’s telephone number to your dental
appointment date in the Date Book.
To use Phone Lookup:
1. Display the record in which you want to insert a phone
number. The record can be in the Date Book, the To Do List, or
the Memo Pad.
2. Do one of the following:
• Tap the Menu icon . Tap Options, and then tap Phone
Lookup.
• Tap the inverted tab at the top of the screen; then tap
Options and tap Phone Lookup.
➜
➜
WORKING WITH APPLICATIONS 109
4
• In the text Graffiti area, drag a diagonal line from the lower
left to upper right to display the Command toolbar. In the
text area, write an L, the shortcut for the Phone Lookup
command.
3. Select a record or write the first few letters of the name you
want to add. The list scrolls to the first record in the list that
starts with the first letter you enter. Continue to spell the
name you’re looking for, or when you see the name, tap it.
4. Tap Add to add the information to the record.
Sorting Records
You can sort lists of records in various ways, depending on the
application. Sorting is available in applications that display
lists—in the Address Book, To Do List, Memo Pad, and Expense.
To sort records in the To Do List and Expense:
1. Open the application to display the list screen.
2. Tap Show.
3. Tap the Sort By pick list, and select an option.
4. Tap OK.
110 WORKING WITH APPLICATIONS
To sort records in the Address Book and Memo Pad:
1. Open the application to display the list screen.
2. Do one of the following:
• Tap the Menu icon . From the Options menu, tap
Preferences.
• Tap the inverted tab at the top of the screen; then tap
Preferences in the Options menu.
• In the text Graffiti area, drag a diagonal line from the lower
left to upper right to display the Command toolbar. In the
text area, write an R, the shortcut for the Preferences
command.
3. In the Preferences dialog box, tap the option you want; then
tap OK to sort the list.
To sort the Memo List manually:
Tap and drag a memo to a new location in the list.
Tip: To display the list of your memos on your computer as you arranged
them manually on your Smartphone, open Memo Pad in Palm Desktop
software, click List By, and select Order on handheld.
Address Book: Memo Pad:
WORKING WITH APPLICATIONS 111
4
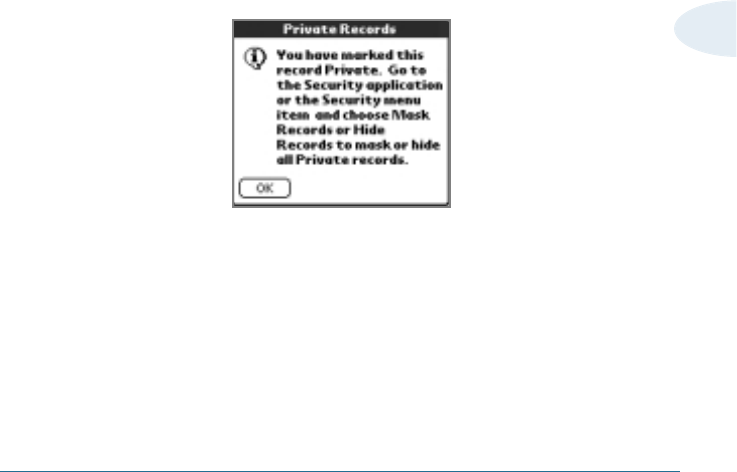
Making Records Private
In all basic applications except Expense, you can make individual
records private. Private records remain visible and accessible,
however, until you select the Security setting to hide all private
records. See “Security” in Chapter x for more information.
To make a record private:
1. In your application, do one of the following:
• Create a new record and tap Edit, and then tap Details.
• Select an existing record, and tap Details.
2. Tap the Private check box. Tap OK.
3. At the alert in the Private Records dialog box, tap OK.
112 WORKING WITH APPLICATIONS
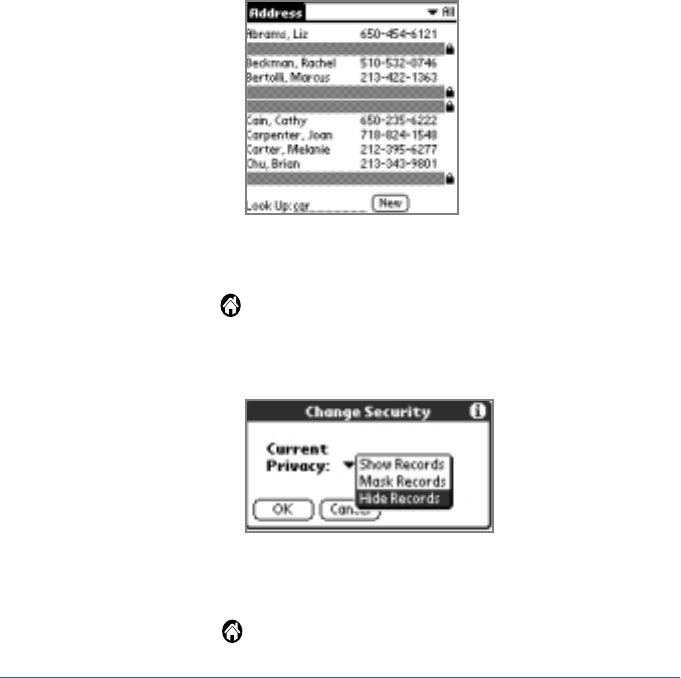
Hiding Private Records
You can hide records that you mark as private. Masked records
appear as gray place holders in the same position they would
appear if they were not masked, and are marked with a lock icon.
If you define a password for your device, you must enter it to
display private records.
To hide private records:
1. Tap to open the Application Launcher, then tap Security.
2. In the Change Security dialog box, in the Current Privacy pick
list, tap Hide Records; then tap OK.
To display private records:
1. Tap to open the Application Launcher, then tap Security.
WORKING WITH APPLICATIONS 113
4
2. From the Current Privacy pick list, tap Show Records; then tap
OK.
If you have assigned a password, you must enter the password
before the hidden records are displayed.
3. Enter your password, and then tap Show.
Attaching Notes
You can attach notes to records in all the basic applications
except the Memo Pad. A note can be up to several thousand
characters long.
To attach a note to a record:
1. Display the entry to which you want to add a note.
2. In Address Book only, tap Edit.
3. Tap Details.
4. Tap Note; then enter the desired note.
5. Tap Done.
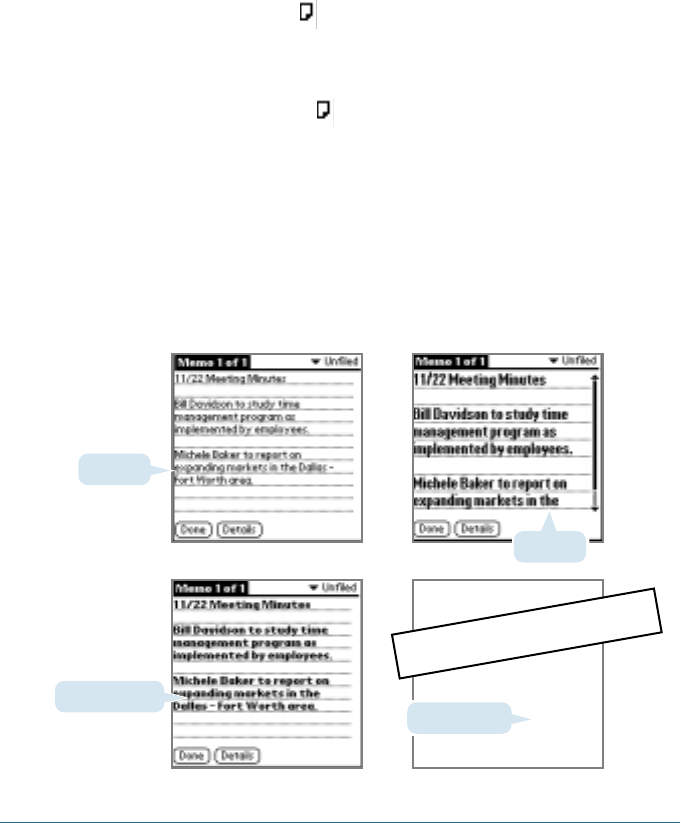
A note icon appears to the right of any item containing a note.
Note icon
114 WORKING WITH APPLICATIONS
To review or edit a note:
Tap the note icon .
To delete a note:
1. Tap the note icon .
2. Tap Delete; then tap Yes to delete the note.
Choosing Fonts
You can change the font style in all basic applications except the
Expense application. You can choose a different font style for
each application.
Small bold font
Small font
Large bold font
Large font
The screen will be inserted

WORKING WITH APPLICATIONS 115
4
To change the font style:
1. Open an application.
2. Do one of the following:
• Tap the Menu icon . From the Options menu, tap Font.
• Tap the inverted tab at the top of the screen; then tap Font
in the Options menu.
• In the text Graffiti area, drag a diagonal line from the lower
left to upper right to display the Command toolbar. In the
text area, write an F, the shortcut for the Font command.
3. Tap the font style you want; then tap OK.
Tap here for large font.
Tap here for bold font.
Tap here for small font.
Getting Information on an Application
You can get information on any application by displaying its
About box. The About box displays the name and version number
of the application.
To display the About box:
1. Tap the Menu icon from any location.
2. In the Options menu, tap About.
The text following the About command differs based on your
location. For example, if you’re in the Date Book, the command
is About Date Book; if you are in the Address Book, the
command is About Address Book.

ADDRESS BOOK 117
Address Book
The Address Book lets you keep names, addresses, telephone
numbers, and other information about your personal or business
contacts.
Use the Address Book to:
• Quickly enter, look up, or duplicate names, addresses, phone
numbers, and other information.
• Enter up to five phone numbers (home, work, fax, car, and so
on) or e-mail addresses for each name.
• Define which phone number appears in the Address List for
each Address Book entry.
• Attach a note to each Address Book entry, in which you can
enter additional information about the entry.
• Assign Address Book entries to categories so that you can
organize and view them in logical groups.
CHAPTER5
5
Address Book
118 ADDRESS BOOK
To open the Address Book:
Press the Address Book button on the front panel of your
Smartphone to open the Address Book and display the list of all
your records.
Note: Press the Address Book button repeatedly to cycle through the
categories in which you have records.
Creating an Address Book Entry
A record in Address Book is called an entry. You can create
entries on your Smartphone, or you can use Palm Desktop
software to create entries on your computer and then download
them to your Smartphone with your next HotSync operation.
Palm Desktop software also has data import capabilities that let
you load database files into the Address Book on your (device
type, lower case).
See “Importing data” on page xx and Palm Desktop online Help
for more information.
Address Book button
ADDRESS BOOK 119
5
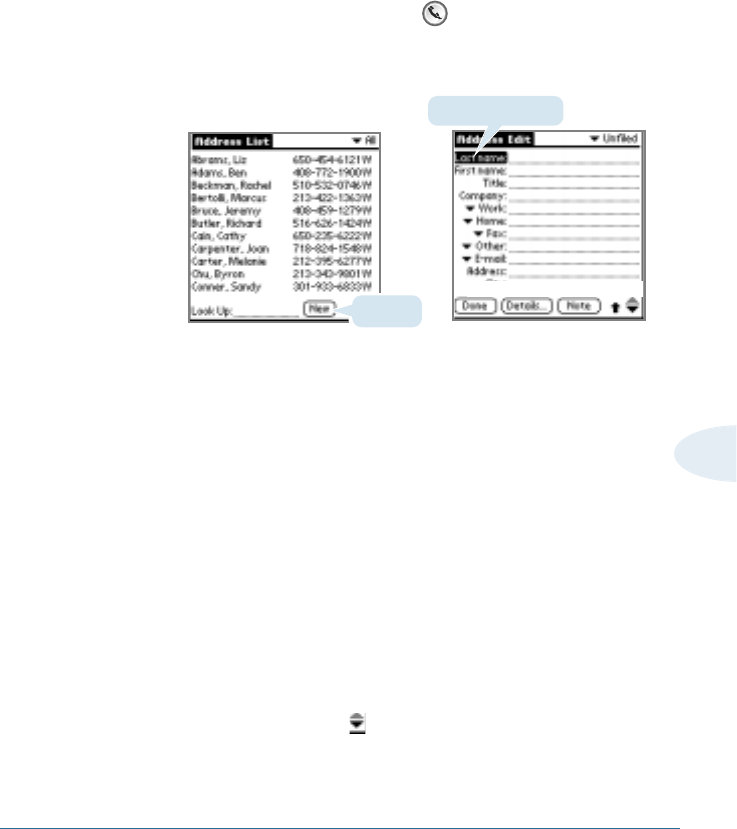
To create a new Address Book entry:
1. Press the Address Book button on the front of your
Smartphone to display the Address List.
2. Tap New.
3. Enter the last name of the person you want to add to your
Address Book.
4. Tap the First Name field to move to it.
You can move to any field by tapping it directly.
5. Enter the individual’s first name in the First Name field.
6. If you want to be able to sort the Address Book by company
name, enter the information you want in the Company field.
7. Enter any other information that you want to include in the
entry.
8. Tap the scroll arrows to move to the next page of
information.
Tap New.
Cursor at Last name

120 ADDRESS BOOK
9. To attach a note to an entry, tap Note. Enter the information
you want in the Graffiti writing area, and then tap Done.
10. When you have finished entering information, tap Done.
Tip: To create an entry that always appears at the top of the Address List,
begin the Last name or Company field with a symbol, as in *If Found
Call.* This entry can contain contact information in case you lose your
Smartphone.
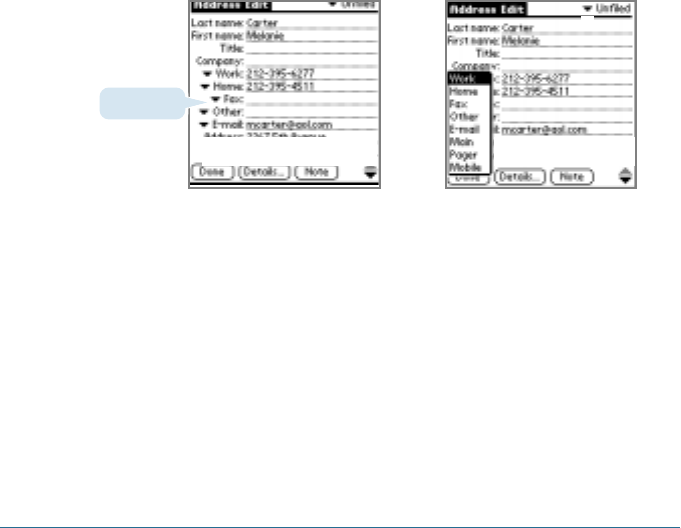
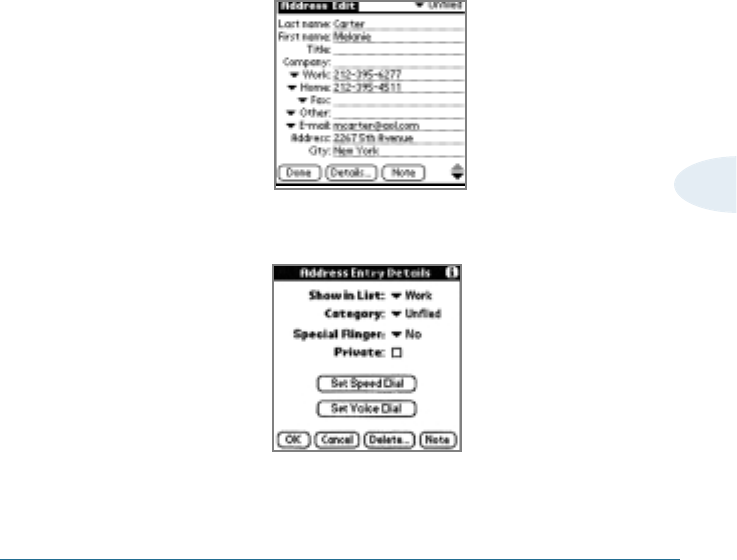
Setting Address Details
When you tap Details in the Address Edit screen, the Address
Details screen opens. The Address Details screen provides a
variety of options that you can associate with the Address entry.
Tap Done.
➜
➜
Tap Details.
ADDRESS BOOK 121
5
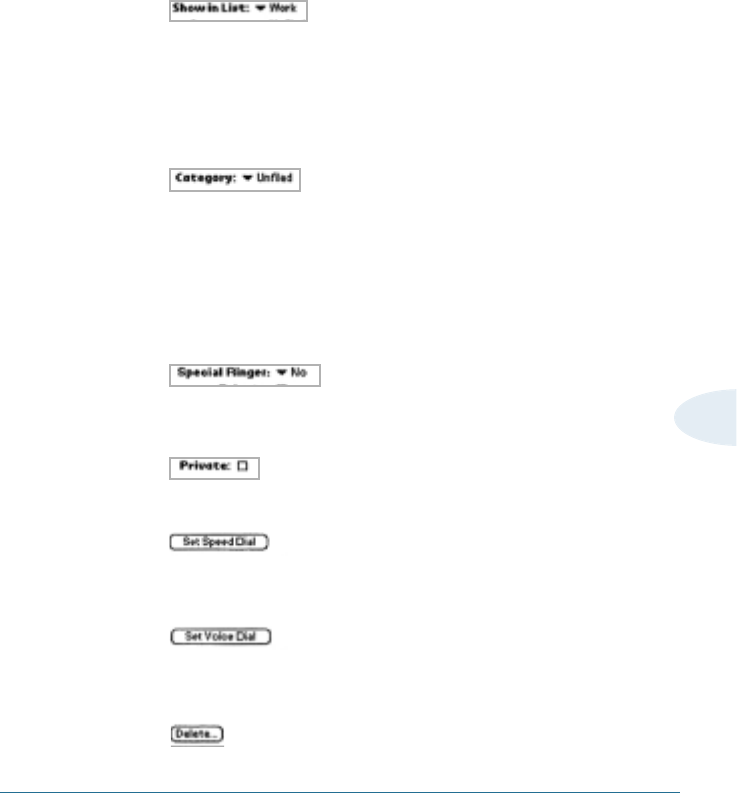
In the Address Entry Details screen, you can set any of the
following settings.
• If you have stored several different numbers (e.g. Work, Home,
Fax, Other, E-mail) in the Address Book entry, you can select
one of them to be displayed on the Address screen. You can
see another phone number by tapping the Show in List pick list
and select the desired number from the pick list.
• Categories can help you file individual Address Book entries
into groups for easy review. To assign a category to an
Address Book entry, tap the category pick list and tap the
category that you want to assign to the Address Book entry.
You can select Personal, Business, Quick List and Unfiled.
If you want to add or rename the categories, see page xx.
• Set a unique ring type for incoming calls from the numbers in
the current entry. Select one from the Special Ring pick list.
• Hide this entry the Security is turned on.
• Set speed dial codes for the numbers in the current entry. For
information on setting speed dial, see page xx.
• Set a voice dial for a selected number. For information on
setting voice dial, see page xx.
• Delete the entry.
122 ADDRESS BOOK
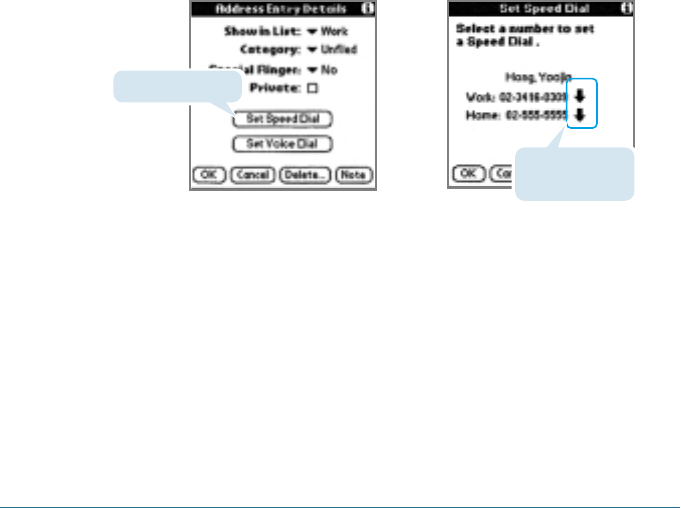
Setting Speed Dial
Speed dialing is a quick way to call frequently used phone
numbers. You can assign a speed dial code to each phone
number. For information on how to make a call using speed dial,
see page xx.
1. When you create or edit the address entry, after you filled in
the fields on the Address Edit screen, tap the Details button.
The Address Entry Details screen opens.
2. Tap the Set Speed Dial button. All the phone number fields for
that entry appear.
3. Select the number to which you want to assign a speed dial by
tapping ◗at the right side of the number.
4. The Speed Dial code table appears. To select the desired
speed code in the table, tap the code.
Speed dial codes that have already been assigned for other
phone numbers have dark backgrounds cannot be selected.
➜
➜
Tap Set Speed Dial.
Tap the pick lists
to select the field.
ADDRESS BOOK 123
5
5. You will find the selected code at the right of the number in
the Set Speed Dial screen.
6. Repeat steps 3 through 5 to set speed code for other numbers,
if necessary.After you finish, tap the OK button to return to the
Address Details screen.
1
_
Tap to see next or
previous numbers screen
by increments of xx.
Tentative
124 ADDRESS BOOK
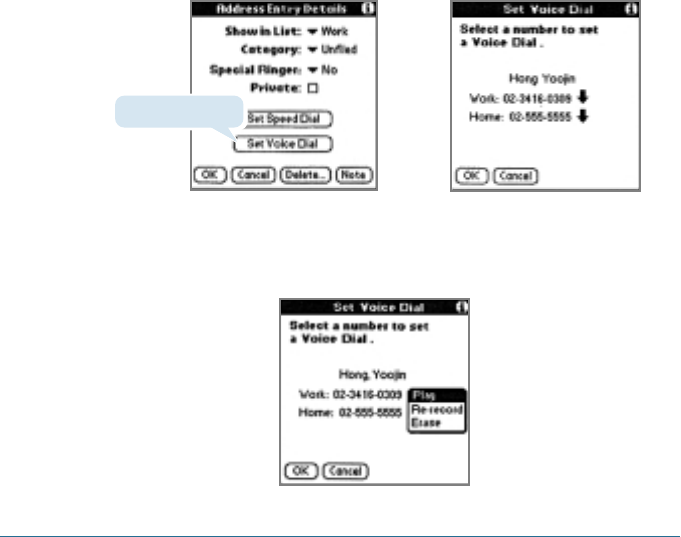
Setting Voice Dial
Voice dialing feature requires that you first set the phone to
recognize the name of the person you are calling. You can add
voice tags for up to 20(???) numbers.
1. When you create or edit the address book entry, after you
filled in the information fields on the Address Edit screen, tap
the Details button. The Address Details screen opens.
2. Tap the Set Voice Dial button. All the phone number fields for
that entry appear.
3. Tap ◗at the right side of the number which you want to add
a voice tag and tap Record from the pick list.
➜
➜
Tap Set Voice Dial.
ADDRESS BOOK 125
5
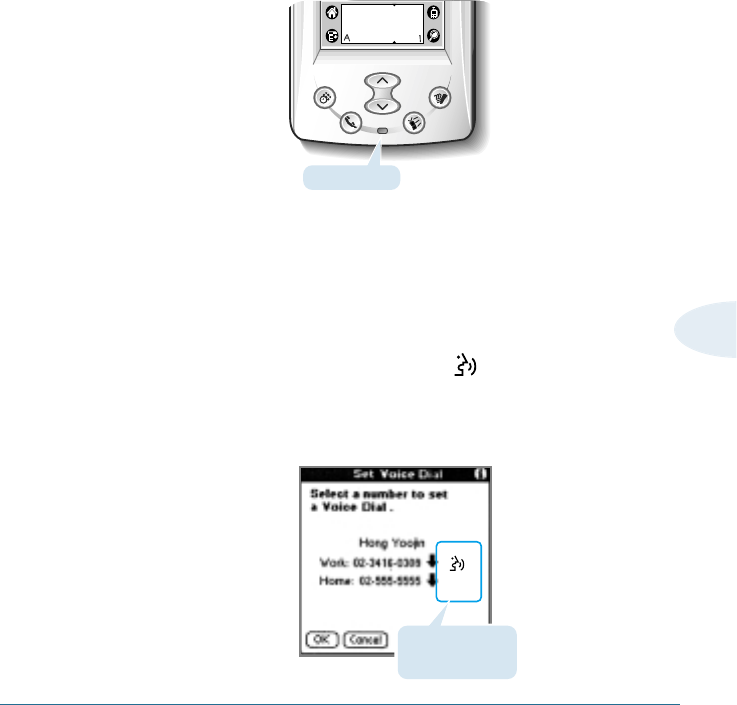
4. The phone will guide you with voice prompt to say the name
you want to record.
5. Say the name you want to record as a voice tag. The phone
stores the name as a first sample, and then prompts to say the
name again.
6. Respond to the prompt by repeating the name. The phone
stores the name as a second sample.
When the name is recorded successfully, you will be guided
with voice prompt and message on the screen.
7. Tap the OK button. You will find the mark at the right side
of the number.
If you want to record other names, repeat steps 3 through 6.
Microphone
Voice tag is added
to the number.
126 ADDRESS BOOK
Tips on recording names
• Avoid recording names phonetically similar. If you record a
similar name to one that is already in memory, the phone
requests another name.
• Avoid recording in a noisy place.
• Speak clearly and naturally.
• The person who will use the phone should record the name.
The phone does not recognize anyone else’s voice.
• Avoid very long or very short names. Names with two to five
syllables are recommended.
• If a voice dial entry does not properly connect, you may need
to record the name again.
Viewing Address Book Entries
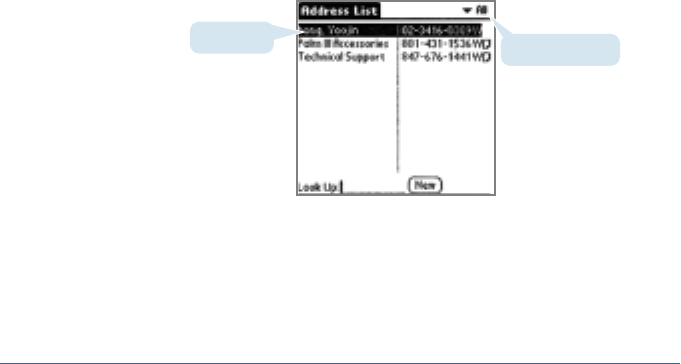
1. Tap the name field of the address entry in the Address list.
After you have assigned categories to your Address entries,
you can easily view the entries by category.
Tap the pick list in the upper-right corner of the screen, then
tap the category you want to view. The Address list now
shows only entries in that category.
Category pick list.
Tap name
ADDRESS BOOK 127
5
2. Tap Done when you have finished viewing the entry.
Note: If you tap the number field of the address entry in the Address list,
you can select the number to dial. Tap the desired number, and then
tap TALK in the phone screen to make a call.
Tap to create new entry
Tap to edit the entry
Tap the phone icon
to dial the number.
To view speed dial list
1. In the Address screen, tap the category pick list in the upper-right
corner and select Speed Dial List from the list.
Category pick list
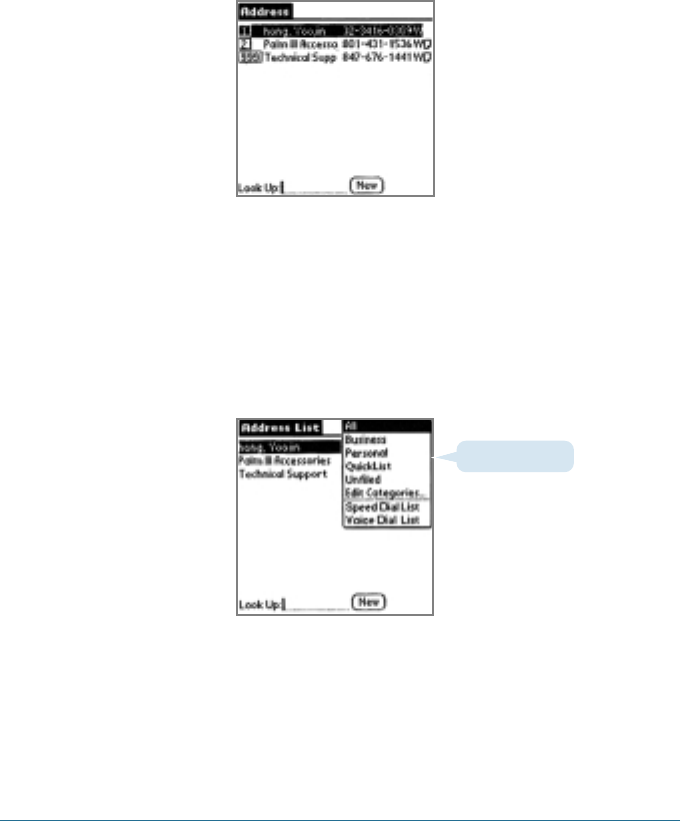
128 ADDRESS BOOK
2. The Address screen shows only the Speed Dial list.
3. Tap the desired entry to open the Address View screen, if
necessary.
To view voice dial list
1. In the Address screen, tap the category pick list in the upper right
corner and select Voice Dial List from the list.
2. The Address screen shows only the Voice Dial list.
Category pick list
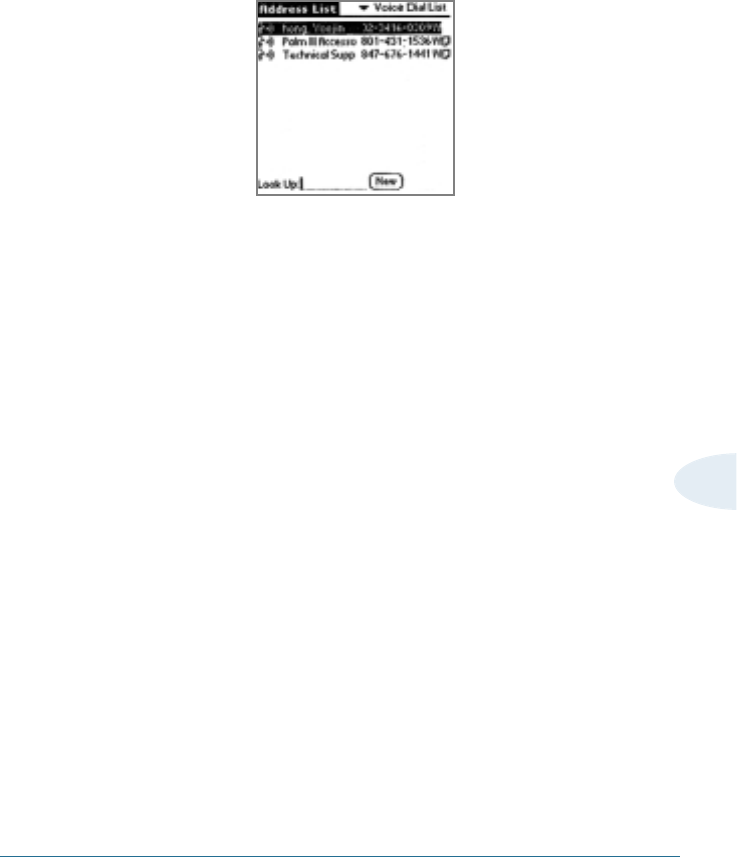
ADDRESS BOOK 129
5
3. Tap the desired entry to open the Address View screen, if
necessary.
Duplicating an Entry
You can duplicate existing entries, which can be helpful when you
want to enter multiple people from a single organization. When you
duplicate an entry, the word Copy appears next to the name in the
First Name field.
To duplicate an entry:
1. From the Address Book, tap a name you want to duplicate.
2. Do one of the following:
• Tap the Address view tab at the top of the screen; then tap
Duplicate Address in the Record menu.
• In the Graffiti text area of your Smartphone screen, drag a
diagonal line from the lower left to upper right to display the
Command toolbar; then write a T in the Graffiti text area to
initiate the Duplicate Address command.
3. Edit the record as necessary.
130 ADDRESS BOOK
Selecting Types of Phone Numbers
You can select the types of phone numbers or e-mail addresses
that an Address Book entry displays. Any changes you make
apply only to the current entry.
To select types of phone numbers:
1. Tap the entry that you want to change in the Address list.
2. Tap Edit.
3. Tap the pick list next to the label you want to change.
4. Select a new label.
Tap triangle. ➜
➜
ADDRESS BOOK 131
5
Editing Address Book Entries
You can change the type of information that appears in the
Address List screen, categorize an entry, and hide an entry for
security reasons. You can also delete entries.
To edit an Address Book entry:
1. Tap the entry that you want to change in the Address list.
2. Tap Edit, and then any field you want to change. Enter or
change information, then tap OK.
3. Tap Details to edit the Address details.

132 ADDRESS BOOK
4. In the Address Entry Details dialog box, select any of the
following settings:
• Tap Show in List, and in the pick list tap which type of
phone or other information you want to appear in the
Address List screen. Options are Work, Home, Fax, Other,
and E-mail.
• Tap Category, and then tap a category in the pick list that
you want to assign to the entry.
• Tap Private to hide the entry when Security is turned on.
• Tap Special Ringer to change the ringer type for incoming
calls from the numbers in the current entry.
• Tap Set Speed Dial to edit the speed dial code.
• Tap Set Voice Dial to play, re-record, or erase the voice tag.
• To attach a note to an entry, tap Note, enter information in
the Graffiti writing area, and tap OK.
• To delete an entry, tap Delete.
5. Tap OK.
ADDRESS BOOK 133
5
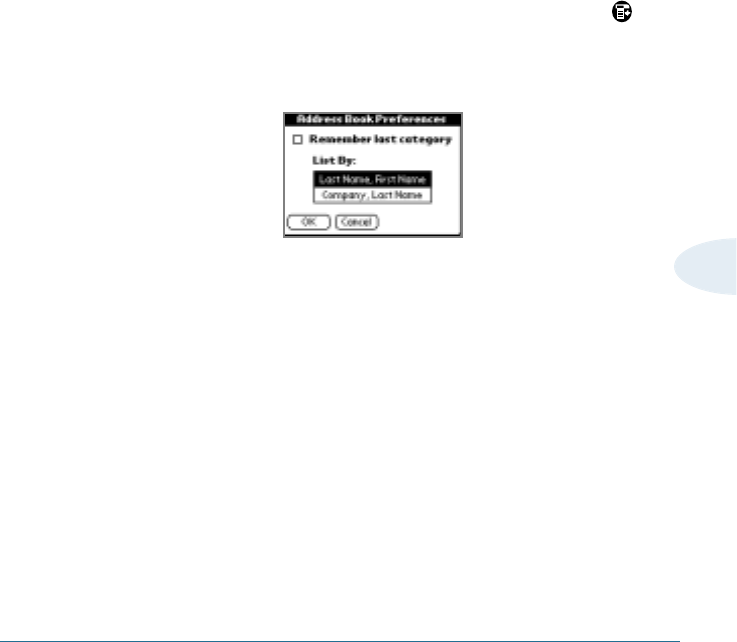
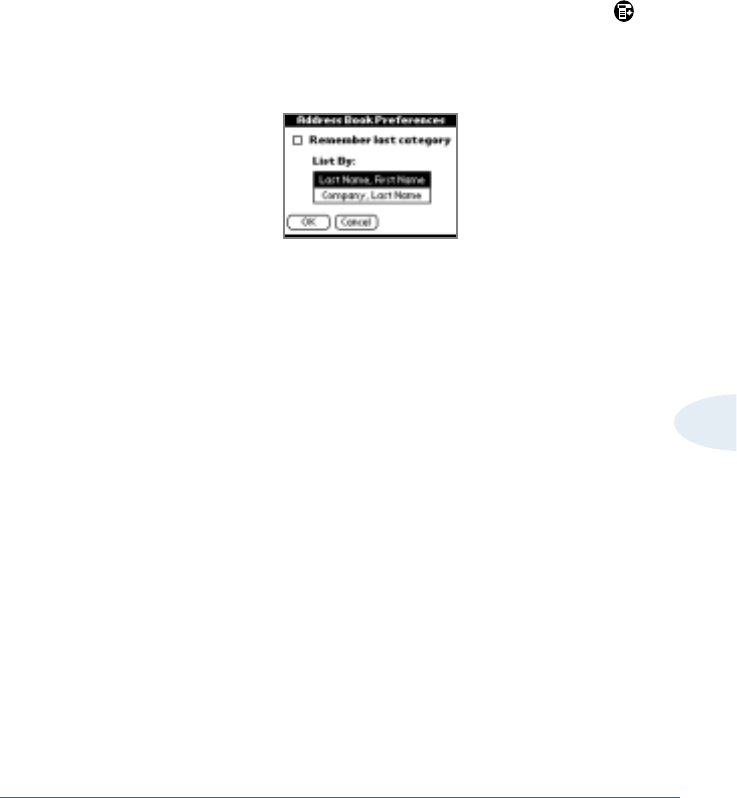
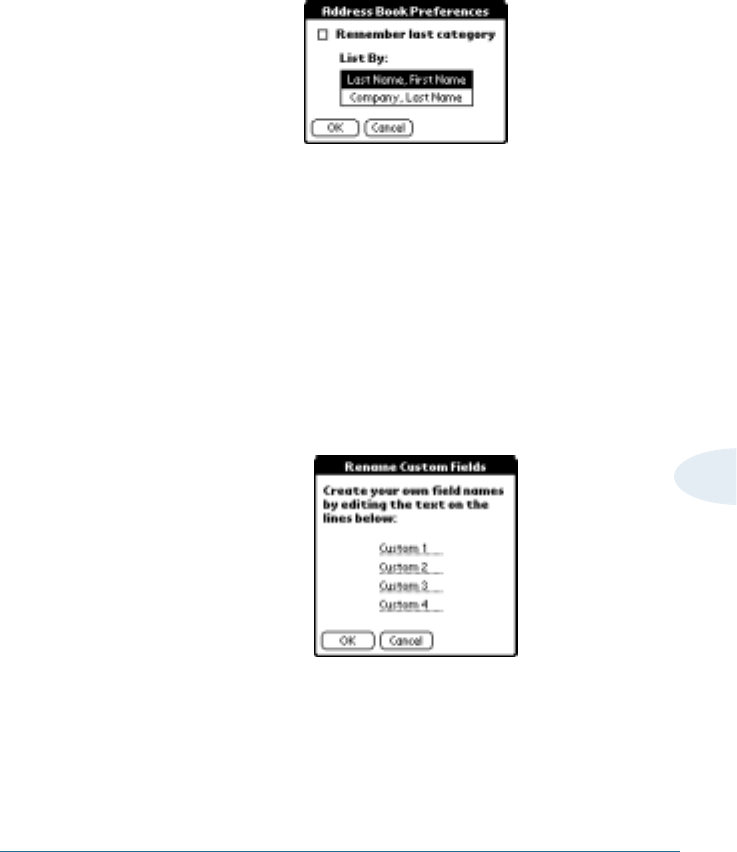
Changing the Address Book Display
You can change how Address Book lists are sorted and you can
add custom fields for entering additional information, using
preferences. You can also have the Address Book display the last
category you selected each time you return to the application.
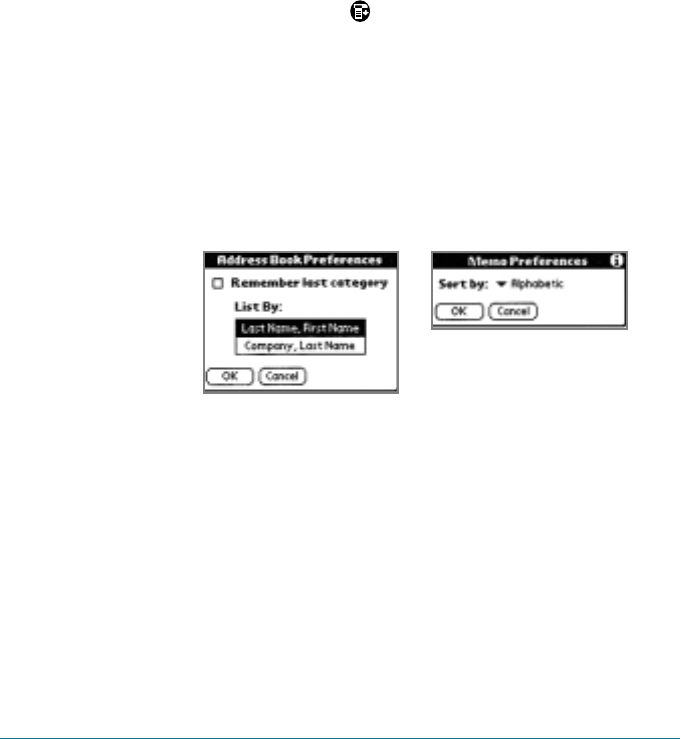
To change how lists are sorted:
1. In the Address list or in Address view, tap the Menu icon
to open the Address Book menus.
2. Tap Options, and then tap Preferences.
3. Choose an option to sort Address Book lists from the List By
pick list:
• Tap Last Name, First Name to sort alphabetically by an
individual’s last name and then first name.
• Tap Company, Last Name to sort alphabetically by the
company name, and then an individual’s last name.
4. Tap OK.
134 ADDRESS BOOK
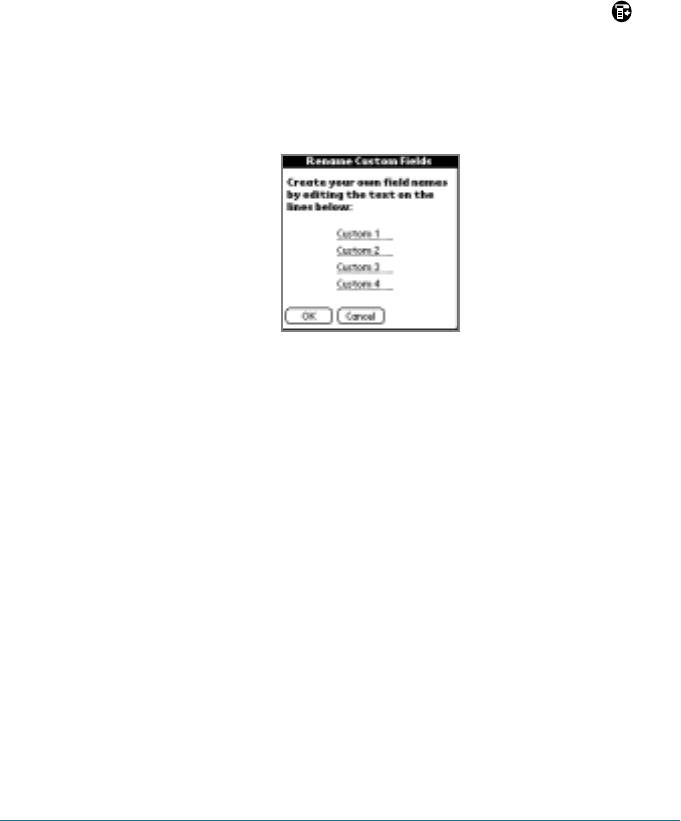
To add custom fields at the end of Address Edit screens:
1. In the Address list or in Address view, tap the Menu icon
to open the Address Book menu.
2. Tap Options, and then tap Preferences.
3. Tap Rename Custom Fields.
4. In the Graffiti writing area, rename the fields to identify the
information you’ll enter in them. The names you give the
custom fields appear in all entries, at the end of the Address
Edit screen.
5. Tap OK in the Rename Custom Fields dialog box.
6. Tap Done.
ADDRESS BOOK 135
5
To control the Address Book display on returning to the
application:
1. In the Address list or in Address view, tap the Menu icon
to open the Address Book menu.
2. Tap Options, and then tap Preferences.
3. In the Address Book Preferences dialog box, select an option:
• To have the Address Book redisplay the last category you
selected on returning to the application, tap the Remember
Last Category check box to select it.
• To have the Address Book display the All category on
returning to the application, tap the Remember Last
Category check box to clear it.
4. Tap OK.
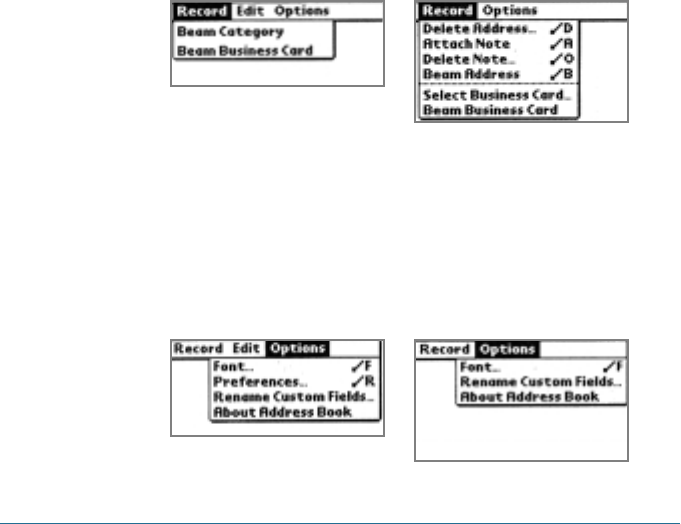
Address Book Menus
Address Book menus are shown here for your reference, and
Address Book features that are not explained elsewhere in this
book are described here.
See “Using Menus” in Chapter x for information about choosing
menus commands.
The Record and Options menus differ depending on whether
you’re displaying the Address screen or the Address View screen.
Record menus
Duplicate Makes a copy of the current record and displays the
Address copy in Address Edit so you can make changes to
the copied record. The copy has the same category
and attached notes as the original record.
Options menus
136 ADDRESS BOOK
#Address list
#Address View
#Address list
#Address View
Preferences
• Remember last category. Determines how
Address Book appears when you return to it
from another application. If you select this
check box, Address Book shows the last
category you selected. If you clear it,
Address Book displays the All category.
Rename These custom fields appear at the end of the
Custom Fields Address Edit screen. Rename them to identify
the kind of information you enter in them.
The names you give the custom fields appear
in all entries.
About Address Shows version information for Address
Book Book.
ADDRESS BOOK 137
5

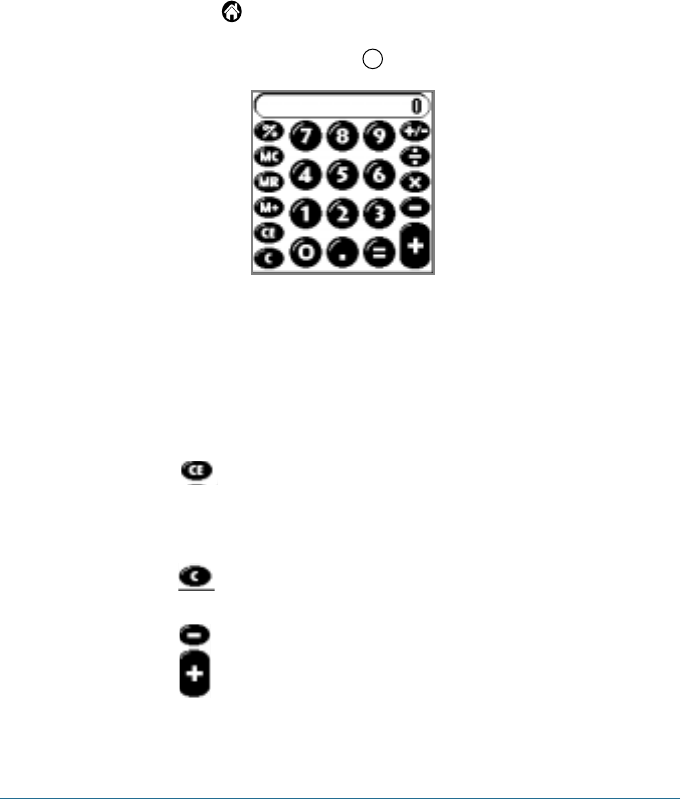
CALCULATOR 139
Calculator
The Calculator lets you perform general mathematical functions,
such as addition, subtraction, multiplication, and division.
Use the Calculator to:
• Perform basic calculations.
• Store and retrieve values.
• Display the last series of calculations, which is useful for
confirming a series of “chain” calculations.
CHAPTER6
6
Calc
140 CALCULATOR
Opening the Calculator
1. Tap to open the Application Launcher.
2. Tap the Calculator icon .
Using the Calculator Buttons
The Calculator includes several buttons to help you perform
calculations.
Clears the last number you entered. Use this button if
you make a mistake while entering a number in the
middle of a calculation. This button enables you to re-
enter the number without starting the calculation over.
Clears the entire calculation and enables you to begin a
fresh calculation.
Toggles the current number between a negative and
positive value. If you want to enter a negative number,
enter the number first and then press the +/- button.