Samsung Electronics Co SCHI300 Dual-Band Analog/PCS Phone (AMPS/CDMA) User Manual
Samsung Electronics Co Ltd Dual-Band Analog/PCS Phone (AMPS/CDMA) Users Manual
Contents
Users Manual Part 4
CALCULATOR 141
6
Places the current number in memory. Each new number
you enter with the M+ button is added to the total stored
in memory. The number that you add can be either a
calculated value or any number you enter by pressing the
number buttons. Pressing this button has no effect on the
current calculation (or series of calculations); it merely
places the value into memory until it is recalled.
Recalls the stored value from memory and inserts it in
the current calculation.
Clears any value that is stored in the Calculator memory.
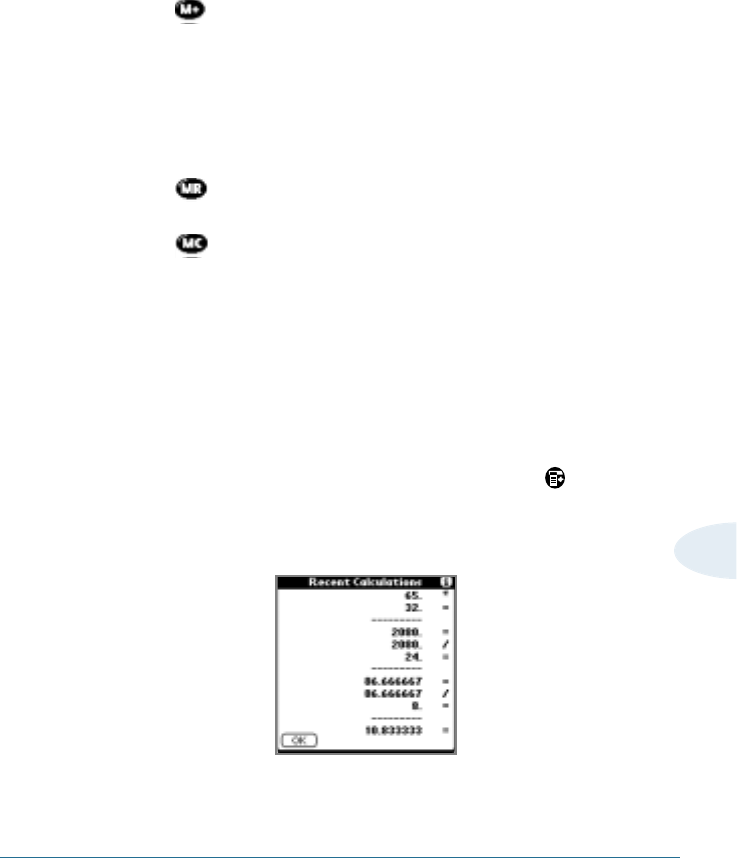
Displaying Recent Calculations
The Recent Calculations command lets you review the last series
of calculations and helps you confirm a chain of calculations.
To display recent calculations:
1. In the Calculator application, tap the Menu icon to open
the Calculator menus.
2. Tap Options, and then tap recent Calculations.
3. When you have finished reviewing the calculations, tap OK.

DATE BOOK 143
Date Book
The Date Book lets you quickly and easily schedule appointments
or any activity associated with a date or date and time. When
you open the Date Book, the current date and a list of times for a
standard business day are displayed.
Use the Date Book to:
• Schedule events: timed events, which have both times and
dates; untimed events, for example, birthdays or anniversaries;
repeating events, such as a weekly meeting held on the same
day at the same time; continuous events, such as a vacation or
three-day conference; and all day events, which reflect the
default hours of a day as set by the user.
• Display your schedule in different ways: by Day, Week, Month,
or Agenda view.
• Set an alarm to sound minutes, hours, or days before a
scheduled appointment.
• Attach notes to events to describe or clarify Date Book entries.
• Rearrange or delete events from your schedule.
CHAPTER7
7
144 DATE BOOK
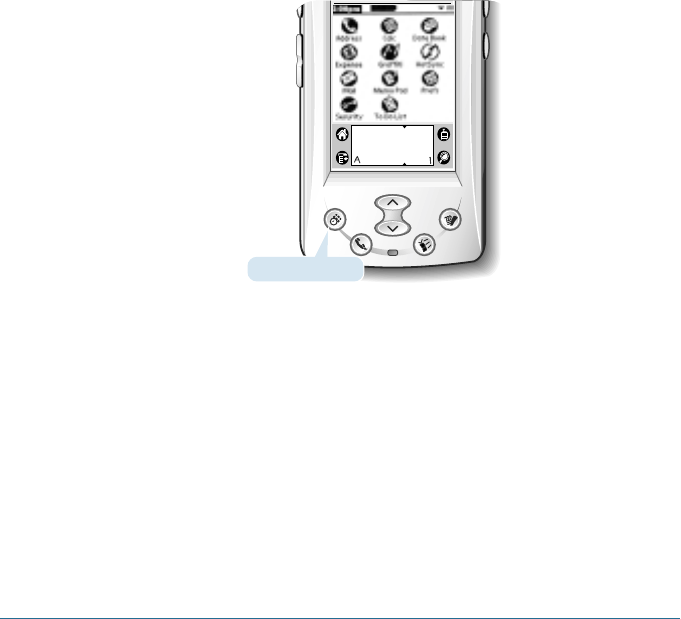
Opening the Date Book
Press the Date Book button on your Smartphone to open the Date
Book to today’s schedule. The date is displayed at the top right of
the screen.
Note: Press the Date Book button repeatedly to cycle through the Day,
Week, Month, and Agenda views. The Date Book views are displayed
at the bottom left of the screen.
You can also open the Data Book application by tapping the Date
Book icon in the Application Launcher.
Date Book button

DATE BOOK 145
7
Scheduling Events
An entry in the Date Book is called an event. When you schedule
an event, its description appears on the time line, and its
duration is set to 1 hour by default. You can easily change the
start time and duration for any event. You can schedule the
following types of events in the Date Book:
• Timed events, such as meetings, that have a specific date and
a specific start and end time.
• Untimed events, such as birthdays, holidays, and anniversaries.
These events occur on a particular date but have no specific
start or end times; they appear at the top of the list of times
marked with a diamond. You can schedule more than one
untimed event on the same date.
• Repeating events, such as a weekly meeting that is held on
the same day at the same time each week.
• Continuous events, such as a vacation or three-day conference.
• All day events, which reflect the default length of the day as
set by the user.
Scheduling Timed Events
You can schedule timed events for the current date or for future
dates.
To schedule a event for the current date:
1. Press the Date Book button on your Smartphone to open
the Date Book to today’s schedule.
The current date and a list of times for a normal business day
are displayed in Day view.
146 DATE BOOK
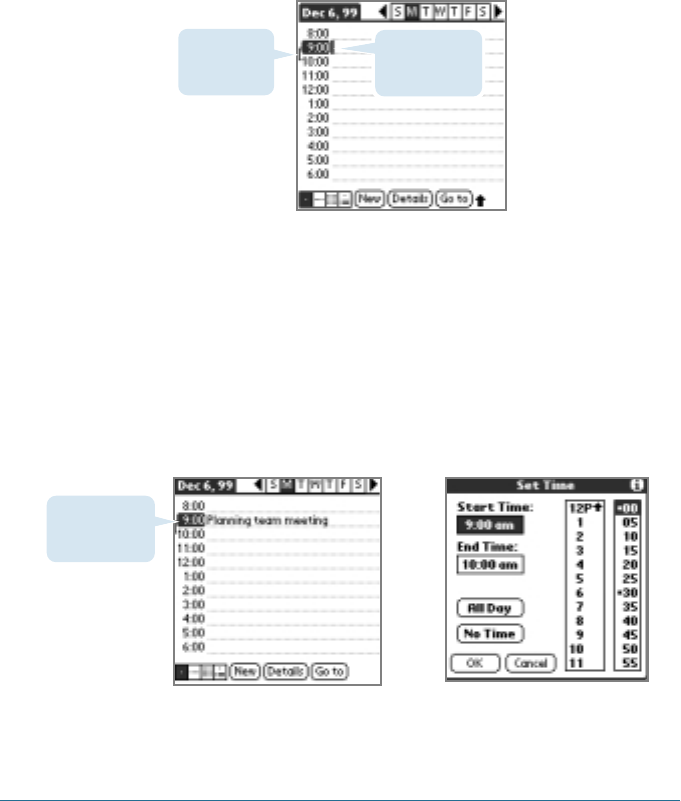
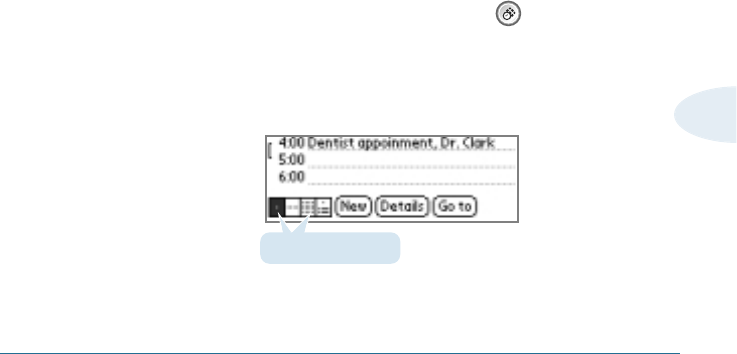
2. With the current day selected, tap the line next to the time
that corresponds to the start of the event.
3. Enter a description of the event, up to 255 characters in
length.
4. Set the event’s duration:
• If the event is 1-hour long, tap OK, and skip to the end of
this procedure.
• If the event is longer or shorter than an hour, tap directly on
the time to open the Set Time dialog box.
Tip: You can open the Set Time dialog box (to select a start time) by
making sure no event is selected, and then writing a number on the
number side of the Graffiti writing area.
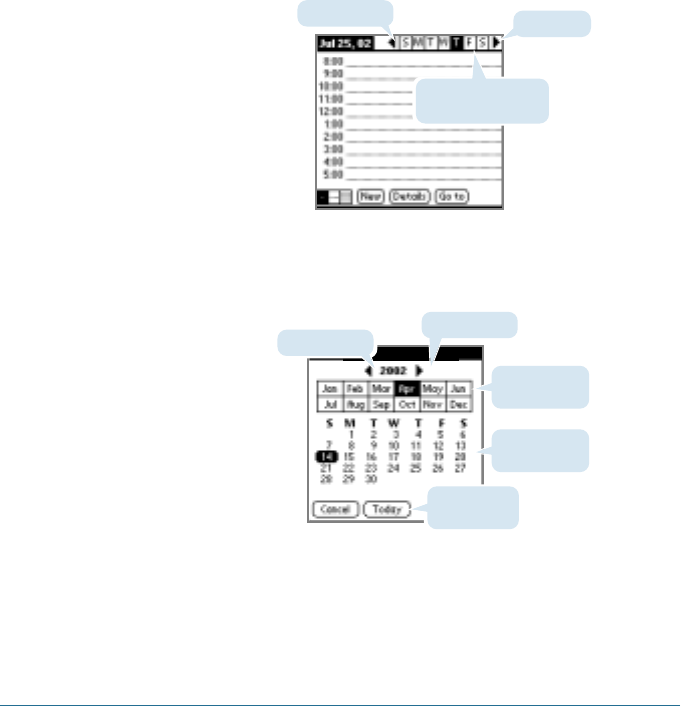
Time bar
shows default
duration.
Tap the time to
display the Set
Time dialog box.
Tap a line next
to desired time;
then enter text.
➜
➜
DATE BOOK 147
7
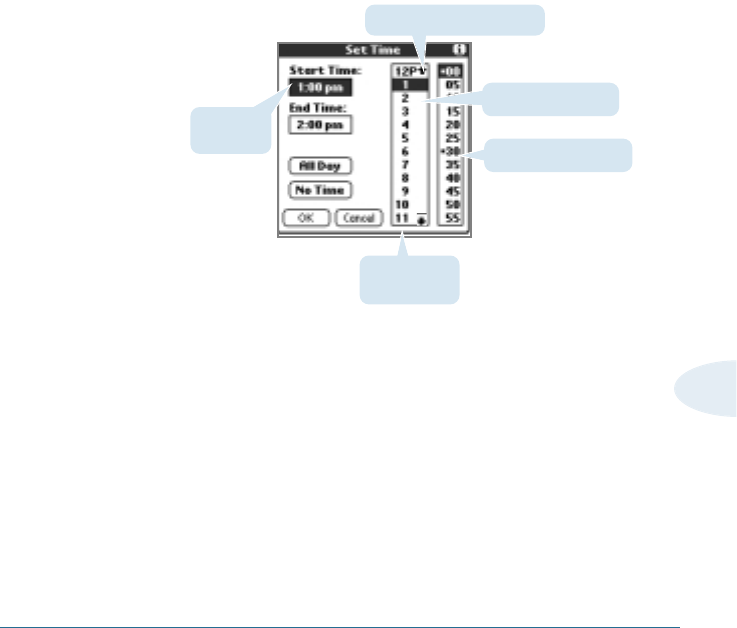
5. Set the duration of the event in either of the following ways:
• Tap the time columns in the Set Time dialog box to set the
Start Time; Tap End Time; then tap the time columns to set
the End Time.
• Tap All Day if the event lasts all day. (The default hours of a
standard business day are set by the user, and may be
changed using the Preference command in the Date Book
application.)
6. Tap OK.
Tap to scroll to earlier hour.
Tap to change minutes.
Tap to change hours.
Tap to scroll
to later hours.
Start Time
highlighted
148 DATE BOOK
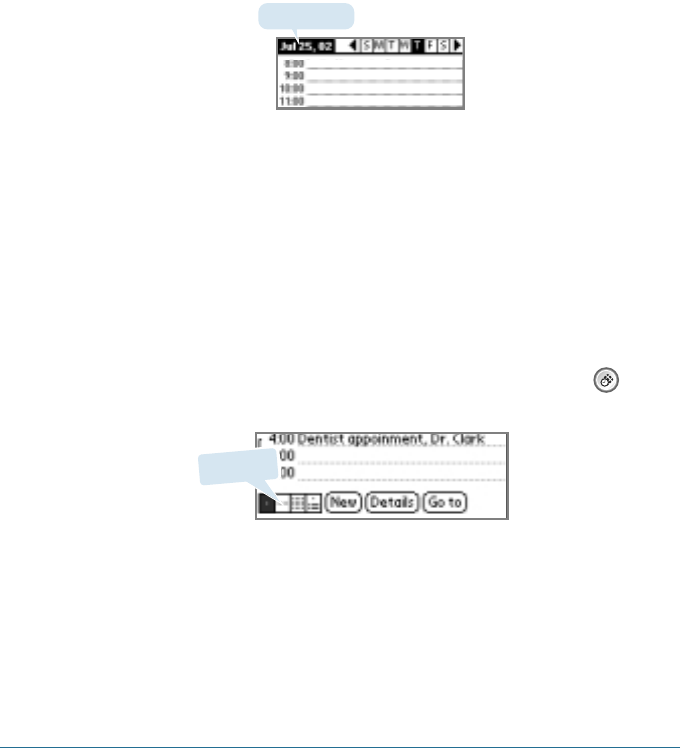
To schedule a timed event for another date:
1. Select the date you want in one of the following ways:
• Tap the desired day of the week in the date bar at the top of
the screen. If necessary, tap the Previous week or Next
week scroll arrows to move to another week.
• Tap Go To at the bottom of the screen to open the Go to
Date dialog box. Select a date by tapping a year, month, and
day in the calendar.
2. After locating the desired date, follow the steps for scheduling
an event for the current day.
Previous week
Tap to select the day
of the current week
Next week
Go to Date
Previous year Previous year
Tap to scroll to
earlier hours
Tap to scroll to
earlier hours
Tap to select
current date

DATE BOOK 149
7
Adding Address Book Information to an Event
You can add a name, address, and telephone number to an event
using the Phone Lookup option. For instructions, see “Phone
Lookup” in Chapter x, Common Tasks.”
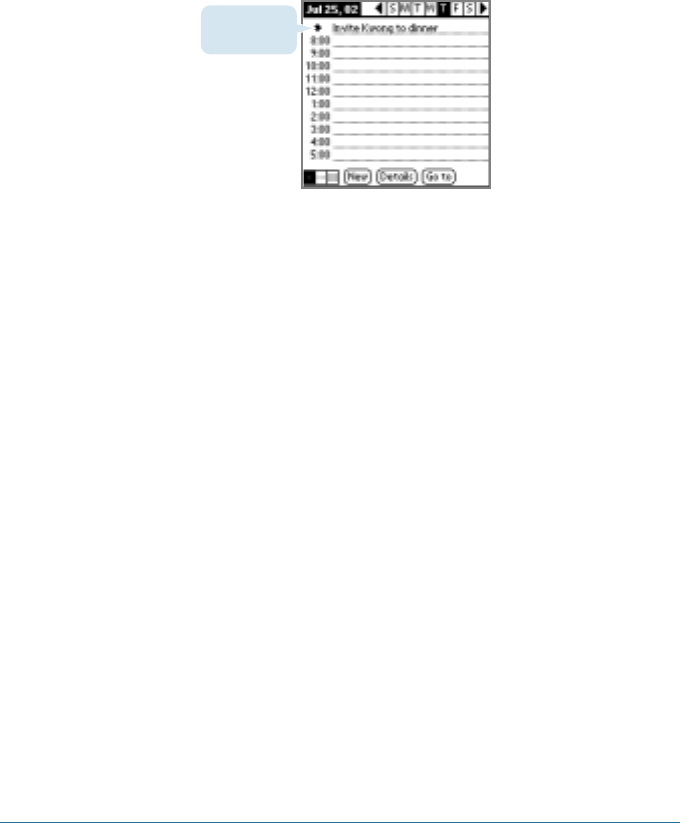
Scheduling Untimed Events
You can schedule untimed events for any date. Untimed events
appear at the top of the list of times marked with a diamond.
To schedule an untimed event:
1. Select the event date you want, as described in the previous
procedure, “To schedule a timed event for another date.”
2. Tap New.
3. In the Set Time dialog box, tap OK. Do not enter a start or end
time.
Tip: You can create a new untimed event by making sure no event is
selected and then writing letters in the Graffiti writing area. When you
start writing, the untimed event appears at the top of the screen
150 DATE BOOK
4. Enter a description of the event.
5. Tap a blank area on the screen to deselect the untimed event.
Note: If you create a timed event and later want to make it an untimed
event, tap directly on the event time on the Date Book screen;
then tap No Time and tap OK.
Scheduling Repeating or Continuous Events
The Repeat function lets you schedule events that recur at
regular intervals or extend over a period of consecutive days.
Repeating events include a birthday and a weekly guitar lesson
that falls on the same day of the week and the same time of day.
Continuous events might include a business trip or a vacation.
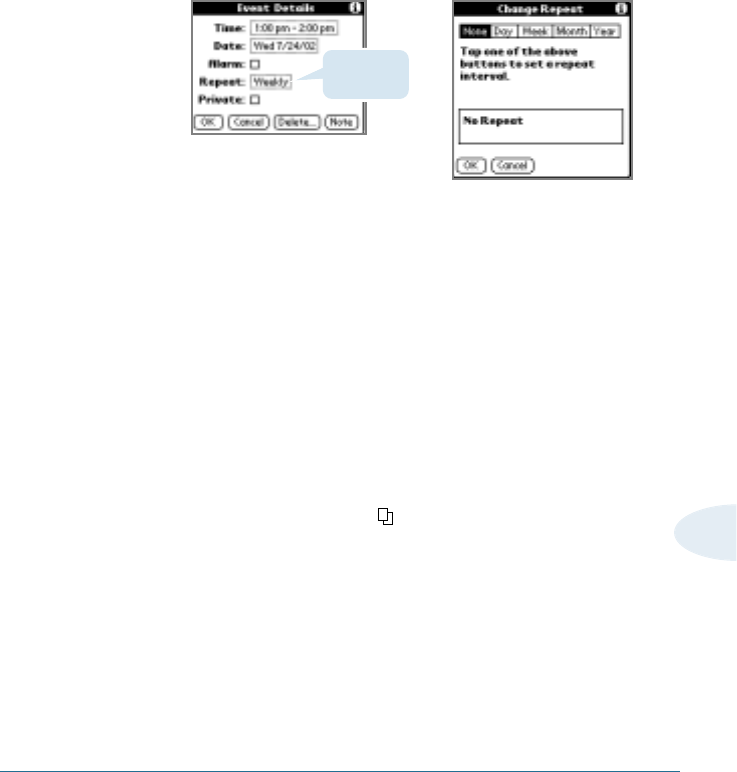
To schedule a repeating or continuous event:
1. Tap the event (Be sure to tap the event and not the time next
to the event.). Typically, a continuous event is an untimed
event.
New untimed
event
DATE BOOK 151
7
2. Tap Details.
3. Tap the Repeat box to open the Change Repeat dialog box.
4. Tap Day, Week, Month, or Year to set how often the event
repeats. For a continuous event, tap Day.
5. Enter a number that corresponds to how often you want the
event to repeat on the Every line. For example, if you select
Month and enter the number 2, the event repeats every other
month.
6. To set an end date for the repeating or continuous event, tap
the End On pick list and tap Choose Date. Use the date picker
to select an end date.
7. Tap OK. The Repeat icon that represents a repeating event
appears to the far right on the event line.
Tap the
Repeat box.
➜
➜

152 DATE BOOK
About Scheduling Repeating or Continuous Events
Keep the following in mind when scheduling repeating or
continuous events:
• If you change the start date of a repeating event, your
Smartphone calculates the number of days you moved the
event. Your Smartphone then automatically changes the end
date to maintain the duration of the repeating event.
• If you change the repeat interval (e.g., daily to weekly) of a
repeating event, past occurrences (prior to the day on which
you change the setting) are not changed, and your Smartphone
creates a new repeating event.
• If you change the date of an occurrence of a repeating event
(e.g., from January 14 to January 15) and apply the change to
all occurrences, the new date becomes the start date of the
repeating event. Your Smartphone adjusts the end date to
maintain the duration of the event.
• If you change other repeat settings (for example, time, alarm,
private) of a repeating event and apply the change to all
occurrences, your Smartphone creates a new event. The start
date of this new event is the day on which the setting is
changed. Past occurrences (prior to the day of the change) are
not changed.
• If you apply a change to a single occurrence of a repeating
event (e.g., time), that occurrence no longer shows the Repeat
icon .

DATE BOOK 153
7
Rescheduling Events
You reschedule events using the Details option in the Date Book.
You can also use the Details option to convert untimed events
into timed events.
To reschedule an event:
1. Tap the event you want to reschedule.
2. Tap Details.
3. To change the time, tap the Time box, select a new time, and
then tap OK.
4. To change the date, tap the Date box, select a new date, and
then tap OK.

154 DATE BOOK
Setting the Alarm
The Alarm setting lets you set an audible alarm for events in your
Date Book, and display a reminder message on-screen. For
untimed events, only the reminder message appears.
Setting an Alarm for an Event
You can set an alarm for minutes, hours, or days before an event.
When you set an alarm, an Alarm icon appears to the far right
of the event with the alarm.
You can also set a silent alarm for untimed events that displays a
reminder message on-screen before the day of the event. The
alarm triggers at the specified period of minutes, hours, or days
before midnight of the day on which the untimed event begins.
For example, you set a 5-minute alarm for an untimed event that
occurs on February 4. The reminder message will appear at 11:55
p.m. on the night of February 3. The reminder remains on the
screen until you turn on your Smartphone and tap OK to turn off
the reminder.
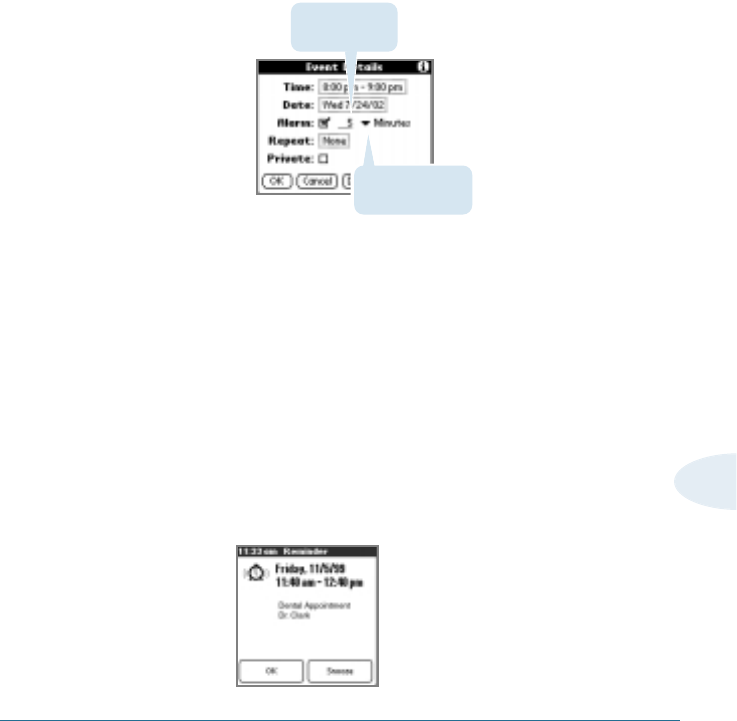
To set an alarm for an event:
1. Tap the event to which you want to assign an alarm.
2. Tap Details.
3. Tap the Alarm check box to select it.
The default setting, 5 Minutes, appears.
DATE BOOK 155
7
4. Set the alarm time:
• Select the 5 next to the Alarm check box and enter any
number from 0 to 99 (inclusive) as the number of time units.
• Tap the pick list to change the time unit; select select
Minutes, Hours, or Days.
5. Tap OK.
Once an alarm has gone off, you can tap the Snooze option to
dismiss the alarm for a 5-minute period.
To dismiss the alarm using the snooze option:
When the alarm dialog box appears, tap Snooze to delay the
alarm for a preset five-minute period.
Each time you tap Snooze, the alarm is dismissed for an
additional 5-minute period.
Enter number of
time units here.
Tap here to select
unit of time.
156 DATE BOOK
Setting Alarm Options
You can set the alarm to go off automatically for each new event
using preferences. You can also set a tone for the alarm and the
number of times the alarm sounds.
To set alarm options:
1. To open the Preferences dialog box, do one of the following:
• In the Date Book, tap the Menu icon .
• Tap the inverted tab at the top of the Date Book screen to
display the menu bar.
• In the text Graffiti area, drag a diagonal line from the lower
left to upper right to display the Command toolbar. Type an
R, the Graffiti shortcut for the Preferences command.
2. In the Options menu; tap Preferences.
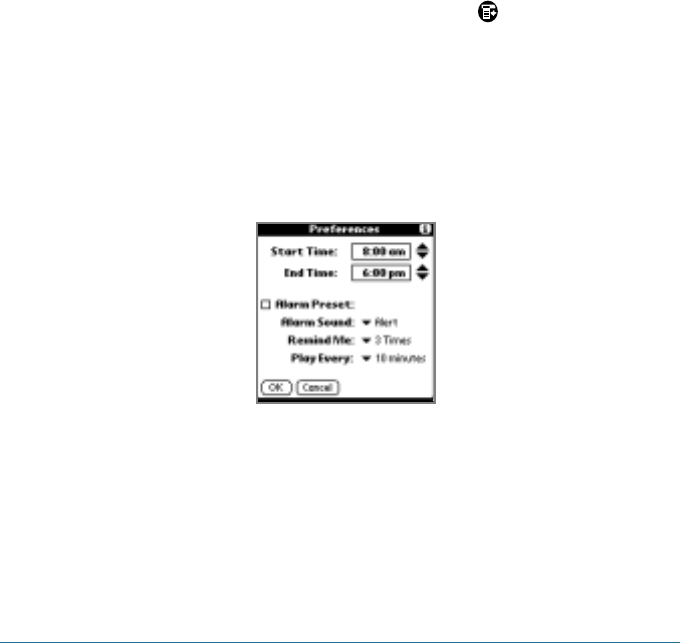
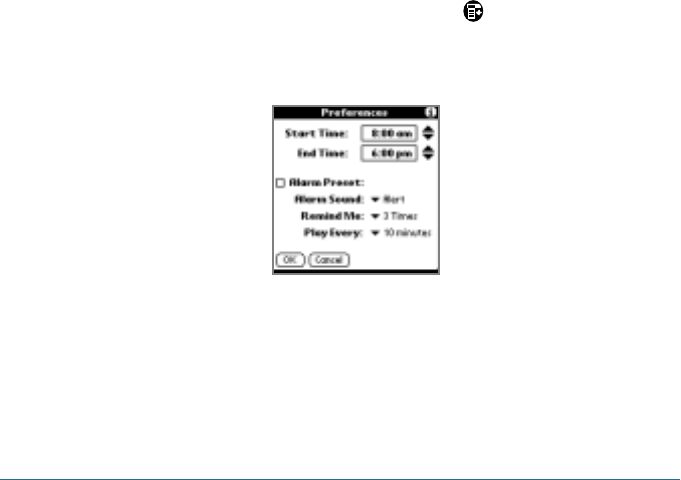
3. Select from the following options:
• Tap Alarm Preset to set an alarm for each new event
automatically. The silent alarm for untimed events is defined
by minutes, days, or hours before midnight of the date of the
event.
DATE BOOK 157
7
• Tap the Alarm Sound pick list, and then tap an option to set
the tone of the alarm. Options include Alarm, Alert, Bird,
Concert, Phone, Sci-fi, and Wake Up.
• Tap Remind Me to define how many times the alarm
sounds–once or twice; or three, five, or ten times.
• Tap Play Every to set how often the alarm sounds–every
minute; or every 5, 10, or 30 minutes.
4. Tap OK.
Changing the Date Book View
The Date Book includes four views for displaying your
appointments: day view, week view, month view, and agenda
view.
To display the Date Book views:
1. Do one of the following:
• Press the Date Book application button repeatedly to
cycle through all the Date Book views.
• Tap a view icon in the lower-left area of the Date Book
screen.
Date Book view icons
158 DATE BOOK
To display the current time:
Tap and hold down the stylus on the date in the date bar to
display the time. (When you release the stylus, the menu bar
appears.)
Tap the date
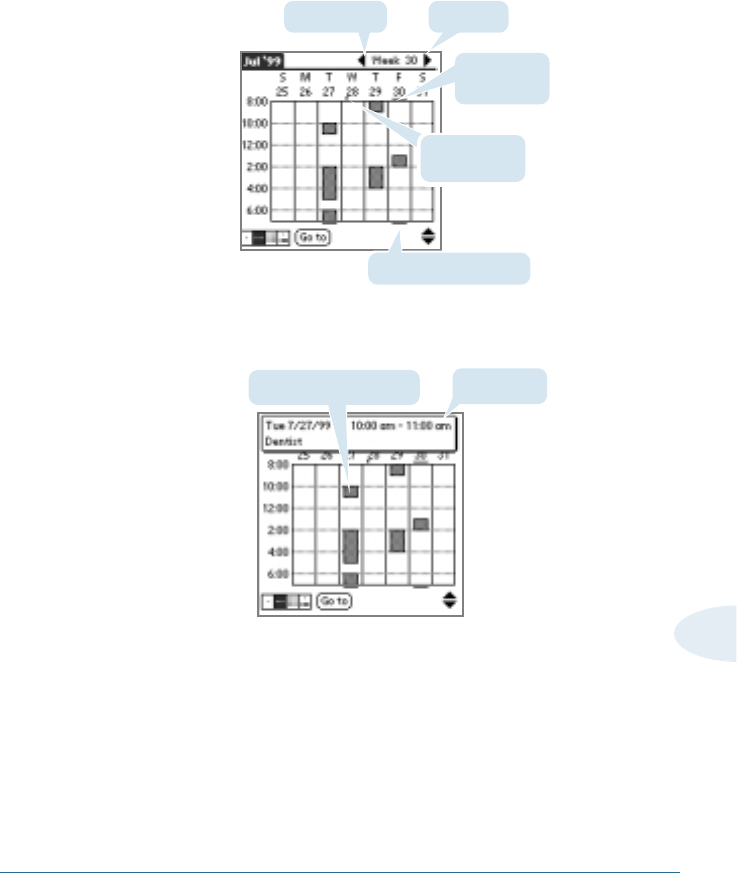
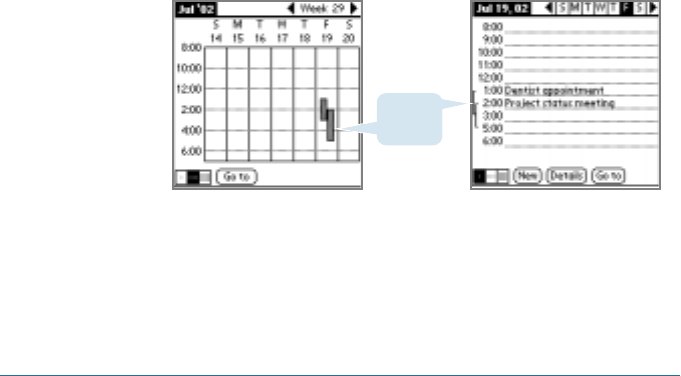
Working in Week view
Week view displays a calendar of your events for an entire week.
This view lets you quickly review your appointments and
available time slots. In addition, the graphical display helps you
spot overlaps and conflicts in your schedule.
To display the Week view:
1. Tap the Week view icon or press the Date Book button
until the Week view appears.
Week view
2. Tap the left and right navigation controls to move forward or
backward a week at a time, or tap on a specific day to display the
details of an event.
Note: The Week View also shows untimed events and events before and after
the range of times displayed.
DATE BOOK 159
7
Bar indicates later event.
Bar indicates
earlier event.
Dot indicates
untimed event.
Next weekPrevious week
3. Tap an event to display a description of the event at the top of
the screen.
Tips for Using Week View
Keep the following points in mind when using Week view:
• To reschedule an event while in Week view, tap and drag the
event to a different time or day.
• Tap a blank time on any day to move to that day and have the
time selected for a new event.
Event details
Tap to show event details.
160 DATE BOOK
• Tap any day or date that appears at the top of the Week view
to move directly to that day without selecting an event.
• The Week view displays the time span defined by the Start
Time and End Time in the Date Book Preferences settings. If
you have an event before or after this time span, a bar appears
at the top or bottom of that day’s column. Use the on the
screen scroll arrows to scroll to the event.
Spotting Event Conflicts
With the ability to define specific start and end times for any
event, it is possible to schedule events that overlap (an event
that starts before a previous event finishes).
An event conflict (time overlap) appears in the Week view as
overlapping time bars and in the Day view as overlapping
brackets to the left of the conflicting times.
Event
conflicts
DATE BOOK 161
7
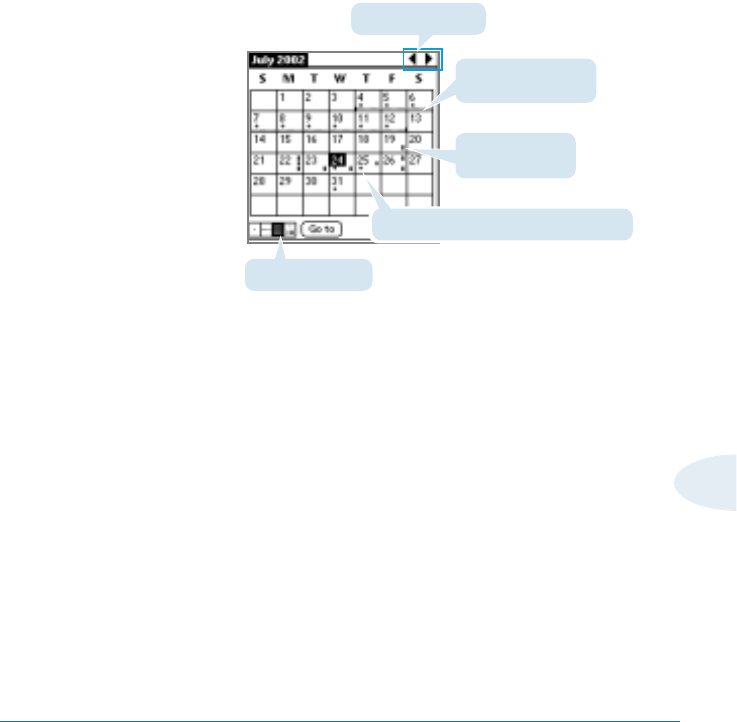
Working in Month View
The Month View screen shows which days have events
scheduled. Dots and lines in the Month view indicate events,
repeating events, and untimed events.
You can control the dots and lines that appear in the Month
View. See “Changing the Date Book display of events” on page
xx for more information.
Month View button
Dots below date indicate untimed events.
Dots on right side
indicate events.
Previous/next month
Dashed line indicates
continuous event.
162 DATE BOOK
Tips for Using Month View
Keep the following points in mind when using the Month view:
• Tap a day in the Month view to display that day in the Day
view.
• Tap the scroll arrows in the upper right corner to move forward
or backward a month.
• Tap Go To to open the date selector and select a different
month.
• Use the scroll buttons on the front panel of your (device type,
lower case) to move between months. Press the top button to
display the previous month, the bottom button to display the
next month.
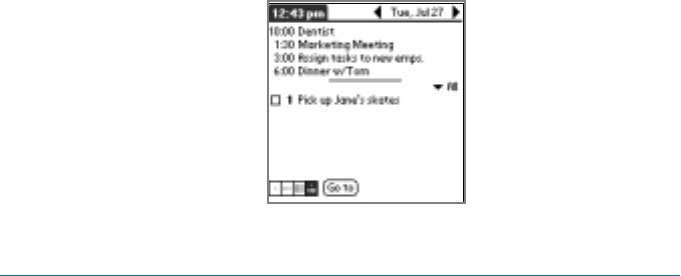
Working in Agenda View
The Agenda view lets you view appointments, untimed events,
and To Do List items in a single screen. Although it is primarily a
viewing option, you can also use the Agenda view to check off
completed To Do List items. To go to a Day View of |any event on
the Agenda view screen, simply tap the desired event.
DATE BOOK 163
7
Tips for Using Agenda View
• Tap any appointment while in Agenda view to display the Day
View of the appointment.
• Check off completed To Do List items in the Agenda view, or
click a description of an item to go directly into the To Do List
application.
Changing the Date Book Display of Events
In Day or Month view, you can change which events appear in
the Date Book. In Day view, you can display time bars that
highlight event conflicts in Day view.
You can also change the starting and ending times displayed for
new entries.
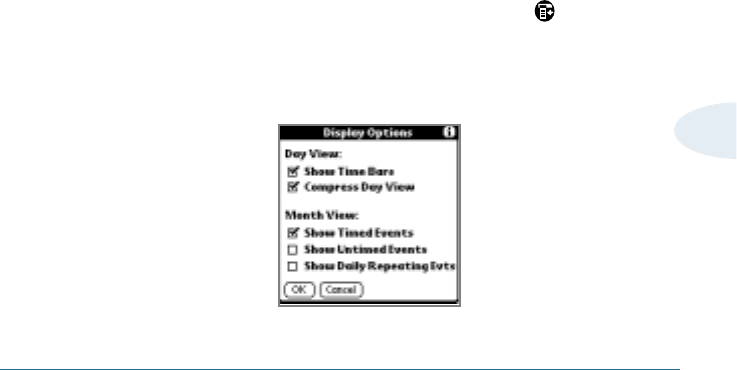
To change the Date Book display of events:
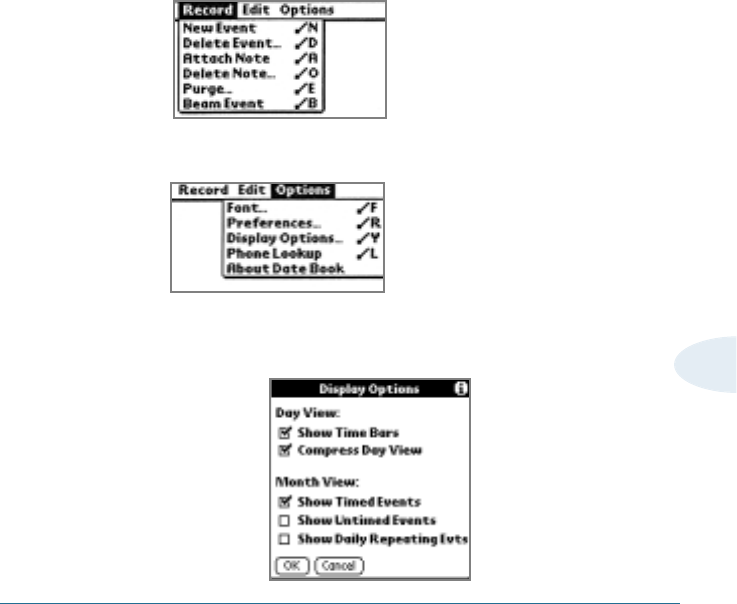
1. In Day view or Month view, tap the Menu icon to open the
Date Book menus.
2. Tap Options, and then tap Display Options.
164 DATE BOOK
3. For Day view, select from the following options:
• Tap Show Time Bars to display time bars showing the
duration of an event and any event conflicts.
• Tap Compress Day View to display start and end times for
each event, but no blank time slots at the bottom of the
screen, to minimize scrolling. Clear the option to display all
time slots.
4. For Month view, select whether to display Timed, Untimed, or
Daily Repeating events.
5. Tap OK.
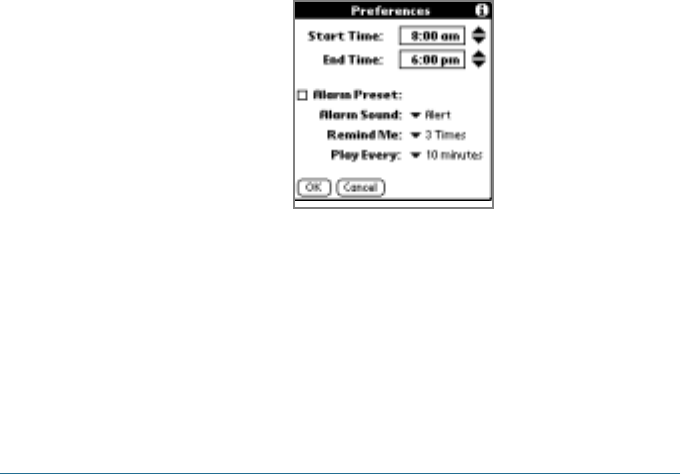
To change the start and end times in the Date Book:
1. In the Date Book, tap the Menu icon to open the Date
Book menus.
2. Tap Options, and then tap Preferences.
3. Tap Start Time and use the scroll arrows to select a new start
time for the Date Book screens. Repeat the step to set a new
end time.
If the time slots you select do not fit on one screen, you can
tap the scroll arrows to scroll up and down.
4. Tap OK.
DATE BOOK 165
7
Date Book Menus
Date Book menus are shown here for your reference, and Date
Book Features that are not explained elsewhere in this book are
described here.
See “Using menus” in Chapter x for information about choosing
menu commands.
Record menu
Display Allows you to change Date Book’s appearance
Options and which events display.
Options menu
166 DATE BOOK
• Show Time Bars. Activates the time bars that
appear in the Day View. The time bars show the
duration of an event and illustrate event conflicts.
• Compress Day View. Controls how times
appear in the Day View. When Compress Day
View is off, all time slots display. When it is on,
start and end times display for each event, but
blank time slots toward the bottom of the screen
disappear to minimize scrolling.
• Month View settings. These check boxes apply
to the Month View of the Date Book. You can
activate any or all of these settings to show that
you have Timed, Untimed, or Daily Repeating
events in the Month View only.
Preferences
• Start/End Time. Defines the start and end times
for Date Book screens. If the time slots you select
do not fit on one screen, you can tap the scroll
arrows to scroll up and down.
• Alarm Preset. Automatically sets an alarm for
each new event. The silent alarm for untimed
events is defined by minutes, days, or hours
before midnight of the date of the event.

DATE BOOK 167
7
• Alarm Sound. Sets the tone of the alarm.
• Remind Me. Defines how many times the alarm
sounds. The choices are Once, Twice, 3 Times, 5
Times, and 10 Times.
• Play Every. Defines how often the alarm sounds.
The choices are Minute, 5 minutes, 10 minutes,
and 30 minutes.

USING THE EXPENSE APPLICATION 169
Using the Expense Application
The Expense application lets you keep track of your expenses and
then transfer the information to a spreadsheet on your computer.
Use the Expense application to:
• Record dates, types of expenses, amount spent, payment
method, and other details associated with any money that you
spend.
• Assign expense items to categories so that you can organize
and view them in logical groups.
• Keep track of vendors (companies) and people involved with
each particular expense.
• Log miles traveled for a particular date or expense category.
• Sort your expenses by date or expense type.
• Transfer your expense information to a Microsoft Excel
spreadsheet (version 5.0 or later) on your computer. (Microsoft
Excel is not included in the Samsung Smartphone package.)
CHAPTER8
8
Expense
170 USING THE EXPENSE APPLICATION
Opening Expense Application
1. Tap the Applications icon to open the Application
Launcher.
2. Tap the Expense icon to display the Expense screen.
Recording Expenses
The Expense application lets you record the date, expense type,
and the amount you spent. You can sort Expense items into
categories or add other information to an item.
Creating Expense Items
A record in the Expense application is called an item.
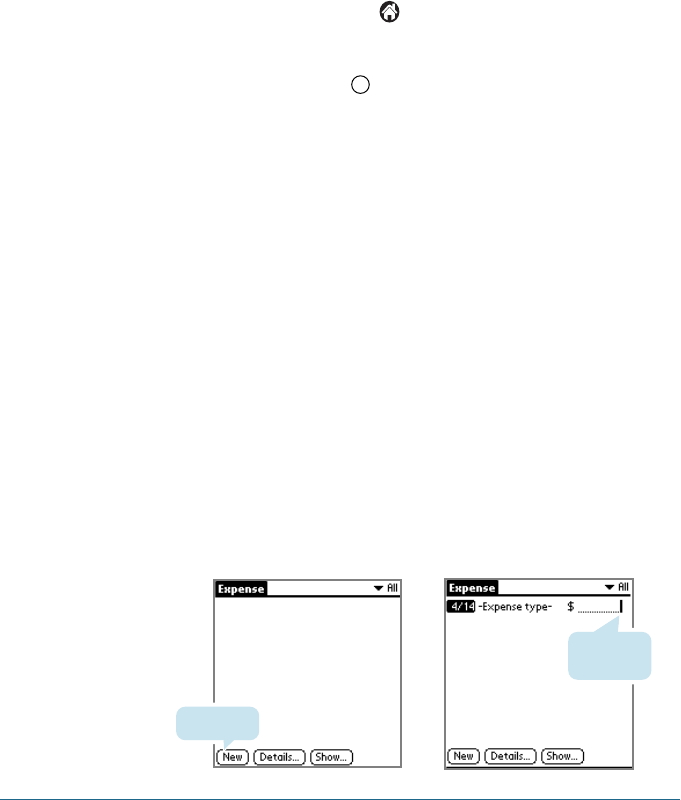
To create an Expense item:
1. Tap New to create a new item.
Tip: You can also create a new Expense item in the Expense List screen
by writing on the number side of the Graffiti writing area. The first
number you write begins your new Expense item.
Tap here.
Cursor of
new item
➜
➜

USING THE EXPENSE APPLICATION 171
8
2. Enter the amount of the expense.
3. Tap the Expense Type pick list and choose a type from the list.
As soon as you choose an Expense type, your Smartphone
saves your entry. If you do not select an Expense type, it does
not save the entry.
Tip: Another quick way to create a new Expense item is to make sure
that nothing is selected in the Expense List. Then write the first letter
or letters of the Expense type to fill it in automatically, and then
write the numerical amount of the Expense item. See “Filling in the
expense type automatically” in this chapter for more information.
Changing the Date of an Expense Item
Initially, Expense items appear with the date you enter them. You
can use Expense to change the date associated with any Expense
item.
To change the date of an Expense item:
1. Tap the Expense item you want to change.
Tap here. ➜
➜
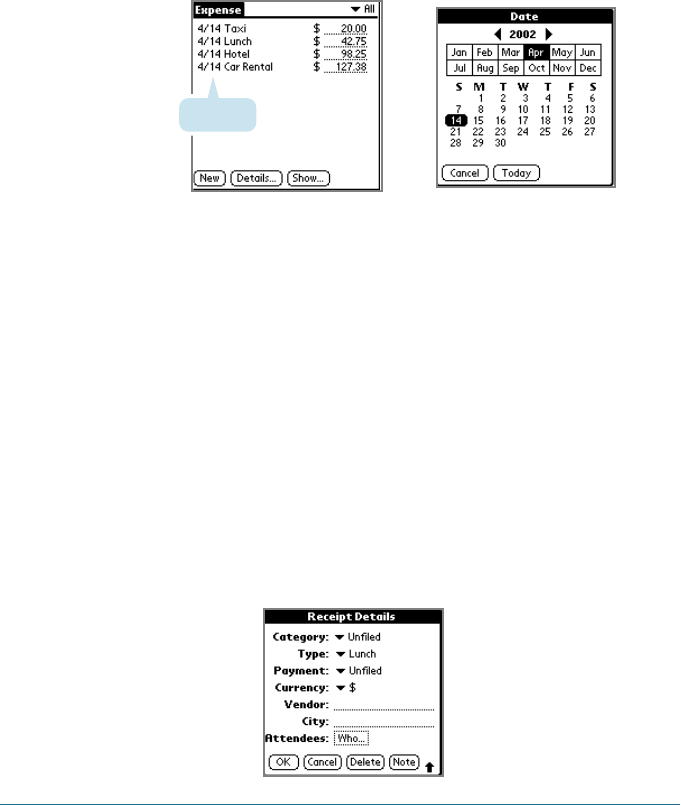
172 USING THE EXPENSE APPLICATION
Tap date.
3. Tap the date you want for the Expense item.
For more information about the Date Screen, see “Scheduling
an Event.”
Entering Receipt Details
You can add detailed information to an expense item using the
Receipt Details dialog box.
To enter receipt details in the Receipt Details dialog box:
1. Tap the Expense item to which you’ll add information.
2. Tap Details to display the Receipt Details dialog box.
2. Tap the date of the selected item.
➜
➜

USING THE EXPENSE APPLICATION 173
8
3. To select a category, tap the Category pick list, and then tap an
option. To create a new category, tap Edit Categories. Tap New
to create a new category.
4. Select any of the following options:
Category See “Categorizing records” earlier in this chapter.
Type Opens a pick list of expense types.
Payment Lets you choose the payment method used to pay
the Expense item. If the item is prepaid (such as
airline tickets supplied by your company), you can
choose Prepaid to place your expense in the
appropriate company-paid cell of your printed
expense report spreadsheet. See “Transferring
your data to Microsoft Excel” later in this chapter
for more information.
Currency Enables you to choose the type of currency used
to pay the Expense item. The default currency unit
is defined in the Preferences dialog box. You can
also display up to four other common types of
currency. See “Customizing the Currency pick list”
later in this chapter for more information.
Vendor Lets you record the name of the vendor
and City (usually a company) associated with the expense
and the city where the expense was incurred. For
example, a business lunch might be at Rosie's
Cafe (Vendor) in San Francisco (City).
Attendees Lets you enter attendees. Tap Who, then do one
of the following in the Attendees screen.
• In the Graffiti writing area, enter others who
attended the event. Tap OK.
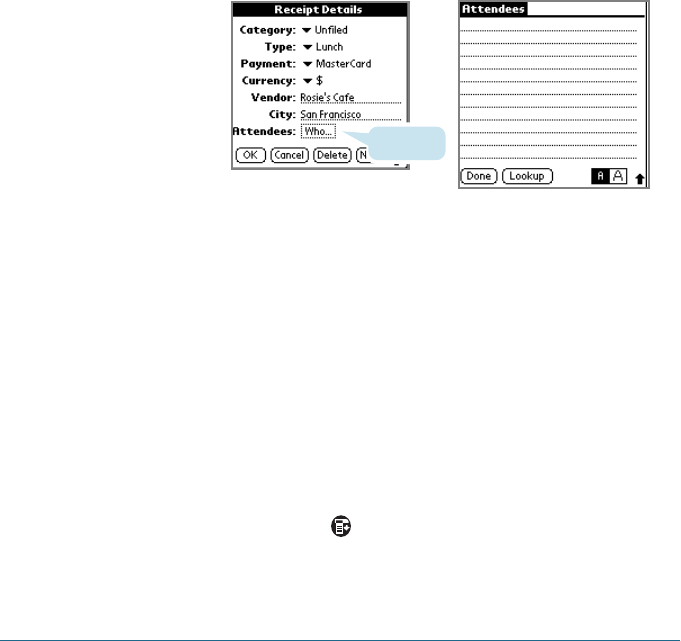
• Tap Lookup to display all Address Book names
that contain an entry in the Company field of
the Address Book record.
Select the name you want to add, and tap Add
to add the name to the Attendees screen;
repeat the step to add more names. Then tap
Done.
5. Tap OK to add the information to the Expense record.
Filling in the Expense Type Automatically
You can select an expense type merely by writing the first letter
or letters of an expense type in the Graffiti writing area. For
example, writing the letter T enters the Taxi expense type.
Writing T and then e enters Telephone, which is the first expense
type beginning with the letters Te.
To fill in the expense type automatically:
1. Tap the Menu icon to open the Expense menus.
174 USING THE EXPENSE APPLICATION
Tap here
➜
➜
USING THE EXPENSE APPLICATION 175
8
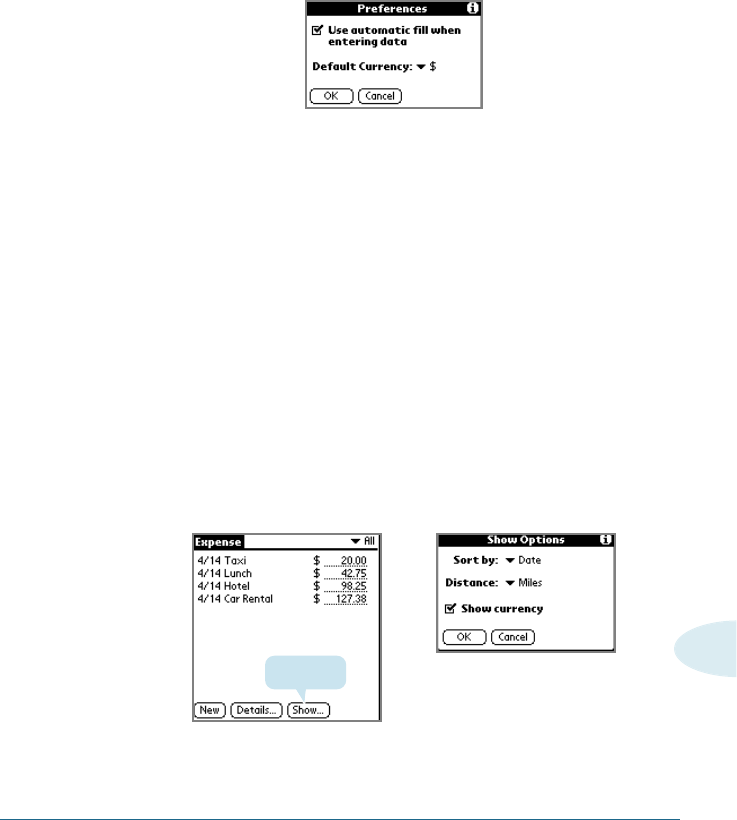
2. Tap Options, and then tap Preferences.
3. Tap the Use automatic fill when entering data check box to
select the option.
4. Tap OK.
Changing the Expense List Display
You can change the display of expenses, including their sort
order, the mileage unit, and the currency symbol, using the Show
Options dialog box.
To change the Expense List display:
1. In the Expense List, tap Show to display the Show Options
dialog box.
Tap Show
➜
➜

176 USING THE EXPENSE APPLICATION
2. To change how expense items are sorted, tap the Sort By pick
list, and then tap Date or Type to sort expense items by the
corresponding option.
3. To change the display of mileage entries, tap Distance, and
then tap Miles or Kilometers to display the corresponding unit.
4. To hide the currency symbol, tap the Show Currency check box
to clear it.
5. Tap OK.
Changing the Currency and Symbols Display
You can change the currencies s available in the Currency pick
list, and you can change the default currency that appears when
you create a new expense item.
If the currency you want to use is not in the list of countries, you
can create your own custom currency symbol and add it to the
pick list.
To change the currencies displayed in the Currency pick
list:
1. In the Expense List, tap an Expense item.
2. Tap Details.
3. Tap the Currency pick list in the Receipt Details dialog box, and
then tap Edit Currencies.
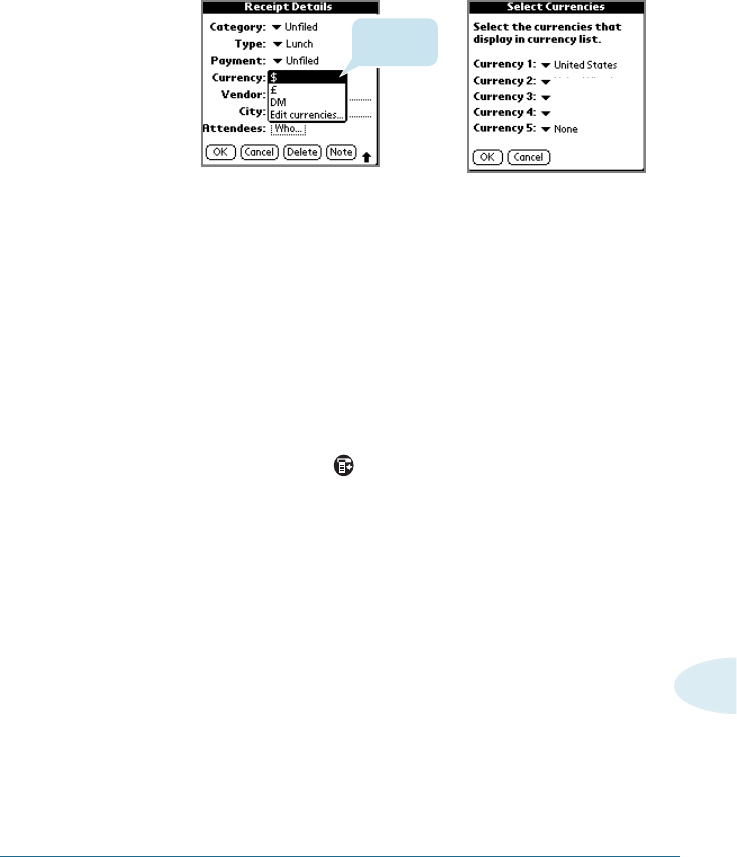
USING THE EXPENSE APPLICATION 177
8
Tap Edit
currencies.
EU(Euro)
United Kingdom
Germany
4. Tap the Currency pick list and select the country whose
currency you want to display on that line.
You can specify up to five currencies.
5. Tap OK to close the Select Currencies dialog box.
6. Tap OK.
To change the default currency symbol for all Expense
items:
1. Tap the Menu icon to open the Expense menus.
2. Tap Options, and then tap Preferences.
3. Tap the Default Currency pick list, and then tap a currency
symbol to select it as the default.
4. Tap OK.
The symbol you selected appears with all new Expense items.
Existing items aren’t affected.
Note: To use a currency symbol only for a selected Expense item, select
the symbol in the item’s Receipt Details dialog box. See “To create
an Expense item” earlier in this chapter.
➜
➜
178 USING THE EXPENSE APPLICATION
Customizing Currency Symbols
You can create and add your own currency symbol to the
Currency pick list.
To define a custom currency symbol:
1. Tap the Menu icon to open the Expense menus.
2. Tap Options, and then tap Custom Currencies.
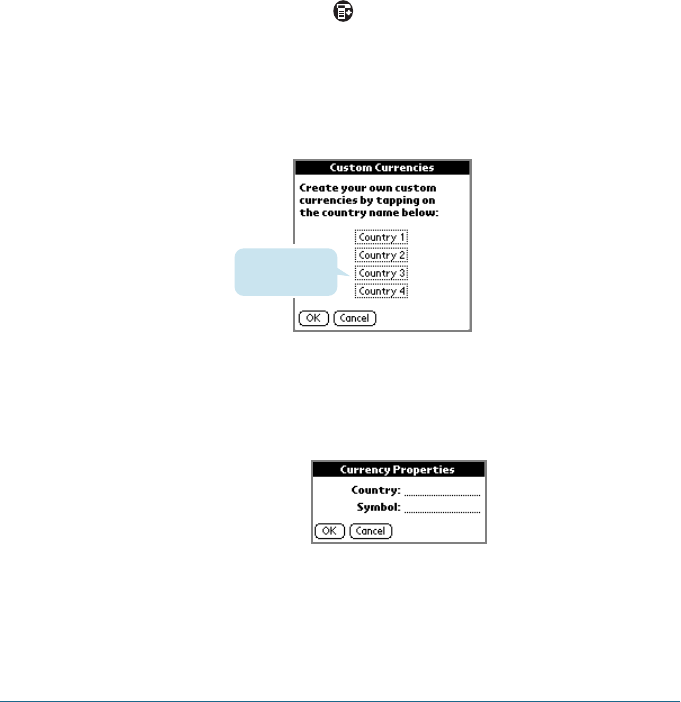
3. In the Custom Currencies dialog box, tap one of the four
Country boxes.
Tap a Country
box.
4. In the Currency Properties dialog box, enter the country name
and currency symbol that you want to appear in the Expense
application.
5. Tap OK to close the Currency Properties dialog box.
6. Tap OK.

USING THE EXPENSE APPLICATION 179
8
Note: To add the currency symbol to the Currency pick list in the Receipt
Details dialog box, see the procedure earlier in this chapter, “To
change the currencies displayed in the Currency pick list.”
Transferring Your Data to Microsoft Excel
Once you have entered expenses in the Expense application on
your Smartphone, Palm Desktop software lets you view and print
the data with your computer.
Note: You must have Microsoft®Excel version 5.0 or later to view and print
your Expense data using one of the provided templates. Microsoft
Excel is not included with the (product name) Smartphone package.
The procedures in this section assume that you have installed Palm
Desktop software. See “Connecting the cradle” in Chapter 1,
“Introduction to the Samsung Smartphone” for more information.
Creating and Printing an Expense Report
Palm Desktop software makes it quick and easy to view and print
your Expense data in a Microsoft Excel spreadsheet.
180 USING THE EXPENSE APPLICATION
To create or print an expense report:
1. Perform a HotSync operation to transfer your latest Expense
data to your computer.
2. Click the Expense application in Palm Desktop software to
open Microsoft Excel and the Expense Report configuration
dialog box.
Note: If you launch the Expense application from the Start menu instead
of from Palm Desktop software, you must first choose your
Smartphone user name.
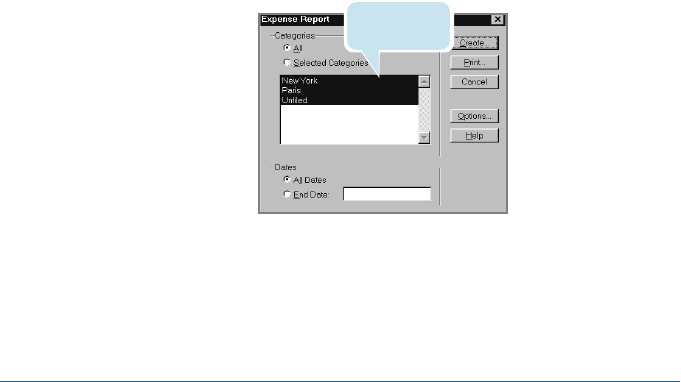
3. Select the expense category using one of the following
techniques:
• Click an expense category.
• Press Ctrl+click to select multiple categories.
• Select All in the Categories group to print the expenses
associated with all of your Expense categories.
Click to select
Categories.

USING THE EXPENSE APPLICATION 181
8
4. Specify a time period to print:
• Enter a date in the End Date field to define an end date for
the expense report.
• Do not enter a date in the End Date field to specify, all
expense entries for the selected categories—up to the date
of the last HotSync operation.
5. Print or display the expense information, choosing one of the
following options:
• Click Print to display the expense report in the Print Preview
window, and then click Print in the Microsoft Excel window
to print your expense report.
• Click Create to display a Microsoft Excel spreadsheet
containing your expense data. Your data appears in
Microsoft Excel spreadsheet form. You can enter
information, make formatting changes, and save and print
the file in the normal manner.
182 USING THE EXPENSE APPLICATION
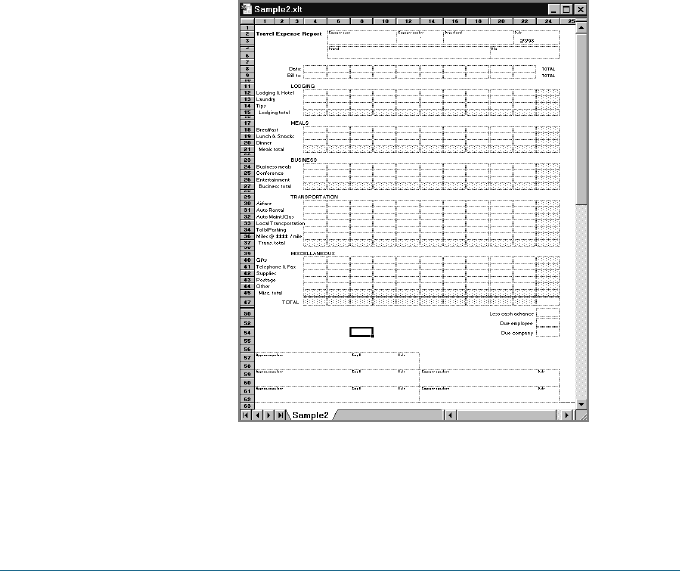
Using Expense Report Templates
Palm Desktop software includes several expense report
templates. When you use one of these templates, you can edit
your expense data in Microsoft Excel.
The templates have the extension .xlt and are stored in the
template folder in the Palm Desktop software directory on your
computer. To see what a template looks like before you use it,
open the template in Microsoft Excel. For example, the template
Sample2.xlt looks like this:

USING THE EXPENSE APPLICATION 183
8
To view your expense data using a Microsoft Excel
template:
1. Display your expense data in a Microsoft Excel spreadsheet as
described in the previous procedure.
2. Click Options.
3. Enter the name, department, and other information as
necessary for your expense report.
4. Click the Templates menu; then select an expense template.
5. Click OK.
Enter report name and
other information.
Choose expense
template.
184 USING THE EXPENSE APPLICATION
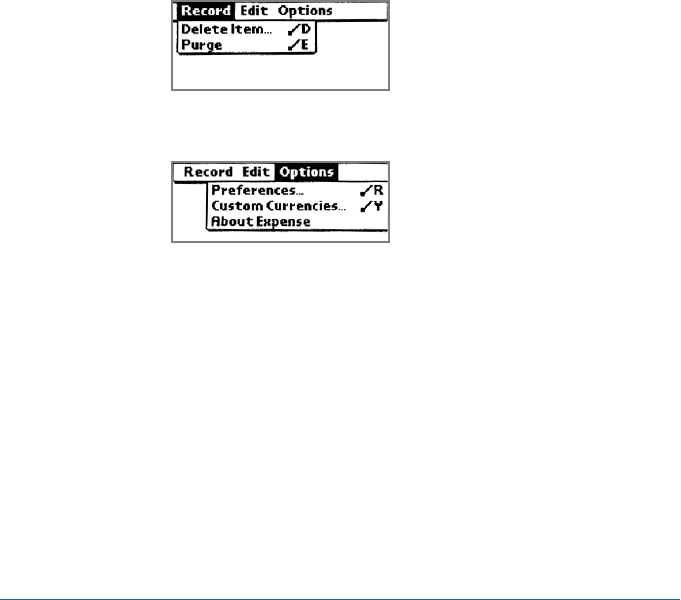
Expense Menus
Expense menus are shown here for your reference, and Expense
features that are not explained elsewhere in this book are
described here.
See “Using menus” in Chapter x for information about choosing
menu commands.
Record menu
Options menu

MAIL 185
Mail
The Mail application lets you manage, on your Smartphone, the
e-mail you send and receive through your desktop computer’s e-
mail application. You can read, reply to, compose, and delete e-
mail on your Smartphone once you’ve performed a HotSync®
operation.
The infrared port at the top of your Smartphone lets you send
data from your Smartphone–including entire applications–to any
other Palm Computing®connected device that’s close by and also
equipped with an IR port.
CHAPTER9
9

186 MAIL
Managing Desktop E-mail Away from Your
Desk
You can send or receive e-mail after you’ve performed a HotSync
operation, either locally using the Smartphone cradle, or remotely
using a modem.
The Mail synchronizes the mail in the Inbox of your desktop e-
mail application with the mail on your Smartphone. For example,
if you delete e-mail items from Mail, your next HotSync operation
also deletes the e-mail items from your desktop e-mail
application, so that you never have to delete e-mail items twice.
Similarly, if you read an e-mail item on your Smartphone and
leave it in your Inbox, your next HotSync operation indicates in
your desktop e-mail application that the item has been read.
The Mail application lets you:
• View, delete, file, and reply to incoming mail.
• Create outgoing e-mail items and drafts of e-mail items.
• Create simple or complex filters, which let you to decide which
type of e-mail your Smartphone retrieves from your desktop e-
mail application.
• Use your Smartphone in its cradle to send and retrieve e-mail
items from your desktop e-mail application.

MAIL 187
9
Setting Up Mail on the Desktop
Before you use the Mail application for the first time, make sure
that your desktop e-mail application is installed and running. You
must also set up Palm Desktop software for use with your
desktop e-mail application.
Your Smartphone supports various desktop e-mail applications,
including Microsoft Exchange (version 4.0 or higher), Eudora
(version 3.0.3 or higher), and Lotus cc: Mail (versions 2.5, 6.0, and
7.0). You can view the full list of the supported applications when
you set up Mail.
If your desktop e-mail application does not appear on the list, you
may still be able to manage your desktop e-mail application from
your Smartphone using special connection software, called a
conduit, that lets you synchronize your desktop e-mail application
and your Smartphone. Contact the vendor of your e-mail
application for more information.
Note: The following instructions assume that you have installed Palm
Desktop software on your computer, but have not yet set up Mail.

188 MAIL
To set up Mail:
1. Choose one of the following options:
• If you have not yet installed Palm Desktop software on your
computer, install the software now. You will be prompted to
set up Mail as part of the Palm Desktop software
installation.
• If you already installed Palm Desktop software on your
computer, and set up Mail, skip to the next procedure, to set
up the HotSync options for Mail.
2. In the Windows task bar, click Start.
3. Select Programs, select Palm Desktop software, and then click
Mail Setup to begin the setup.
4. Follow the instructions on the screen to set up your
Smartphone for use with your desktop e-mail application.
To set or change HotSync options:
1. In the bottom right corner of the Windows taskbar, click the
HotSync icon .
2. Choose Custom.
Tip: You can also choose Custom from the HotSync menu in Palm Desktop
software.
3. Choose Mail from the list box.
4. Click Change.
MAIL 189
9
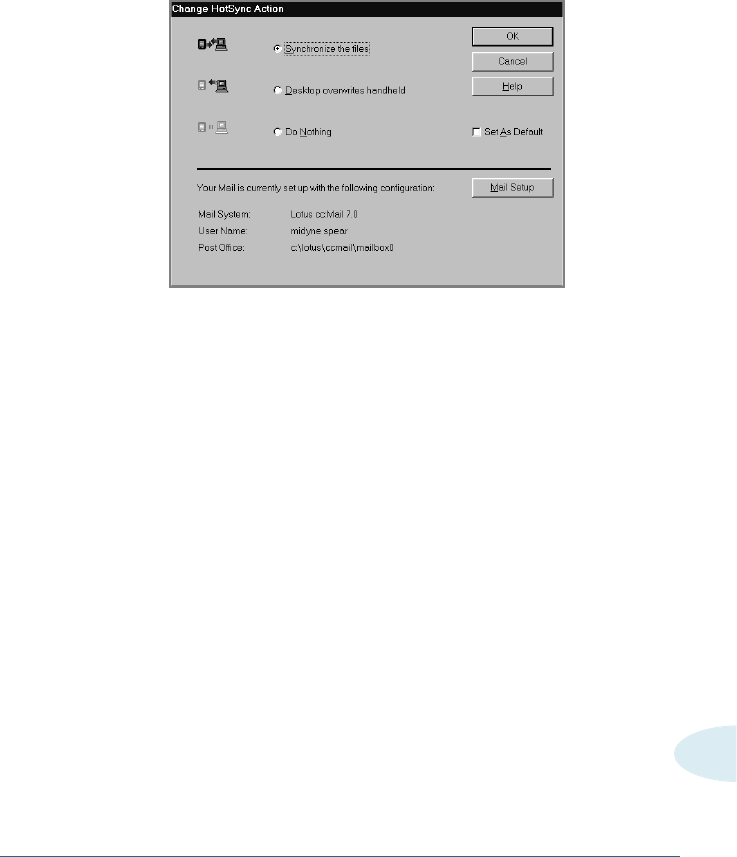
5. Click one of the following settings:
Synchronize Synchronizes the mail on your organizer and
the files your desktop E-Mail application.
Desktop Replaces the mail on your organizer with the
overwrites mail in your desktop E-Mail application. You
handheld should use this option only if, for some reason,
the two inboxes get out of sync.
Do Nothing Turns off communication between your
organizer and desktop E-Mail application.
Note: Changing the HotSync setting from the default affects only the next
HotSync operation. Thereafter, the HotSync Action reverts to the
default setting.
190 MAIL
Synchronizing Mail with your e-mail application
After you turn on and set up Mail, you must perform a HotSync
operation to synchronize Mail with your desktop e-mail
application.
For complete information on using HotSync, see Chapter x,
“Exchanging and Updating data using HotSync Operations.”
Creating, Viewing, and Replying to E-mail
The Mail application lets you create e-mail that your desktop
application can send, and view, edit, and reply to e-mail received
from your desktop application. The first time you open the Mail
application, it displays the Mail list.
To open the Mail application on your Smartphone:
1. Tap to open the Applications Launcher.
2. Tap the Mail icon.
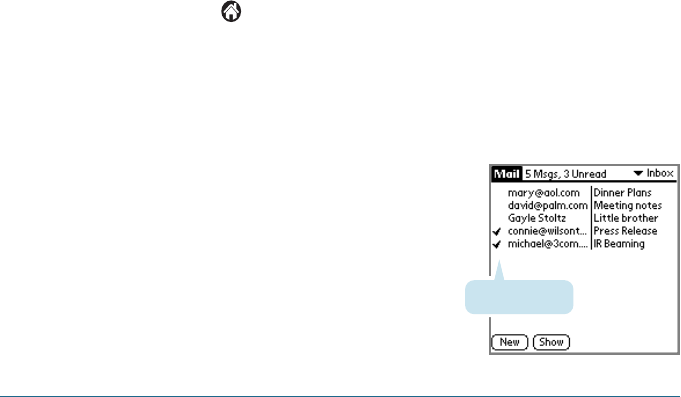
Viewing E-mail Items
The Mail list displays your incoming e-
mail items, who sent them, and the date
they were received. A check mark
indicates any e-mail items that you’ve
read. Bold indicates high-priority e-mail
items. Previously read
MAIL 191
9
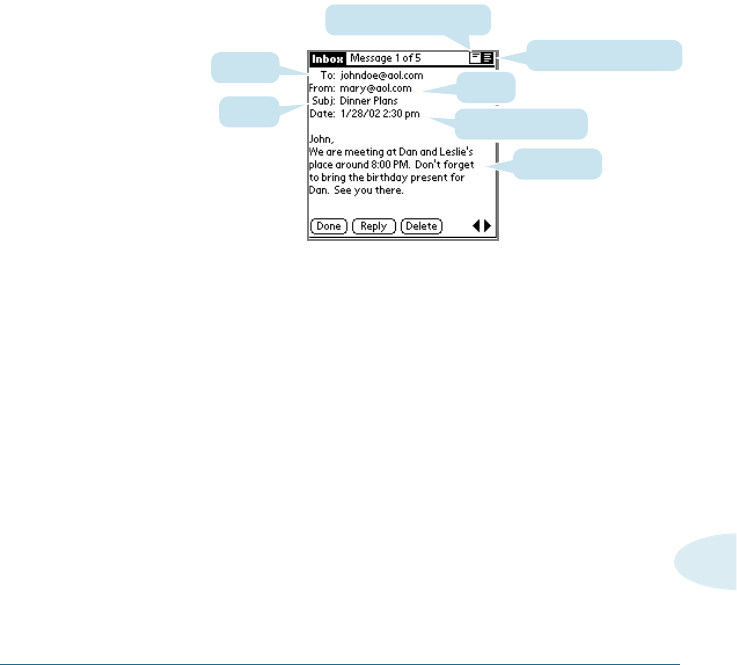
To view e-mail items:
1. Tap an item in the Mail list.
By default, the Mail application shows only the From and
Subject fields. You can display complete information about the
sender, receiver, and copied recipients, as well as the subject
and the date the e-mail item was created.
2. To change the display of header information, tap a header
mode icon in the upper right corner of the screen:
• Tap the Complete Header icon to view complete information
about the sender, receiver, and copied recipients, in addition
to the subject and date the e-mail item was created.
• Tap the Abbreviated Header icon to redisplay the
abbreviated header.
Mail uses the header type you select for all your e-mail items.
3. To close an e-mail item, tap Done.
Complete Header icon.
Abbreviated Header icon
Sender
Recipient
Subject Time and date sent
e-mail body
192 MAIL
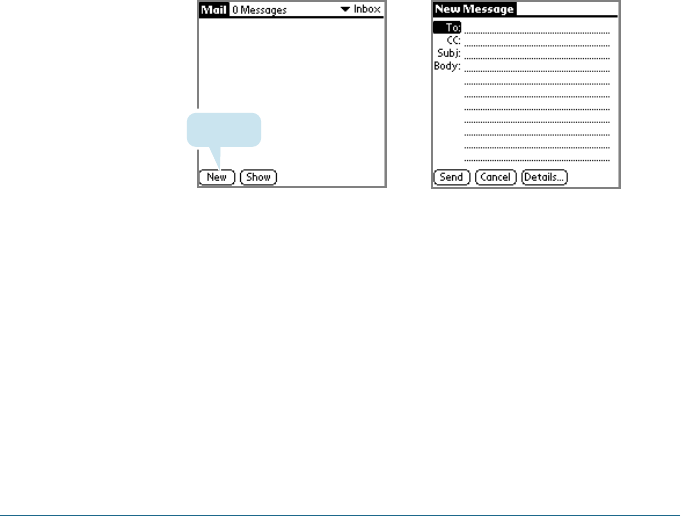
Creating E-mail Items
You create e-mail items with your Smartphone the same way you
create e-mail with your desktop e-mail application: you identify
the recipient of the e-mail item, define a subject, and create the
body of the e-mail item. At a minimum, all e-mail items must
contain information in the To and Subject fields.
You create original e-mail items and replies in the New Message
screen.
To create an e-mail item:
1. Tap New.
Tip: You can also create an e-mail item by tapping New in the Message
menu.
2. Enter the e-mail address of the recipient, using the same
format as you would from your desktop e-mail application.
For example, if you’re sending an e-mail item to a user on the
same network, you don’t have to add Internet information,
such as @mycorp.com.
Tap New
➜
➜