Samsung Electronics Co SCHI300 Dual-Band Analog/PCS Phone (AMPS/CDMA) User Manual
Samsung Electronics Co Ltd Dual-Band Analog/PCS Phone (AMPS/CDMA) Users Manual
Contents
Users Manual Part 2
38 USING PHONE AND MESSAGING
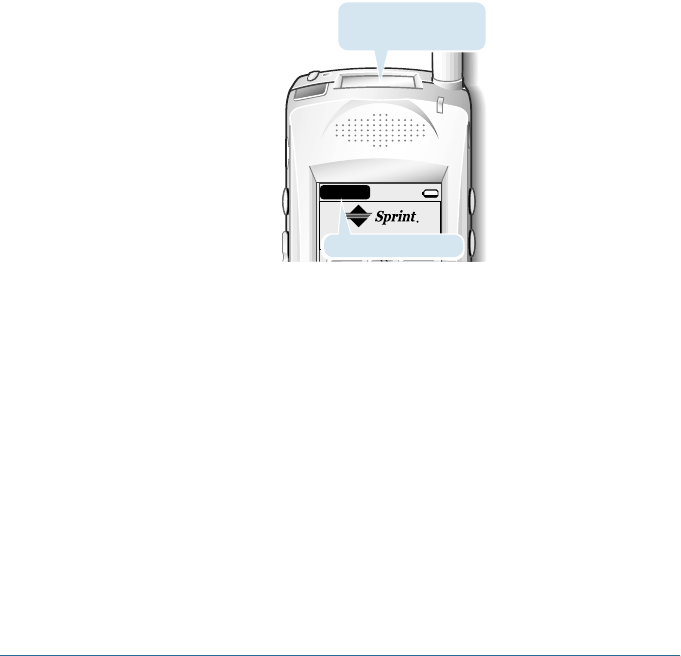
Turning the Phone On and Off
You can turn the phone’s power on and off separately from the
electronic organizer. When the phone is off, you can use the Palm
applications on your Smartphone. If the phone’s power is off, the
small LCD at the top of the phone is off and the Phone Off
indicator appears at the top left corner of the Smartphone main
screen.
When the phone is turned on:
• The time and date appear at the top of the screen, along with
symbols showing battery and signal strength.
• You can send and receive calls. If there is an incoming,
outgoing, or active phone call, information about the call
appears on the screen.
• You can use the phone. You can use Palm applications while
making a phone call. If you are using an application when the
phone rings, you can answer the call with confidence. The
Smartphone stores your work for you automatically.
Phone LCD turns off
when the phone is off.
Phone Off
Phone Off indicator
When the phone is turned off:
• You can use all the organizer features.
• You cannot send or receive calls, send or receive e-mail, or
search the Web.
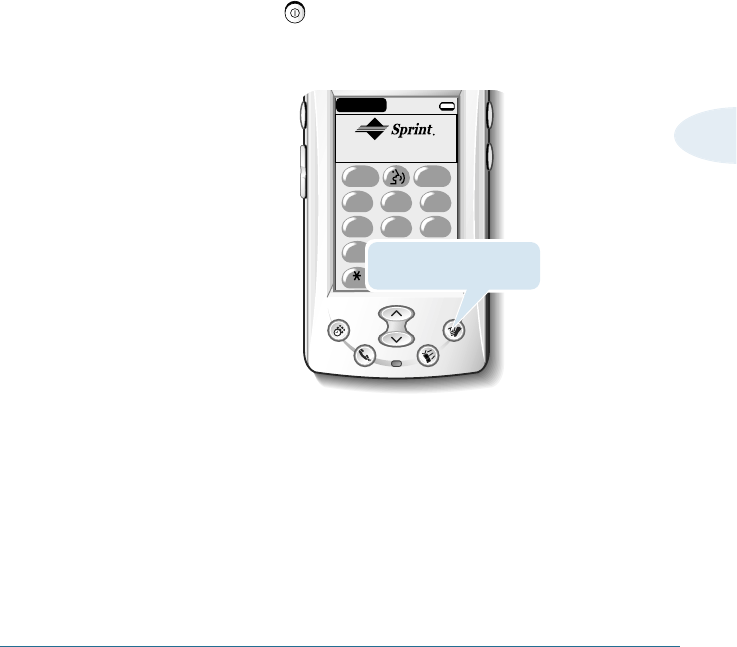
Turning the Phone On
Press and hold button on the front panel of the Smartphone
until the Phone LCD at the top of the Smartphone turns on. Phone
screen opens and the phone’s power is on.
USING PHONE AND MESSAGING 39
3
oper
8
tuv
7
pqrs 9
wxyz
5
jkl
4
ghi 6
mno
2
abc
1
TALK END
3
def
0
Phone Off
Press and hold this button
to turn the phone on.
19:42P 09/18/200

40 USING PHONE AND MESSAGING
Turning the Phone Off
When you don’t use the phone feature, you can turn the phone
off. If you turn the phone off, you can still use all other organizer
features.
To turn the phone off:
1. Open the Phone screen. For details, see page xx.
2. Tap and hold the END button on the phone screen.
The phone LCD at the top of the Smartphone turns off and
Phone Off indicator appears at the top of the Smartphone main
screen. Now, you can not use phone or message feature.
Tip: When the phone is off, you can still use phone features not related to
making or receiving a call, for example, viewing outgoing call list or
setting phone options.
USING PHONE AND MESSAGING 41
3
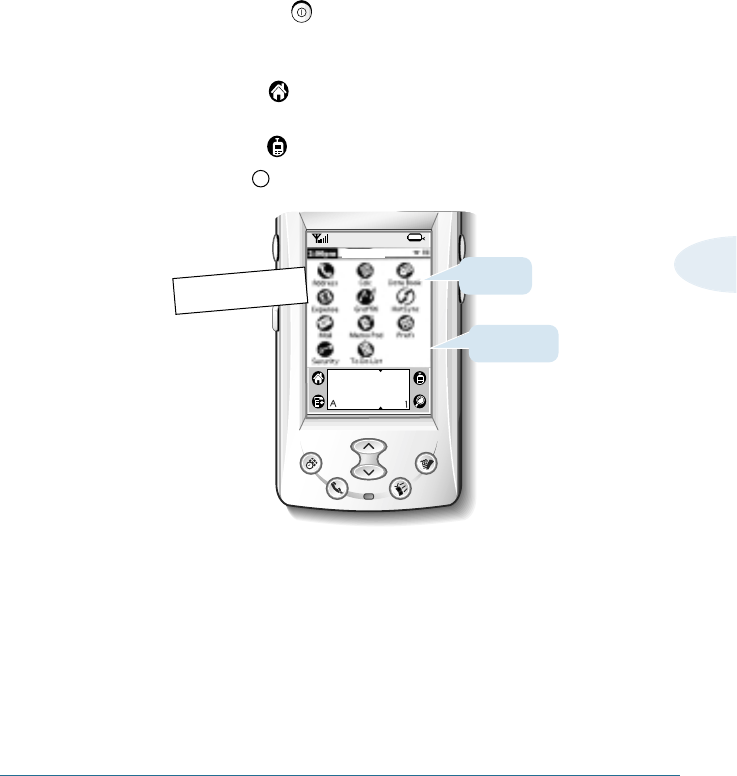
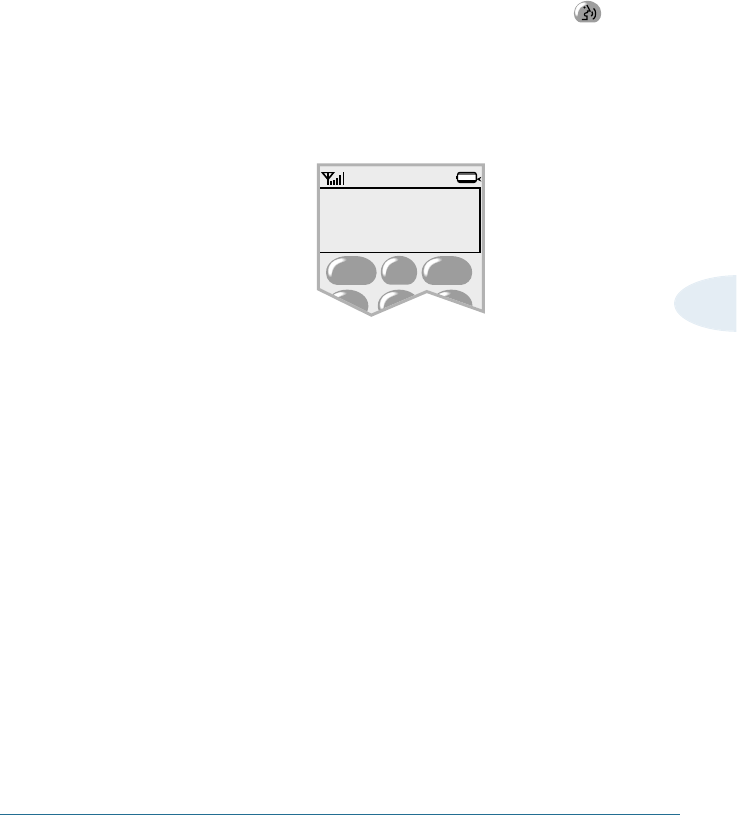
Opening the Phone Screen
1. Wake up the Smartphone screen, if necessary, by pressing the
power button at the right side of the Smartphone.
2. To open the Phone screen, choose from the following options:
• Tap the icon to open the Applications Launcher, then tap
the Phone icon.
• Tap the icon at the right side of Graffiti writing area.
• Press button on the front panel of the Smartphone.
Note: You can open the Phone screen without turning the phone’s power on.
With the phone’s power off, you can use phone menus but cannot
make or receive calls and messages.
Phone icon
Phone button
Tentative
42 USING PHONE AND MESSAGING
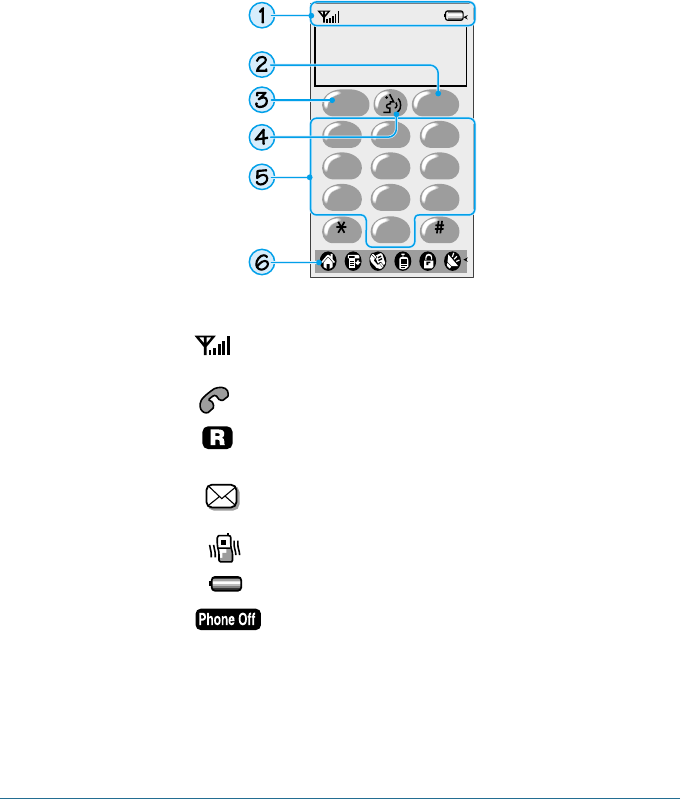
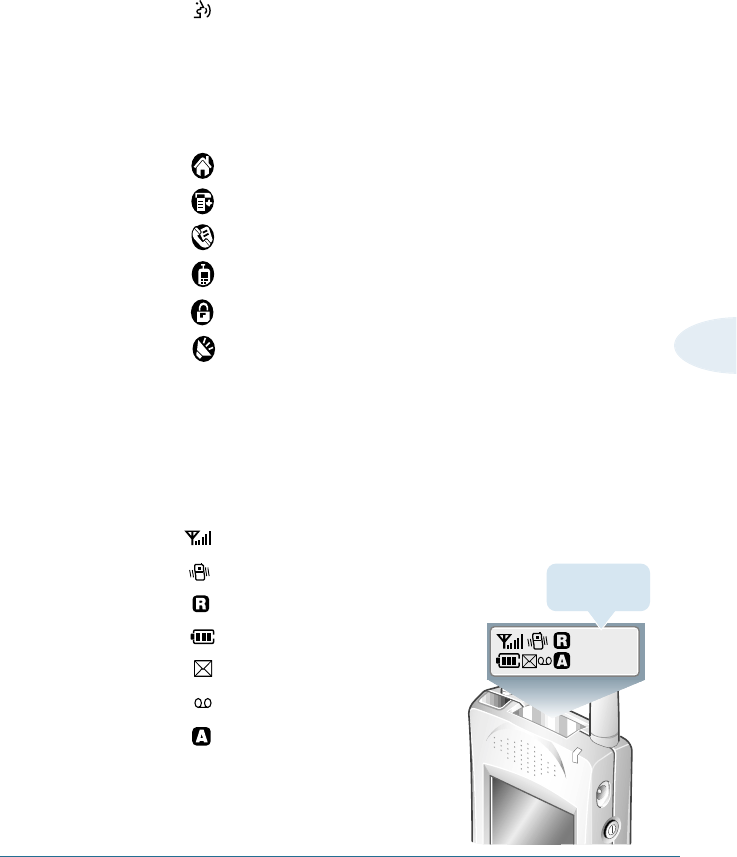
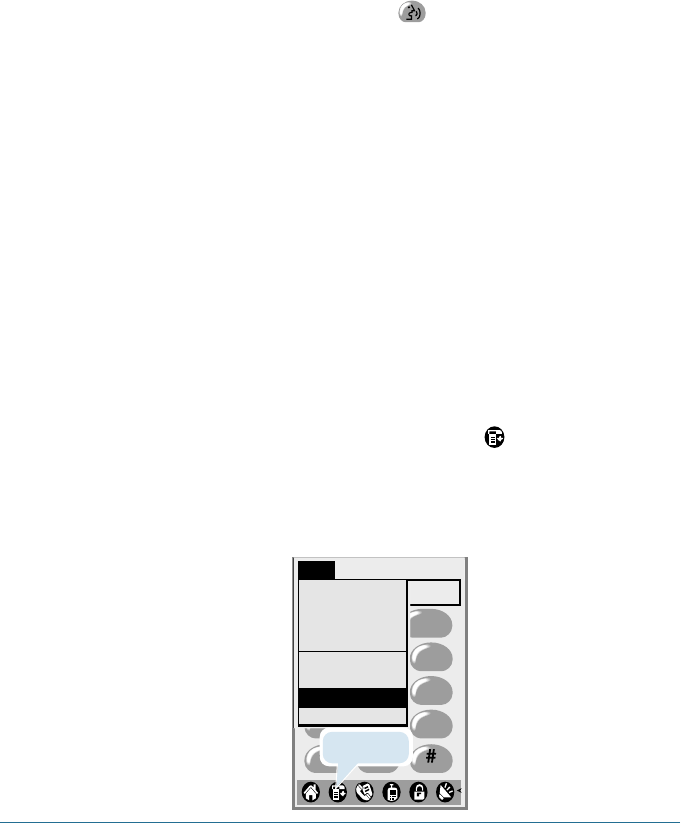
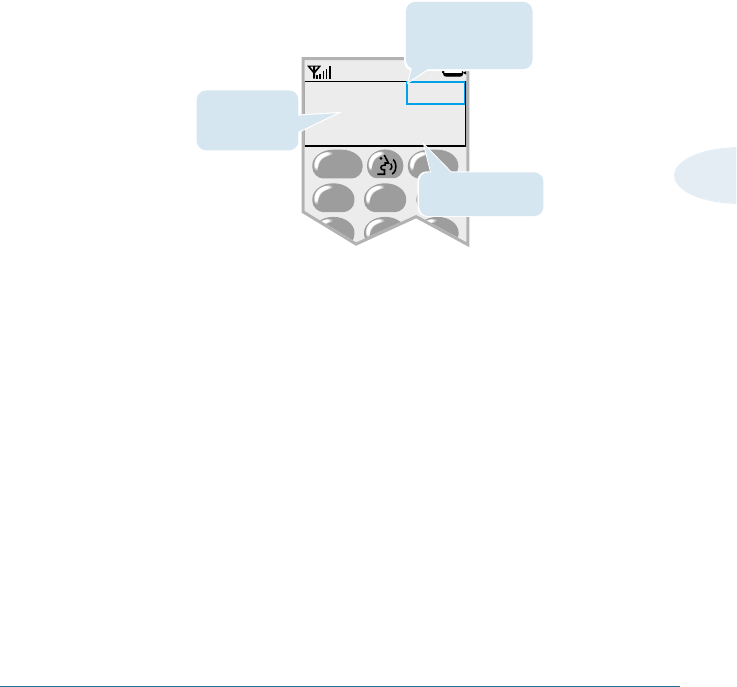
Features on the Phone Screen
1. Display indicators
Shows the received signal strength. The greater
the number of bars, the better the signal strength.
Appears when a call is in progress.
Appears when you are out of your home area and
have registered with a different network.
Appears when a new text message has been
received.
Appears when the phone is set to vibration mode.
Shows the level of your battery.
Appears when the phone application is off.
2. END key : Disconnects a call. When you press and hold this
key in Standby mode, the phone application turns
off.
3. TALK key : Sends a call.
oper
8
tuv
7
pqrs 9
wxyz
5
jkl
4
ghi 6
mno
2
abc
1
TALK END
3
def
0
USING PHONE AND MESSAGING 43
3
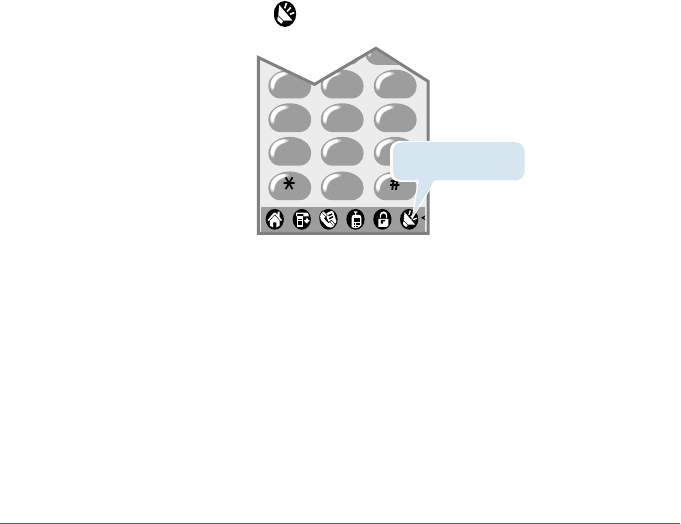
4. key : Allows you to activate voice dial.
5. Number keys : Enters a phone number or open the menus.
6. Bottom strip icons
Tap the Bottom Strip icons with the stylus to do the following:
Move to home.
Open the menu items.
Access the address book.
Open the outgoing call log.
Activate or cancel key guard when you hold it down.
Activate or cancel speakerphone.
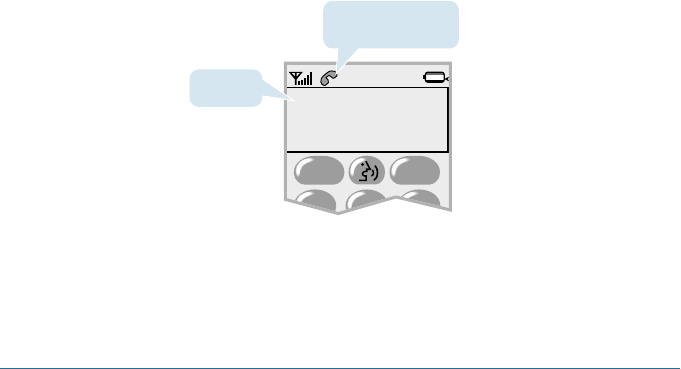
Features on the Phone LCD
In Standby mode, the phone LCD displays current time and date.
The indicators available are as follows:
Signal strength indicator
Vibrator indicator
Roaming indicator
Battery charge indicator
Text or page message indicator
Voice message indicator
???
12:39P
Dec 31
Current time
and date
Making a Call
You can make a phone call using the Dialer on the screen.
To make a call using the Dialer:
1. If the phone is not powered on, press and hold the phone
button on the front of the Smartphone. For details, see page
xx.
2. Key in the area code and the phone number by tapping the
number digits in the Phone screen with the stylus.
The number displays on the top of the screen as you tap them.
3. When the number is correctly displayed, tap the TALK button
to dial the number.
4. During a call, the call duration time displays. If matching
number is in the Address list, the corresponding name also
appears.
5. When you have finished your call, tap the END button.
44 USING PHONE AND MESSAGING
21
TALK END
3
01:20
John Smith
123-456-7890
Blinks then remains
on when connected
Call time
USING PHONE AND MESSAGING 45
3
Correcting the Number
When you key in the number button on the screen, the
button is replaced with the CLR button until the call ends.
To clear the last digit displayed, tap the CLR button briefly.
To clear the whole display, touch and hold down the CLR button
for more than one second.
Advanced Calling Features
In addition to calls that you make by dialing the number, you can
make calls directly from the Voice Dial, Speed Dial, Address
Book, and Call History menu options.
Voice Dialing
If you have set voice dial for the number you want to call (see
page xx), you can use voice to make a call.
To set a voice dial:
To use voice dial, you first set the phone to recognize the name
of the person you are calling. You can record up to 20(??) names
using the Address application. See page xx for information on
how to record name.
21
TALK END
CLR
3
00-182
To place voice dialing calls:
1. In the Phone screen, tap the button on the screen.
2. At the voice prompt, say the name into the phone.
• If the phone recognizes the name, the phone attempts a
connection.
• If the phone does not recognize the name, the screen
prompts for the name again.
• If the phone does not recognize the name after two
attempts, the message ‘Could Not Recognize Name’
displays. Try the call again later, or check the recorded
name.
To search through Voice Dial list, then make a call:
You can scan through the voice dial list you have recorded.
1. In the Phone screen, tap the Menu icon . The phone menu
list appears.
2. Tap Voice Dial List from the Calls menu. The Voice Dial List
which shows the voice dial names appears.
46 USING PHONE AND MESSAGING
oper
8
tuv
7
pqrs 9
wxyz
5
jkl
4
ghi 6
mno
2
abc
1
TALK END
CLR
3
def
0
Messages OptionsCalls
Outgoing
Incoming
Missed
Air time
Address List
Speed Dial List
Voice Dial List
Tone List
Menu icon
USING PHONE AND MESSAGING 47
3
3. Scroll through the list if necessary by using the scroll buttons
and .
4. Tap the desired name you want to call. To dial the selected
name, tap Call from the pop-up menu.
Speed Dialing
You can designate up to 1000 phone numbers from your Address
Book to be on your Speed Dial list. You can then call these
phone numbers using only a one- or three-digit number (0
through 999). Because Speed Dial is linked to the Address Book,
when you change a phone number in the Address Book, it is
automatically updated in the Speed Dial list.
To make a call using speed dial:
1. In the Phone screen, touch and hold the speed number.
If the number contains more than one digit, tap briefly the
first digit(s) and touch and hold the last digit.
As you press the number, the name of the person you are
calling appears on the screen.
The screen will be inserted
>
>
48 USING PHONE AND MESSAGING
2. Press the TALK button.
3. When you have finished your call, press the END button.
To search, then speed dial:
If you do not remember the speed dial number for someone you
want to call, follow these steps to select it from the Speed Dial
list.
1. In the Phone screen, tap the Menu icon . The phone menu
list appears.
2. Select Speed Dial List from the Calls menu. The Speed Dial list
which shows the speed dial codes appears.
3. To scroll through the list if necessary, press the scroll buttons
on the front of the Smartphone.
4. Tap the desired entry you want to call. To dial the selected
entry, tap Call from the pop-up options.
The screen will be inserted

USING PHONE AND MESSAGING 49
3
Redialing the Last Number
The phone stores the last number dialed. To redial the number,
just touch and hold down the TALK button in the Phone screen.
Using the Address Book
You can store the phone numbers called regularly in memory,
called the Address Book. You then simply recall the number to
dial. For further information on Address Book, see page xx.
To make a call from the Address Book:
1. In the Phone screen, tap the Menu icon . The phone menu
list appears.
2. Select Address List from the Calls menu. The Address Book list
appears in alphabetic order.
3. To scroll through the list if necessary, press the scroll buttons
on the front of the Smartphone. Or enter the first few letters of
the name you want to find in the Lock Up field.
The screen will be inserted
50 USING PHONE AND MESSAGING
4. To see more information about an entry, tap the desired name.
To dial number, tap the number in the Address List screen. If
there is more than one number, the Select Number To Dialog
box opens. Tap the desired number.
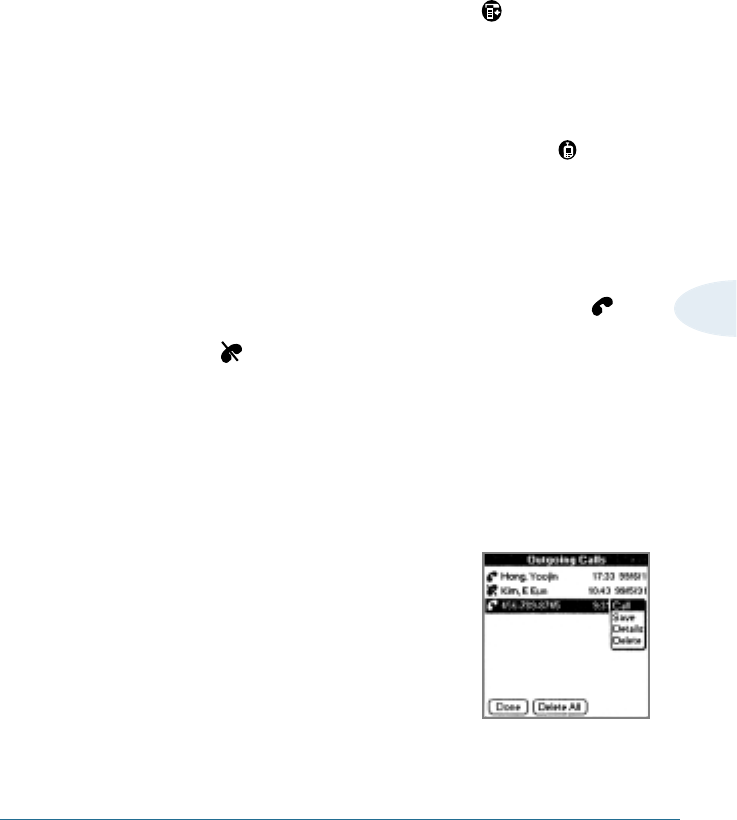
Using Call History
Your phone stores up to 20 numbers you either called or received
calls from. It identifies callers, and the date and time they called.
You can view the incoming and outgoing calls list independently
and dial a number from the list.
Tap the phone icon to
dial the corresponding
number.
Tap Edit to open
Address Edit screen.
The screen will be inserted
The screen will be inserted
➜
➜
USING PHONE AND MESSAGING 51
3
To make a call from the calls list:
1. In the Phone screen, tap the Menu icon to open the Phone
menus.
2. From the Calls tab on the top of the menu screen, select
Outgoing for outgoing calls and Incoming for incoming calls .
Tip: You can quickly open the Outgoing calls list by tapping icon on
the bottom of the Phone screen.
3. The selected calls list appears. The date/time stamp displays
for each log.
If there is an internal Address Book match, the corresponding
name displays. If not, only the phone number displays.
symbol indicates you have successfully dialed or received the
call. symbol indicates you have not connected or missed
the call.
4. To scroll through the list if necessary, press the scroll buttons
and on the front panel of the Smartphone.
5. To dial the selected number highlighted, tap Call from the
pop-up options.
Note: In case of duplicate entries, the phone
stores the number with each time and
date in which the call arrives.
>
>

52 USING PHONE AND MESSAGING
To save a number in the Address Book:
After selecting one from the outgoing calls list, you can save the
number in the phone’s Address Book. Tap the desired number in
the calls list. When pop-up menu appears, select Save. The
Address New screen opens which allows you to create a new
address book entry.
To see the details:
To see more information about the selected entry, select Details
from the pop-up options. You can see the details about a Specific
entry.
To delete one number from the outgoing calls list:
The phone automatically replaces older calls with newer ones.
However, if you want to delete a selected number from the calls
list immediately, tap the number you want to erase in the calls list.
From the pop-up menu, select Delete.
To delete all outgoing calls number:
To delete all numbers from the calls list, tap button in
the list.
Using Four-digit Dial
Your phone provides the option of four-digit dialing of numbers
stored in the internal Address Book or the outgoing calls list. This
allows you to enter the last four consecutive digits of someone’s
phone number, have your phone remember the rest, and then dial
it for you.
Delete All
USING PHONE AND MESSAGING 53
3
To place a call using four-digit dialing:
1. In the Phone screen, key in the last four consecutive digits of a
phone number that you have stored in your Address Book or you
have dialed before.
2. The phone displays the number matching your input.
Making Emergency Calls
You can dial 911 or any emergency numbers you have pre-
specified even when the Smartphone is locked. For details on
locking the Smartphone, see page xx.
To make an emergency call when the phone is locked:
1. Tap Emergency Calls in the System Lockout screen.
2. Phone screen appears. Tap the desired number, then tap TALK.
Note: If you enter number other than the emergency numbers you
specified in the emergency number list or 911, the Smartphone
returns to the System Lockout screen.
54 6
2
abc
1
TALK END
3
def
01/03
Catherine
44-123-4567
The number of total
numbers matching
your input
Name
(if stored in the
Address Book)
Phone number
matching your input
54 USING PHONE AND MESSAGING
3. If the phone contains more than one phone number in which
the last four consecutive digits are the same, it displays the
number of the phone numbers matching your input either from
the outgoing calls list or Phone Book list in the upper right
corner of the screen.
Select the desired number by pressing the scroll buttons.
4. To dial the number, tap TALK.
Using Speakerphone
You can turn the speakerphone feature on by holding down the
Speaker icon on the bottom of the Phone screen.
With the speakerphone on, you can talk without using the hands.
oper
8
tuv
7
pqrs 9
wxyz
5
jkl
4
ghi 6
mno
2
abc
1
TALK END
CLR
3
def
0
Speakerphone icon
USING PHONE AND MESSAGING 55
3
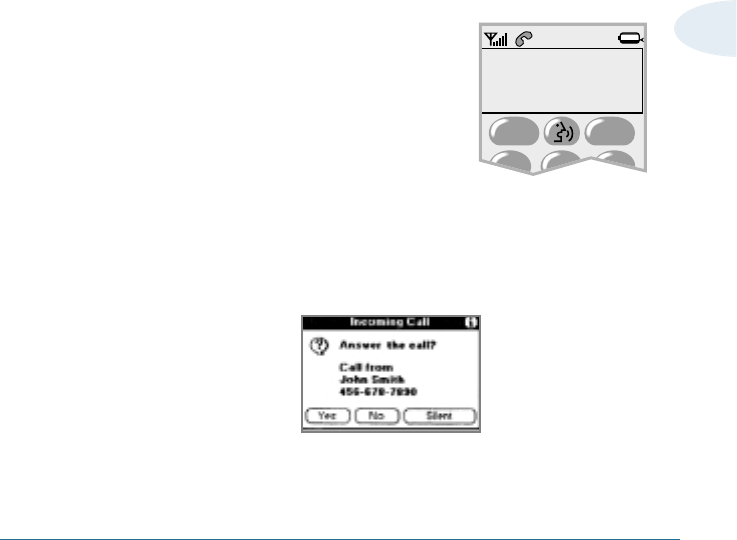
Answering Calls
Note: To receive a call, the phone must be turned on. For details, see page
xx.
When somebody calls you, the phone rings and the Phone screen
turns on. If the caller can be identified, the caller’s phone number
(or name if pre-stored in your Address Book) is displayed both on
the main screen and small LCD at the top of the phone. If the
caller cannot be identified, only the message ‘Incoming’ is
displayed.
To answer the call:
Tap any button on the Phone screen
(except END).
You can adjust the volume of the ringer
for that call with the volume buttons on
the left side of the phone.
Note: You can answer a call while using a menu feature. The screen alerts
you with the incoming call message. Tap Yes to answer the call, or No
to reject the call. If rejected, the call will be forwarded to your voice
mailbox. If no mailbox is available, the call will be disconnected. If
you tap Silent button, the ringer will be muted.
21
TALK END
3
01:20
John Smith
123-456-7890
56 USING PHONE AND MESSAGING
In-Call Options
Your phone provides a number of functions that you can use
during a call. You may not utilize all of these functions at all
times. Many of the in-call options are network services.
Tap the Menu icon on the bottom of
the Phone screen during a call. The Busy
menu appears on the screen which allows
you to access the following options.
Record
This option allows you to record voice conversation. Using the
Voice Recorder button on the left side of the phone, you can also
record the telephone conversation. For details, see page xx.
Mute
This option allows you to switch your phone’s microphone off, so
that the other party cannot hear you. *Mute* displays on the
screen.
To resume, tap the Menu icon and select this option again in
the Busy menu.
Silent Key
This option does not transmit the key tones. It allows you to tap
buttons without hearing annoying key tones during a call.
1
abc de
23
Record
Mute
Silent key
DTMFs send
Tone list
Busy
USING PHONE AND MESSAGING 57
3
DTMFs Send
Selecting this option sends DTMF (Dual Tone Multi Frequency)
tones of your phone number. Use this option when you leave your
phone number for the person to return your call.
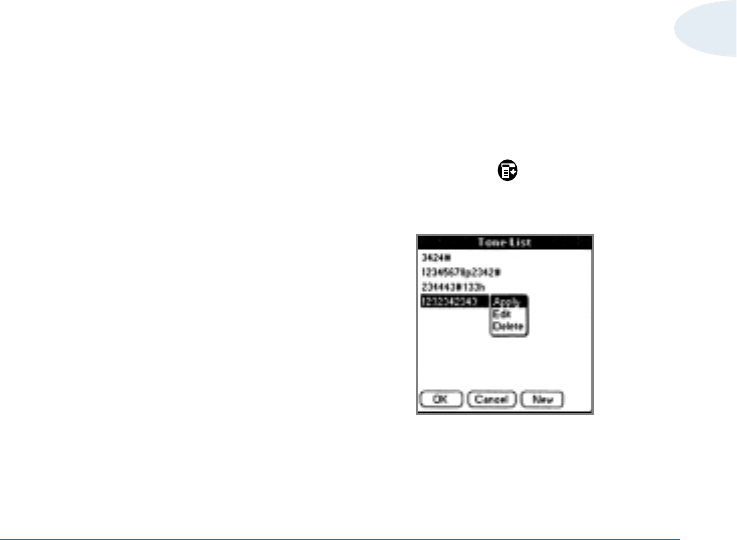
Tone List
This option allows you to send DTMF tones of the numbers you
have previously stored in the Tone list. DTMF tones can be used
to control electronic phone services, such as a bank account or
voice mail system.
To use this option, you should store the numbers you want to
send as DTMF tones, for example, the bank account number and
password.
To register DTMF numbers:
1. In the Phone screen, press the Menu icon to open the
Phone menus.
2. Select Tone list from the
Calls menu.
3. Tap the New button.
4. Enter the desired number, then tap the OK button.
58 USING PHONE AND MESSAGING
To use the DTMF number during a call:
1. After you call the service, select this option from the Busy
menu when the service asks to enter the DTMF code.
2. Select the desired number in the Tone List.
3. Tap the TALK button.
Call Waiting
You can answer an incoming call while you have a call in
progress, if this service is supported by the network. Contact your
service provider to activate Call Waiting.
During a call in progress, an incoming alert sounds for another
incoming call and a Call Waiting message appears on the screen.
The caller’s name (if stored in the internal Address Book) or
phone number is also displayed if the caller identification feature
is supported on your network.
The call waiting message disappears after 15 seconds or if you
tap TALK.
TALK END
01:10 Call Waiting
Catherine
987-654-321

USING PHONE AND MESSAGING 59
3
To answer a waiting call:
1. Tap the TALK button. The phone connects the calling party, and
places the current party on hold.
2. Tap the TALK button again to switch between the two parties.
Making a Conference Call
Three-way calling enables user to conduct conference calls with
two separate parties simultaneously. Users are billed air time for
each outgoing call separately.
To make a conference call:
1. Call the first conference participant.
2. During a conversation, press TALK button, enter the phone
number for the second participant, them press TALK again. The
phone places the other party on hold.
3. When the party answers, press TALK again to connect with the
original party.
60 USING PHONE AND MESSAGING
Advanced Phone Features
Viewing Missed Calls
If you are unable to answer a call, you can find out who was
calling you, if this service is available on your network. You can
call the person back, if necessary.
The number of missed calls is displayed on the small LCD at the
top of the smartphone and the last caller name (if stored in the
internal Address Book) and the phone number is also displayed
immediately after the call was missed.
If you tap the TALK button on this screen, you’ll be connected to
the last caller you have not answered. If you press any other keys
on this screen, the missed call notification screen disappears.
To view the missed calls:
1. In the Phone screen, tap the Menu icon to open Phone
menus.
2. Select Missed from the Calls menu. The Missed Call list
appears.
TALK END
3 missed calls
123-456-7890
USING PHONE AND MESSAGING 61
3
3. To scroll through the list if necessary, press the scroll buttons
on the front of the Smartphone.
4. Select the desired number. To dial the number highlighted, tap
Call from the menu which pops up.
You can also save or delete the number by selecting
corresponding commands from the pop-up menu.
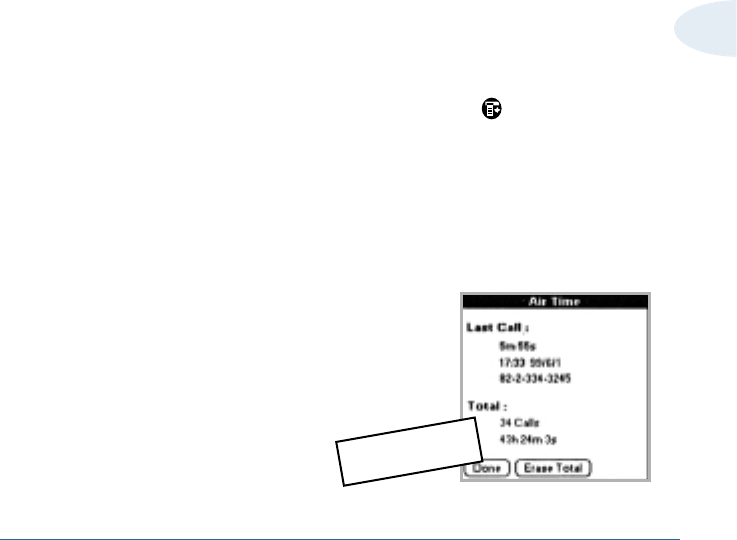
Viewing Air Time
You can review the air time of the most recent call, as well as
total air time for all calls since the last reset action. You can also
reset the call timer.
To review the air time:
1. In the Phone screen, tap the Menu icon to open the Phone
menus.
2. Select Airtime from the Calls menu.
3. The Air Time screen appears. Select the call type you want to
view the air time.
4. You can review the last call time,
the total number of calls and the air
time for all the selected calls,
independently, since the last reset
action.
Tentative

62 USING PHONE AND MESSAGING
5. If you want to reset the call timer, tap the Erase Total button,
then the OK button.
To exit, tap the Done button.
Using Key guard
Use the Key guard feature to make sure that keys are not
pressed accidentally (for example, if the Smartphone slips around
inside a briefcase). The Key guard remains on until you either
turn it off or answer a phone call.
Note: For additional security, you can lock your Smartphone with a
password. See page xx.
To turn on Key guard:
In the Phone screen, tap and hold down the Key guard icon
on the bottom until KEY GUARD appears on the screen.
If you receive a call while Key guard is turned on:
Press TALK to answer the call. Key guard is automatically turned
off.
To unlock Key guard:
Tap and hold down the Key guard icon until KEY GUARD
disappears on the screen.
USING PHONE AND MESSAGING 63
3
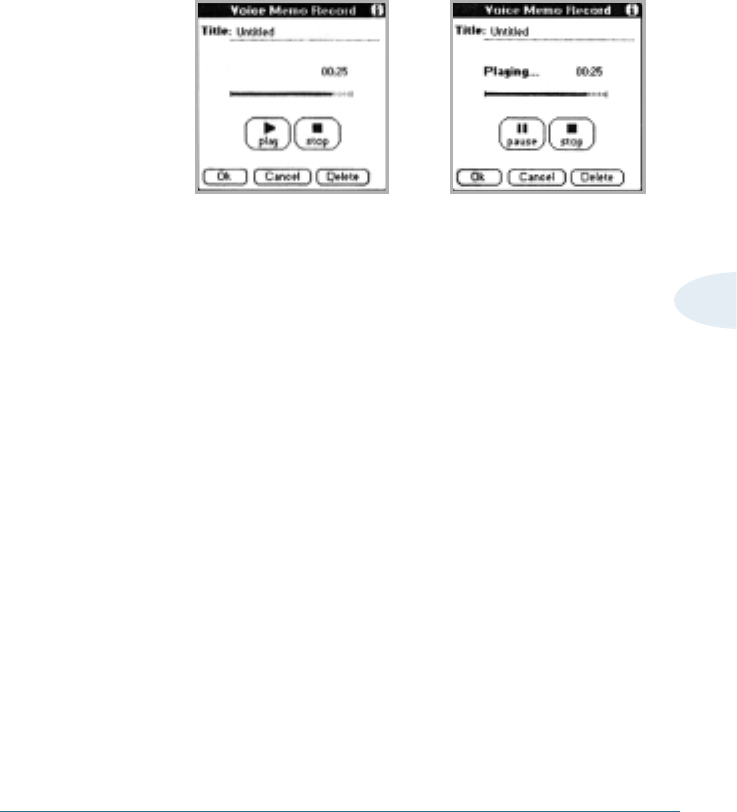
3. You can stop the recording for a while by pressing the pause
button and then start again by pressing the Record button.
4. To stop the recording, press the stop button. Telephone
conversation recording is automatically stopped when the call
ends.
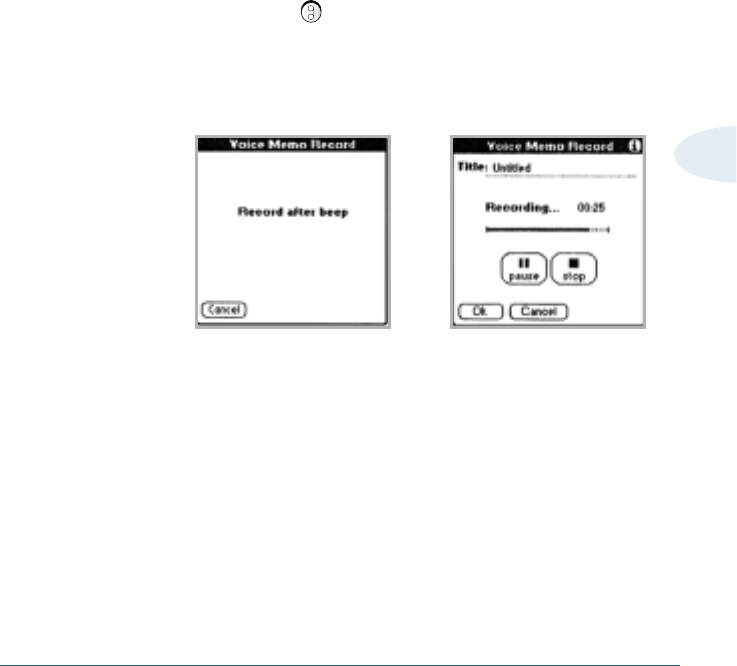
Voice Recorder
The Voice recorder allows you to record telephone conversations
and voice memos. You can also listen to your recordings. The
maximum length of a recording is 30 ???? seconds.
To record:
1. Press and hold button on the left side of the Smartphone.
2. The Voice Memo Record screen appears. Begin your recording
after a beep. If you are recording a telephone conversation,
both parties will hear a beep when the recording starts.
➜
➜
64 USING PHONE AND MESSAGING
Tip: If you stop recording by pressing and holding down the button on
the left side of the phone, the Voice Memo Record dialog box doses and
the voice memo is recorded as an ‘Untitled’ automatically.
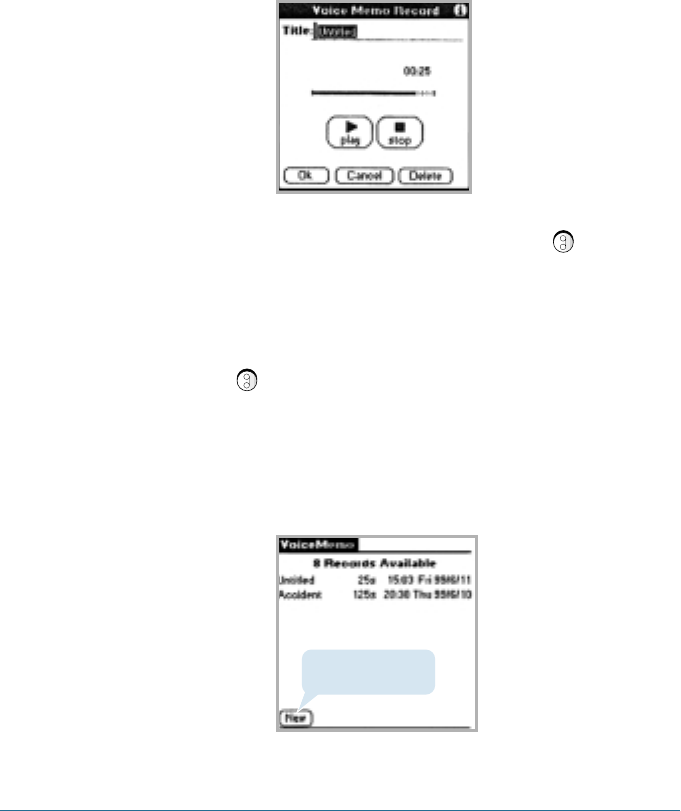
To play recording:
1. Press button on the left side of the Smartphone briefly.
2. The Voice Memo List opens and shows a list of all the sound
files currently stored in your Smartphone. You’ll see the length,
which is measured in seconds, of the file and the date and time
it was recorded.
5. Edit the title, then tap OK when completed.
Allows you to record
a new voice memo.
USING PHONE AND MESSAGING 65
3
3. To open a file, tap the desired file, and tap the play button.
4. The pause command temporarily stops the playing of the sound
file. To start playing again, press the Record button.
5. To stop playing, press the Stop button.
Note: Sound files that the voice recorder can play have a WAV extension and
support the following audio format: 8, 11, 22 or 44 khz, PCM/A-law,
Stereo/Mono, 8bit.
➜
➜
SMS (Short Message Service)
The Short Message Service enables you to talk and receive short
messages. You can also receive voice mails. To talk and receive
short messages, the SMS must be supported by the network you
are using. Contact your home service provider for details.
Note: To send or receive messages, the phone’s power must be on.
Sending a Short Message
To write and talk a new short message:
1. Wake up the Smartphone screen, if necessary, by using the
power button on the right side of the Smartphone.
2. Choose the following options to launch SMS application:
• Tap icon to open the Applications Launcher, then tap the
SMS icon.
• In the Phone screen, tap the Menu icon to open the
Phone menus, then tap Inbox or Outbox from the Messages
menu.
66 USING PHONE AND MESSAGING
The screen will be inserted

3. When the Messages screen opens, tap the New button.
The New Message screen opens.
4. To enter the recipient's mobile phone number in the To field,
enter the number. For details on entering numbers, see page
xx.
If you already stored the number in your phone’s Address Book,
you can select it by tapping the To button. For details on
Address Book, refer to page xx.
5. If you want to set the message’s priority, tap the pick list. You
can select either Normal, or Urgent from the pick list.
6. To enter the callback number, tap the Call # field to position
the cursor, then type in the desired numbers.
You can enter up to 160 characters. The character counter
shows how many characters you have typed at the top of the
screen.
7. To enter the contents, tap the Body field to position the cursor
in the field, then type the desired message.
USING PHONE AND MESSAGING 67
3
This counter shows the number
of characters used out of the
total number of characters that
can be entered.
Tap to select a
number from the
Address Book.
68 USING PHONE AND MESSAGING
8. If you want to store the message in the OutBox for use at a
later time, tap the Draft button.
To talk the message, tap the Send button. The remote phone
should have SMS capability to receive your message. All sent
messages are stored in the Outbox.
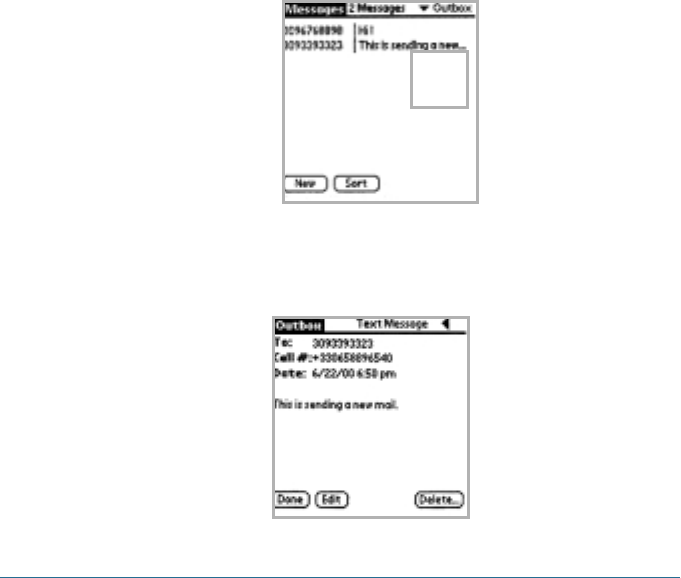
To view messages you wrote:
1. Once you are in the Message screen, select Outbox after
tapping the pick list in the upper-right corner of the Messages
screen.
2. Tap the desired message, then tap the Edit button to change
the contents. After you edit the message, you can send or save
it to Draft folder.
To delete, tap the Delete button. To exit, tap the Done button.
Done
Edit
Delete
USING PHONE AND MESSAGING 69
3
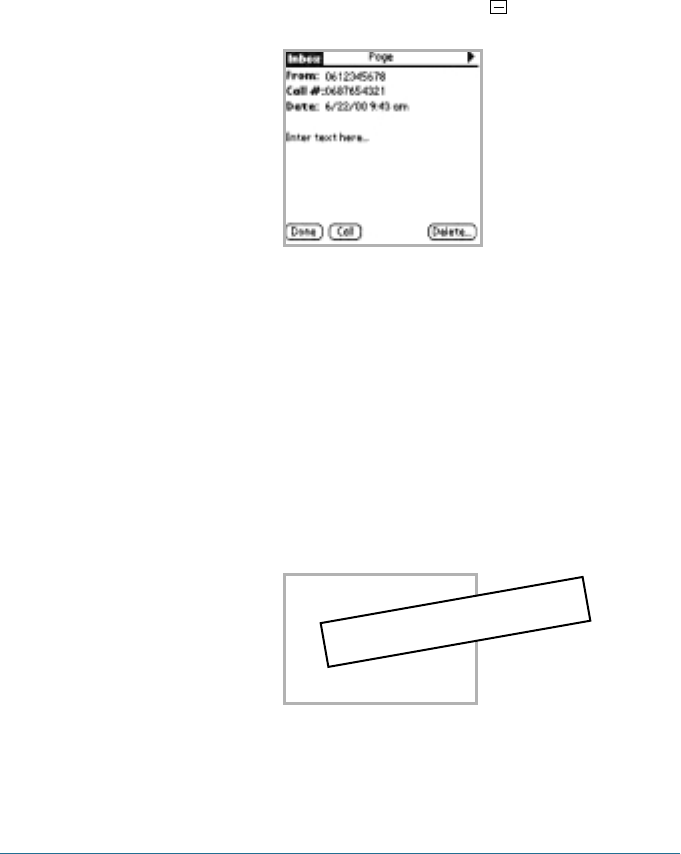
Receiving Messages
Short messages are received automatically, provided that this
service is available and that the phone is on and within cellular
coverage area. All received messages are stored in the InBox
folder.
A received short message can be a normal short message,
paging message or notification of a voice message in your voice
mailbox.
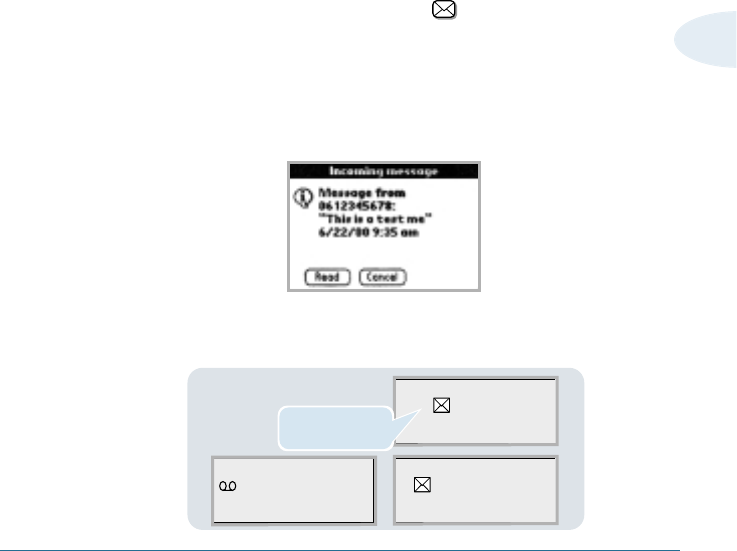
To read or listen to messages:
When a new message has arrived, icon appears at the top
of screen and the Incoming message screen opens which
provides Read, Listen, or Call button according to the type of
messages. Tapping the button allows you to read the text
message contents, to connect to the voice mail server, or to dial
the paging number. Tapping the Cancel button returns to Standby
mode.
The small LCD at the top of the Smartphone also displays
incoming message alert:
• With Callback number
New Voicemail
123-456-7890
! New Text
123-456-7890
New Page
123-456-7890
Urgent message
indicator
70 USING PHONE AND MESSAGING
After the Incoming message screen disappears, if you want to
read or listen to messages, do as follows:
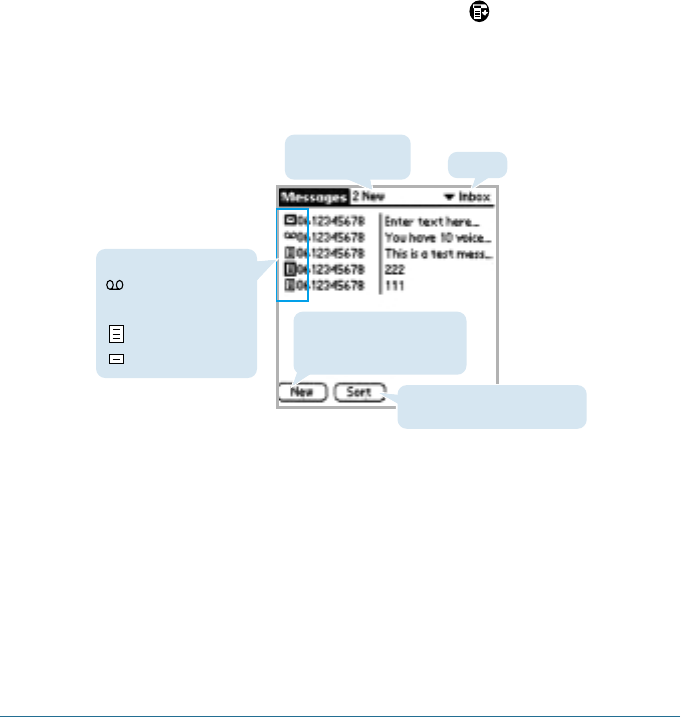
1. Choose the following options to open the Inbox folder.
• Tap SMS icon in the Application Launcher screen. Then tap
Inbox at the top of the pick list.
• In Phone screen, tap the Menu icon to open menus. Tap
Messages on the menu bar, and select Inbox.
2. The messages you received are displayed. An icon next to the
message indicates the message type.
3. Tap the desired message from the list. The selected message
contents are displayed.
pick list
Total number of
messages received
Shows messages according to
the selected sorting order.
Opens the New Message
screen which allows you to
talk a new message.
Message Types
Voice mail
!Urgent text message
Text message
Pager
USING PHONE AND MESSAGING 71
3
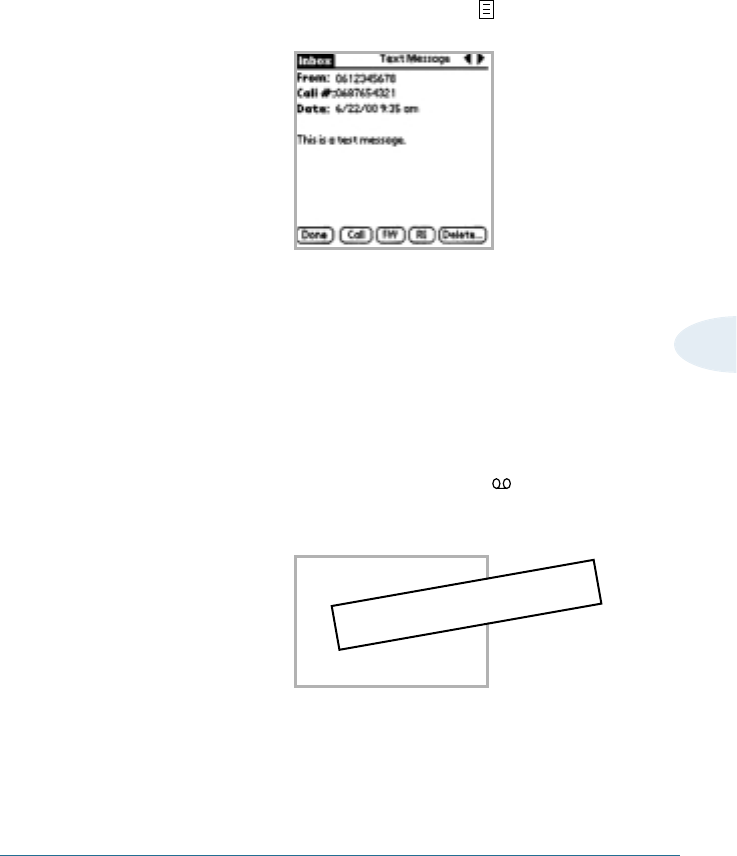
a. If you selected text message marked in front, the Text
Message screen opens.
To reply to a received message, tap the RE button.
To make a call to the talker, tap the Call button.
To forward the message to another party, tap the FW
button.
To delete the message, tap the Delete button.
To exit, tap the Done button.
b. If you selected voice message marked in front, the
following screen opens and allows you to listen to the
voicemail.
To listen to the message, tap the Listen button. The phone
automatically calls your voice mailbox.
To delete, tap the Delete button.
To exit, tap the Done button.
The screen will be inserted
72 USING PHONE AND MESSAGING
C. If you selected page message marked in front, the Page
screen appears.
To call to the caller, tap the Call button.
To delete the message, tap the Delete button.
To exit, tap the Done button.
Sorting the Message List
You can sort the message list in various ways.
1. When you see the messages list received in the Inbox folder or
stored in the Outbox folder of the SMS screen, tap the Show
button.
2. Tap the Sort by pick list and select an option, then tap OK.
The message list is rearranged in order by the selected sorting
method.
The screen will be inserted

USING PHONE AND MESSAGING 73
3
Deleting a SMS Message
The Inbox and Outbox folders can store up to 50 messages each.
When the inbox folder is full, you cannot receive any more
messages until you delete old messages. When the Outbox folder
is full, the oldest message is automatically deleted when Sending
a new message.
To manually delete a message:
1. When you see the messages list received in the Inbox folder or
stored in the Outbox folder of the Messages screen, select the
message you want to delete.
2. Tap the Delete button. You are asked to delete the selected
message.
3. Tap the OK button to confirm.
To delete all messages:
1. When you are in the Messages screen, tap the Menu icon .
2. Tap the Message tab, and select Delete All. You are asked to
confirm the deletion.
3. Tap the OK button to delete all messages.
Note: Voicemail messages are automatically deleted after you listen to the
corresponding message in your voicemail box. Voicemail messages
cannot be deleted using phone menus.
74 USING PHONE AND MESSAGING
Setting Phone Preferences
Phone preferences setting enables you to configure the phone
settings.
To change the phone preferences:
Choose the following options:
• In the Application Launcher, tap the Prefs icon, then tap the
pick list in the upper right corner and select the desired phone
preference menu.
• In the Phone screen, tap the Menu icon , then tap Options,
and select the desired preference command.
The screen will be inserted
The screen will be inserted
USING PHONE AND MESSAGING 75
3
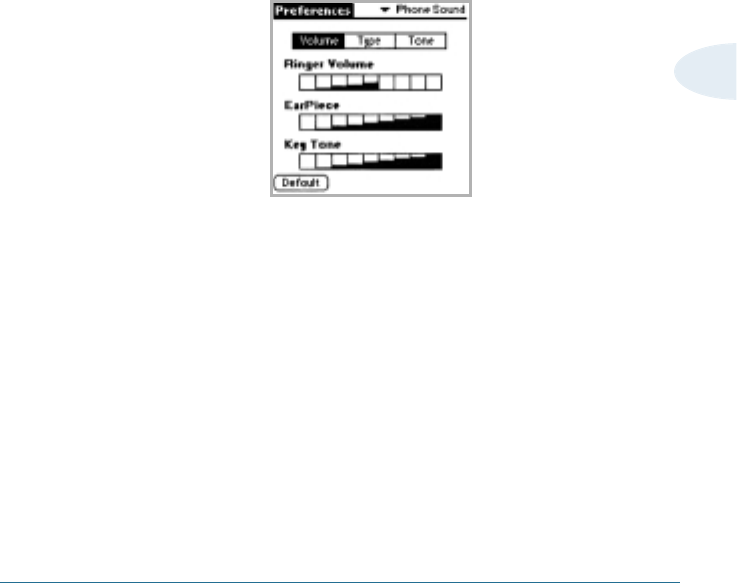
Phone Sound
To configure the phone sounds, tap PSound from the pick list in
the Preference screen.
In the phone menu screen, tap Sounds from the Options tab.
Volume
You can adjust ringer volume, earpiece volume and key tone
volume.
To increase the volume, tap the block on the right side, and to
decrease the Volume, tap the left block.
Tapping Default sets the volume to the default mode.
Type
You can set your phone to signal an incoming call or message in
the following ways:
• Bell – the ringer sounds.
• Vibrator – the phone vibrates.
• Lamp – The red LED on the top of the phone flashes.
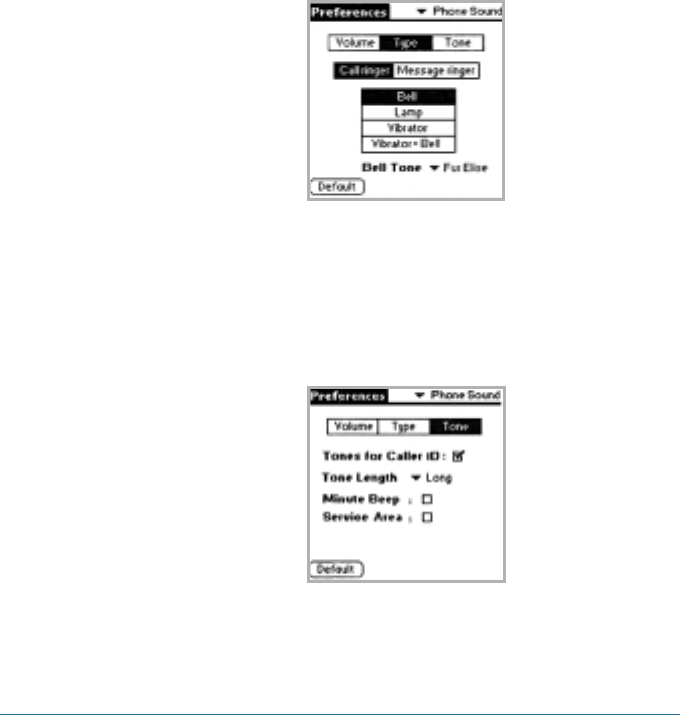
76 USING PHONE AND MESSAGING
• Vibrator+Bell – the phone vibrates and the ringer also sounds
if you do not answer the call.
To select the ringer type, tap Type, then tap the desired ringer
type. You can set the ringer type differently for Call and Message
each other.
Tap the Bell Tone pick list and select the ring tone from the list.
Tone
Tap Tone in the Phone Sound Preference screen. The following
tone menus are displayed.
USING PHONE AND MESSAGING 77
3
• Tones for Caller ID – TBD
• Tone Length – Some phones you call can recognize only longer
tones. You may have to change the length to Long for some
calls. When calling a paging system, your phone should be in
the Short mode.
• Minute Beep – If you put a check mark on this check box, the
phone beeps an alert 10 seconds before each elapsed minute
to remind you of the length of the current call.
• Service Area – If you put a check mark on this checkbox, the
phone beeps when you exit service area or when you return to
a service area.
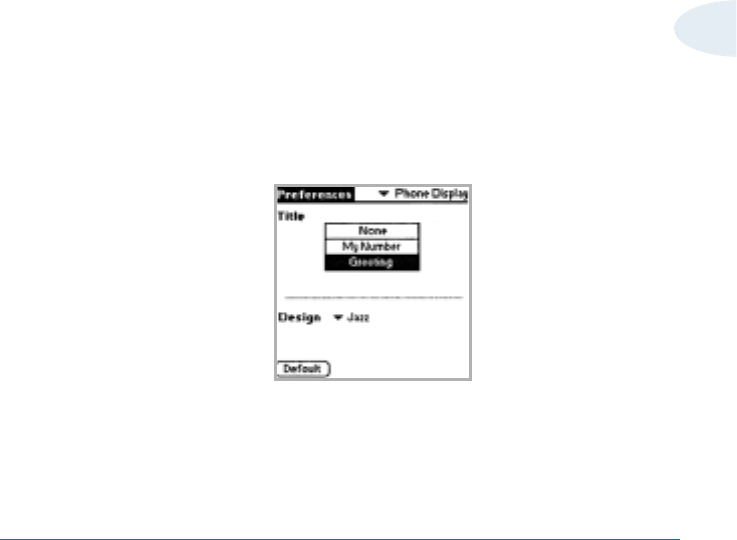
Phone Display
To configure the phone display, tap PDisplay from the pick list in
the Preference screen.
In the Phone menu screen, tap Display from the Options tab.
78 USING PHONE AND MESSAGING
You can select the title that you see in the idle mode of the
Phone screen.
To select design : TBD
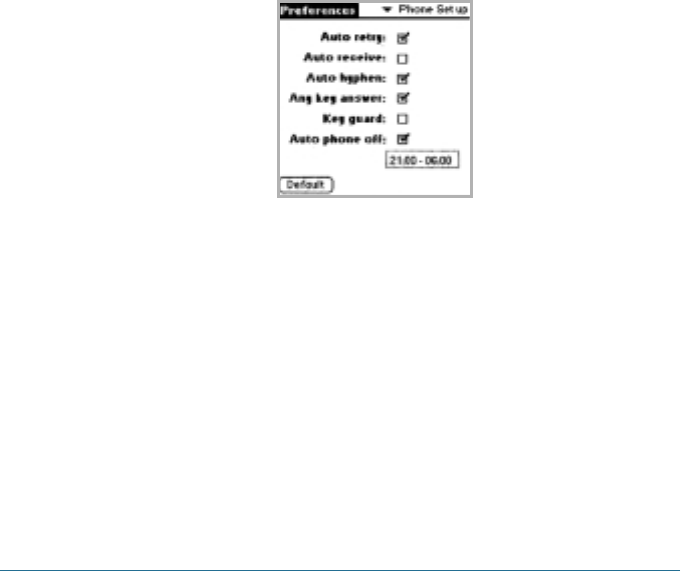
Phone Setup
To configure other phone settings, tap PSetup from the pick list in
the Preference screen.
In the phone menu screen, tap Setup from the Options tab.
The following options are available:
• Auto retry – With this checkbox selected, a number is
automatically redialed if the call is not connected successfully.
• Auto receive – With this checkbox selected, the phone will
answer incoming call after 2 rings.
• Auto hyphen – With this checkbox selected, your phone
automatically hyphenates number as follows: area code–
number. Digits following a pause are not hyphenated.
• Any key answer – With this checkbox selected, you can
answer incoming calls by pressing any key.
• Key guard – With this checkbox selected, you can lock the
keypad on the Phone screen.
USING PHONE AND MESSAGING 79
3
• Auto phone off – With this checkbox selected, you can set the
phone to turn off during a specified time period.
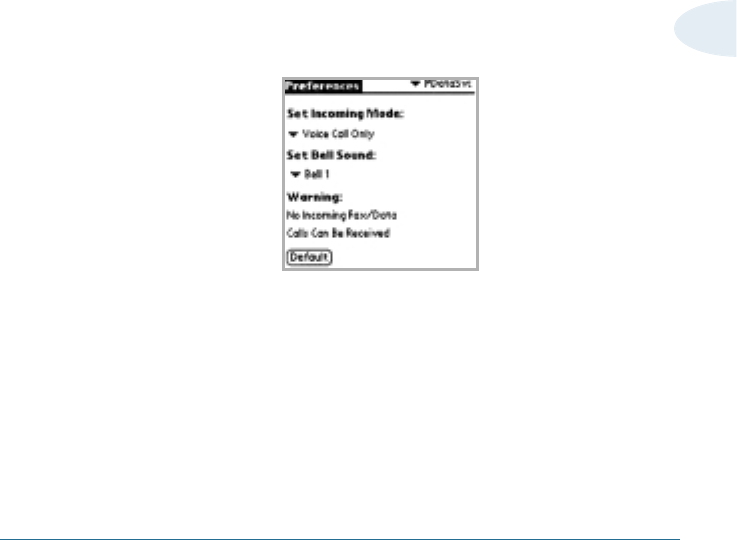
Setting Data Service Preferences
You can set your phone to receive voice call only, data call only,
or fax call only.
To set this feature:
1. Choose from the following options:
• In the Preferences screen, tap PDataSvc from the pick list.
• In the Phone menu screen, tap Data Service from the
Options tab.
2. Tap the Set Incoming Mode pick list, then select Voice Call
Only, Data Call Only, or Fax Call Only.
Note : Once you have set the incoming mode to “Data Call Only” or “Fax
Call Only,” you cannot receive regular voice calls until you change
back to “Voice call Only.”
3. To set a unique bell sound for data call, tap the Set Bell Sound
pick list and select the desired bell type.

80 USING PHONE AND MESSAGING
Setting Security Options
Your Smartphone includes a Security application that lets you set
options to protect entries from unauthorized users in a variety of
ways:
The Security application lets you:
• Mask or hide entries you have defined as private. The Mask
option displays a gray bar over private records, and the Hide
option completely removes (hides) private records.
• Assign a password to viewing options to enhance security.
Assigning a password requires you to enter a password before
private entries can be viewed; not assigning a password lets
you view private entries when you Show Records from the
Security dialog box.
• Lock and turn off your Smartphone so that a password must be
entered before you can use the device again.
• Hide records that you have defined as private, with or without
a password. Without a password, private records are hidden
until you set the Security application to display them; with a
password, you must enter the password to view the private
entries.
To access the Security menu:
Choose from the following options:
• In the Applications Launcher, tap the Security icon.
• In the Phone menu screen, tap Security from the Options tab.
USING PHONE AND MESSAGING 81
3
Masking and Hiding Records
You can mask or hide private records. When you mask private
records, a visual place holder appears where the record would
normally be displayed; when you hide records, they are not
visible anywhere in the list.
For information on how to mask private records and how to hide
private records, see page xx.
Assigning and Editing Passwords
You can assign a password to protect your private records and to
lock your Smartphone.
Once you define a password, you can change or delete it at any
time. You must enter the current password before you can
change or delete it.
If you’ve forgotten your password, you can delete it. See
“Recovering from a forgotten password” later in this chapter.
The screen will be inserted
82 USING PHONE AND MESSAGING
To assign, change, or delete a password:
1. Open the Security screen.
2. Tap the Password box.
3. Enter a password—either the one you want to assign or your
current password if you want to change or delete it—and tap
OK.
4. Choose from the following options:
• To assign a password, enter the password again to verify it,
and tap OK.
• To change your password, enter a new password and tap
OK.
• To delete your password, enter your current password. Tap
OK, and then tap Delete.
The screen will be inserted
USING PHONE AND MESSAGING 83
3
Locking Your Smartphone
You can turn off and lock your Smartphone with a password to
protect information. You must then enter the password when you
turn on your device to gain access to the information on it.
Important! If you forget the password, you must perform a hard
reset to resume using your Smartphone. Performing a hard reset
deletes all the records in your Smartphone; however, you can
restore all synchronized data at the next HotSync operation. See
“Performing a Hard Reset” in Appendix A for more information.
To lock your Smartphone:
1. Tap Details in the Security screen.
2. Tap the Lock pick list, and select from the following options:
• Off – The phone remains unlocked.
• Now – The phone locks immediately and stays locked until
the lock code is entered.
• Power On – The phone locks automatically the next time
your phone is powered on and stays locked until the lock
code is entered.
The screen will be inserted

84 USING PHONE AND MESSAGING
Restricting Calls
Your phone provides a wide variety of call restrict options in the
Security menu. These options give you powerful tools to manage
your phone.
To restrict calls:
1. Tap Details in the Security screen.
2. Select the following options:
• Restrict incoming call – With this checkbox selected, you
can set your phone not to receive incoming calls.
• Restrict outgoing call – With this checkbox selected, you
can set your phone not to make outgoing calls.
Registering Emergency Call
Your phone provides the option of storing three emergency
numbers.
All three emergency numbers can be manually dialed at any time
even when your phone is locked or all outgoing calls are
restricted. This can be a useful feature for controlling what
numbers can be dialed from your phone.
To store emergency numbers:
1. Tap Details in the Security screen.
2. Tap the location and enter the desired number, then tap OK.

USING PHONE AND MESSAGING 85
3
Resetting Your Phone
Resetting the phone erases all phone’s data including SMS
messages and returns to the default settings.
To reset the phone:
1. Tap Details in the Security screen.
2. Tap the Reset phone button.
3. Tap OK to reset the phone, or tap Cancel to cancel the
operation.
WORKING WITH APPLICATIONS 87
Working with Applications
This chapter explains how to open applications, how to
personalize application settings, and how to categorize
applications into related groups. This chapter also provides
instructions about tasks common to two or more applications.
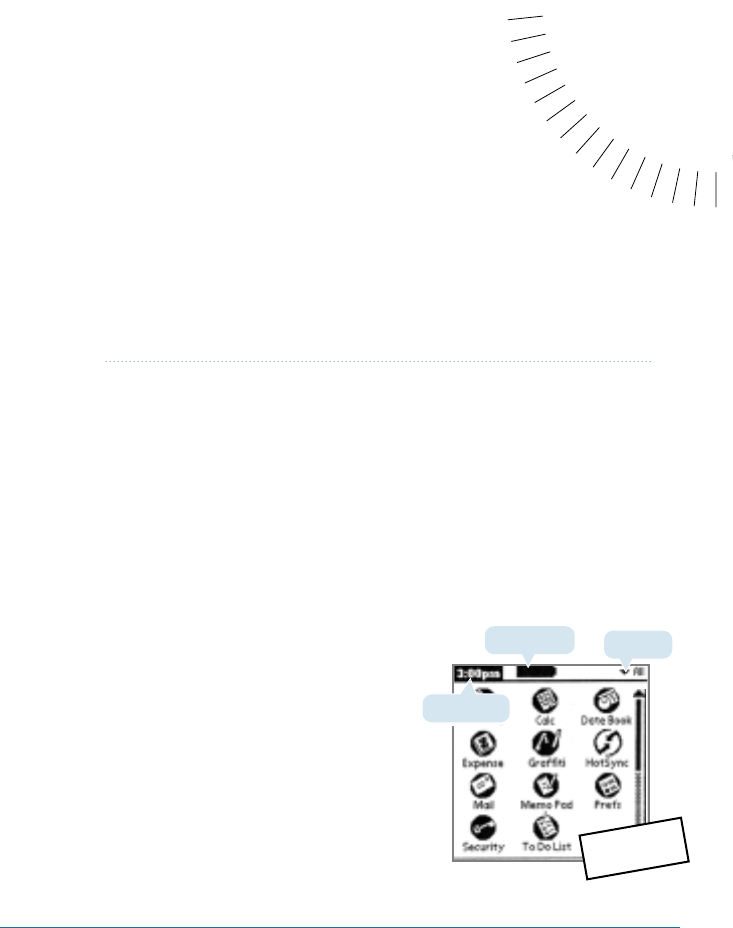
Using the Applications Launcher
The Applications Launcher displays
all the available applications on your
Smartphone by default.
In addition to providing a way for
you to open applications, the
Applications Launcher displays the
current time, battery level, and
application category. You can also
display only selected applications
by arranging applications into
categories.
CHAPTER4
4
Category
Battery level
Current time
Tentative