Samsung Electronics Co SLM4025NX Mono Laser Printer User Manual MagpieN english
Samsung Electronics Co Ltd Mono Laser Printer MagpieN english
Contents
Users Manaul 2
31
2. Menu Overview and Basic Setup
Menu overview
The control panel provides access to various menus to set up the machine or use the machine’s functions.
• For models that do not have the display screen on the control panel, this feature is not applicable.
• Some menus may not appear on the display depending on options or models. If so, it is not applicable to your machine.
• Some menu names may differ from your machine depending on its options or the models.
• The menus are described in the Advanced Guide (see "Useful Setting Menus" on page 188).
1
M332xND/M382xD/M382xND/M382xDW/M402xND
Accessing the menu
1Press (Menu) button on the control panel.
2 Press the arrows until the needed menu item appears and press OK.
3 If the setting item has sub menus, repeat step 2.
4 Press OK to save the selection.
5 Press (Cancel) to return to the ready mode.
Menu overview
32
2. Menu Overview and Basic Setup
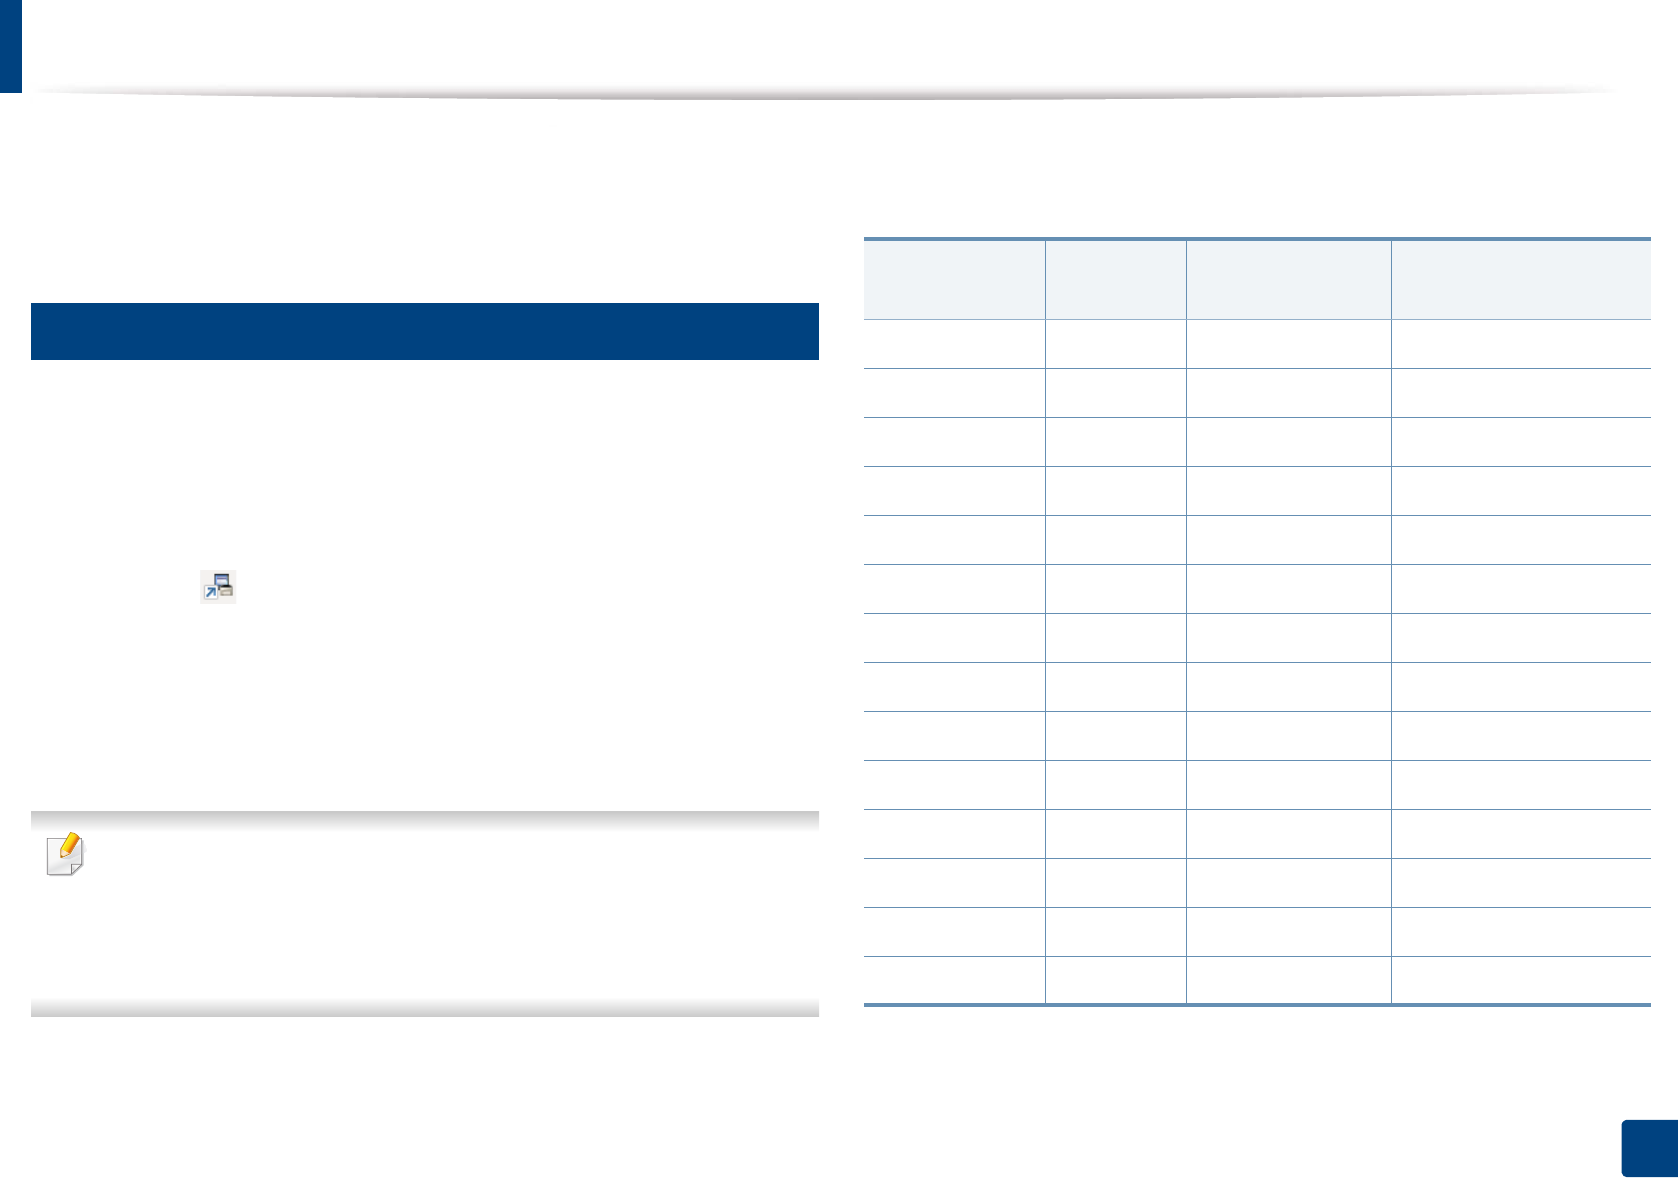
Information Layout Paper Graphic System Setup
Menu Map
Configuration
Demo Page
Supplies Info.
Usage Counter
Accounta
PCL Font
PS Font
EPSON Font
KSC5843 Fontb
KSC5895 Fontb
KSSM Fontb
a. This is used only available when Job Accounting is enabled from the SyncThru™ Web Admin Service.
b. This option may not be available depending on your country.
Orientation
Portrait
Landscape
Margin
Common Margin
MP Tray
<Tray X>
Emulation Mar.
Duplex
Off
Long Edge
Short Edge
Copies
MP Tray
Paper Size
Paper Type
Tray <x>
Paper Size
Paper Type
Paper Source
Tray 1
Tray 2c
MP Tray
Auto
c. This option only appears when an optional tray is installed.
Resolution
Standard
High Resol.
Clear Text
Off
Minimum
Normal
Maximum
Auto CR
Date & Timed
Clock Moded
Language
Default Paper
A4
Letter
Power Save
Wakeup Event
Job Timeout
Altitude Adj.
Normal
High 1
High 2
High 3
High 4
d. M382xDWonly.
Auto Continue
Auto Tray Swi.
Paper Substit.
Tray Protect.
SkipBlankPages
Maintenance
CLR Empty Msg.e
Supplies Life
Image Mgr.
TonerLow Alert
ImgU.Low Alertf
RAM Disk
Toner Save
Eco Settings
Auto Power Off
e. This option only appears when small amount of toner is left in the cartridge.
f. M3325/M3825/M4025 series only.
Menu overview
33
2. Menu Overview and Basic Setup
Emulation Network Job Managementa
a. This option is available when the optional memory installed or RAM Disk is checked.
Emulation Type
Setup
TCP/IP (IPv4)
DHCP
BOOTP
Static
TCP/IP (IPv6)
IPv6 Protocol
DHCPv6 Config
Ethernet
Ethernet Port
Ethernet Speed
802.1x
Wi-Fib
Wi-Fi On/Off
Wi-Fi Settings
WPS
Wi-Fi Direct
Wi-Fi Signal
CLR Wi-Fi Set.
b. M382xDW only.
Protocol Mgr.
HTTP
WINS
SNMPv1/v2
UPnP(SSDP)
mDNS
SetIP
SLP
Network Conf.
Clear Setting
Active Job
Secured Job
Stored Job
Print
Delete
Filing Policy
Change Name
Overwrite
Menu overview
34
2. Menu Overview and Basic Setup
2
M402xNX
You can set menus easily using the touch screen.
• The home screen is shown on the touch screen on the control panel.
• Some menus are grayed out depending on your options or models.
• Some menu names may differ from your machine depending on its
options or the models.
• The menus are described in the Advanced Guide (see "Useful Setting
Menus" on page 188).
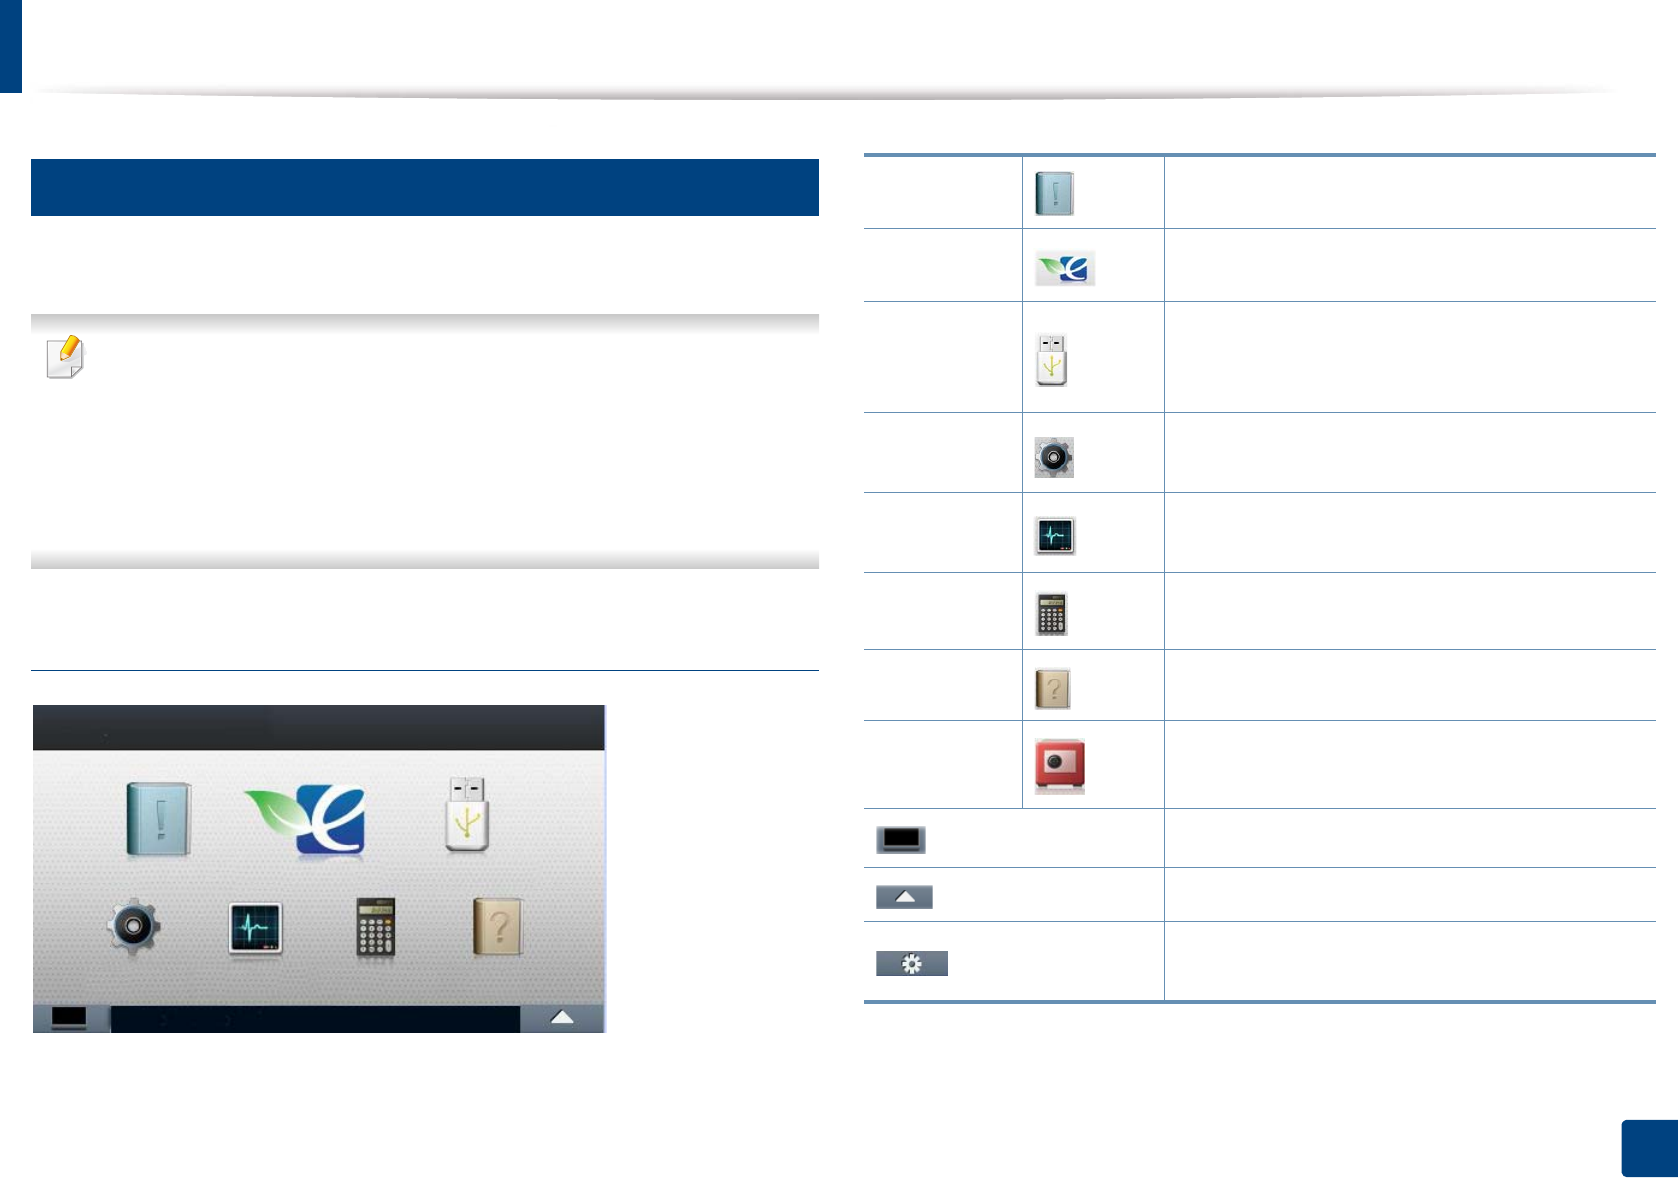
Introducing the Home Screen
Information Print various machine information and reports.
Eco Displays Eco settings.
USB Enters the USB menu when USB memory is
inserted into the USB memory port on your
machine.
Setup Browse current machine settings or change
machine values.
Job Status Displays the jobs currently running, completed or
in queue.
Counter Displays total pages printed.
Help View help and troubleshooting information.
Secure
Release
Displays the list of secured jobs. You can delete or
print the secured job on the list.
Displays the toner status.
Select the LCD brightness or language.
Customize the option settings including darkness,
original type, and more.
Menu overview
35
2. Menu Overview and Basic Setup
(Information) (Eco) (Direct USB) (Setup)
Configuration
Demo Page
Help List
Network Configuration
Supplies Information
Job Reports
Usage Counter
Account
Font List
Eco-On
On
Off
Settings
Default Mode
On
Off
On-Forceda
Feature
Configuration
Default
Custom
a. If you set the eco mode on with a password from the SyncThru™ Web Service (Settings tab > Machine Settings > System > Eco Settings) or Samsung Easy Printer Manager
(Device Settings > Eco), the On force message appears. You have to enter the password to change the eco mode status.
Print From
(Option settings)
Copies
Auto Fit
Duplex
Tray
File Manage
(Option settings)
Format
Delete
Show Space
System
Date&Time
Clock Mode
Language
Maintenace
Default Paper
Size
Power Save
Wakeup Event
Altitude
Adjustment
Job Timeout
File Policy
Held Job
Timeout
Admin Setup
User Access
Control
Authentication
Stamp
Item
Opacity
Position
Secure Release
Max Job Count
per User
Smart Release
Release Mode
Chang Admin.
Password
Firmware
Upgrade
Image
Overwrite
Manual
Overwrite
Method
Overwrite
Times
Application
Application
Management
Install New
Application
Network
TCP/IP(IPv4)
TCP/IP (IPv6)
Ethernet
802.1x
Protocol
Management
HTTP
WINS
SNMPv1/v2
Menu overview
36
2. Menu Overview and Basic Setup
(Setup) (Job Status) (Secure Release) (Counter) (Help)
SNTP
UPnP(SSDP)
mDNS
SetIP
SLP
Network
Configuration
Clear Setting
Layout
Orientation
Margin
Duplex
Paper
Copies
MP Tray/ [Tray<x>]
Paper Source
Tray Confirmation
Tray Behaviour
Auto Continue
Auto Tray Switch
Paper Substitution
Tray Protection
Graphic
Resolution
Clear Text
Edge Enhance
Auto CR
Emulation
Emulation Type
Setup
Current Job
Secure Job
Stored Job
Completed Job
Card
ID/PW
PIN
Stored Job List
(Option
settings)
Detail
Print All
Delete All
Refresh
Total Printed Basic Taskflow
TroubleShooting
37
2. Menu Overview and Basic Setup
Machine’s basic settings
• For models that do not have the display screen on the control panel, set
the machine’s settings by using the Device Settings in Samsung Easy
Printer Manager program
- For Windows and Mac users, you set from Samsung Easy Printer
Manager > (Switch to advanced mode) > Device Settings,
see "Device Settings" on page 242.
After installation is complete, you may want to set the machine's default
settings.
To change the machine’s default settings, follow these steps:
It may be necessary to press OK to navigate to lower-level menus for some
models.
1Select (Menu) > System Setup on the control panel.
OR
For the model with a touch screen, select (Setup) > System > Next
on the touch screen.
2 Select the option you want, then press OK.
OR
For the model with a touch screen, select the option you want and go to
step 5.
•Language: Change the language that is displayed on the control
panel.
•Date & Time: You can set the time and date. They are printed on
reports. If, however, they are not correct, you need to change it for
the correct time being.
Enter the correct time and date using arrows or numeric keypad (see
"Keypad letters and numbers" on page 210).
• Month = 01 to 12
• Day = 01 to 31
• Year = requires four digits
• Hour = 01 to 12
• Minute = 00 to 59
Machine’s basic settings
38
2. Menu Overview and Basic Setup
•Clock Mode: You can set your machine to display the current time
using either a 12 hours or 24 hours format.
•Power Save: When you are not using the machine for a while, use
this feature to save power.
• When you press the power button or start printing, the product will wake
up from the power saving mode.
• When you press any button except power button, the machine wake up
from the power save mode. Press (Menu) > System Setup >
Wakeup Event > On on the control panel.
•Altitude Adj.: Print quality is affected by atmospheric pressure,
which atmospheric pressure is determined by the height of the
machine above sea level. Before you set the altitude value,
determine the altitude where you are (see "Altitude adjustment" on
page 209).
3 Select the option you want, then press OK.
4 Press OK to save the selection.
5 Press (Cancel) or home( ) icon to return to ready mode.
Refer to below links to set other settings useful for using the machine.
• See "Setting the paper size and type" on page 48.
• See "Keypad letters and numbers" on page 210.
39
2. Menu Overview and Basic Setup
Media and tray
This chapter provides information on how to load print media into your
machine.
• Using print media that does not meet these specifications may cause
problems or require repairs. Such repairs are not covered by Samsung’s
warranty or service agreements.
• Make sure not to use the inkjet photo paper with this machine. It could
cause damage to the machine.
• Using inflammable print media can cause a fire.
• Use designated print media (see "Print media specifications" on page
113).
• Make sure not to use the inkjet photo paper with this machine. It could
cause damage to the machine.
The use of inflammable media or foreign materials left in the printer may
lead to overheating of the unit and, in rare cases may cause a fire.
3
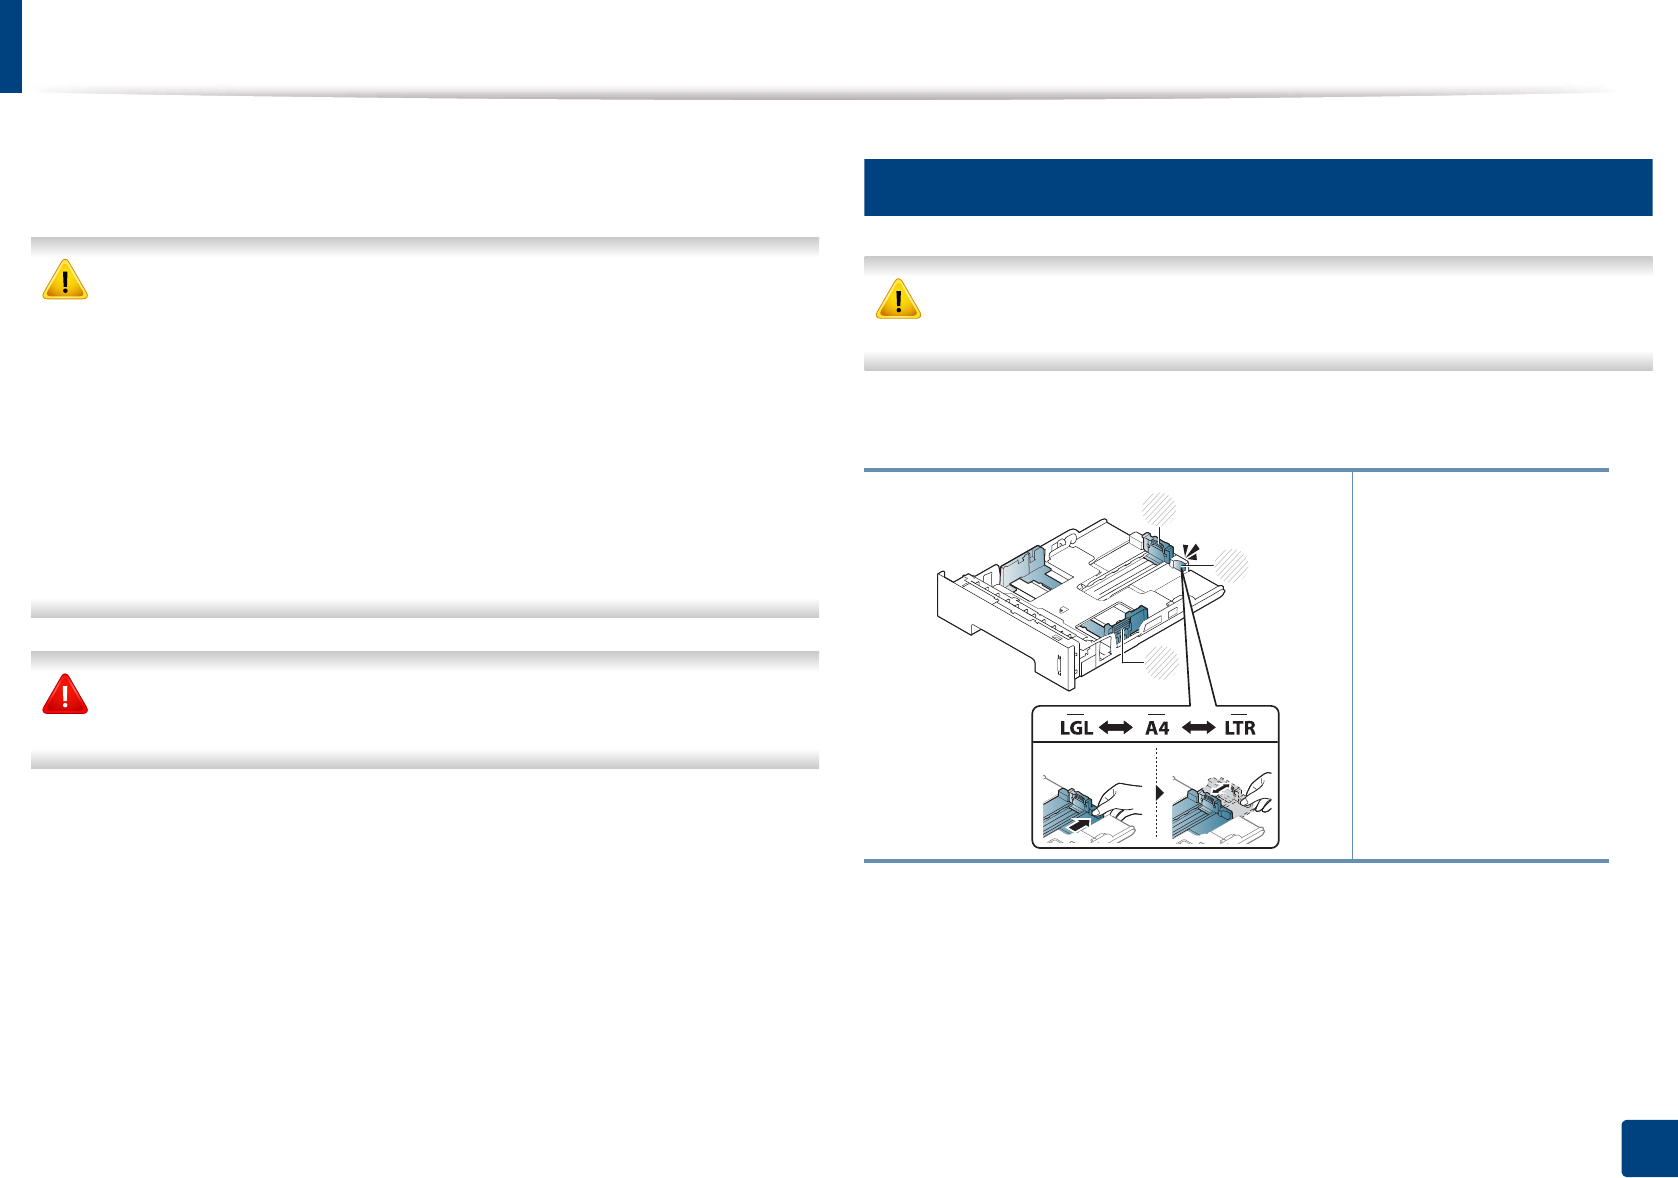
Tray overview
If you do not adjust the guide, it may cause paper registration, image skew,
or jamming of the paper.
To change the size, you need to adjust the paper guides.
1 Tray extension guide
2 Paper length guide
3 Paper width guide
3
2
1
Media and tray
40
2. Menu Overview and Basic Setup
The duplex unit is preset to Letter/LGL or A4 size, depending on your country. To
change the paper size, adjust the guides as shown below.
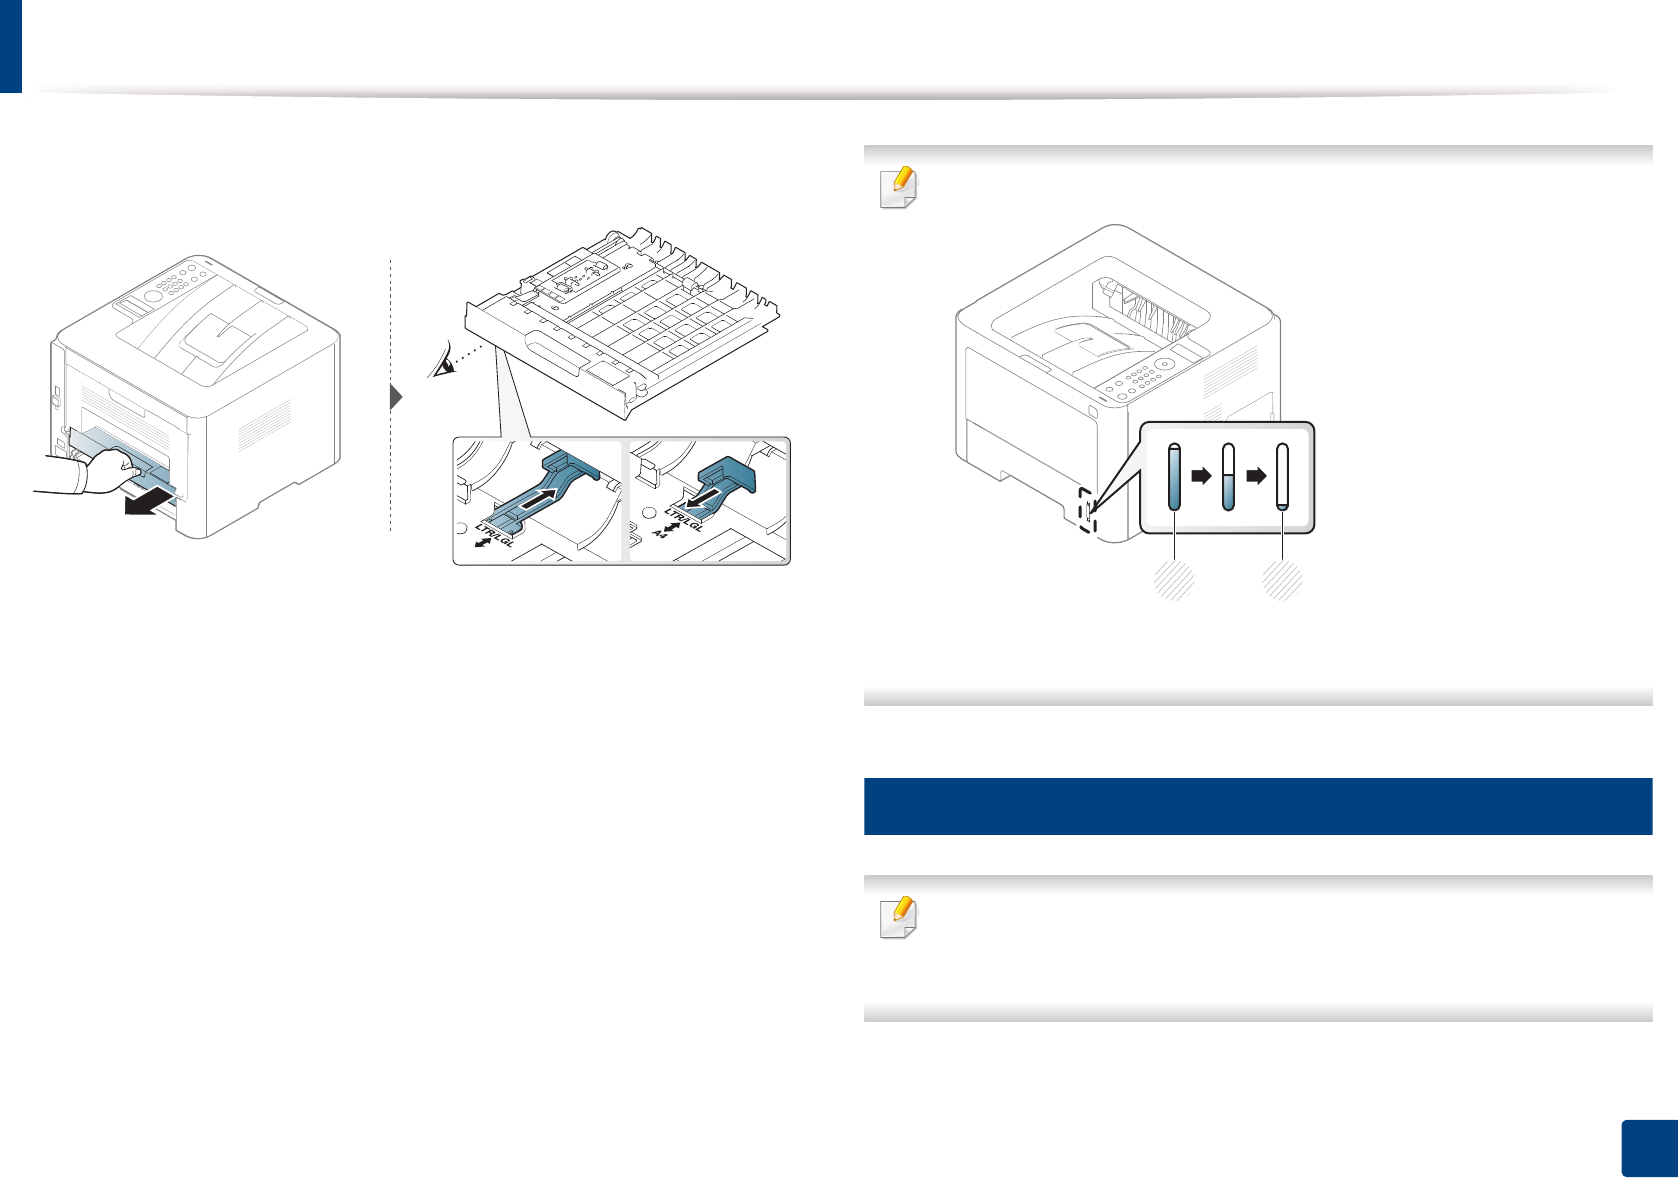
Paper quantity indicator shows the amount of paper in the tray.
1 Full
2 Empty
4
Loading paper in the tray
Illustrations on this user’s guide may differ from your machine depending
on its options or models. Check your machine type (see "Front view" on
page 20).
A4
21

Media and tray
41
2. Menu Overview and Basic Setup
Tray 1 / optional tray
1Pull out the paper tray.
2 Squeeze and the paper width guide and paper length lever to locate
them in the correct paper size slot marked at the bottom of the tray to
adjust to the size (see "Tray overview" on page 39).
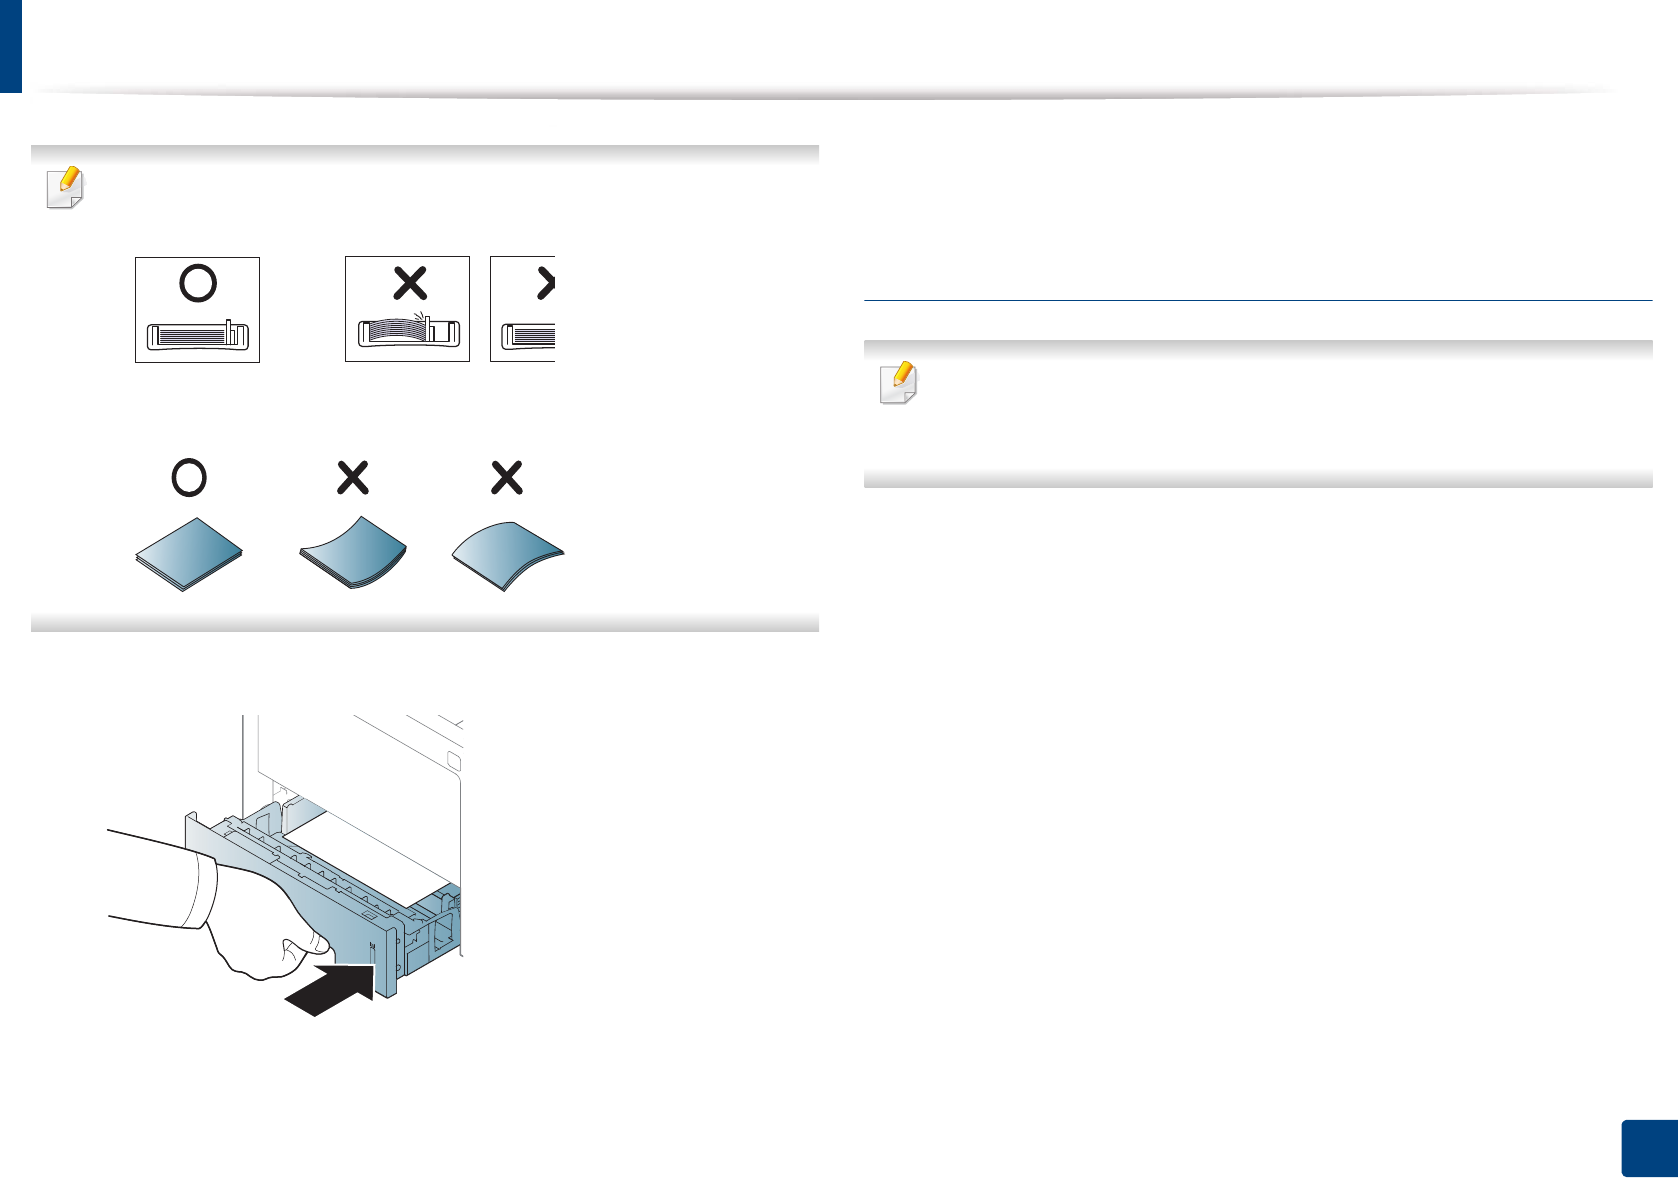
3 Flex or fan the edge of the paper stack to separate the pages before
loading papers.
4 After inserting paper into the tray, squeeze the paper width guides and
paper length guide.
2
1
3
1
2
Media and tray
42
2. Menu Overview and Basic Setup
• Do not push the paper width guide too far causing the media to warp.
• If you do not adjust the paper width guide, it may cause paper jams.
• Do not use a paper with a leading-edge curl, it may cause a paper jam or
the paper can be wrinkled.
5 Insert the tray back into the machine.
6 When you print a document, set the paper type and size for the tray (see
"Setting the paper size and type" on page 48).
Multi-purpose (or Manual feeder) tray
Illustrations on this user’s guide may differ from your machine depending
on its options or models. Check your machine type (see "Front view" on
page 20).
The Multi-purpose (or Manual feeder) tray can hold special sizes and types of
print material, such as postcards, note cards, and envelopes (see "Print media
specifications" on page 113).
Tips on using the Multi-purpose (or Manual feeder) tray
• Load only one type, size and weight of print media at a time in the Multi-
purpose (or Manual feeder) tray.
• To prevent paper jams, do not add paper while printing when there is still
paper in the Multi-purpose (or Manual feeder) tray. This also applies to other
types of print media.
• Always load the specified print media only to avoid paper jams and print
quality problems (see "Print media specifications" on page 113).
• Flatten any curl on postcards, envelopes, and labels before loading them
into the Multi-purpose (or Manual feeder) tray.
Media and tray
43
2. Menu Overview and Basic Setup
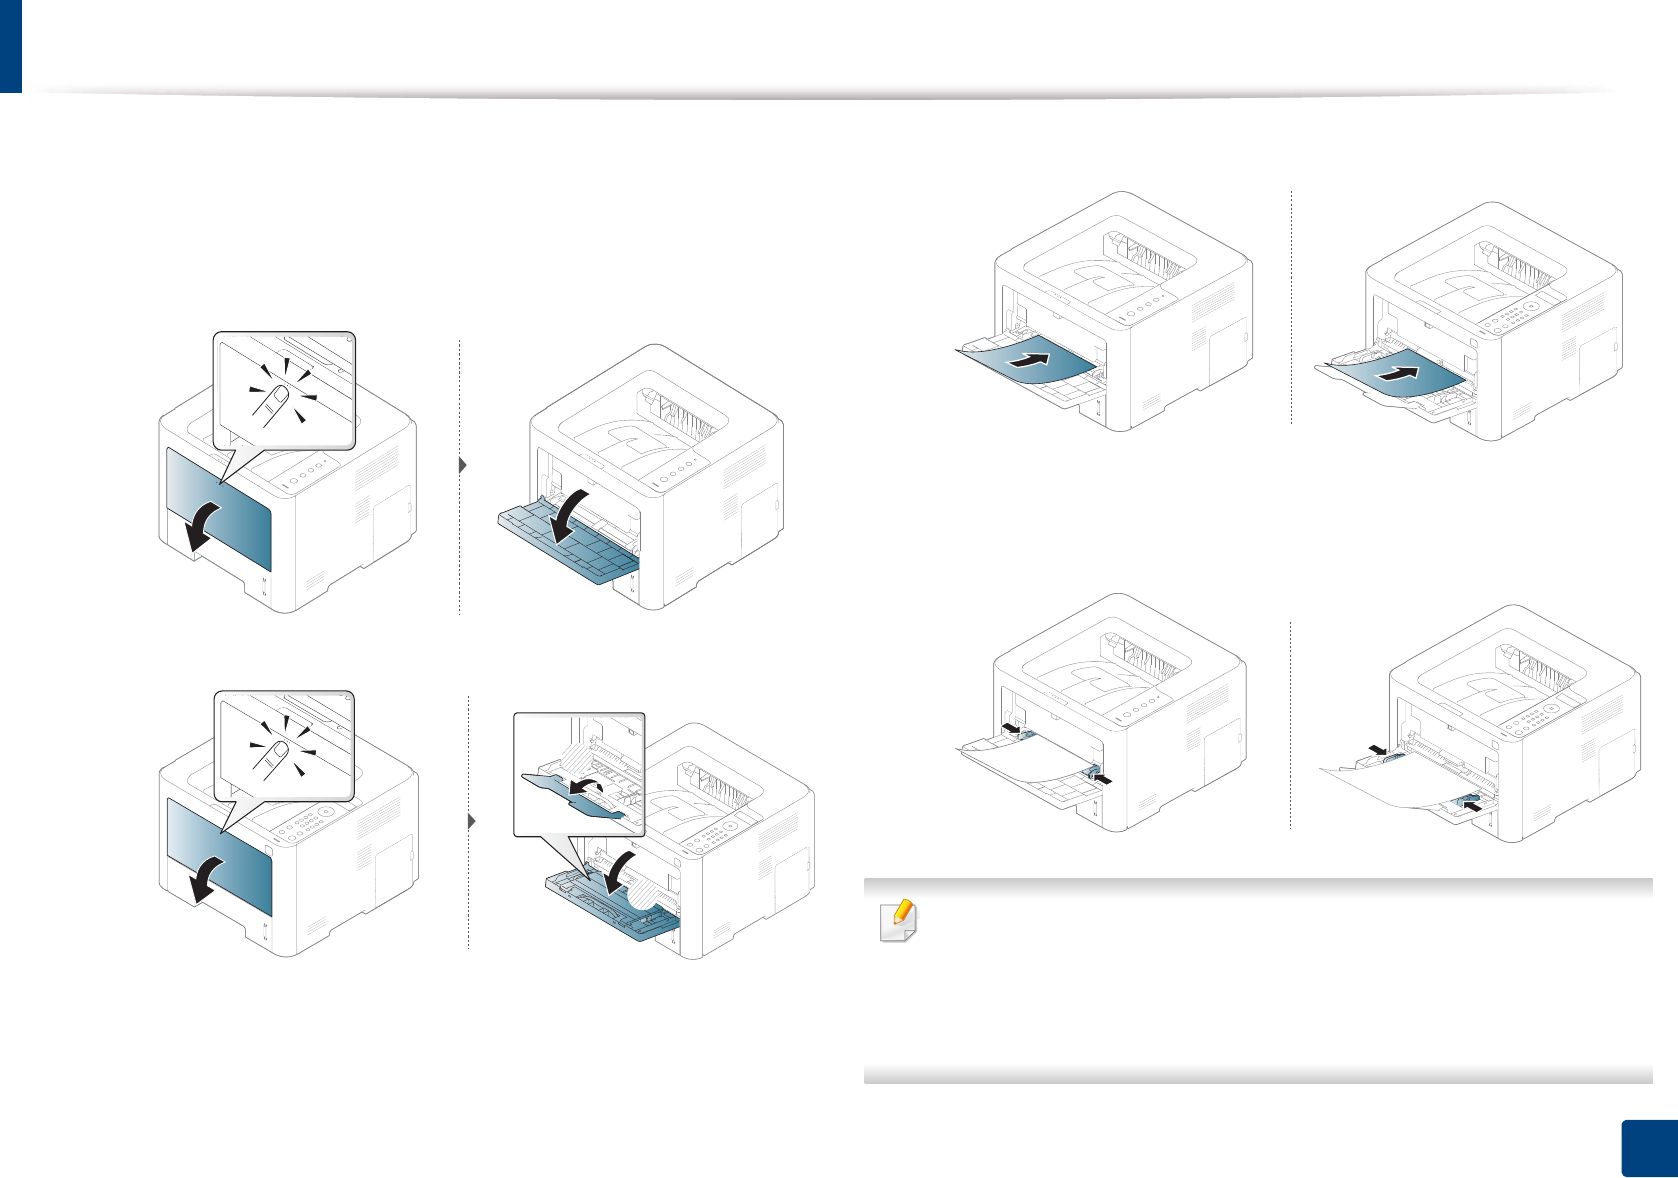
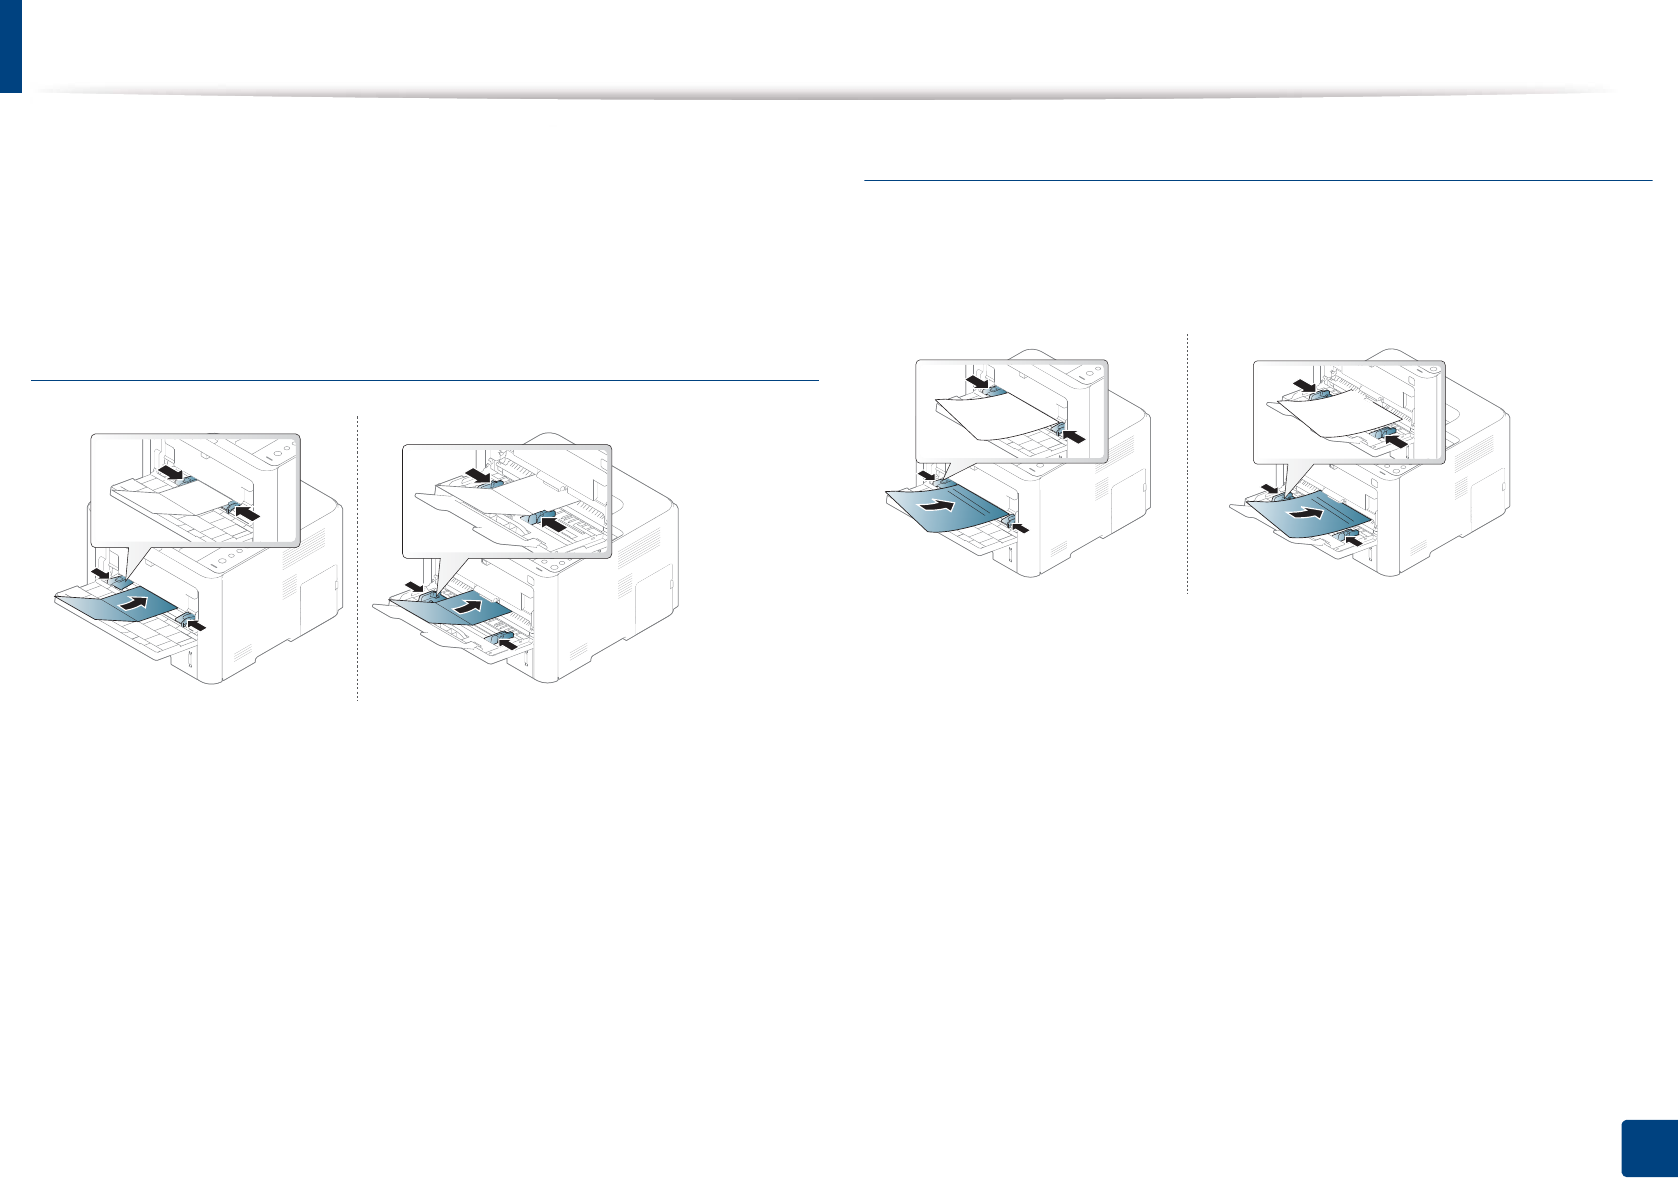
1Pull out the paper tray for manual feeding.
Or
Press the push-release of Multi-purpose (or Manual feeder) tray to open.
• M332xND/M382xD series
• M382xND/M382xDW/M402xND series
2 Load the paper.
3 Squeeze the Multi-purpose (or Manual feeder) tray paper width guides
and adjust them to the width of the paper. Do not force them too much,
or the paper will bent resulting in a paper jam or skew.
• When printing the special media, you must follow the loading guideline
(See "Printing on special media" on page 44).
• When papers overlap when printing using Multi-purpose (or Manual
feeder) tray, open tray 1 and remove overlapping papers then try
printing again.
2
1
Media and tray
44
2. Menu Overview and Basic Setup
4 When you print a document, set the paper type and size for the Multi-
purpose (or Manual feeder) tray (see "Setting the paper size and type" on
page 48).
5
Printing on special media
The table below shows the special media usable in tray.
The paper setting in the machine and driver should match to print without a
paper mismatch error.
To change the paper setting set in the machine, from the Samsung Easy Printer
Manager select (Switch to advanced mode) > Device Settings.
Or if your machine supports a display screen or touch screen, you can set it from
the control panel.
Then, set the paper type from the Printing preferences window > Paper tab >
Paper Type (see "Opening printing preferences" on page 51).
• When using special media, we recommend you feed one sheet at a time
(see "Print media specifications" on page 113).
• Illustrations on this user’s guide may differ from your machine
depending on its options or models. Check your machine type (see
"Front view" on page 20).
To see for paper weights for each sheet, refer to "Print media specifications" on
page 113.
Types Tray 1 Optional traya
a. This is feature is availiable when you install and optional tray (see "Variety feature" on page
10).
Multi-purpose (or
manual feeder) tray
Plain ●● ●
Thick ●● ●
Thicker ●
Thin ●● ●
Bond ●● ●
Color ●
CardStock ●● ●
Labels ●
Transparency ●
Envelope ●
Preprinted ●
Cotton ●
Recycled ●● ●
Archive ●● ●
Media and tray
45
2. Menu Overview and Basic Setup
(●: Supported, Blank: Not supported)
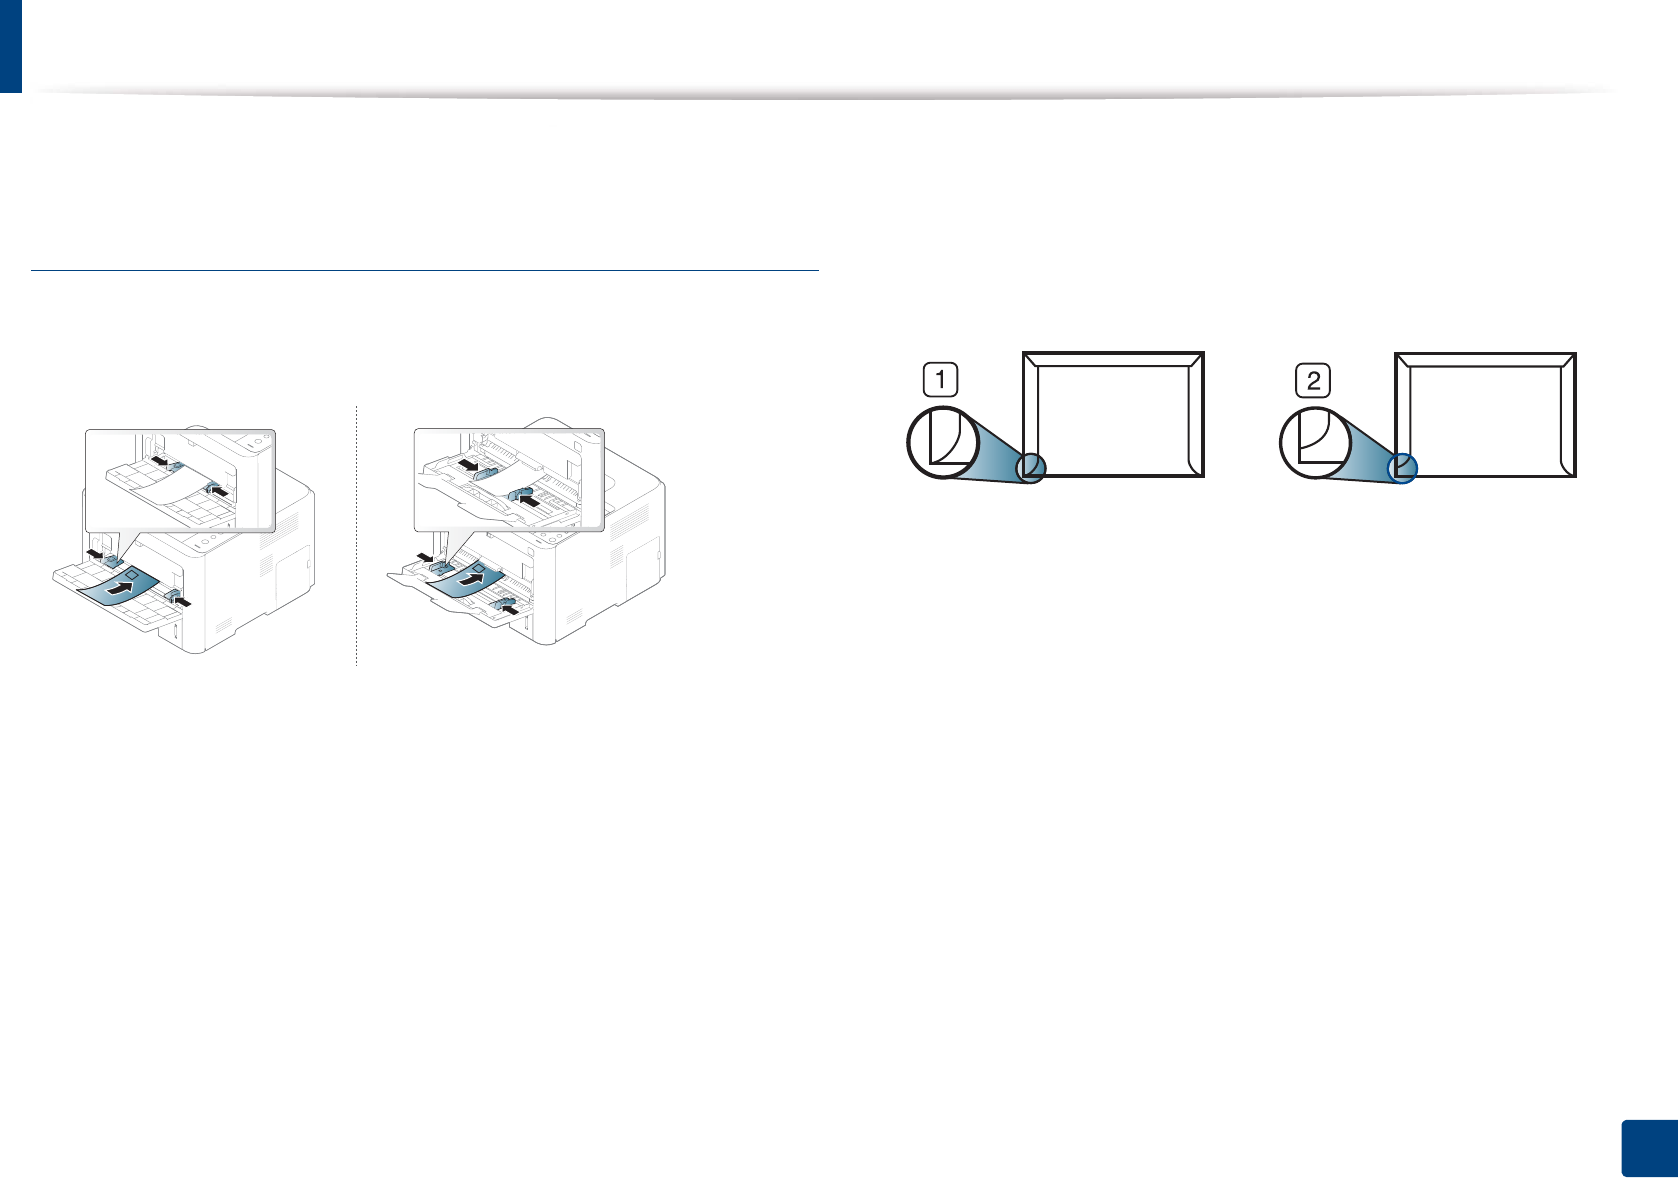
Envelope
Printing successfully on envelopes depends upon the quality of the envelopes.
To print an envelope, place it as shown in the following figure.
• When selecting envelopes, consider the following factors:
-Weight: should not exceed 90 g/m2 otherwise; jams may occur.
-Construction: should lie flat with less than 6 mm curl and should not
contain air.
-Condition: should not be wrinkled, nicked, nor damaged.
-Temperature: should resist the heat and pressure of the machine
during operation.
• Use only well-constructed envelopes with sharp and well-creased folds.
• Do not use stamped envelopes.
• Do not use envelopes with clasps, snaps, windows, coated lining, self-
adhesive seals, or other synthetic materials.
• Do not use damaged or poorly made envelopes.
• Be sure the seam at both ends of the envelope extends all the way to the
corner of the envelope.
1 Acceptable
2 Unacceptable
• Envelopes with a peel-off adhesive strip or with more than one flap that
folds over to seal must use adhesives compatible with the machine’s fusing
temperature for 0.1 second about 170°C (338 °F). The extra flaps and strips
might cause wrinkling, creasing, or jams, and may even damage the fuser.
• For the best print quality, position margins no closer than 15 mm from the
edges of the envelope.
• Avoid printing over the area where the envelope’s seams meet.

Media and tray
46
2. Menu Overview and Basic Setup
Transparency
To avoid damaging the machine, use only transparencies designed for use in
laser printers.
• Must withstand the machine’s fusing temperature.
• Place them on a flat surface after removing them from the machine.
• Do not leave unused transparencies in the paper tray for long. Dust and dirt
may accumulate on them, resulting in spotty printing.
• To avoid smudging caused by fingerprints, handle them carefully.
• To avoid fading, do not expose printed transparencies to prolonged
sunlight.
• Ensure that transparencies are not wrinkled, curled, or have any torn edges.
• Do not use transparencies that separate from the backing sheet.
• To prevent transparencies from sticking to each other, do not let the printed
sheets stack up as they are being printed out.
Labels
To avoid damaging the machine, use only labels designed for use in laser
printers.
• When selecting labels, consider the following factors:
-Adhesives: Should be stable at your machine’s fusing temperature
about 170°C (338°F).
-Arrangement: Only use labels with no exposed backing between them.
Labels can peel off sheets that have spaces between the labels, causing
serious jams.
-Curl: Must lie flat with no more than 13 mm of curl in any direction.
-Condition: Do not use labels with wrinkles, bubbles, or other
indications of separation.
• Make sure that there is no exposed adhesive material between labels.
Exposed areas can cause labels to peel off during printing, which can cause
paper jams. Exposed adhesive can also cause damage to machine
components.
Media and tray
47
2. Menu Overview and Basic Setup
• Do not run a sheet of labels through the machine more than once. The
adhesive backing is designed for only a single pass through the machine.
• Do not use labels that are separating from the backing sheet or are wrinkled,
bubbled, or otherwise damaged.
Card stock/ Custom-sized paper
• In the software application, set the margins to at least 6.4 mm (0.25 inches)
away from the edges of the material.
Preprinted paper
When loading preprinted paper, the printed side should be facing up with an
uncurled edge at the front. If you experience problems with paper feeding, turn
the paper around. Note that print quality is not guaranteed.
• Must be printed with heat-resistant ink that will not melt, vaporize, or
release hazardous emissions when subjected to the machine’s fusing
temperature for 0.1 second (about 170°C (338°F)).
• Preprinted paper ink must be non-flammable and should not adversely
affect machine rollers.
• Before you load preprinted paper, verify that the ink on the paper is dry.
During the fusing process, wet ink can come off preprinted paper, reducing
print quality.
Media and tray
48
2. Menu Overview and Basic Setup
Glossy Photo
• Recommended media: Glossy paper (Letter) for this machine by HP
Brochure Paper (Product: Q6611A) only.
• Recommended media: Glossy paper (A4) for this machine by HP Superior
Paper 160 glossy (Product: Q6616A).
6
Setting the paper size and type
After loading paper in the paper tray, set the paper size and type using the
control panel buttons.
The paper setting in the machine and driver should match to print without a
paper mismatch error.
To change the paper setting set in the machine, from the Samsung Easy Printer
Manager select (Switch to advanced mode) > Device Settings.
Or if your machine supports a display screen or touch screen, you can set it from
the control panel.
Then, set the paper type from the Printing preferences window > Paper tab >
Paper Type (see "Opening printing preferences" on page 51).
It may be necessary to press OK to navigate to lower-level menus for some
models.
1Select (Menu) > Paper > Paper Size or Paper Type button on the
control panel.
OR
For the model with a touch screen, select (Setup) > Paper > Next >
select a tray > Paper Size or Paper Typee on the touch screen.
2 Select the option you want.
For the model with a touch screen, select the option you want and go to
step 4.
3 Press OK to save the selection.
4 Press (Cancel) or home( ) icon to return to ready mode.
If you want to use special-sized paper such as billing paper, select the Paper
tab > Size > Edit... and set Custom Paper Size Settings in the Printing
Preferences (see "Opening printing preferences" on page 51).
Media and tray
49
2. Menu Overview and Basic Setup
7
Using the output support
The surface of the output tray may become hot if you print a large number
of pages at once. Make sure that you do not touch the surface, and do not
allow children near it.
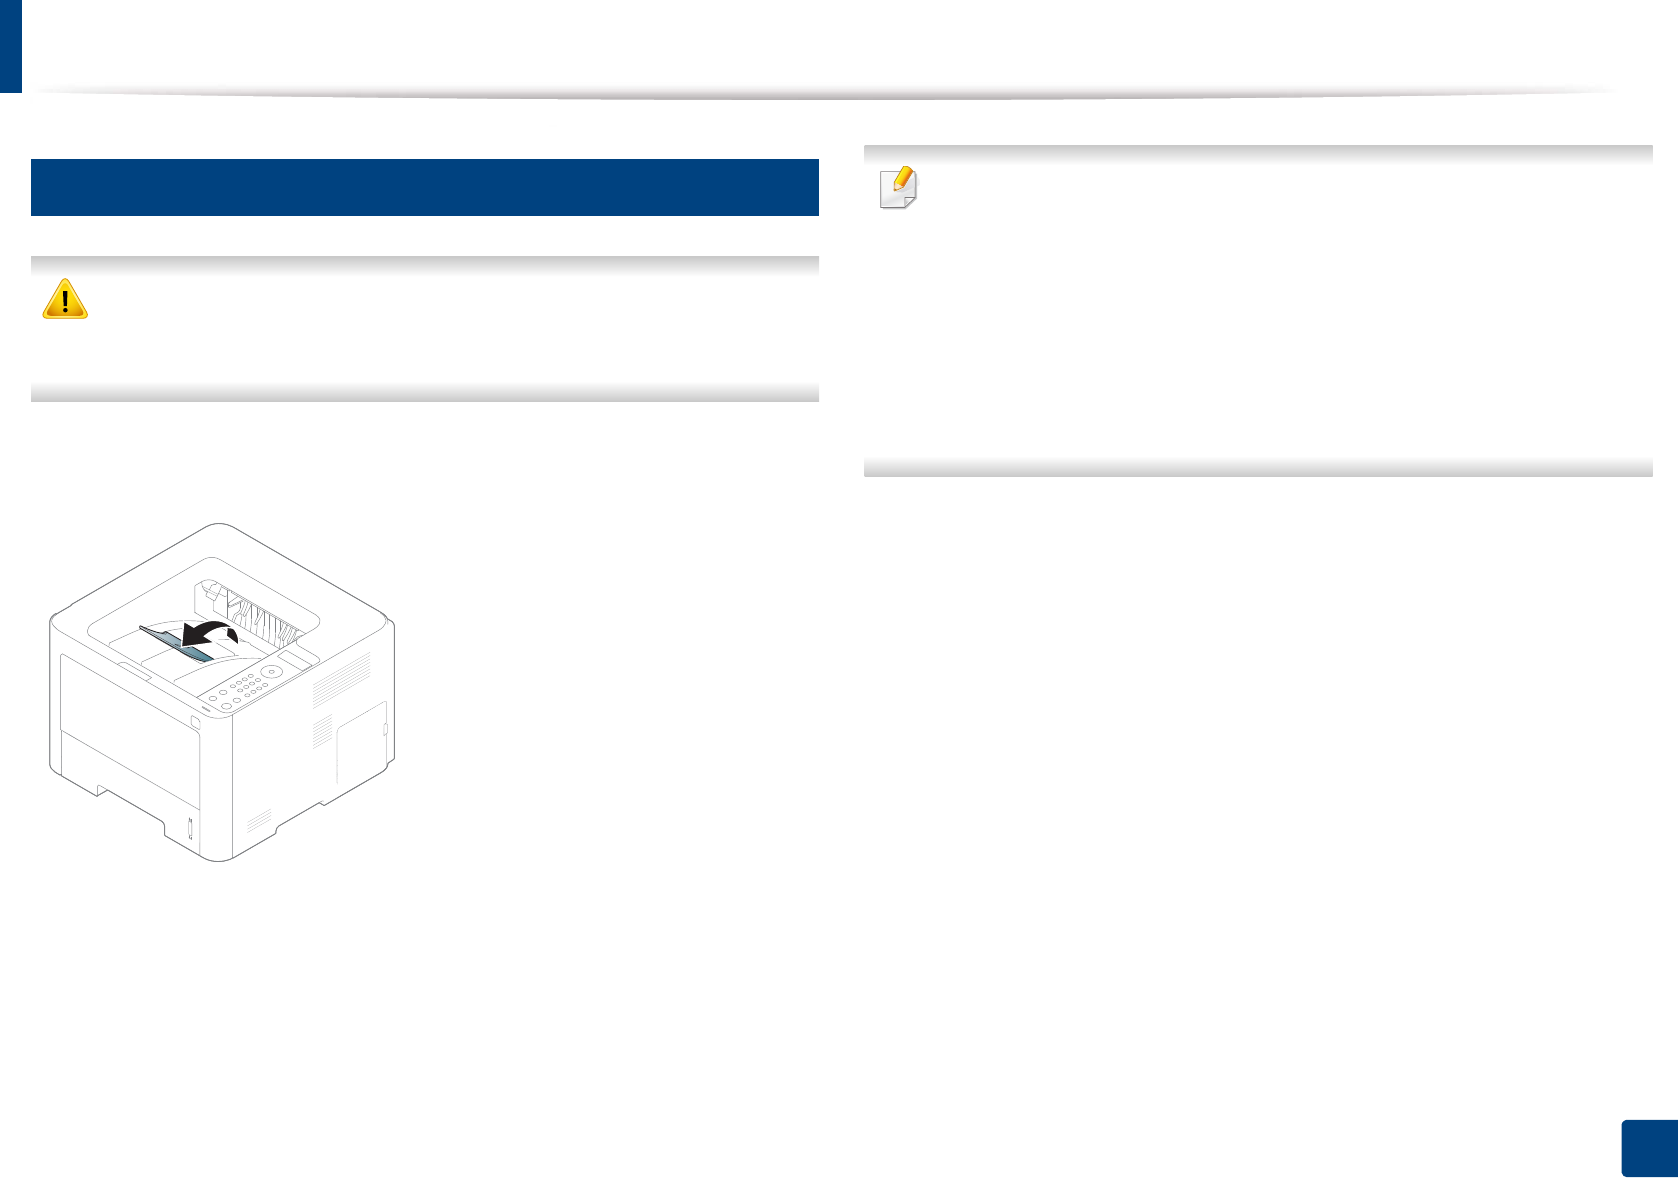
The printed pages stack on the output support, and the output support will help
the printed pages to align. Unfold the output support.
• Illustrations on this user’s guide may differ from your machine
depending on its options or models. Check your machine type (see
"Front view" on page 20).
• If more than 50 pages (one-sided) of Legal paper is stacked in the output
tray, paper can be mis-aligned or paper jams can occur. Do not let paper
to stack up in the output tray.
• When printing on thick paper, paper may not properly align on the
output support. Close the output support or turn the paper over in the
tray before printing.
50
2. Menu Overview and Basic Setup
Basic printing
For special printing features, refer to the Advanced Guide (see "Using
advanced print features" on page 213).
8
Printing
• If you are a Mac, Linux, or Unix operating systems user, refer to the
Advanced Guide (see "Mac printing" on page 223, "Linux printing" on
page 225, or "Unix printing" on page 227).
• For Winodws 8 user, see "Basic printing" on page 247.
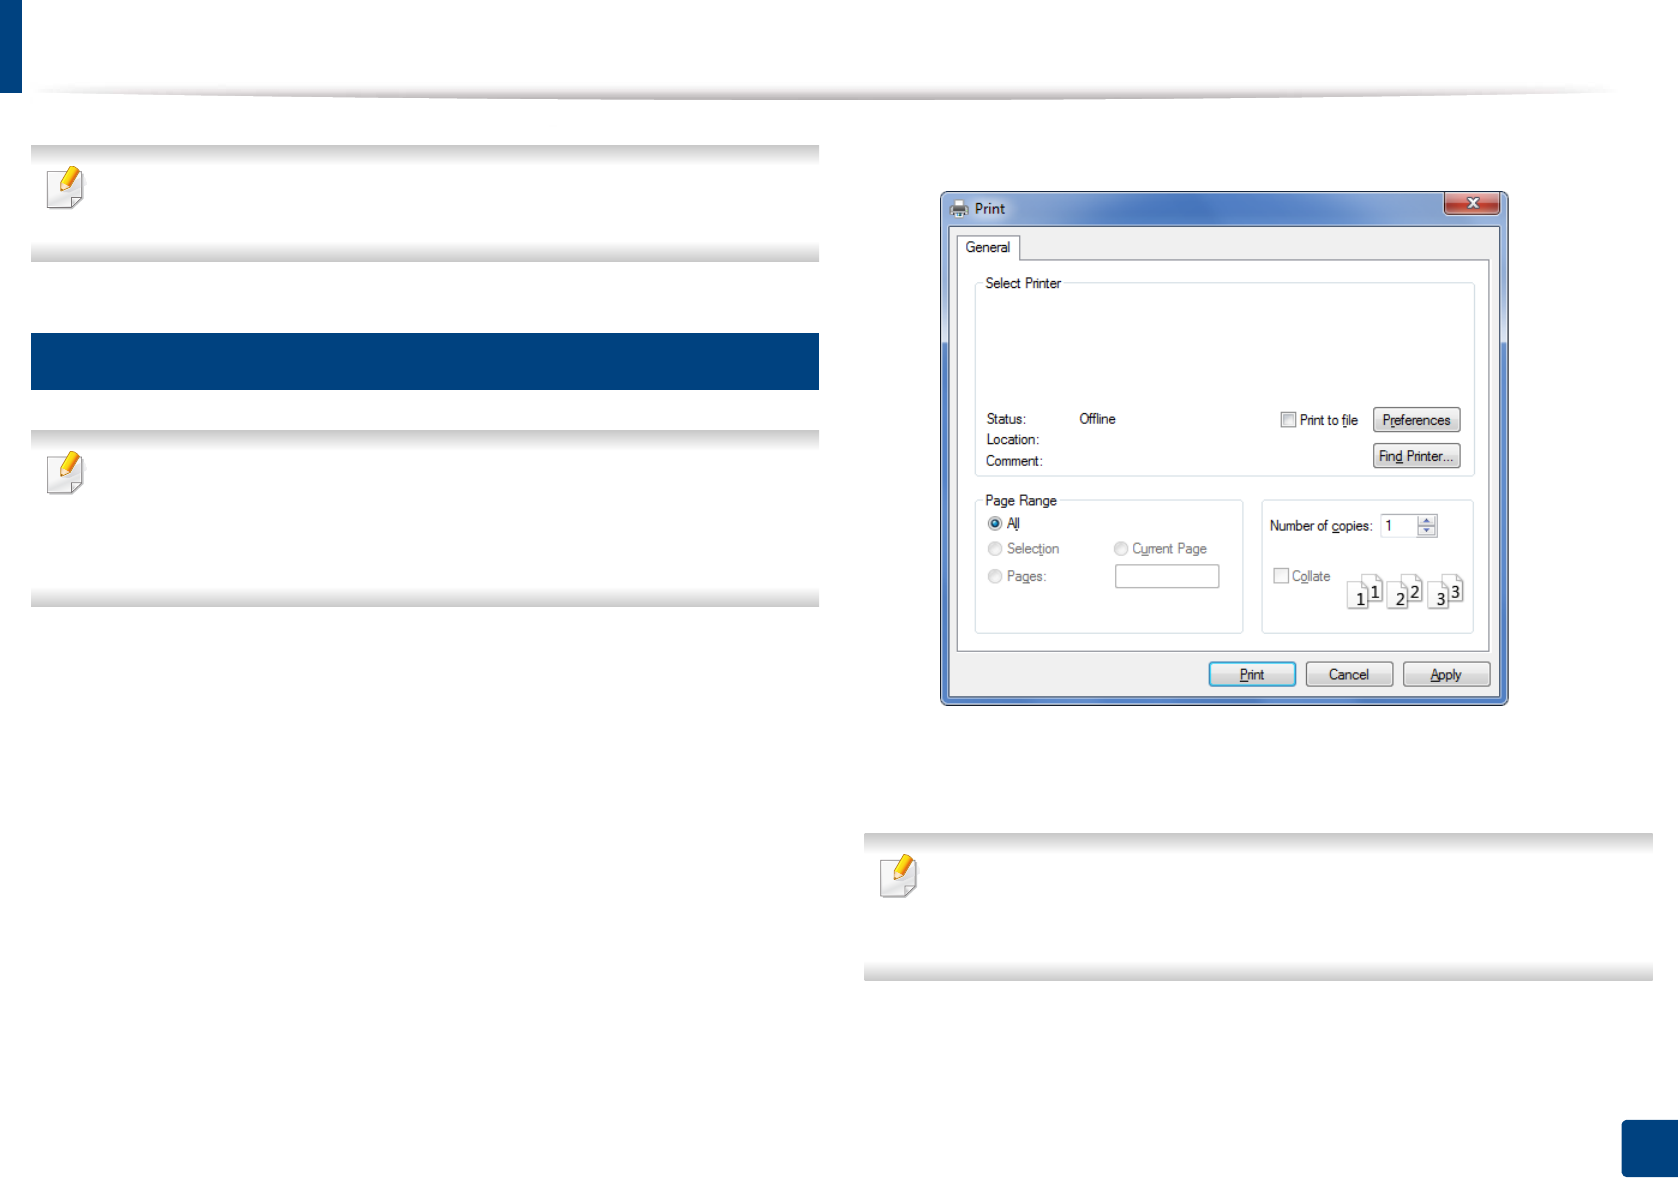
The following Printing Preferences window is for Notepad in Windows 7.
1Open the document you want to print.
2 Select Print from the File menu.
3 Select your machine from the Select Printer list.
4 The basic print settings including the number of copies and print range
are selected within the Print window.
To take advantage of the advanced printing features, click Properties or
Preferences from the Print window (see "Opening printing preferences" on
page 51).
5 To start the print job, click OK or Print in the Print window.
Basic printing
51
2. Menu Overview and Basic Setup
9
Canceling a print job
If the print job is waiting in the print queue or print spooler, cancel the job as
follows:
• You can access this window by simply double-clicking the machine icon
( ) in the Windows task bar.
• You can also cancel the current job by pressing (Cancel) on the control
panel.
10
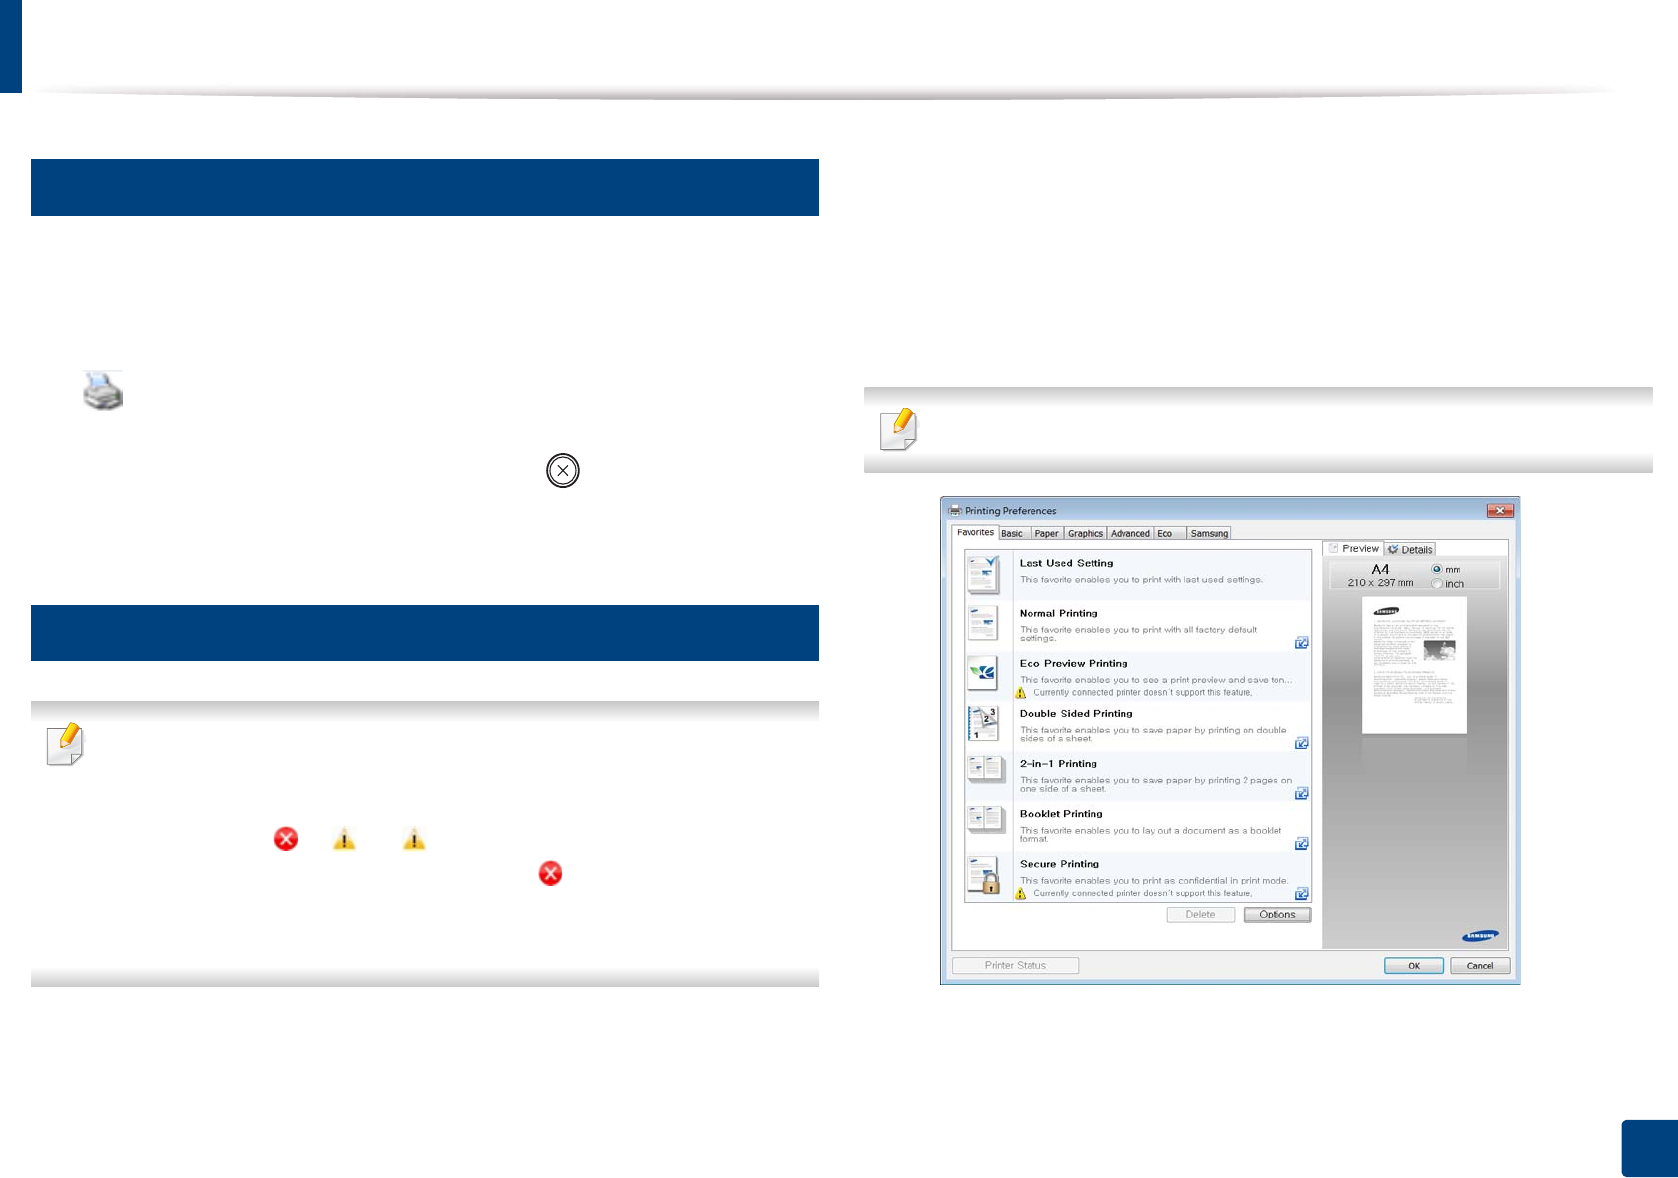
Opening printing preferences
• The Printing Preferences window that appears in this user’s guide may
differ depending on the machine in use.
• When you select an option in Printing Preferences, you may see a
warning mark or . An mark means you can select that certain
option but it is not recommended, and an mark means you cannot
select that option due to the machine’s setting or environment.
• For Windows 8 user, see "Opening more settings" on page 248.
1Open the document you want to print.
2 Select Print from the file menu. The Print window appears.
3 Select your machine from the Select Printer.
4 Click Properties or Preferences.
The screenshot may differ depending on model.
Basic printing
52
2. Menu Overview and Basic Setup
•You can apply Eco features to save paper and toner before printing (see
"Easy Eco Driver" on page 235).
• You can check the machine’s current status pressing the Printer Status
button (see "Using Samsung Printer Status" on page 243).
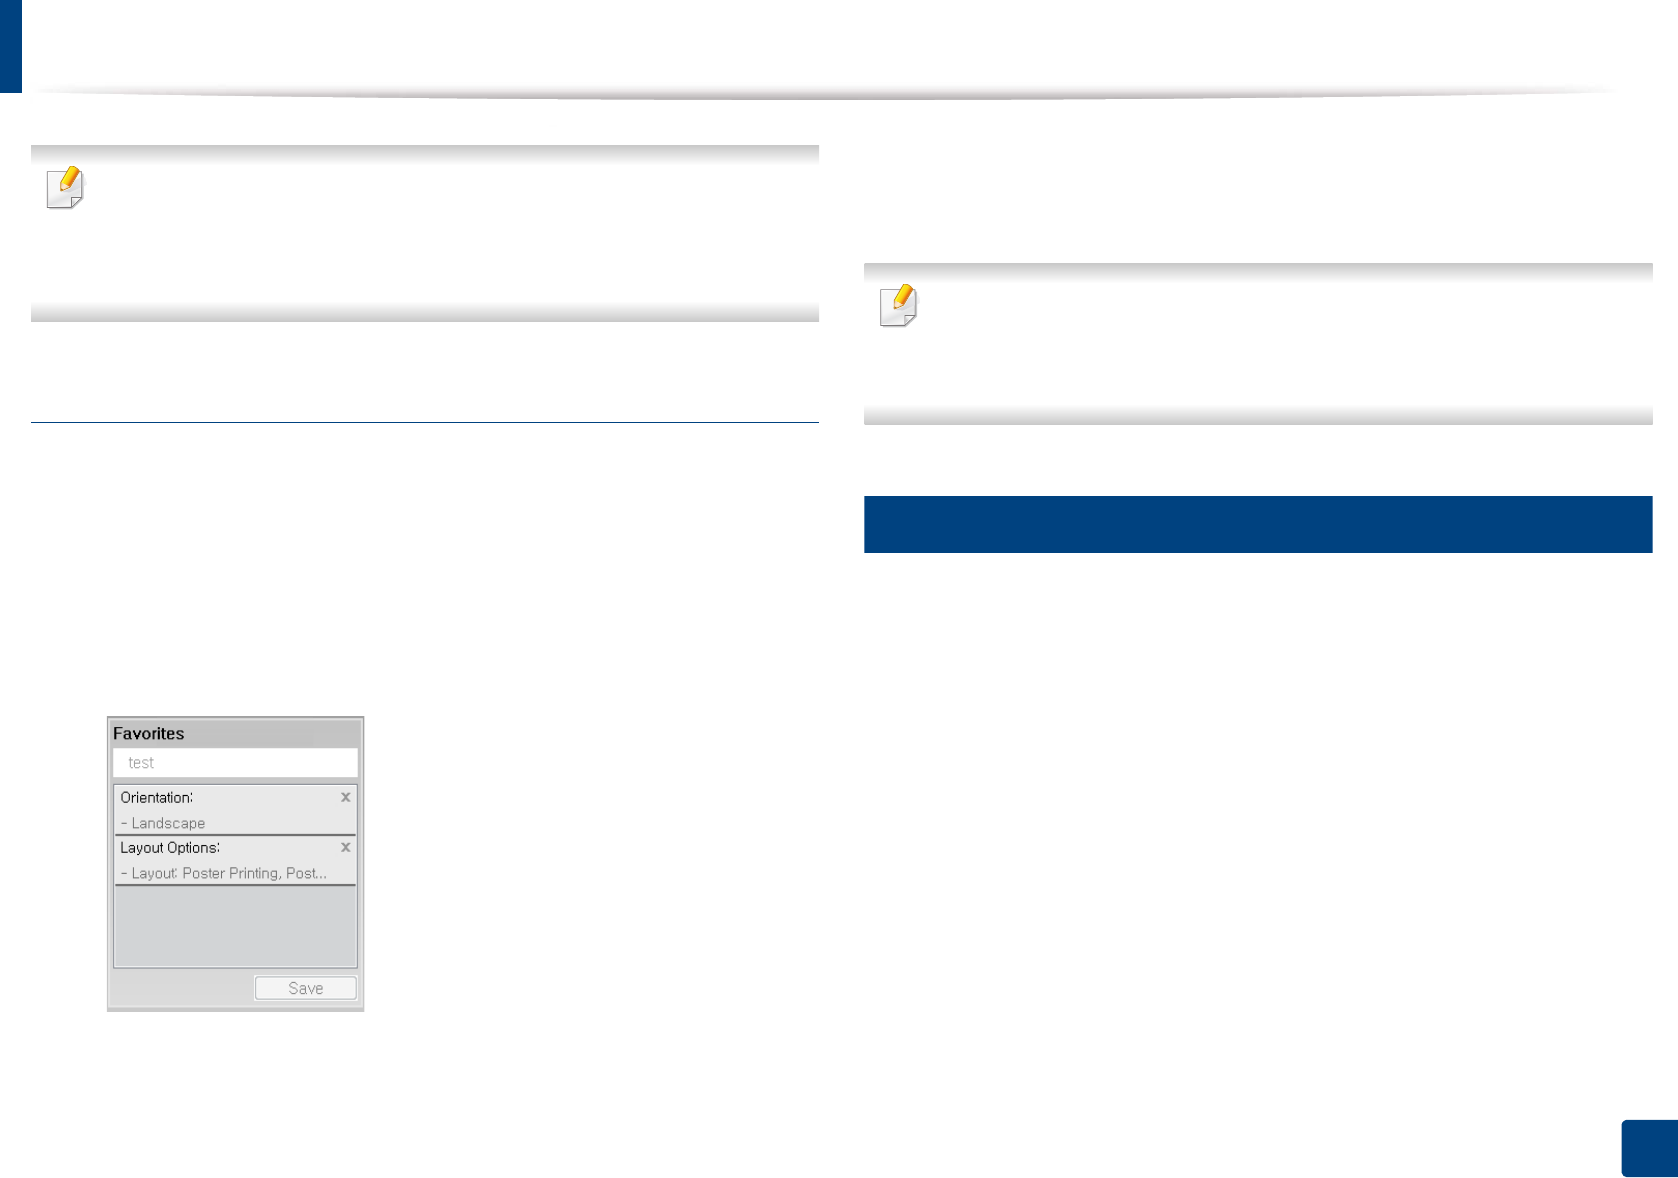
Using a favorite setting
The Favorites option, which is visible on each preferences tab except for the
Samsung tab, allows you to save the current preferences for future use.
To save a Favorites item, follow these steps:
1Change the settings as needed on each tab.
2 Enter a name for the item in the Favorites input box.
3 Click Save.
4 Enter name and description, and then select the desired icon.
5 Click OK. When you save Favorites, all current driver settings are saved.
To use a saved setting, select it in the Favorites tab. The machine is now set
to print according to the settings you have selected.
To delete saved settings, select it in the Favorites tab and click Delete.
11
Using help
Click the option you want to know on the Printing Preferences window and
press F1 on your keyboard.
Basic printing
53
2. Menu Overview and Basic Setup
12
Eco printing
The Eco function reduces toner consumption and paper usage. The Eco
function allows you to save print resources and lead you to eco-friendly printing.
If you press the Eco button from the control panel, Eco mode is enabled. The
default setting of Eco mode is double-sided printing (long edge), multiple pages
per side (2-up), skip blank pages, and toner save. Some features may not be
available depending on the model.
• Double-sided printing (long edge) feature is only available for duplex
models (see "Variety feature" on page 10).
• Depending on the printer driver you use, Skip blank pages may not work
properly. If Skip blank pages feature does not work properly, set the
feature from the Easy Eco Driver (see "Easy Eco Driver" on page 235).
Setting Eco mode on the control panel
• For models that do not have the display screen on the control panel, this
feature is not applicable.
• It may be necessary to press OK to navigate to lower-level menus for
some models.
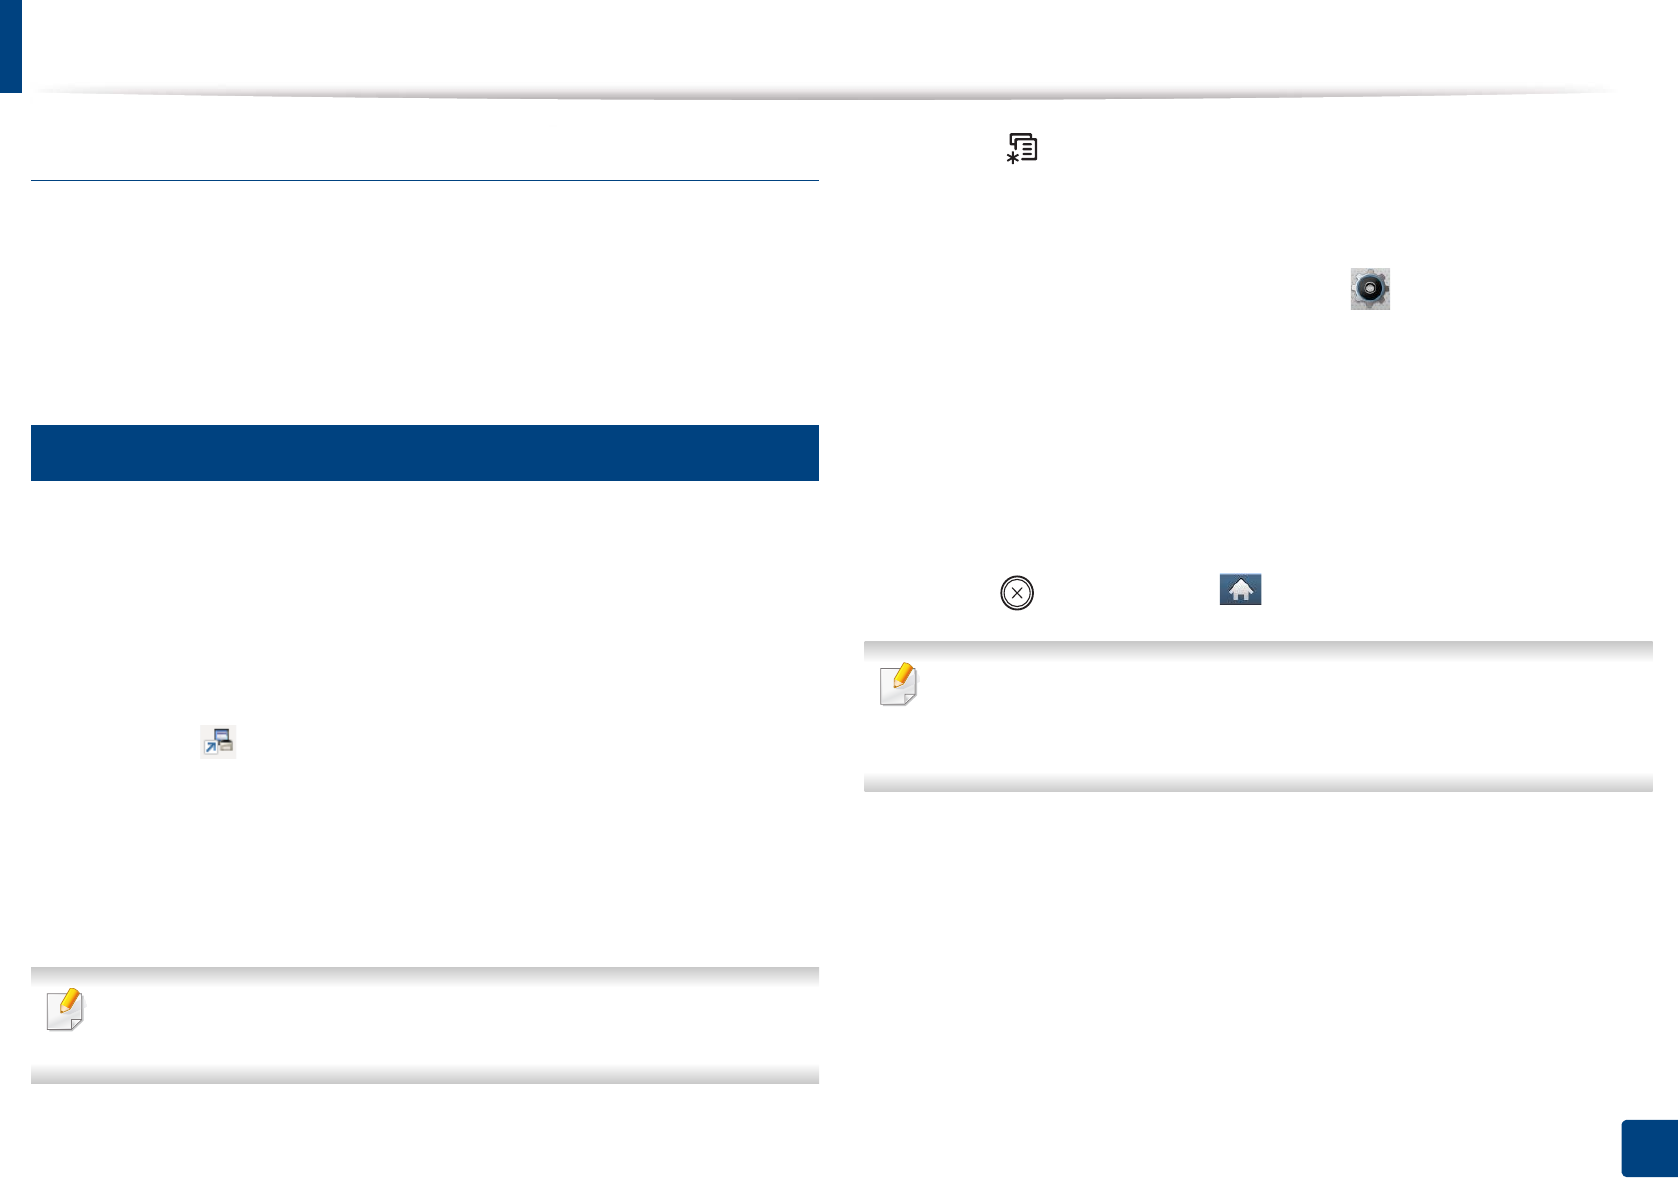
1Select (Menu) > System Setup > Eco Setup on the control panel.
OR
For the model with a touch screen, select (Eco) > Settings > Next
on the touch screen.
2 Select the option you want and press OK.
For the model with a touch screen, select the option you want and go to
step 4.
•Default Mode: Select this to turn on or off the eco mode.
-Off: Set the eco mode off.
-On: Set the eco mode on.
If you set the eco mode on with a password from the SyncThru™ Web
Service (Settings tab > Machine Settings > System > Eco Settings) or
Samsung Easy Printer Manager (Device Settings > Eco), the On force
message appears. You have to enter the password to change the eco mode
status.
•Change Temp.: Follow the settings from Syncthru™ Web Service or
Samsung Easy Printer Manager. Before you select this item, you
must set the eco function in SyncThru™ Web Service (Settings tab >
Machine Settings > System > Eco Settings) or Samsung Easy
Printer Manager (Device Settings > Eco).
-Default Eco: The machine is set to Default Eco mode.
-Custom Eco: Change any necessary values.
Basic printing
54
2. Menu Overview and Basic Setup
3 Press OK to save the selection.
4 Press (Cancel) or home( ) icon to return to ready mode.
Setting eco mode on the driver
To take advantage of the advanced printing features, click Properties or
Preferences from the Print window (see "Opening printing preferences" on
page 51).
Open the Eco tab to set Eco mode. When you see the eco image ( ), that
means the eco mode is currently enabled.
Eco options
•Printer Default: Follows the settings from the machine's control panel.
•None: Disables Eco mode.
•Eco Printing: Enables eco mode. Activate the various Eco items you want to
use.
•Password: If the administrator fixed to enable the Eco mode, you have to
enter the password to change the status.
Password button: You can set from SyncThru™ Web Service (Settings tab >
Machine Settings > System > Eco Settings) or Samsung Easy Printer
Manager (Device Settings > Eco), the password button is activated. To
change the print settings, click on this button, enter the password or need
to contact the administrator.
Result simulator
Result Simulator shows the results of reduced emission of carbon dioxide, used
electricity, and the amount of saved paper in accordance with the settings you
selected.
• The results are calculated on the basis that the total number of printed
paper is one hundred without a blank page when the Eco mode is disabled.
• Refers to the calculation coefficient about CO2, energy, and paper from IEA,
the index of Ministry of Internal Affairs and Communication of Japan and
www.remanufacturing.org.uk. Each model has a different index.
• The power consumption in printing mode refers to the average printing
power consumption of this machine.
• The actual amount displayed is only an estimate as the actual amount may
differ depending on the operating system used, computing performance,
application software, connection method, media type [thickness], media
size, job complexity, etc.
Basic printing
55
2. Menu Overview and Basic Setup
13
Secure printing
• This feature is not supported for M332xND/M382xD.
• Some menus may not appear on the display depending on options or
models. If so, it is not applicable to your machine.
• You might not be able to print a complex document using the RAM disk.
Install an optional memory to print a complex document.
When you use a printing device in an office, school or other public place, you can
protect your personal documents or confidential information by using the
secure printing feature.
Starting secure printing from the SyncThru™ Web
Service
1Access a web browser, such as Internet Explorer, from Windows.
Enter the machine IP address of your printer (http://xxx.xxx.xxx.xxx) in
the address field and press the Enter key or click Go.
2 Click Login on the upper right of SyncThru™ Web Service website.
3 Settings > Machine Settings > System > Ram Disk.
4 Enable Ram Disk.
This features may not appear on the display depending on options or
models. If so, it is not applicable to your machine.
Printing secure documents from the control panel
1Select (Menu) > Job Management > Stored Job on the printer’s
control panel.
OR
For the model with a touch screen, select (Job Status) > Stored
Jobs > Next on the touch screen.
2 Select the document to print.
3 Enter the password that you set from the printer driver.
4 Print the document.
5 Press (Cancel) or home( ) icon to return to ready mode.

56
2. Menu Overview and Basic Setup
Using USB memory device
This feature is available for M402xNX only (see "Variety feature" on page 10).
This chapter explains how to use a USB memory device with your machine.
14
About USB memory
USB memory devices are available with a variety of memory capacities to give
you more room for storing documents, presentations, downloaded music and
videos, high resolution photographs or whatever other files you want to store or
move.
You can do the following tasks on your machine by using a USB memory device.
• Scan documents and save them on a USB memory device
• Print data stored on a USB memory device
• Restore backup files to the machine’s memory
• Format the USB memory device
• Check the available memory space
15
Plugging in a USB memory device
The USB memory port on the front of your machine is designed for USB V1.1 and
USB V2.0 memory devices. Your machine supports USB memory devices with
FAT16/FAT32 and a sector size of 512 bytes.
Check your USB memory device’s file system from your dealer.
You must use only an authorized USB memory device with an A plug connector.
Use only a metal-shielded USB memory device.
Only use a USB memory device that has obtained compatibility certification;
otherwise, the machine might not recognize it.
A B