Yaesu Musen 20445X20 AMATEUR RADIO WITH SCANNING RECEIVER User Manual 4
Yaesu Musen Co., Ltd. AMATEUR RADIO WITH SCANNING RECEIVER 4
Contents
User Manual 4
26
Basic Operation
Performing Communication
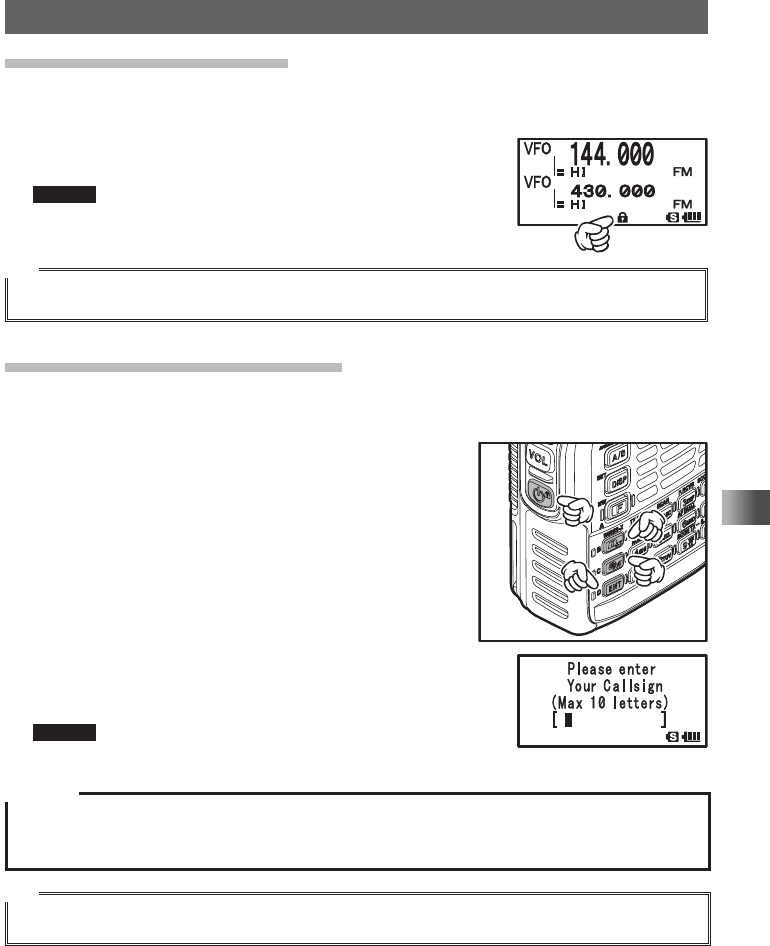
Turning off the Transceiver
To turn off the transceiver, press and hold P over 1 second.
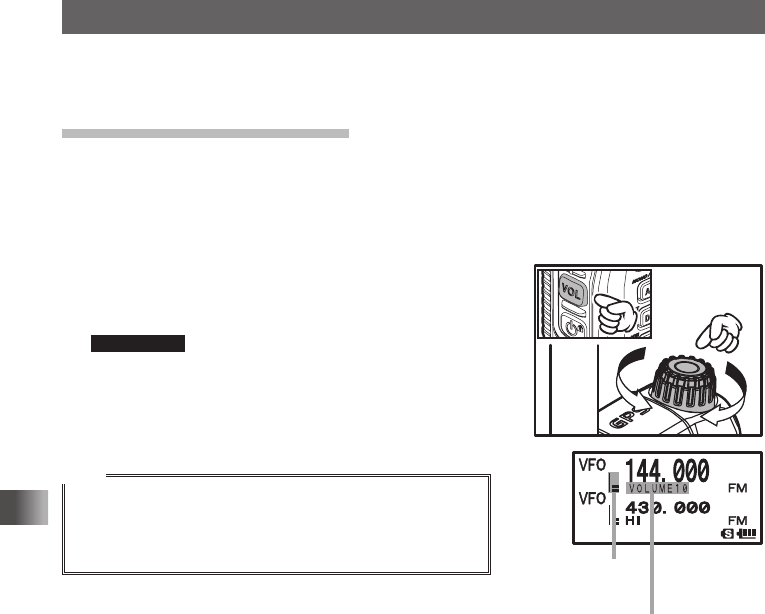
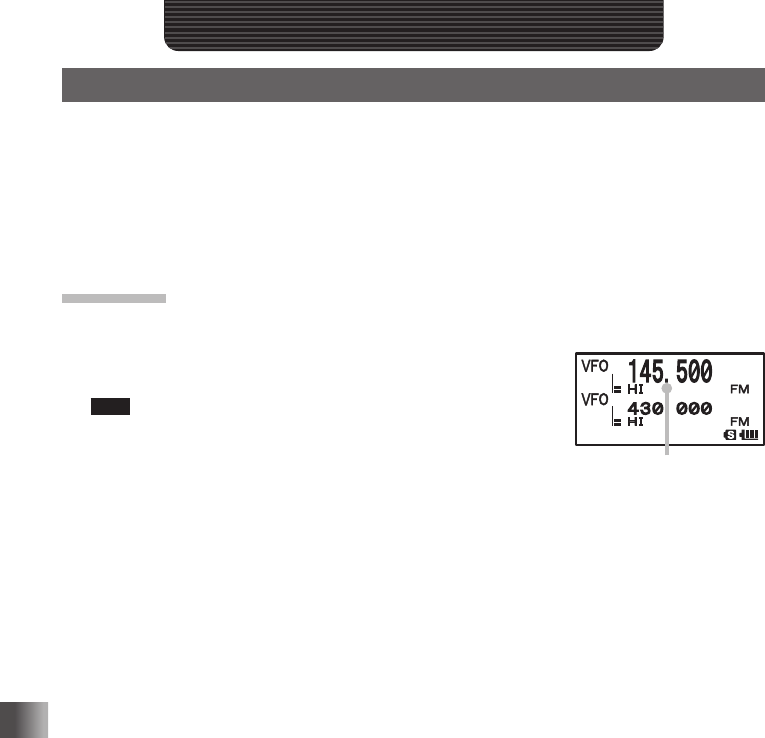
Adjusting the Volume Level
You can adjust the transceiver volume level for the A-band and B-band separately.
1 Press A to select the A-band or B-band for which you want to adjust the volume
level.
Pressing A each time toggles between the A-band and B-band.
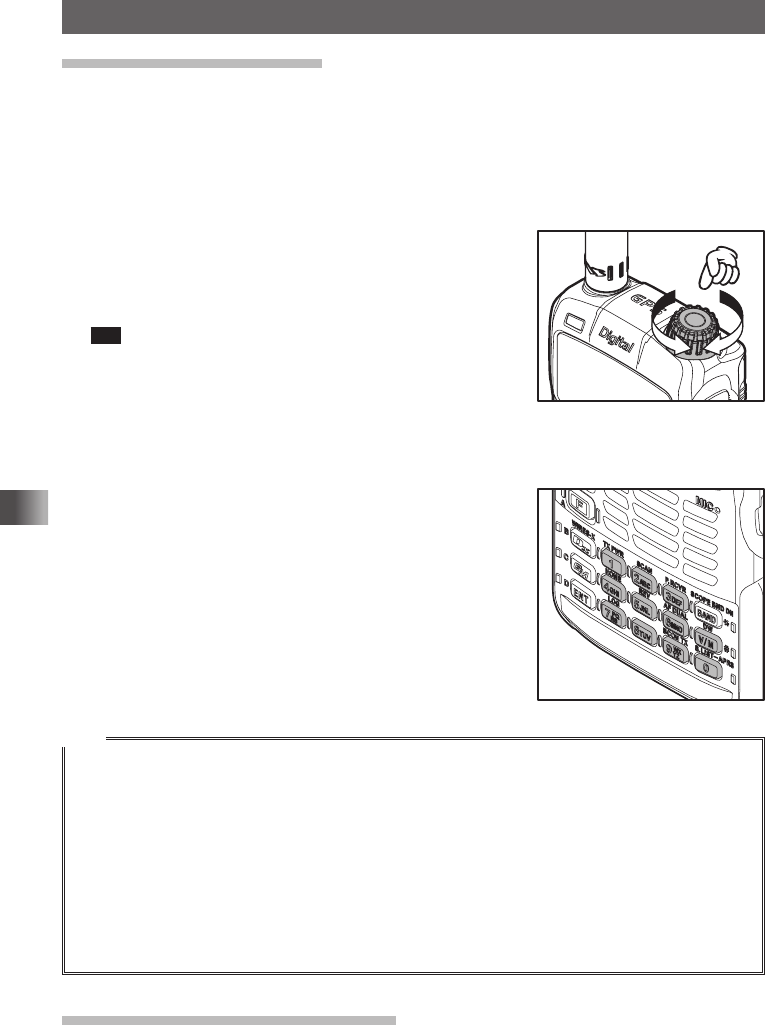
2 While pressing v, turn O to adjust the volume
level.
The volume bar graph moves up/down.
Supplement If no sound is heard from the speaker, press
T and then adjust the volume level while
listening to white noise.
3 Release v to exit from the Volume Level
Adjustment mode.
Tips
• Pressing v starts MUTE (silencing the audio) function,
muting entire sound.
• Pressing v while the audio is being muted cancels the
MUTE function. Sound Volume
Bar Graph
A “SP
VOLUME” level among
0 trough 31 appears.
Application for FCC / IC
FCC ID: K6620445X20
IC: 511B-20445X20
27
Basic Operation
Performing Communication
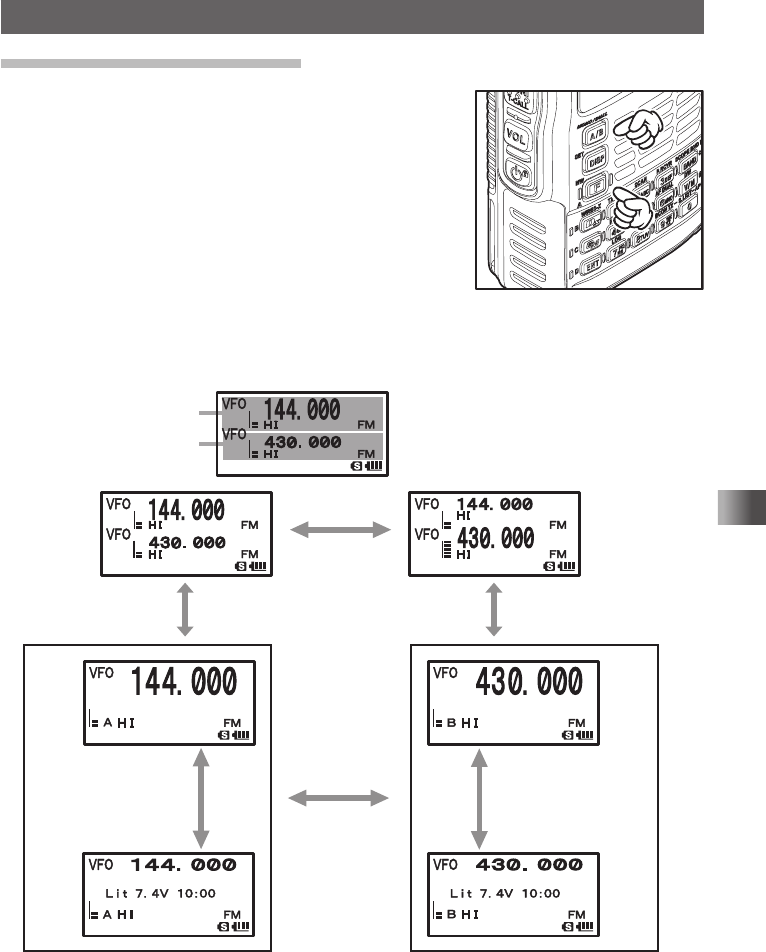
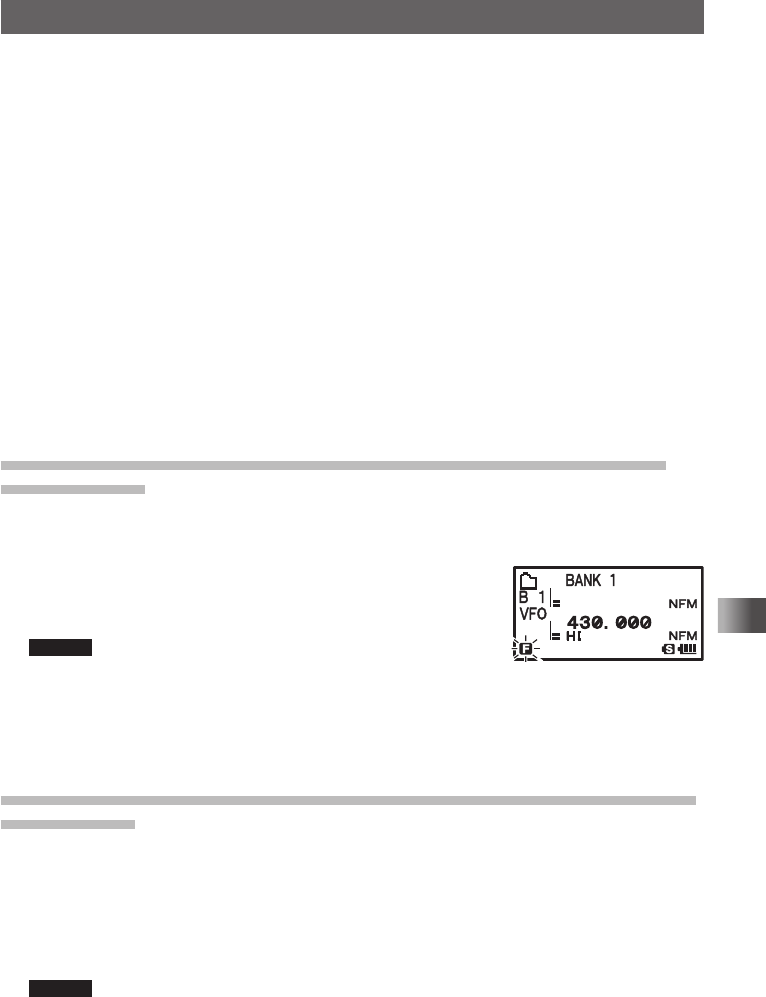
Selecting an Operating Band
The frequency displayed on the LCD in large letters is the
operating band.
You can change the frequency of the operating band and
activate the transmitter.
Each time A is pressed, the operating content displayed on the LCD screen is
changed.
Press F
↓
Press A.
Press F
↓
Press A.
Press A.
Press A.
A-band (operating band)
B-band
Press and hold A
about 1 second.
Press and hold A
about 1 second.
Application for FCC / IC
FCC ID: K6620445X20
IC: 511B-20445X20
28
Basic Operation
Performing Communication
Tip
• On A-band, you can transmit and receive using the 144 MHz and 430 MHz Amateur radio bands.
• On B-band, you can transmit and receive using the 144 MHz and 430 MHz Amateur radio bands.
In addition, the frequencies on the chart below can be received on A-band and B-band.
Chart of A-band and B-band reception frequencies
A-band and B-band reception frequencies
A-band B-band
0.5 MHz to 1.8 MHz
(AM BC Band)
30 MHz to 76 (88) MHz
(50 MHz band)
108 MHz to 137 MHz
(AIR band)
137 MHz to 174 MHz
(144 MHz band)
174 MHz to 222 MHz
(VHF-TV Band)
222 MHz to 420 MHz
(INFO band (1))
420 MHz to 470 MHz
(430 MHz band)
470 MHz to 774 (800) MHz
(UHF-TV Band)
803 (800) MHz to 999.9 MHz
Cellular Blocked
USA version
108 MHz to 137 MHz
(AIR band)
137 MHz to 174 MHz
(144 MHz band)
174 MHz to 222 MHz
(VHF-TV Band)
222 MHz to 420 MHz
(INFO band (1))
420 MHz to 470 MHz
(430 MHz band)
470 MHz to 580 MHz
( ): EXP/European version
−−
−−
−−
1.8 MHz to 30 MHz
(SW band)
−−
76 (88) MHz to 108 MHz
(FM BC Band)
−−
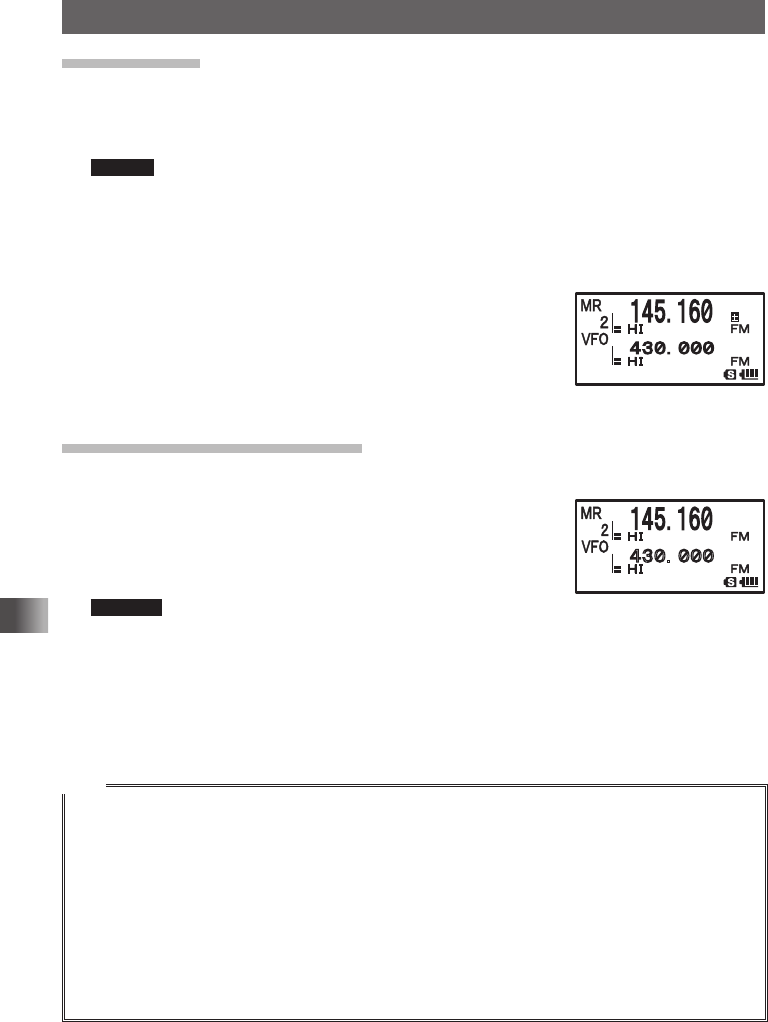
• A-band and B-band can be received at the same time.
You can receive Amateur radio frequency while listening to the AIR band, or receive two Amateur radio
frequencies on the same frequency band at the same time (V+V/U+U: Dual frequency reception on
the same band).
Application for FCC / IC
FCC ID: K6620445X20
IC: 511B-20445X20
29
Basic Operation
Performing Communication
Selecting a Frequency Band
You can select a frequency band to use for the A-band and B-band separately.
Setting a Frequency Band for the A-band
1 Press A to select the A-band.
2 Press B repeatedly to select a frequency band.
Short Wave
Band
50 MHz
band
FM BC
Band AIR band 144 MHz
band
VHF-TV
Band
Information radio
band (1)
430 MHz
band
UHF-TV
Band
Cellular Blocked
USA version
AM BC
Band
Tip Pressing F and then B changes frequency bands shown above in the reverse order.
Selecting a Frequency Band for B-band
1 Press A to select the B-band.
2 Press B to select a frequency band.
AIR band 144 MHz band VHF-TV Band
Information radio band (1)
430 MHz band
470MHz to 580MHz
Tip Pressing F and then B changes frequency bands shown above in the reverse order.
Caution
Digital communication can be performed only on the A-band.
Digital communication cannot be performed on the B-band.
Tips
• The frequency settings from the factory are:
A-band: 144.000 MHz B-band: 430.000MHz
• The factory setting of the Auto mode is set such that the transceiver is automatically switched to the
optimal reception mode for the default frequency bands.
To change the default reception mode, press and hold M for over 1 second and then select [2 TX/
RX] → [1 MODE] → [4RX MODE] (See page 38).
• For the relationship between frequency bands and reception frequencies, see the table on page 28.
• You can also recall the home channel of each frequency band by pressing F and then 4 (See
page 45).
Application for FCC / IC
FCC ID: K6620445X20
IC: 511B-20445X20
30
Basic Operation
Performing Communication
Tuning in to a Frequency
Tune in to your desired frequency using either of the following methods:
(1) Turn O to tune in to your desired frequency.
(2) Enter your desired frequency directly using the numeric keys.
Tuning in to your desired frequency with O.
1 Switch to the VFO mode.
2 Turn O to tune in to your desired frequency.
Turning O clockwise: The frequency increases.
Turning O counterclockwise: The frequency de-
creases.
Tip You can tune to the desired frequency in steps of 1 MHz by
pressing F and turning O.
Entering a Desired Frequency Directly Using Numeric Keys
1 Press V to enter the VFO mode, in which you can tune to the desired frequency.
2 Enter the desired frequency using numeric keys.
Example: To enter 145.520 MHz, Press the T he
following keys in sequence:
1→4→5→5→2
Example: To enter 430.000 MHz, Press the T he
following keys in sequence:
4→3→H
Tips
• In factory settings, the Auto Step mode is set such that the transceiver is automatically switched to the
optimal frequency steps for the reception frequency.
You can change frequency steps manually using O (See page 37).
• If you enter a wrong digit when entering a frequency using numeric keys, you can cancel it by press-
ing p.
• In factory settings, turning O beyond the selected frequency band does not change the selected
frequency band to another frequency band and displays the selected frequency band repeatedly on
the LCD.
To prevent it, press and hold M for over 1 second to switch to the Set mode, select [8 CONFIG] →
[21 VFO MODE] and change the [21 VFO MODE] to “ALL”. Thereby, you can change the frequency
band to another frequency band by turning O beyond the selected frequency band.
Selecting Communication Mode
This transceiver can operate in both analog and digital communication modes.
Application for FCC / IC
FCC ID: K6620445X20
IC: 511B-20445X20

31
Basic Operation
Performing Communication
Pressing % repeatedly switches the communication mode as follows.
[Analog (FM)] → [Auto (
¢
FM)] → [Digital (DN)] → [Digital Wide (VW)]
FM: Analog Analog communication using FM mode.
¢
○○ Auto Automatically switches between Analog AM (
¢
AM), Analog
FM (
¢
FM), and Digital (
¢
DN).
DN: Digital Digital communication using (C4FM (Quaternary FSK)
modulation
VW: Wide Digital High sound quality of Digital Communication
Caution
Digital communication can be performed only on the A-band.
Performing Communication
1 Speak into the microphone while pressing p.
When speaking into the microphone, keep it about 5 cm away from your mouth.
2 Release p.
The transceiver returns to the Reception mode.
Cautions
Use the transceiver at the minimum required transmission power level.
Doing so prevents the transceiver from overheating and saves battery power, increasing the operat-
ing time.
Do not continue transmitting for a prolonged period. The transceiver can overheat, resulting in mal-
function or burn.
If transmission is continued for a long period, the transceiver overheats and the overheat protection
function is activated. As a result, the transmitting power level is automatically set to Low Power. If
you continue transmitting while the overheat protection function is active, the transceiver will be forc-
ibly returned to the Reception mode.
If you touch the transceiver immediately after the overheat protection function has become active,
you can get burned. Wait for the temperature inside the transceiver to drop sufficiently before resum-
ing transmission.
Do not perform transmission without attaching the antenna. The transmitter circuit can be damaged.
Tips
• In the FM mode, you can transmit on the 144 MHz and 430 MHz ham radio bands.
• Even while you are receiving in the AM mode, you can transmit in the FM mode by pressing p.
• You can change the transmit power level by pressing F and then 1.
Transmit power level may be lower when using the battery pack or the alkaline battery case.
For more details, see “Changing the Transmission Power Level” on page 36.
• If p is pressed when a frequency other than the amateur ham radio band is selected, an alarm tone
(beep) will be emitted and “ERROR” appears on the LCD, disabling transmission.
• Pressing and holding M for over 1 second, and changing the Set Mode option [8 CONFIG] will allow
you to use the transceiver more conveniently.
• Selecting [8 CONFIG] → [2 BCLO] prohibits transmission during reception of a signal.
Application for FCC / IC
FCC ID: K6620445X20
IC: 511B-20445X20
32
Basic Operation
Performing Communication
Selecting Communication Mode
This transceiver is equipped with AMS (Automatic Mode Select) which automatically se-
lects between 4 modes of transmission to fit the signal being received. Because the trans-
mission is automatically adjusted to that of the other station, not only C4FM digital signals,
but analog signals are also recognized.
Press % to display [
¢
DN*] on the LCD.
* (The display depends on the received signal.)
䰢䰒䰛
䰢䰒䰛
䰒䰙
Ā
䎧䎱
䰔䰕
䰔䰕
䰀䯿䯿䯺䯼䯼䯼
䯽䰀䰁䯺
䎚䎛
䯼
ÿĀ
Example of when AMS is displayed.
To fix the transmission mode for operation, switch the transmission mode with %.
Pressing % toggles between communication modes in the order listed below.
[
¢
DN (AMS)] → [DN (V/D mode)] → [VW (FR mode)] → [FM (analog)]
Operation mode Display Description of Modes
AMS
(Automatic Mode Select)
¢
○○ Transmission mode is automatically selected from 4 types ac-
cording to the signal received.
(“○○” part differs depending on the received signal.)
The AMS feature settings may be changed via Set Mode ( p.112).
V/D Mode
(Voice/Data simultaneous
transmission mode)
DN Call is less prone to interruption due to detection and correction
of voice signals during digital voice signal transmission. This is
the standard mode for C4FM FDMA Digital
Voice FR Mode
(Voice Full Rate Mode)
VW Digital voice data transmission using the entire 12.5kHz band.
Enables high-quality voice communication.
Data FR Mode (High Speed
Data Communication Mode)
High speed data communication using entire 12.5kHz band.
This mode is automatically selected for image communication.
Analog FM Mode FM Analog communication using FM mode.
Effective when the signal is weak and audio is susceptible to
interruption in digital mode.
Cautions
Digital communication can be performed only on the A-band.
Digital communication cannot be performed on the B-band.
In V/D mode (“DN” on the LCD), position information is included in the radio wave during voice
communication, however, it is not include in the Voice FR mode (“VW” on the LCD).
Application for FCC / IC
FCC ID: K6620445X20
IC: 511B-20445X20
33
Basic Operation
Listening to the Radio
Listening to the AM/FM Radio
AM broadcast stations can be easily received using “Preset Memory Receiver” (See page
52), where many major broadcast stations are already saved to this transceiver, or the
stations can be directly tuned in by inputting the frequency of the desired broadcast sta-
tion with the O and key pad.
1 Press A
Set A band as the operating band.
2 Press B
Select either the “AM broadcast” or “FM broadcast” bands. The “R” icon will ap-
pear on the display while in the Broadcast Reception mode.
3 Adjust the frequency by turning O or using the key pad (See page 30).
Tip
• Broadcast stations that are frequently listened to can be saved to memory (See page 43).
• If you would like to scan a radio band, set A band as the operating band and press F, then 2.
• If a signal is detected during the scan, a beep will sound; the transceiver will receive the signal for 5
seconds then resume scanning.
• The decimal point will flash when the scan is stopped.
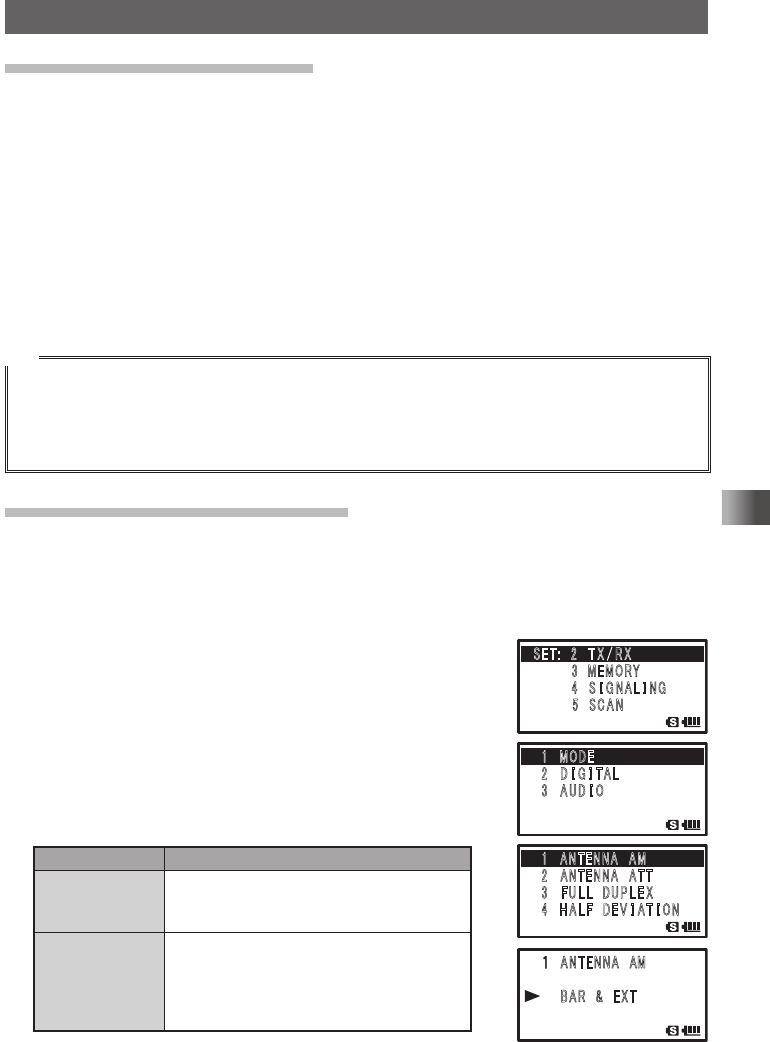
Switching between AM Antennas
When listening to AM broadcast stations, the Bar and external antennas may be switched
for best reception according to conditions. During normal use, you may not need to switch
between AM antennas.
Enter the Set mode:
1 Press and hold M for over 1 second.
2 Turn O to select [2 TX/RX].
3 Press H.
4 Turn O to select [1 MODE].
5 Press H.
6 Turn O to select [1 ANTENNA AM].
7 Press H.
8 Turn O to switch to the desired antenna.
Display Operation
BAR & EXT
ANTENNA
AM broadcasts can be received using both
the whip antenna provided at the top of the
transceiver and the built-in bar antenna.
BAR ANTENNA When receiving AM broadcasts, the trans-
ceiver uses only the built-in bar antenna.
Rotate the transceiver to adjust the AM
broadcast (middle wave band) for the best
receiving sensitivity.
9 Press p to exit from the Set mode.
䎶䎨䎷䎝䎃䎃䎕䫹 䎷 䎻 䎒 䎵 䎻
䎃䎃䎃䎃䎃䎃䎃䎃䎖䫹䎰䎨䎰䎲䎵䎼
䎃䎃䎃䎃䎃䎃䫹䎗 䫹 䎶 䎬 䎪 䎱 䎤 䎯 䎬 䎱䎪
䎃䎃䎃䎃䎃䎃䎃䎃䎘䫹 䎶 䎦 䎤 䎱
䎔䎃䎃䎰䎲䎧䎨
䎕 䫹 䎧 䎬 䎪 䎬 䎷䎤䎯
䎖 䫹 䎤 䎸 䎧 䎬 䎲
䎔䎃䎃䎤䎱䎷䎨䎱䎱䎤䎃䎃䎤䎰
䎕 䫹 䎤䎱䎷䎨䎱䎱䎤䎃䎃䎤䎷䎷
䎖 䫹 䎩 䎸 䎯 䎯䎃䎃䎧 䎸 䎳 䎯 䎨 䎻
䎗䎃䎃 䎫 䎤 䎯 䎩䎃䎃䎧 䎨 䎹 䎬 䎤 䎷 䎬 䎲䎱
䎤䎱䎷䎨䎱䎱䎤䎃 䎃䎤䎰
䎥䎤䎵 䎃 䎃䎉 䎃 䎃 䎨䎻䎷
Application for FCC / IC
FCC ID: K6620445X20
IC: 511B-20445X20
34
Basic Operation
Miscellaneous Settings
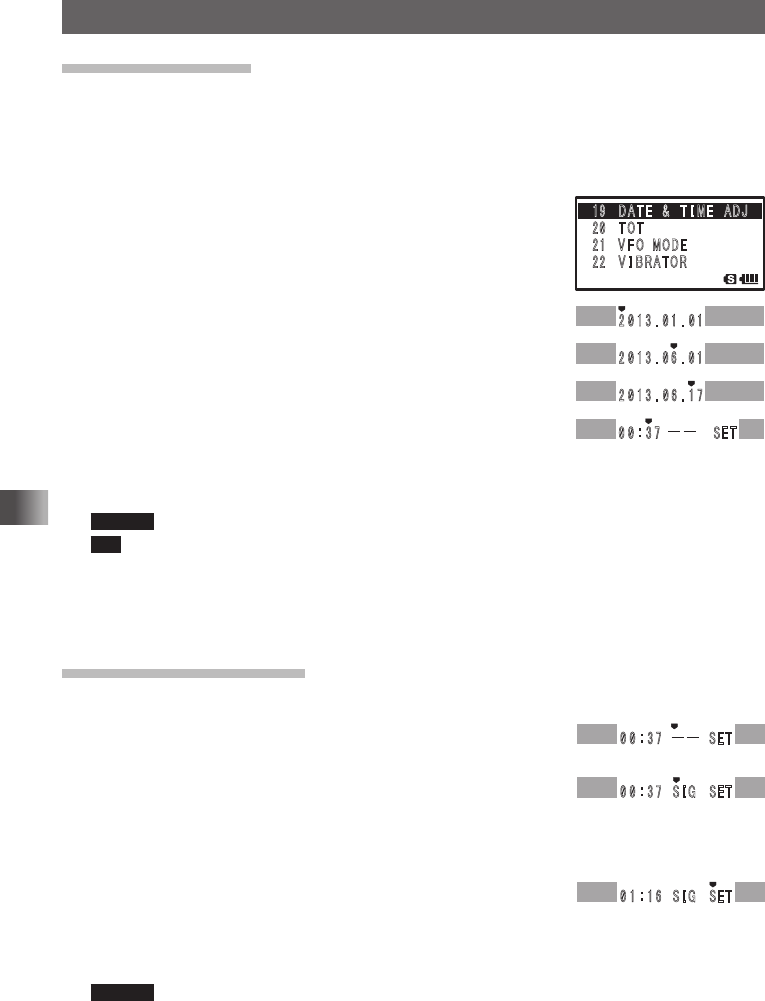
Setting clock time
This transceiver is equipped with an internal clock. The clock is used to display the time,
and also to turn the transceiver on or off at a specified time (timer function). Set the clock
before using the transceiver for the first time.
Enter the Set mode:
1 Press and hold M for over 1 second.
2 Turn O to select [8 CONFIG].
3 Press H.
4 Turn O to select [19 DATE & TIME ADJ].
5 Press H.
6 Turn O to set [YEAR].
7 Press H.
The cursor moves to [MONTH].
8 Turn O to set [MONTH].
9 Repeat steps 5 and 6.
Set [DAY], [HOUR], and [MINUTE]
Pressing F moves the cursor to the setting item shown on the left.
Remark The hour appears in the 24-hour clock format.
Tip If GPS information is received, the clock will be set automatically.
Next, set the time signal alarm.
If you do not want to set the time signal alarm, proceed to step 3 described in “Setting the
Time Signal”.
Setting the Time Signal
Set the time signal so that a tone is emitted at 00 minute of each hour.
1 Press B.
The cursor moves to [– –].
2 Turn O to select “SIG”.
If you select [TIME SIGNAL] you will hear a time signal tone
(beep) at 00 minute of each hour.
If you do not want to hear the time signal tone, leave “– –” as it is.
3 Press H.
The cursor moves to [SET].
4 Press H to save the [TIME SIGNAL] setting.
5 Press p to exit from the Set mode.
Remark When “MONOBAND RECEPTION” is selected, the current time appears on the LCD.
䎔䎜䎃䎃 䎧 䎤 䎷 䎨 䎃 䎃䎉䎃䎃 䎷 䎬 䎰䎨䎃䎃䎤䎧䎭
䎕䎓䫹 䎷 䎲 䎷
䎕䎔䫹 䎹 䎩 䎲 䎃 䎰 䎲 䎧䎨
䎕䎕䎃䎃 䎹 䎬 䎥 䎵 䎤䎷䎲䎵
䎕 䎓 䎔 䎖 䎑 䎓 䎔 䎑 䎓 䎔
䎕 䎓 䎔 䎖 䎑 䎓 䎙 䎑 䎓 䎔
䎕 䎓 䎔 䎖 䎑 䎓 䎙 䎑 䎔 䎚
䎓 䎓 䎝䎖䎚䎃䎃䎃䎃䎃䎃䎃䎃䎃䎃 䎃䎶䎨䎷䎃
䎓 䎓 䎝䎖䎚䎃䎃䎃䎃䎃䎃䎃䎃䎃䎃䎶䎨䎷䎃
䎓 䎓 䎝䎖䎚䎃䎃 䎶 䎬 䎪䎃䎃䎶䎨䎷
䎓 䎔 䎝䎔䎙䎃䎃 䎶 䎬 䎪䎃䎃䎶䎨䎷䎃
Application for FCC / IC
FCC ID: K6620445X20
IC: 511B-20445X20
35
Basic Operation
Miscellaneous Settings
Tips
• The accuracy of the clock is 30 seconds/month. However, it may vary depending on the environment
conditions, such as the temperature.
• The transceiver is equipped with a dedicated rechargeable lithium battery for the clock.
Normally, the transceiver is powered from the battery pack. When the battery pack is detached or
runs out, the lithium battery starts operating automatically. The lithium battery can power the clock for
approximately 2 months.
• When you use the transceiver for the first time or without the battery pack for a long period of time,
the accuracy of the clock may be poor. In such case, reattach the battery pack and adjust the time.
• When the transceiver is operating in “Mono” band, the current time appears on the LCD.
However, when display of double-size characters or dual display is selected, the current time does
not appear on the LCD.
• The calendar can display dates from January 1, 2000 A.D. up to December 31, 2099 A.D.
• If AUTO is selected in [9 APRS] → [21 GPS TIME SET] in the Set mode, the clock will automatically
display accurate time. However, the day of the week is not set automatically. Set the day of the week
manually.
• If you use the timer function, the transceiver will be turned off automatically (See page 132).
In addition, you can set the transceiver to turn on at the specified time (See page 132).
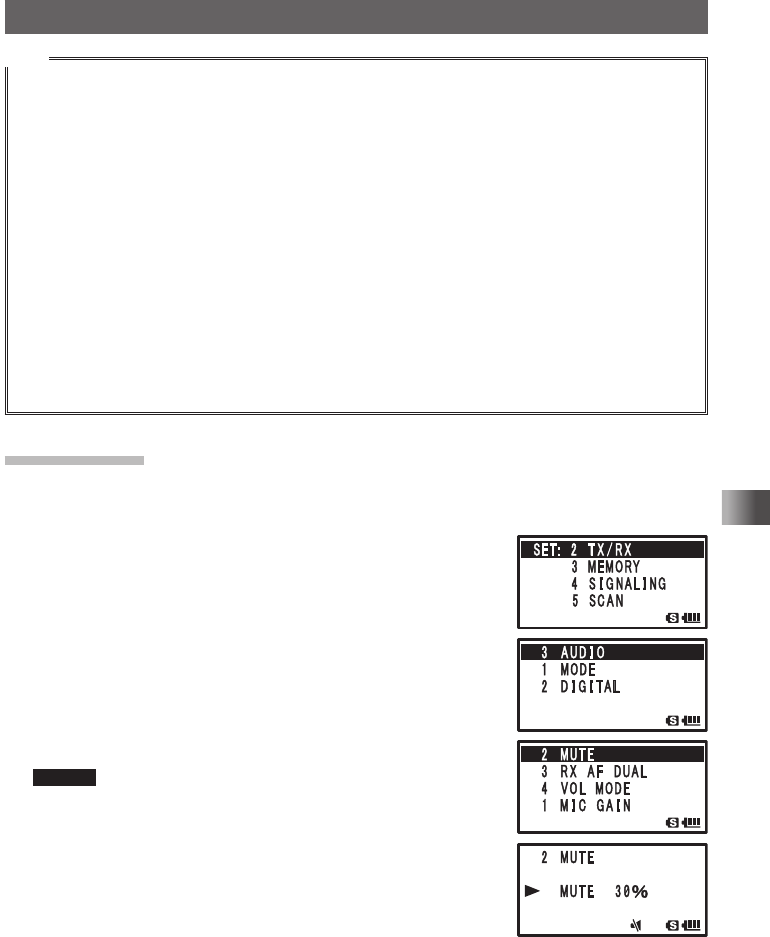
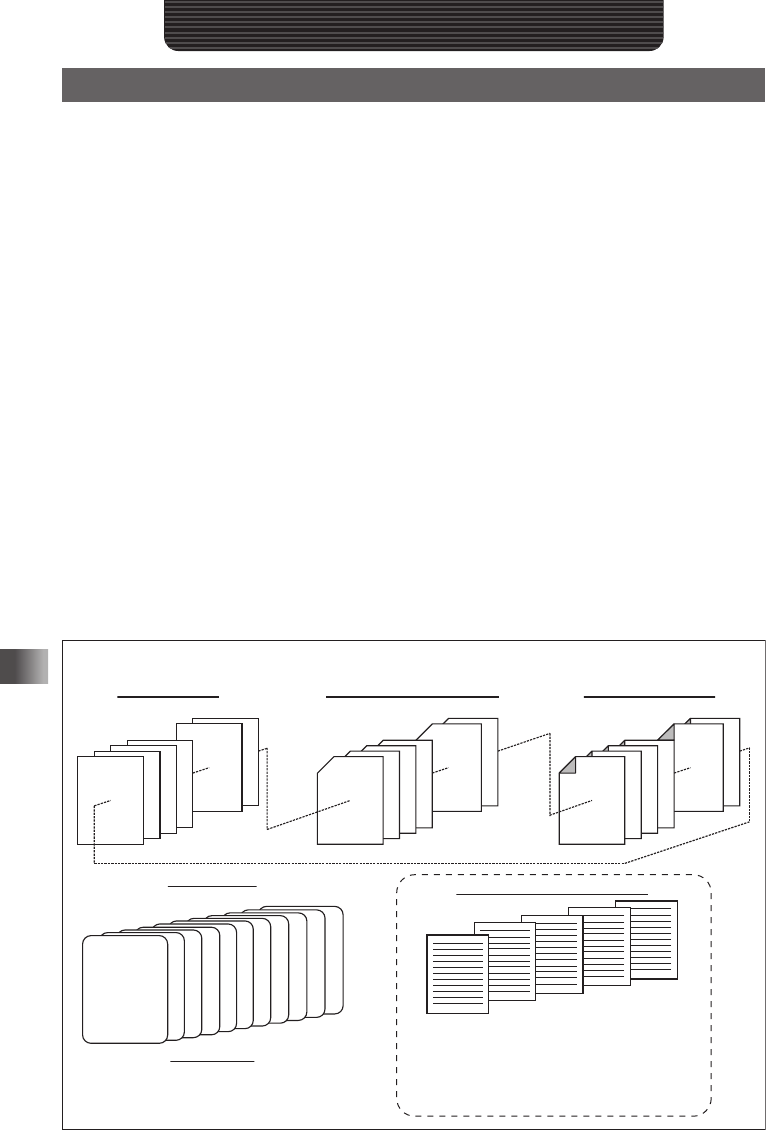
Muting Audio
If it is difficult to hear the voice because the audio of A-band and the B-band are mixed
during dual reception, you can mute the audio of the non-operating band.
1 Press and hold M for over 1 second to select the Set
mode.
2 Turn O to select [2 TX/RX].
3 Press H.
4 Turn O to select [3 AUDIO].
5 Press H.
6 Turn O to select [2 MUTE].
7 Press H.
8 Turn O to select a mute level.
Remark You can select one of the following 4 levels of mute:
• MUTE 30%
• MUTE 50%
• MUTE 100%
• OFF
The higher the value for MUTE, the more the non-operating
band audio is reduced.
To deactivate the muting function, select OFF.
Application for FCC / IC
FCC ID: K6620445X20
IC: 511B-20445X20
36
Basic Operation
Miscellaneous Settings
9 Press p to exit from the Set mode.
Remark When the muting function is active, ] appears on the LCD.
When the muting function is active, ] blinks on the LCD.
Tips
• Even if the muting function is activated, the voice is not muted when no signal is received on the
operating band.
• Pressing v while in frequency display screen, zooms in on [MUTE] and both A and B bands can
be muted simultaneously.
Pressing v again will deactivate MUTE.
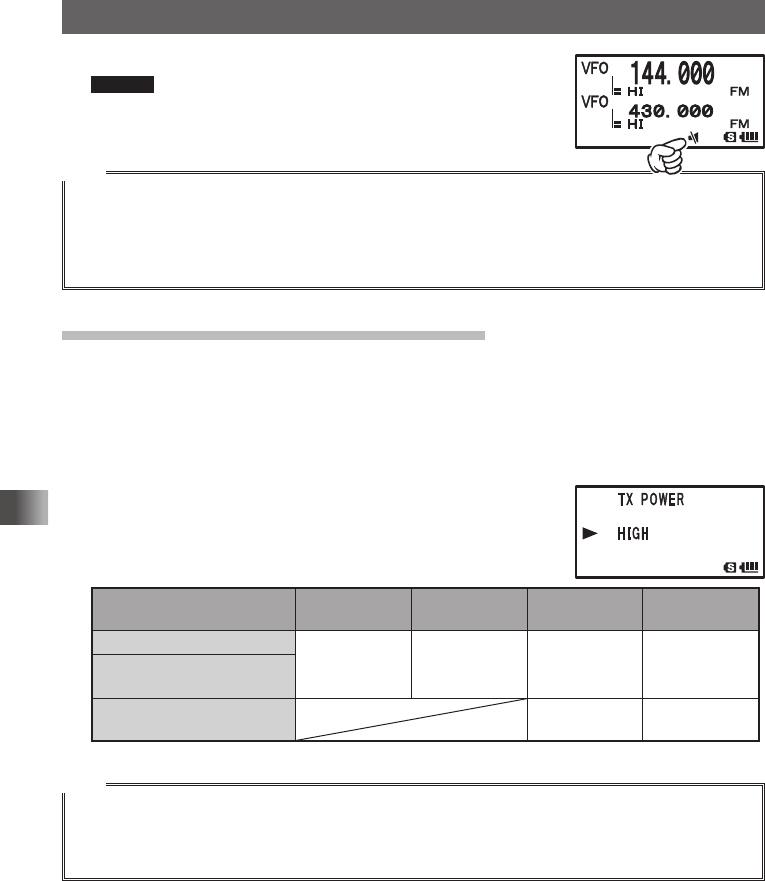
Changing the Transmission Power Level
The maximum transmission power level of this transceiver is 5W. When communicating
with a friend in the immediate area or when you want to reduce the battery power con-
sumption, you can lower the transmit power level. For power supply types and transmit
power levels, see the table shown below.
1 Press F and then 1.
2 Turn O to select the transmit power level.
Select [LOW1], [LOW2], [LOW3], or [HIGH] by turning O.
3 Press p to save the selected transmit power level.
Battery type
HI (High
Power)
L3 L2 L1
Battery pack
5 W 2.5 W 1 W 0.1 W
External power supply
(13.8 VDC)
Battery Case
(alkaline battery) Approx. 0.8 W 0.1 W
Tips
• You can set the transmitter power level separately for the A-band and B-band.
• Use the transceiver at the minimum required transmit power level to reduce battery power
consumption.
• By default, “HI (High power)” is selected.
Application for FCC / IC
FCC ID: K6620445X20
IC: 511B-20445X20
37
Basic Operation
Miscellaneous Settings
Adjusting the Squelch Level
You can mute the raspy noise heard when no signal is being received. The squelch level
can be adjusted separately for two broadcasts (FM and AM) received on the A-band and
B-band. When the squelch level is increased, the noise is more liable to disappear but, if
it is set too high, it becomes difficult to receive weak signals. Adjust the squelch level as
required.
1 Press A to select the desired operating band.
2 On the FT1XDR, press F and then T.
On the FT1XDE, press and hold M over 1 second to enter the Set mode, and then
select [4 SIGNALING] → [8 SQL LEVEL].
3 Turn O to adjust the squelch level.
Remark The squelch level can be adjusted within the range from 0 to 15.
Default: LEVEL 1
4 Press p to save the Squelch Level Adjustment and exit the
Squelch Level Adjustment mode.
Tips
While T is held pressed, the squelch function will be deactivated
for both the A-band and B-band.
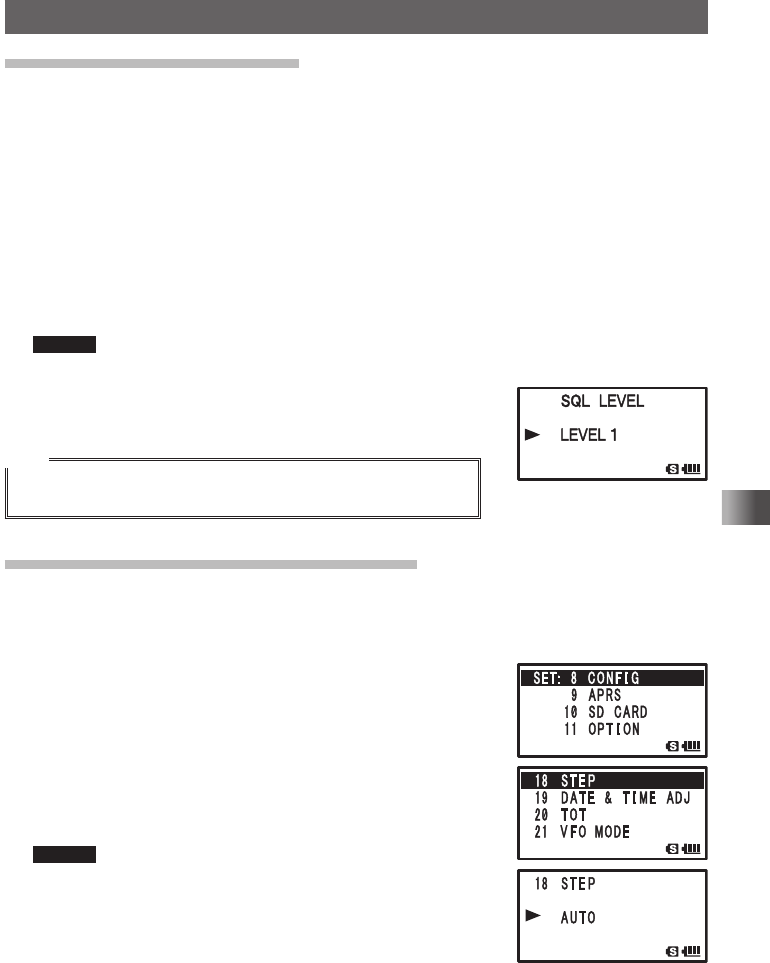
Changing the Frequency Step Manually
By default, “AUTO (Step)” is selected so that the optimum frequency step is automati-
cally selected according to the received frequency. You can change this frequency step
manually.
1 Press and hold M over 1 second.
Enters the Set mode.
2 Turn O to select [8 CONFIG].
3 Press H.
4 Turn O to select [18 STEP].
5 Press H.
6 Turn O to select your desired frequency step.
Remark Selectable frequency steps are as follows:
• AUTO • 5 KHz • 6.25 KHz
• (8.33 KHz) • 10 KHz • 12.5 KHz
• 15 KHz • 20 KHz • 25 KHz
• 50 KHz • 100KHz
It is recommended that AUTO be selected normally.
Default: AUTO
7 Press p to save the frequency step, and exit the Frequency Step Setting mode.
Application for FCC / IC
FCC ID: K6620445X20
IC: 511B-20445X20
38
Basic Operation
Miscellaneous Settings
Tips
• For the AIR band (108 MHz to 136.991 MHz), the frequency step “8.33 kHz” can be selected.
• For bands covering 250MHz to 300MHz, and bands covering 580 MHz or higher, the frequencies,
frequency steps “5 kHz”, “6.25 kHz”, and “15 kHz” cannot be selected.
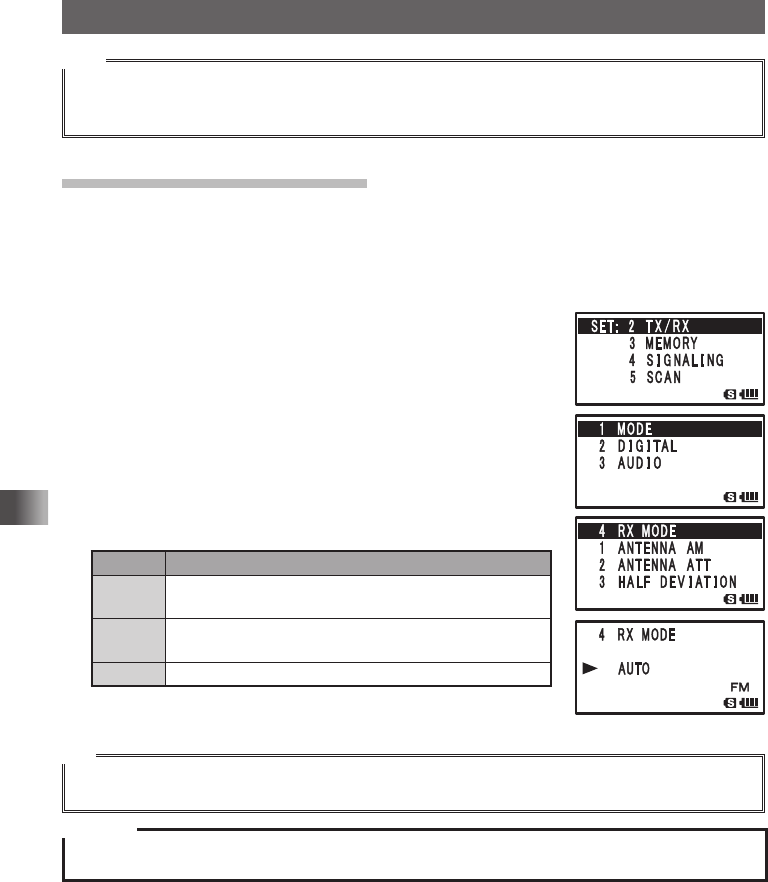
Changing the Mode Manually
By default, the reception (RX) is set to “AUTO (Auto Mode)” so that the optimal reception
mode (radio wave type) is automatically selected according to the receiving band (fre-
quency band). You can change this mode manually.
Enters the Set mode:
1 Press and hold M for over 1 second.
2 Turn O to select [2 TX/RX].
3 Press H.
4 Turn O to select [1 MODE].
5 Press H.
6 Turn O to select [4 RX MODE].
7 Press H.
8 Turn O to select your desired reception mode.
It is recommended that AUTO be selected normally.
Display Operation
AUTO The optimal reception mode is automatically selected
according to the frequency band.
FM Only the selected band is switched to the NFM (FM
mode).
AM Only the selected band is switched to the AM mode.
9 Press p to exit the Set mode.
Tip
• Even if the AM mode is selected on a ham radio band, 144 MHz band or 430 MHz band, transmission
takes place in the FM mode.
Caution
You cannot change the mode of A-band AM/FM broadcast radio bands.
Application for FCC / IC
FCC ID: K6620445X20
IC: 511B-20445X20
39
Basic Operation
Miscellaneous Settings
Locking keys and switches
To prevent accidental frequency change during operation, keys, switches and O except
p switch, T, v, P can be locked.
1 Press P to lock the keys and switches.
l appears on the LCD.
Remark To unlock a key or switch, press P again.
l disappears from the LCD.
Tip
• You can also lock the O and p switch by selecting the Set mode option [8 CONFIG] → [9 LOCK].
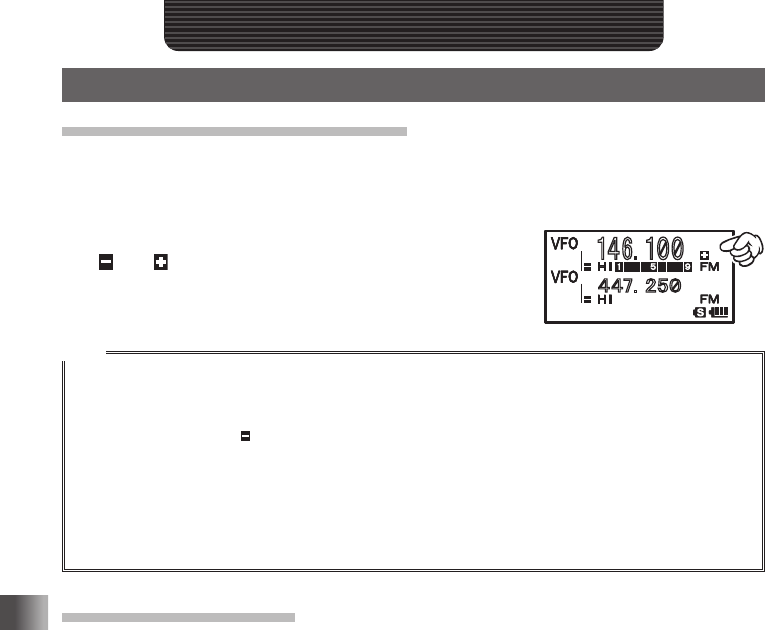
Restoring to Defaults (All Reset)
You can restore all transceiver settings and memory content, such as memory channels,
to the defaults.
1 Press P while pressing %, D, and H.
The transceiver is turned on, followed by beep.
When you hear the beep, release the keys.
2 When “ALL RESET PUSH F KEY!” appears on the
LCD, press F.
A beep sounds and the callsign input screen appears
on the LCD.
3 Input a callsign for your transceiver.
Input the callsign with the numeric keys.
4 Press p to save your callsign and the screen returns to the
frequency display.
Remark To cancel the All Reset function, press a key or switch other
than F.
Caution
When the All Reset function is performed, all data such as memory channels registered in the memory
is deleted. Be sure to write it down on paper or back up the data on the microSD memory card (See
pages 138 to 139).
Tip
To return only the Set Mode option settings to default, press P while pressing % and V.
Application for FCC / IC
FCC ID: K6620445X20
IC: 511B-20445X20
40
Repeater Operation
Repeater Operation
Repeater Operation
Communicating Via the Repeater
The transceiver includes an ARS (Automatic Repeater Shift) function which permits com-
munication through the repeater automatically just by setting the receiver to the repeater
frequency.
1 Set the receive frequency to the repeater frequency.
“
” or “
” appears in the upper right corner of the LCD.
2 Press p, to begin communicating through the repeat-
er.
Tips
• Pressing F and then pressing 5 enters the “reverse” state where the transmit frequency and the
receive frequency are temporarily reversed. This allows you to check and find if direct communication
with the remote station is possible.
• In the “reverse” state, [
] blinks on the LCD.
• Pressing F again and then 5 exits the “reverse” state.
• Press and hold M over 1 second to enter the Set mode and change the options to allow more
convenient use of this function.
[8 CONFIG] → [14 RPT ARS] You can deactivate the ARS function.
[8 CONFIG] → [15 RPT SHIFT] You can set the repeater shift direction.
[8 CONFIG] → [16 RPT SHIFT FREQ] You can change the repeater shift step.
Tone Calling (1750 Hz)
If your transceiver is FT1XDE (European version), press and hold in the T switch
(just below the p switch) to generates a 1750 Hz burst tone to access the European
repeater. The transmitter will automatically be activated, and a 1750 Hz audio tone will
be superimposed on the carrier. Once access to the repeater has been gained, you may
release the T switch, and use the p switch for activating the transmitter thereafter.
If you need to access the repeaters which requires a 1750 Hz burst tone for access by
the FT1XDR (USA/EXP versions), you can set the T switch to serve as a “Tone Call”
switch instead. To change the configuration of this switch, use Set Mode [8 CONFIG] →
[10 MONI/T-CALL].
䰀䰀
䎚
䯺
䎕䎘
䯼
䯽䰀
䎙
䯺䯽䯼䯼
Application for FCC / IC
FCC ID: K6620445X20
IC: 511B-20445X20

41
Repeater Operation
Repeater Shift
The FT1XDR/DE has been configured, at the factory, for the repeater shifts customary in
the country where it is sold. For the 144 MHz band, this usually will be 600 kHz, while the
430 MHz shift will be 1.6 MHz, 7.6 MHz, or 5 MHz (USA version).
Depending on the part of the band in which you are operating, the repeater shift may be
either downward (−) or upward (+), and one of these icons will appear to the right of the
display frequency on the LCD when repeater shifts have been enabled.
Automatic Repeater Shift (ARS)
The FT1XDR/DE Automatic Repeater Shift feature causes the appropriate repeater shift
to be automatically applied whenever it is tuned into the designated repeater sub-bands.
If the ARS feature does not appear to be working, you may have accidentally disabled it.
To re-enable ARS:
1 Press and hold the M for over 1 second to enter the set mode.
2 Turn the O to select [8 CONFIG].
3 Press H.
4 Turn the O to select [14 RPT ARS].
5 Press H.
6 Turn the O to select “ON” (to enable Automatic Repeater Shift).
7 Press the p to save the new setting and exit the Set mode.
Application for FCC / IC
FCC ID: K6620445X20
IC: 511B-20445X20
42
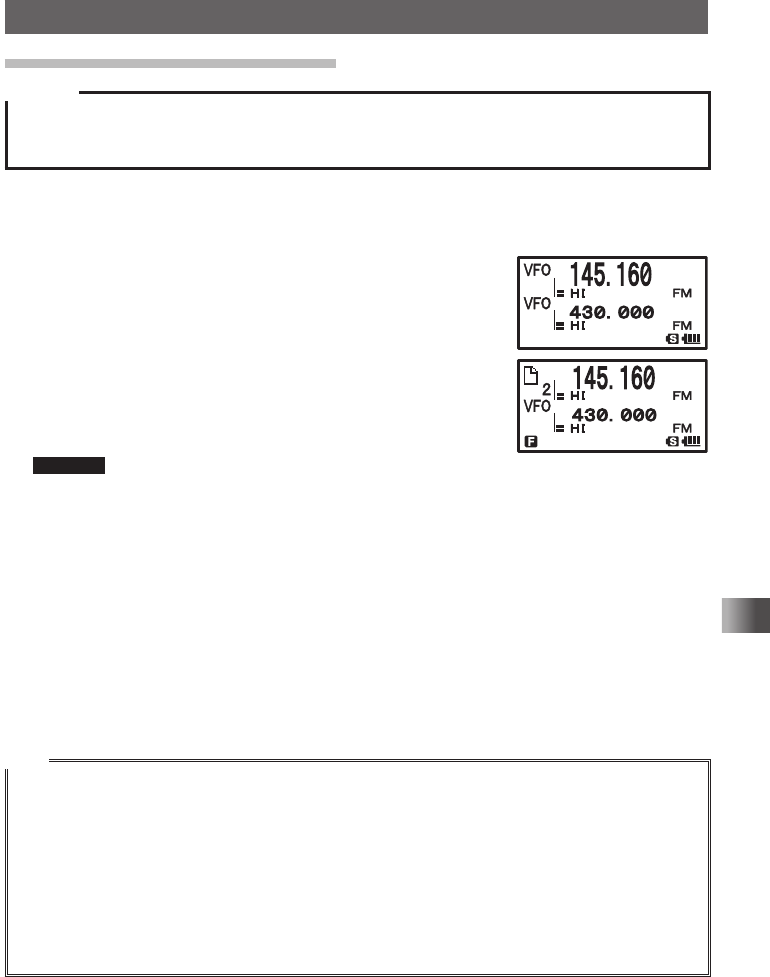
Using the Memory
Using the Memory
A Wide Variety of Memory Functions
The FT1XDR/DE transceiver provides the following various types of memory channels in
addition to the regular memory channels (numbers 001 to 900).
• [Home channels] which can be recalled on each frequency band with one touch of a
key. (See page 45)
• Preset Receiver Memory Channels such as VHF Weather Broadcast Station (10 chan-
nels), international VHF (marine) radios (57 channels) and world broadcasts (89 chan-
nels) (see pages 51 to 55)
• 99 (901 to 999) skip search memory channels that allow you to skip unwanted frequen-
cies during VFO scanning (See page 58)
• 50 sets of memory channels (L01/U01 to L50/U50) for programmable memory chan-
nels scanning (PMS) (See page 63)
The operating frequency and other operational information can be registered to each
regular memory channel, home channel, or PMS memory channel:
• Operating frequency • Memory tag • Repeater information
• Tone information • DCS information • Transmission output
• Memory channel skip information
(The operating mode information is not registered to the memory channels)
Memory channels can be sorted and registered to memory banks according to the in-
tended use. The transceiver allows you to use 24 types of memory banks. A maximum of
100 memory channels can be registered to each memory bank. A name can be assigned
to each memory bank with up to 16 characters. (See page 48)
/8
/8
/8
/8
/8
/8
Memory Channel Configuration of the transceiver
Memory channels
(900 channels)
Home channels
(11 channels)
Memory banks
(24 banks)
Up to 100 memory channels can be
registered to each bank.
Skip search memory channels
(99 channels)
PMS memory channels
(50 sets)
Preset receiver memory channels
• Memory channels for short wave broadcasts
(89 channels and international VHF (marine)
radios (57 channels))
Application for FCC / IC
FCC ID: K6620445X20
IC: 511B-20445X20
43
Using the Memory
A Wide Variety of Memory Functions
Registering to Memory Channel
Caution
The information such as operating frequency that is registered to memory channels can be corrupted
due to wrong operation, static electricity, or electrical noise. Also, it can be erased in the case of a failure
or repair. Be sure to write it down on paper or otherwise save the information (See pages 138 to 139).
The transceiver allows you to use 900 memory channels (memory channel numbers 1 to
900).
1 Switch to the VFO mode.
2 Tune in to a frequency by turning O.
Select the frequency you want to register to a memory chan-
nel.
3 Press and hold F over 1 second.
Enters the Memory Channel Registration mode, and the
number of the memory channel next to the memory channel
to which you registered a frequency last blinks.
Remarks • To cancel the memory channel registration, press the p
switch.
• To register a frequency to a memory channel specified, Turn O to select the memory
channel.
The ( icon indicating [The specified memory channel is unregistered] lights, and the
memory channel blinks.
The ) icon indicating [The specified memory channel is registered] lights.
• Pressing M each time skips memory channels quickly in steps of 100 memory channels.
4 Press F to complete the memory channel registration. The registered frequency
appears on the LCD.
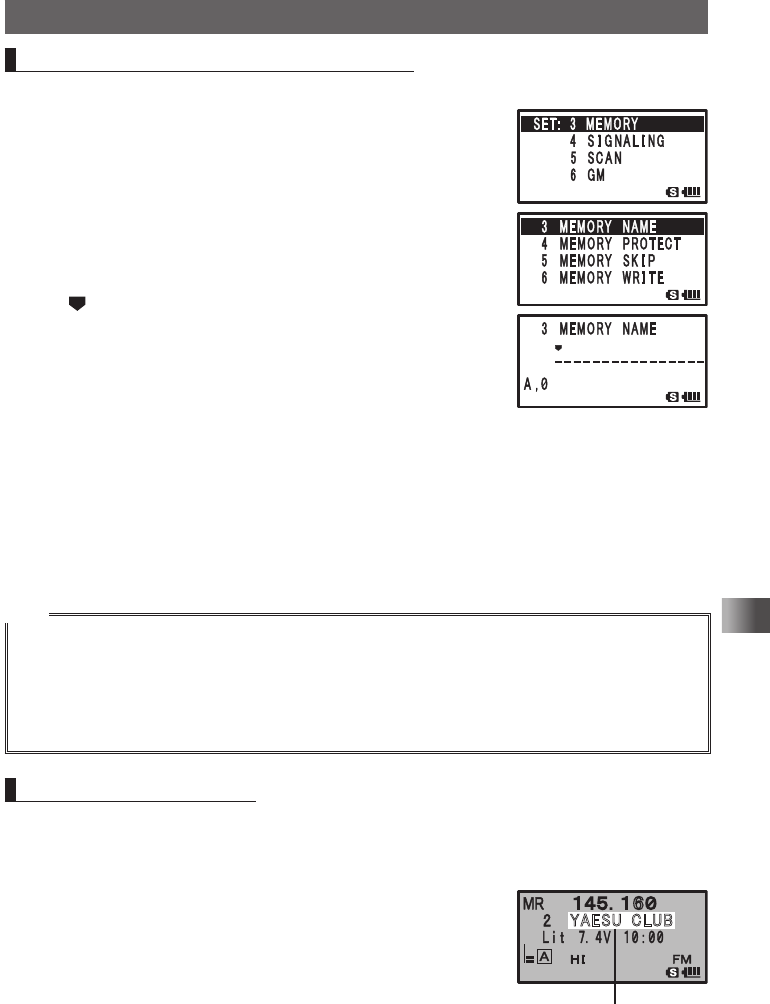
When registering a frequency to a memory channel already registered, “Overwrite
OK?” appears on the LCD.
Tips
• By default, 144.000 MHz is registered to the memory channel 1. It can be changed to another fre-
quency, but not be deleted.
• The frequency which has been registered to a memory channel can be overwritten with a new frequency.
When you attempt to register a new frequency to a memory channel, an unregistered memory chan-
nel appears.
• To display the lowest unregistered memory number when you register a frequency to a memory
channel, press and hold M over 1 second to enter the Set mode, and then select [3 MEMORY] →[6
MEMORY WRITE].
• To inhibit registration to all memory channels, press and hold M over 1 second to enter the Set
mode, and then select [3 MEMORY] → [4 MEMORY PROTECT].
Application for FCC / IC
FCC ID: K6620445X20
IC: 511B-20445X20
44
Using the Memory
A Wide Variety of Memory Functions
Split Memory
Two different frequencies, one for reception and other for transmission, can be registered
to a memory channel.
1 Register a receive frequency to a memory channel.
Remark See “Registering to Memory Channel” above.
2 Select a transmit frequency in the VFO mode.
3 Press and hold F over 1 second.
4 Turn O to select the memory channel number that you registered the receive fre-
quency to.
5 While pressing p, press F to save the Split memory
channel.
When you recall the memory channel to which you reg-
istered two different frequencies (one for receive and the
other for transmit), the @ appears on the LCD
Recalling a Memory Channel
Recall a registered memory channel using the following procedure:
1 Press V to enter the Memory mode and the memory
channel you used last appears on the LCD.
2 Turn O to select the desired memory channel.
Select the memory channel to use.
Remarks • You can directly recall a memory channel using numeric
keys.
To recall memory channel 15: Press 15H
• Pressing F and turning O allows you to skip memory channels quickly in steps of 10
memory channels.
3 Press V to exit the Memory mode, and the frequency selected in the VFO mode
appears.
Tips
• Unregistered memory channels are skipped.
• By default, a priority memory channel, which is used as dual receive priority memory channel, is set to
the memory channel number 1. [P] appears on the upper right corner of the priority memory channel
number (See page 75).
• The frequency registered to a memory channel can be transferred to the VFO operating band in the
following procedure:
Press and hold F over 1 second. → Press V → “OVERWRITE OK?” appears → Press V.
• To place the FT1XDR/DE transceiver in the Memory Channel only mode, use the following procedure,
which allows the use of memory channels only.
Press V while pressing P to turn on the transceiver.
To cancel the Memory Channel Only mode, press P while pressing V again.
䋴䋳䋰䋮䋰䋰䋰
Application for FCC / IC
FCC ID: K6620445X20
IC: 511B-20445X20
45
Using the Memory
A Wide Variety of Memory Functions
Recalling Home Channel
1 Press F and then 4.
The home channel of the currently selected frequency band appears on the LCD.
Tips • For the relationship between the frequency bands and the home channel frequencies, see the
table on the next page.
• Selecting a frequency by turning O allows you to return to
the VFO mode.
Frequency band Frequency Frequency band Frequency
AM BC Band 540 kHz 174 to 222 MHz band 174.000 MHz
FM BC Band 76.000 (88.000) MHz (INFO band (1)) 222.000 MHz
(SW band) 1.800 MHz 430 MHz band 446.000 (430.000) MHz
50 MHz 50.000 MHz 470 to 770 MHz band 470.000 MHz
(AIR band) 108.000 MHz Information radio band (2) 860.000 MHz
144 MHz band 146.520 (144.000) MHz ― ―
( ): EXP/European version
Returning to the Previous Frequency
1 Press F and then 4
The frequency used before recalling the home channel appears on the LCD.
Changing Home Channel Frequency
You can change a default home channel frequency.
1 Switch to the VFO mode.
2 Turn O to select a frequency.
Select a frequency to change.
3 Press and hold F for over 1 second to enter the Write mode.
4 Press D.
“OVERWRITE?” appears on the LCD for about 5 seconds.
5 Press D.
When the home channel frequency has been overwritten by
a new frequency, the home channel frequency of the se-
lected frequency band is changed.
䎲䎹䎨䎵䎺䎵 䎬 䎷䎨䎢
Application for FCC / IC
FCC ID: K6620445X20
IC: 511B-20445X20

46
Using the Memory
A Wide Variety of Memory Functions
Deleting Memory Channel
1 Switch to the Memory mode.
2 Press and hold F for over 1 second.
3 Turn O to select the memory channel to delete.
4 Press H.
“MASK?” appears on the LCD for about 3 seconds.
Remark To cancel the memory channel deletion operation, press
F.
5 Press H to delete the memory channel.
Remark To delete other memory channels, repeat steps 2 through
5.
Caution
Memory channel 1 cannot be deleted.
Tips
The memory channel specified as a priority memory channel cannot be deleted. To delete a priority
memory channel, specify it as a regular memory channel, then delete it.
Restoring Deleted Memory Channel
You can restore a deleted memory channel.
1 Switch to the Memory mode.
The last used memory channel appears.
2 Press and hold F for over 1 second.
3 Turn O to select the memory channel to restore.
4 Press H to restore the deleted memory channel.
Using Memory Tag
Memory channels and home channels can be assigned a name (memory tag) such as a
callsign or broadcast station name. A memory tag can be specified with up to 16 charac-
ters. The following types of characters can be entered:
• Alphabetic characters (uppercase and lowercase characters)
• Numeric characters (numbers) • Symbols
䎰䎤䎶䎮䎢
Application for FCC / IC
FCC ID: K6620445X20
IC: 511B-20445X20
47
Using the Memory
A Wide Variety of Memory Functions
Assigning a Name to a Memory Channel
Example: Assignment of name [YAESU]
1 Switch to the Memory mode.
2 Recall the memory channel to assign a name.
3 Press and hold M for over 1 second to enter the Set mode.
4 Turn O to select [3 MEMORY].
5 Press H.
6 Turn O to select [3 MEMORY NAME].
7 Press H.
The
cursor appears on the LCD.
8 Press 9 8 times to select the numeric character [Y].
9 Press H to move the cursor to the next character position.
10
Press 2 5 times to select the numeric character [A].
11
Press H to move the cursor to the next character position.
12
Press 3 6 times to select the numeric character [E].
13
Press H to move the cursor to the next character position.
14
Press 7 9 times to select the numeric character [S].
15
Press H to move the cursor to the next character position.
16
Press 8 6times to select the numeric character [U].
17
Press p to save the memory tag to the memory channel and exit the Set mode.
Tips
• To delete a character, press F. The character is deleted and the cursor moves to left.
• Pressing 0 while entering alphanumeric characters (A,0) allows you to select 0, (space), –, /, ?,
!, ., : and #
• When entering the same character repeatedly, press H to move the cursor.
• When assigning a name to a home channel, recall the target home channel by first executing step 1
(see above).
Displaying Memory Tag
During mono band operation, the tag (name) of the memory channel or home channel can
be displayed using the following procedure:
1 Switch to the Memory mode.
2 Press and hold A for over 1 second.
The operating band is displayed in Mono band, and a tag
(name) appears under the frequency.
䎙
䎼䎤䎨䎶䎸䎃 䎦䎯䎸䎥
Tag (name) display
Application for FCC / IC
FCC ID: K6620445X20
IC: 511B-20445X20

48
Using the Memory
Using Memory Bank
Registered memory channels can be sorted according to the intended use. The trans-
ceiver allows you to use 24 types of memory banks. A maximum of 100 memory channels
can be registered to each memory bank.
One memory channel can be registered in two or more memory banks. If the memory
channel registered in any memory bank is changed or updated, the content of the cor-
responding memory channel in the other memory banks is automatically changed or up-
dated.
Memory banks
b1
b2
b3
b4
b5
b6
b7
b8
b9
(1~100)
(1~100)
(1~100)
(1~100)
(1~100)
(1~100)
(1~100)
(1~100)
(1~100)
b10 (1~100)
b24 (1~100)
144MHz band is registered.
430MHz band is registered.
Ham radio bands are registered together.
AIR band is registered.
~
Memory channels
1145.000MHz
2145.500MHz
3120.400MHz
4−
5439.700MHz
6432.800MHz
7108.700MHz
8 −
9 −
10 −
900−
~
Registering a Memory Channel in a Memory Bank
1 Switch to the Memory mode.
2 Turn O to select a memory channel.
Select the memory channel to register in a memory bank.
3 Press and hold F for over 1 second to enter the Memory
Write mode.
4 Turn O to select a memory bank number.
Select the number (B1 to B24) of the memory bank to regis-
ter the memory channel.
5 Press F to register the memory channel in the memory
bank.
Tips
• See “Registering Your Favorite Preset Receiver Memory Channels in Memory Bank” on page 51.
• When selecting a memory bank using O, the memory channel, skip search memory channel, and
programmable memory channel appear on the LCD as well. They appear repeatedly on the LCD in
the following order:
1 ⇔ 2 ⇔ 3 ⇔ ...L50 ⇔ U50 ⇔ BANK1 ⇔ BANK2 ⇔ ...BANK24 ⇔ 1 ⇔ 2...
When the displayed number is close to [1], turning O counterclockwise will display memory banks.
When the displayed number is close to [U50], turning O clockwise will display memory banks.
• Pressing M displays memory banks quickly in steps of 100 memory channels. If the bank name was
changed, the changed bank name appears.
• The icon appears for a memory bank in which no memory channel is registered, and the icon
appears for a memory bank in which at least one memory channel is registered.
Bank number
Bank name
Application for FCC / IC
FCC ID: K6620445X20
IC: 511B-20445X20

49
Using the Memory
Using Memory Bank
Recalling Memory Bank
1 Switch to the Memory mode.
2 Press B.
Pressing B each time toggles between the memory
channel number and bank number.
3 Press F and then B.
4 Turn O to select a memory bank.
Select a memory bank.
5 Press B.
The memory bank to be used is determined.
6 Turn O to select a memory channel.
Select a memory channel in the memory bank.
Remarks • To select another memory bank, repeat steps 3 through 5.
• To return to the Regular Memory Channel mode, press
B.
Canceling Memory Channel Registration in
Memory Bank
1 Recall the memory bank in which the memory channel registration is to be deleted.
See “Recalling Memory Bank” above.
2 Turn O to select a memory channel that is to be canceled from the Memory bank.
3 Press and hold F over 1 second, and then press H.
Registration of memory channel in the memory bank is cancelled, returning to the
memory bank display state. If no other memory channel is registered in the memory
bank, the memory bank having the lowest bank number appears.
Assigning Name to Memory Bank
A memory bank can be specified with up to 16 characters.
The following types of characters can be entered:
• Alphabetic characters (uppercase and lowercase characters)
• Numeric characters (numbers) • Symbols
Example: 144Mz band
1 Press and hold M for over 1 second to enter the Set
mode.
2 Turn O to select [3 MEMORY].
3 Press H.
䋹
Memory channel
number
Bank
number
Bank
number Bank name
Bank number
Change the bank name.
Enter a name (First digit)
Application for FCC / IC
FCC ID: K6620445X20
IC: 511B-20445X20
50
Using the Memory
Using Memory Bank
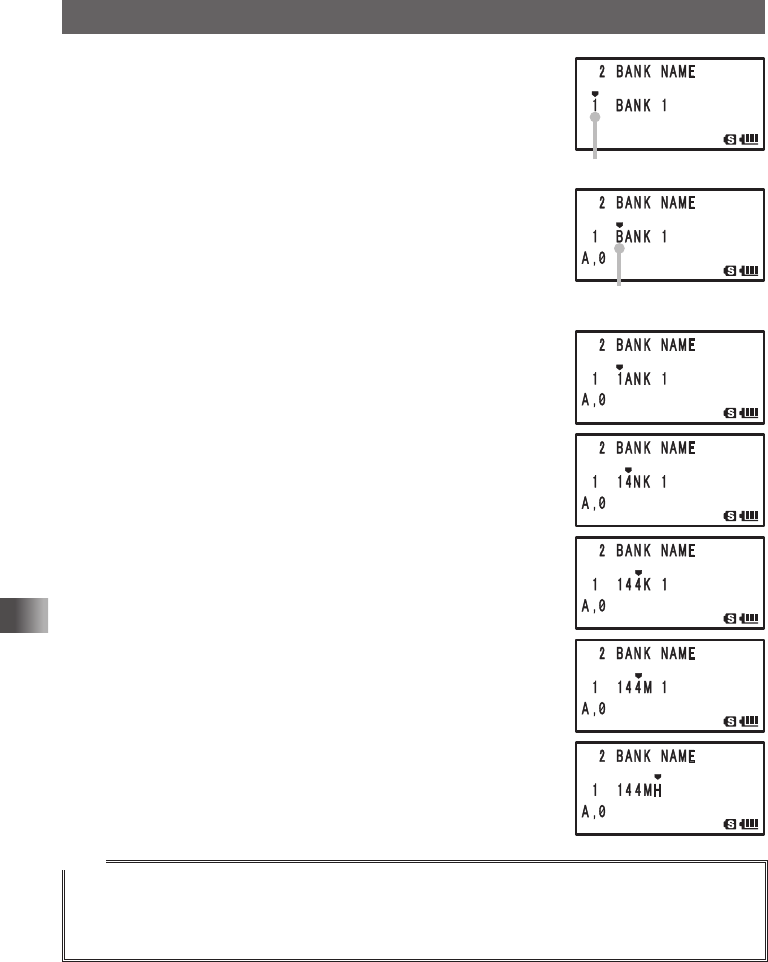
4 Turn O to select [2 BANK NAME].
5 Press H.
6 Turn O to select a memory bank.
Select the number of the memory bank to which you want to
assign a name.
7 Press H to move the cursor to the first character of the
bank name.
8 Press 1 to select the numeric character [1].
9 Press H to move the cursor to the next character position.
10
Press 4 7 times to select the numeric character [4].
Pressing 4 allows you to select the following characters
sequentially:
G → H → I → g → h → i → 4 → G
11
Press H to move the cursor to the next character position.
12
Press the 4 key 7 times to select the numeric character
[4].
Pressing the 4 key allows you to select the following char-
acters sequentially:
G → H → I → g→ h → i → 4 → G
13
Press H to move the cursor to the next character position.
14
Press 6 to select [M].
Pressing 6 allows you to select the following characters
sequentially:
M → N → O → m → n → o → 6 → M
15
Press H to move the cursor to the next character position.
16
Select [H].
17
Press [9] 8 times.
Select [z].
18
Press p to save the name of memory bank and exit the Set
mode.
Tips
• To delete a character, press F. A character is deleted and the cursor moves to left.
• Pressing 0 while entering alphanumeric characters (A,0) allows you to select 0, (space), –, /, ?,
!, ., : and #
• When entering the same type of characters repeatedly, press H to move the cursor.
Bank number
Change the bank name.
Enter a name (First digit)
Application for FCC / IC
FCC ID: K6620445X20
IC: 511B-20445X20
51
Using the Memory
Convenient Preset Receiver Memory Channels
Frequencies of SP1 Weather Broadcast (10 channels). SP2 International VHF (marine)
radio (57 channels) and SP3 Shortwave Broadcasts (89 channels) are preset in the pre-
set receiver memory channels. These channels can be selected in advance from region
to region.
• VHF Weather Broadcast Station preset receiver memory channels
[SP1 WX CH] ......................................................................................................Page 52
The frequencies (10 channel) used for the VHF Weather Broadcast Station are regis-
tered to the dedicated preset receiver memory channels.
• International VHF (marine) radio preset receiver memory channels
[SP2 INTVHF] .....................................................................................................Page 53
The frequencies (57 channel) used for the international VHF (marine) radio are regis-
tered to the dedicated preset receiver memory channels.
• World broadcast preset receiver memory channels
[SP3 SW] ............................................................................................................Page 54
You can listen to major broadcasts from around the world (total 89 channels).
Registering Your Favorite Preset Receiver Memory Channels in
Memory Bank
You can register your favorite preset receiver memory channel in a memory bank.
1 Turn O to select your favorite preset receiver memory channel.
2 Press and hold F for over 1 second to enter the Memory
Bank Write mode.
The f blinks on the LCD.
Remark To cancel registration, press p.
3 Turn O to select the memory bank in which you want to
register your favorite preset receiver memory channel.
4 Press the F to register the preset receiver memory channel in the memory bank,
and the frequency appears on the LCD.
Recalling Preset Receiver Memory Channel to Listen to the Weath-
er Broadcast
1 Press A to set A-band to the operating band.
2 Press F and then 3 to enter the Preset Receiver mode.
3 Press B.
Select [SP1 WX CH].
4 Turn O to select a preset Weather Broadcast receiver memory channel to listen to.
Remark To stop reception of the Weather Broadcast, press 3.
Application for FCC / IC
FCC ID: K6620445X20
IC: 511B-20445X20
52
Using the Memory
Convenient Preset Receiver Memory Channels
Recalling Preset Receiver Memory Channel to Listen to the Interna-
tional VHF (Marine) Radio
The frequencies (57 channels) used for the international VHF (marine) radio are regis-
tered to the dedicated preset receiver memory channels.
1 Press A to set A-band to the operating band.
2 Press F and then 3 to enter the Preset Receiver mode.
3 Press B.
Select [SP2 INTVHF].
4 Turn O to select a preset VHF receiver memory channel
to listen to.
Remark To stop reception of the international VHF radio, press
3.
In the event of extreme weather disturbances, such as storms and hurricanes, the
NOAA (National Oceanic and Atmospheric Administration) sends a weather alert ac-
companied by a 1050 Hz tone and subsequent weather report on one of the NOAA
weather channels. You may enable the Weather Alert tone via Set Mode option
[4 SIGNALING] → [14 WX ALERT], if desired (See page 124).
Tips
• The preset receiver memory channel cannot be rewritten with the data of another frequency.
• To scan the preset receiver memory channels toward higher channel numbers, press F and then
2.
Turning O one click counterclockwise scans the preset receiver memory channels toward lower
channel numbers. If a signal is received during scanning, the scanning is suspended for 5 seconds.
• The operation that is performed when scanning stops can be set by following the procedure described
in “Selecting a Reception Method When Scanning Stops” on page 59.
WX Channel Frequency List
CH Frequency CH Frequency
1 162.550 MHz 6 162.500 MHz
2 162.400 MHz 7 162.525 MHz
3 162.475 MHz 8 161.650 MHz
4 162.425 MHz 9 161.775 MHz
5 162.450 MHz 10 163.275 MHz
䎬䎱䎷䎃 䎹䎫䎩
Application for FCC / IC
FCC ID: K6620445X20
IC: 511B-20445X20
53
Using the Memory
Convenient Preset Receiver Memory Channels
Frequencies of International VHF (Marine)
Radio registered to the preset receiver memory channels
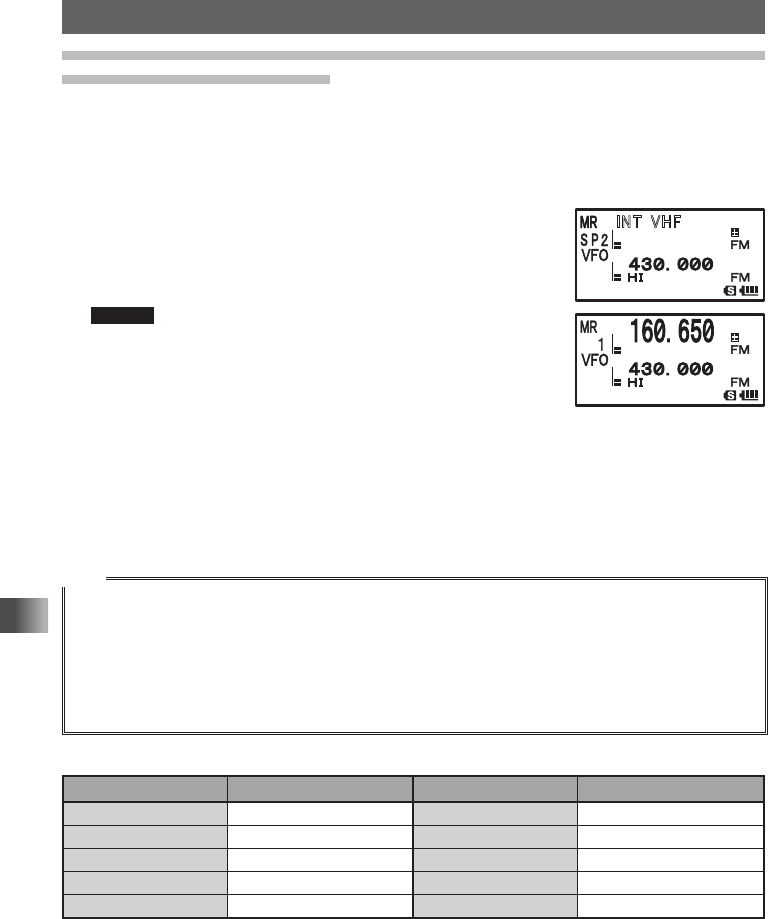
Memory channel No. Frequency (MHz) Memory channel No. Frequency (MHz)
1 156.050 160.650* 15 156.750
2 156.100 160.700* 16 156.800
3 156.150 160.750* 17 156.850
4 156.200 160.800* 18 156.900 161.500*
5 156.250 160.850* 19 156.950 161.550*
6 156.300 20 157.000 161.600*
7 156.350 160.950* 21 157.050 161.650*
8 156.400 22 157.100 161.700*
9 156.450 23 157.150 161.750*
10 156.500 24 157.200 161.800*
11 156.550 25 157.250 161.850*
12 156.600 26 157.300 161.900*
13 156.650 27 157.350 161.950*
14 156.700 28 157.400 162.000*
Memory No. Frequency (MHz) Memory No. Frequency (MHz)
60 156.025 160.625*74 156.725
61 156.075 160.675* 75 156.775
62 156.125 160.725* 76 156.825
63 156.175 160.775* 77 156.875
64 156.225 160.825* 78 156.955 161.550*
65 156.275 160.875* 79 156.975 161.575*
66 156.325 160.925* 80 157.025 161.625*
67 156.375 81 157.075 161.675*
68 156.425 82 157.125 161.725*
69 156.475 83 157.175 161.775*
70 156.525 84 157.225 161.825*
71 156.575 85 157.275 161.875*
72 156.625 86 157.325 161.925*
73 156.675 87 157.375 161.975*
– – 88 157.425 162.025*
Remark
* indicates the frequency of the VHF Marine base station. For example, if the preset receiver memory
channel 1 is selected, the base station frequency 160.650 MHz appears and @ lights. Pressing F
and then 5 displays the Ship Station frequency 160.650 MHz and @ lights The base station fre-
quency minus 4.6 MHz equals the Ship Station frequency, and duplex operation starts. To return to the
base station frequency, press F and then 5.
Application for FCC / IC
FCC ID: K6620445X20
IC: 511B-20445X20
54
Using the Memory
Convenient Preset Receiver Memory Channels
Worldwide short wave broadcast
CH
Number
Frequency
(MHz) Name Broadcast Station
Name
1 6.030 VOA USA
2 6.160 VOA USA
3 9.760 VOA USA
4 11.965 VOA USA
5 9.555 CANADA Canada
6 9.660 CANADA Canada
7 11.715 CANADA Canada
8 11.955 CANADA Canada
9 6.195 BBC UK
10 9.410 BBC UK
11 12.095 BBC UK
12 15.310 BBC UK
13 6.090 FRANCE France
14 9.790 FRANCE France
15 11.670 FRANCE France
16 15.195 FRANCE France
17 6.000 DW Germany
18 6.075 DW Germany
19 9.650 DW Germany
20 9.735 DW Germany
21 5.990 ITALY Italy
22 9.575 ITALY Italy
23 9.675 ITALY Italy
24 17.780 ITALY Italy
CH
Number
Frequency
(MHz) Name Broadcast Station
Name
25 7.170 TURKEY Turkey
26 7.270 TURKEY Turkey
27 9.560 TURKEY Turkey
28 11.690 TURKEY Turkey
29 9.660 VATICAN Vatican
30 11.625 VATICAN Vatican
31 11.830 VATICAN Vatican
32 15.235 VATICAN Vatican
33 5.955 NEDRLAND Netherlands
34 6.020 NEDRLAND Netherlands
35 9.895 NEDRLAND Netherlands
36 11.655 NEDRLAND Netherlands
37 5.985 CZECH Czech Republic
38 6.105 CZECH Czech Republic
39 9.455 CZECH Czech Republic
40 11.860 CZECH Czech Republic
41 9.780 PORTUGAL Portugal
42 11.630 PORTUGAL Portugal
43 15.550 PORTUGAL Portugal
44 21.655 PORTUGAL Portugal
45 9.650 SPAIN Spain
46 11.880 SPAIN Spain
47 11.910 SPAIN Spain
48 15.290 SPAIN Spain
Recalling Preset Receiver Memory Channel to Listen to the
World Broadcast
The frequencies (89 channels) used for the world broadcast are registered to the dedicated
preset receiver memory channels.
1 Press A to set A-band to the operating band.
2 Press F and then 3 to enter the Preset Receiver mode.
3 Press B.
Select [SP3 SW].
4 Turn O to select a preset world Broadcast receiver memory channel to listen to.
Remark To stop reception of the world broadcast, press 3.
Depending on time zone or signal strength, Broadcasts may not be received.
There are broadcast station other than those listed below that can be received. In addition, depending
on the broadcast station, the frequency may be changed, off-air, or have become abolished. For
details, please refer to a commercially sold frequencies list.
Application for FCC / IC
FCC ID: K6620445X20
IC: 511B-20445X20

55
Using the Memory
Convenient Preset Receiver Memory Channels
CH
Number
Frequency
(MHz) Name Broadcast Station
Name
49 6.055 NIKKEI Japan (Nikkei)
50 7.315 NORWAY Norway
51 9.590 NORWAY Norway
52 9.925 NORWAY Norway
53 9.985 NORWAY Norway
54 6.065 SWEDEN Sweden
55 9.490 SWEDEN Sweden
56 15.240 SWEDEN Sweden
57 17.505 SWEDEN Sweden
58 6.120 FINLAND Finland
59 9.560 FINLAND Finland
60 11.755 FINLAND Finland
61 15.400 FINLAND Finland
62 5.920 RUSSIA Russia
63 5.940 RUSSIA Russia
64 7.200 RUSSIA Russia
65 12.030 RUSSIA Russia
66 7.465 ISRAEL Israel
67 11.585 ISRAEL Israel
68 15.615 ISRAEL Israel
69 17.535 ISRAEL Israel
70 6.045 INDIA India
CH
Number
Frequency
(MHz) Name Broadcast Station
Name
71 9.595 INDIA India
72 11.620 INDIA India
73 15.020 INDIA India
74 7.190 CHINA China
75 7.405 CHINA China
76 9.785 CHINA China
77 11.685 CHINA China
78 6.135 KOREA South Korea
79 7.275 KOREA South Korea
80 9.570 KOREA South Korea
81 13.670 KOREA South Korea
82 6.165 JAPAN Japan
83 7.200 JAPAN Japan
84 9.750 JAPAN Japan
85 11.860 JAPAN Japan
86 5.995 AUSTRALI Australia
87 9.580 AUSTRALI Australia
88 9.660 AUSTRALI Australia
89 12.080 AUSTRALI Australia
Reception Mode: AM
Application for FCC / IC
FCC ID: K6620445X20
IC: 511B-20445X20
56
Scanning Function
Scanning Function
Using the Scanning Function
The FT1XDR/DE supports the following four scan modes:
(1) VFO Scan
(2) Memory Channel Scan
(3) Programmable Memory Channel Scan
(4) Selected Memory Channel Scan
VFO Scan
1 Switch to the VFO mode, and then select a band to scan.
2 Press F and then 2 to start scanning (SCAN) toward
higher frequencies.
Tips When a signal is received during scanning, the decimal point
blinks.
Turn O clockwise: Scanning is performed toward higher fre-
quencies.
Turn O counterclockwise: Scanning is performed toward lower
frequencies.
When a signal is received during scanning, a beep is emitted and its frequency appears for 5
seconds. When scanning is suspended, the decimal point blinks and the LCD stays lit. After
receiving the signal for 5 seconds, scanning resumes.
The range for scanning can be selected by selecting the Set mode options [5 SCAN WIDTH]
and then [5 SCAN] .
When a signal is received,
the decimal point blinks.
Application for FCC / IC
FCC ID: K6620445X20
IC: 511B-20445X20
57
Scanning Function
Using the Scanning Function
Canceling Scanning
To cancel scanning, press p.
Tips
• Even during scanning, you can adjust the squelch in the following procedure:
Press F. → Press T. → Turn O to adjust the squelch.
• During scanning, you can save the squelch adjustment in the following procedure:
Press F → Press T.
A-band and B-band reception frequencies
A-band B-band
0.5 MHz to 1.8 MHz
(AM BC Band)
30 MHz to 76 (88) MHz
(50 MHz band)
108 MHz to 137 MHz
(AIR band)
137 MHz to 174 MHz
(144 MHz band)
174 MHz to 222 MHz
(VHF-TV Band)
222 MHz to 420 MHz
(INFO band (1))
420 MHz to 470 MHz
(430 MHz band)
470 MHz to 774 (800) MHz
(UHF-TV Band)
803 (800) MHz to 999.9 MHz
Cellular Blocked
USA version
108 MHz to 137 MHz
(AIR band)
137 MHz to 174 MHz
(144 MHz band)
174 MHz to 222 MHz
(VHF-TV Band)
222 MHz to 420 MHz
(INFO band (1))
420 MHz to 470 MHz
(430 MHz band)
470 MHz to 580 MHz
( ): EXP/European version
−−
−−
−−
1.8 MHz to 30 MHz
(SW band)
−−
76 (88) MHz to 108 MHz
(FM BC Band)
−−
• For the operation to perform when scanning stops, see “Selecting a Reception Method When Scan-
ning Stops” on page 59.
• Press and hold M over 1 second to select the Set mode option, and then select the following setting
items for more convenient use:
[8 CONFIG] → [3 BEEP] → [EDGE]: Emits a beep when the frequency band edge is reached.
[8 CONFIG] → [3 BEEP] → [SELECT]: Prevents a beep from being emitted when scanning stops.
[5 SCAN] → [2 SCAN LAMP]: Prevents the LCD from being lit when scanning stops.
Skipping a Frequency You Do Not Want to Scan (Skip Search Memory)
Scanning may stop at a frequency that you do not want to receive. Such a frequency can
be skipped by registering it to the [skip search memory channels]. Up to 99 frequencies
can be saved in the skip search memory channels (memory channels 901 to 999).
Application for FCC / IC
FCC ID: K6620445X20
IC: 511B-20445X20

58
Scanning Function
Using the Scanning Function
Specifying the Frequency You Do Not Want to Scan
1 Start VFO scanning.
Start VFO scanning with reference to [VFO Scanning] on page 56.
2 When scanning stops at a frequency you do not want to receive, press and hold F
for over 1 second.
The number of the next unregistered skip search memory channel will blink.
Tips Turning O allows you to specify other skip search memory channels.
3 Press F to save (register) the frequency to the skip search memory channel, and
resume scanning.
Tips • You can register a frequency you do not want to receive to a skip search memory channel by
using the following procedure in advance:
1 In the VFO mode, tune in to the frequency you do not want to scan.
2 Press and hold F for over 1 second.
3 Turn O to select a skip search memory channel.
4 Press F to save (register) the frequency to the skip search memory channel.
• To stop scanning, press p.
Deleting a Frequency Registered to the Skip Search Memory Channel
The frequency registered to the skip search memory channel can be deleted in the follow-
ing procedure. After it is deleted the frequency is scanned.
1 Switch to the Memory mode.
2 Press and hold F for over 1 second.
3 Turn O to select a skip search memory channel from which you wish to delete the
registered frequency.
Select the skip search memory channel (901-999) from which the registered frequen-
cy is to be deleted.
When selecting a skip search memory channel number, pressing M allows you to
skip memory channel numbers in steps of 100 memory channel numbers.
4 Press H.
[DELETE OK?] appears on the LCD.
5 Press H to delete the registered frequency from the skip search memory channel.
Tip To delete another frequency from the skip search memory channel, repeat steps 2 through 4.
Tips
• Restoring the Frequency Deleted from the Skip Search Memory Channel
If you have not specified a new frequency for the same memory channel, you can restore the deleted
frequency by repeating steps 1 through 4.
Application for FCC / IC
FCC ID: K6620445X20
IC: 511B-20445X20
59
Scanning Function
Using the Scanning Function
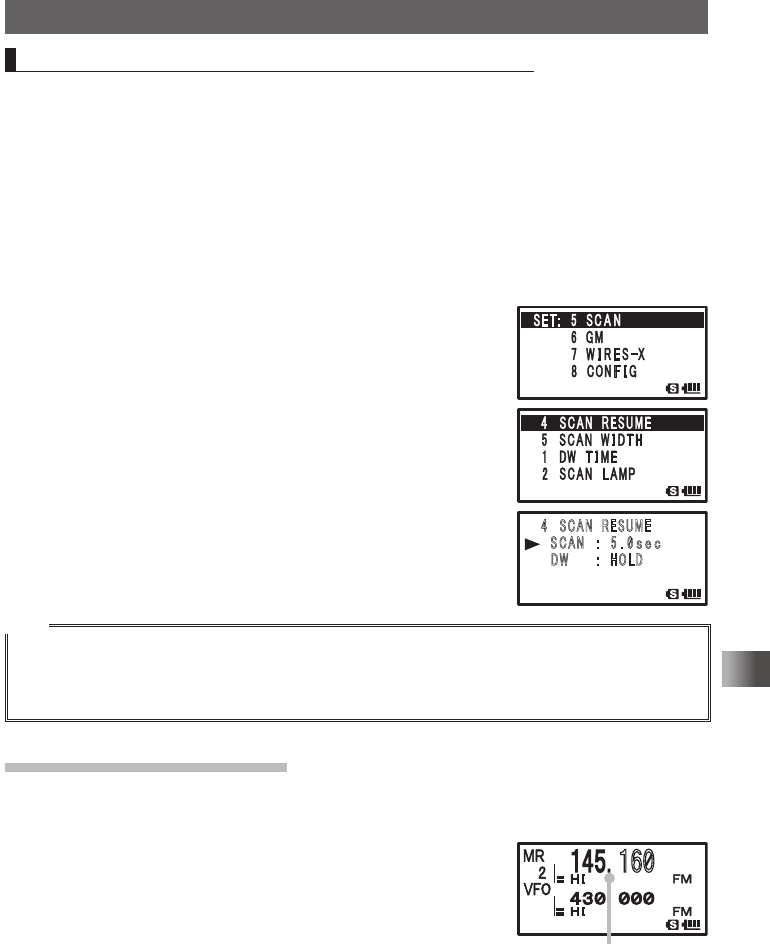
Selecting a Reception Method When Scanning Stops
When scanning stops, you can select one of the following three reception methods:
(1) The signal is received for the specified period of time, and then scanning resumes.
You can specify this period of time in steps of 0.5 second within the range from 2 to
10 seconds.
(2) The signal is received until it fades out. Two seconds after the signal fades out, scan-
ning resumes. [BUSY] appears on the LCD.
(3) Scanning stops and the current frequency is received. [HOLD] appears on the LCD.
1 Press and hold M for over 1 second.
2 Turn O to select [5 SCAN].
3 Press H.
4 Turn O to select [4 SCAN RESUME].
5 Press H.
6 Press H again.
7 Turn O to specify the reception method.
Select a reception method from [2 SEC TO 10 SEC (0.5
SEC STEP)], [BUSY], and [HOLD].
8 Press p to save the specified reception method and exit
from the Set mode.
Tips
• The reception method selected here is also applied to [VFO Scanning], [Programmable Memory
Channel Scanning] and [Memory Channel Scanning].
• The scanning restart time after BUSY (duration of signal reception) can be changed by selecting the
Set mode option [5 SCAN RESTART] → [3 SCAN RE-START].
Memory Channel Scanning
Frequencies registered to the memory channels can be scanned in the order of memory
channel number.
1 Switch to the Memory mode and recall a memory channel.
2 Press F and then 2.
Scanning (SCAN) is performed toward higher memory
channel numbers.
When a signal is received, the decimal point blinks.
䎗 䎃 䎶䎦䎤䎱䎃 䎃䎵䎨䎶䎸䎰䎨
䎃䎃䎃 䎶 䎦䎤䎱䎃䎃 䎝 䎃 䎘 䎑 䎓
䏖 䏈 䏆
䎃 䎃 䎃䎧䎺䎃䎃䎃䎃䎃䎝䎃䎃䎫䎲䎯䎧䎃䎃䎃 䎃
䎃
䋱䋶䋰
When a signal is received,
the decimal point blinks.
Application for FCC / IC
FCC ID: K6620445X20
IC: 511B-20445X20