Yaesu Musen 30593X3D MOBILE MARINE TRANSCEIVER User Manual GX6000 Owner s Manual
Yaesu Musen Co., Ltd. MOBILE MARINE TRANSCEIVER GX6000 Owner s Manual
Contents
OM User Manual 2
Page 31
GX6000
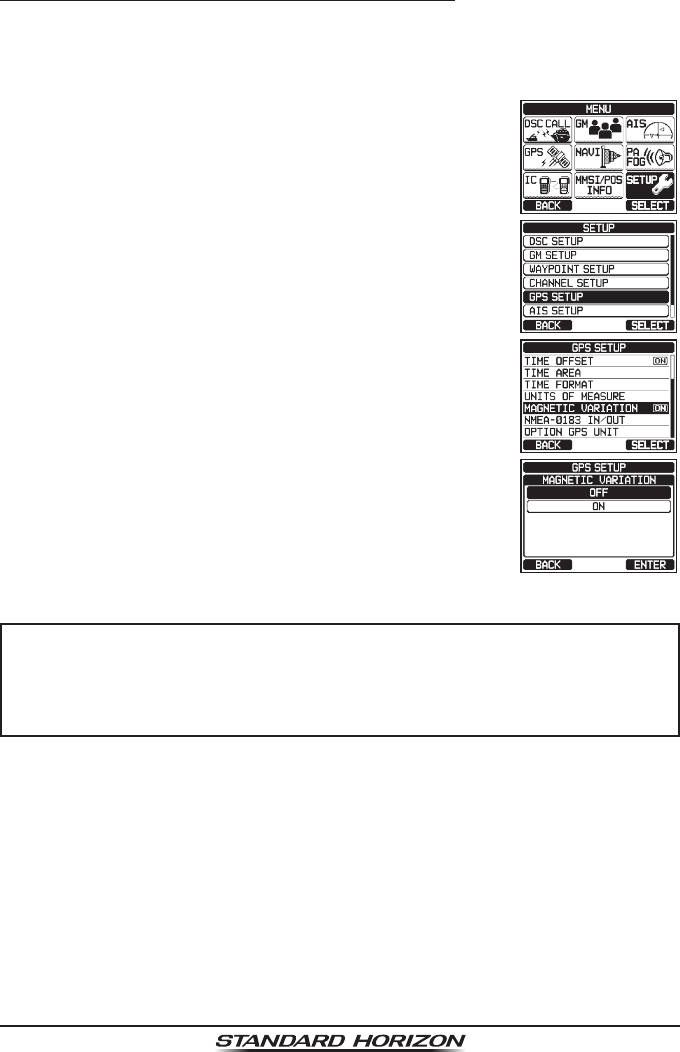
7.8.4 Changing COG to True or Magnetic
Allows the GPS COG (Course Over Ground) and the BRG from an AIS target
to be selected to show in ON or OFF. Factory default is “OFF” however by
following the steps below the COG can be changed to “ON”.
1. Press the MENU key to display “MENU”.
c
c
2. Rotate the DIAL/ENT knob to select “SETUP”, then
press the [SELECT] soft key.
3. Rotate the DIAL/ENT knob to select “GPS SETUP”,
then press the [SELECT] soft key.
4. Rotate the DIAL/ENT knob to select “MAGNETIC
VARIATION”, then press the [SELECT] soft key.
5. Rotate the DIAL/ENT knob to select “OFF” or “ON”.
6. Press the [ENTER] soft key to store the selected
setting.
7. Press the CLEAR key to return to radio operation.
NOTE
Setting to “ON” is effective only when the RMC sentences with magnetic
data are input from external devices such as a GPS receiver (The
SCU-31 inputs the RMC sentences, but does not input with magnetic
data.).
Page 32 GX6000
8 BASIC OPERATION
8.1 TURNING ON AND OFF THE TRANSCEIVER
1. After the transceiver has been installed, ensure that the power supply and
antenna are properly connected.
2. Press and hold the key to turn the radio on.
3. Press and hold the key again to turn the radio off.
8.2 RECEPTION
1. Rotate the SQL knob fully counterclockwise. This state is known as “squelch
off”.
2. Turn up the VOL knob until noise or audio from the speaker is at a comfort-
able level.
3. Rotate the SQL knob, clockwise until the random noise disappears. This
state is known as the “squelch threshold”.
4. Rotate the DIAL/ENT knob or press the ▲/▼ key to
select the desired channel. Refer to the channel chart
on Pages 140 to 142 for available channels.
5. When a message is received, adjust the volume to
the desired listening level. The “[BUSY]” indicator on
the display indicates that communications are being
received.
8.3 TRANSMISSION
1. Perform steps 1 through 4 of RECEPTION.
2. Before transmitting, monitor the channel to ensure it is clear.
THIS IS AN FCC REQUIREMENT!
3. Press the microphone’s PTT (push-to-talk) switch.
The “[TX]” indicator on the LCD is displayed.
4. Speak slowly and clearly into the microphone.
5. When the transmission is nished, release the micro-
phone’s PTT switch.
NOTE
Position your mouth about 1/2” (1.5 cm) away from the microphone
hole and speak in a normal voice.

Page 33
GX6000
8.3.1 Transmit Power
The TX output power of the GX6000 is set to high level (25W) in factory default,
and the “[HI]” indicator is displayed on the top part of the screen.
To switch the TX output power:
1. Press the ►/◄ key repeatedly until the [HI] or [LOW]
soft key is displayed at the bottom of the screen.
2. Press the [HI] or [LOW] soft key to switch between
HI (25W) or LO (1W) output power.
When the TX output power is set to “Low” while the
transceiver is on channel 13 or 67, the output power
will temporarily switch from “Low” to “High” power until
the PTT switch of the microphone is released. This
soft key is not function on transmit inhibited and low
power only channels.
8.4 BASIC OPERATION OF THE MENU MODE
Using the menu mode, the various functions of the GX6000 can be customized
to match the method of use. You can select the items that you would like to
adjust from the respective lists and enter or select the appropriate settings for
the intended various operation.
1. Press the MENU key on the operation mode screen
to display “MENU”.
c
c
2. Rotate the DIAL/ENT knob or press the ▲/▼/►/◄
key to select the menu item, then press the [SELECT]
soft key or press the DIAL/ENT knob to display
“MENU LIST”.
3. Rotate the DIAL/ENT knob or press the ▲/▼ key to
select the item, then press the [SELECT] soft key or
press the DIAL/ENT knob.
4. Rotate the DIAL/ENT knob or press the ▲/▼ key to
select the item, then press the [SELECT] soft key or
press the DIAL/ENT knob.
Page 34 GX6000
5. Rotate the DIAL/ENT knob or press the ▲/▼ key to
select the desired setting.
6. Press the [ENTER] soft key to or press the DIAL/ENT
knob store the selected setting.
7. Press the CLEAR key to return to radio operation.
(The display can also be returned to the previous
screen by pressing the [BACK] soft key.)
The same operation process as the above is written as follows in this opera-
tion manual.
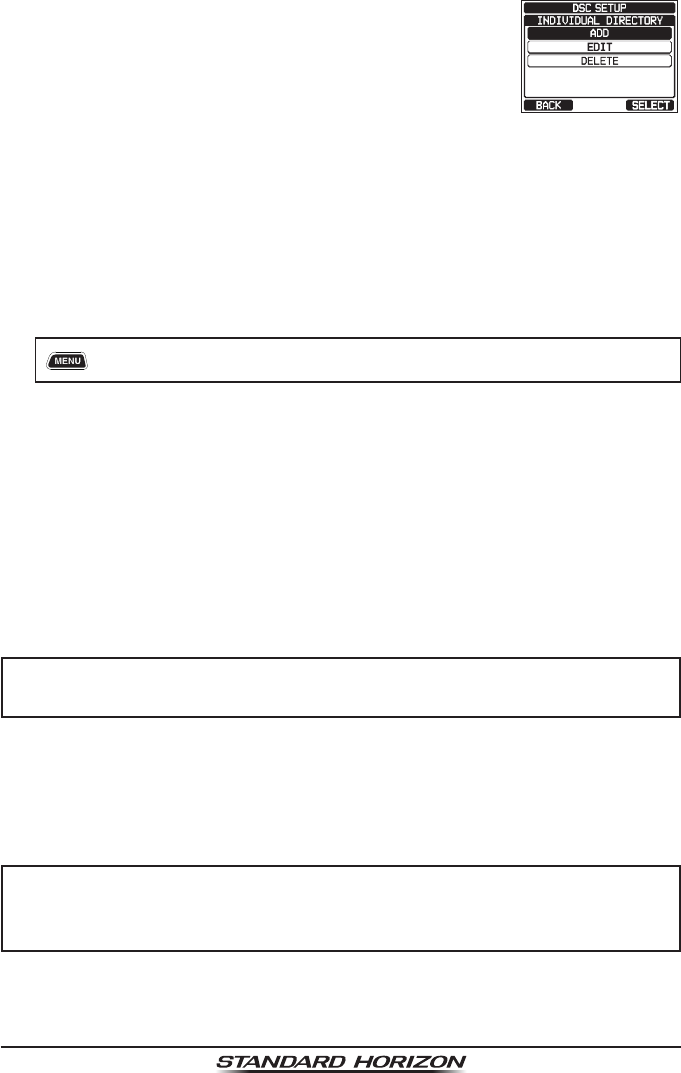
[] “SETUP” “DSC SETUP” “INDIVIDUAL DIRECTORY”
8.5 TRANSMIT TIME-OUT TIMER (TOT)
When the PTT switch on the microphone is held down, transmit time is limited
to 5 minutes. This limits unintentional transmissions due to a stuck microphone.
About 10 seconds before automatic transmitter shutdown, a warning beep will
be heard from the speaker(s). The transceiver will automatically go to receive
mode, even if the PTT switch is continually held down. Before transmitting
again, the PTT switch must rst be released and then pressed again.
NOTE
Once the transmitter is shut down by the TOT, transmission to the last
channel is only allowed 10 seconds after the shutdown.
8.6 SIMPLEX/DUPLEX CHANNEL USE
Refer to the VHF MARINE CHANNEL CHART (Pages 140 to 142 ) for
instructions on use of simplex and duplex channels.
NOTE
All channels are factory-programmed in accordance with FCC (USA),
Industry Canada (Canada), and International regulations. Mode of
operation cannot be altered from simplex to duplex or vice-versa.
Page 35
GX6000
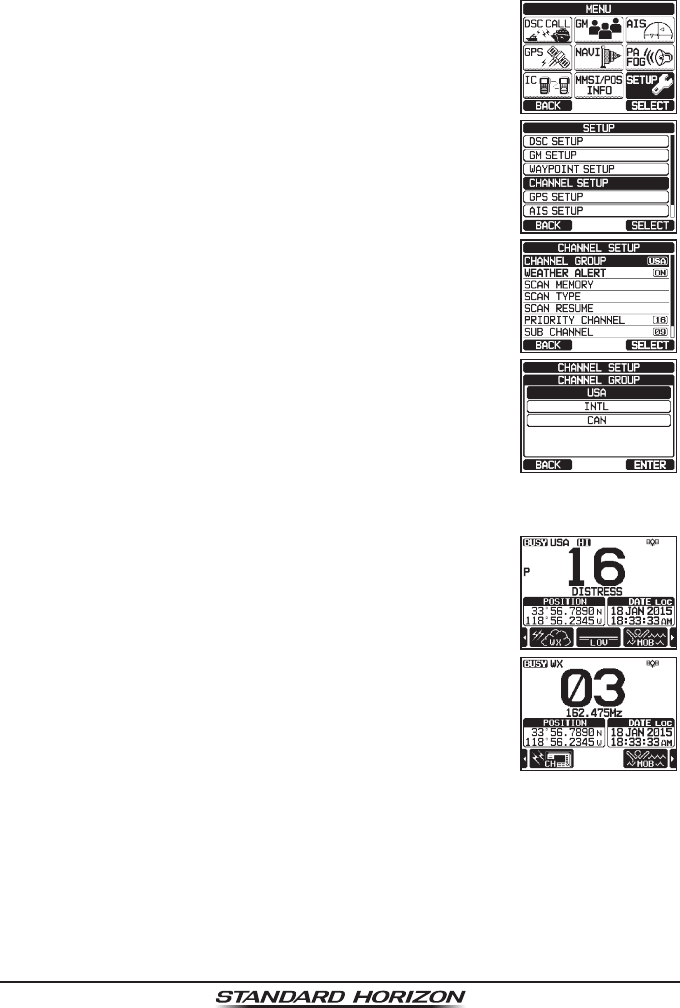
8.7 USA, INTERNATIONAL, AND CANADA MODE
To change the channel group from USA to International or Canada:
1. Press the MENU key to display “MENU”.
c
c
2. Rotate the DIAL/ENT knob to select “SETUP”, then
press the [SELECT] soft key.
3. Rotate the DIAL/ENT knob to select “CHANNEL
SETUP”, then press the [SELECT] soft key.
4. Rotate the DIAL/ENT knob to select “CHANNEL
GROUP”, then press the [SELECT] soft key.
5. Rotate the DIAL/ENT knob to select desired channel
group “USA”, “INTL”, or “CAN”.
6. Press the [ENTER] soft key to store the selected
setting.
7. Press the CLEAR key to return to radio operation.
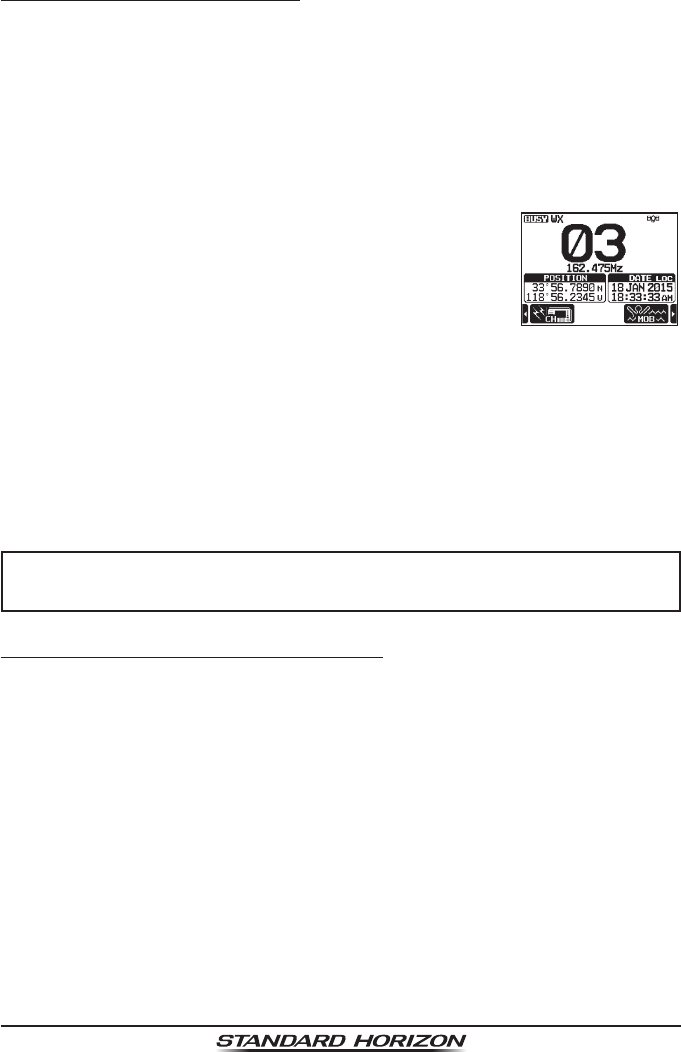
8.8 NOAA WEATHER CHANNELS
1. To receive a NOAA weather channel, press the ►/◄
key repeatedly until the [WX] soft key is displayed at
the bottom of the screen.
2. Press the [WX] soft key. The “WX” indicator appears
on the top part of the screen.
3. Rotate the DIAL/ENT knob to select a different NOAA
weather channel.
4. To exit from the NOAA weather channels, press the
[CH] soft key. The transceiver returns to the channel
it was on prior to a weather channel and the “WX”
indicator disappears from the display.
Page 36 GX6000
8.8.1 NOAA Weather Alert
In the event of extreme weather disturbances, such as storms and hurricanes,
the NOAA (National Oceanic and Atmospheric Administration) sends a weather
alert accompanied by a 1050 Hz tone and subsequent weather report on one
of the NOAA weather channels.
The GX6000 can receive weather alerts when monitoring a weather channel
and, on the last selected weather channel during scanning modes or while on
another working channel.
When an alert is received on a NOAA weather channel,
scanning will stop and the transceiver will emit a loud
beep to alert the user of a NOAA broadcast. Press any
key to stop the alert. After stopping the beep sound, the
weather alert reception conrmation screen will appear.
Press [OK] to display a conrmation screen. The conr-
mation screen will ask you whether to move to the weather
channel or return in the marine channel. Press [YES] to
switch to the weather channel, and press [NO] to return
to the marine channel.
To disable the weather alert function, refer to section “16.2 WEATHER ALERT”.
NOTE
If no key is pressed the alert will sound for 5 minutes and then the
weather report will be received.
8.8.2 NOAA Weather Alert Testing
NOAA tests the alert system ever Wednesday between 11AM and 1PM. To
test the GX6000’s NOAA weather feature, setup as in section “8.8.1 NOAA
Weather Alert” and conrm the alert is heard on Wednesdays between 11AM
and 1PM local time.
Page 37
GX6000
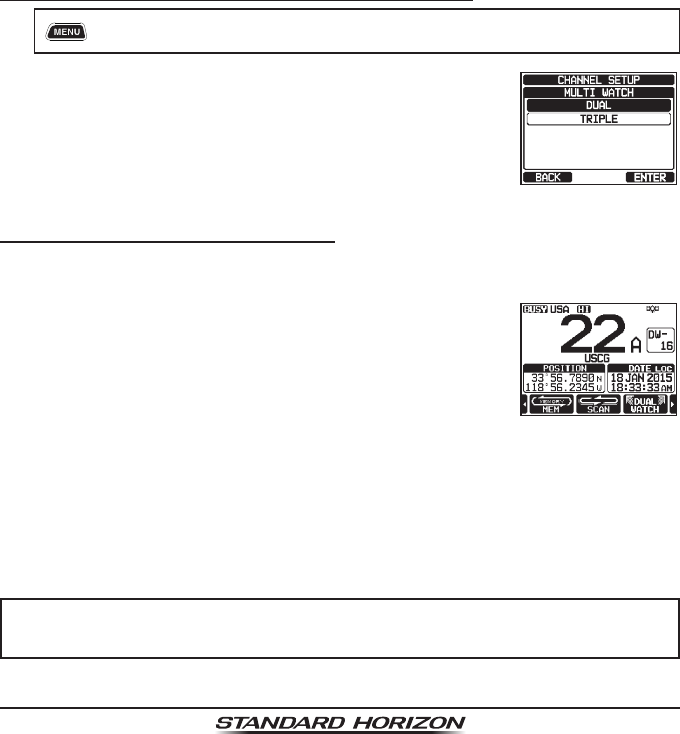
8.9 MULTI WATCH (TO PRIORITY CHANNEL)
Multi watch is used to scan two or three channels for communications.
• In Dual Watch, a normal VHF channel and the priority channel are scanned
alternately.
• In Triple Watch, a normal VHF channel, the priority channel, and the sub
channel are scanned alternately.
When a signal is received on the normal channel the radio briey switches
between the normal channel and the priority channel to look for a transmission.
If the radio receives communications on the priority channel the radio stops
and listens to priority channel until communication ends and then starts dual
or triple watch scan again.
8.9.1 Setting up the Multi Watch Operation
1. [] “SETUP” “CHANNEL SETUP” “MULTI WATCH”
2. Rotate the DIAL/ENT knob to select “DUAL” or
“TRIPLE”.
3. Press the [ENTER] soft key to store the selected
setting.
4. Press the [CLEAR] key to return to radio operation.
8.9.2 Starting the Dual Watch
1. Adjust the SQL knob until the background noise disappears.
2. Rotate the DIAL/ENT knob to select a channel you wish to watch.
3. Press ►/◄ key repeatedly until the [DUAL WATCH]
soft key is displayed at the bottom of the screen, press
the [DUAL WATCH] soft key.
The radio will monitor the priority channel and the
channel that was selected in step 2.
If a signal is received on the channel selected in step
2, the GX6000 will dual watch to priority channel.
4. To stop dual watch, press the [DUAL WATCH] soft key again.
When selecting “TRIPLE” in the SETUP menu, [TRIPLE WATCH] will be
displayed as the soft key instead of [DUAL WATCH].
NOTE
The priority channel may be changed from CH16 (default) to another
channel. Refer to section “16.7 PRIORITY CHANNEL”.
Page 38 GX6000
8.10 SCANNING
The GX6000 will automatically scan channels programmed into the preset
channel memory and also the scan channel memory, and the last selected
weather channel.
When an incoming signal is detected on one of the channels during scan, the
radio will pause on that channel, allowing you to listen to the incoming transmis-
sion. The radio will automatically start scanning again after the transmission
stops.
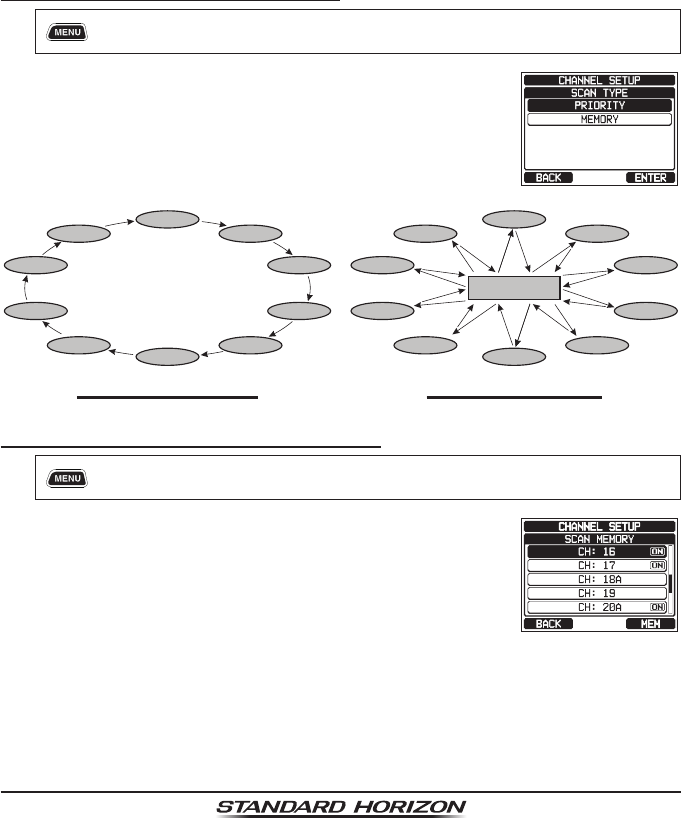
8.10.1 Selecting the Scan Type
1. [] “SETUP” “CHANNEL SETUP” “SCAN TYPE”
2. Rotate the DIAL/ENT knob to select “PRIORITY” or
“MEMORY”.
3. Press the [ENTER] soft key to store the selected
setting.
4. Press the [CLEAR] key to return to radio operation.
Memory Scan (M-SCAN)
CH12
CH09
CH01A
CH15
CH18
CH22A
CH61A
CH68A
CH68A
CH88A
Priority Scan (P-SCAN)
Priority Channel
CH12
CH09
CH01A
CH15
CH18
CH22A
CH61A
CH68A
CH68A
CH88A
8.10.2 Programming Scan Memory
1. [] “SETUP” “CHANNEL SETUP” “SCAN MEMORY”
2. Rotate the DIAL/ENT knob to select a desired chan-
nel to be scanned, then press the [MEM] soft keys.
“ON” icon will appear at the right side of the selected
channel.
3. Repeat step 2 for all the desired channels to be scanned.
4. To REMOVE a channel from the list, select the channel then press the
[MEM] soft key. “ON” icon of the selected channel will disappear.
5. When you have completed your selection, press the CLEAR key to return
to radio operation.

Page 39
GX6000
To check channels to be scanned, rotate the DIAL/ENT
knob. The “[MEM]” icon will appear when the memory
channel is displayed.
Note: When “SCAN MEMORY” is assigned to the soft
key, the memory function switches between on and
off every time you press the [MEM] soft key.
8.10.3 Memory Scanning (M-SCAN)
1. Set the scan type to “MEMORY” in the SETUP menu (refer to “8.10.1
Selecting the Scan Type”).
2. Adjust the SQL knob until the background noise disappears.
3. Press the ►/◄ key repeatedly, then press the [SCAN]
soft key. “MEM SCAN” appears on the display.
Scanning will proceed from the lowest to the highest
programmed channel number and preset channel
(described in the next section) and will stop on a
channel when a transmission is received.
The channel number will blink during reception.
4. To stop scanning, press the [SCAN] soft key, 16/S or CLEAR key.
8.10.4 Priority Scanning (P-SCAN)
1. Set the scan type to “PRIORITY” in the SETUP menu (refer to “8.10.1
Selecting the Scan Type”).
2. Adjust the SQL knob until the background noise disappears.
3. Press the ►/◄ key repeatedly, then press the [SCAN]
soft key. “PRI SCAN” appears on the display. Scan-
ning will proceed between the memorized channels
and preset channel (described in next section) and
the priority channel.
The priority channel will be scanned after each
programmed channel.
4. To stop scanning, press the [SCAN] soft key, 16/S or CLEAR key.
NOTE
In the default setting, Channel 16 is set as the priority channel. You
may change the priority channel to the desired channel from Channel
16 on the SETUP menu. Refer to section “16.7 PRIORITY CHANNEL”.
Page 40 GX6000
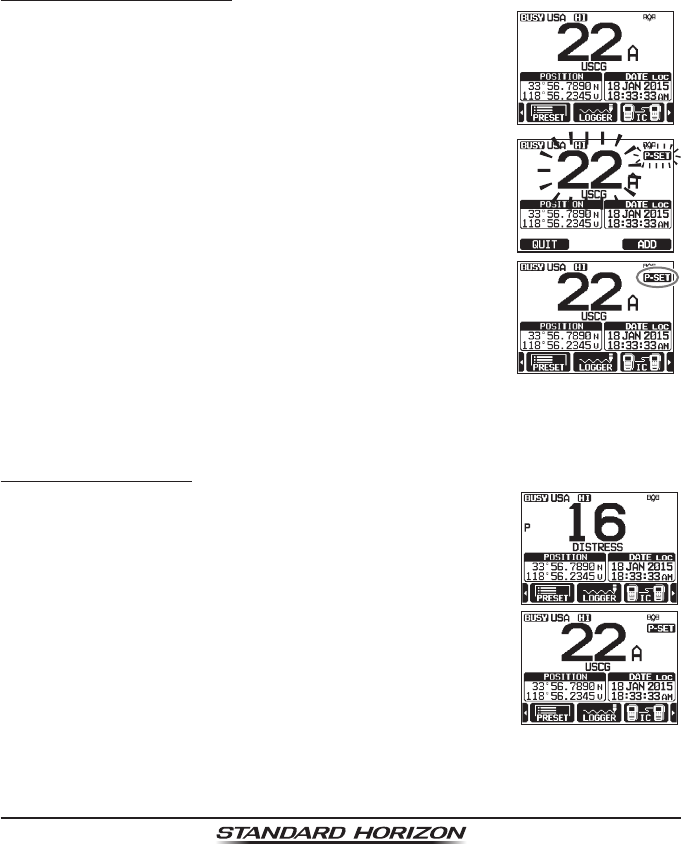
8.11 PRESET CHANNELS: INSTANT ACCESS
10 preset channels can be programmed for instant access. Press the ►/◄
key repeatedly, then press the [PRESET] soft key. Pressing the [PRESET] key
activates the user assigned channel bank. If the [PRESET] soft key is pressed
and no channels have been assigned, alert beep will sound.
Before beginning the Instant Access operation, assign the “PRESET” command
into one of the programmable keys, refer to section “15.8 SOFT KEYS”.
8.11.1 Programming
1. Rotate the DIAL/ENT knob to select the channel to
be programmed.
2. Press the ►/◄ key repeatedly to indicate the function
on the display, then press and hold the [PRESET] soft
key until the “P-SET” icon and channel number are
blinking.
3. Press the [ADD] soft key to program the channel
into the preset channel memory. “[P-SET]” icon will
appear.
4. Repeat steps 1 through 3 to program the desired
channels into the preset channels. Up to 10 channels
can be registered. If you attempt to register the 11th
channel, error beep will sound.
8.11.2 Operation
1. Press the ►/◄ key repeatedly, then press the
[PRESET] soft key to recall the preset channel. The
“[P-SET]” icon will appear on the display.
2. Rotate the DIAL/ENT knob to select the desired preset
channel.
3. Press the [PRESET] soft key to return to the last
selected channel. The “[P-SET]” icon will disappear
from the display.
Page 41
GX6000
8.11.3 Deletion
1. Press the ►/◄ key repeatedly, then press the
[PRESET] soft key to recall the preset channel.
2. Rotate the DIAL/ENT knob to select the preset chan-
nel to be deleted.
3. Press and hold the [PRESET] soft key until the
“[P-SET]” icon and channel number are blinking.
4. Press the [DELETE] soft key to delete the channel
from the preset channel memory.
5. Repeat steps 2 through 4 to delete the desired chan-
nels from preset channels.
6. To exit from deleting the preset channels, press the [QUIT] soft key.
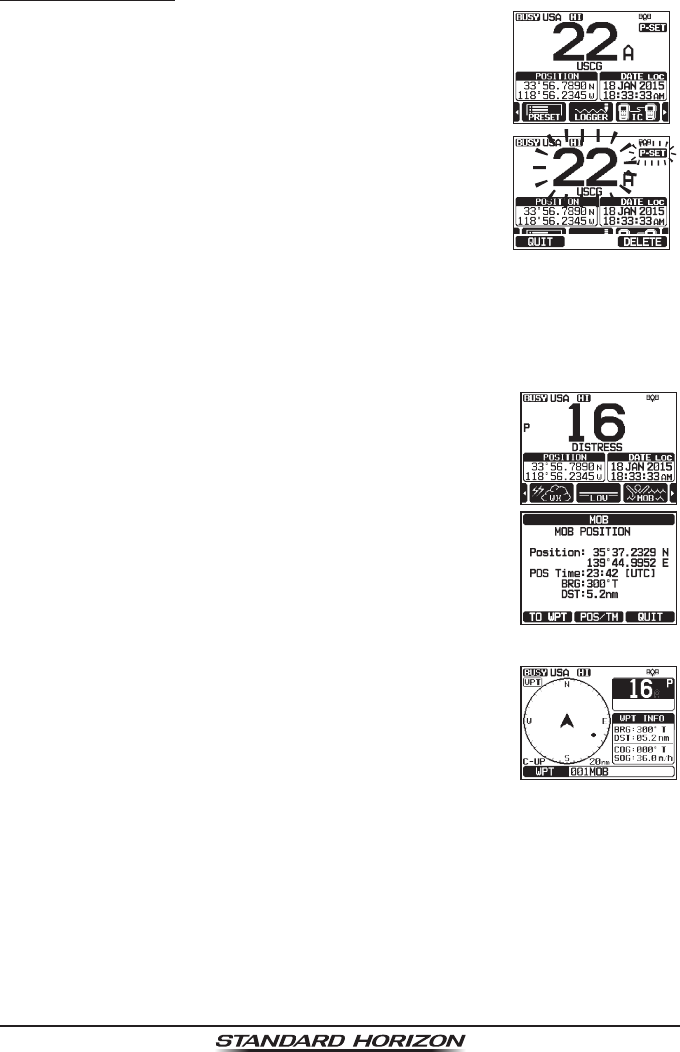
8.12 MOB OPERATION
The GX6000 provides a feature to memorize the position information instantly
in case of MOB (Man Over-Board).
1. Press the ►/◄ key repeatedly, then press the [MOB]
soft key.
2. Press the [TO WPT] soft key to start the navigation to
the displayed position. For details about the naviga-
tion, see section “11 NAVIGATION”.
To modify the displayed position information, press the
[POS/TM] soft key. For details about the modication,
see “Editing a Waypoint” on page 86.
3. To transmit a DSC distress message, lift the red spring
loaded DISTRESS cover on the right side of the
transceiver, then press and hold the DISTRESS key
(see section “10.2.1 Transmitting a DSC Distress
Alert” for details).
The nature of the distress call is automatically set to “MOB”.
Page 42 GX6000
8.13 PA/FOG OPERATION
The GX6000 has two 25 W hailers built-in and can be used with any 4 Ohm
PA horn. Standard Horizon offers two HAIL/PA horns, the 220SW (5” round
30 Watt HAIL/PA horn) and the 240SW (5” x 8” rectangular 40 Watt HAIL/PA
horn). When the GX6000 is in PA Hail mode the PA speaker listens back (acts
as a microphone and provides two-way communications through the HAIL/PA
horn to the main radio).
NOTE
When in the PA HAIL or FOG HORN mode, the GX6000 will continue
to receive DSC calls and communications on the last selected working
channel prior to entering the PA HAIL or FOG HORN mode.
Then the GX6000 AIS page can also be accessed when in the PA HAIL
or FOG HORN mode.
PA HAIL mode:
PA HAIL mode allows the transceiver to be used as a power hailer when
an optional STANDARD HORIZON 220SW or 240SW HAIL/PA horn is
installed. The PA Hail mode has a listen-back feature which provides two
way communication through the HAIL/PA horn.
FOG HORN mode:
Automatic signaling is transmitted through the HAIL/PA horn. When the
fog horn signal is not being outputted the GX6000 listens back through the
connected HAIL/PA horn.
HORN mode:
Foghorn sound or siren sound can be transmitted through the HAIL/PA
horn. When the fog horn signal is not being outputted the GX6000 listens
back through the connected HAIL/PA horn.
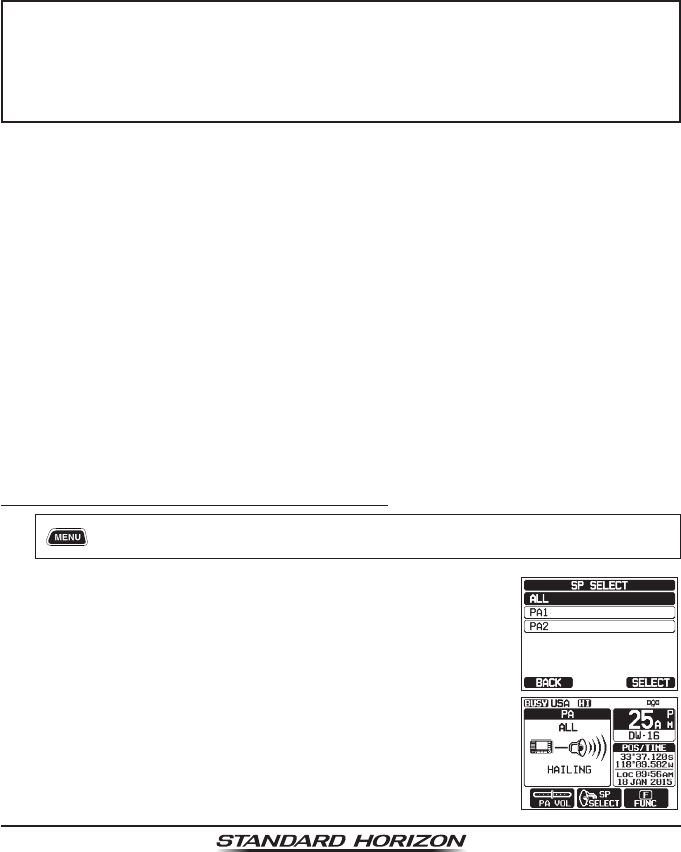
8.13.1 Operating the PA HAIL mode
1. [] “PA FOG” “PUBLIC ADDRESS”
2. Rotate the DIAL/ENT knob to speaker select “ALL”,
“PA1” or “PA2”, then press the [SELECT] soft key.
Press the microphone’s PTT switch to speak through
the HAIL/PA speaker.
3. Press the [PA VOL] soft key, then rotate the DIAL/
ENT knob to control the AF output level.
Press the [ENTER] soft key. The AF output level can
be set from 0 to 31.
Page 43
GX6000
4. To listen back, rotate the VOL knob.
5. Press the CLEAR key to return to radio operation.
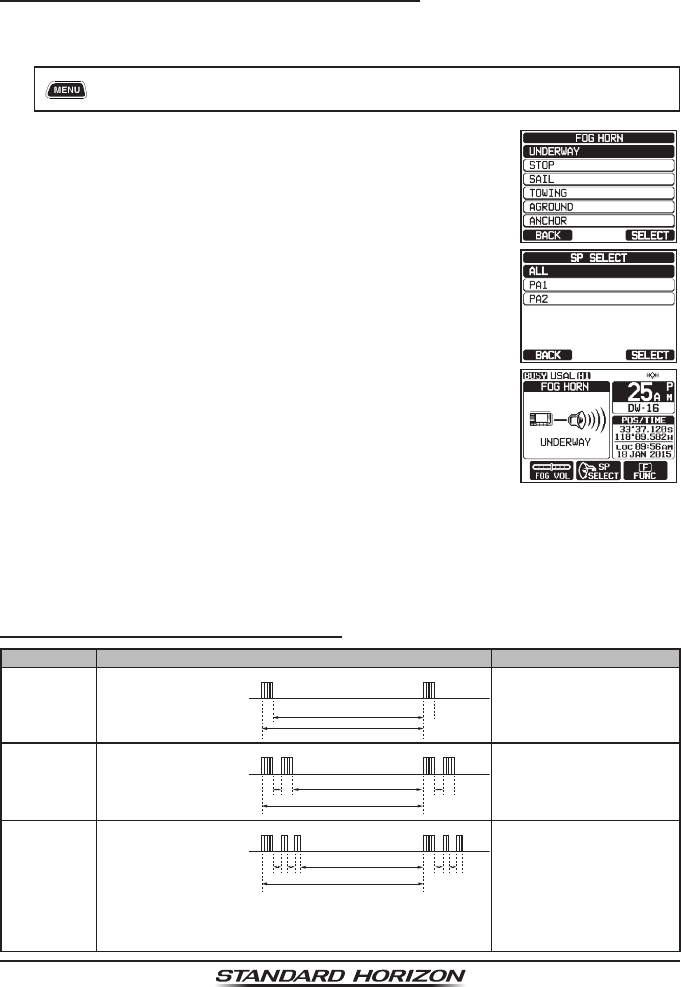
8.13.2 Operating the FOG HORN mode
The user can select the type of horn from “Underway”, “Stop”, “Sail”, “Towing”,
“Aground” and “Anchor”.
1. [] “PA FOG” “FOG HORN”
2. Rotate the DIAL/ENT knob to select one of the six
functions described above, then press the [SELECT]
soft key.
3. Rotate the DIAL/ENT knob to speaker select “ALL”,
“PA1” or “PA2”, then press the [SELECT] soft key.
4. On the “FOG HORN” mode, while pressing the
[HORN] soft key to activate the tone through the HAIL/
PA speaker.
Press the [FOG VOL] soft key, then rotate the DIAL/
ENT knob to control the AF output level.
Press the [ENTER] soft key. The AF output level can
be set from 0 to 31.
5. To listen back, rotate the VOL knob.
6. Press the CLEAR key to return to radio operation.
8.13.3 Fog Signal Timing Chart
TYPE PATTERN USAGE
UNDERWAY One 5-second blasts
every 120 seconds.
5s 5s
120s
Listen Back
Motor vessel underway and
making way.
STOP Two 5-second blasts
(separated by 2
seconds) every 120
seconds.
5s 5s5s 5s
2s 2s
120s
Listen Back
Motor vessel underway but
stopped (not making way).
SAIL One 5-second
blasts followed by
two 1-second blasts
(separated by 2
seconds) every 120
seconds.
1s 1s1s 1s5s 5s
2s 2s2s 2s
120s
Listen Back
Sailing vessel underway,
shing vessel (underway or
anchored), vessel not under
command, a vessel restricted
in her ability to maneuver
(underway or at anchor), or
a vessel towing or pushing
another ahead.
Page 44 GX6000
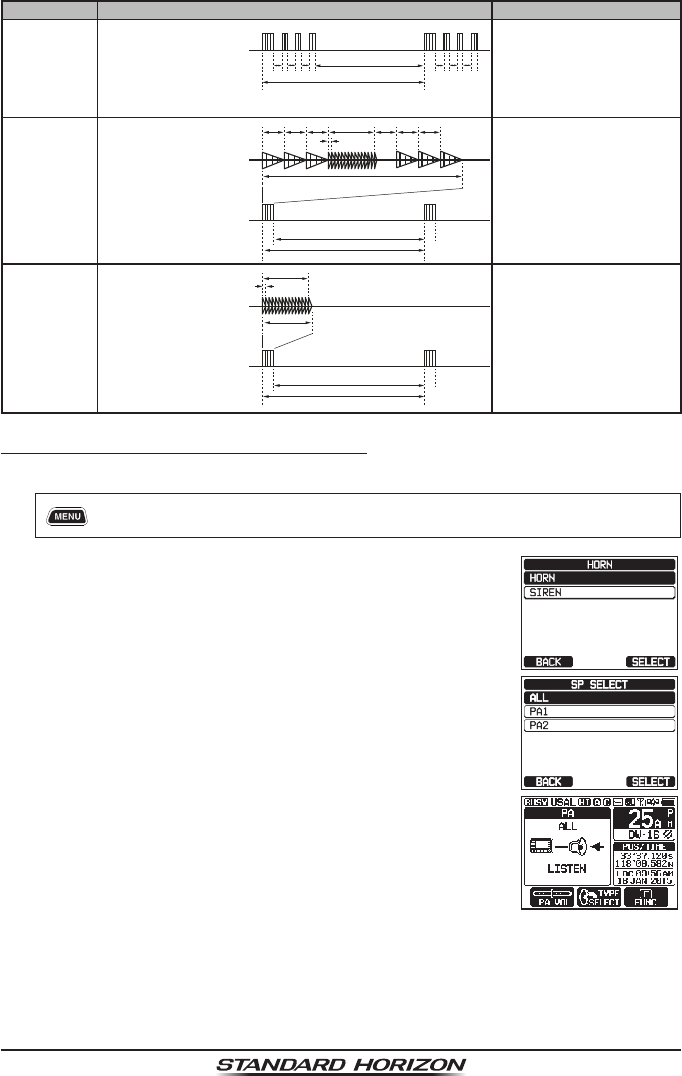
TYPE PATTERN USAGE
TOWING One 5-second blasts
followed by three
1-second blasts
(separated by 2
seconds) every 120
seconds.
1s 1s1s 1s1s 1s5s 5s
2s 2s2s 2s2s 2s
120s
Listen Back
Vessel under tow (manned).
AGROUND One 11-second rings
every 60 seconds.
1s 1s
1s
11s
1s 1s
1s 5s
250ms
60s
Listen Back
Vessel is aground.
ANCHOR One 5-second rings
every 60 seconds.
5.25s
5s
250ms
60s
Listen Back
Vessel is at anchor.
8.13.4 Operating the HORN mode
The user can select the type of horn from “Horn” and “Siren”.
1. [] “PA FOG” “HORN”
2. Rotate the DIAL/ENT knob to select “HORN” or
“SIREN”, then press the [SELECT] soft key.
3. Rotate the DIAL/ENT knob to speaker select “ALL”,
“PA1” or “PA2”, then press the [SELECT] soft key.
4. On the “Horn” and “Siren” modes, while pressing
the [HORN] soft key to activate the tone through the
HAIL/PA speaker.
Press the [FOG VOL] soft key, then rotate the DIAL/
ENT knob to control the AF output level. Press the
[ENTER] soft key. The AF output level can be set from
0 to 31.
5. To listen back, rotate the VOL knob.
6. Press the CLEAR key to return to radio operation.
Page 45
GX6000
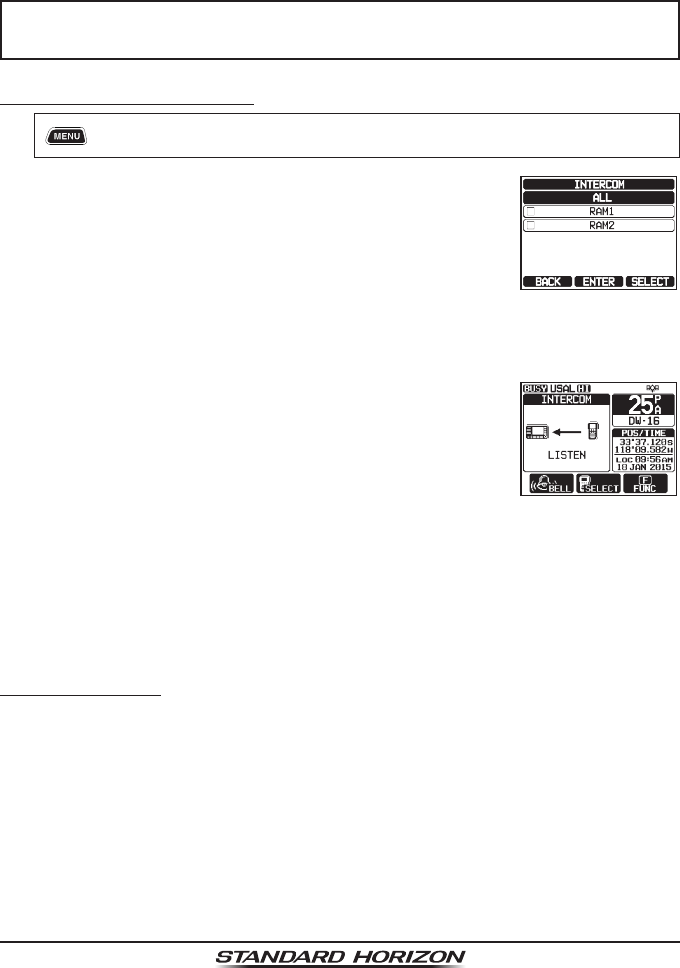
8.14 INTERCOM OPERATION
The optional SSM-70H (RAM4) remote station microphone must be connected
to perform intercom functions between the GX6000 and the SSM-70H (RAM4).
NOTE
When using the intercom function, connect one or two SSM-70H
(RAM4) Remote Station Microphone to the GX6000.
8.14.1 Communication
1. [] “IC”
2. Rotate the DIAL/ENT knob to select the device to
which you want to communicate, then press the
[SELECT] soft key. The “” icon will appear at the
left side of the selected station.
Note: When only one SSM-70H (RAM4) is connected
to GX6000, continue to step 5.
3. Repeat step 2 for all the desired devices.
4. Press the [ENTER] soft key.
5. When the intercom mode is enabled, “INTERCOM”
is displayed on the radio and SSM-70H (RAM4).
6. Press the microphone’s PTT switch on the radio. “Talk”
will be shown on the display.
Note: A warning beep will be heard when the radio’s
PTT and RAM4’s PTT switches are pushed at the
same time.
7. Speak slowly and clearly into the microphone, hold the microphone about
1/2” (1.5 cm) away from your mouth.
8. When nished, release the PTT switch.
9. Press the CLEAR key to return to radio operation.
8.14.2 Calling
Pressing the [BELL] soft key when in intercom mode on either the radio or
RAM4 microphone will produce a calling beep to the other station.
8.15 VOICE SCRAMBLER
The voice scrambler function for the 4-code type (CVS2500A compatible) or
the 32-code type (FVP-42 compatible for Furuno Electric FM-4721) is avail-
able by conguring optional settings. Refer to the section “16.13 SCRAMBLER
SETUP” to program the voice scrambler.