Yaesu Musen 30593X3D MOBILE MARINE TRANSCEIVER User Manual GX6000 Owner s Manual
Yaesu Musen Co., Ltd. MOBILE MARINE TRANSCEIVER GX6000 Owner s Manual
Contents
OM User Manual 3
Page 46 GX6000
1. Select a channel that was programmed for scrambler
mode (the “ ” icon will appear on the display).
2. Monitor the channel before transmitting.
3. Transmit the voice message. The transmission sent
will be scrambled.
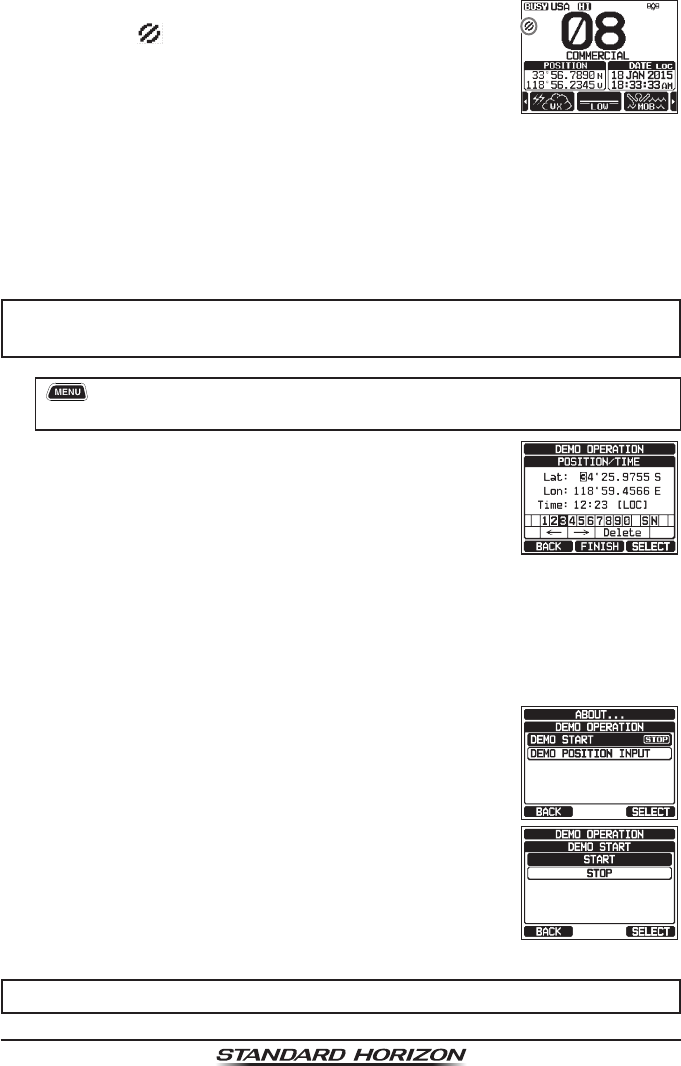
8.16 DEMO MODE
This mode is used by Standard Horizon sales persons and dealers to demonstrate radio,
DSC and AIS functions. Demo mode allows latitude, longitude and time to be entered
to simulate radio displays. When the demo mode is enabled, the radio display will
automatically switch from the NORMAL, COMPASS, WAYPOINT, AIS and GM displays.
NOTE
When demo mode is enabled and the radio is turned off and back on
the radio will still be in the demo mode.
1. [] “SETUP” “ABOUT...” “DEMO OPERATION”
“DEMO POSITION INPUT”
2. Enter the latitude/longitude of your vessel and your
local UTC time in the 24-hour notation by the DIAL/
ENT knob. Rotate the DIAL/ENT knob to select the
number and press the [SELECT] soft key to move
the cursor to the next character.
3. If a mistake was made entering in the latitude/longitude of your vessel and
your local UTC time, rotate the DIAL/ENT knob to select “←” or “→”, press
the [SELECT] soft key until the wrong character is selected, then perform
step 2.
4. To store the data entered, press the [FINISH] soft key.
5. Rotate the DIAL/ENT knob to select “DEMO START”,
then press the [SELECT] soft key.
6. Rotate the DIAL/ENT knob to select “START”, then
press the [SELECT] soft key.
NOTE
To stop the demo mode, select “STOP” in step 6 above.
Page 47
GX6000
9 GPS OPERATION
The GX6000 has the optional SCU-31 external GPS antenna to receive and
display the position information. When the radio is connected to an external
GPS device by the NMEA-0183 or NMEA2000, you may select the order of
priority of the connection devices to be used when obtaining location informa-
tion via the SETUP menu (Refer to section “18.1 ORDER OF PRIORITY”).
Your position information as well as received positions can be memorized and
utilized later for navigation.
9.1 DISPLAYING POSITION INFORMATION
9.1.1 GPS Information Numerical Display
1. [] “GPS” “GPS INFO”
2. Display the numerical display.
3. Press the CLEAR key to return to radio operation.
9.1.2 GPS Information Compass Display
1. [] “GPS” “COMPASS”
2. Display the compass display.
3. Press the CLEAR key to return to radio operation.
Note: Depending on the assignment of the soft keys
you may switch the screen immediately from the
basic display to the compass display by pressing the
[COMP] soft key.
9.2 CHECKING GPS STATUS
1. [] “GPS” “GPS STATUS”
2. Display the GPS status currently being received.
3. Press the CLEAR key to return to radio operation.
Page 48 GX6000
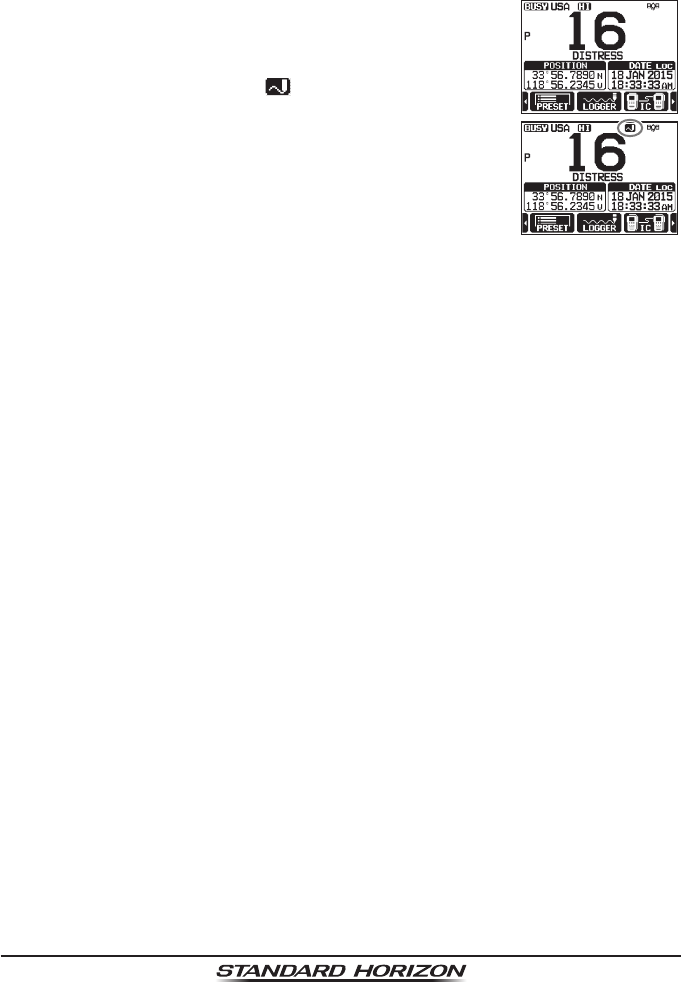
9.3 GPS LOGGER OPERATION
The GX6000* includes a logger for position information that allows you to record
your location at regular intervals. (* Requires optional SCU-31 GPS Receiver.)
1. Press the [LOGGER] soft key to turn the function on
or off.
The recording starts and the display returns to the
previous screen with the “ ” icon on the top of the
display.
• You may change the log interval time of recording
via the SETUP menu (Refer to section “18.11.4
Logger Interval”).
Note: To utilize the records, connect the GX6000 to a
PC and download the log data from the radio by using
the PC Programming Software. Refer to section “20
CONNECTING A USB DATA TERMINAL TO THE
PC”.
Logger operation alert:
• When the memory for log data becomes full, three beeps will sound and a
warning message will be displayed. Afterwards the logger does not operate
until the log data in the memory are erased.
• When the logger cannot record for some reason, three beeps will sound
and a warning message will be displayed. Afterwards the logger does not
operate anymore.
• An error message will be displayed when the radio cannot erase the log data
in the memory during the operation following the alert of memory full (see
above) or in the SETUP menu (Refer to section “18.11.5 Log Erase”).
Page 49
GX6000
10 DIGITAL SELECTIVE CALLING (DSC)
10.1 GENERAL WARNING
This GX6000 is designed to generate a digital maritime distress and
safety call to facilitate search and rescue. To be effective as a safety
device, this equipment must be used only within communication range
of a shore-based VHF marine channel 70 distress and safety watch
system. The range of signal may vary but under normal conditions
should be approximately 20 nautical miles.
NOTE
A DSC Warning sticker is included with
the GX6000. To comply with FCC regula-
tions this sticker must be mounted in a
location that can be easily viewed from
the location of the GX6000.
WARNING
STICKER
Digital Selective Calling (DSC) is a semi-automated method of establishing a
radio call, it has been designated by the International Maritime Organization
(IMO) as an international standard for establishing VHF, MF and HF radio
calls. It has also been designated as part of the Global Maritime Distress and
Safety System (GMDSS). It is planned that DSC will eventually replace aural
watches on distress frequencies and will be used to announce routine and
urgent maritime safety information broadcasts.
This system allows mariners to instantly send a distress call with GPS position
(when connected to the transceiver) to the Coast Guard and other vessels
within range of the transmission. DSC will also allow mariners to initiate or
receive Distress, Urgency, Safety, Routine, Position Request, and Position
Report, Automatic Position Polling, and Group calls to or from another vessel
equipped with a DSC transceiver.

Page 50 GX6000
10.2 DSC DISTRESS ALERT
The GX6000 is capable of transmitting and receiving DSC distress messages
to all DSC radios. Distress alert calls from the GX6000 include the latitude and
longitude of the vessel when the external GPS unit is activated.
10.2.1 Transmitting a DSC Distress Alert
NOTE
To be able to transmit a DSC distress call, MMSI number must be programmed,
refer to section “7.6.1 Maritime Mobile Service Identity (MMSI)”.
In order for your ships location to be transmitted, the GX6000 must be
able to receive a valid position data from the SCU-31 external GPS
antenna or other GPS device connected by NMEA 0183 or NEMA 2000.
Refer to section “7.5.3 Accessory Cables and NMEA 0183 Cables”
Basic Operation
1. Lift the red spring loaded DISTRESS cover, press
once and then press and hold the DISTRESS key for 3
seconds. The radio display will count down (3-2-1) and
then transmit the distress call. The backlight of the display
and keypad ashes while the radio's display is counting
down.
2. When the distress signal is sent, the transceiver
watches for a transmission on CH70 until an acknowl-
edgment signal is received.
3. If no acknowledgment is received, the distress call is
repeated in 4 minute intervals until a DSC acknowl-
edgment is received.
4. When a DSC distress acknowledgment is received,
a distress alarm sounds and Channel 16 is automati-
cally selected. The display shows the MMSI of the
ship responding to your distress.
5. Press the microphone’s PTT switch and state your name, vessel name,
number of persons on board and the distress situation, then say “over” and
wait for a reply from the acknowledging ship.
6. To turn off the distress alarm before the radio retransmits the distress alert,
press the 16/S key or the [QUIT] soft key.
Page 51
GX6000
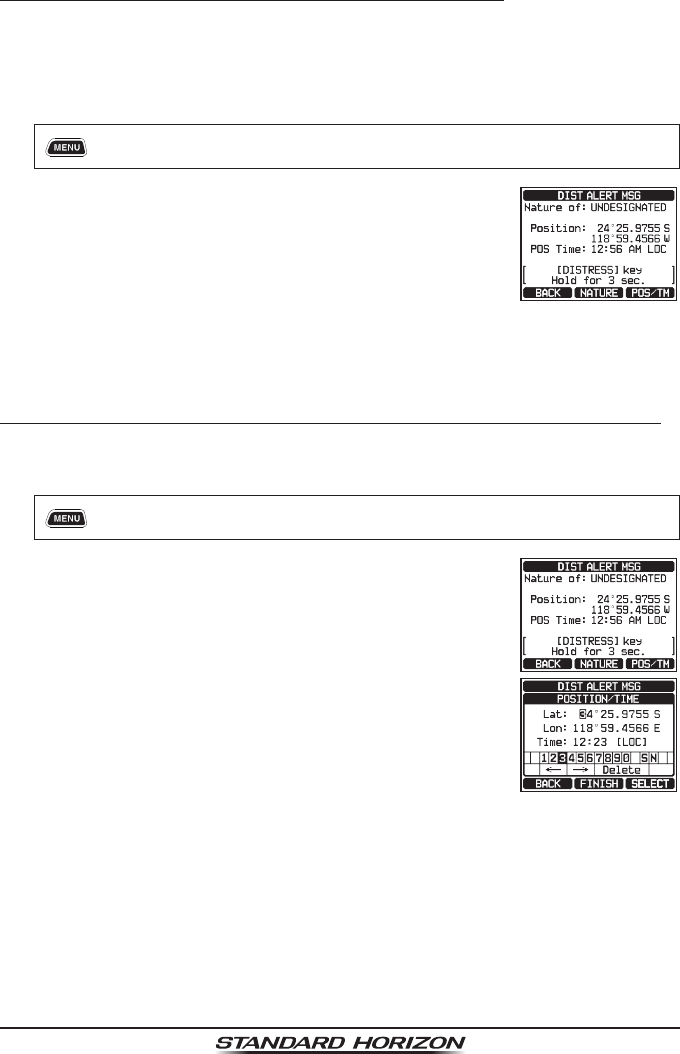
Transmitting a DSC Distress Alert with Nature of Distress
The GX6000 is capable of transmitting a DSC distress alert with the following
“Nature of Distress” categories:
Undesignated, Fire/Explosion, Flooding, Collision, Grounding, Capsizing,
Sinking, Adrift, Abandoning, Piracy, MOB.
1. [] “DSC CALL” “DIST ALERT MSG”
2. Press the [NATURE] soft key. The “NATURE OF”
menu will appear on the display.
3. Rotate the DIAL/ENT knob to select the desired nature of distress category,
then press the [SELECT] soft key.
4. Press and hold the DISTRESS key until a distress alert is transmitted.
Transmitting a DSC Distress Alert by Manually Inputting Location and Time
In case the GX6000 fails to get a GPS position x, you may manually input your
latitude and longitude, and time before transmitting the distress alert.
1. [] “DSC CALL” “DIST ALERT MSG”
2. Press the [POS/TM] soft key.
3. Rotate the DIAL/ENT knob to select the rst number
of latitude, then press the [SELECT] soft key to step
to the next number.
4. Repeat step 3 to set the position and time.
If a mistake was made, rotate the DIAL/ENT knob to
select “←” or “→”, press the [SELECT] soft key until
the wrong character is selected, then perform step 3.
5. When nished programming the position and time, press the [FINISH] soft
key. The display will return to the previous screen.
6. Press and hold the DISTRESS key until a distress alert is transmitted.
Page 52 GX6000
Pausing a DSC Distress Alert
After a DSC distress call is transmitted, the DSC distress call is repeated every
4 minutes until the call is canceled by the user or until the radio is turned off and
on again. The GX6000 has the capability to suspend (pause) the retransmitting
of the distress call by the procedure below.
1. After the distress call is transmitted, the radio will show
the display as on the right.
Looking at this display you will notice “TX IN: 02:10”,
this is the time when the radio will re-transmit the DSC
distress call.
2. To suspend re-transmitting the DSC call, press the
[PAUSE] soft key.
3. To resume counting down to transmit the DSC
Distress call, press the [RESUME] soft key.
Canceling a DSC Distress Alert
If a DSC distress alert was sent by error the GX6000 allows you to send a
message to other vessels to cancel the distress call that was made.
1. Press the [CANCEL] soft key, then press the [YES]
soft key.
2. After the message for cancelling has been transmitted,
press the [OK] soft key.
3. Press the [FINISH] soft key.
4. Press the [QUIT] soft key to return to radio operation.
Page 53
GX6000
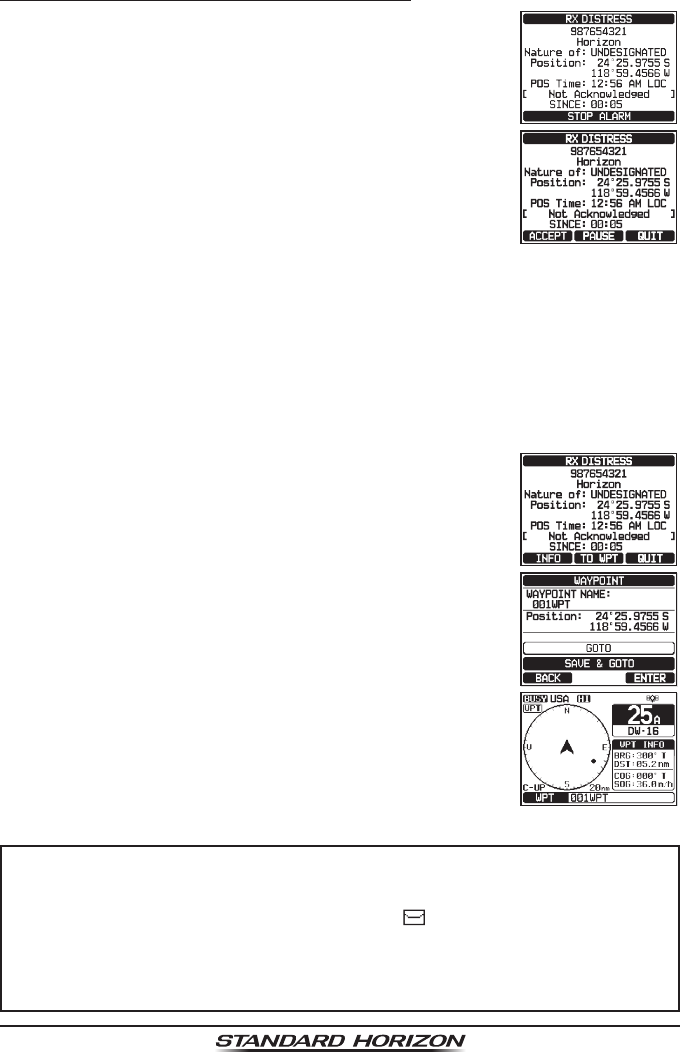
10.2.2 Receiving a DSC Distress Alert
1. When a DSC distress call is received, an emergency
alarm sounds.
2. Press any key to stop the alarm.
3. Rotate the DIAL/ENT knob to show information on
the vessel in distress.
On the display you will notice 3 soft key selections.
These selections are described below:
[ACCEPT]: Press this key to accept the DSC distress
call and to switch to Channel 16.
Note: If a key is not pressed for 30 seconds or longer the radio will automati-
cally switch to Channel 16. (“AUTO CHANNEL CHANGE” timer settings
can be changed in “DSC SETUP” menu. The default setting is 30 sec.)
[PAUSE]: Press this key to temporarily disable automatic switching to Channel 16.
[QUIT]: Press this key to quit the automatic Channel 16 switching and revert
to the last selected working channel.
4. After accepting the call, press the [TO WPT] soft
key to set the vessel in distress as a destination for
navigation.
Note: You may change the waypoint name.
5. Rotate the DIAL/ENT knob key to select “SAVE &
GOTO”, then press the [SELECT] soft key to change
the display to the waypoint navigation screen. The
display indicates the distance and direction of the
distressed vessel, and the compass displays the
distressed vessel by dot ().
6. To stop navigating to a waypoint, press one of the
soft keys, then press the [STOP] soft key. The radio
is switched to the normal mode.
NOTE
• You must continue monitoring Channel 16 as a coast station may
require assistance in the rescue attempt.
• When there is an unread distress alert, “ ” icon will appear on the
display. You may review the unread distress alert from the DSC log, refer
to the section “10.11.2 Reviewing a Logged DSC RX Distress Call”.
• Not all DSC radios can receive a DSC distress relay call.
Page 54 GX6000
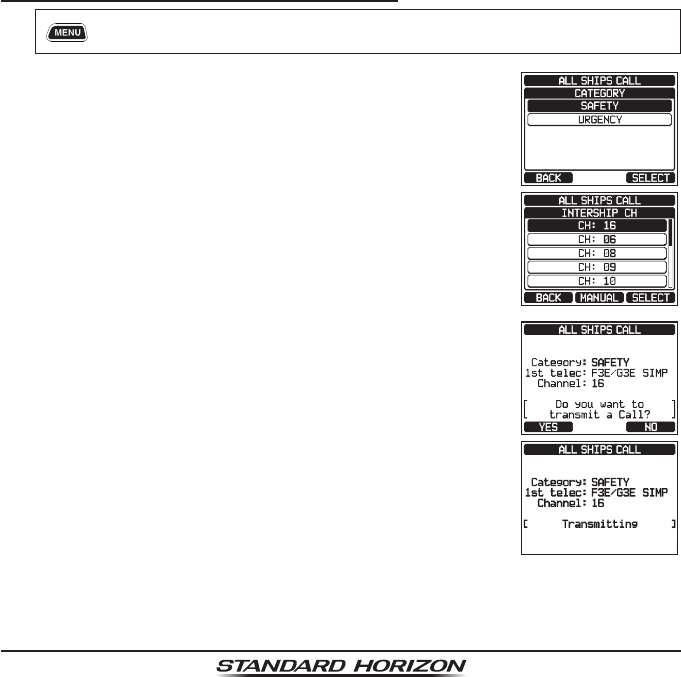
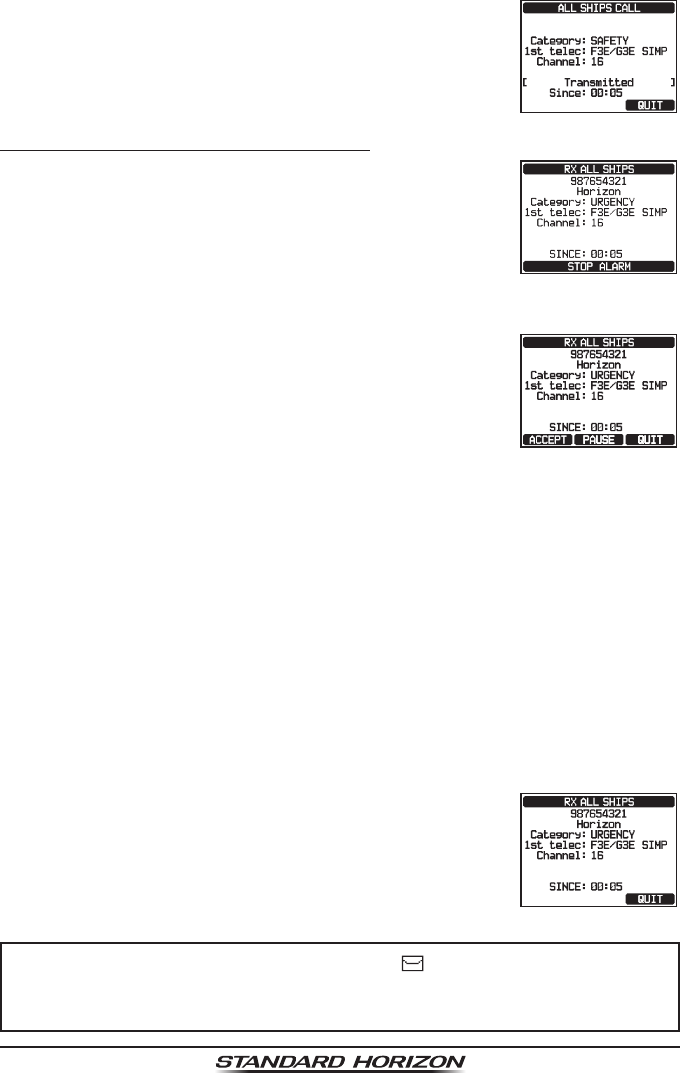
10.3 ALL SHIPS CALL
The all ships call function allows contact to be established with DSC equipped
vessels without having their MMSI in the individual calling directory. Also, priority
for the call can be designated as “Safety” or “Urgency”.
SAFETY Call: This type of call is used to transmit boating safety information
to other vessels. This message usually contains information
about an overdue boat, debris in the water, loss of a naviga-
tion aid or an important meteorological message. This call is
the same as saying “Securite, Securite, Securite”.
URGENCY Call: This type of call is used when a vessel may not truly be in
distress, but have a potential problem that may lead to a
distress situation. This call is the same as saying “PAN PAN,
PAN PAN, PAN PAN” on Channel 16.
10.3.1 Transmitting an All Ships Call
1. [] “DSC CALL” “ALL SHIPS CALL”
2. Rotate the DIAL/ENT knob to select the nature of
call (“SAFETY” or “URGENCY”), then press the
[SELECT] soft key.
3. In the INTERSHIP CH list, rotate the DIAL/ENT knob
to select the operating channel “.*.”on which you want
to communicate, then press the [SELECT] soft key.
To select operating channels from all voice channels,
press the [MANUAL] soft key.
4. Press the [YES] soft key to transmit the selected type
of all ships call.
5. After the all ships call is transmitted, the transceiver
will switch to the selected channel.
6. Listen to the channel to make sure it is not busy, then
key the microphone and say “PAN PAN, PAN PAN,
PAN PAN” or “Securite, Securite, Securite” depending
on the priority of the call.
Page 55
GX6000
7. Press the [QUIT] soft key to exit the all ships call
menu.
10.3.2 Receiving an All Ships Call
1. When an all ships call is received, an emergency
alarm will sound.
The display shows the MMSI of the vessel transmit-
ting the all ships call and the radio will change to
the requested channel after 30 seconds (the default
setting of “AUTO CHANNEL CHANGE”).
2. Press any key to stop the alarm.
3. Monitor the requested channel until the all ships voice
communication is completed.
On the display you will notice 3 soft key selections.
These selections are described below:
[ACCEPT]: Press this key to accept the DSC all ships
call and to switch to requested channel.
Note: If a key is not pressed for 30 seconds or longer the radio will auto-
matically change to the requested channel (the default setting of “AUTO
CHANNEL CHANGE”).
[PAUSE]: Press this key to temporarily disable automatic switching to the
requested channel.
Note: In some cases, automatically switching to a requested channel might
disrupt important ongoing communications. This feature allows commer-
cial users to suspend channel switching and stay on the working channel
selected before the all ships call was received.
[QUIT]: Press this key to quit the automatic channel switching and revert
to the last selected working channel.
4. Press the [QUIT] key to return to the channel display.
NOTE
When there is an unread all ships call, “ ” icon will appear on the
display. You may review the unread all ships call from the DSC log, refer
to the section “10.11.2 Reviewing a Logged DSC RX Distress Call”.

Page 56 GX6000
10.4 INDIVIDUAL CALL
This feature allows the GX6000 to contact another vessel with a DSC VHF
radio and automatically switch the receiving radio to a desired communications
channel. This feature is similar to calling a vessel on CH16 and requesting to
go to another channel (switching to the channel is private between the two
vessels). Up to 100 individual contacts may be programmed.
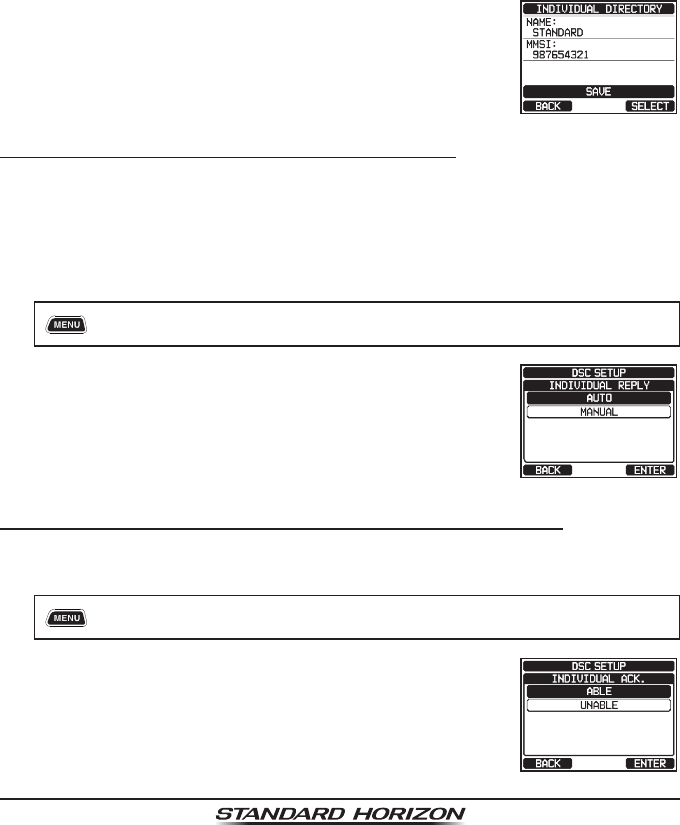
10.4.1 Setting up the Individual / Position Call Directory
The GX6000 has a DSC directory that allows you to store a vessel or person’s
name and the associated MMSI number you wish to contact via individual
calls, auto polling, position request, position report, and polling transmissions.
To transmit an individual call you must program this directory with information
of the persons you wish to call, similar to a cellular phone's telephone directory.
1. [] “SETUP” “DSC SETUP” “INDIVIDUAL DIRECTORY”
2. Rotate the DIAL/ENT knob to select “ADD”, then
press the [SELECT] soft key.
3. Rotate the DIAL/ENT knob to select “NAME:”, then
press the [SELECT] soft key.
4. Rotate the DIAL/ENT knob to scroll through the rst
letter of the name of the vessel or person you want
to reference in the directory.
5. Press the [SELECT] soft key to store the rst letter
in the name and step to the next letter to the right.
6. Repeat steps 4 and 5 until the name is complete. The name can consist of
up to fteen characters, and if you do not use all fteen characters, select
“→” to move to the next space. This method can also be used to enter a
blank space in the name.
If a mistake was made entering in the name, rotate the DIAL/ENT knob to
select “←” or “→”, press the [SELECT] soft key until the wrong character
is selected, then perform steps 4 and 5.
7. When nished entering the name (using fteen characters or less), press
the [FINISH] soft key to advance to the MMSI number entry.
Page 57
GX6000
8. Rotate the DIAL/ENT knob to select “MMSI:”, then press the [SELECT]
soft key.
9. Rotate the DIAL/ENT knob to scroll through numbers, 0-9. To enter the
desired number and move one space to the right by pressing the [SELECT]
soft key. Repeat this procedure until all nine space of the MMSI number are
entered.
If a mistake was made entering in the MMSI number, rotate the DIAL/ENT
knob to select “←” or “→”, press the [SELECT] soft key until the wrong
character is selected, then perform step 9.
10. When nished entering the MMSI number, press the [FINISH] soft key.
11. To store the entered data, rotate the DIAL/ENT knob
to select “SAVE”, then press the [SELECT] soft key.
12. To enter another individual address, repeat steps 2
through 11.
13. Press the CLEAR key to return to radio operation.
10.4.2 Setting up the Individual Call Reply
This menu item sets up the radio to automatically (default setting) or manually
respond to a DSC individual call requesting you to switch to a working channel
for voice communications. When “Manual” is selected the MMSI of the calling
vessel is shown allowing you to see who is calling. This function is similar to
caller id on a cellular phone.
1. [] “SETUP” “DSC SETUP” “INDIVIDUAL REPLY”
2. Rotate the DIAL/ENT knob to select “AUTO” or
“MANUAL”.
3. Press the [ENTER] soft key to store the selected
setting.
4. Press the CLEAR key to return to radio operation.
10.4.3 Enabling the Individual Call Acknowledgment
The radio can select either reply message “Able” (default) or “Unable” when the
individual reply setting (described in the previous section) is set to “AUTOMATIC”.
1. [] “SETUP” “DSC SETUP” “INDIVIDUAL ACK.”
2. Rotate the DIAL/ENT knob to select “ABLE” or
“UNABLE”.
3. Press the [ENTER] soft key to store the selected
setting.
4. Press the CLEAR key to return to radio operation.
Page 58 GX6000
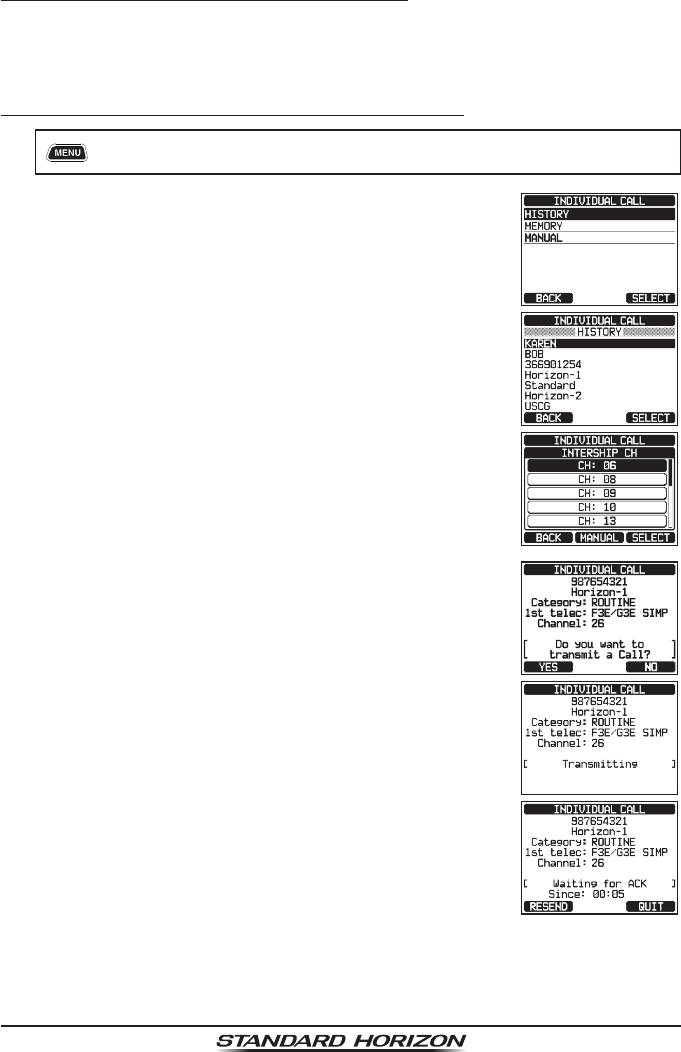
10.4.4 Transmitting an Individual Call
This feature allows the user to contact another vessel with a DSC radio. This
feature is similar to calling a vessel on CH16 and requesting to go to another
channel.
Individual Call using the Individual/Position Directory
1. [] “DSC CALL” “INDIVIDUAL CALL”
2. Rotate the DIAL/ENT knob to select “HISTORY” or
“MEMORY”, then press the [SELECT] soft key.
3. Rotate the DIAL/ENT knob to select an individual you
want to contact, press the [SELECT] soft key.
4. In the INTERSHIP CH list, rotate the DIAL/ENT knob
to select the operating channel on which you want to
communicate, then press the [SELECT] soft key. To
select operating channels from all voice channels,
press the [MANUAL] soft key.
5. Press the [YES] soft key to transmit the individual
DSC signal.
6. When an individual call acknowledgment is received,
the established channel is automatically changed to
the channel which is selected on step 4 above and a
ringing tone sounds.
7. Press the [QUIT] soft key to listen to the channel to
make sure it is not busy, then press the microphone’s
PTT switch and talk into the microphone to commu-
nicate with the other vessel.
Page 59
GX6000
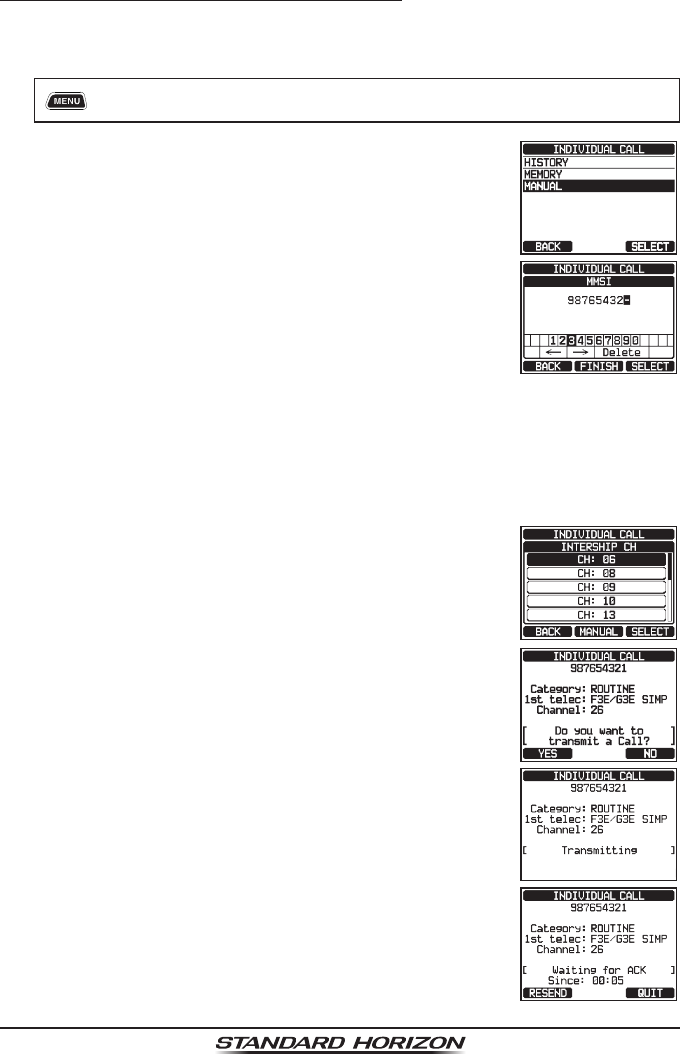
Individual Call by Manually Entering an MMSI
You may enter an MMSI number manually to contact without storing it in the
individual directory.
1. [] “DSC CALL” “INDIVIDUAL CALL”
2. Rotate the DIAL/ENT knob to select “MANUAL”, then
press the [SELECT] soft key.
3. Rotate the DIAL/ENT knob to select the rst number
of the MMSI which you want to contact, then press
the [SELECT] soft key to step to the next number.
4. Repeat step 3 to set the MMSI number (nine digits).
If a mistake was made entering in the MMSI number,
rotate the DIAL/ENT knob to select “←” or “→”, press
the [SELECT] soft key until the wrong character is
selected, then perform step 3.
5. When nished entering the MMSI number, press the
[FINISH] soft key.
6. In the INTERSHIP CH list, rotate the DIAL/ENT knob
to select the operating channel on which you want to
communicate, then press the [SELECT] soft key. To
select operating channels from all voice channels,
press the [MANUAL] soft key.
7. Press the [YES] soft key to transmit the individual
DSC signal.
8. When an individual call acknowledgment is received,
the established channel is automatically changed to
the channel which is selected on step 6 above and a
ringing tone sounds.
9. Press the [QUIT] soft key to listen to the channel to
make sure it is not busy, then press the microphone’s
PTT switch and talk into the microphone to commu-
nicate with the other vessel.
Page 60 GX6000
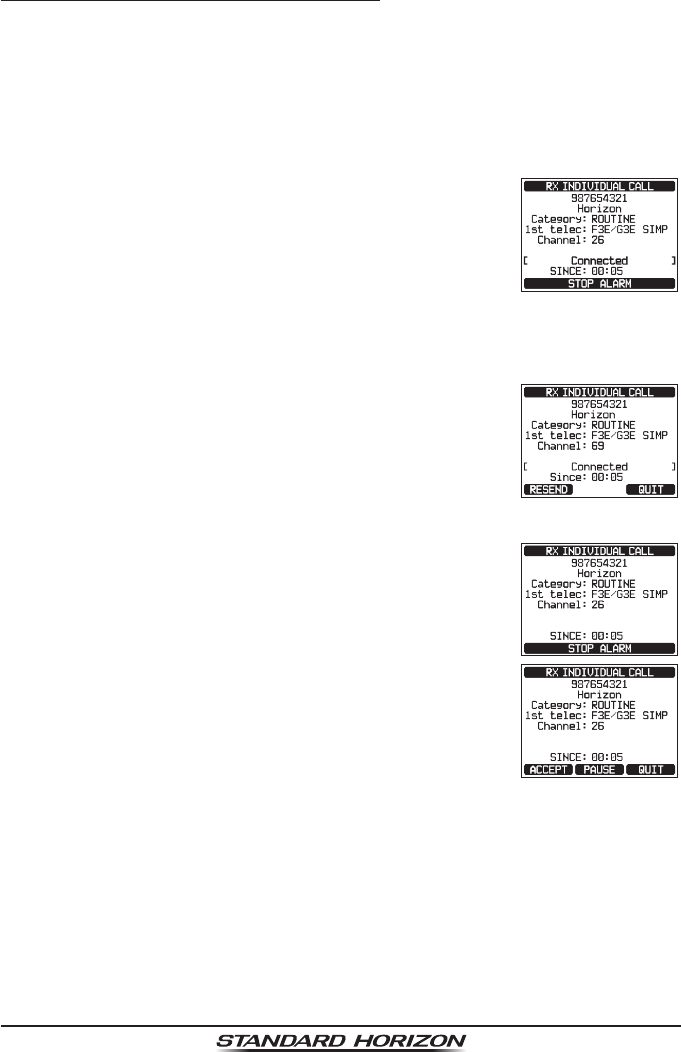
10.4.5 Receiving an Individual Call
When an individual DSC call is received, the radio will automatically respond
(default setting) to the calling ship, and switch to the requested channel for
voice communications. Refer to section “10.4.2 Setting up the Individual Call
Reply” to change the reply to manual if you want to see who is calling before
replying to the call.
Automatic reply:
1. When an individual call is received, an individual call
ringing alarm sounds.
The radio automatically switches to the requested chan-
nel. The display shows the MMSI of the vessel calling.
2. Press any key to stop the alarm.
3. Monitor the requested channel until the message is completed.
Press the microphone’s PTT switch and talk into the microphone to commu-
nicate with the vessel that initiated the individual call.
4. Press the [QUIT] soft key to return to radio operation.
Manual reply:
1. When an individual call is received, an individual call
ringing alarm sounds.
The display shows the MMSI of the vessel transmitting
the individual call.
2. Press any key to stop the alarm.
3. On the display you will notice 3 soft key selections.
These selections are described below:
[ACCEPT]: Press this key to accept the DSC indi-
vidual call and to switch to requested channel.
[PAUSE]: Press this key to temporarily disable auto-
matic switching to the requested channel.
Note: In some cases, automatically switching to a requested channel might
disrupt important ongoing communications. This feature allows commer-
cial users to suspend channel switching and stay on the working channel
selected before the individual call was received.
[QUIT]: Press this key to quit the automatic channel switching and revert
to the last selected working channel.
Note: If a key is not pressed for 30 seconds or longer the radio will auto-
matically change to radio operation.