Yaesu Musen 30593X3D MOBILE MARINE TRANSCEIVER User Manual GX6000 Owner s Manual
Yaesu Musen Co., Ltd. MOBILE MARINE TRANSCEIVER GX6000 Owner s Manual
Contents
OM User Manual 8
Page 94 GX6000
12.2 STARTING GM OPERATION
NOTE
To start GM operation, congure the GM Group Directory setting in
setup menu. Otherwise, you cannot start the GM operation. Refer to
section “12.1.1 Setting Up GM Group Directory” for details.
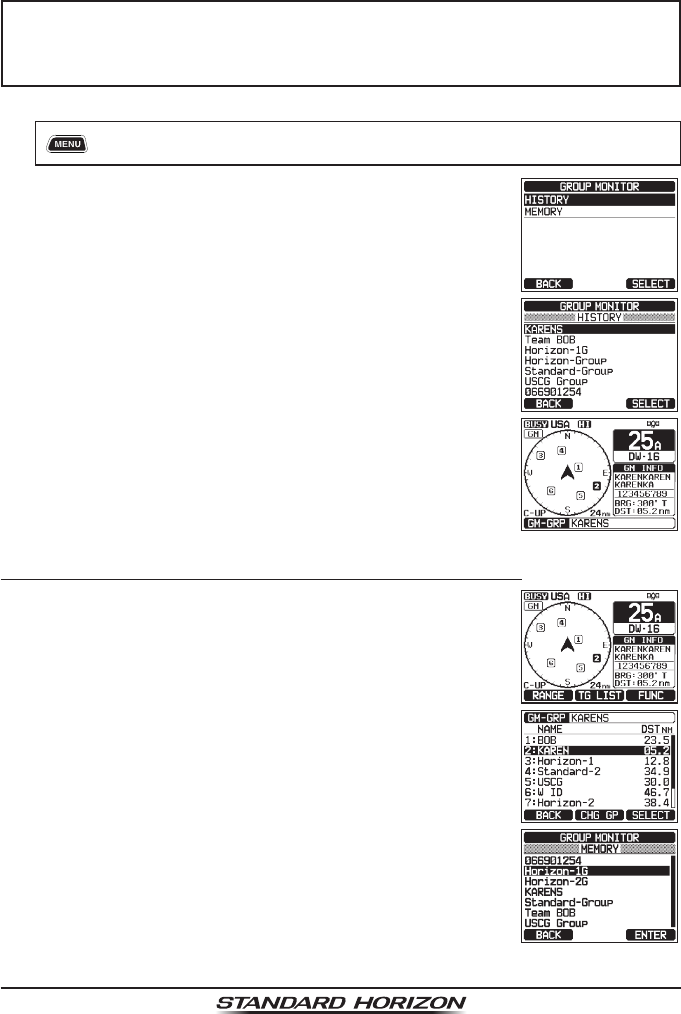
1. [] “GM”
2. Rotate the DIAL/ENT knob to select the desired
category (“HISTORY” or “MEMORY”), then press the
[SELECT] soft key.
3. Rotate the DIAL/ENT knob to select a group you want
to monitor, then press the [SELECT] soft key.
The GM operation starts and the GM target display
appears.
4. Press the CLEAR key to return to radio operation.
12.2.1 Changing the GM Group Being Monitored
1. On the GM target display, press one of the soft keys
to show the key selections.
2. Press the [TG LIST] soft key.
3. Press the [CHG GP] soft key.
4. Rotate the DIAL/ENT knob to select the name of the
group you want to start monitoring, then press the
[ENTER] soft key.
Page 95
GX6000
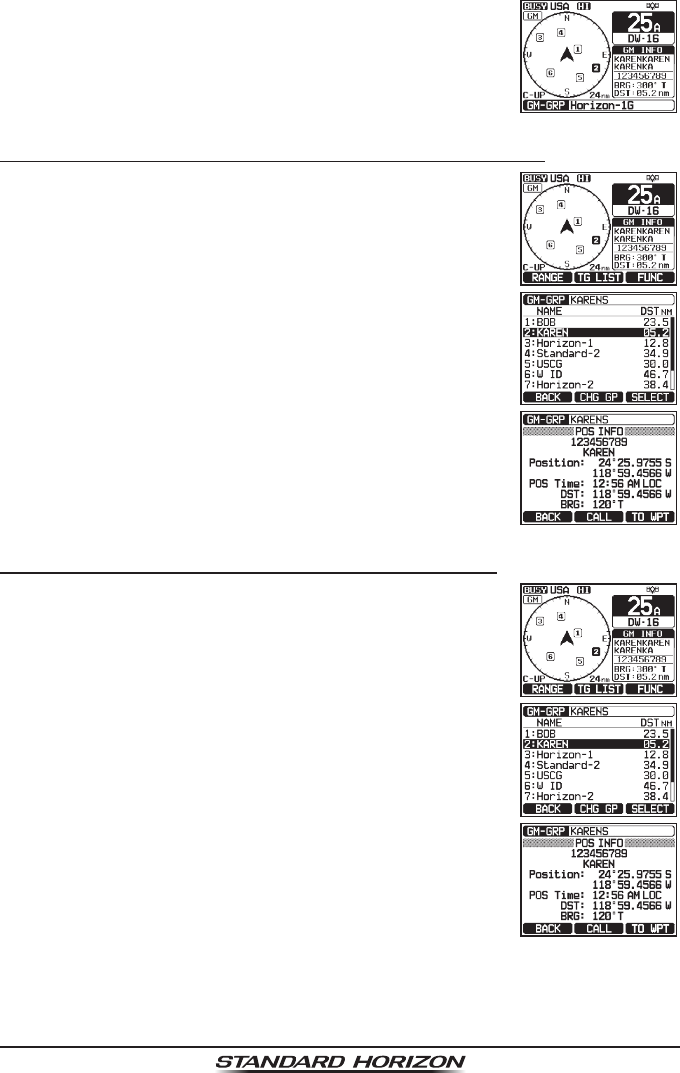
The GM group being monitored changes. The GM
target display appears.
5. Press the CLEAR key to return to radio operation.
12.2.2 Transmitting a DSC Call to a Group Member
1. On the GM target display, press one of the soft keys
to show the key selections.
2. Press the [TG LIST] soft key.
3. Rotate the DIAL/ENT knob to select a member you
want to call.
4. Press the [SELECT] soft key to display the location,
distance, and bearing of the selected member.
5. Press the [CALL] soft key to transmit a DSC Individual
call to the selected member.
12.2.3 Starting Navigation to a Group Member
1. On the GM target display, press one of the soft keys
to show the key selections.
2. Press the [TG LIST] soft key.
3. Rotate the DIAL/ENT knob to select a member you
want to approach.
4. Press the [SELECT] soft key to display the location,
distance, and bearing of the selected member.
5. Press the [TO WPT] soft key to start navigation to the
selected member. (Press the [BACK] soft key twice
to cancel and return to the GM target display.)

Page 96 GX6000
13 AUTOMATIC IDENTIFICATION SYSTEM (AIS)
13.1 GENERAL
NOTE
• The GX6000 is equipped with an antenna connection designated for
AIS. By connecting a marine antenna to this connector, the transceiver
can receive AIS signals while receiving a VHF voice transmissions.
• Install the VHF antenna and the AIS antenna as far away from each
other as possible. Having a large vertical distance is especially effec-
tive for improving high frequency isolation. To make even longer-range
communication possible, it is recommended to install the antenna for
VHF at a height higher than the antenna for AIS.
The Automatic Identication System (AIS) is a short range coastal tracking
system. AIS is intended to assist in collision avoidance by seeing positions and
courses of AIS equipped vessels around your vessel.
AIS is mandatory on passenger ships, irrespective of size, all ships 300 gross
tonnage and larger engaged on international voyages, cargo ships of 500 gross
tonnage and larger not engaged on international voyages.
AIS uses two marine VHF channels. Each ship equipped with an AIS transpon-
der transmits a packet every few seconds with information about the ship and
its voyage. Radio frequencies: AIS1 = 161.975 MHz, or channel 87B and AIS2
162.025 MHz, or channel 88B. A stand-alone AIS receiver or the AIS receiver
built in to a Class A or Class B transponder can pick up these radio signals
and translate them into a NMEA data sentence that can be understood by a
computer with the proper software or by an AIS-enabled chart plotter.
Classes of AIS:
Class A - 12.5W power output - mandated for use on SOLAS Chapter V vessels
(and others in some countries).
Class B CS - 2W output - lower cost derivative for leisure and non-SOLAS
markets.
The GX6000 is capable of receiving Class A and Class B CS transmissions
with
the internal Dual Channel AIS receiver.
Page 97
GX6000
13.2 AIS OPERATION
The GX6000 is equipped with an AIS receiver and can display AIS targets
around your vessel on the radio's display. Therefore, you can identify and avoid
in proximity to your vessel.
NOTE
To show AIS targets on the radio’s display, the SCU-31 or an external
GPS devices needs to be connected via NMEA 0183 or NMEA 2000
so the radio knows its position relative to the AIS targets.
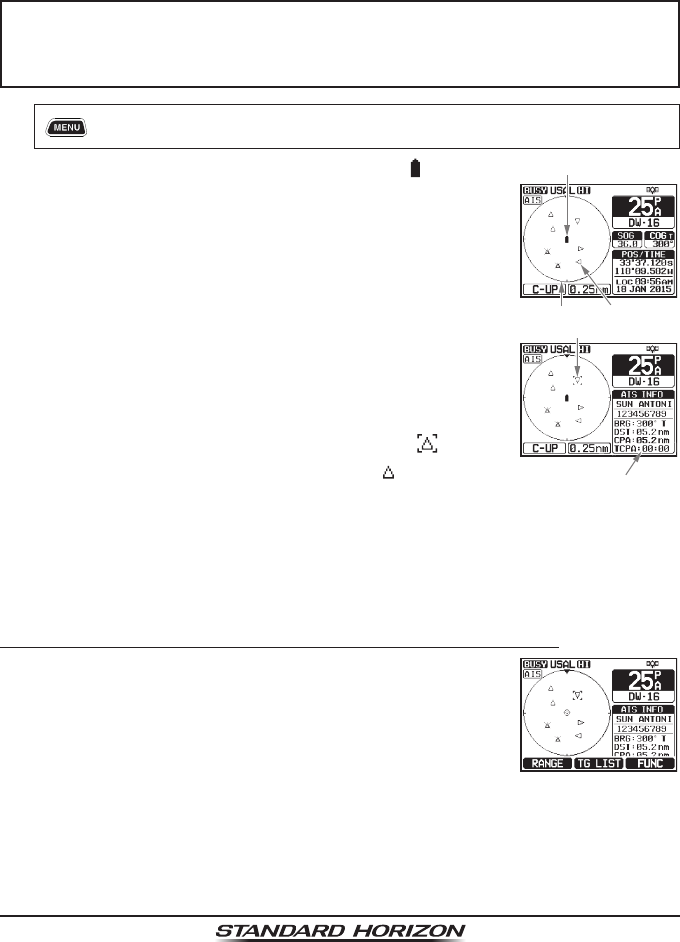
1. [] “AIS”
The AIS display shows your vessel as a “ ” icon in
the center of the display. AIS targets are shown as
triangles. The line projected from the circle is the AIS
vessels course over ground (COG).
Vessel Location
AIS Target
Range Ring
2. Press the ►/◄ key to change the AIS target. Pressing
the ◄ key sequentially displays AIS vessels in order
closest to your ship. Pressing the ► key sequentially
displays AIS vessels in order furthest from your ship.
<AIS>
Selected AIS Target
Information
of the AIS Target
The selected AIS target is displayed with “ ” icon,
while other stations are displayed with “ ” icon.
Note: Up to 15 AIS targets can be shown on the display. All received AIS targets
are displayed on the compatible chartplotter or navigation software via
NMEA 0183 or NMEA 2000.
3. Press the CLEAR key to return to radio operation.
13.2.1 Displaying the AIS Target Information Screen
1. On the AIS screen, press one of the soft keys to show
the key selections. These selections are described
below:
[RANGE]: Press this key to change the display range
of the screen.
[TG LIST]: Press this key to show a list of the MMSI
numbers or the vessel names being
received.
[FUNC]: Press this key to show the function menu.
2. Press the [TG LIST] soft key to show a list of AIS target being received.
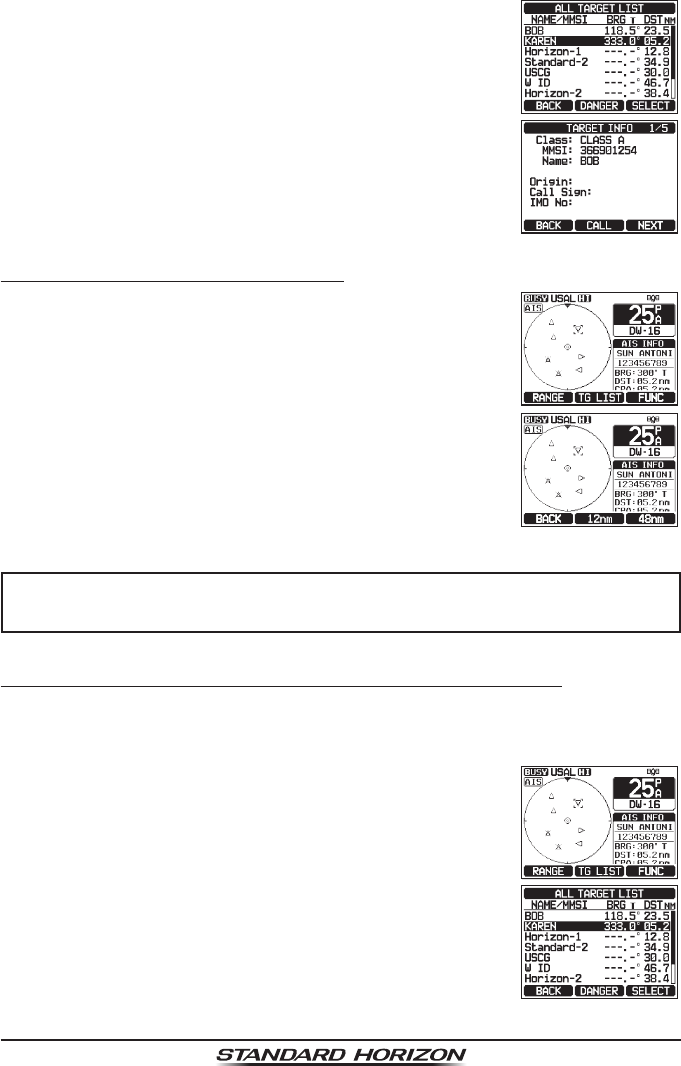
Page 98 GX6000
3. Rotate the DIAL/ENT knob to select the MMSI number
(or vessel name). then press the [SELECT] soft key.
Pressing the [DANGER] soft key changes the order
to the TCPA time order.
4. The AIS target information screen appears. To see
more information of the AIS target, press the [NEXT]
soft key.
5. Press the CLEAR key to return to radio operation.
13.2.2 Changing the AIS Range
1. On the AIS screen, press one of the soft keys to show
the key selections.
2. Press the [RANGE] soft key. Press the soft keys at
the center and right side to select the radius range to
display on the AIS screen.
3. Press the [BACK] soft key to return to AIS screen.
NOTE
You may change the display range unit of the AIS screen, refer to
section “18.7 UNITS OF MEASURE”.
13.2.3 Transmitting an Individual Call to an AIS Ship
It is possible for the GX6000 to transmit a DSC individual call to a received AIS
target by the procedure below:
1. On the AIS screen, press one of the soft keys to show
the key selections.
2. Press the [TG LIST] soft key to show a list of AIS
target being received.
3. Rotate the DIAL/ENT knob to select the MMSI number
(or vessel name). then press the [SELECT] soft key.
Page 99
GX6000
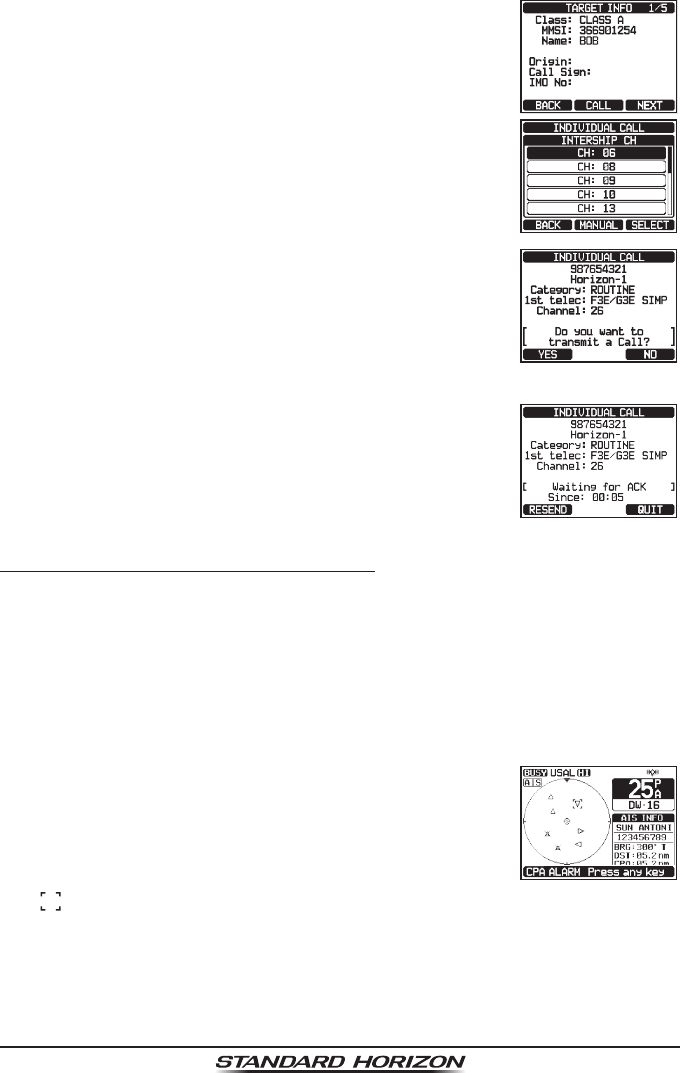
4. Press the [CALL] soft key
5. In the INTERSHIP CH list, rotate the DIAL/ENT knob
to select the operating channel on which you want to
communicate, then press the [SELECT] soft key. To
select operating channels from all voice channels,
press the [MANUAL] soft key.
6. To transmit an individual DSC call to the select AIS
ship, press the [YES] soft key.
After the GX6000 transmits, the radio waits for the
DSC radio on the AIS ship to transmit a reply, at which
time the radio will ring like a telephone. Pick up the
mic, press the PTT switch and talk to the AIS vessel.
7. Press the [QUIT] soft key to return to AIS screen.
8. Press the CLEAR key to return to radio operation.
13.2.4 CPA/TCPA Alarm Functions
The CPA (Closest Point of Approach) alarm sounds when other AIS vessels
enter within the range set as the CPA Limit. For details, refer to section “13.3.1
CPA”.
The TCPA (Time to Closest Point of Approach) alarm sounds according to the
time set as the TCPA Limit which is the time taken until other AIS vessels enter
within the range set as the CPA Limit. For details, refer to section “13.3.2 TCPA”.
1. If other AIS vessels approach your ship, the alarm
sounds according to the CPA Limit and TCPA Limit
that you set in advance.
2. Press any key to stop the alarm.
The targets for the CPA/TCPA alarm will appear with
“ ” and ash.
Up to 15 targets for the CPA/TCPA alarm can be shown on the screen.
Note: If the display is in a mode other than AIS, the radio automatically
switches to the AIS mode.

Page 100 GX6000
3. On the display you will notice 3 soft key selections.
These selections are described below:
[INFO]: Pressing this key shows the information
screen of the CPA/TCPA alarm targets.
[CALL]: Pressing this key switches the screen to the
setting screen for transmitting individual DSC
calls.
[QUIT]: Press this key to return to AIS screen.
4. To transmit individual calls to the CPA/TCPA alarm targets, follow steps 4
through 8 in “13.2.3 Transmitting an Individual Call to an AIS Ship”
13.2.5 Changing the Compass Display
The compass display can be switched between “COURSE-UP” and “NORTH-
UP”. The default setting is “COURSE-UP”.
Refer to section “18.2 COMPASS DIRECTION” for details.
13.3 AIS SETUP
[ ] “SETUP” “AIS SETUP” “VESSEL INFO”
13.3.1 CPA
This function allows you to set the CPA (Closest Point of Approach) alarm distance.
: CPA means the positions at which two moving vessels reach their closest
possible distance.
1. [] “SETUP” “AIS SETUP” “CPA”
2. Rotate the DIAL/ENT knob to select the distance you
want the radio to alert you of an approaching AIS
equipped vessel. You can select one from “0.5nm”,
“1nm”, “2nm”, “5nm”, or “10nm” (“0.5nm” is default).
3. Press the [ENTER] soft key to store the selected
setting.
4. Press the CLEAR key to return to radio operation.
13.3.2 TCPA
This function allows you to set the TCPA (Time to Closest Point of Approach)
alarm.
: Setting up a TCPA alarm sets a time point where the radio will alarm when
an AIS equipped vessel approaching is within the time selected.
Page 101
GX6000
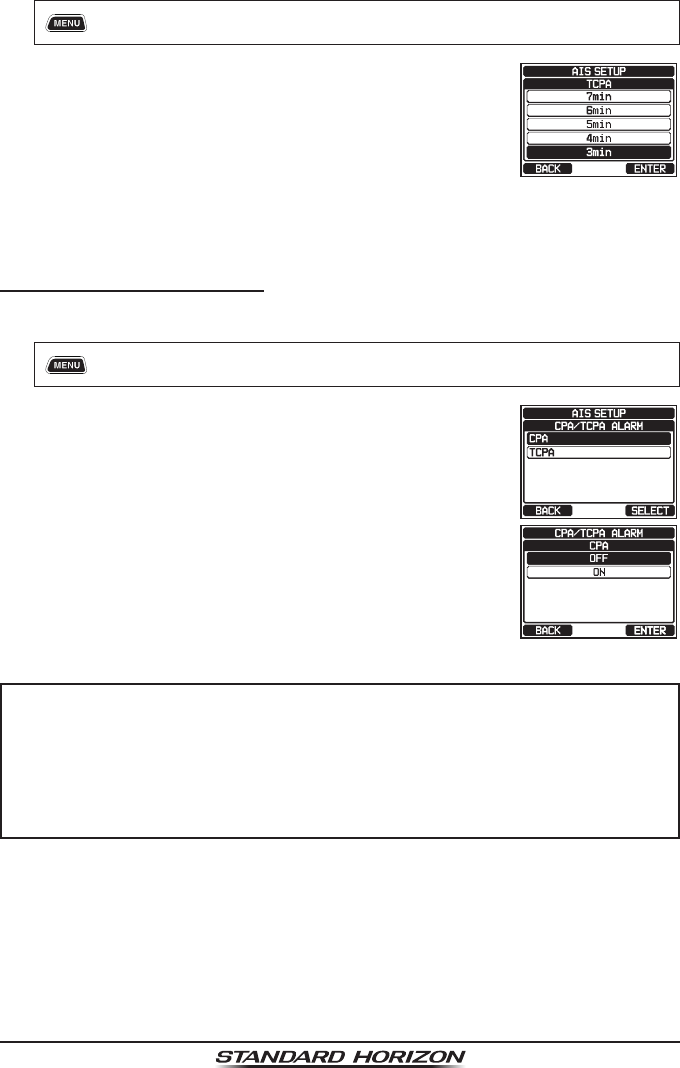
1. [] “SETUP” “AIS SETUP” “TCPA”
2. Rotate the DIAL/ENT knob to select the time you want
the radio to alert you of an approaching AIS equipped
vessel. The time can be set from “1min” to “30min”
(“10min” is default).
3. Press the [ENTER] soft key to store the selected
setting.
4. Press the CLEAR key to return to radio operation.
13.3.3 CPA/TCPA Alarm
Enable/disable the CPA/TCPA alarm functions. The default setting is “OFF”.
1. [] “SETUP” “AIS SETUP” “CPA/TCPA ALARM”
2. Rotate the DIAL/ENT knob to select “CPA” or “TCPA”,
then press the [SELECT] soft key.
3. Rotate the DIAL/ENT knob to select “OFF” or “ON”.
4. Press the [ENTER] soft key to store the selected
setting.
5. Press the CLEAR key to return to radio operation.
NOTE
The alarm will sound until it is disabled (1) by pressing any key, (2)
following the steps above and selecting “OFF” in step 3, or (3) when
the ship is out of the selected CPA/TCPA alarm range. The alarm is
produced from the front panel speaker, the speaker in the mic, the
optional external speaker and optional RAM4 and RAM4W mic when
connected.
Page 102 GX6000
14 NMEA 2000 SETUP
Set the device numbers and system numbers of devices connected to the
NMEA 2000 network.
14.1 SELECT DEVICE
Select the device for which you want to set the device number and system number.
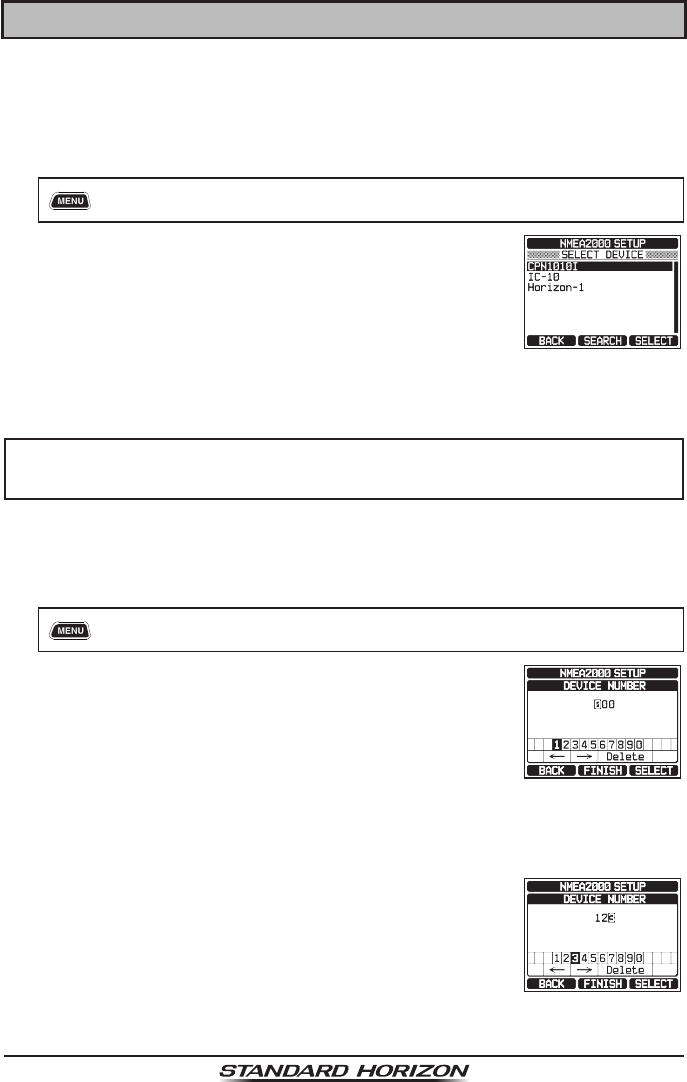
1. [] “SETUP” “NMEA2000 SETUP” “SELECT DEVICE”
2. In the SELECT DEVICE list, rotate the DIAL/ENT
knob to select the external device for which you want
to set the device number or the system number.
3. Press the [SELECT] soft key to store the selected setting.
4. Press the CLEAR key to return to radio operation.
NOTE
If any devices connected to the network are not displayed in the list,
press the [SEARCH] soft key to update the list.
14.2 DEVICE NUMBER
If connecting two or more GX6000 radios, change the device number of either
one. Set the device number of the device selected in “14.1 SELECT DEVICE”.
1. [] “SETUP” “NMEA2000 SETUP” “DEVICE NUMBER”
2. Rotate the DIAL/ENT knob to select the rst digit of
the device number, then press the [SELECT] soft key
to step to the next number.
3. Repeat step 2 to set the device number within the
range of 000 to 251. (“000” is default).
4. If a mistake was made entering in the device number, rotate the DIAL/ENT
knob to select “←” or “→”, press the [SELECT] soft key until the wrong
character is selected, then perform step 2.
5. When nished programming the device number, press
the [FINISH] soft key.
6. Press the CLEAR key to return to radio operation.

Page 103
GX6000
14.3 SYSTEM NUMBER
Set the system number of the device selected in “14.1 SELECT DEVICE”.
1. [] “SETUP” “NMEA2000 SETUP” “SYSTEM NUMBER”
2. Rotate the DIAL/ENT knob to select the rst digit of
the system number, then press the [SELECT] soft
key to step to the next number.
3. Repeat step 2 to set the system number within the
range of 00 to 15. (“00” is default).
4. If a mistake was made entering in the system number, rotate the DIAL/ENT
knob to select “←” or “→”, press the [SELECT] soft key until the wrong
character is selected, then perform step 2.
5. When nished programming the system number,
press the [FINISH] soft key.
6. Press the CLEAR key to return to radio operation.
14.4 SUMMARY OF THE NMEA 2000 SETUP
Item Description Default Value Page
SELECT DEVICE Select the device for which you
want to set the device number or
the system number
−
102
DEVICE NUMBER Set the device number 000 102
SYSTEM NUMBER Set the system number 00 103
14.5 COMPATIBLE NMEA 2000 PGN LIST
Receive Transmit
059392 ISO Acknowledgement 059392 ISO Acknowledgement
059904 ISO Request 059904 ISO Request
060928 ISO Address Claim 060928 ISO Address Claim
065240 ISO Commanded Address − −
126464 Receive/Transmit PGN's group
function
126464 Receive/Transmit PGN's group
function
126993 Heartbeat 126993 Heartbeat
126996 Product Information 126996 Product Information
127237 Heading/Track Control − −
127250 Vessel Heading − −
127258 Magnetic Variation − −
128259 Speed − −
129025 Position, Rapid Update − −
129026 COG and SOG, Rapid Update − −

Page 104 GX6000
Receive Transmit
129029 GNSS Position Data 129029 GNSS Position Data
129033 Local Time Offset − −
− − 129038 AIS Class A Position Report
− − 129039 AIS Class B Position Report
− − 129040 AIS Class B Extended Position
Report
− − 129041 AIS Aids to Navigation (AtoN)
Report
− − 129793 AIS UTC and Date Report (Base
Station)
− − 129794 AIS Class A Static and Voyage
Related Data
− − 129796 AIS Acknowledge
− − 129797 AIS Binary Broadcast Message
− − 129798 AIS SAR Aircraft Position Report
− − 129799 Radio Frequency/Mode/Power
− − 129801 AIS Addressed Safety Related
Message
− − 129802 AIS Safety Related Broadcast
Message
− − 129808 DSC Call Information
− − 129809 AIS Class B “CS” Static Data
Report, Part A
− − 129810 AIS Class B “CS” Static Data
Report, Part B
129540 GNSS Sats in View 129540 GNSS Sats in View

Page 105
GX6000
15 CONFIGURATION SETUP
15.1 DISPLAY MODE
The display mode can be selected according to the time of day you operate
the radio.
1. [] “SETUP” “CONFIGURATION” “DISPLAY MODE”
2. Rotate the DIAL/ENT knob to select the desired
setting. You can select one from “DAY MODE” or
“NIGHT MODE”.
DAY MODE: Normal display mode.
NIGHT MODE: Low brightness display mode for night
use.
3. Press the [ENTER] soft key to store the selected setting.
4. Press the CLEAR key to return to radio operation.
15.2 DIMMER ADJUSTMENT
This menu selection adjusts the backlight intensity.
1. [] “SETUP” “CONFIGURATION” “DIMMER”
2. Rotate the DIAL/ENT knob to select the desired level
(“7” is default). When “OFF” is selected, the lamp is
turned off.
3. Press the [ENTER] soft key to store the selected level.
4. Press the CLEAR key to return to radio operation.
15.3 DISPLAY CONTRAST
The display contrast can be adjusted to suit your operation environment.
1. [] “SETUP” “CONFIGURATION” “CONTRAST”
2. Rotate the DIAL/ENT knob to select the desired level.
The contrast level can be set from “1” to “30” (“15” is
default).
3. Press the [ENTER] soft key to store the selected level.
4. Press the CLEAR key to return to radio operation.