Yaesu Musen 30593X3D MOBILE MARINE TRANSCEIVER User Manual GX6000 Owner s Manual
Yaesu Musen Co., Ltd. MOBILE MARINE TRANSCEIVER GX6000 Owner s Manual
Contents
OM User Manual 4
Page 61
GX6000
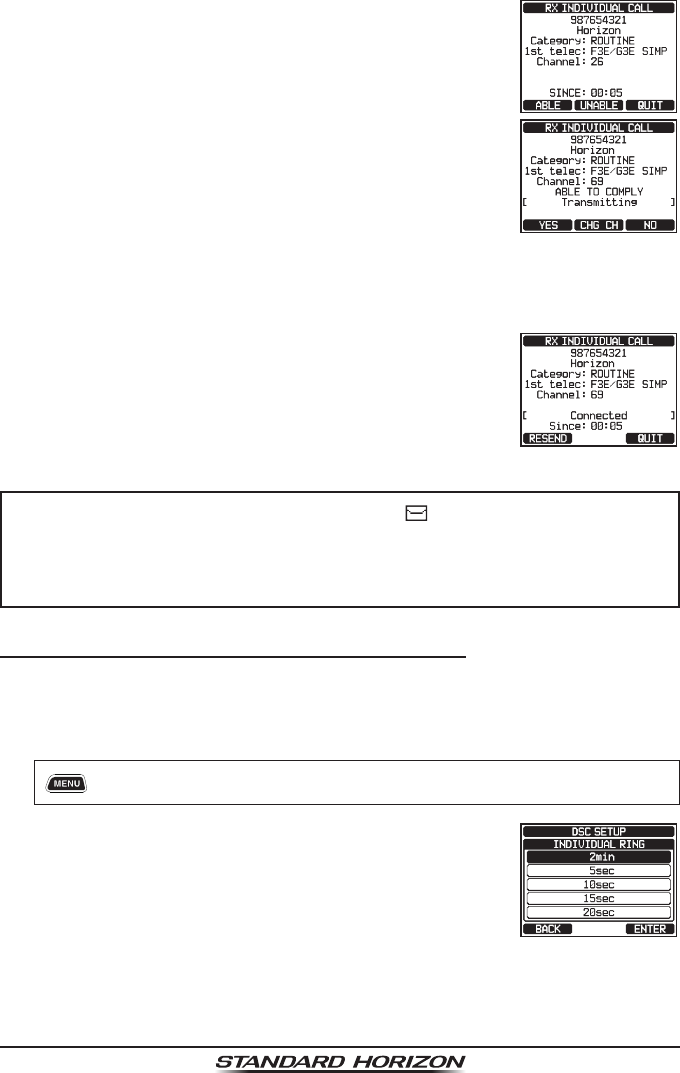
4. After accepting the call, press the [ABLE] soft key to
switch to the requested channel. (To inform the vessel
that you are unable to respond, press the [UNABLE]
soft key.)
5. Press the [YES] soft key to send an acknowledge-
ment.
Press the [CHG CH] soft key to change the channel
for communication from the requested one.
6. Monitor the requested or specied channel until the
message is completed.
Press the microphone’s PTT switch and talk into the microphone to commu-
nicate with the vessel that initiated the individual call.
7. Press the [QUIT] soft key to return to the channel
display.
NOTE
When there is an unread individual call, “ ” icon will appear on the
display. You may review the unread individual call from the DSC log,
refer to the section “10.11.2 Reviewing a Logged DSC RX Distress
Call”.
10.4.6 Setting up the Individual Call Ringer
When an individual call is received the radio’s default setting will produce a
ringing sound for 2 minutes. This selection allows the individual call ringer time
to be changed.
1. [] “SETUP” “DSC SETUP” “INDIVIDUAL RING”
2. Rotate the DIAL/ENT knob to select ringing time of
individual calls.
3. Press the [ENTER] soft key to store the selected
setting.
4. Press the CLEAR key to return to radio operation.
Page 62 GX6000
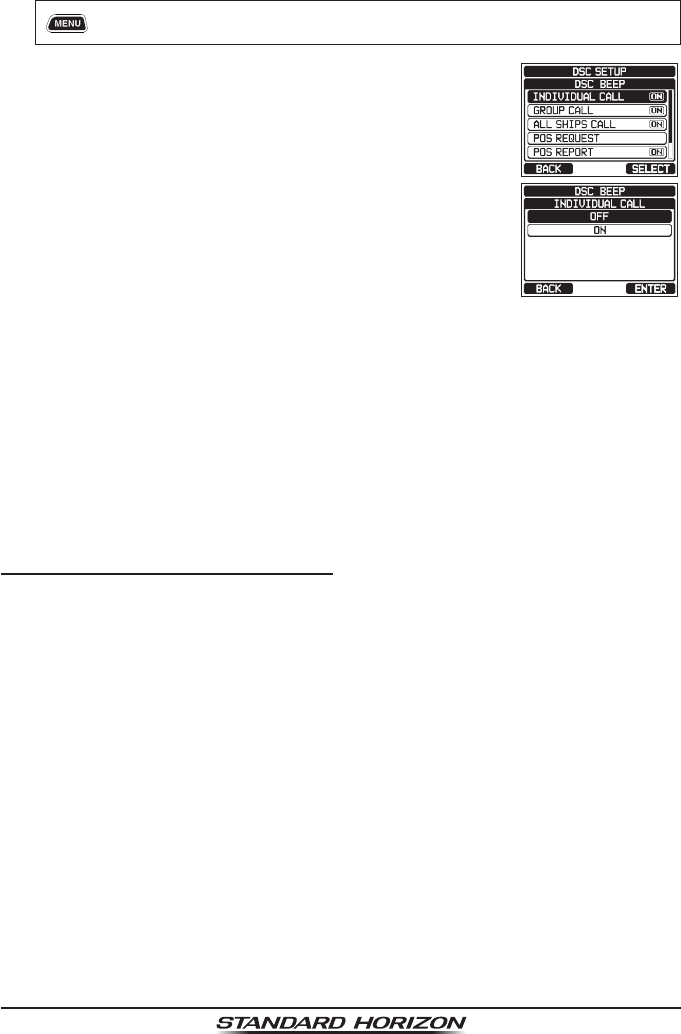
The GX6000 has the capability to turn off the individual call ringer.
1. [] “SETUP” “DSC SETUP” “DSC BEEP”
2. Rotate the DIAL/ENT knob to select “INDIVIDUAL
CALL”, then press the [SELECT] soft key.
3. Rotate the DIAL/ENT knob to select “OFF”.
4. Press the [ENTER] soft key to store the selected
setting.
5. Press the CLEAR key to return to radio operation.
To enable the ringer tone, repeat the above procedure, rotating the DIAL/ENT
knob to select “ON” in step 3 above.
10.5 GROUP CALL
This feature allows the user to contact a group of specic vessels using DSC
radios with the group call function to automatically switch to a desired channel
for voice communications. This function is very useful for yacht clubs and vessels
traveling together that want to collectively make announcements on a predeter-
mined channel. Up to 32 group MMSIs may be programmed.
10.5.1 Setting up a Group Call
For this function to operate, the same group MMSI (Maritime Mobile Service
Identity Number) must be programmed into all the DSC VHF radios within the
group of vessels that will be using this feature. To understand Group MMSI
programming, rst a ship MMSI has to be understood.
Ship MMSI: The rst three digits called MID (Mobile Identity Group) of a ship
MMSI denote the country where the ship’s MMSI is registered. The last 6 digits
are specic to the ships ID.
Ship MMSI Example: If your MMSI is “366123456”, “366” is MID which denote
the country and “123456” is your ships MMSI.
Group MMSI:
Group MMSI numbers are not assigned by the FCC or other organizations
licensed to assign ship MMSI numbers.
The rst digit of a group MMSI is always set to “0” by International rules. All
Standard Horizon radios are preset so when programming a group MMSI
the rst digit is set to “0”.
The USCG recommends programming the MID of a ship MMSI into the
Page 63
GX6000
Second, Third and Fourth digits of the group MMSI as it denotes the area
the ship is located in.
The last 5 digits are decided upon by persons in the group. This is an impor-
tant step as all radios in the group must contain the same group MMSI so
they can be contacted by each other. There is a chance that another group
of vessels may program in the same group MMSI. If this happens, simply
change one or more of the last 5 digits of the group MMSI.
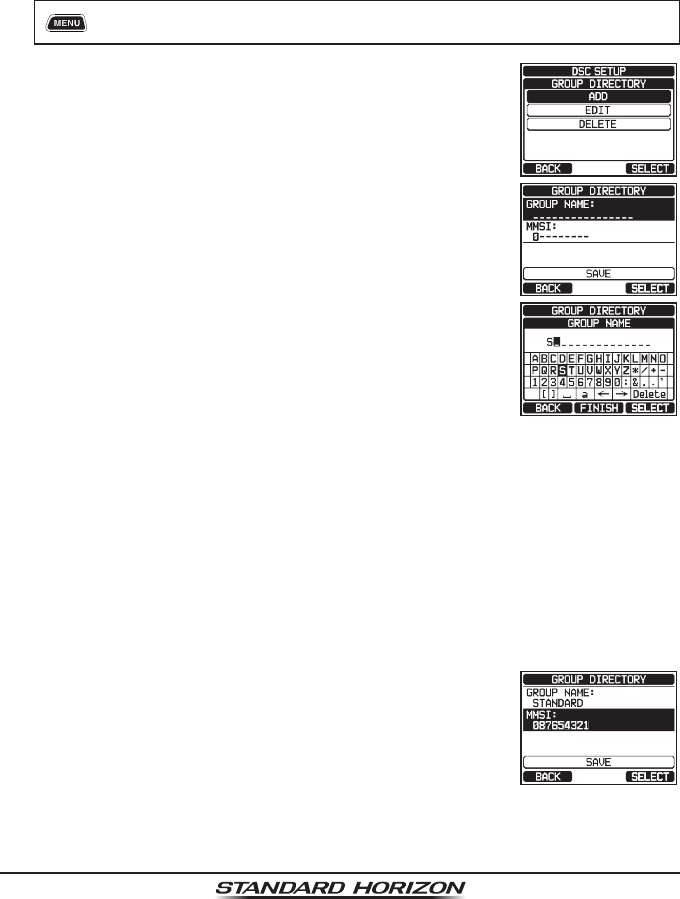
1. [] “SETUP” “DSC SETUP” “GROUP DIRECTORY”
2. Rotate the DIAL/ENT knob to select “ADD”, then
press the [SELECT] soft key.
3. Rotate the DIAL/ENT knob to select “GROUP
NAME:”, then press the [SELECT] soft key.
4. Rotate the DIAL/ENT knob to scroll through the rst
letter of the name of the group you want to reference
in the directory.
5. Press the [SELECT] soft key to store the rst letter
in the name and step to the next letter to the right.
6. Repeat steps 4 and 5 until the name is complete. The name can consist of
up to fteen characters, if you do not use all eleven characters, select “→”
to move to the next space. This method can also be used to enter a blank
space in the name.
If a mistake was made entering in the name, rotate the DIAL/ENT knob to
select “←” or “→”, press the [SELECT] soft key until the wrong character
is selected, then perform steps 4 and 5.
7. When nished entering the group name (using fteen characters or less),
press the [FINISH] soft key to advance to the group MMSI number entry.
8. Rotate the DIAL/ENT knob to select “MMSI:”, then
press the [SELECT] soft key.
9. Rotate the DIAL/ENT knob to select the second
number of the MMSI (nine digits: rst digit perma-
nently set to “0”) which you want to contact, then press
the [SELECT] soft key to step to the next number.
Repeat this procedure until all eight spaces of the MMSI number are entered.
Page 64 GX6000
If a mistake was made entering in the MMSI number, rotate the DIAL/ENT
knob to select “←” or “→”, press the [SELECT] soft key until the wrong
character is selected, then perform step 9.
10. When nished entering the MMSI number, press the [FINISH] soft key to conrm.
11. To store the data, select “SAVE”, then press the [SELECT] soft key.
12. To enter another group address, repeat steps 2 through 11.
13. Press the CLEAR key to return to radio operation.
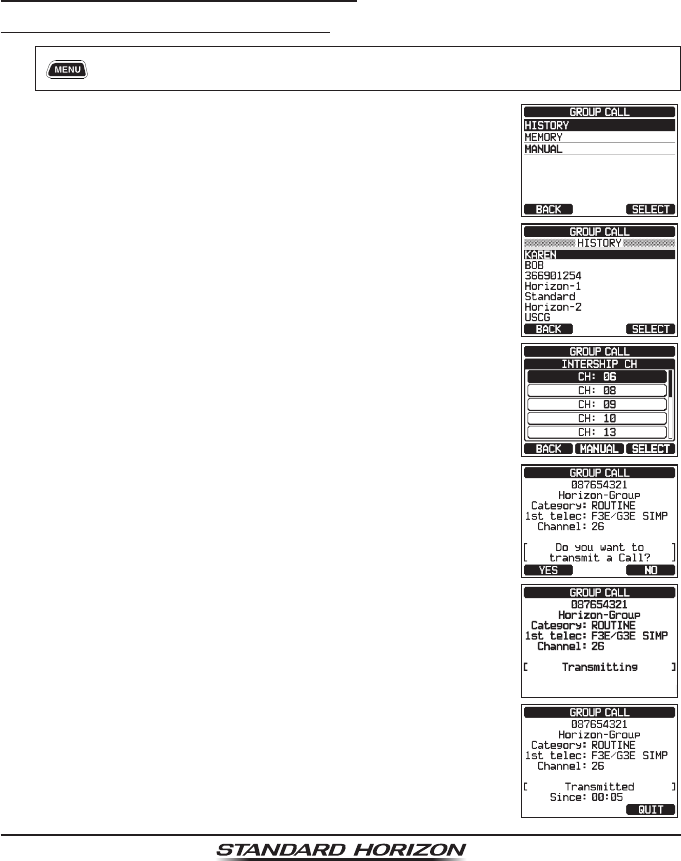
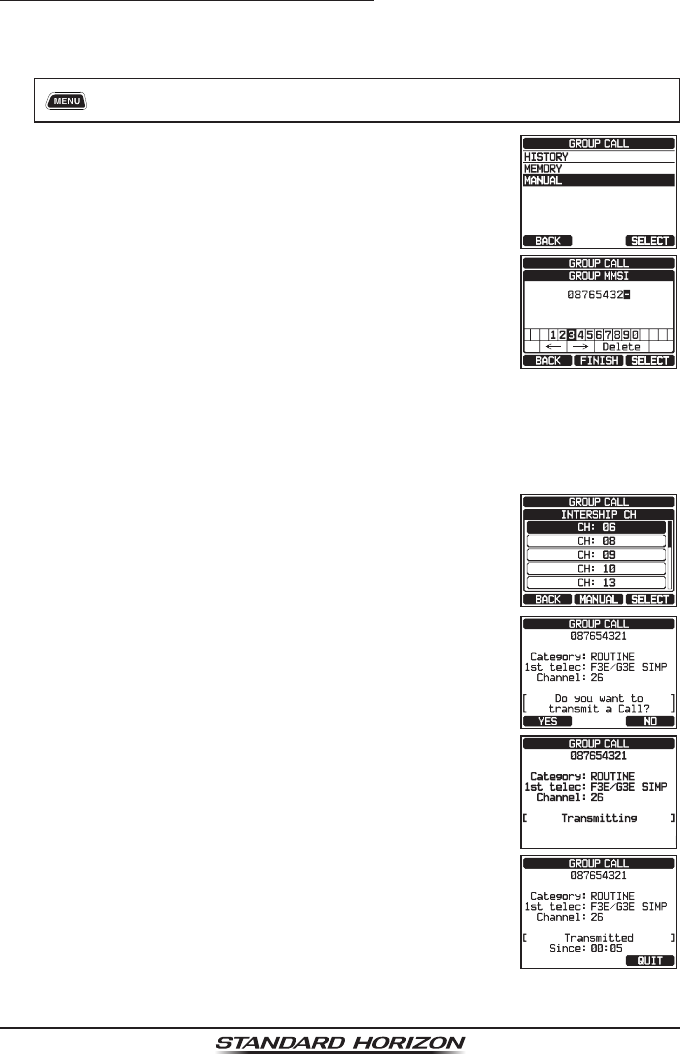
10.5.2 Transmitting a Group Call
Group Call using the Group Directory
1. [] “DSC CALL” “GROUP CALL”
2. Rotate the DIAL/ENT knob to select “HISTORY” or
“MEMORY”, then press the [SELECT] soft key.
3. Rotate the DIAL/ENT knob to select a group you want
to contact, then press the [SELECT] soft key
4. In the INTERSHIP CH list, rotate the DIAL/ENT knob
to select the operating channel on which you want to
communicate, then press the [SELECT] soft key. To
select operating channels from all voice channels,
press the [MANUAL] soft key.
5. Press the [YES] soft key to transmit the group call
signal.
6. When the group call signal is sent, the display will be
as shown in the illustration at the right.
7. After the group call is transmitted, all the radios in the
group will switch to the designated channel.
8. Listen to the channel to make sure it is not busy, then
press the microphone’s PTT switch to communicate
with all of the vessels in the group.
Page 65
GX6000
Group Call by Manually Entering an MMSI
This feature allows you to contact a group of vessels by entering in their group
MMSI manually.
1. [] “DSC CALL” “GROUP CALL”
2. Rotate the DIAL/ENT knob to select “MANUAL”, then
press the [SELECT] soft key.
3. Rotate the DIAL/ENT knob to select the rst number of
the MMSI (nine digits: rst digit permanently set to “0”)
which you want to contact, then press the [SELECT]
soft key to step to the next number.
4. Repeat step 3 to set the MMSI number.
If a mistake was made entering in the MMSI number, rotate the DIAL/ENT
knob to select “←” or “→”, press the [SELECT] soft key until the wrong
character is selected, then perform step.
5. When nished entering the MMSI number, press the [FINISH] soft key.
6. In the INTERSHIP CH list, rotate the DIAL/ENT knob
to select the operating channel on which you want to
communicate, then press the [SELECT] soft key. To
select operating channels from all voice channels,
press the [MANUAL] soft key.
7. Press the [YES] soft key to transmit the group call
signal.
8. After the group call is transmitted, all the radios in the
group will switch to the designated channel.
9. Listen to the channel to make sure it is not busy, then
press the microphone’s PTT switch to communicate
with all of the vessels in the group.
Page 66 GX6000
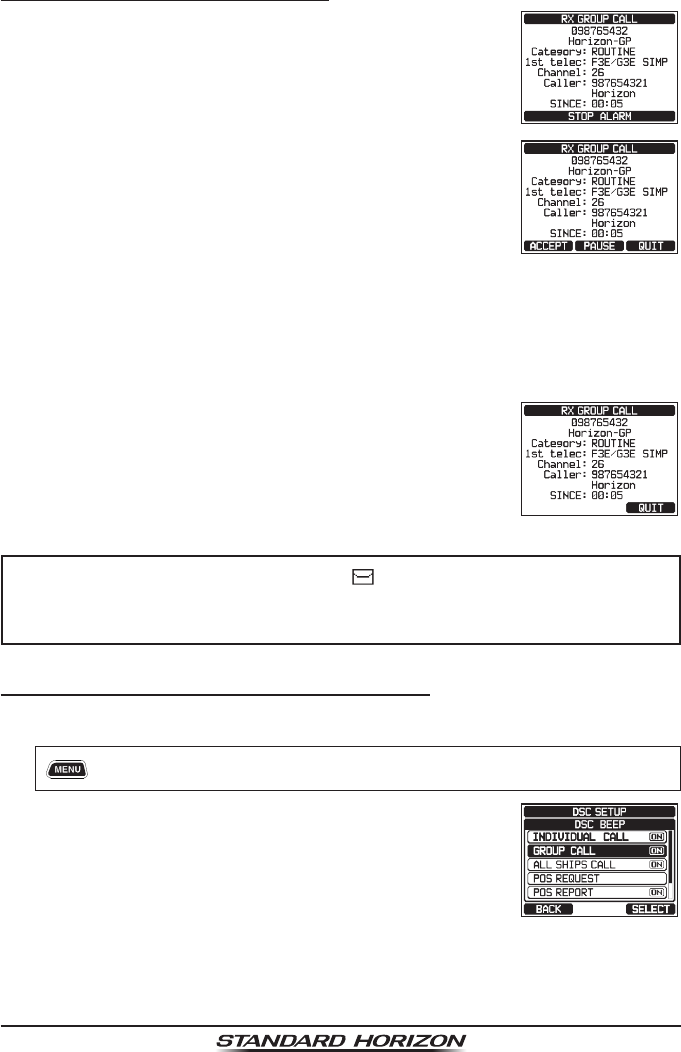
10.5.3 Receiving a Group Call
1. When a group call is received, the GX6000 will
produce a ringing alarm sound.
2. The display shows the group MMSI number.
3. Press any key to stop the alarm.
On the display you will notice 3 soft key selections.
These selections are described below:
[ACCEPT]: Press this key to accept the group call
and to switch to requested channel.
[PAUSE]: Press this key to temporarily disable auto-
matic switching to the requested channel.
[QUIT]: Press this key to quit the automatic channel switching and revert
to the last selected working channel.
4. If you want to respond, monitor the channel to make sure it is clear, then
press the microphone’s PTT switch and talk into the microphone to commu-
nicate with all of the vessels in the group.
5. Press the [QUIT] soft key to return to radio operation.
Note: If a key is not pressed for 30 seconds or longer
the radio will automatically change to radio operation.
NOTE
When there is an unread group call, “ ” icon will appear on the display.
You may review the unread group call from the DSC log, refer to the
section “10.11.3 Reviewing Other Logged Calls”.
10.5.4 Setting up the Group Call Ringer
The GX6000 has the capability to turn off the group call ringer.
1. [] “SETUP” “DSC SETUP” “DSC BEEP”
2. Rotate the DIAL/ENT knob to select “GROUP CALL”,
then press the [SELECT] soft key.
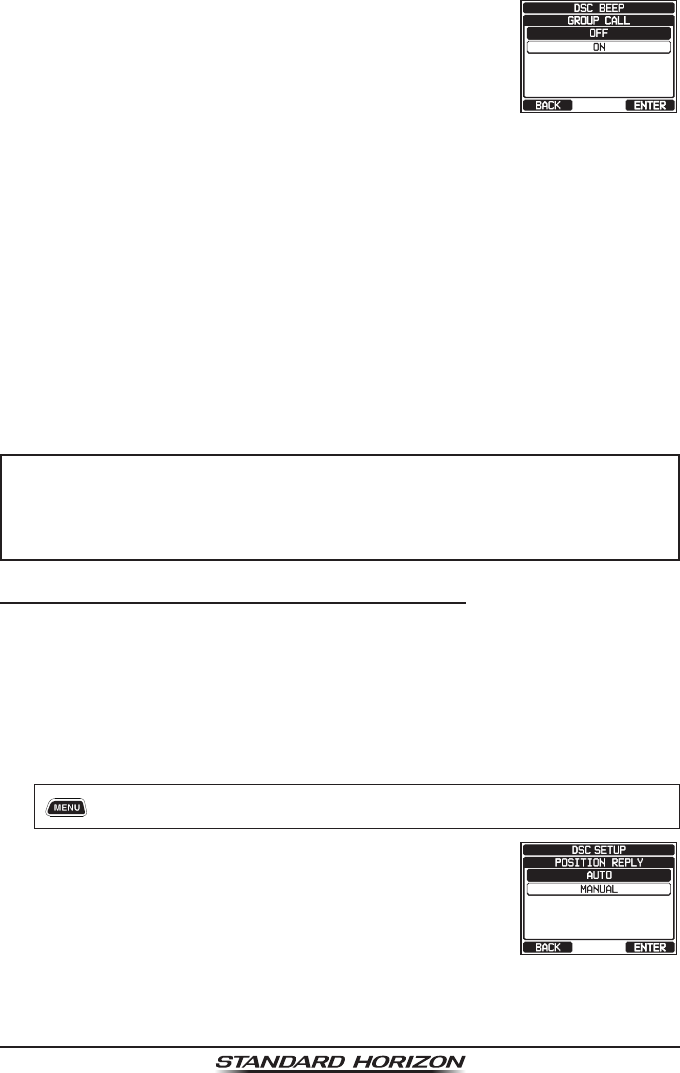
Page 67
GX6000
3. Rotate the DIAL/ENT knob to select “OFF”.
4. Press the [ENTER] soft key to store the selected
setting.
5. Press the CLEAR key to return to radio operation.
To re-enable the ringer tone, repeat the above procedure, rotating the DIAL/
ENT knob to select “ON” in step 3 above.
10.6 POSITION REQUEST
Advancements in DSC have made it possible to poll the location of another
vessel and show the position of that vessel on the display of the GX6000.
Standard Horizon has taken this feature one step further, if a compatible GPS
chart plotter is connected to the GX6000, the polled position of the vessel is
shown on the display of the GPS chart plotter making it easy to navigate to
the location of the polled vessel. This is a great feature for anyone wanting to
know the position of another vessel. For example, your buddy that is catching
sh or nding the location of a person you are cruising with.
NOTE
The other vessel must have an operating GPS receiver connected to
its DSC radio and must not have its radio set to deny position requests.
(Refer the section “10.4 INDIVIDUAL CALL” to enter information into
the individual directory).
10.6.1 Setting up a Position Request Reply
The GX6000 can be set up to automatically (default setting) or manually send
your position when requested by another vessel. This selection is important if
you are concerned about someone polling the position of your vessel that you
may not want to. In the manual mode you will see the MMSI (Maritime Mobile
Service Identity Number) or persons name shown on the display allowing you
to choose to send your position to the requesting vessel.
1. [] “SETUP” “DSC SETUP” “POSITION REPLY”
2. Rotate the DIAL/ENT knob to select “AUTO” or
“MANUAL”. In “AUTO” mode, after a DSC POS
request is received, the radio will automatically trans-
mit your vessel’s position. In “MANUAL” mode, the
display of the GX6000 will show who is requesting
the position and the [YES] soft key on radio has to
be pressed to send your position to the requesting
vessel.