Yaesu Musen 30593X3D MOBILE MARINE TRANSCEIVER User Manual GX6000 Owner s Manual
Yaesu Musen Co., Ltd. MOBILE MARINE TRANSCEIVER GX6000 Owner s Manual
Contents
OM User Manual 7
Page 84 GX6000
11 NAVIGATION
The GX6000 is capable of storing up to 250 waypoints for navigation using
the compass page.
You can also navigate to DSC distress calls with position or a position received
from another DSC radio using DSC polling.
11.1 WAYPOINT OPERATION
11.1.1 Starting and Stopping Navigation
Navigation by Using the Waypoint Directory
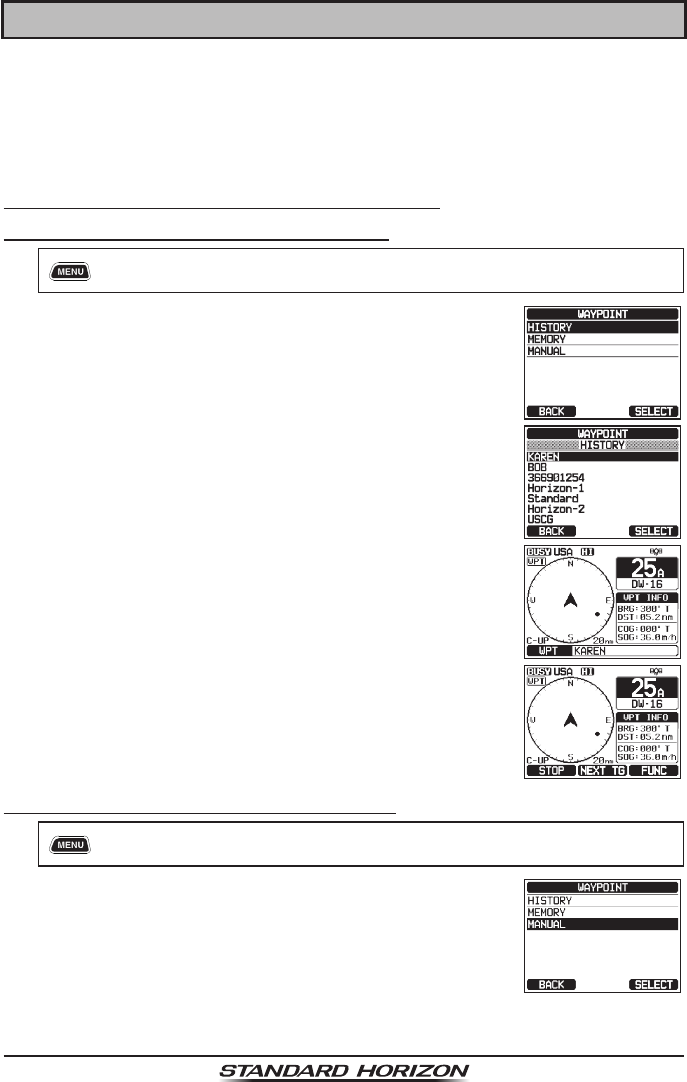
1. [] “NAVI” “WAYPOINT”
2. Rotate the DIAL/ENT knob to select the desired
category (“HISTORY” or “MEMORY”), then press the
[SELECT] soft key.
3. Rotate the DIAL/ENT knob to select a waypoint, then
press the [SELECT] soft key. The navigation screen
will appear.
The screen includes the distance and direction to the
destination, and the waypoint is indicated by a dot ()
inside the compass.
4. Press one of the soft keys to show the key selections.
Press the [STOP] soft key to stop the navigation.
Navigation by Manually Entering a Waypoint
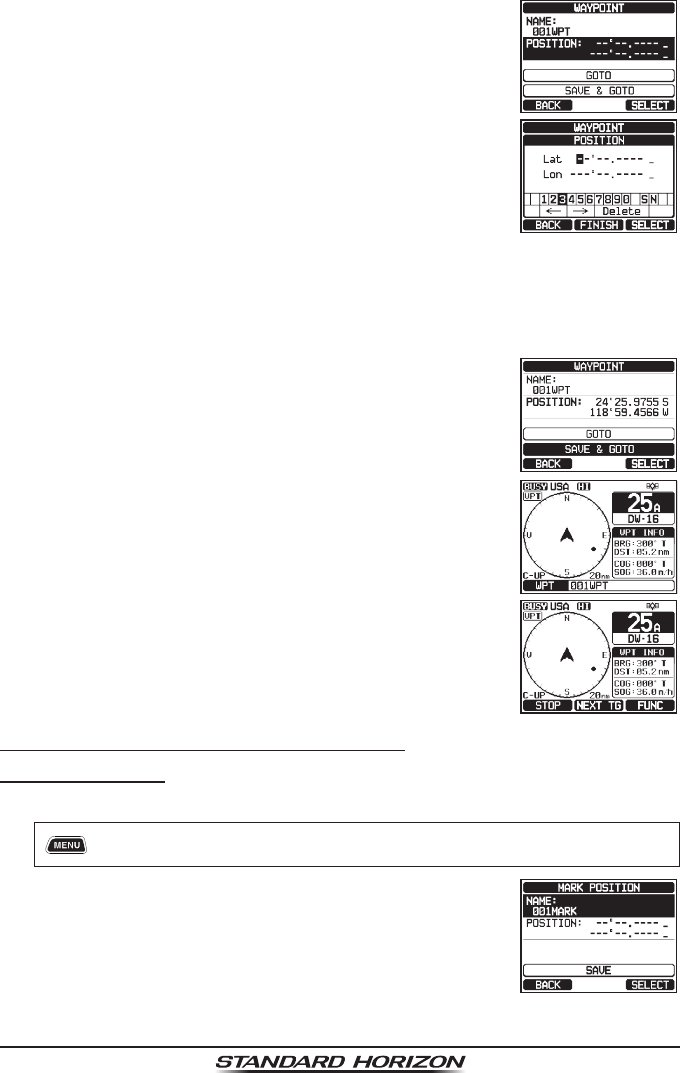
1. [] “NAVI” “WAYPOINT”
2. Rotate the DIAL/ENT knob to select “MANUAL”, then
press the [SELECT] soft key.
3. If you want to give the waypoint an easy-to-nd name,
rotate the DIAL/ENT knob to select “NAME:”, press
the [SELECT] soft key, then enter the name. For
details, refer to “10.4.1 Setting up the Individual /
Position Call Directory”.
Page 85
GX6000
4. Rotate the DIAL/ENT knob to select “POSITION:”,
then press the [SELECT] soft key.
5. Rotate the DIAL/ENT knob to select the rst number
of latitude, then press the [SELECT] soft key to step
to the next number.
6. Repeat step 5 to set the position.
If a mistake was made, rotate the DIAL/ENT knob to
select “←” or “→”, press the [SELECT] soft key until
the wrong character is selected, then perform step 5.
7. When nished programming the position, press the [FINISH] soft key. The
display will return to the previous screen.
8. Rotate the DIAL/ENT knob to select “SAVE &
GOTO”, then press the [SELECT] soft key. To set the
Waypoint as a temporary destination without saving
and start the navigation, select “GOTO” and press the
[SELECT] soft key.
The navigation screen will appear.
The screen includes the distance and direction to the
destination, and the waypoint is indicated by a dot ()
inside the compass.
9. Press one of the soft keys to show the key selections.
Press the [STOP] soft key to stop the navigation.
11.1.2 Setting Up Waypoint Directory
Marking a Position
This feature allows the radio to mark the current position of the vessel.
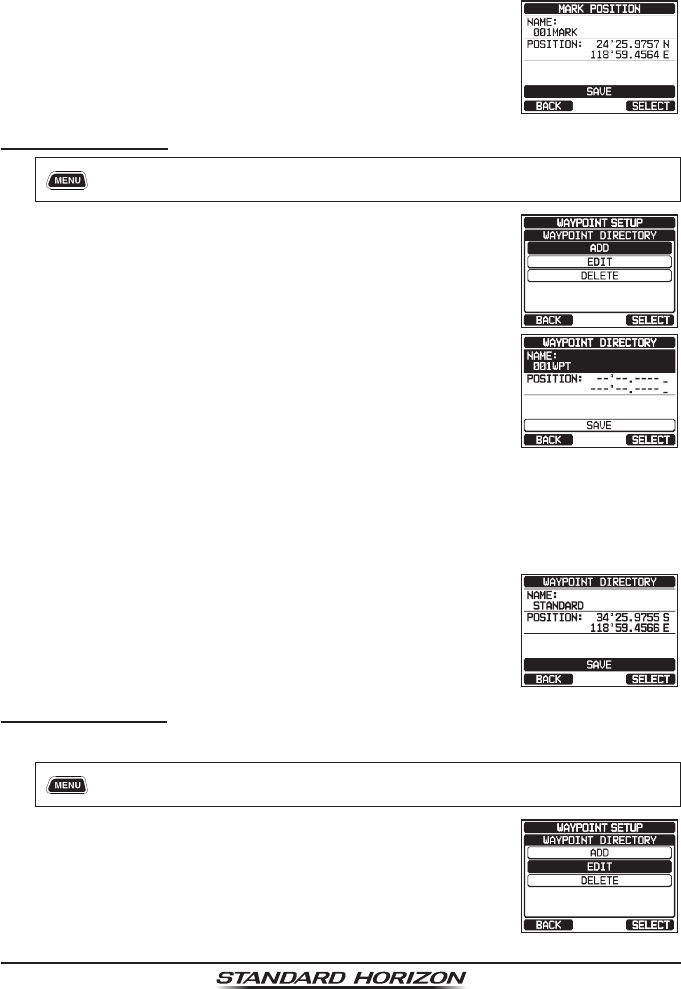
1. [] “SETUP” “WAYPOINT SETUP” “MARK POSITION”
2. Rotate the DIAL/ENT knob to select “NAME:”, then
press the [SELECT] soft key.
3. Enter the waypoint name by rotating the DIAL/ENT
knob and the [SELECT] soft key.
When nished entering the name (using fteen char-
acters or less), press the [FINISH] soft key.
Page 86 GX6000
4. If you want to modify the position, rotate the DIAL/ENT knob to select
“POSITION:”, press the [SELECT] soft key, then enter the new coordinates.
When nished modifying the position, press the [FINISH] soft key.
5. Rotate the DIAL/ENT knob to select “SAVE”, then
press the [SELECT] soft key to save the mark posi-
tion into memory.
6. Press the CLEAR key to return to radio operation.
Adding a Waypoint
1. [] “SETUP” “WAYPOINT SETUP” “WAYPOINT DIRECTORY”
2. Rotate the DIAL/ENT knob to select “ADD”, then
press the [SELECT] soft key.
3. Rotate the DIAL/ENT knob to select “NAME:”, then
press the [SELECT] soft key.
4. Enter the waypoint name by rotating the DIAL/ENT
knob and the [SELECT] soft key.
When nished entering the name (using fteen char-
acters or less), press the [FINISH] soft key.
5. Rotate the DIAL/ENT knob to select “POSITION:”, press the [SELECT]
soft key, then enter the coordinates.
When nished entering the position, press the [FINISH] soft key.
6. Rotate the DIAL/ENT knob to select “SAVE”, then
press the [SELECT] soft key to save the waypoint
into memory.
7. Press the CLEAR key to return to radio operation.
Editing a Waypoint
This function allows a previously entered waypoint to be edited.
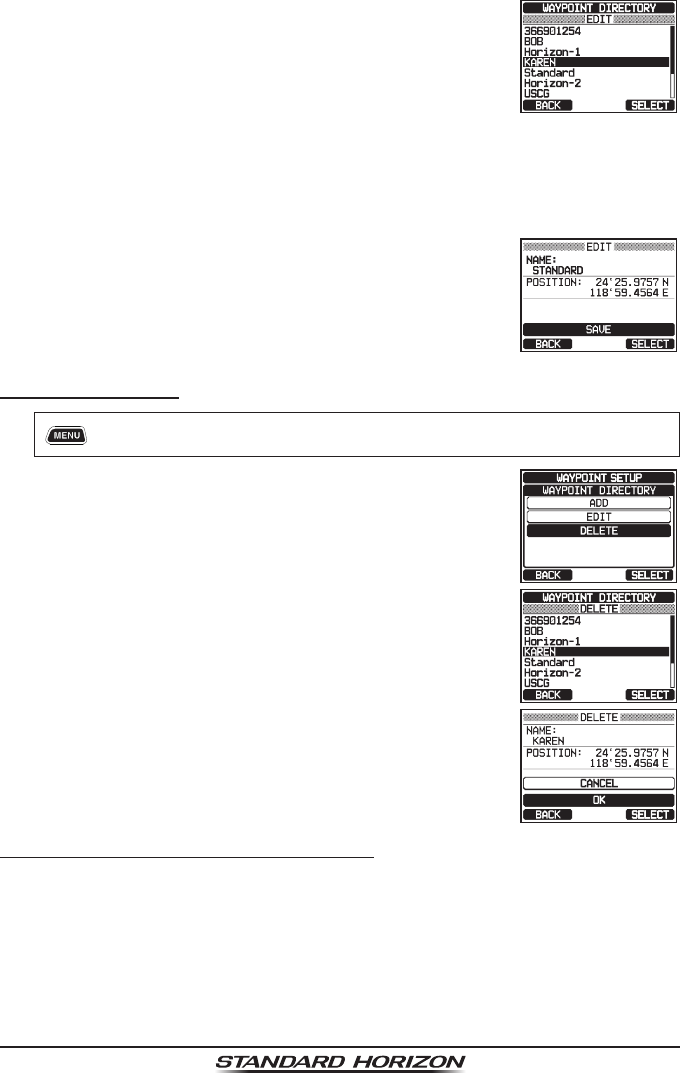
1. [] “SETUP” “WAYPOINT SETUP” “WAYPOINT DIRECTORY”
2. Rotate the DIAL/ENT knob to select “EDIT”, then
press the [SELECT] soft key.
Page 87
GX6000
3. Rotate the DIAL/ENT knob to select the waypoint to
be edited, then press the [SELECT] soft key to show
the waypoint input display.
4. Rotate the DIAL/ENT knob to select “NAME:” or
“POSITION:”, then press the [SELECT] soft key.
5. Rotate the DIAL/ENT knob to select “←” or “→”, press the [SELECT] soft
key until the character to be changed is selected, then enter a new character.
6. Repeat step 5 until the waypoint is updated.
When nished editing, press the [FINISH] soft key.
7. Rotate the DIAL/ENT knob to select “SAVE”, then
press the [SELECT] soft key to store the edited
waypoint into memory.
8. Press the CLEAR key to return to radio operation.
Deleting a Waypoint
1. [] “SETUP” “WAYPOINT SETUP” “WAYPOINT DIRECTORY”
2. Rotate the DIAL/ENT knob to select “DELETE”, then
press the [SELECT] soft key.
3. Rotate the DIAL/ENT knob to select the waypoint to
be deleted, then press the [SELECT] soft key.
4. Conrm the waypoint to be deleted, rotate the DIAL/
ENT knob to select “OK”, then press the [SELECT]
soft key.
5. Press the CLEAR key to return to radio operation.
Saving a DSC Position Call as a Waypoint
When a position is received from another DSC radio the GX6000 allows the
position to be saved as a waypoint.
Refer to section “10.7.4 Saving the Reported Position as a Waypoint” for
details.
Page 88 GX6000
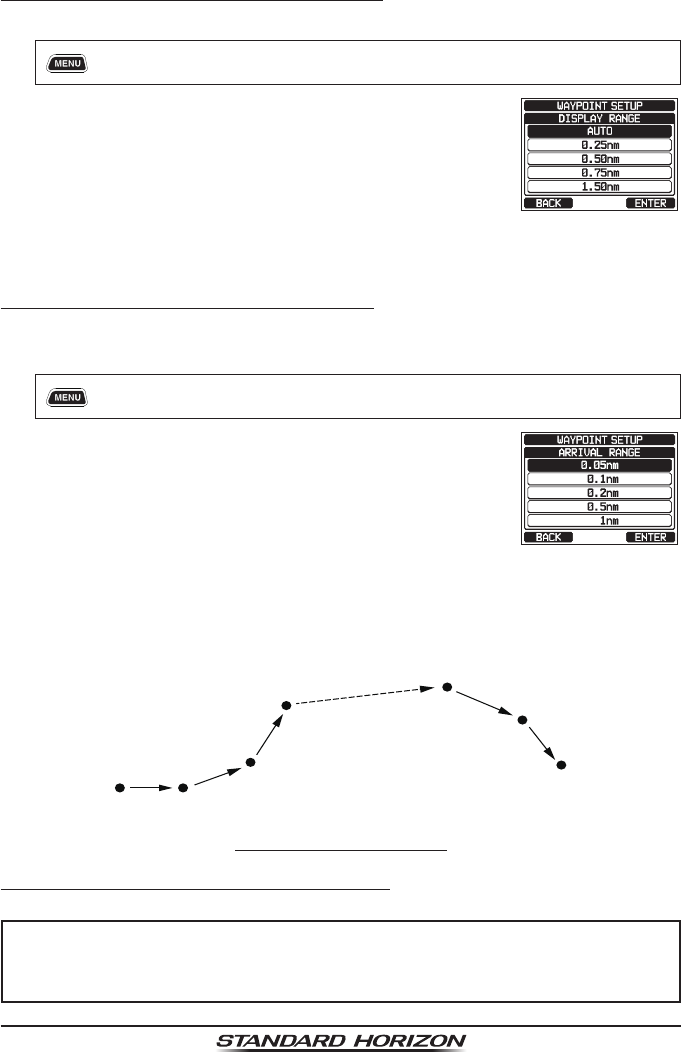
11.1.3 Selecting the Display Range
This menu item allows setting of the range on the compass display.
1. [] “SETUP” “WAYPOINT SETUP” “DISPLAY RANGE”
2. Rotate the DIAL/ENT knob to select desired range.
(Unit of measure depends on the settings in the GPS
SETUP menu. Refer to section “18.7 UNITS OF
MEASURE”.)
3. Press the [ENTER] soft key to store the selected
setting.
4. Press the CLEAR key to return to radio operation.
11.1.4 Selecting the Arrival Range
This menu item sets the distance to alert you when you are within the specied
arrival range of the waypoint.
1. [] “SETUP” “WAYPOINT SETUP” “ARRIVAL RANGE”
2. Rotate the DIAL/ENT knob to select desired range.
(Unit of measure depends on the settings in the GPS
SETUP menu. Refer to section “18.7 UNITS OF
MEASURE”.)
3. Press the [ENTER] soft key to store the selected setting.
4. Press the CLEAR key to return to radio operation.
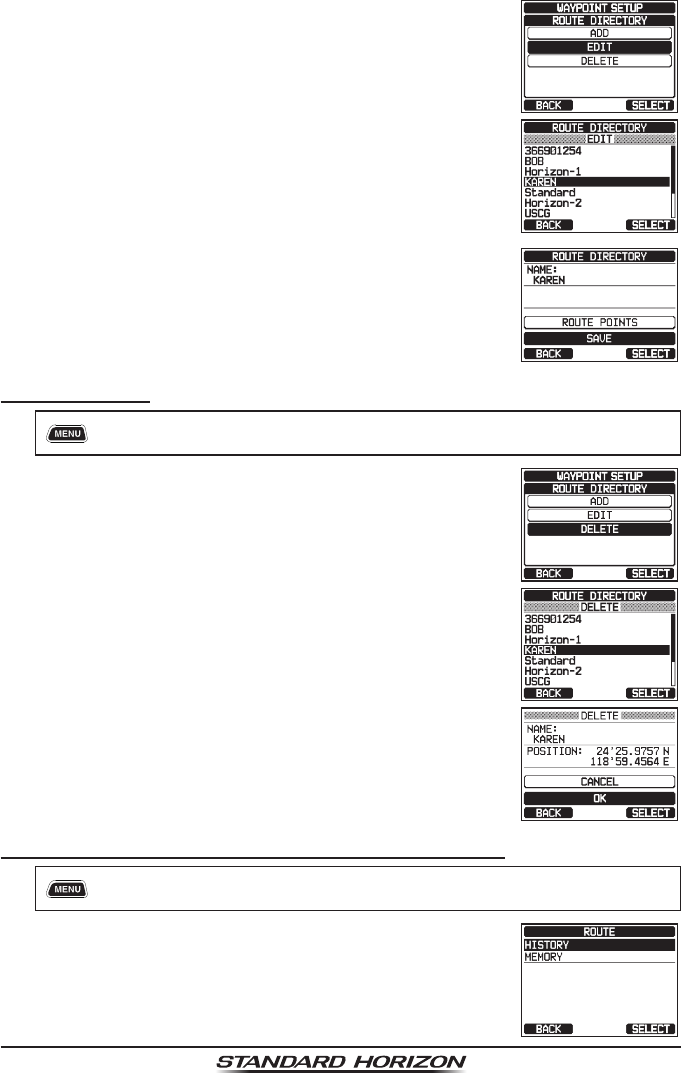
11.2 ROUTING OPERATION
The GX6000 allows you to set 1 to 15 waypoints along the route.
Current
position
WPT
Via1
Via2
Via3
Via14
Via15
Routing to a Waypoint
11.2.1 Setting Up Routing Directory
NOTE
All the destinations and via-points must be programmed as waypoints
in the GX6000 memory. Refer to section “11.1.2 Setting Up Waypoint
Directory”.

Page 89
GX6000
Adding a Route
1. [] “SETUP” “WAYPOINT SETUP” “ROUTE DIRECTORY”
2. Rotate the DIAL/ENT knob to select “ADD”, then
press the [SELECT] soft key.
3. Rotate the DIAL/ENT knob to select “NAME:”, then
press the [SELECT] soft key.
4. Enter the route name by rotating the DIAL/ENT knob
and the [SELECT] soft key.
When nished entering the name (using fteen char-
acters or less), press the [FINISH] soft key.
5. Rotate the DIAL/ENT knob to select “ROUTE
POINTS”, press the [SELECT] soft key.
6. Rotate the DIAL/ENT knob to select “WPT:”, then
press the [SELECT] soft key.
7. Rotate the DIAL/ENT knob to select a waypoint, then
press the [SELECT] soft key.
8. Rotate the DIAL/ENT knob to select “Via1”, then press
the [SELECT] soft key.
9. Rotate the DIAL/ENT knob to select a waypoint, then
press the [SELECT] soft key.
10. Repeat steps 8 and 9 to add more via-points.
11. Press the [BACK] soft key.
12. Rotate the DIAL/ENT knob to select “SAVE”, then
press the [SELECT] soft key to store the route into
memory.
13. Press the CLEAR key to return to radio operation.
Editing a Route
This function allows a previously entered route to be edited.
1. [] “SETUP” “WAYPOINT SETUP” “ROUTE DIRECTORY”
Page 90 GX6000
2. Rotate the DIAL/ENT knob to select “EDIT”, then
press the [SELECT] soft key.
3. Rotate the DIAL/ENT knob to select the route to be
edited, then press the [SELECT] soft key to show the
route input display.
4. Perform steps 3 to 11 of the previous page until the
route is updated.
5. Rotate the DIAL/ENT knob to select “SAVE”, then
press the [SELECT] soft key to store the edited route
into memory.
6. Press the CLEAR key to return to radio operation.
Deleting a Route
1. [] “SETUP” “WAYPOINT SETUP” “ROUTE DIRECTORY”
2. Rotate the DIAL/ENT knob to select “DELETE”, then
press the [SELECT] soft key.
3. Rotate the DIAL/ENT knob to select the route to be
deleted, then press the [SELECT] soft key.
4. Conrm the route to be deleted, rotate the DIAL/ENT
knob to select “OK”, then press the [SELECT] soft
key.
5. Press the CLEAR key to return to radio operation.
11.2.2 Starting and Stopping Route Navigation
1. [] “NAVI” “ROUTE”
2. Rotate the DIAL/ENT knob to select the desired
category (“HISTORY” or “MEMORY”), then press the
[SELECT] soft key.

Page 91
GX6000
3. Rotate the DIAL/ENT knob to select a route, then
press the [SELECT] soft key. The navigation screen
with “RUT” indicator appears.
4. A message “ARRIVED” will appear when you have
reached to the rst target point.
To start navigation to the next target, press the [YES]
soft key.
5. Press one of the soft keys to show the key selections.
Press the [STOP] soft key to stop the navigation.
11.2.3 Changing the Destination
1. On the navigation screen, press one of the soft keys
to show the key selections.
2. Press the [NEXT TG] soft key.
3. Rotate the DIAL/ENT knob to select desired destina-
tion, then press the [SELECT] soft key.
4. The navigation screen with a new destination appears.
11.2.4 Selecting Automatic or Manual Routing
This selection allows you to start navigation to the next target automatically or
manually when your vessel has arrived at a waypoint.
1. [] “SETUP” “WAYPOINT SETUP” “ROUTING OPERATION”
2. Rotate the DIAL/ENT knob to select “AUTO” or
“MANUAL”, then press the [ENTER] soft key.
3. Press the CLEAR key to return to radio operation.
Page 92 GX6000
12 GM OPERATION
The GM (Group Monitor) feature of the GX6000 utilizes the same system as
the DSC Group call and Auto Position Polling, to display the group members'
locations.
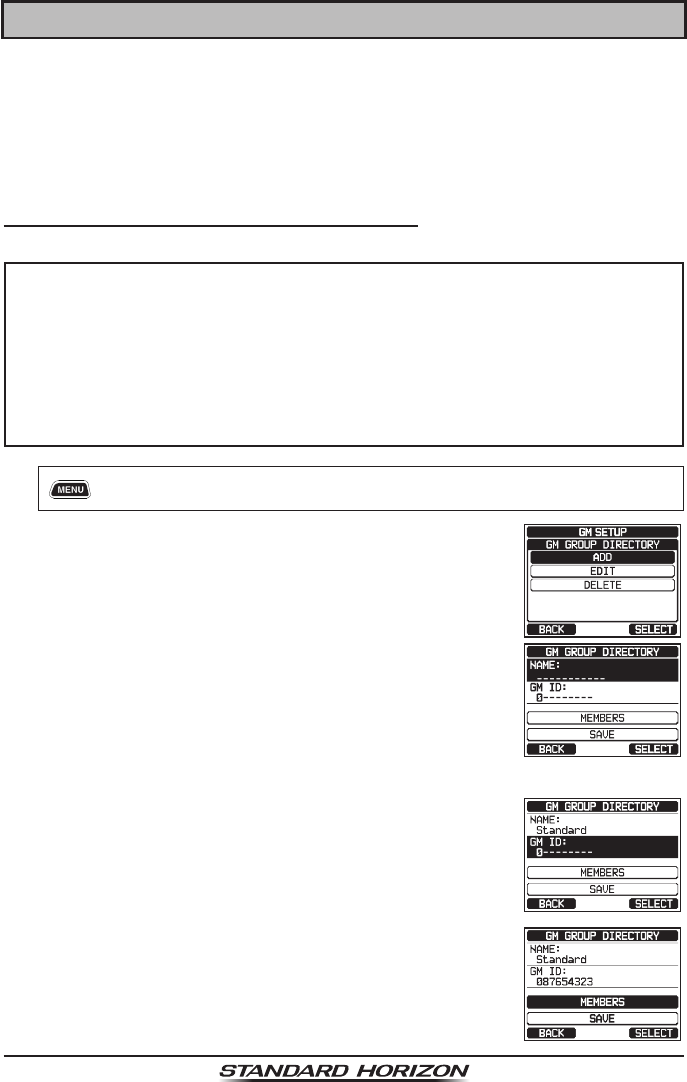
12.1 SETTING UP GM OPERATION
The GX6000 is capable of storing up to 10 groups with 1 to 9 members each.
12.1.1 Setting Up GM Group Directory
NOTE
• For this function to operate, the same group MMSI must be programmed
into each transceiver of group members to be monitored. Refer to
section “10.5.1 Setting up a Group Call” for details.
• Group members for GM operation can only be selected from the
Individual/Position Call directory, there for all members that you want
to monitor have to be stored in the directory. Refer to section “10.4.1
Setting up the Individual / Position Call Directory” for details.
1. [] “SETUP” “GM SETUP” “GM GROUP DIRECTORY”
2. Rotate the DIAL/ENT knob to select “ADD”, then
press the [SELECT] soft key.
3. Rotate the DIAL/ENT knob to select “NAME:”, then
press the [SELECT] soft key.
4. Enter the route name by rotating the DIAL/ENT knob
and the [SELECT] soft key.
When nished entering the name (using eleven char-
acters or less), press the [FINISH] soft key.
5. Rotate the DIAL/ENT knob to select “GM ID:”, press
the [SELECT] soft key, then enter the group MMSI
number.
When nished entering the MMSI, press the [FINISH]
soft key.
6. Rotate the DIAL/ENT knob to select “MEMBER”, then
press the [SELECT] soft key.
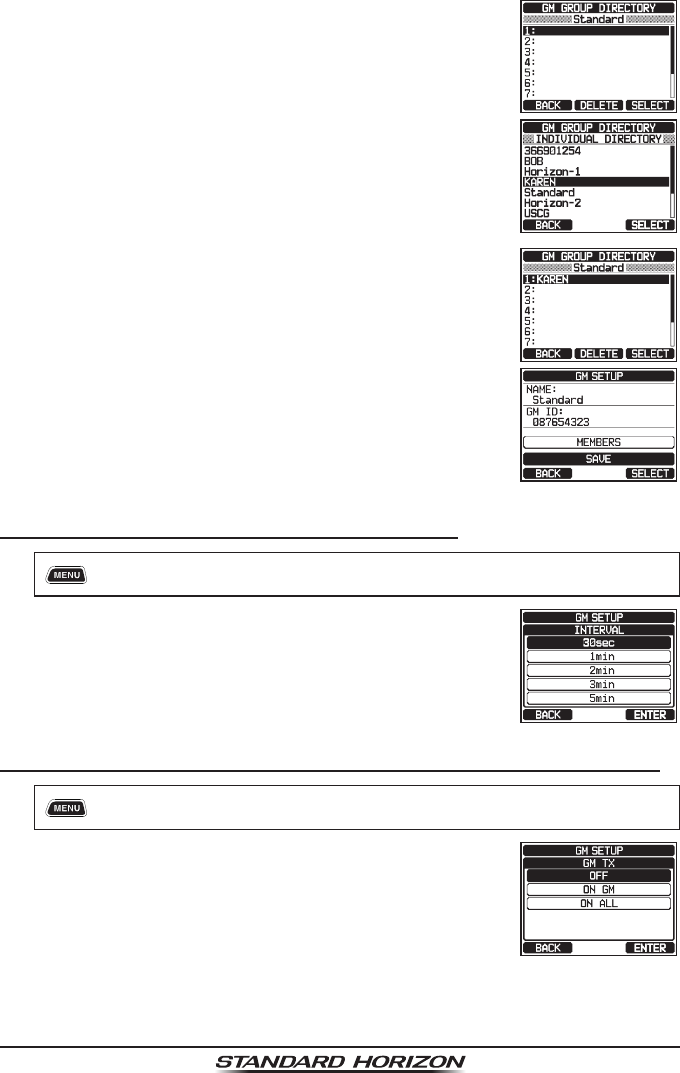
Page 93
GX6000
7. Rotate the DIAL/ENT knob to select a list number,
then press the [SELECT] soft key.
8. Rotate the DIAL/ENT knob to select a member from
the Individual directory, then press the [SELECT] soft
key.
9. Repeat steps 8 to add members to the group, then
press the [BACK] soft key.
10. Press the [BACK] soft key to return to the “NAME:”
and “GM ID:” screen.
11. Rotate the DIAL/ENT knob to select “SAVE” to store
the data, then press the [ENTER] soft key.
12. To enter another group directory, repeat steps 2
through 11.
13. Press the CLEAR key to return to radio operation.
12.1.2 Setting Up the Polling Time Interval
1. [] “SETUP” “GM SETUP” “INTERVAL”
2. Rotate the DIAL/ENT knob to select the desired
interval time, then press the [ENTER] soft key.
3. Press the CLEAR key to return to radio operation.
12.1.3 Enabling/Disabling Transmission during GM Operation
1. [] “SETUP” “GM SETUP” “GM TX”
2 Rotate the DIAL/ENT knob to select the desired
transmission type, then press the [ENTER] soft key.
OFF: Disables the transmission during GM
operation.
ON GM: Enables the transmission during the GM
target display.
ON ALL: Enables the transmission during the GM operation.
3. Press the CLEAR key to return to radio operation.