Cygnion HRCU10102 Cordless Phone User Manual Chapter4
Cygnion Corporation Cordless Phone Chapter4
Cygnion >
Contents
CG2400 chapter 4
57
Chapter
4Full System
Configuration
The Configuration Window
Once the system is fully installed, you can configure
it (set it up) more fully to fit your specific needs.
You can also use the procedures in this chapter to
change system features that you initially set up
during installation.
All configuration changes are made from the
Configuration window:
The configuration options display in the left panel of
the window. They are:
CyberGenie Customize the CyberGenie interface, including
system inbox voicemail greetings and rejection
message.

CG 2400 User Guide
58
58
Base Station Change the base station authorization code or view
other base station information.
External Lines Add or delete a line, and customize external line
functions such as welcome greetings, business
hours, and call routing.
Handsets Delete handsets and view handset properties.
Users Add or delete users, edit user records, and set up
personal voicemail greetings.
Call log Customize the call log information.
An Overview of Types of
Greeting Messages
There are four types of customizable messages:
Welcome greetings What the caller hears if you set up incoming calls to
go directly to the CyberGenie auto attendant. You
have three options for setting the welcome
greetings: what the caller hears during business
hours, during non-business hours, and a temporary
message for special instances, such as holidays, that
does not overwrite the other two messages.
System voicemail
greetings
The system inbox accepts messages from callers who
do not ask for a specific user. You have two greeting
options: a main greeting, which serves as a default,
and a temporary greeting that does not overwrite the
main greeting.
Personal voicemail
greetings
Each user can set his or her own personal voicemail
greeting: a main or default greeting and a temporary
greeting that does not overwrite the main greeting.
System rejection
message
A message to which you can route unwanted calls,
such as telemarketing calls. You can use the default
message, or record your own customized message.
NOTE: Messages can
also be recorded from
the handset. See
“Changing the
Rejection Message” on
page128.
Specific procedures for recording each type of
message are covered throughout this chapter.
Chapter 4: Full System Configuration
59
How Incoming Calls are
Routed
NOTE: The bolded
boxes indicate where
your custom-recorded
messages can be heard
by the caller.
An external call comes
in. Depending on how
the system is set up,
the call is routed in
one of two ways...
If the system is
set to ring all
active handsets
or a specific
user's handset...
The caller hears one
of three possible
greeting messages,
depending on time of
day and message
selected...
Business hours
greeting
or
Non-business
hours greeting
or
Temporary
greeting
A handset user
answers the call
No users answer
the call after a
specified number
of rings
The call goes to
system voicemail.
Caller hears Main
or Temporary
message
The caller asks
for a specific
user
Caller does not ask for
specific user, or fails 3
times to ask for a
recognized user
Specified user
answers the
call
User does not answer and call is
routed to user's voicemail. Caller
hears Main or Temporary message
If user does not want the call, it
can be routed to the Rejection
message then disconnected

CG 2400 User Guide
60
60
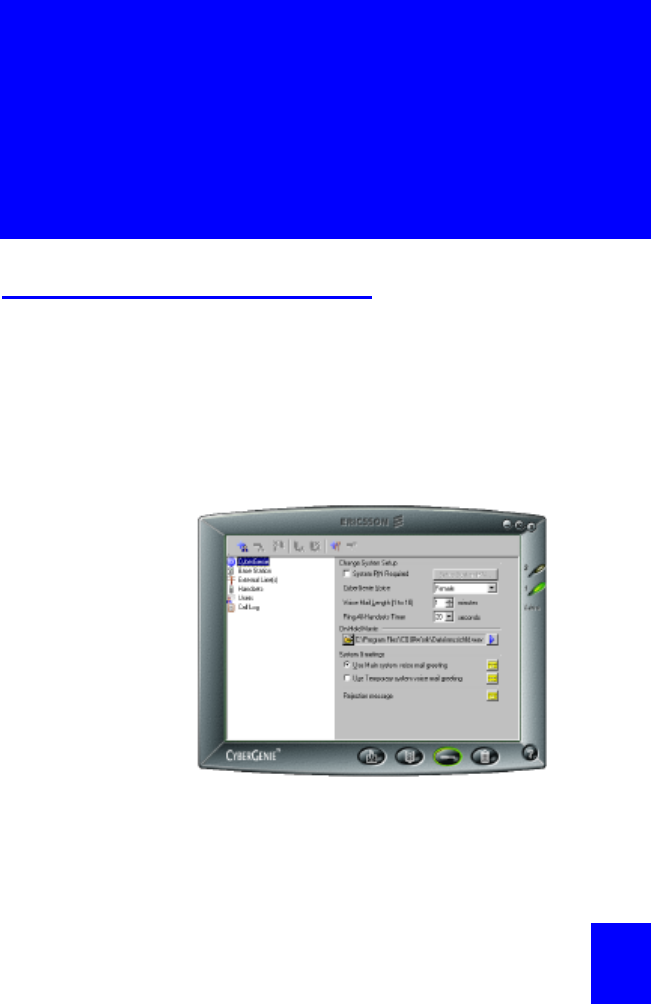
CyberGenie System Setup
Click CyberGenie in the Configuration Resource
Panel to access CyberGenie system setup.
The voicemail greetings configured in this panel are
for the system inbox. A caller hears this message if
CyberGenie cannot route the caller to a specific user.
(For information on how calls are routed, see
“Setting Call Routing” on page70.)
Changing System Setup
The optional system PIN controls access to system
configuration by prompting users for a PIN number
before allowing access to any configuration functions.
This prevents unauthorized system access from both
the PC and the handset. A system PIN is not
required.
To set or change the system PIN:
1. Access the Configuration window if not already
there.
2. Click CyberGenie from the Configuration
resources panel.
3. On the Change System Setup panel, click
System PIN Required .
NOTE: If you forget the
system PIN, you will
need to uninstall then
reinstall the software to
regain system access.
In the process, you will
lose all your custom
settings, including self-
recorded outgoing
messages.
4. Click Setup System PIN. A dialog box will open.
5. Type the new PIN in the Enter new PIN box. It
must be four digits.
6. Type it again to confirm the number in the Re-
enter new PIN box.
7. Click OK.
8. Make a note of your system PIN.
To remove the system PIN:
Click the System PIN Required checkbox to clear the
checkmark.
Chapter 4: Full System Configuration
61
Changing the CyberGenie
Voice
NOTE: CyberGenie’s
voice gender only
affects the voice that
assists callers and
interacts with users. It
does not affect
recorded outgoing
messages.
CyberGenie uses a synthesized human voice to assist
callers and interact with users. You have two options:
male or female.
To change the CyberGenie voice:
1. Click the down arrow on CyberGenie Voice to
view a dropdown list.
2. Click the desired gender.
Setting Voicemail Length
You can limit the length of a message a caller can
leave in increments of 1 to 10 minutes.
To change the voicemail length:
Click the up or down arrow on to adjust
the maximum length of incoming messages.
Setting the Ring-all-Handsets
Timer
You can set the number of seconds before an
incoming call rolls over to the system inbox voicemail
if no user answers from a handset. The minimum you
can select is 20 seconds. The maximum is 60
seconds.
To change the timer:
Click the down arrow on to select from a
dropdown list.
Changing On-Hold Music
On-hold music is what a caller hears when on hold.
The music will play on a continuous loop when the
user is on hold.

CG 2400 User Guide
62
62
NOTE: CyberGenie
comes with a default
.wav file called
musichld.wav, but any
.wav file can be used.
If you have a sound recording application on your PC,
you can use this feature to record your own
promotions or other special messages or music for
on-hold listening.
To change the existing on-hold music:
1. To hear the existing on-hold music, click on
the On-Hold Music file description. A media
window will open and play the music. The player
will close automatically.
NOTE: If you want no
music or sound while
the caller is on hold,
select the silent.wav
file in the default
directory.
2. To change the music, click to browse through
your directories. Unless you have set up the
software in a different directory from the
recommended default, the default directory is
Program Files/CG@Work/Data.
3. Click the desired .wav file. To hear the file
selected, repeat step 1.
Recording System Inbox
Voicemail Greetings
The system voicemail greeting is what a caller hears
when the call is routed to system inbox voicemail. A
caller will be routed to system voicemail if:
•The system is set to “ring all handsets” and no
users pick up within the specified time,
•The caller fails to identify a specific user, or
•The caller fails after three tries to successfully
identify a system user.
System voicemail greetings can be recorded at your
computer if you have a microphone. They can also be
recorded using the handset, as described in
“Changing Welcome Greetings” on page125.
The system voicemail greeting is a different message
than what the caller hears when a call first comes in
or when a call is routed to a personal mailbox (see
“An Overview of Types of Greeting Messages” on
page58, and “How Incoming Calls are Routed” on
page59.)
Chapter 4: Full System Configuration
63
You can record two types of system voicemail
greetings:
Main The main system voicemail greeting that should
rarely, if ever, change.
Temporary A temporary greeting that can be changed without
overwriting the main greeting. This is typically used
to record a special message for holidays.
To record a system greeting:
NOTE: You cannot
use main and
temporary greetings
at the same time.
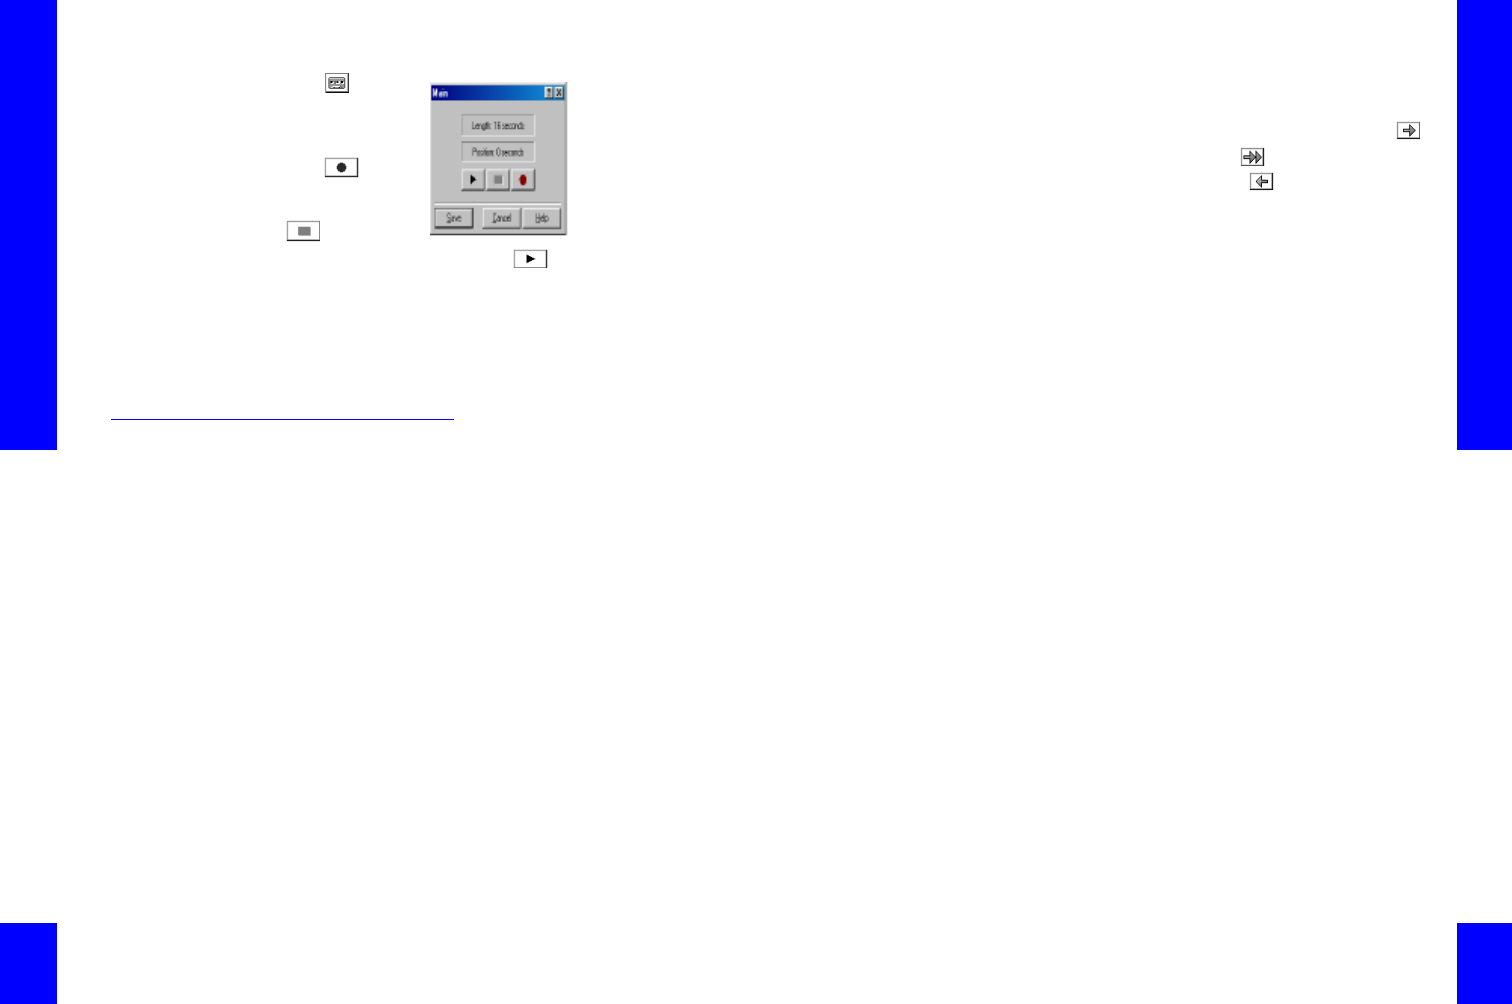
1. Click for the
greeting you want
to record. A
dialog box opens.
NOTE: Recording
a new greeting
will overwrite
the existing one.
2. Click to start recording.
3. When done, click .
4. To listen to the message, click .
5. To save the message, click Save. The .wav file
will be saved in the default directory (usually
Program Files/CG@Work/ Data ).
Recording a Rejection
Message
The rejection message is what a caller hears when
you reject a call.
Rejection messages can be recorded at your
computer if you have a microphone. They can also be
recorded using the handset, as described in
“Changing the Rejection Message” on page128.
NOTE: Recording a
new message
will overwrite the
existing one.
Your CG 2400 system comes with a default rejection
message:
“I am sorry but we do not accept calls of this
nature. Please remove this number from your
database. Thank you.”
This message can be changed.
CG 2400 User Guide
64
64
To record a rejection message:
1. Click on Set
Rejection
message. A
dialog box opens.
2. Click to start
recording.
3. When done, click
.
4. To listen to the message, click .
5. To save the message, click Save. The .wav file
will be saved in the default directory (usually
Program Files/CG@Work/Data) as junkcall.wav.
Chapter 4: Full System Configuration
65
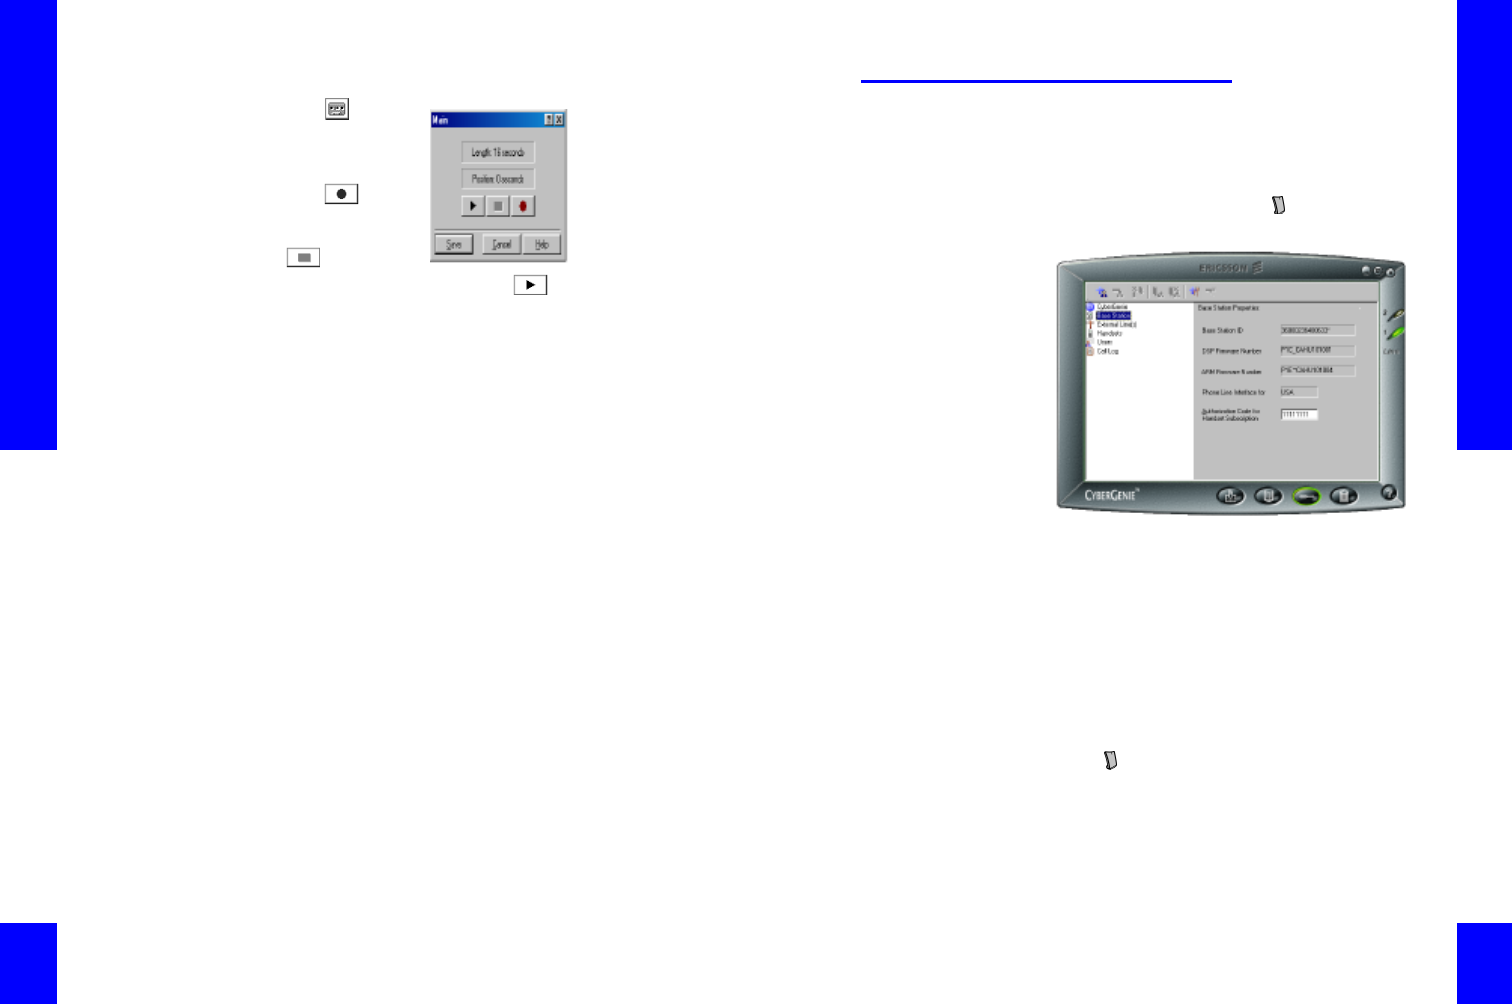
Base Station Setup
The base station authorization code is used to
subscribe a new handset to the system. Most data on
the Base Station panel is for information only.
If not already highlighted, click Base Station to
access the Base Station Properties panel:
NOTE: Changing the
authorization code does
not affect handsets
already subscribed to
the base station.
The authorization code is always eight digits. The
default code is 11111111. You can change this code
to prevent unauthorized handsets from subscribing
to your base station, or to control base station access
if you use more than one base station by assigning
different codes to different base stations.
To change the base station authorization
code:
NOTE: It is
recommended that you
change the base station
authorization code to a
unique code after initial
installation.
1. Access the Configuration window if not already
there.
2. Click Base Station on the Configuration
resources panel.
3. On the Base Station Properties panel, highlight
the existing authorization code at the bottom of
the panel.
4. Type the new code over the existing code.
CG 2400 User Guide
66
66
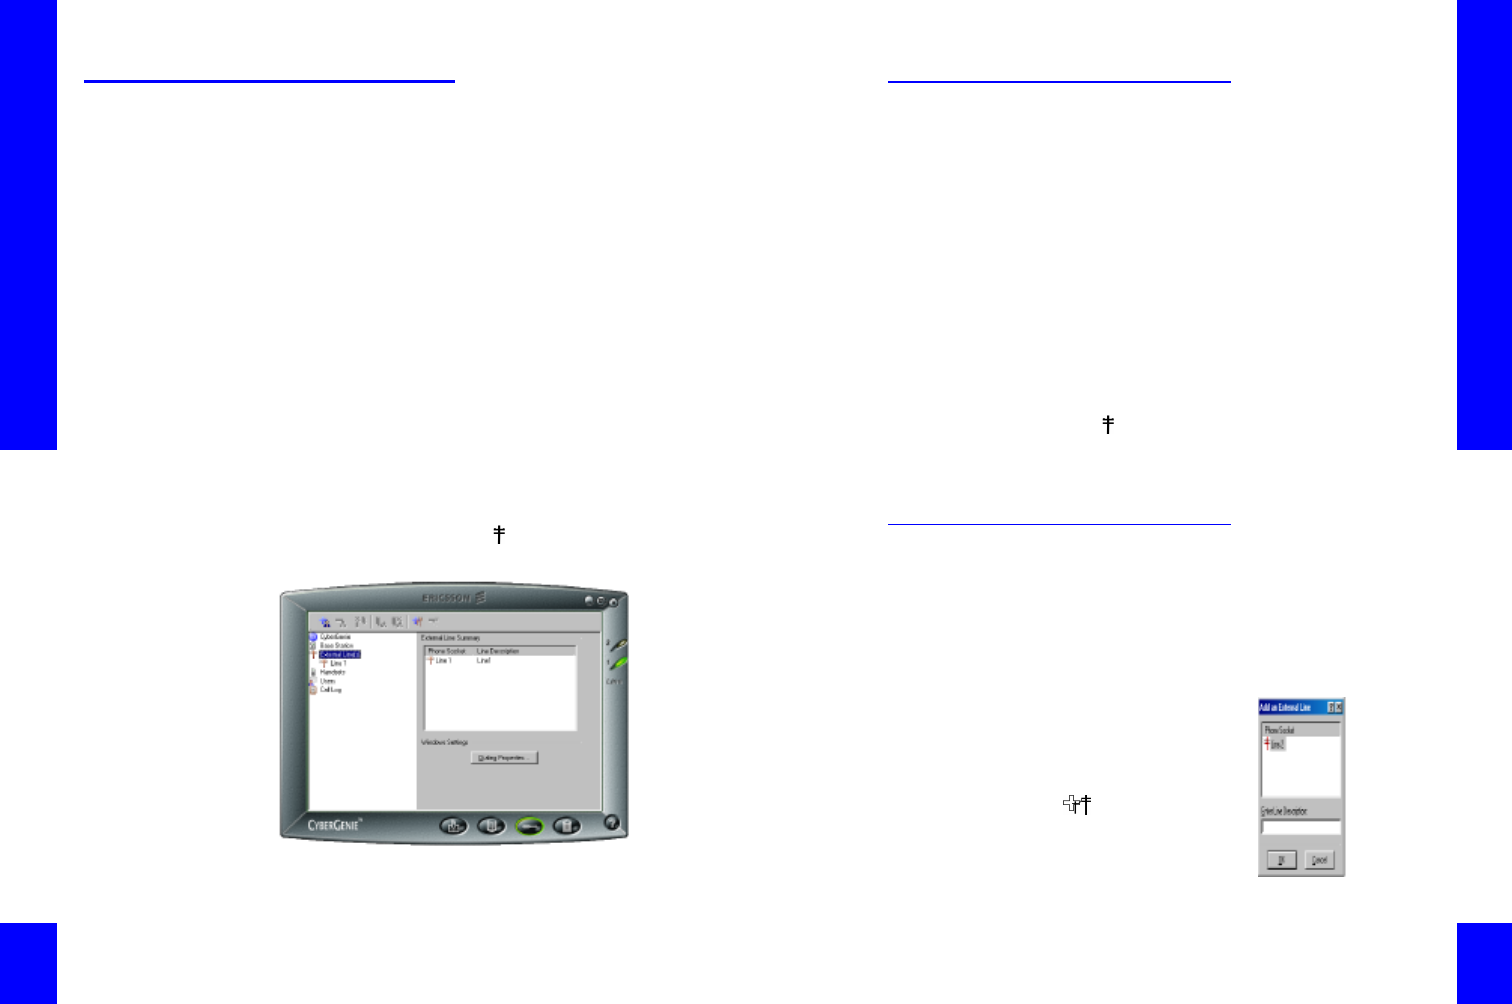
External Line Setup
The External Line Summary panel shows which
analog line sockets on the base station are used and
the descriptions assigned to each. (If you have only
one phone line connected to your CG 2400 system,
only one line will display.)
NOTE: Line setup must
be done for each
analog phone line
connected to your base
station.
The following can be configured from this panel and
its panel tabs:
•Adding or deleting a line, or changing a line
description.
•Setting the general properties for all outgoing
calls.
•Defining business hours and non-business hours.
•Setting how calls on a specific line are routed
during business or non-business hours.
•Setting which outgoing messages play for
business and non-business hours. Recording the
outgoing messages. Defining which message a
caller receives.
If not already highlighted, click External Lines to
access the External Line Summary panel:
Chapter 4: Full System Configuration
67
Changing Dialing Properties
NOTE: The dialing
properties should
already be set up in
Windows. This option is
available from this
window for convenience
should you need to
change them.
Dialing properties are the “rules” you can set or
change that affect how outgoing calls are
automatically handled.
Dialing properties address how the system treats all
outgoing calls. Unlike all other line configuration in
CyberGenie@Work, it is system-specific, not line-
specific.
The Dialing Properties button on the External Line
Summary panel takes you directly to the Dialing
Properties window used in Microsoft Windows.
To access the Dialing Properties panel:
NOTE: Refer to your
Microsoft Windows help
for specific questions
on dialing properties.
1. Access the Configuration window if not already
there.
2. Click External Lines on the configuration
menu.
3. When the External Line Summary panel displays,
click the Dialing Properties button.
Adding and Deleting External
Phone Lines
The system supports two analog phone lines. From
this panel, you can add or delete a line, or change a
line description.
To add an external line:
1. Access the Configuration
window if not already
there.
2. From the CyberGenie@
Work menu bar, click
. A dialog box opens.
3. Type a line description,
then click OK. To set
general properties,
business hours, routing,
CG 2400 User Guide
68
68
and auto attendant features for the new line, see
“Setting General Properties” on page68.
To delete an external line:
1. Highlight the phone line to be deleted.
2. From the CyberGenie@Work menu bar, click .
3. Click Yes to confirm the deletion.
You can also remove a line by right-clicking Line1 or
Line2 from either the Configuration resources panel
or the External Line Summary panel then selecting
the Delete option.
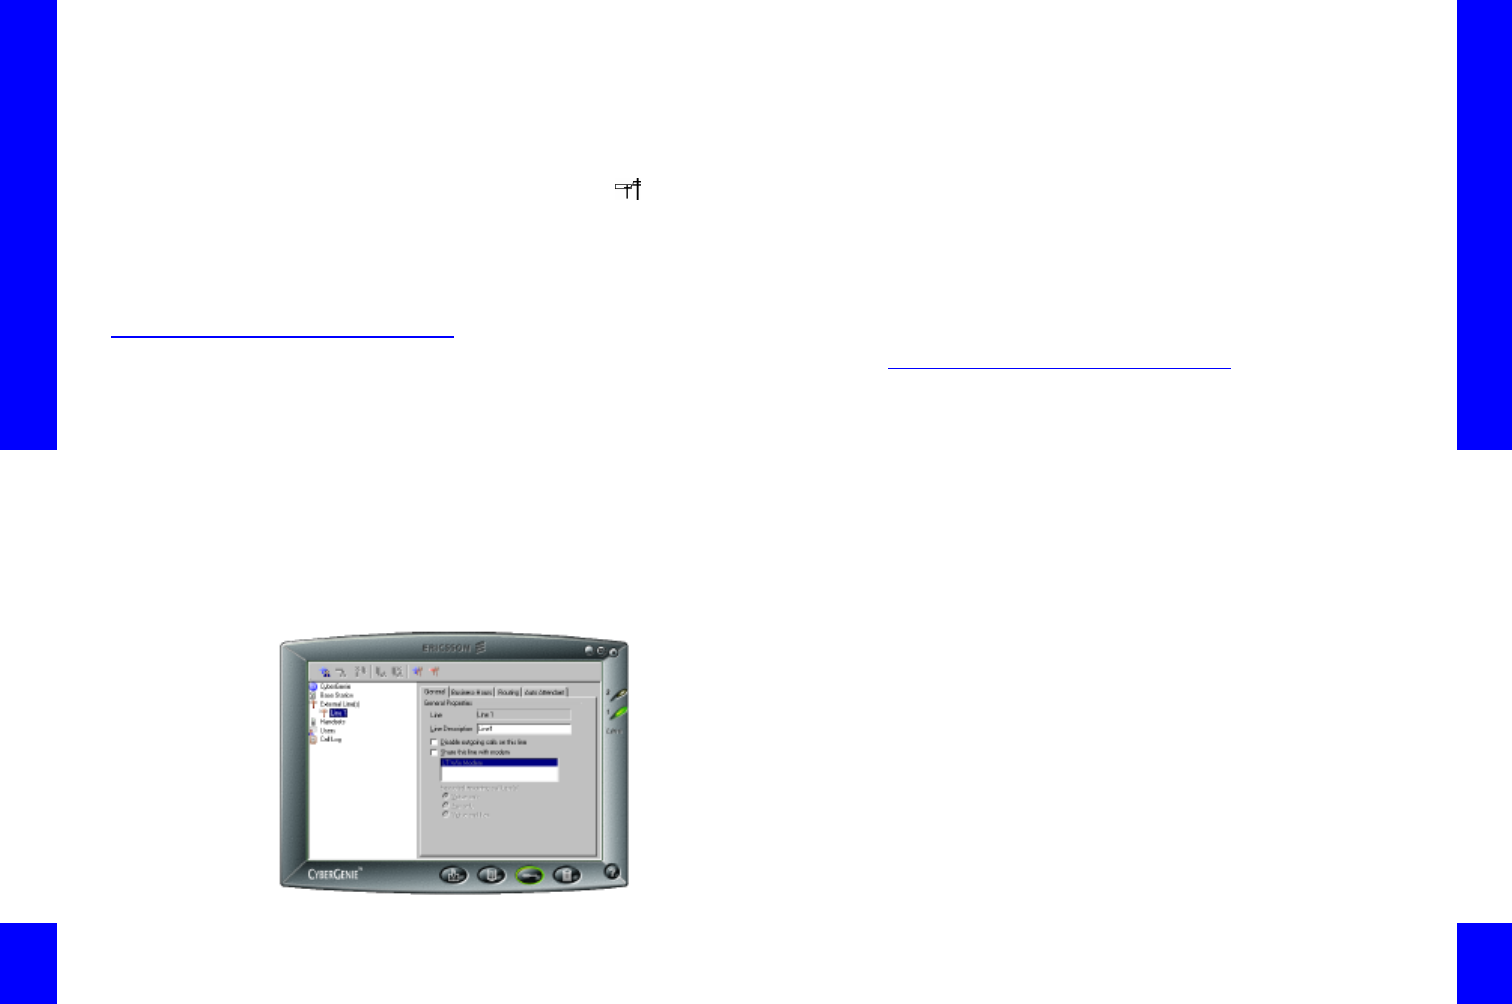
Setting General Properties
From the General Properties tab, you can change the
description of an existing line, disable outgoing calls
for a particular line, and, for Line 1 only, configure
the line for voice calls, fax calls, or both.
To set general properties:
1. Access the Configuration window if not already
there.
2. Click Line # from the Configuration resources
panel, or double click the line number or
description on the External Line Summary panel.
The detail panel will change.
Chapter 4: Full System Configuration
69
3. If the General Properties tab is not on top, click
the General tab, then select the desired settings:
•To change the line description, type over the
existing description.
NOTE: If you want to
share a line between
CyberGenie and your
PC’s fax/modem, you
must use Line 1.
•To disable outgoing calls, click the Disable
outgoing calls on this line checkbox. This
feature lets you disable outgoing calls for a single
line without disabling incoming calls, which allows
a dedicated incoming call line.
•To allow the line to accept fax calls, click Share
this line with modem, then click Fax only or
Both if you also want to receive voice calls on the
line. (The default is Voice only.)
Setting Business Hours
Depending on how you set up call routing (see
“Setting Call Routing” on page70), your incoming
calls can ring through to one or more handsets, or
they can ring through to the CyberGenie welcome
greeting.
If they ring through to CyberGenie, you can set
different greeting messages based on the time of day
and day of week.
These options are set by defining business hours and
non-business hours. Default business hours are
Monday through Friday, 8:00 A.M. to 6:00 P.M.
To change business hours:
1. Access the Configuration window if not already
there.
2. Click Line # from the Configuration resources
panel, or double click the line number or
description on the External Line Summary panel.
CG 2400 User Guide
70
70
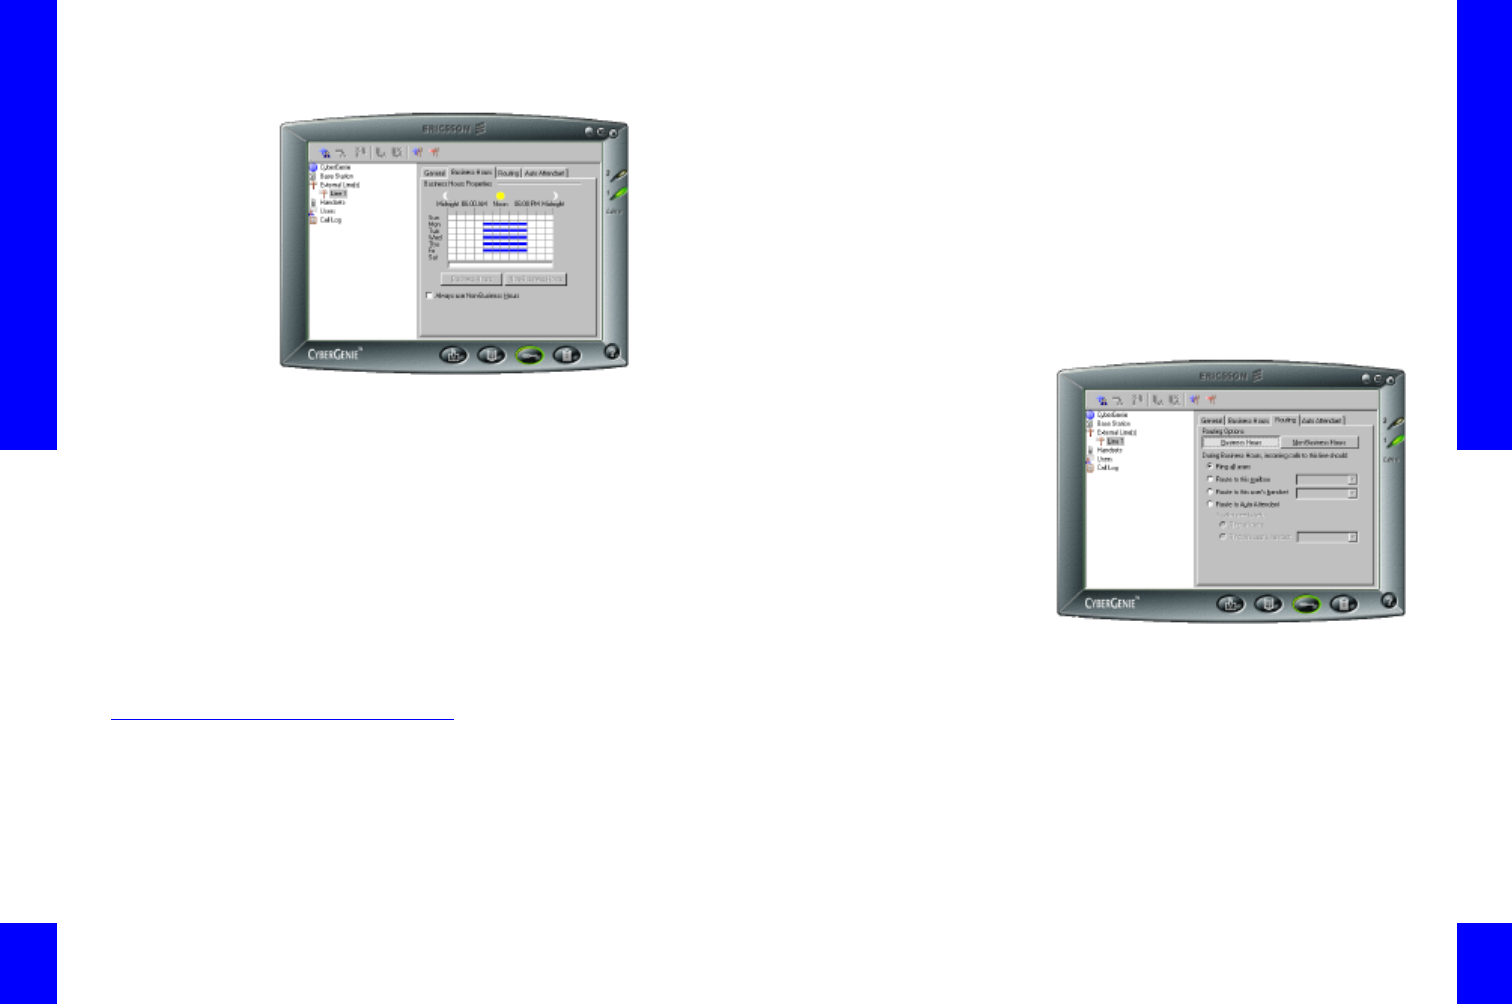
3. Click the Business Hours tab.
4. The blue bars on the graph represent business
hours. Click and drag across a single day to set
the office hours for that day. The actual hours
you’re selecting will display under the weekly
grid.
5. When you have that day set to the hours you
want, click either the Business Hours button or
the Non-Business Hours button to set the
hours for that day of the week.
6. Repeat for each day.
If you click the Always use Non-Business Hours
checkbox, then the entire week will gray out, and
only the non-business hours greeting will play. This is
useful, for example, if you leave town or temporarily
close the office.
Setting Call Routing
Call routing determines how a call is received and
forwarded.
You can set up different call routings for each line
based on business and non-business hours.
Chapter 4: Full System Configuration
71
NOTE : You may want
to verify call routing
choices after you have
added users and
handsets.
For each set of hours, you can further specify how
you want calls handled by directing the calls to
specified users, to specified mailboxes, or to
CyberGenie.
To set call routing:
1. Access the Configuration window if not already
there.
2. Click Line # from the Configuration resources
panel, or double click the line number or
description on the External Line Summary panel.
3. If the Routing tab is not on top, click the Routing
tab.
4. Determine which routing to use for business
hours. The options are:
Ring all users Ring all active handsets when a
call comes in. (Active refers to a handset that is
on and able to accept incoming calls.) If the call
remains unanswered, it is forwarded to the
system inbox. (For how to set the length of time
before a call is routed to the system inbox, see
“Setting the Ring-all-Handsets Timer ” on
page61.)

CG 2400 User Guide
72
72
NOTE: If the user to
whom the calls will be
forwarded does not
answer the call and has
selected Do not
forward my calls, the
call will go unanswered.
Route to this mailbox Routes incoming calls to
a personal or system mailbox from a dropdown
list of users with mailboxes set up. (For more
information on how to set up users and user
mailboxes see “User Setup” on page80.)
Route to this handset Routes incoming calls to
a specific handset, selected from a dropdown list
of users with assigned handsets. (For how to
subscribe additional handsets and assign users to
them, see “Subscribing a Handset to the Base
Station” on page76 and “Assigning a Handset to
a User” on page77.)
Route to Auto Attendant All calls are first
routed to auto attendant and the caller hears a
business hours, non-business hours or temporary
welcome greeting. After the welcome greeting, a
caller can say the user’s name or enter the user’s
extension from a touchtone keypad.
If a caller doesn’t know a specific user’s name or
extension, or if CyberGenie cannot understand
the caller’s request, the call may require further
routing. You then have two more routing options:
Ring all users The call will ring through to every
active handset.
NOTE: Auto attendant
will only ring users
during business hours.
During non-business
hours, auto attendant
routes the call to the
system inbox.
Ring this user You can select from a dropdown
list of users with active handsets.
If the incoming call is not answered by a user, it
will then go to the system voicemail.
5. Repeat steps 2 through 4 for Non-Business
Hours.
Setting Up Auto Attendant
Auto attendant configuration lets you set welcome
greetings, select and unselect temporary greetings,
and determine the users to which CyberGenie routes
calls.
Chapter 4: Full System Configuration
73
Recording Welcome Greetings
The welcome greeting is the message a caller first
hears if you have set up incoming calls to go directly
to CyberGenie. (For more information, see “Setting
Call Routing” on page70.)
There are three possible welcome greetings:
•Business Hours
•Non-business Hours
•Temporary
To record a welcome greeting:
1. Access the Configuration window if not already
there.
2. Click Line 1 from the Configuration resources
panel, or double-click the line number or
description on the External Line Summary panel.
3. If the Auto Attendant tab is not on top, click the
Auto Attendant tab.
4. Under Welcome Greetings, click the message
type you want to record.
CG 2400 User Guide
74
74
5. Click to
access the
recording dialog
box.
6. Click to start
recording.
7. When done, click
.
8. To listen to the message, click .
9. To save the message, click Save. The .wav file
will be saved in the default directory (usually
Program Files/CG@Work/Data).
To use the temporary greeting:
Click the Use Temporary Greeting checkbox.
Selecting Users for Call
Acceptance
When calls are set to route to the auto attendant, the
Only Accept Calls for Selected Users option is
available. Two lists of users will display under this
option:
Available users A list of all users that have been set up on the
system.
Selected users A list of users for which CyberGenie will accept calls.
Users are set up for the entire system, not for a
single line.
Since user call acceptance selection is per line, this
feature is useful, for example, if you want to set up
one line in your home office for business and the
other line for the family. You could then set up the
business line to take calls only to your name, and the
family line to take calls for all family members.
Chapter 4: Full System Configuration
75
To select or unselect users for call
acceptance:
1. Highlight the available user name, then click .
2. To select all users, click .
3. To un-select a user, click .

CG 2400 User Guide
76
76
Handset Setup
The CG 2400 system comes with one pre-subscribed
handset, but can support up to nine additional
handsets.
Additional handsets must be subscribed to your base
station before they can be used.
Subscribing a Handset to the
Base Station
Handset subscription establishes a wireless
connection between the handset and the base
station. When a fully charged handset is not
subscribed, the handset goes directly to the
subscribe menu when turned on.
Once a handset is subscribed, it can be assigned to a
user, as described in the next topic.
To subscribe a new handset to the base
station:
1. Press and hold to turn the handset on.
2. Ensure that your new handset is fully charged.
The on the handset display indicates a fully
charged handset.
3. Subscribe should display. Press . (If
Subscribe does not display, see the next
procedure.)
4. The display will prompt for the system’s
authorization code with Enter AC.
NOTE: If you are not
sure of the base
station’s authorization
code, see “Base Station
Setup” on page65.
5. Enter the authorization code and press .
6. The handset displays Subscribing while it
attempts to communicate with your base station.
7. If the subscription process is successful, the
handset displays Subscription Ready. After a
moment the handset will display AVAILABLE ##
(the symbol ## is the assigned handset
number).
Chapter 4: Full System Configuration
77
If subscription is unsuccessful, the display reads
Subscription Failed. Try again, or refer to
“Troubleshooting” on page183.
To subscribe a previously subscribed
handset to the base station:
1. Press to access the handset menu and
scroll through the options.
2. Scroll to >BaseStation and press , then to
>Subscribe and press .
3. Enter AC appears. Enter the authorization code
and press .
4. The handset displays Subscribing while
establishing a connection to the base station.
5. If the subscription process is successful, the
handset displays Subscription Ready. After a
moment the handset displays AVAILABLE ##
(## is the assigned handset number).
Assigning a Handset to a User
Once a handset has been subscribed, a user can be
assigned to the handset.
NOTE: Handset
assignment does not
affect a user’s
extension number.
Users can be unassigned from handsets and
reassigned easily. For example, if the handsets are
being used in a small office environment where
different users work different hours, you can change
handset assignment to match whoever is in the office
at a given time with any available handset.
Handset assignment is done from the Configuration
window.
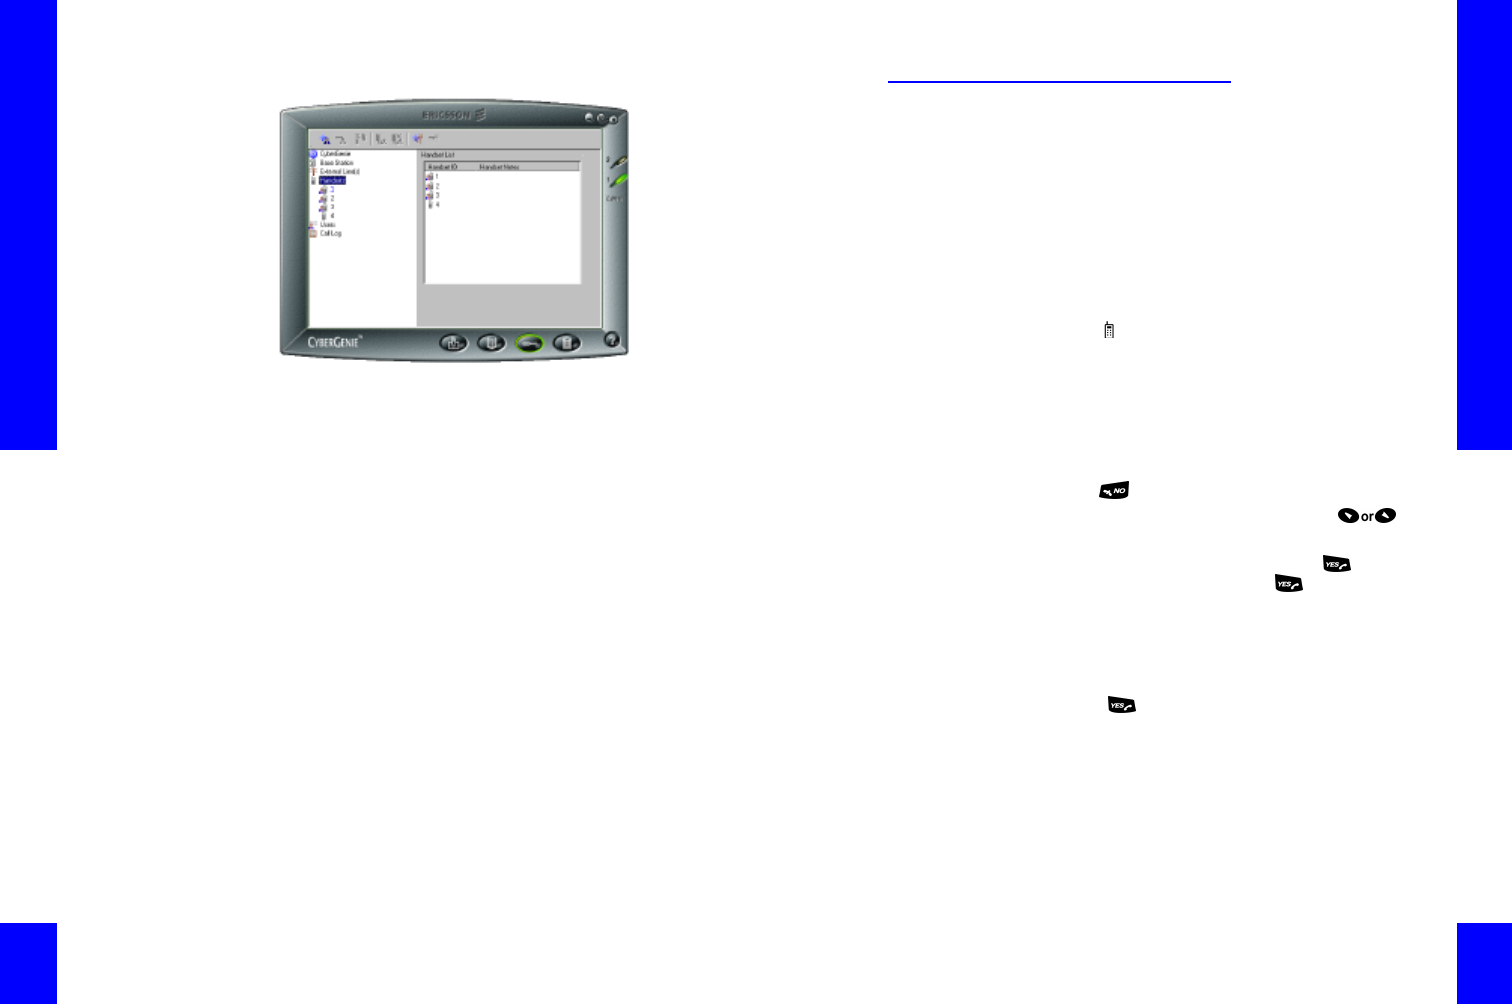
If not already highlighted, click Handsets to access
the Handset List panel.
Click Handsets again to access a list of subscribed
handsets.
CG 2400 User Guide
78
78
The Handset List panel shows which handsets have
been subscribed to the base station, and any notes
that may have been entered for each handset.
To assign a handset to a user:
1. Right-click the handset number on either the
resources panel or the Handset List panel. The
Handset Properties panel appears, and a menu
opens.
2. Position the mouse pointer over the Assign to
User option and a list of users who do not have
handsets available displays.
3. Click the user name to whom the handset will be
assigned.
4. If desired, type in any notes regarding the
handset, such as the day or time the handset was
assigned.
To unassign a handset:
1. Right-click on the handset number on either the
resources panel or the Handset List panel.
2. Click Unassign User. Notes entered for this
handset will remain unless manually removed.
Chapter 4: Full System Configuration
79
Unsubscribing a Handset
If you no longer want to use a specific handset with
your base station, you should unsubscribe it.
Unsubscribing is a two-step process:
NOTE: Before un-
subscribing a handset
from the application,
unassign the user
assigned to the
handset.
•Unsubscribe from the application.
•Unsubscribe from the handset.
To unsubscribe from the application:
1. Access the Configuration window if not already
there.
2. Click Handsets in the system resources area.
3. Right-click the handset to be unsubscribed.
4. Click Unsubscribe Handset.
5. Click OK to confirm.
To unsubscribe from the handset:
1. Ensure the handset is switched on. Press and
hold to turn it on.
2. When the idle display appears, press to
scroll through the menu.
3. Scroll to >BaseStation and press , then
scroll to >Delete and press .
The handset will display a list of base stations. In
most cases, there will be only one base station.
However, there may be situations where the
handset is subscribed to multiple base stations. If
needed, scroll to the desired base station, then
press .
4. Confirm deletion when prompted.
CG 2400 User Guide
80
80
User Setup
The system supports up to 20 users. Users can be
assigned to an available handset or assigned mailbox
only.
User setup is done from the Configuration window.
If not already highlighted, click Users to access
the User List panel.
Click Users a second time to display a list of all
users in the resources panel.
Setting up a New User
CyberGenie@Work uses four tabs for information
when setting up a new user:
General General user data such as name and extension.
External number The user’s contact information.
Call forwarding How to route unanswered calls.
Messaging How and where to notify the user when messages
arrive.
Chapter 4: Full System Configuration
81
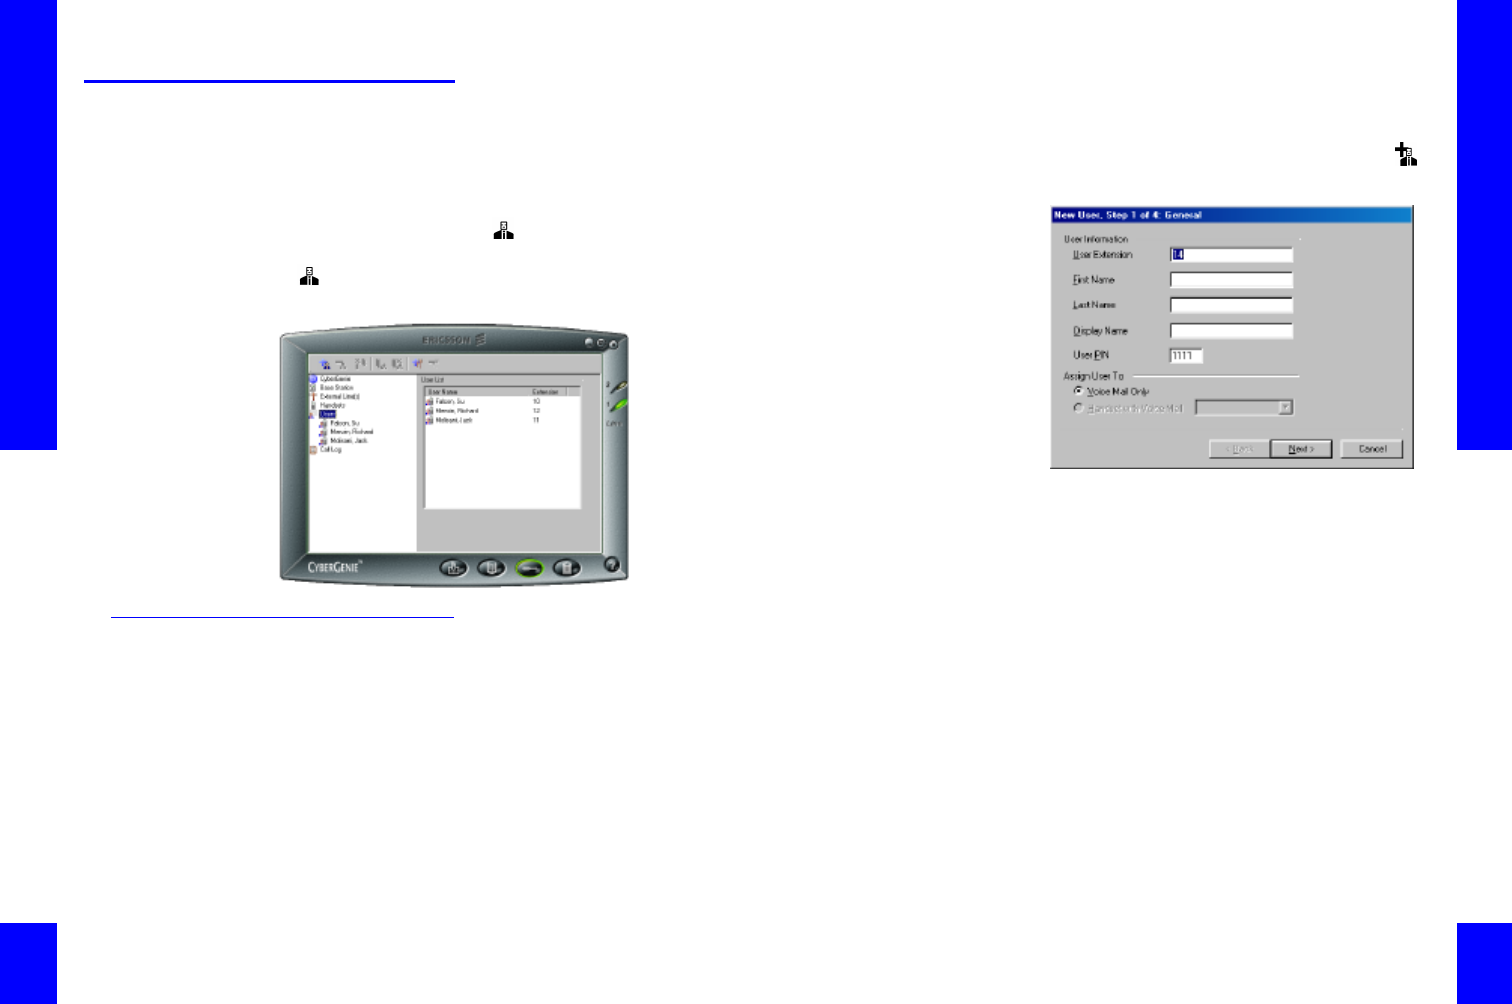
To access the User Panel:
1. Access the Configuration window if not already
there.
2. From the CyberGenie@Work menu bar, click .
The first panel will display:
To set up a new user—General:
1. Enter the following:
User Extension The system defaults to the next
available extension number. Change it by typing
over the existing number with any two digits
between 10 and 98.
First Name
Last Name
Display Name The user name to display on the
handset. You are limited to eight characters,
including spaces. If you leave this field blank, the
handset display will default to the user’s name,
first and last, using as many characters as will fit
in the eight-character limit.
User PIN You must enter a user PIN (or accept
the default of 1111).
CG 2400 User Guide
82
82
NOTE: Handsets can
also be assigned from
the Handset resource.
See “Assigning a
Handset to a User” on
page77.
Voicemail Only or Handset with Voicemail
Handset with Voicemail is only available if there
are unassigned handsets subscribed to the
system. To assign a handset from this panel, click
the down arrow to view and select from a list of
available handsets. All users entered are assigned
a mailbox whether or not a handset is available.
2. Click Next to move to the second panel:
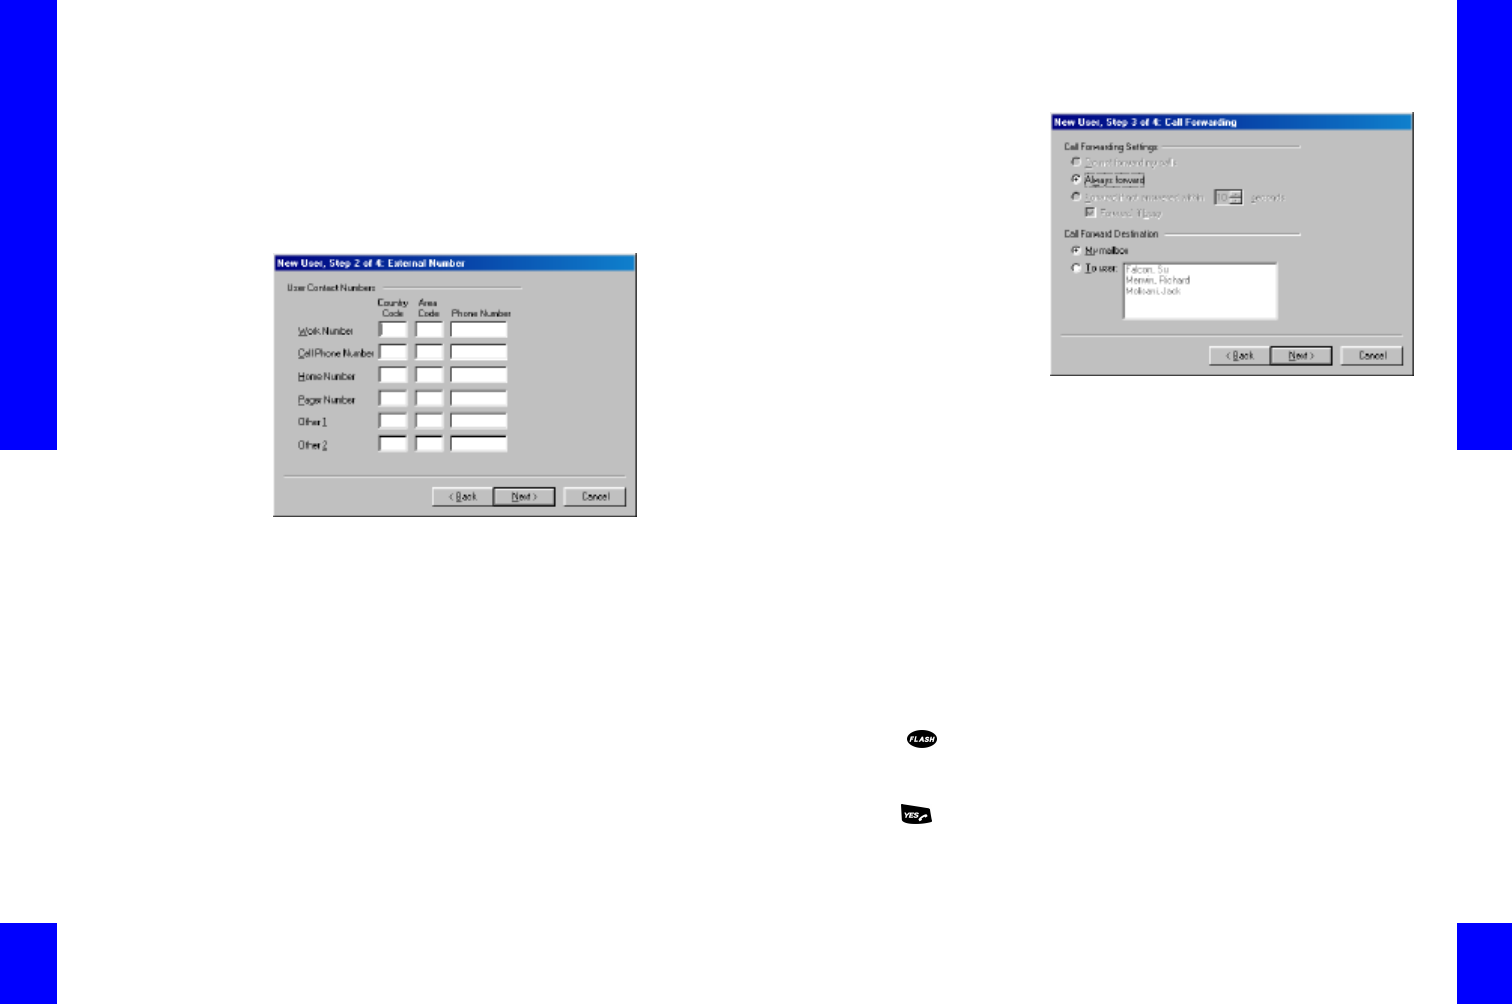
To set up a new user—External Number:
Contact numbers are not required. However, if you
want CyberGenie@Work to be able to forward
message notices to this user on a remote phone, you
must enter a number to which notices can be
forwarded.
1. Enter the contact numbers for this user.
Chapter 4: Full System Configuration
83
2. Click Next to move to the third panel:
To set up a new user—Call Forwarding:
NOTE: CyberGenie call
waiting allows you to
switch between phone
lines if you have two
analog phone lines
connected to your base
station. Call waiting on
your public phone
service switches
between calls on the
same line.
CyberGenie’s call
waiting uses a different
tone to distinguish from
public phone service
call waiting.
The key on your
handset switches
between phone service
call-waiting calls. The
key answers
CyberGenie call-waiting
calls.
Call forwarding determines how unanswered calls to
this user are routed.
1. Select the user’s call forwarding settings from the
following options:
Do not forward my calls Unanswered calls will
not be forwarded to voicemail. (This option is
only available to users with assigned handsets.)
Always forward All calls are forwarded
according to the Call Forward Destination
selection below.
Forward if not answered within __ seconds
Use the up and down arrow keys to select the
number of seconds, from 5 to 60, before an
unanswered call is forwarded. This also applies to
incoming second calls.
Forward if busy Check this box if you want the
user’s call forwarded if the handset is in use. If
unchecked, the user will hear a call-waiting tone
on the handset when a second call comes in.
2. If you select Do not forward my calls above,
Call Forward Destination options are not
available. If you select one of the other options,
CG 2400 User Guide
84
84
you must then select a destination for forwarded
calls:
My mailbox Routes the call to the user’s
mailbox.
To user Routes the call to another user’s
handset or voicemail. Click from the list of
displayed users to select.
3. Click Next to go to the final panel:
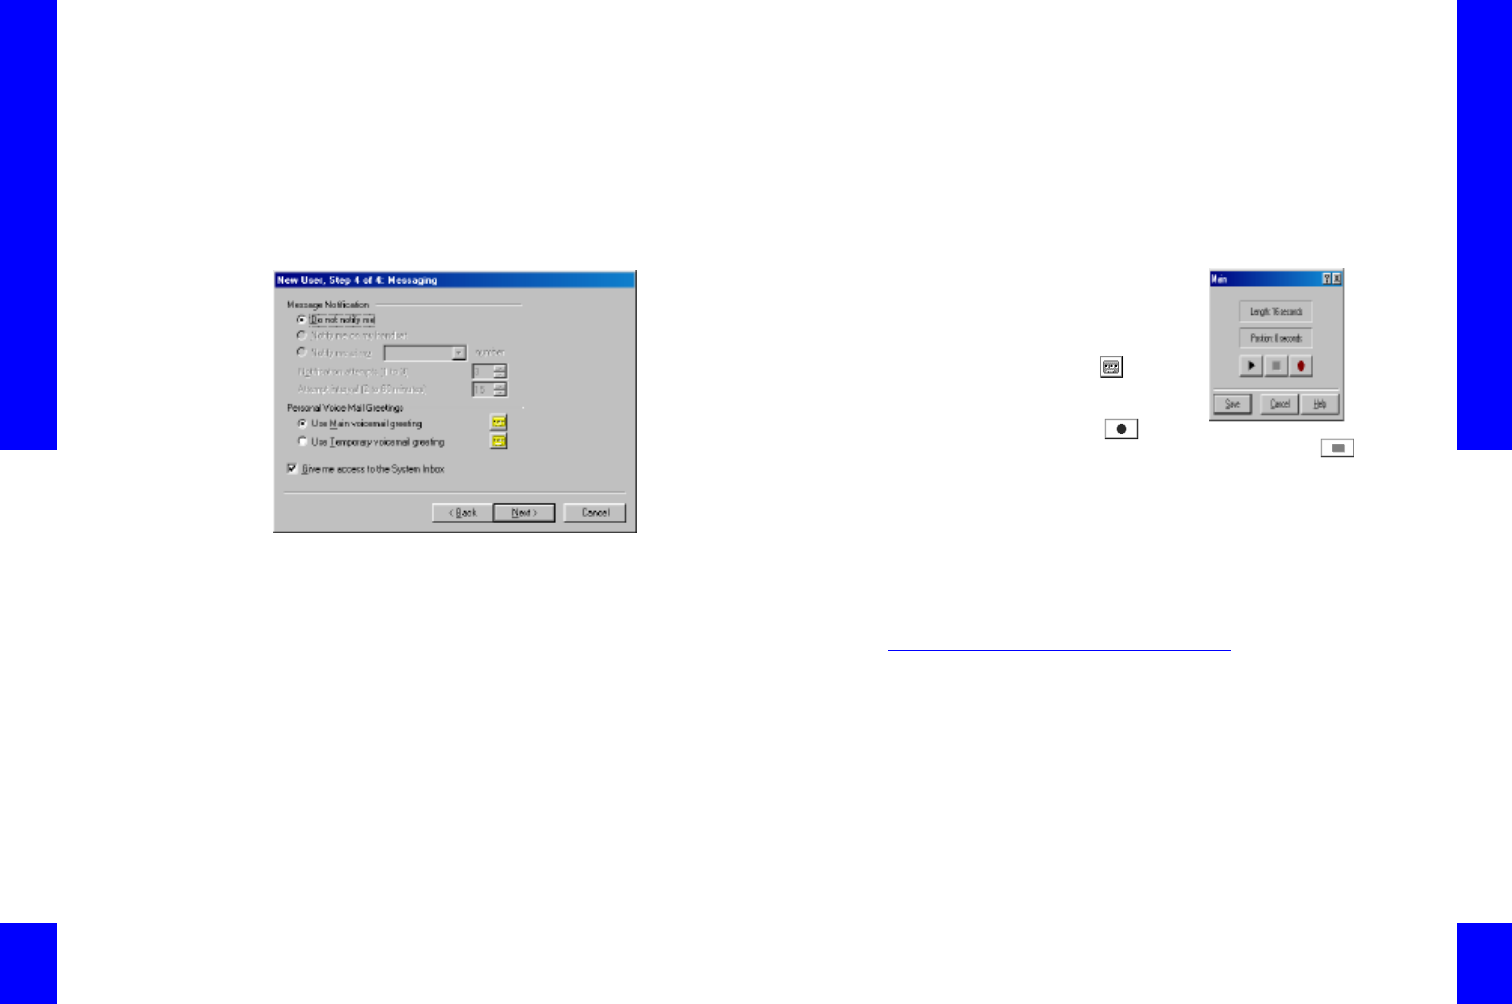
To set up a new user—Messaging:
Message notification determines whether the user
will be notified when new messages arrive in the
user’s mailbox, and where notification will be routed.
1. Select from the following options:
Do not notify me
Notify me on my handset
Notify me at my ________ number Only
available if at least one phone number is entered
for this user. Click the down arrow to view, and
select from a list of available numbers.
Notification attempts (1 to 3) The number of
times CyberGenie will place a notification call to
the user. Use the up and down arrow keys to
adjust the number of tries.
Chapter 4: Full System Configuration
85
Attempt interval (2 to 60 minutes) The
frequency with which notification attempts will be
placed by CyberGenie.
2. A personal voicemail greeting is the greeting a
caller hears when a call is routed to the user’s
mailbox. The user has two options: a main
message, which serves as the default, and a
temporary message that can be recorded without
overwriting the main message.
To record a
message at the
computer, select
Main or
Temporary, then
click . A
recording dialog
box opens.
Click to
begin recording. When done, click , then
Save.
NOTE: You can also
record personal
voicemail greetings
from the handset. See
“Changing Voicemail
Greetings” on
page127.
3. If you check the Give this user access to the
system inbox option, the user will be able to
access messages left in the system inbox.
Leaving it blank will restrict the user to accessing
messages from his or her own personal mailbox
only.
4. Click Next when done.
Changing User Information
You can edit or delete user records once a user has
been set up.
User record edit procedures are very similar to the
procedures for adding a new user, with one
exception: the General tab lets you add information
that is not available during new user setup.
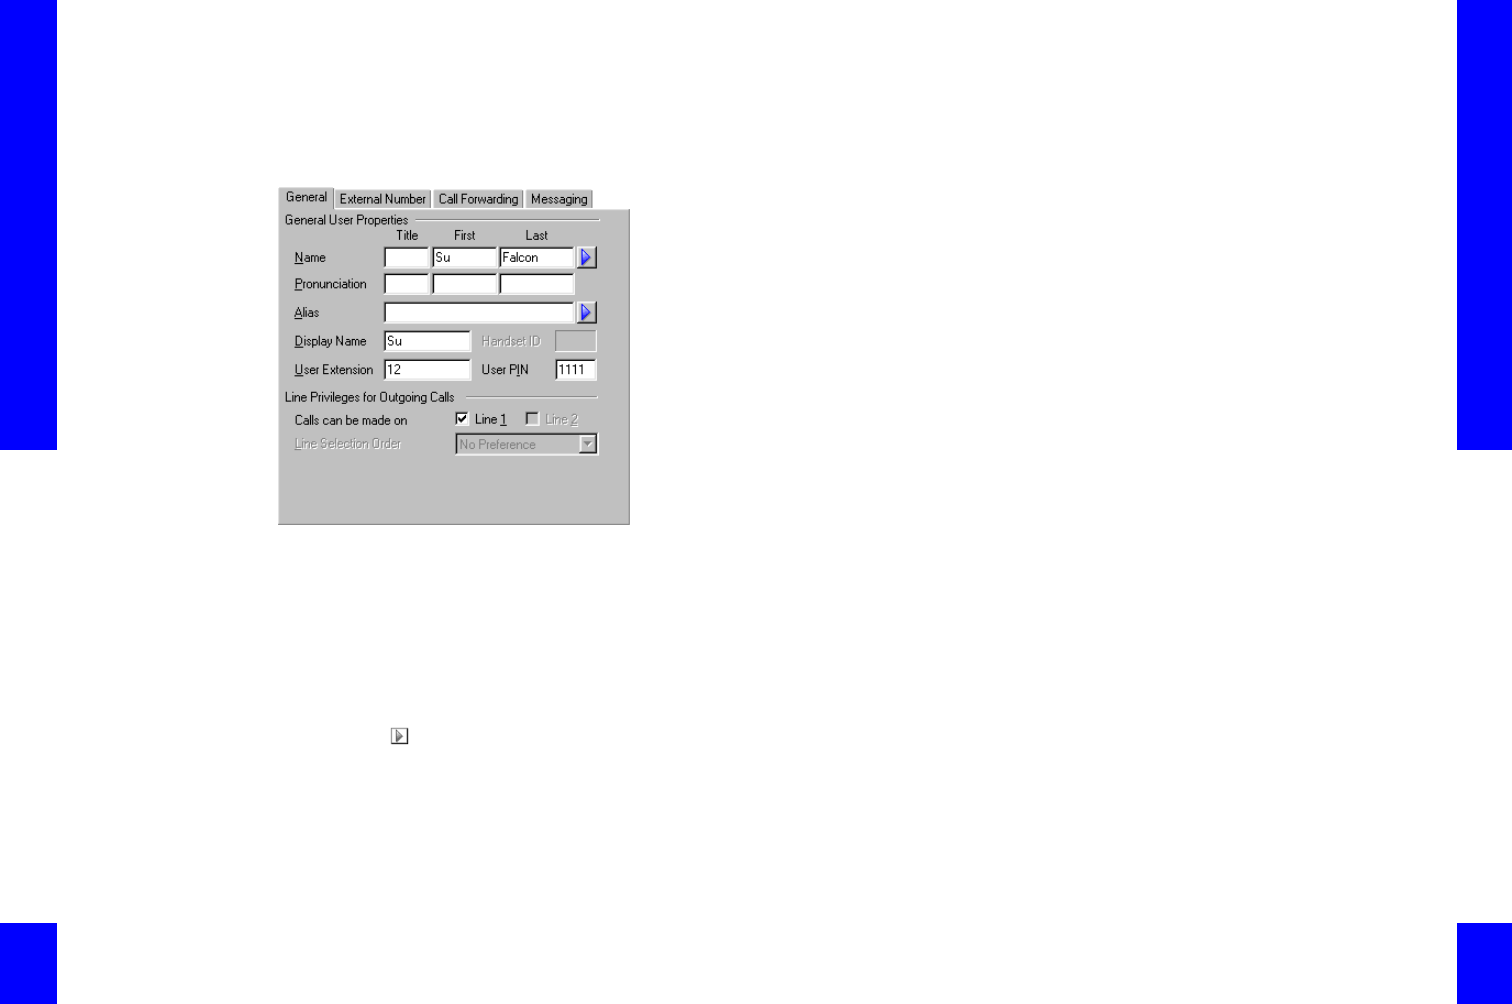
To edit user information—General:
CG 2400 User Guide
86
86
1. Access the CyberGenie Configuration window.
2. Click Users in the system resources area.
3. Highlight the specific user record to be edited.
The record for that user will appear:
4. Edit or add the following information:
Title (optional) Enter a title for this user if
desired.
First Name
Last Name
NOTE: For tips on how
to improve
CyberGenie’s
pronunciation and
understanding of
contact names, see
“CyberGenie
Pronunciation” on
page171.
Pronunciation (optional) You can control
CyberGenie’s understanding and pronunciation of
a user name from these fields. Once a name is
entered, click beside the Last Name field to
test CyberGenie’s pronunciation. If the name is
not pronounced correctly, enter the name
phonetically (as it sounds) under Pronunciation.
For example, you could enter the name “Kaellagh
Reilley” as KAYla RYElee.
Alias (optional) Any nickname you might use
for this contact. For example, Uncle George. If
Chapter 4: Full System Configuration
87
you enter an alias, CyberGenie will hear either
the alias or the user’s proper name.
Display Name The user name to display on the
handset. You are limited to eight characters,
including spaces. If you leave this field blank, the
handset display will default to the user’s name,
first and last, using as many characters as will fit
in the eight-digit limit.
Handset ID This field is for information only and
cannot be edited from this screen. If no handset
is assigned to this user, the field will be empty.
User Extension Change the extension number
by typing over the existing number with any two
digits between 10 and 98.
NOTE: Handsets
cannot be assigned
from this tab. To assign
a handset to this user,
or to change handset
assignment, see
“Assigning a Handset to
a User” on page77.
Setup User PIN The User PIN is a security
measure that lets a user control access to that
user’s mailbox. A user PIN must be four digits.
If you click the Setup User PIN button, a dialog
box opens. Enter the user PIN, then enter it a
second time to confirm. When done, click OK.
Line Privileges for Outgoing Calls You can
restrict outgoing calls for this user, if desired. If
you have more than one external phone line
connected to your base station and set up in
CyberGenie@ Work, you can control access to
which lines the user can call from. For example,
you can prevent a family member from using
your business line if you have a home office.
If you have more than one line, you can also
select the preferred order in which the handset
will access a line for outgoing calls.
5. When done, click on the next tab, or on another
feature in CyberGenie@Work.
CG 2400 User Guide
88
88
To edit other user information:
The remaining tabs contain the same information as
the new user tabs. For specific procedures or
descriptions, see:
•“To set up a new user—External Number:” on
page82
•“To set up a new user—Call Forwarding:” on
page83
•“To set up a new user—Messaging:” on page84
To delete a user record:
NOTE: Deleting a user
record will also delete
any personal messages
stored on the system
for that user.
1. Access the CyberGenie Configuration window.
2. Click Users in the system resources area.
3. Click the specific user.
4. From the CyberGenie@Work menu bar, click .
5. Click Yes to confirm.
Chapter 4: Full System Configuration
89
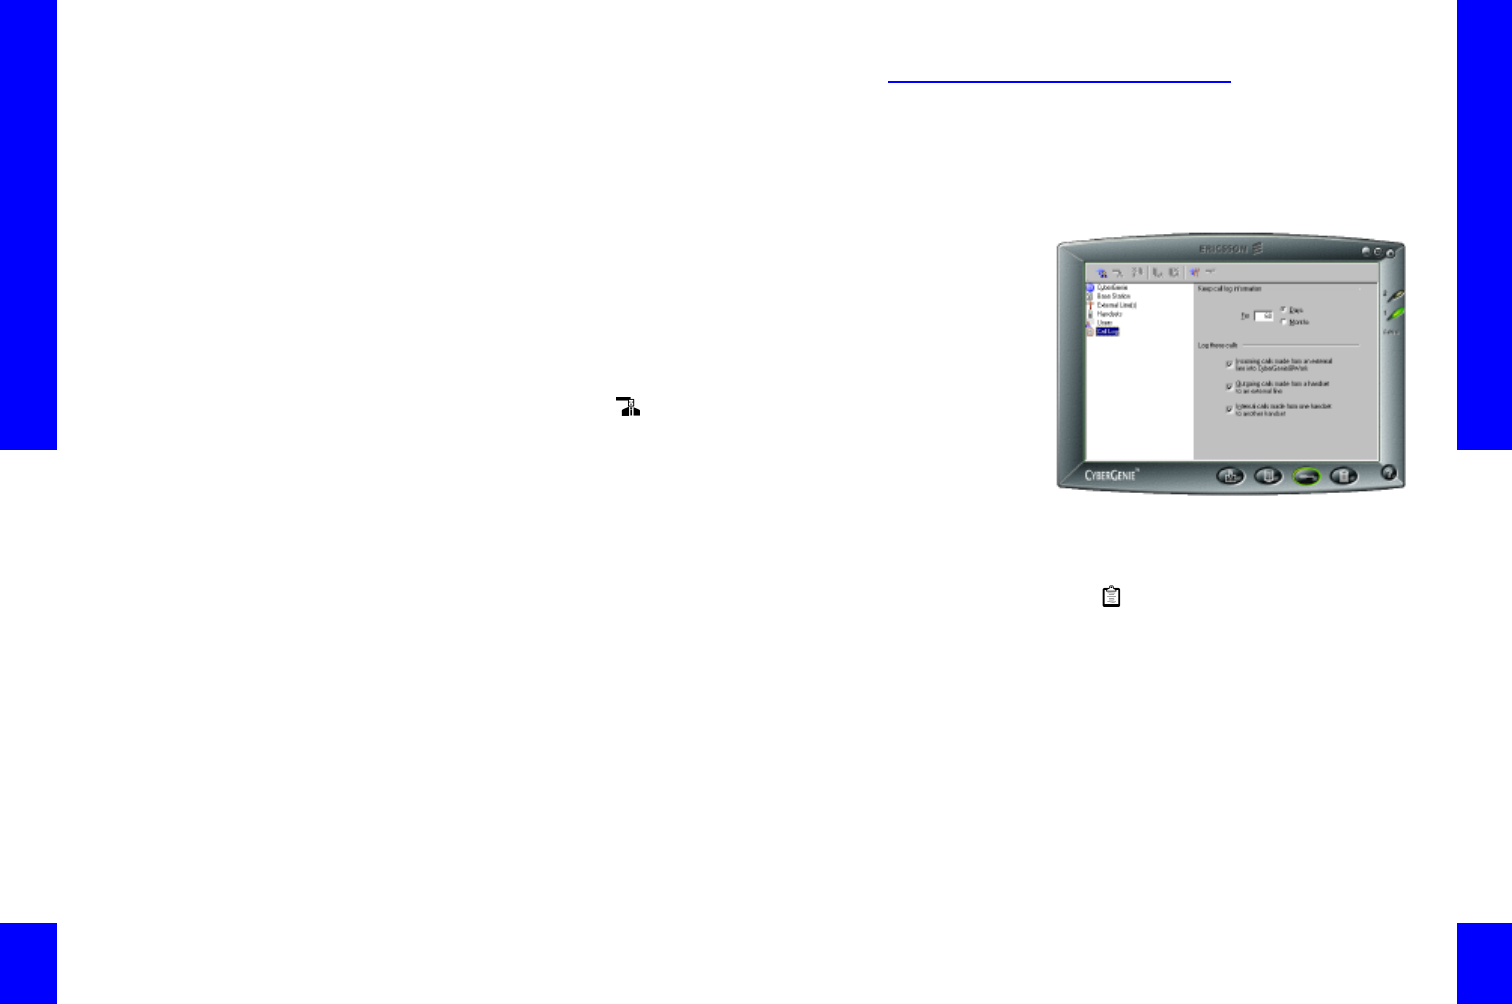
Call Log Setup
The call log is a running record of calls coming in
and/or out of the system.
You can configure the call log to capture call data for
specific time periods, and for specific types of calls.
To configure the call log:
NOTE: For more
information, see “Call
Log” on page101.
1. Access the Configuration window if not already
there.
2. Click Call Log to access the Call Log
configuration panel.
3. Set the Keep call log information for duration.
This option determines whether you want to keep
the call records for days or months, and the
quantity of either.
Click Days or Months.
Type in the number of days or months you want
the call log information to remain in the system.
4. Select the type of calls you want to log: incoming
calls, outgoing calls, and/or calls from one
handset to another. You can select some, all, or
none.

CG 2400 User Guide
90
90