Cygnion HRCU10102 Cordless Phone User Manual Chapter3
Cygnion Corporation Cordless Phone Chapter3
Cygnion >
Contents
CG2400 chapter 3

37
Chapter
3The User
Interface
The Three Interfaces
An interface is a way of interacting with a system.
In the CG 2400 system, you have three basic user
interfaces:
Handset User
Interface (HUI)
The interface you use when you access features and
functions by pressing keys on the handset keypad, or
by using the menus on the handset display.
Speech User
Interface (SUI)
When you “talk” to CyberGenie to access your mail,
place calls, or change your outgoing messages
(incoming call greetings and voicemail greetings),
you are using the speech user interface.
Graphical User
Interface (GUI)
The software application, CyberGenie@Work, from
which you can set up and configure your system, add
users and handsets, update your contacts list,
monitor calls, place calls, and more. The GUI
includes online help.
NOTE: When using the
handset, you cannot
combine speech and
handset commands. If
you start using speech
commands during a
procedure, then switch
to keystrokes on the
keypad, the speech
interface becomes
inactive until the
current call activity is
ended.

CG 2400 User Guide
38
Handset User Interface
The handset has keys on the keypad that perform
specific functions. There are also menu options you
can view on the handset display and select by
pressing keys.
Many of the features available can be accessed either
from the keypad or by using speech commands with
CyberGenie.
Modes of Operation
Handsets can be used with the system in either of
two modes:
Full function mode When the CG 2400 system is working with an active
PC, it is in full function mode.
Standalone mode If the PC is turned off or the USB cable is unplugged,
the CG 2400 can run in standalone mode, which lets
you place and receive external calls but does not
provide CyberGenie functions.
Handset Keys
Press to start a CyberGenie session.
Press to answer a call or place a predialed call.
Press and hold to turn the phone on or off, or end a
call. While using the handset display menu, press to
return to previous menu option.
Press to activate and navigate the handset menus, or
to change case when entering text.
Press to delete the last character entered on the
display. When in a menu, press to return to idle
display. When a call is active, press to mute the
handset microphone.
Press to switch between call-waiting calls on the
same line (if this feature is available from your phone
service), or answer an incoming call while the
handset menu is active.

Chapter 3: The User Interface
39
Up and down
volume
control keys
(located on the left side of the handset) Press to
adjust the earpiece volume louder or quieter. While
on the handset menu RingVolume option, press to
adjust the ring signal volume.
Indicator light
Earpiece
Volume controls
YES / off-hook
Menu / up
Handset display
CyberGenie key
Headset jack
Menu / down
Clear / mute
Flash hook
Microphone
On / off / NO
on-hook
CG 2400 User Guide
40
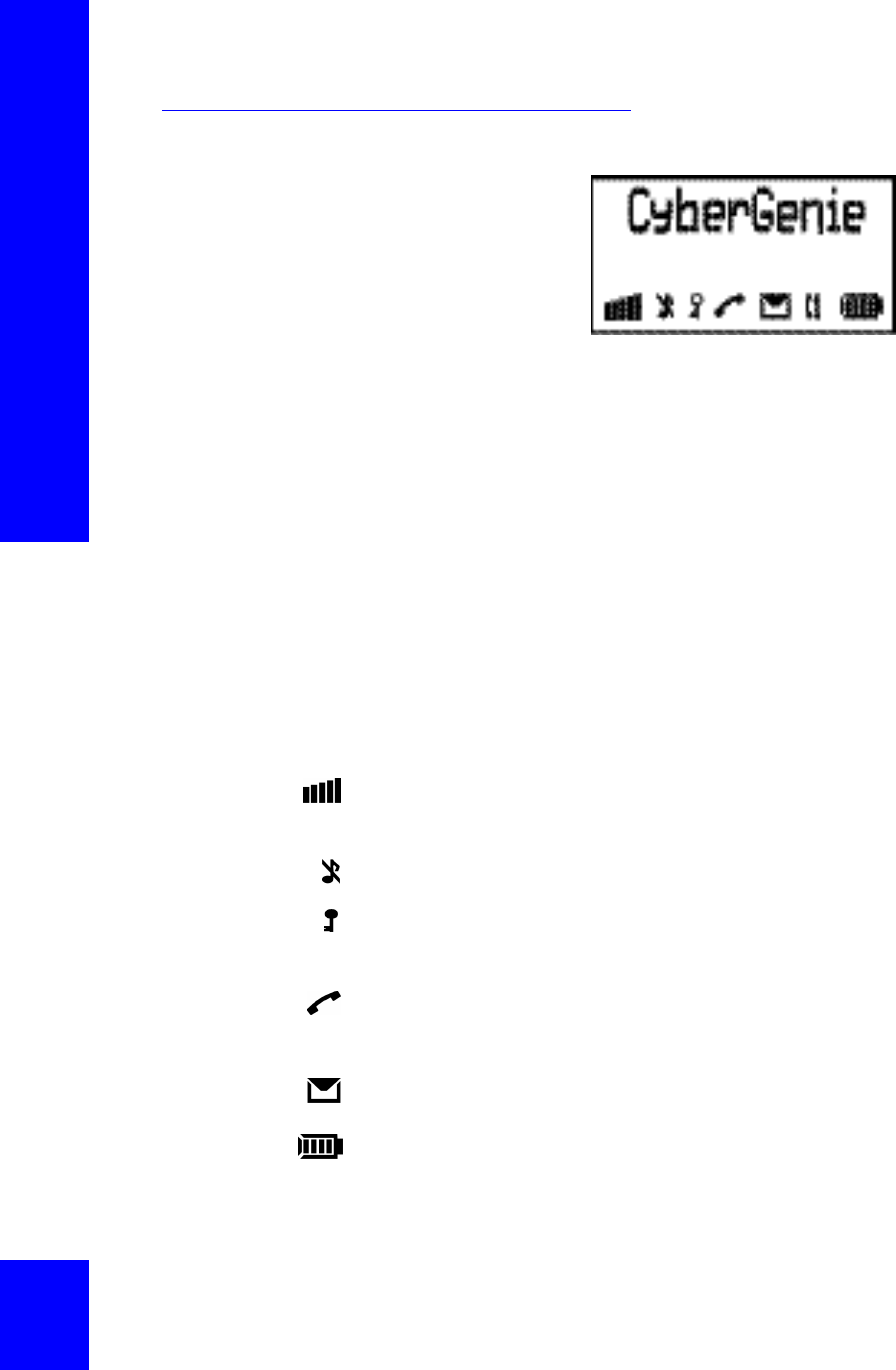
The Handset Display
The display consists
of two text lines and
a row of status
icons.
Display Text
The text on the
handset display varies depending on the handset’s
state.
Idle mode An assigned handset will display the user’s name and
extension when the handset is idle (not in use).
Call in progress When you place a call, the number dialed displays on
the second row. Once the call connects, the call’s
duration will display on the top row.
Call ended When you end a call, the duration will display for a
couple of seconds before the display returns to idle.
While accessing the
handset display
menu
While accessing the handset display menu (see
“Using the Handset Display Menu” on page41), the
current menu option shows on the display.
Display Icons
Shows signal strength. When you move too far away
from the base station, the signal will diminish. It
always displays.
Indicates handset ringer is turned off.
Indicates handset keylock is turned on. (The keylock
does not stop incoming calls, it only prevents calls
from being placed from the handset keypad.)
Indicates handset is off-hook. If a call is not placed,
the handset will eventually return to the on-hook
state and the icon will disappear.
Indicates that you have a message in your personal
or system inbox.
Shows remaining battery charge. It always displays.
Chapter 3: The User Interface
41
Using the Handset Display
Menu
With the handset menu, you can control advanced
telephony functions and customize the handset.
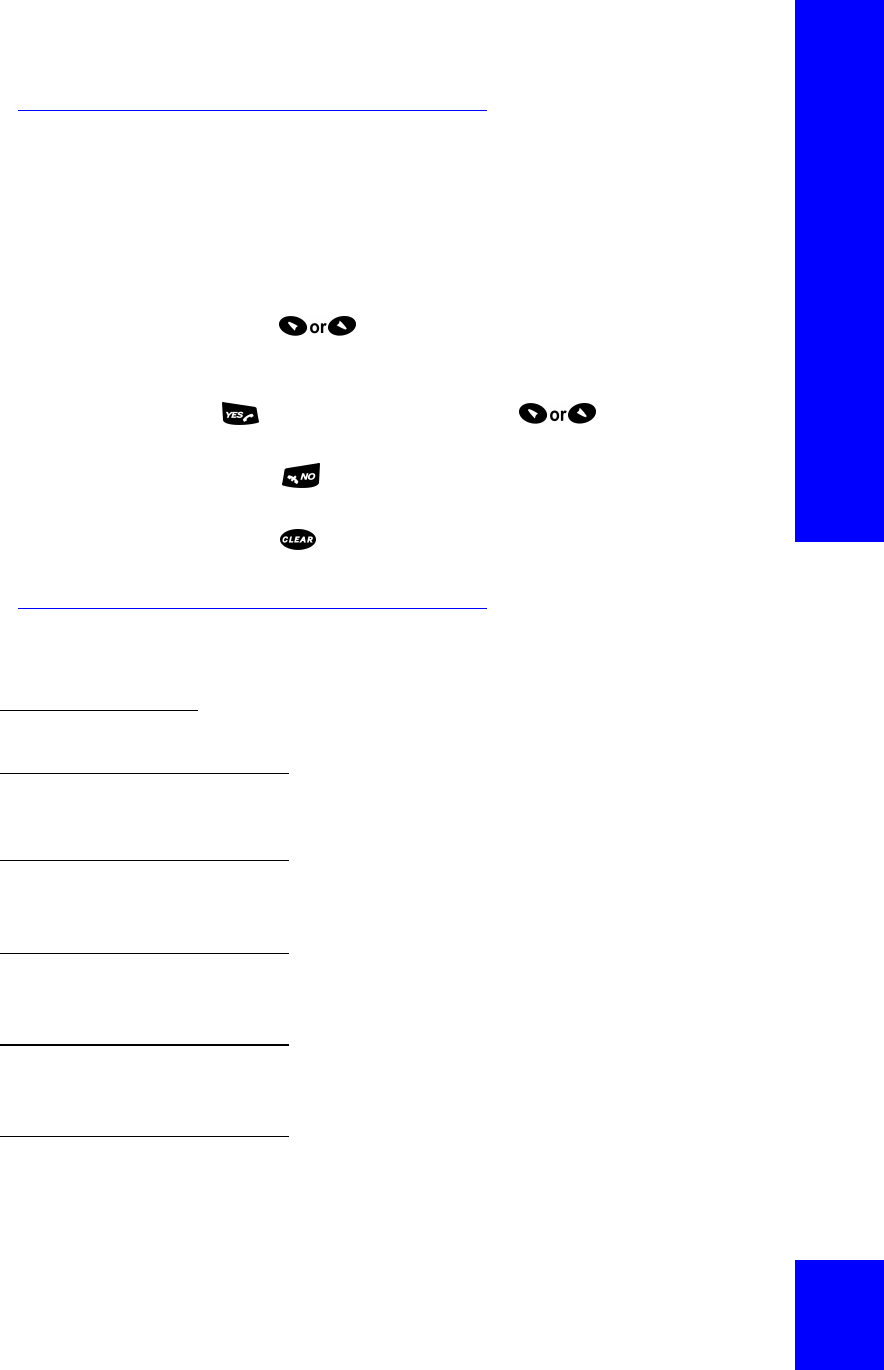
To navigate the menu options:
Press to access the menu and move through
menu options.
The active option is indicated by a > to the left. Press
to select an option, then to move
through the sub-menu options.
Press at any time to move up one level of menu
options.
Press to return to idle mode on the handset
display.
Handset Display Menu Options
Menu Path
>IntCall Place an internal call from the handset.
>PhoneBook Access phonebook information stored in
the handset:
>PhoneBook
>CallName Access and dial a contact stored in the handset
phonebook.
>PhoneBook
>Status Display the date and time of the most recent
phonebook download.
>PhoneBook
>Download Download flagged names and phone numbers from
the Contacts List on the computer.
>PhoneBook
>DeleteAll Delete all phonebook records from the handset.

CG 2400 User Guide
42
>Handset Access specialized handset options:
>Handset
>AutoKeyLock Lock the keys on the handset to prevent accidental
calling.
>Handset
>BabyPhone Use the handset as a baby monitor:
>Handset
>BabyPhone
>Activate
Turn on the BabyPhone feature by placing a call from
the monitor phone to the speaker phone.
>Handset
>BabyPhone
>SetPhoneNo
Set the handset number to be used as a speaker with
the handset monitor.
>Handset
>BabyPhone
>InfoTone
Turn off or on an information tone that alerts you
that the BabyPhone monitor is working.
>Handset
>Alerts Control the sound type and volume for
different types of handset alerts:
>Handset
>Alerts
>RingVolume
Set the ring volume for incoming calls.
>Handset
>Alerts
>RingType
Set the type of ring for internal or external calls,
callbacks, message notification, or pages.
>Handset
>Alerts
>KeySound
Set the handset keys to make a clicking sound when
you press a key, or to remain silent.
>Handset
>Alerts
>DiscreetRng
Turn on or off a feature that starts a ring quietly and
gradually increases the volume.
>Handset
>PhoneLock Control handset access:

Chapter 3: The User Interface
43
>Handset
>PhoneLock
>PowerOn
Prevent a user without the handset PIN from
operating the phone.
>Handset
>PhoneLock
>Subscript
Prevent someone from subscribing the handset to a
base station without the PIN.
>Handset
>PhoneLock
>ChangePIN
Change the handset PIN. The default is 1111.
>Handset
>DirectCall Set the handset to dial a specific number regardless
of which key is pressed.
>Handset
>MasterReset Reset all handset features to defaults.
>Handset
>Language Change the language that shows on the handset
display. Options are English, French and Spanish.
>Handset
>Display Change the display’s appearance:
>Handset
>Display
>Light
Turn the backlight on or off.
>Handset
>Display
>Contrast
Adjust the contrast.
>Handset
>AutoAnswer Set the phone to answer automatically when using
optional headset for full hands-free operation.
>BaseStation Subscribe or unsubscribe a handset to a
base station:

CG 2400 User Guide
44
>BaseStation
>Select Select a specific base station for the handset or set
automatic subscription for the base station with
strongest signal.
>BaseStation
>Rename Enter a new name for the base station on the
handset.
>BaseStation
>Delete Unsubscribe a handset from a base station.
>BaseStation
>Resubscribe Resubscribe a handset to a base station when it has
been accidentally unsubscribed from the PC.
>BaseStation
>Subscribe Subscribe a handset to a base station or to a second
base station.
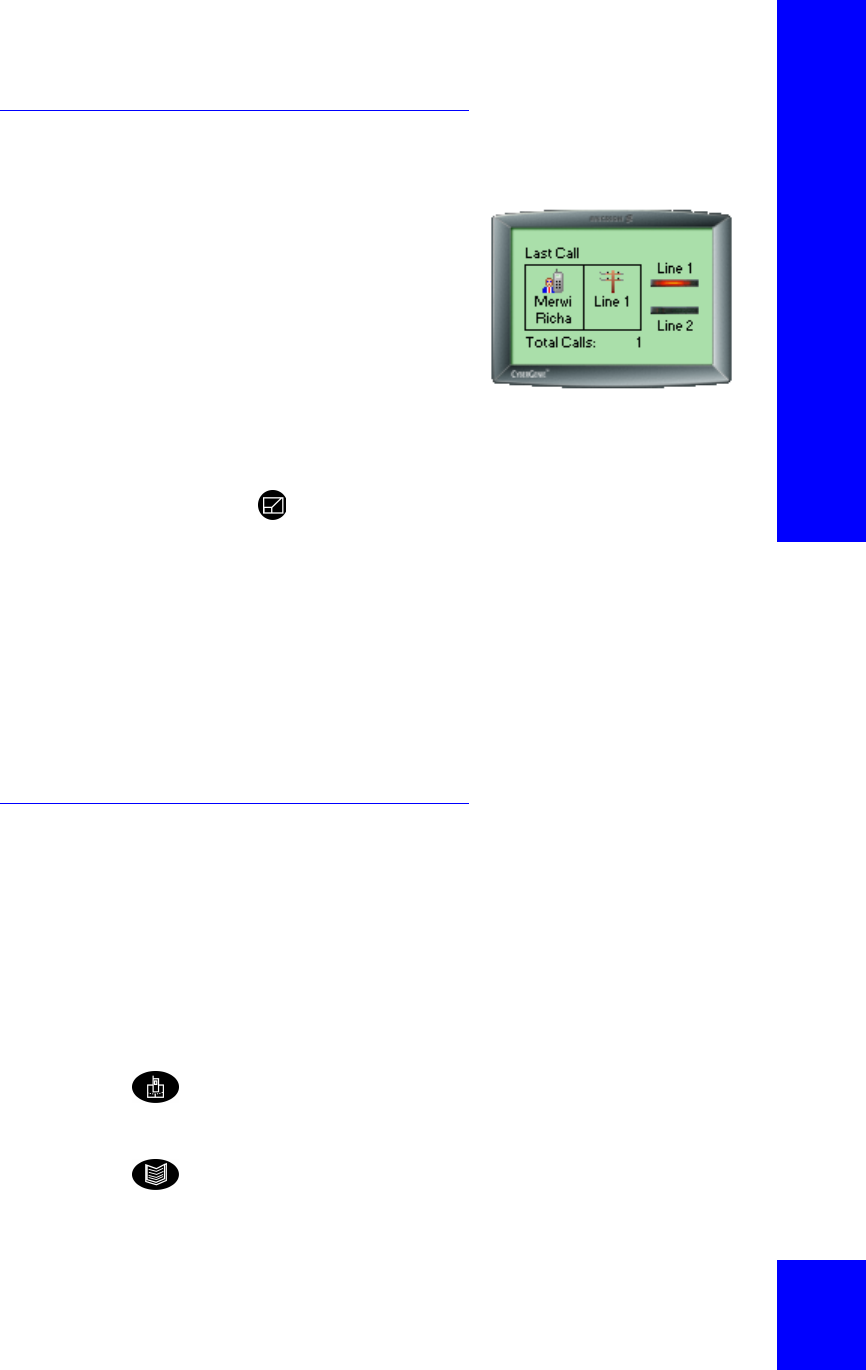
>Information View information about calls recently
placed from this handset:
>Information
>LastDialed View the last number dialed.
>Information
>LastCall View the most recent call’s duration.
>Information
>TotalCalls Total calling time from this handset.
>Information
>ShowIPEI View the handset IPEI (International Portable Part
Equipment Identity) code for the handset.

Chapter 3: The User Interface
45
Speech User Interface
You can use the speech interface during a
CyberGenie session to place calls, control call
functions, and access speech menu options.
NOTE: If you switch
from speech commands
to using the handset
keypad during a call
session, you are no
longer in the speech
interface for the
duration of that
session.
CyberGenie can be used easily by both the new and
the experienced user. When you are not sure what to
do, CyberGenie will assist you. Once you learn to
navigate through the options, you can select them
quickly by speaking or by pressing a key on the
handset.
In some cases (such as a noisy environment), it will
be easier to interact with CyberGenie through the
keypad. CyberGenie will prompt you to press the
correct numeric keys to indicate your menu selection
when that option is available.
Accessing CyberGenie
To access the speech interface, press the key.
When CyberGenie asks Who would you like to call?
you have the following options:
Call by name If you answer CyberGenie's Who would you like to
call? by giving a name in the contact list that is
marked for speech recognition, CyberGenie will
attempt to match the spoken word with a name in
the contact list. Once successful, CyberGenie will
place the call.
CyberGenie menu If you answer CyberGenie's Who would you like to
call? by saying “CyberGenie,” you can begin to
navigate through other available options.
CyberGenie help When using CyberGenie, if you are not sure what to
do or say, CyberGenie will assist.
Depending on the feature you are using, CyberGenie
will either repeat the question, or provide more
detailed help or options.
If you have trouble answering a prompt, remain
silent and CyberGenie will repeat the prompt. If you
need more assistance, say I need help, or Help and

CG 2400 User Guide
46
CyberGenie provides more detailed explanations and
options. You can also press the 0 key at any time
while working with CyberGenie to get help.
Once you are familiar with the system, you can
interrupt the prompts by speaking or pressing a key.
Other CyberGenie Functions
Other speech-activated features include:
Forwarding calls Lets you enable/disable call forwarding as well as
select a forwarding destination.
Checking messages Lets you check voicemail, email, and fax header
messages.
Call parking Places the most recently held external call into park
mode, which allows another handset user to pick up
the call.
Picking up calls Lets you receive the call most recently parked to
your handset.
Recording memos Lets you record a memo to yourself.
Changing voicemail
greetings
Gives you access to the voicemail greetings menu.
Changing welcome
greetings
Gives you access to the welcome greetings menu.
For all CyberGenie options, follow CyberGenie's
instructions to complete the activity.
CyberGenie Quick Reference
Press the key to answer an incoming call.
Press the key to end a call.
Start all CyberGenie sessions by pressing the key
on the handset.
With all of the following commands, you cannot mix
speech and keypad commands. If you start in the
speech interface and press a key to access a
function, you will then be in the handset keypad
interface for the rest of that call session.

Chapter 3: The User Interface
47
Basic commands
Call management
VOICE (SAY) KEY OPTION DESCRIPTION
CYBERGENIEACCESS THE CYBERGENIE SPEECH
INTERFACE MENU
RETURN TO TOP LEVEL FROM ANYWHERE
IN THE MENU TREE
YES 1YES (IN RESPONSE TO CYBERGENIE)
NO2NO (IN RESPONSE TO CYBERGENIE)
PHONE MENU 6ACCESS CALL MANAGEMENT MENU (SEE
“CALL MANAGEMENT” ON PAGE47)
MAIL MENU 7ACCESS MAIL MENU
GREETINGS
MENU
8ACCESS GREETINGS MENU
GOODBYE 9END CYBERGENIE SESSION
I NEED HELP0GET HELP FROM CYBERGENIE FOR
CURRENT ACTIVITY
VOICE (SAY) KEY OPTION DESCRIPTION
CALL BY NAME6 1 START CALL-BY-NAME PROCEDURE
DIAL EXTERNAL
NUMBER
6 2 DIAL EXTERNAL NUMBER
DIAL EXTENTION6 3 DIAL EXTENSION
SWITCH CALL 6 3 SWITCH BETWEEN TWO CALLS WHEN ONE
IS ON HOLD
RETRIEVE 6 4 RETRIEVE A PARKED CALL WHEN A
PARKED CALL IS WAITING ( ONLY ALLOWED
WHEN HANDSET IS IDLE)
HANG UP6 4 END AN ACTIVE CALL
SET UP A
CONFERENCE
CALL
6 5 SET UP A CONFERENCE CALL WHEN TWO
CALLS ARE ON THE LINE
PARK THIS CALL 6 5 PARK THE CALL ON HOLD WHEN ONLY
ONE CALL IS ON THE LINE
FORWARD MY
CALLS
6 6 FORWARD ALL CALLS
STOP
FORWARDING
6 7 STOP CALL FORWARDING
REJECT THIS
CALL
6 8 SEND CALL TO THE REJECTION MESSAGE
AND DISCONNECT

CG 2400 User Guide
48
Unified mail
management
Outgoing message
management
VOICE (SAY) KEY OPTION DESCRIPTION
READ NEW MAIL 7 1 READ NEW MAIL
READ SAVED MAIL7 2 READ SAVED MAIL
RECORD A MEMO7 3 RECORD A MEMO
VOICE (SAY) KEY OPTION DESCRIPTION
VOICEMAIL GREETINGS
(AND/OR)
PERSONAL GREETINGS
8 1 1 ACCESS PERSONAL GREETINGS
VOICEMAIL GREETINGS
(AND/OR)
SYSTEM GREETINGS
8 1 2 ACCESS SYSTEM GREETINGS
WELCOME GREETINGS
(THEN) BUSINESS
HOURS GREETING
8 2 1 ACCESS BUSINESS HOURS
GREETING
WELCOME GREETINGS
(THEN) NON-BUSINESS
HOURS GREETING
8 2 2 ACCESS NON-BUSINESS HOURS
GREETING
WELCOME GREETINGS
(THEN) TEMPORARY
GREETING
8 2 3 ACCESS TEMPORARY WELCOME
GREETING
REJECTION MESSAGE8 3 ACCESS REJECTION MESSAGE
Chapter 3: The User Interface
49
Graphical User Interface
The Server
The CyberGenie@Work server is the background
program that runs CyberGenie@Work. It
automatically loads when you start your PC.
NOTE: If is
yellow, check that the
USB cable is properly
connected and the base
station is powered.)
The CyberGenie button on your Windows system
tray indicates that the software is loaded.
When is green, the server is running. When is
red, the server is shut down. When is yellow, the
PC is not communicating with the base station.
The Application
The CyberGenie@Work application is the software
user interface. The server can run with the
application closed, but you have to open the
application to interact with the program from the
computer.
To access a CyberGenie@Work application
window from the Windows taskbar:
Double-click in the Windows system tray to open
the Call Progress window directly:
CG 2400 User Guide
50
To access a CyberGenie@Work application
window from the Windows taskbar:
1. Right-click in the
Windows taskbar to
open the CyberGenie
rollup menu.
2. From this menu, click
the desired application.
NOTE: Always shut
down the application
and the server before
shutting down your
computer to keep from
losing data.
To close the application:
Click in the upper-right corner of any application
window.
To shut down the server and/or your
computer:
NOTE: With the server
closed, CyberGenie will
not log calls, but you
can still place external
calls from the handset
if the base station is
powered and the
handset charged.
1. If the application is open, close it.
2. Right-click on the Windows taskbar to close
the CyberGenie@Work server.
3. Click Shut Down from the CyberGenie rollup
menu. A series of status messages will appear
indicating that the system is closing down. Do
not power down your computer until the
status messages no longer display!
4. Power down the computer the way you normally
would.
To restart the CyberGenie server:
CyberGenie@Work automatically starts up when you
turn on your computer. To restart it without rebooting
your whole system:
1. Right-click on the Windows taskbar.
2. Click Start Up.
Chapter 3: The User Interface
51
Miniaturizing the Application
Window
You can also minimize the
application window. This
lets you view some call
activity without obscuring
other applications you
might want open on your
monitor screen. When the
window is miniaturized, a
limited amount of information is displayed.
To miniaturize the application window:
Click in the upper right corner of the application
window.
To move the miniaturized window:
Click anywhere on the window and drag it to the
desired position on the screen.
To maximize the miniaturized window:
Double-click on the border of the miniaturized
window.
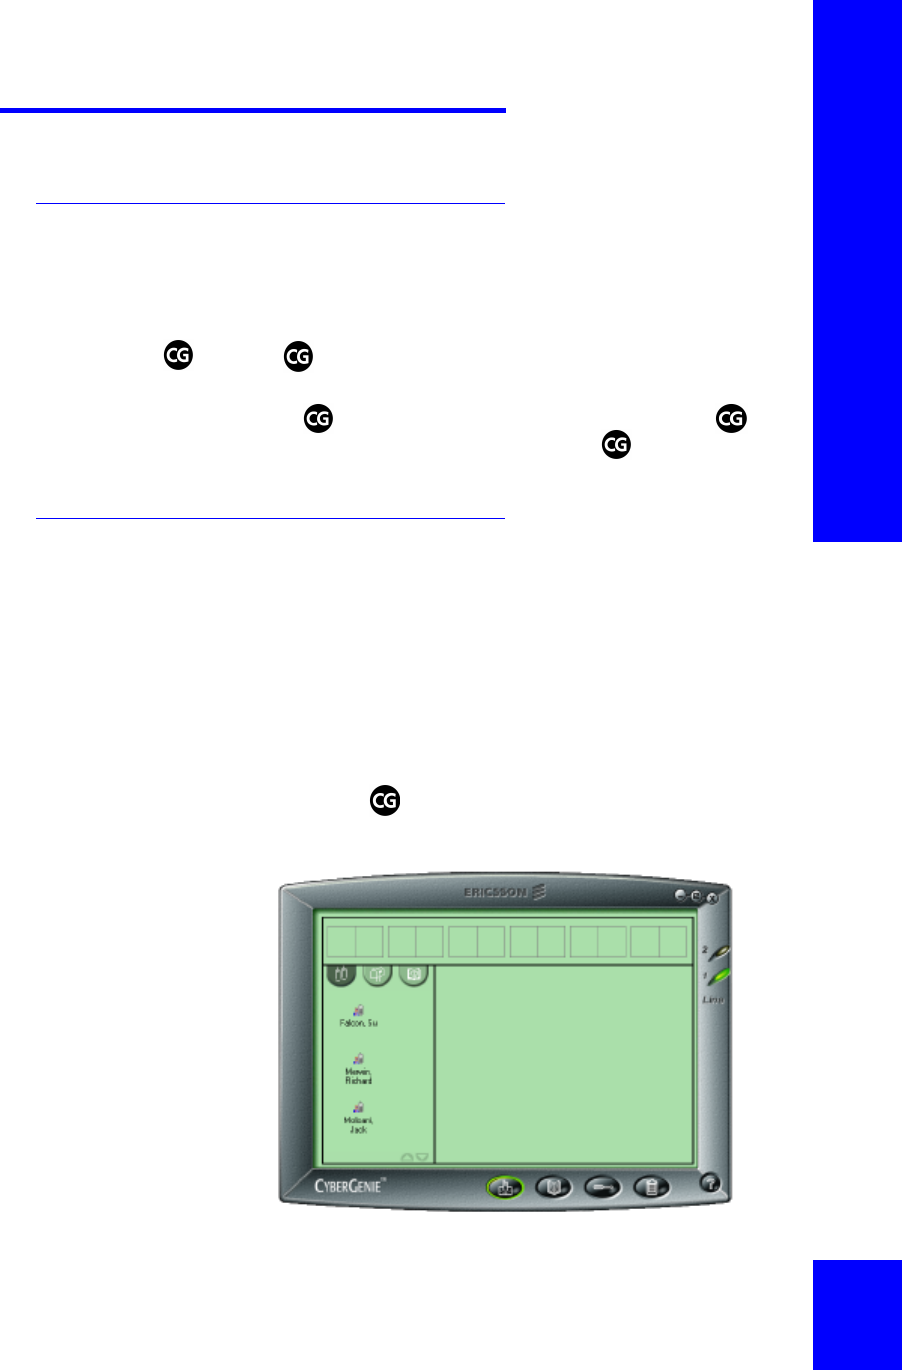
Areas on a Window
Panels A panel is an area on an application window.
Generally, the panel to the left shows available
resources, while the panel to the right shows detailed
information.
Application buttons Application buttons are on the bottom window
border. Clicking an application button opens the
corresponding application window:
The Call Progress button accesses the Call Progress
window. From this window, you can graphically track
calls in progress and perform various call functions.
The Contacts button accesses the Contacts window.
From this window you can view, add, edit, and delete
contact names and numbers.

CG 2400 User Guide
52
The Configuration button accesses the Configuration
window, from which you can edit configuration
settings.
The Call Log button accesses the Call Log window,
which displays a list of all calls in and out.
The CyberGenie@Work Help button accesses the
online help, which provides procedural information.
Clicking on the CyberGenie logo on the bottom left of
the window border will display information on the
version of CyberGenie@Work you have installed. You
can also access registration from this window.
Line indicators The line indicators on the right side of the window
border show phone line status:
Green indicates a line is available.
Red indicates a line is in use.
Amber indicates that outbound calling has been
turned off for this line.
Amber broken indicates that the system cannot
detect a dialtone on the line.
Off (no light) indicates the line is not connected.
Chapter 3: The User Interface
53
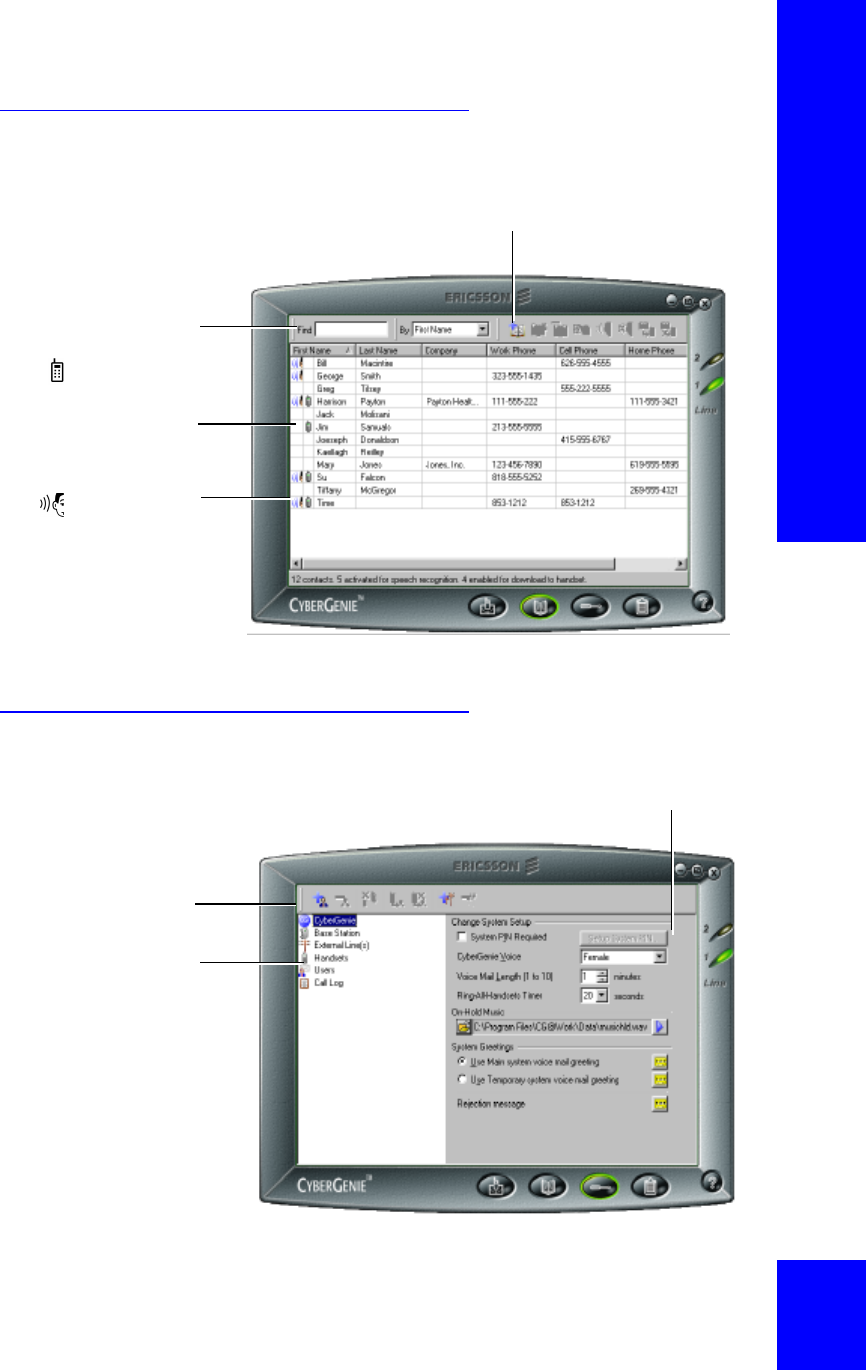
Contacts Window
Configuration Window
You can use the buttons on the application menu bar to
quickly access such features as adding a contact record
or activating a contact for speech recognition.
Use the search fields to
quickly find contact names.
The icon indicates this
contact is activated for
speech recognition.
The icon indicates this
contact’s name and number
can be downloaded to your
handset.
The information displayed on the detail panel on the right
changes depending on the option selected to the left.
The application menu bar
provides quick access to
such features as adding or
deleting a user record.
Click on a configuration
option in the resources
panel on the left to display
details for each option. If
you click a second time on
either Handsets or Users,
lists of available handsets
or active users will also
display in the resources
panel. Click again to hide
the sub-options.
CG 2400 User Guide
54
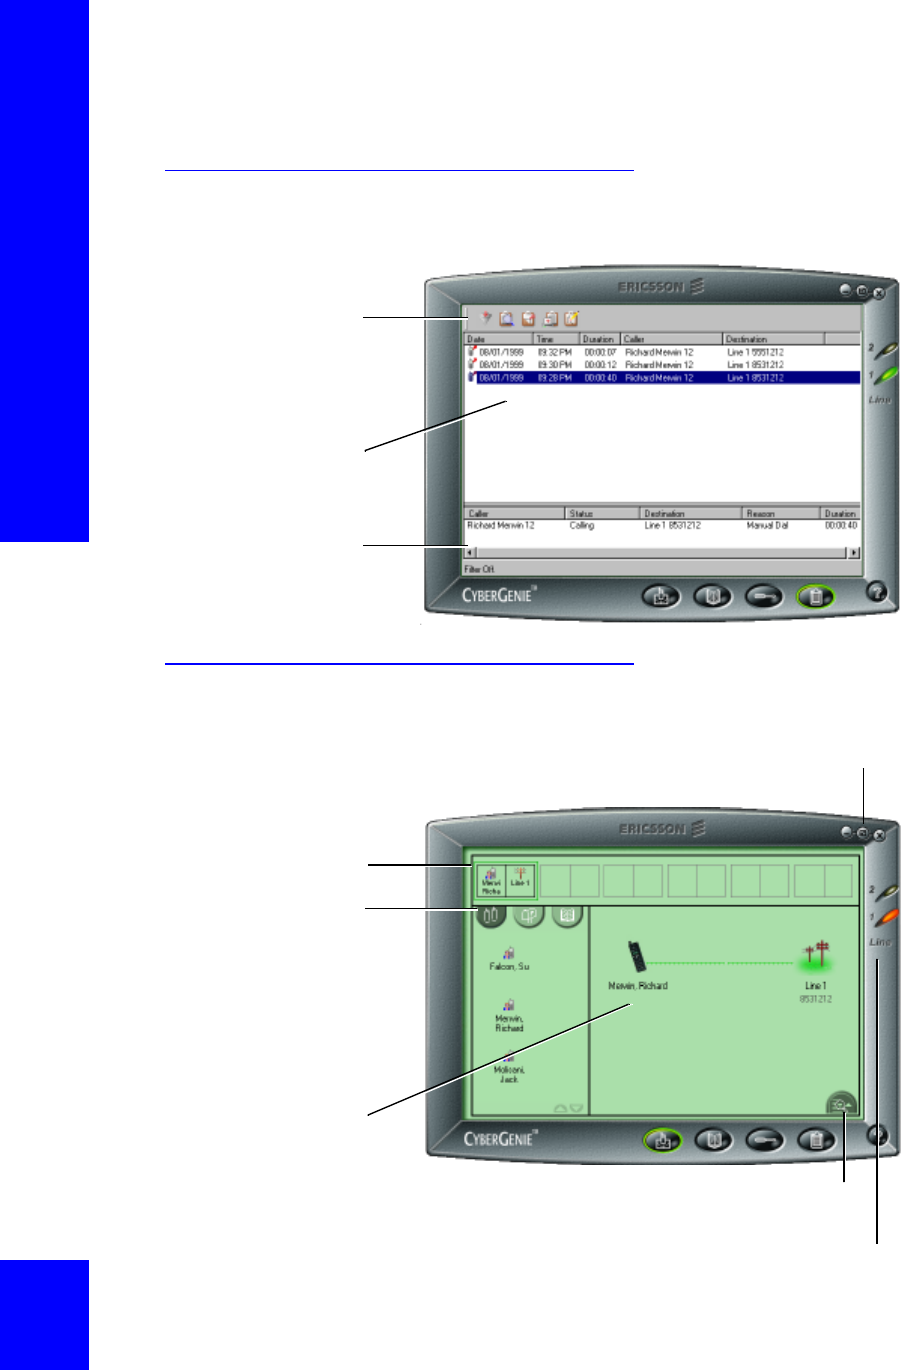
Call Log Window
Call Progress Window
Click to display a text description of the call
in the bottom of the Call Details panel.
The application menu
bar provides quick
access to such features
as filtering or printing
the call log information.
You can view records of
calls made through your
CG 2400 System.
You can also view
detailed information for
each call.
From any application window, you can click this button to
display a miniaturized view of the Call Progress window.
The Call Detail summary
panel shows all current
call activity.
The call resources view
buttons on the User/
Contact panel change the
information displayed in
the left panel. You can
display active handsets,
users with mailboxes or a
full list of contacts.
The Call Details panel
graphically displays call
activity for the air channel
highlighted in the
Summary panel at the top.
Line indicators show which lines are in use.

Chapter 3: The User Interface
55
Online Help
To access online help, click on the application
menu, or access it through the CyberGenie@Work
rollup menu.
To get help for a specific window, press F1 while in
the window.
If you right-click while over specific fields, a What’s
This? pop-up appears. Click What’s This? for field-
specific information.

CG 2400 User Guide
56