Cygnion HRCU10102 Cordless Phone User Manual Chapter5
Cygnion Corporation Cordless Phone Chapter5
Cygnion >
Contents
CG2400 chapter 5

91
Chapter
5System
Administration
The CG 2400 System and
Your PC
Three basic areas of CG 2400 system administration
are performed primarily from the PC:
•Monitoring and controlling calls from the Call
Progress window.
•Using the Call Log window to view call histories.
•Maintaining the contacts database on the
Contacts window.
CG 2400 User Guide
92
Call Progress
From the Call Progress window, you can view or
monitor all current call activity as well as control
various call functions, including:
•Placing a call
•Transferring a call
•Making a conference call
•Rejecting a call
•Canceling any call operation
•Listening to someone leaving a voicemail
message.
There are three possible call session combinations:
•External line to handset
•Handset to external line
•Handset to handset.
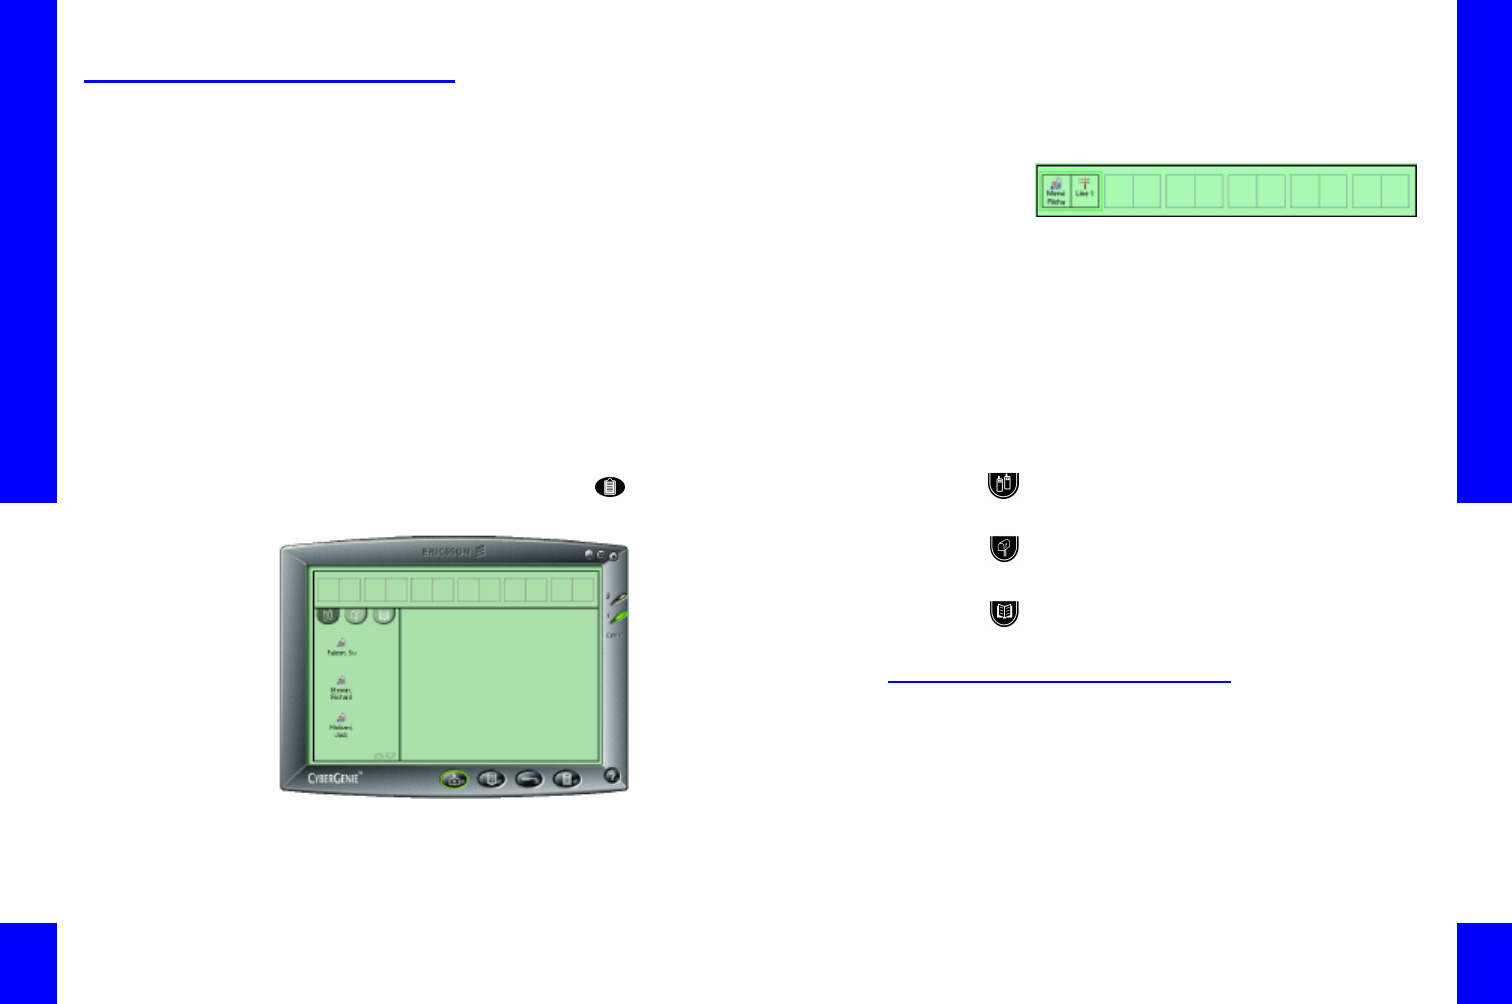
To access the Call Progress window, click the
application button.
The Call Progress window is divided into three
distinct areas:
Chapter 5: System Administration
93
System Call
Activities
A graphical view of any system call activities. Each
pair of boxes shows a single call session. A call
session displays the source of a call and the call
destination.
Call Details The Call Details panel displays call details for
whichever call session is highlighted in the System
Call Activities panel. It is also the area from which
you can control calls.
If you click the text display button on the bottom
right corner of this panel, the panel will split, and a
text description of the current call activity will display
in the bottom panel.
User/Contact This panel can provide three different views of call
resource information, depending on which icon is
active:
Displays all users with handsets assigned and lets
you redirect or transfer an active call to any user
displayed.
Displays all mailboxes, whether or not the user has
an active handset, and lets you transfer an active call
to any user mailbox displayed.
Displays the contacts list, and lets you place a call to
any contact displayed. (See “Adding and Updating
Contact Records” on page107.)
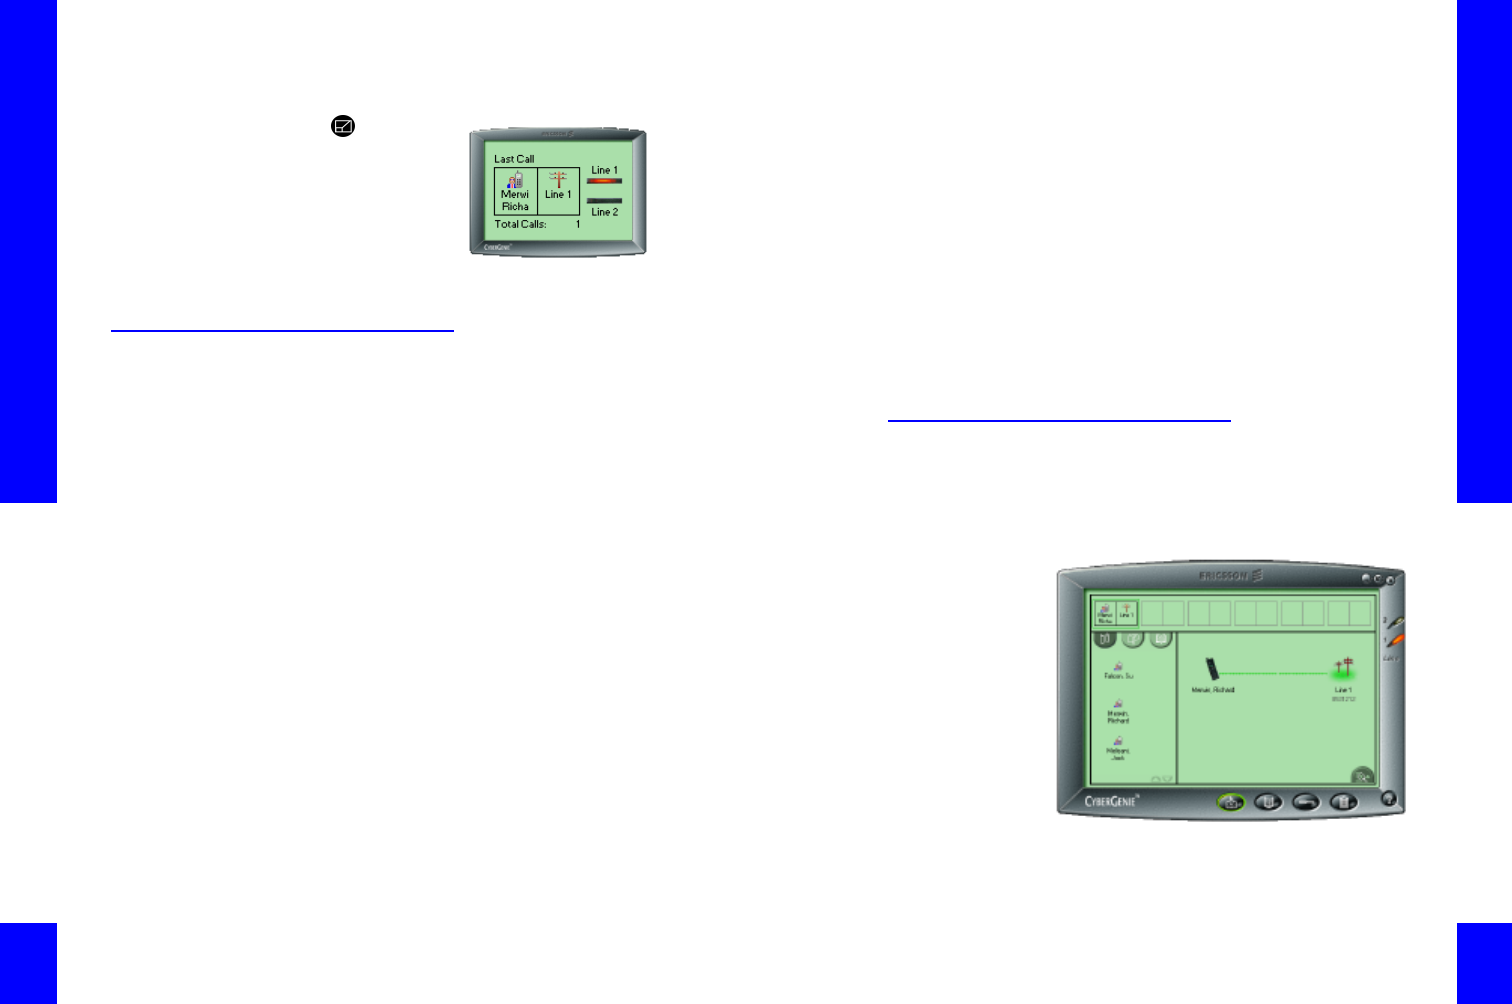
Miniaturizing the Call Progress
Window
You can view the Call Progress window in full-screen
view or miniaturized.
CG 2400 User Guide
94
To miniaturize or maximize the Call
Progress window:
1. Click in the upper
right-hand corner. The
image will miniaturize:
2. Click and drag from
anywhere on the
image to reposition it
on the screen.
3. Double-click anywhere on the image border to
maximize the window.
Call Progress Control
There are three basic types of call you can control
from the Call Progress window:
Two-party calls: Two-party calls involve only two parties: a call
received from an external line, a call placed from a
handset to an external line, or an internal call from
one handset to another. For two-party calls, you can:
Dial Dial a call by putting the first call on hold and
dialing a second number while the first call waits.
When you use this feature, it turns your two-party
call into a three-party call.
Transfer Transfer an existing call to another
handset, to voicemail, or to an external line.
Reject Reject a call by sending the call to the
rejection message, after which the caller is
disconnected.
Cancel Cancel any current call operation.
Three-party calls: Three-party calls involve three parties: conference
calls, or calls that have one party on hold while the
handset user places or receives another call. For
three-party calls in progress, you can:
Transfer Transfer the conference call to the non-
originating party, which will remove the call
originator without disconnecting the call.
Chapter 5: System Administration
95
Conference Conference a call by dialing a third
party while you have an existing call on hold, then
conferencing all three parties into the call session.
Reconnect Reconnect the call to the original call
configuration, disconnecting the third party from the
call.
Cancel Cancel any current call operation.
Incoming calls: This could be an incoming call from an external line,
or an incoming call from one handset to another. For
incoming calls, you can:
Redirect Redirect the incoming call to another
handset or voicemail.
Listen Listen to an incoming message when a call
goes to voicemail. The listen feature is only available
for external calls.
Viewing Calls in Progress
Call functions available vary depending on whether
the call is a two- or three-party call or an incoming
call. All functions assume that you have a call in
progress displayed on the Call Progress window:

CG 2400 User Guide
96
Dialing an Additional Call
When an active call is displayed in the Call Progress
window, you can place a call to a third party without
disconnecting the parties currently engaged in the
call session.
NOTE: To originate a
call from the computer,
see “Dialing a Contact
from Your PC” on
page110.
While the current call is placed on hold, the
additional call can be placed to either an internal or
external number.
To place an additional call:
1. Access the Call Progress window.
2. If more than one call session displays, click the
desired session on the System Call Activities
panel to display the call session in the Call Details
panel.
NOTE: The first party
remains on hold until
the new call is
terminated or until you
conference all parties in
on the call (see
“Conferencing a Call”
on page98).
3. If the new call will be to an internal number, click
in the Call/Contact panel to display the active
handset users. If it is to an external number, click
to display the Contacts list.
4. Place the mouse cursor over the Handset icon on
the Call Detail panel. A menu box will pop up.
5. Click Dial, then double-click the user or contact
to which the new call will be placed.
Reconnecting a Call
If you have two calls active from the same originator,
but the calls are not conferenced, you can quickly
disconnect the second call and return to the original
call with the Reconnect option.
To reconnect a call:
NOTE: This option
works only with a
three-party call that is
not a conference call.
1. Place the mouse cursor over the Handset icon on
the Call Detail panel. A menu box will pop up.
2. Click Reconnect. The third party will be
disconnected and the second party will return to
active call.
Chapter 5: System Administration
97
Transferring a Call in a Two-
Party Scenario
You can transfer a call to another handset, to
voicemail, or to an external number.
To transfer a call:
NOTE: You can
transfer the call to an
external number only if
the call is from another
handset. You cannot
transfer an external call
to another external
number.
1. Access the Call Progress window.
2. If more than one call session displays, click the
desired session on the System Call Activities
panel to display the call session in the Call Details
panel.
3. If the call will be transferred to an internal
number, click in the User/Contact panel to
display the active handset users. If it is to be
transferred to voicemail, click to display the
Mailbox list. If the call is an internal call to be
transferred to an external number, click to
display the Contacts list.
4. Place the mouse cursor over the Handset icon on
the Call Detail panel. A menu box will pop up.
5. Click Transfer, then double-click the user or
contact to which the new call will be placed.
The call will terminate from the original handset
when the transfer to the new handset or
voicemail is made.
Transferring a Call in a Three-
Party Scenario
When you have dialed an additional number (see
“Dialing an Additional Call” on page96), you have
the option of transferring the new call to the second
party, which will remove the call originator from the
call session without disconnecting the remaining two
parties.

CG 2400 User Guide
98
To transfer a call in a three-party scenario:
1. With the first party connected, dial the additional
number as described in “Dialing an Additional
Call” on page96.
2. When the third party answers, place the mouse
cursor over the handset icon on the Call Detail
panel. A menu box will pop up.
3. Click Transfer. The call will be transferred and
the originating caller disconnected.
Conferencing a Call
A conference call is where three parties can talk
during a single call session simultaneously. Once you
initiate a conference call, no other actions can be
taken with that call other than disconnecting one or
all lines.
To make a conference call:
1. Access the Call Progress window.
2. If more than one call session displays, click the
desired session on the System Call Activities
panel to display the call session in the Call Details
panel.
3. If the third party in the conference call will be an
internal number, click in the Call/Contact
panel to display the active handset users. If it is
to be an external number, click to display the
Contacts list.
NOTE: If the call
originator hangs up
first from the handset,
the remaining parties
can continue to talk.
4. Place the mouse cursor over the Handset icon on
the Call Detail panel. A menu box will pop up.
5. Click Dial, then double-click the user or contact
to which the new call will be placed.
6. When the third party answers, click Conference.
The system will automatically connect all parties.
Chapter 5: System Administration
99
Rejecting a Call
You can send an active call to the rejection message
while it is displayed on the Call Progress window. (For
more information, see “Recording a Rejection
Message” on page63.)
To reject a call:
NOTE: You can only
reject an incoming
external call. You
cannot reject an
internal call.
1. Access the Call Progress window.
2. If more than one call session displays, click the
desired session on the System Call Activities
panel to display the call session in the Call Details
panel.
3. Place the mouse cursor over the handset icon on
the Call Detail panel. A menu box will pop up.
4. Click Reject. The caller will be routed to the
rejection message. When the message finishes
playing, the call will be terminated.
Redirecting an Incoming Call
When a call comes in, you can redirect it to another
handset or to voicemail from the Call Progress
window.
To redirect a call:
1. Click the incoming call icon.
2. Click the handset or mailbox to which the call will
be redirected.

CG 2400 User Guide
100
Listening to Incoming
Messages
With CyberGenie@Work, you can screen incoming
messages.
To listen to an incoming message:
NOTE: You can only
screen an incoming
external call. You
cannot screen a
message left internally.
1. Wait until the call routes to a mailbox.
2. Place the mouse pointer over the mailbox, then
click Listen.
3. If you want to take the call, click Redirect, then
click on your handset. The call will ring through to
you.
Chapter 5: System Administration
101
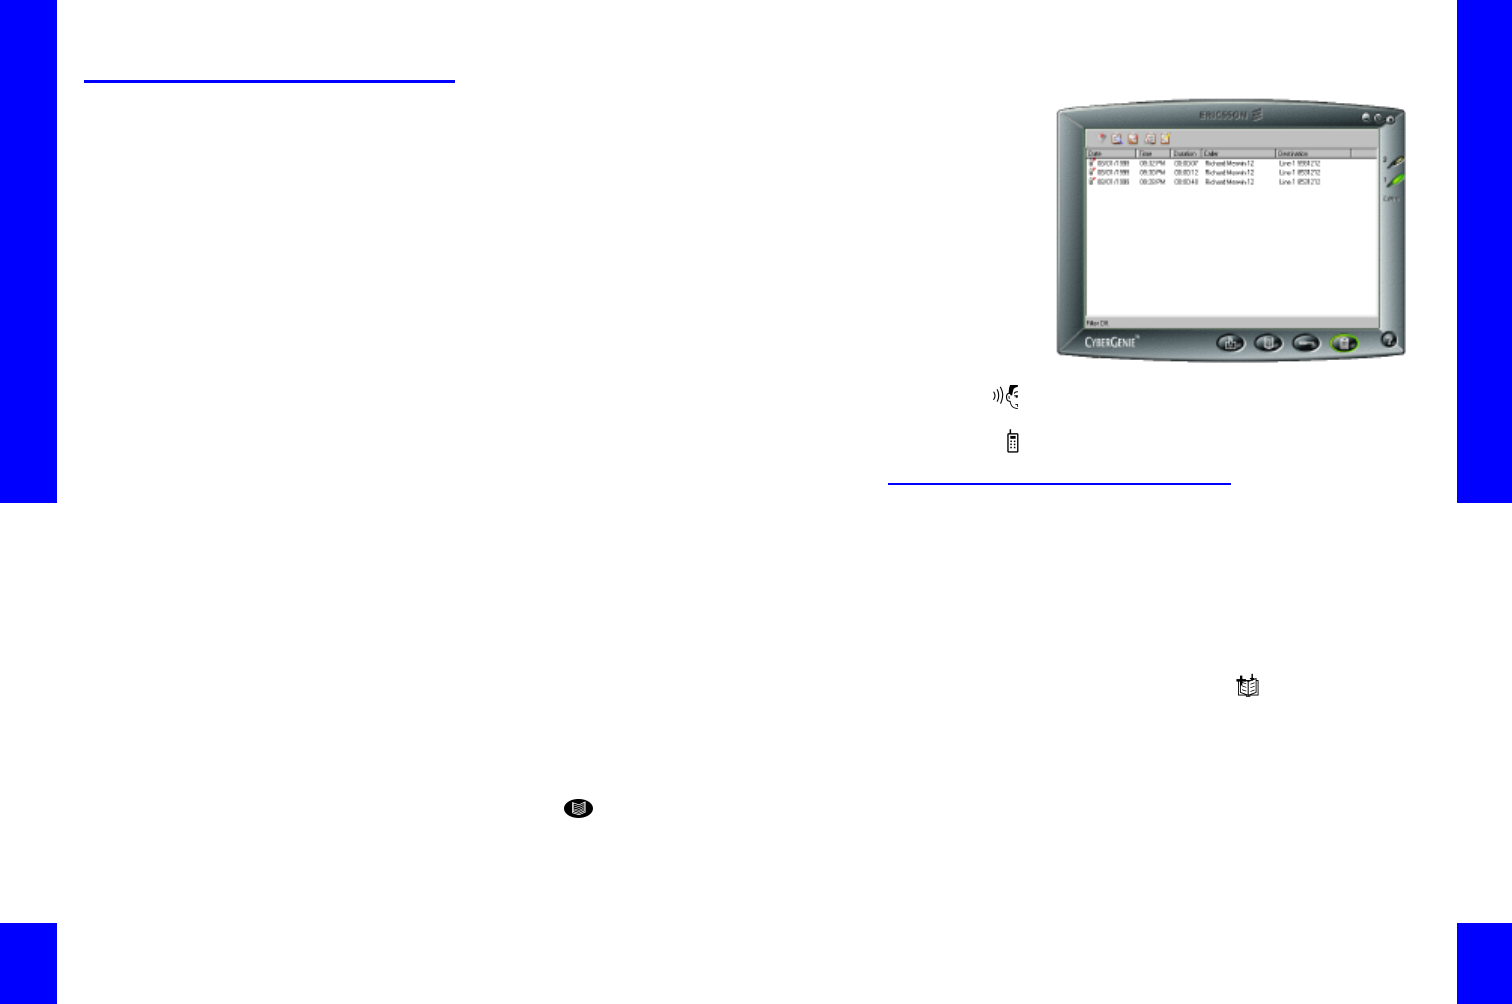
Call Log
The call log displays a detailed history of all calls
made through the system. The summary data
displayed includes:
Date Date the call was placed.
Time The time it was placed.
Duration How long the call lasted.
Caller Who originated the call.
Destination Who received the call.
You can also view detail data for each call:
Status The call’s current state. For a full list of possible
statuses, see the “Call Status Table” on page176.
Reason The reason for the status. For a full list of possible
reasons, see the “Call Reason Table” on page177.
The actual data captured to the call log can be
selected through system configuration. For more
information on configuring the call log data, see “Call
Log Setup” on page89.
The data in the call log can be sorted in various ways,
as well as filtered and/or printed, but all data
displayed is for information only and cannot be
changed from this window.
The handset icon on the log indicates the type of call:
Indicates an incoming call from an external source.
Indicates an outgoing call to an external destination.
Indicates an internal call between two handsets.
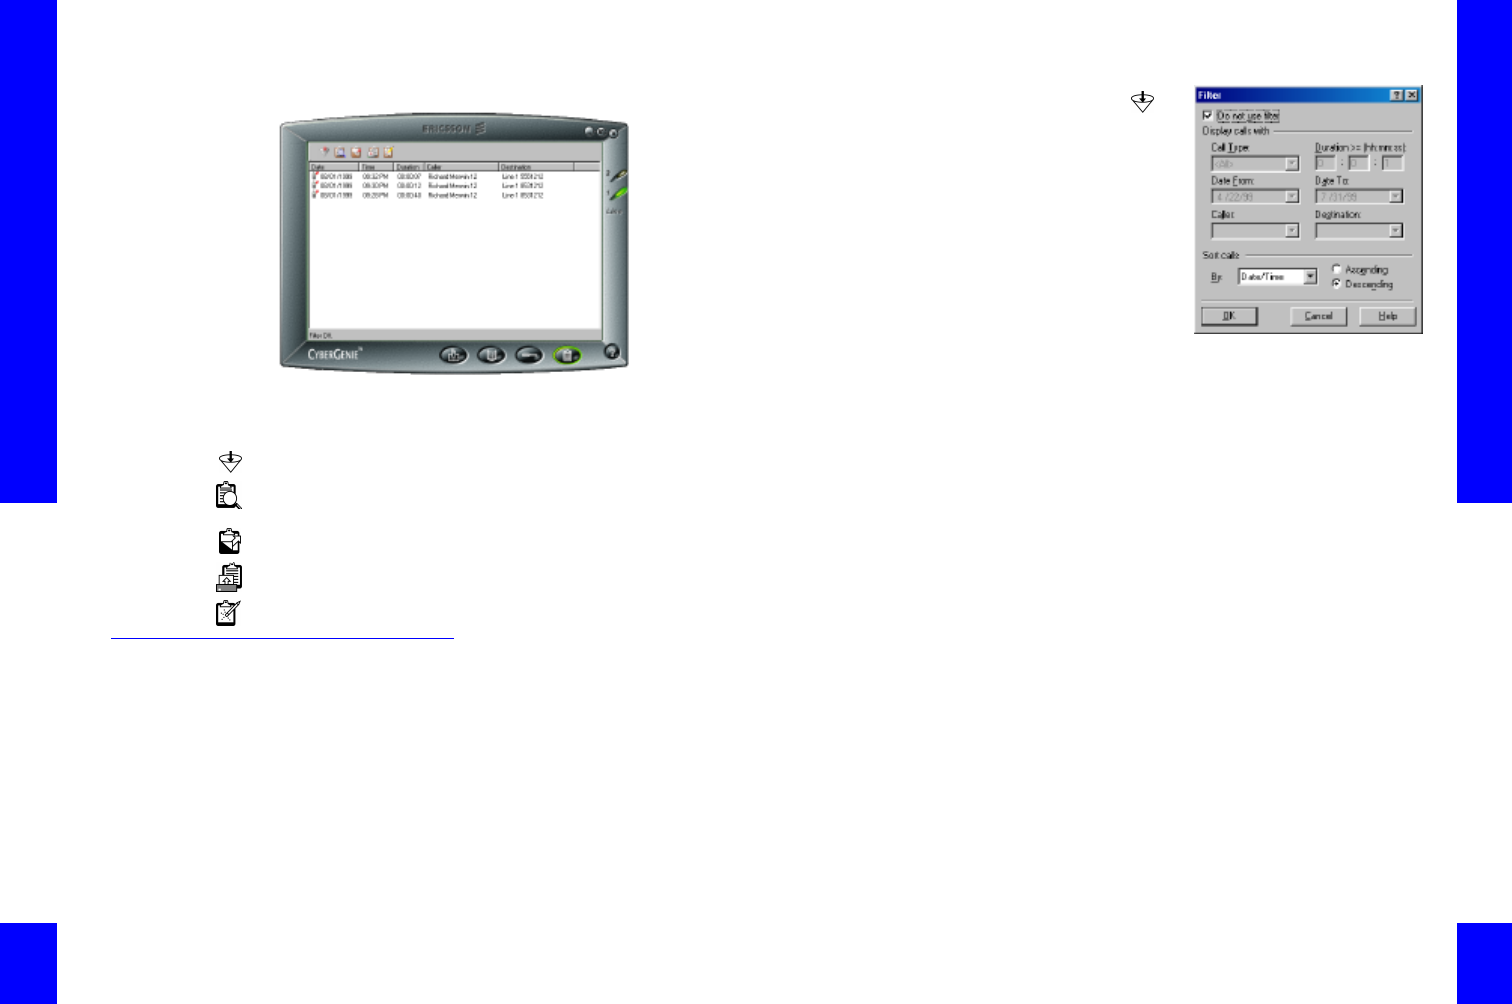
Viewing the Call Log
To access the Call Log, click the application
button.
CG 2400 User Guide
102
When the Call Log application window is open, the
CyberGenie@Work menu bar provides the following
options:
Lets you filter call information.
Opens a second panel that displays call detail
information for a highlighted call record.
Refreshes the display with any new call records since
you’ve accessed the Call Log window.
Prints the call log.
Clears all log entries.
Filtering Call Records
The default display is for all call records. You can
restrict the records displayed by using the filter.
To filter call records:
1. Access the Call Log window.
Chapter 5: System Administration
103
2. On the menu
bar, click . A
Filter dialog box
opens.
3. To filter
records, ensure
that the Do not
use filter
checkbox is not
checked.
4. Select from
some or all of
the filter
options:
Under Call Type, click the down arrow to select
from a list of options. The default is All.
Enter hours, minutes, and seconds as desired to
view all calls with a Duration greater than the
time you enter. For example, to view all calls that
are more than 30 minutes long, enter 00:30:00.
Enter a Date From and Date To range, or click
the down arrow on each date to view and select
from a calendar.
Under Caller, click the down arrow to view and
select from a list of originating callers. Note that
the source of the call is always either a user with
an assigned handset for internally originated
calls, or an external line number for incoming
calls.
Under Destination, click the down arrow to view
and select from a list of call destinations.
To choose a Sort order, click on the down arrow.
You can also select Ascending or Descending
order.
5. When done, click OK. Only the data selected with
the filter will display.
CG 2400 User Guide
104
To turn off the filter:
1. Click again.
2. Click Do not use filter to set the check in the
box.
3. Click OK.
Changing Sort Order from the
Log
You can also change the sort order of the call records
directly from the Call Log window.
To change the sort order:
1. Access the Call Log window.
2. Place your mouse pointer over the column
heading by which you want to sort.
3. Click the column heading. The data will resort
based on that heading. For example, if you sort
by Duration, calls with the longest duration will
appear at the top of the log, with the shortest
calls at the bottom.
Viewing Details
The View Detail function displays additional
information about each specific call in the bottom of
the main Call Log window.
To view call details:
1. Access the Call Log window.
2. On the menu bar, click . The details panel will
open.
3. Scroll through the panel using the scroll bar on
the right if needed.
4. Click and drag the top of the details panel to
resize.
5. When done, click again to close.
Chapter 5: System Administration
105
Refreshing the Call Log
You can refresh the display with records of any new
call since you’ve accessed the Call Log window.
To refresh the call log:
On the menu bar, click . The log will update with
any new call records.
Printing the Call Log
To print the call log:
1. Access the Call Log window.
2. On the menu bar, click . A print dialog box will
open.
3. Select the report parameters, then click OK to
print the report.
Clearing the Call Log
You also have the option of deleting all call records
from the log.
CAUTION: Once
deleted, you will not be
able to recover the call
log information.
As necessary for system maintenance, a system
administrator may need to clear individual logs or the
entire log.
To clear the call log:
1. Access the Call Log window.
2. To clear a single log entry, highlight the record
line before step 3. To clear all entries, do not
highlight any lines.
3. On the menu bar, click .
4. Click Yes to confirm deletion.
CG 2400 User Guide
106
Contacts
CyberGenie@Work lets you maintain a list of
contacts. You can use this information to place calls
from the Call Progress application window or from
your handset through CyberGenie.
If you use Microsoft Outlook or another MAPI-
compliant email software package,
CyberGenie@Work can read the entries in your
existing phonebook, and you can add names and
addresses from the Contacts application window. If
you don’t use another application, you can create a
contact list directly in CyberGenie@Work.
Whether your contacts list is created in Outlook or
CyberGenie@Work, several fields are added to the
database that provide special features only available
with CyberGenie:
Speech recognition Lets you flag an entry in your contacts list so that a
user can ask CyberGenie to dial a number, and
CyberGenie will recognize the name and dial it based
on your spoken command.
Pronunciation You can enter the name phonetically to ensure that
CyberGenie understands the name and pronounces it
correctly.
Download to handset Lets you flag a contact record for downloading to
your handset directory. The handset can store up to
100 names and phone numbers. (For more
information, see “Downloading the Phonebook to
Your Handset” on page145.)
Alias A nickname for this contact (for example, Uncle
George) that CyberGenie will recognize for speech
access.
Display name The name that shows on the handset display when
this contact is called.
To access the Contacts window, click the menu
button.
Chapter 5: System Administration
107
Indicates that a contact is activated for speech
recognition.
Indicates that a contact has been flagged for handset
download.
Adding and Updating Contact
Records
New contact records can be added at any time. A
contact record requires a minimum of first or last
name, and one phone number.
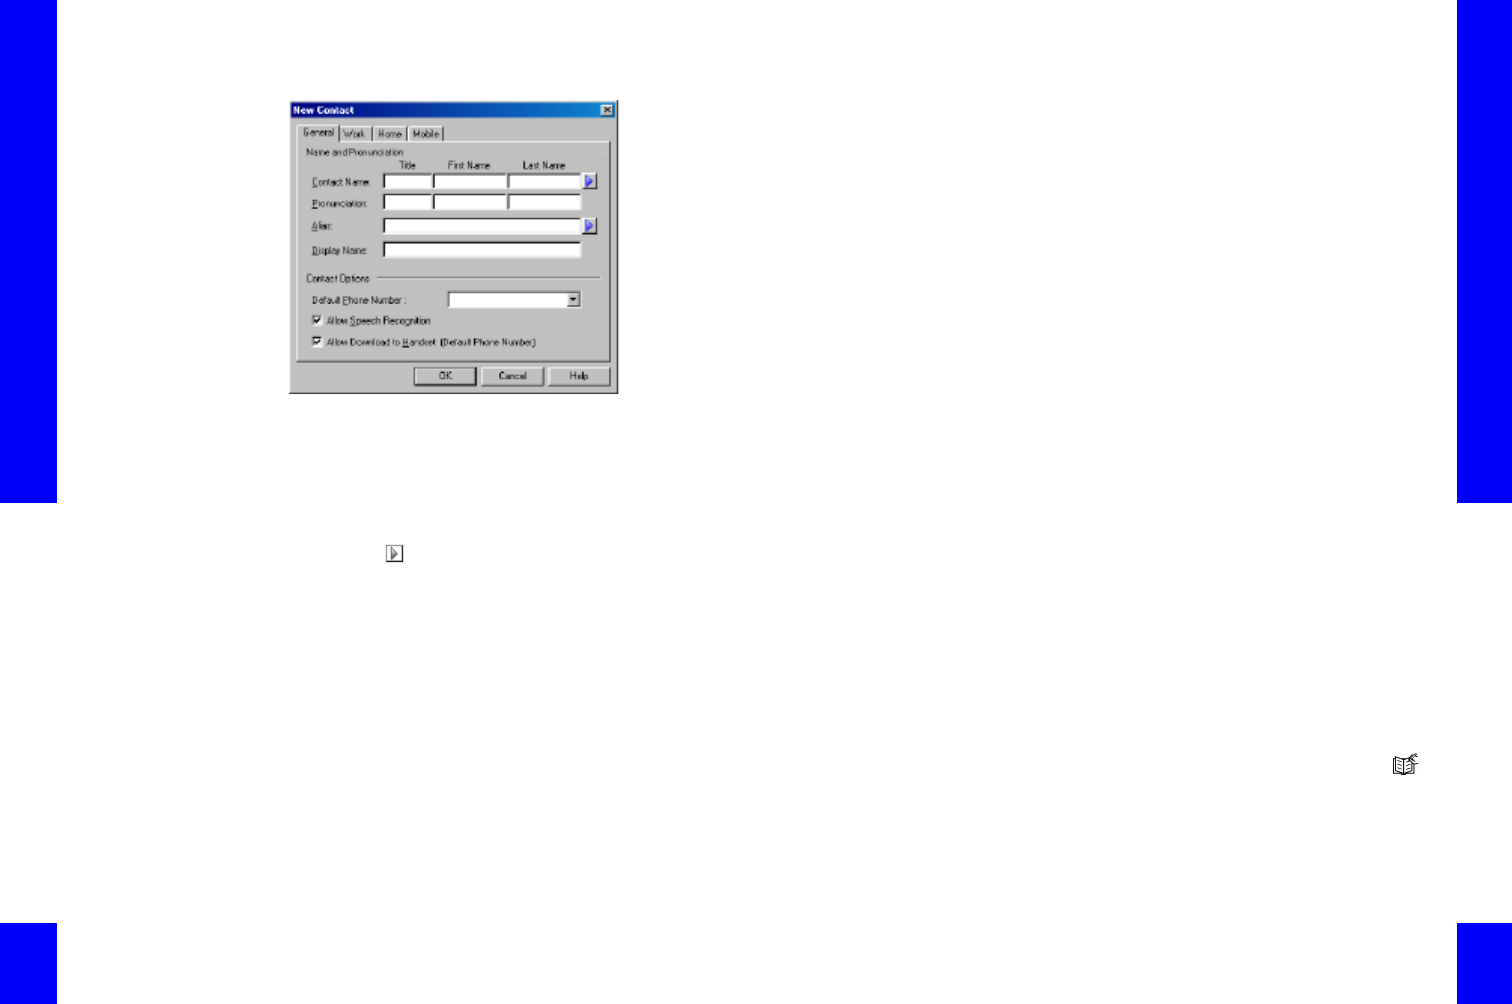
To add a new contact—General data:
1. Access the CyberGenie Contacts window.
2. On the menu bar, click . The New Contact
window will open, with the General tab on top:
CG 2400 User Guide
108
3. Enter the following data:
Title (optional)
First Name and/or Last Name At least one
must be entered.
NOTE: For tips on how
to improve
CyberGenie’s
pronunciation and
understanding of
contact names, see
“CyberGenie
Pronunciation” on
page171.
Pronunciation (optional) If you plan to use
this contact name with the speech recognition
feature, click beside the Last Name field to
test CyberGenie’s pronunciation. If the name is
not pronounced correctly, enter the name
phonetically (as it sounds) under Pronunciation.
For example, you could enter the name “Kaellagh
Reilley” as KAYla RYElee.
Alias (optional) A nickname for this contact.
For example, Uncle George. If you enter an alias,
CyberGenie will hear either the alias or the
contact’s proper name. If you have duplicate
names in the contact list, this is a way around
getting the wrong contact when using CyberGenie
speech recognition feature.
Display Name (optional) The name entered
here will display on the user’s handset when a
handset is assigned to that user. Note that if you
Chapter 5: System Administration
109
leave this field blank, the user’s name will be the
default display.
Default Phone Number to Dial Out Used as
the default destination number when a handset
user uses speech recognition to dial a contact
without specifying a different call destination.
This defaults to the first phone number entered,
but can be changed at any time.
Allow Speech Recognition Click to activate the
speech recognition feature for this contact.
Allow Download to Handset Click to allow this
contact name and number to be downloaded to a
handset.
To add a new contact—Phone numbers:
NOTE : You may need
to insert a pause for
some phone numbers.
For example, some
phone systems require
you to dial an extension
after a short greeting.
A comma signals the
system to pause for 3
seconds. The pause
character is only
available when the
system is online.
1. Click the Work tab to open the next window,
then enter the contact’s work information. All
fields on this window are optional.
2. Click the Home tab to open the next window,
then enter the contact’s home information. All
fields on this window are optional.
3. Click the Mobile tab to open the final window,
then enter the contact’s mobile phone and pager
information. All fields on this window are
optional.
4. If desired, return to the General tab and select
the Default Phone Number to Dial Out.
5. When done, click OK to save the record.
To edit a contact:
1. Access the CyberGenie Contacts window.
2. Click to highlight the contact record to be edited
and double-click the contact record, or click
on the menu bar, or right-click on the contact
name, then click Open.
3. Type over existing data. Refer to the procedures
on adding a contact above as needed.
4. When done, click OK.
CG 2400 User Guide
110
To remove a contact:
1. Access the CyberGenie Contacts window.
2. Highlight the contact record to be removed.
3. On the menu bar, click , or right-click the
contact record, then click Remove.
4. Click Yes to confirm deletion.
Editing a Contact Directly
You can use the standard Windows interface rules for
copy, cut, and paste on a single field while in the
Contacts window.
To cut, copy, or paste a field:
NOTE: Refer to your
Windows help for more
information on cut,
copy, and paste
procedures.
1. To highlight a single field, click the field, then
click a second time. Note that this is two clicks,
not a double-click.
2. Right-click to open a dialog box, or use the
Windows keyboard shortcuts.
3. Move the cursor to the field where you want to
paste or copy. Repeat step 2.
Dialing a Contact from Your PC
While the Call Progress window provides ways of
manipulating calls already in progress, you can
originate a new call from the Contacts window.
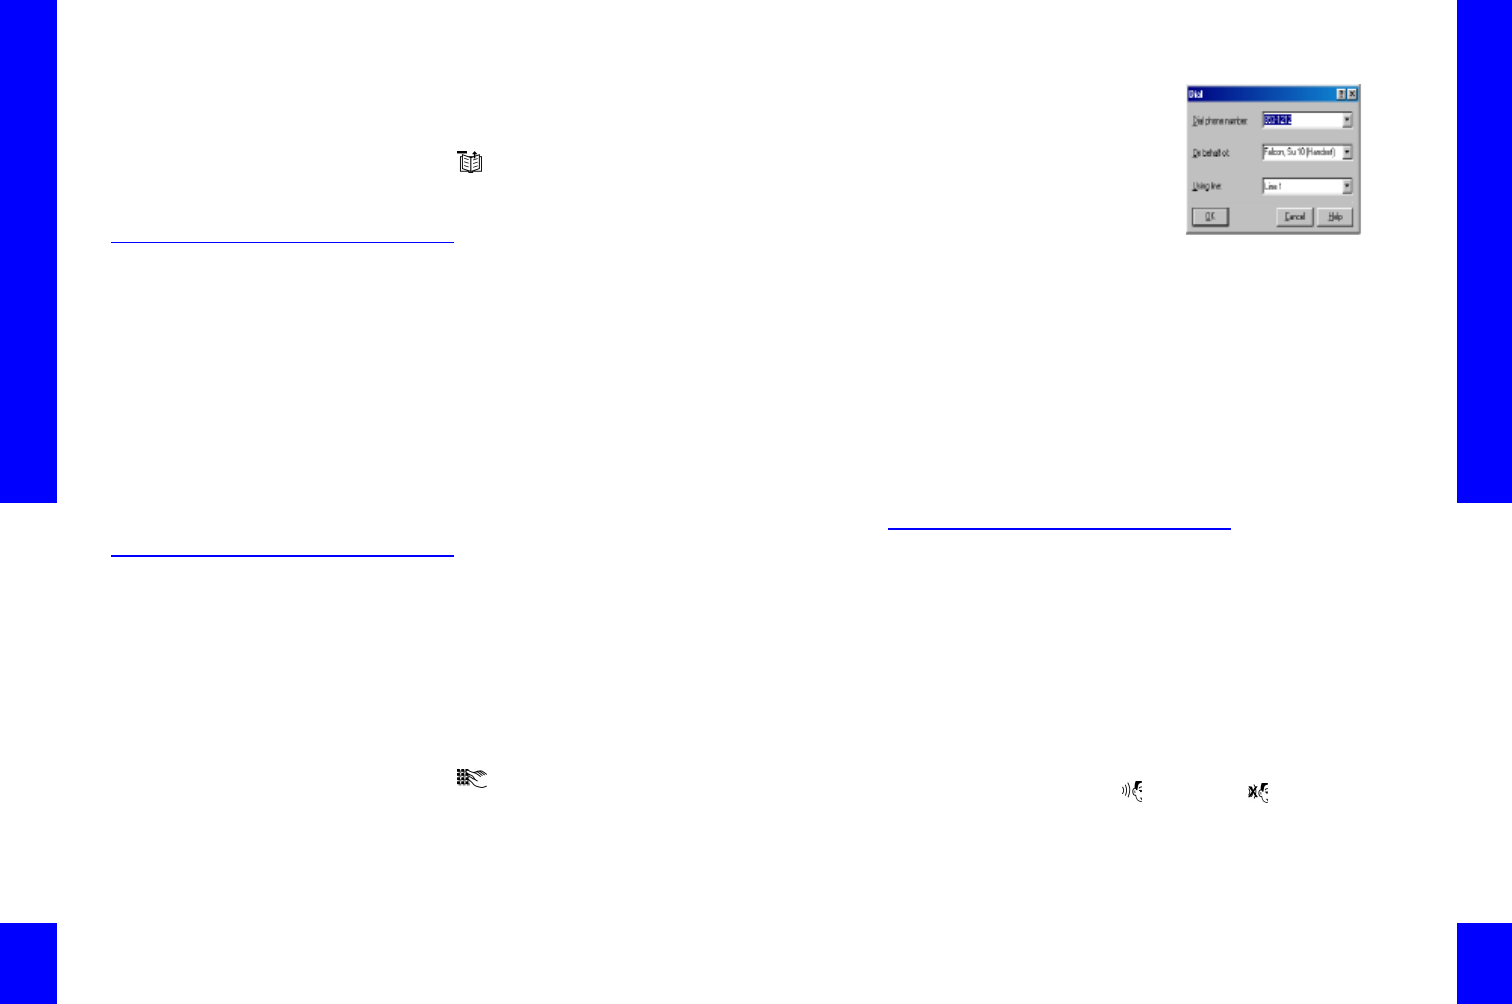
To dial a contact:
1. Access the CyberGenie Contacts window.
2. Click to highlight the name of the contact to be
dialed.
3. On the menu bar, click , or right-click the
contact name, then click Dial. A dialog box
opens.
Chapter 5: System Administration
111
Verify or
change the
following data:
Dial phone
number The
number to be
dialed. If
incorrect, click
the down
arrow to view and select from a dropdown list of
numbers for this contact.
On behalf of The handset user to whom the call
will be routed. If incorrect, click the down arrow
to view and select from a dropdown list of
handset users.
Using line The line on which the call will be
placed. The default is Auto Select. If you have
only one analog line connected to the base
station, your only option will be Line 1.
4. When done, click OK to initiate the call. It will be
directed to the selected handset.
Activating Speech Recognition
When a contact name is flagged for speech
recognition, a handset user can ask CyberGenie to
dial a number, and CyberGenie will recognize the
name and dial it based on the spoken command.
There are three ways you can activate or deactivate
speech recognition for a contact:
•From the Add Contact or Edit Contact panels,
under the General tab (described starting on
page107).
•By clicking the contact name to highlight, then
clicking (activate) or (deactivate) on the
menu bar.
•By right-clicking the contact name, then clicking
either Activate Speech Recognition or
Deactivate Speech Recognition.

CG 2400 User Guide
112
Enabling Download to Handset
When a contact name is enabled for downloading to a
handset directory, a handset user can download the
contact and default number to the handset for quick
reference. A handset can store up to 100 names and
numbers. (For more information, see Chapter 7:
Calls from the Handset, under “Calls from the
Handset Phonebook” on page145.)
There are three ways you can enable or disable a
record for downloading to a handset:
•From the Add Contact or Edit Contact panels,
under the General tab (described starting on
page 517).
•By clicking the contact name to highlight, then
clicking (activate) or (deactivate) on the
menu bar.
•By right-clicking the contact name, then clicking
either Enable Download to Handset or
Disable Download to Handset.
Changing the Sort Order for
the Contacts List
You can change the sort order of the contacts list to
more quickly find specific contact information.
To change the sort order:
1. Access the Contacts window.
2. Place your mouse pointer over the column
heading by which you want to sort.
3. Click the column heading. The data will re-sort
based on that heading. For example, if you sort
by Company, all contacts with no company will
display first, then contacts will be grouped by
company, in alphabetical order.
Chapter 5: System Administration
113
Changing Your Contacts View
CyberGenie@Work provides two different views for
your contacts list:
Spreadsheet The default view, where each record displays on a
single line.
Business card A second panel opens over the spreadsheet, and
displays a single record at a time in a business card
layout.
To change your contacts view:
1. Access the CyberGenie Contacts window.
2. Right-click on a contact record, then click Show
Business Card. The view will change.
3. To return to spreadsheet layout, repeat steps 1
and 2.

CG 2400 User Guide
114