LINKSYS WT54GV40 802.11G Broadband Router with SpeedBooster/Switch User Manual Book
LINKSYS LLC 802.11G Broadband Router with SpeedBooster/Switch Book
LINKSYS >
Contents
- 1. Users Manual 1
- 2. Users Manual 2
- 3. Users Manual 3
- 4. Users Manual 4
- 5. Users Manual 5
- 6. Users Manual 6
- 7. Users Manual 7
- 8. Users Manual 8
- 9. Users Manual 9
- 10. Users Manual 10
- 11. Users Manual 11
- 12. Users Manual 12
- 13. Users Manual 13
- 14. Users Manual 14
- 15. Users Manual 15
- 16. Users Manual 16
- 17. Users Manual 17
- 18. Users Manual 18
Users Manual 12
11
Chapter 4: Connecting the Wireless-G Broadband Router
Connecting One Router to Another
Wireless-G Broadband Router with SpeedBooster
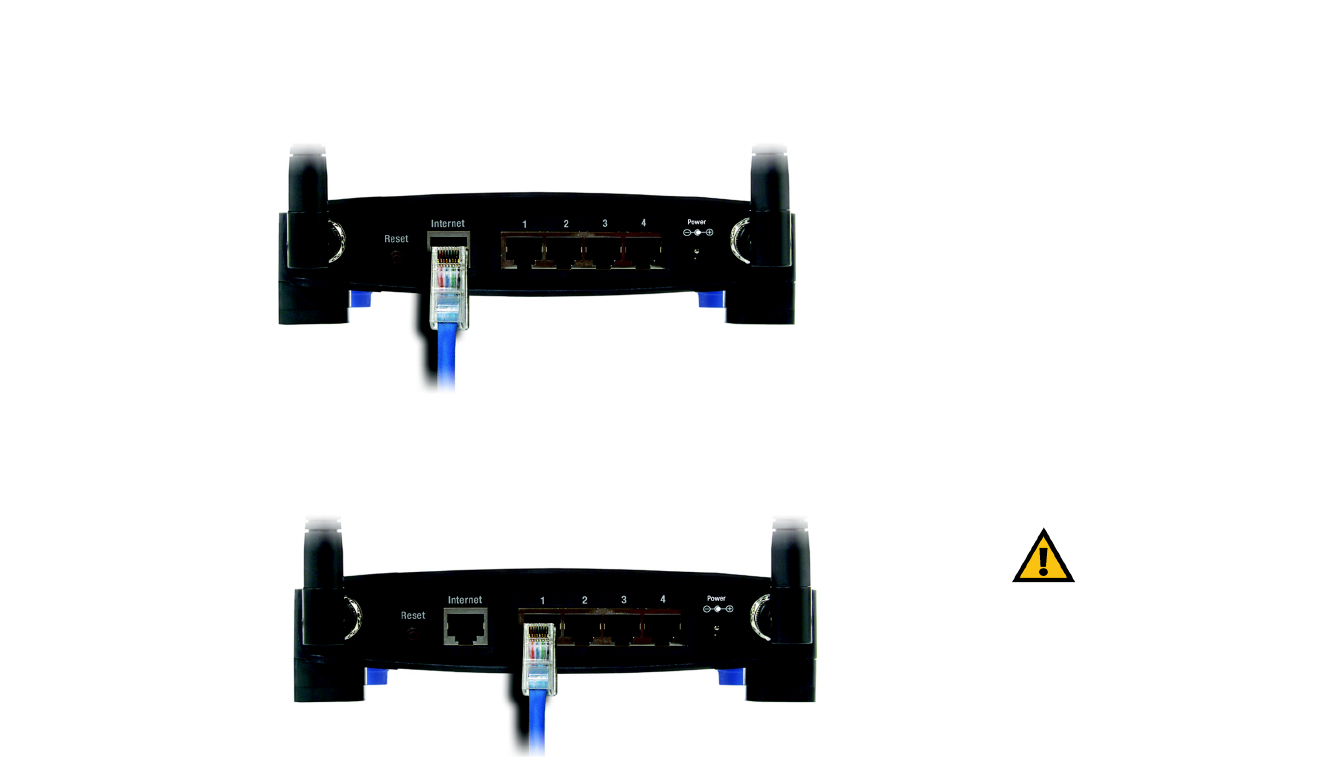
8. Connect a standard Ethernet network cable to the Broadband Router’s Internet port. Then, connect the other
end of the Ethernet cable to one of the numbered Ethernet ports on your other router.
9. Decide which network computers or Ethernet devices you want to connect to the Broadband Router.
Disconnect the selected computers or devices from the other router, and then connect them to the Broadband
Router’s numbered ports using standard Ethernet network cabling.
IMPORTANT: Make sure you use the power
adapter that is supplied with the Router. Use of a
different power adapter could damage the Router.
Figure 4-7: Connecting Your Network Devices
Figure 4-6: The Router with the Internet Connection is connected through the Internet Port

12
Chapter 4: Connecting the Wireless-G Broadband Router
Connecting One Router to Another
Wireless-G Broadband Router with SpeedBooster
10. Connect the AC power adapter to the Broadband Router's Power port and the other end into an electrical
outlet. Only use the power adapter supplied with the Broadband Router. Use of a different adapter may result
in product damage.
Now that the hardware installation is complete, proceed to “Chapter 5: Configuring the Wireless-G
Broadband Router,” for directions on using the Router’s Web-Based Utility to configure the Router’s
settings for your network.
Figure 4-8: Connecting the Power
13
Chapter 5: Setting up the Wireless-G Broadband Router
Overview
Wireless-G Broadband Router with SpeedBooster
Chapter 5: Setting up the Wireless-G Broadband Router
Overview
The Wireless-G Broadband Router with SpeedBooster Setup Wizard will guide you through the installation
procedure. It will go through the instructions for configuring the Router’s network and wireless settings.
Using the Setup Wizard
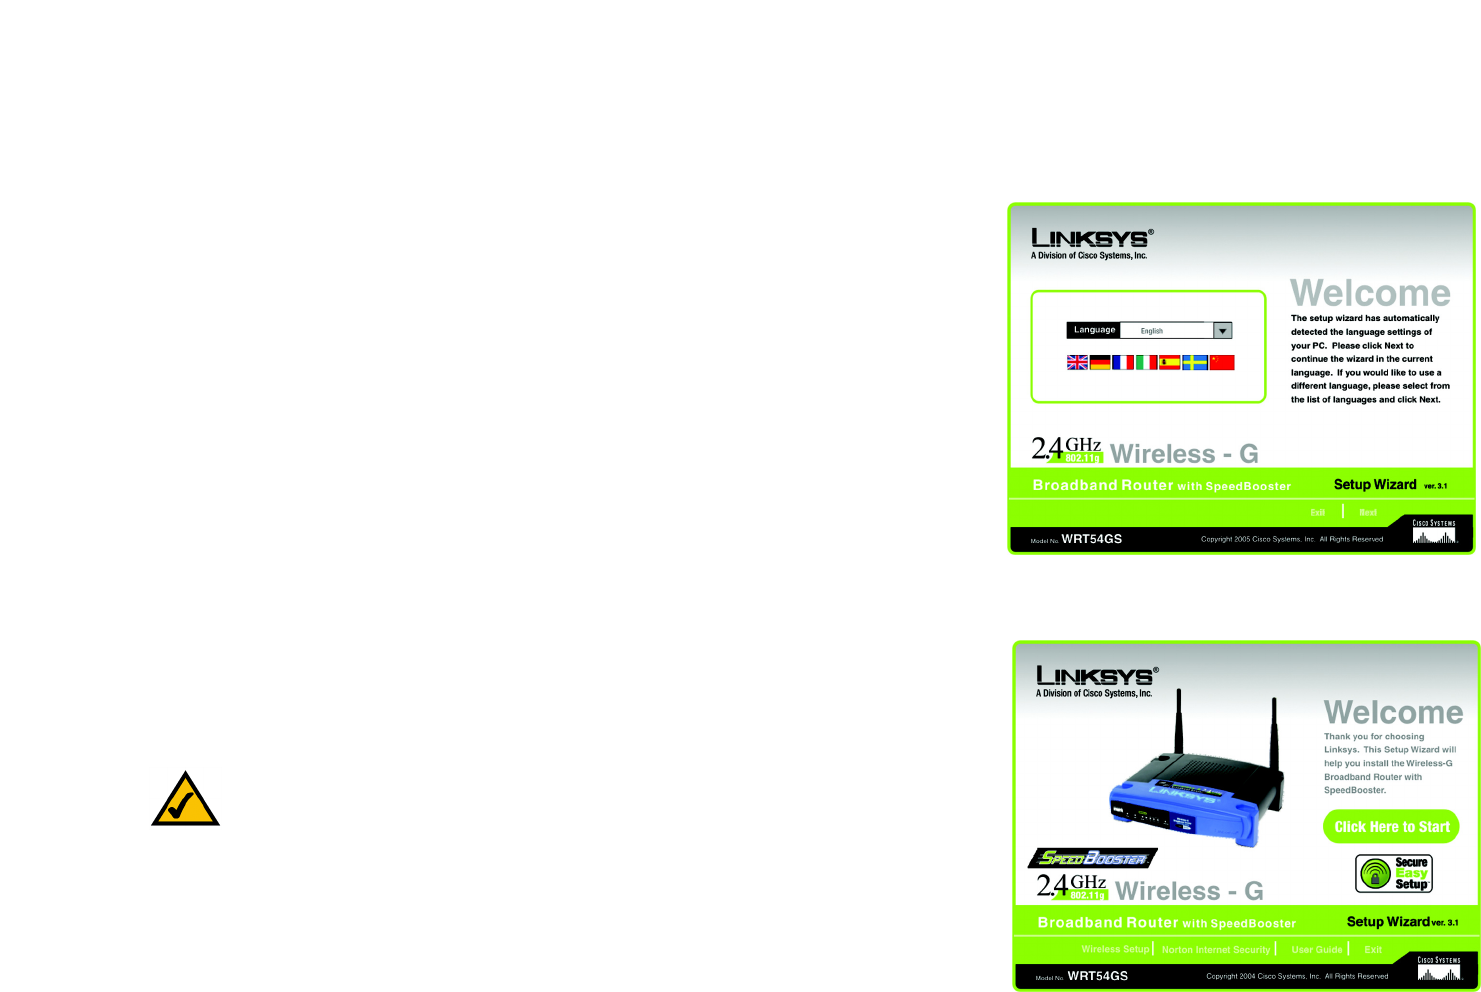
1. Insert the Setup Wizard CD-ROM into your CD-ROM drive. The Setup Wizard should run automatically, and
the Welcome screen should appear. If it does not, click the Start button and choose Run. In the field that
appears, enter D:\setup.exe (if “D” is the letter of your CD-ROM drive).
2. The Setup Wizard will automatically detect the language setting of your PC. On the initial Welcome screen,
click the Next button if you want to proceed with the Setup Wizard using the current language. If you want to
use a different language, select the appropriate language, and then click the Next button.
3. On the following Welcome screen, click the Click Here to Start button if this is the first time you are running
the Setup Wizard. These are your other choices:
Wireless Setup - If you have a computer displaying the SecureEasySetup logo, then click Wireless Setup
and proceed to the section at the end of this chapter, “Using SecureEasySetup to Configure Your Notebook.”
Norton Internet Security - Click the Norton Internet Security button to install the Norton Internet Security
software program.
User Guide - Click the User Guide button to open the PDF file of this User Guide.
Exit - Click the Exit button to exit the Setup Wizard.
Figure 5-1: Setup Wizard’s Welcome - Language
Selection Screen
Figure 5-2: Setup Wizard’s Welcome - Start
Wizard Screen
NOTE: SecureEasySetup uses WPA-Personal encryption. If your current wireless devices do not
support WPA-Personal security, then you cannot use SecureEasySetup on your network. You will
need to manually configure your network security using the encryption supported by your
existing devices.
14
Chapter 5: Setting up the Wireless-G Broadband Router
Using the Setup Wizard
Wireless-G Broadband Router with SpeedBooster
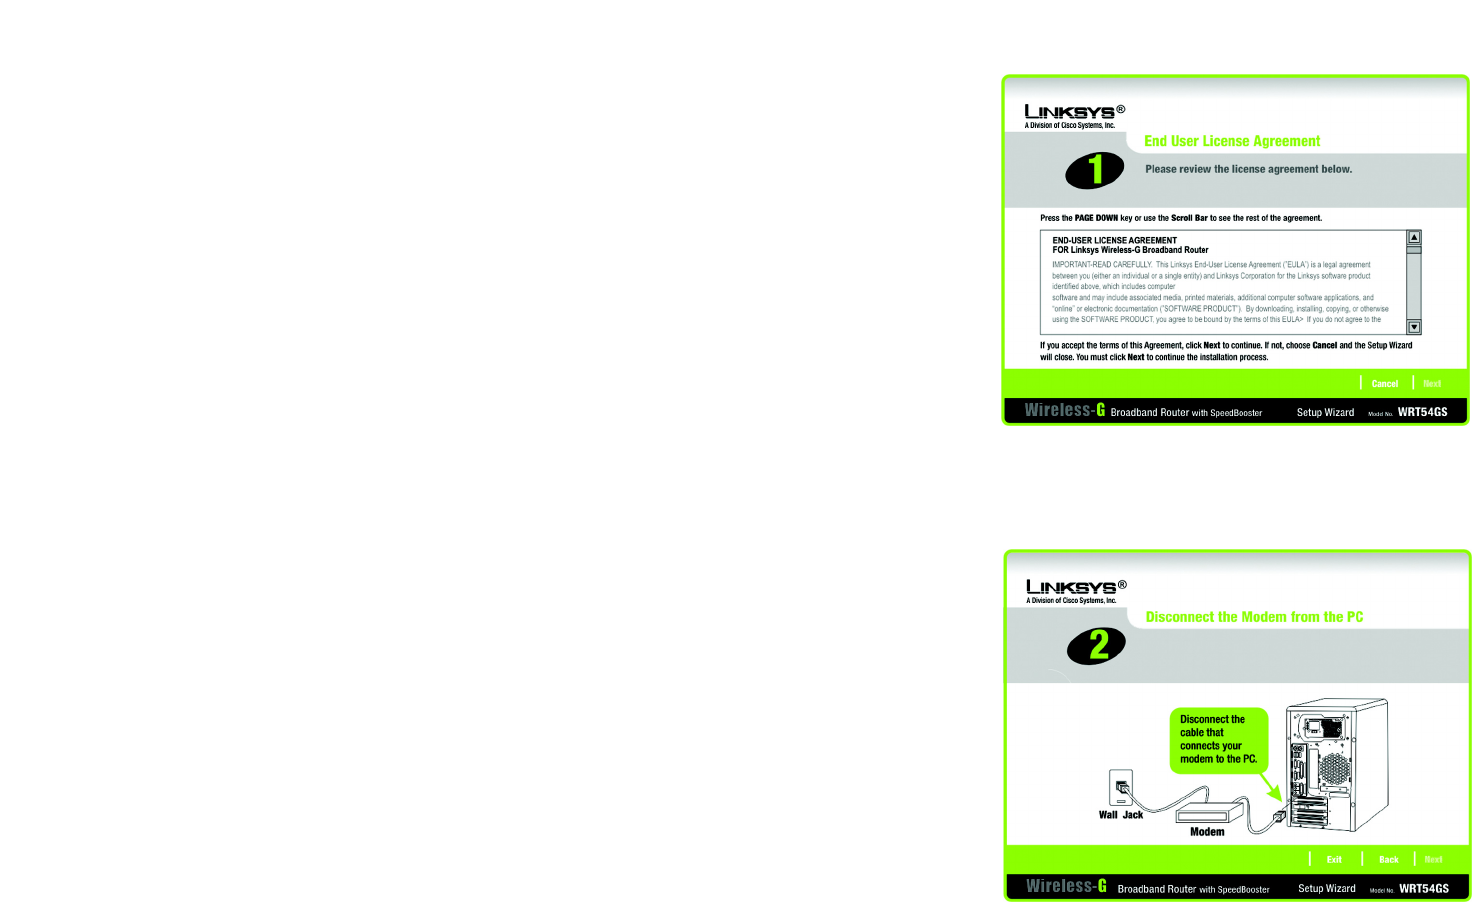
4. After reading the License Agreement, click the Next button if you accept, or click the Cancel button to end
the installation.
5. The Setup Wizard will ask you to disconnect your broadband modem from your PC. After you have done so,
click the Next button.
Figure 5-3: Setup Wizard’s License Agreement Screen
Figure 5-4: Setup Wizard’s Disconnect the Modem from
the PC Screen
15
Chapter 5: Setting up the Wireless-G Broadband Router
Using the Setup Wizard
Wireless-G Broadband Router with SpeedBooster
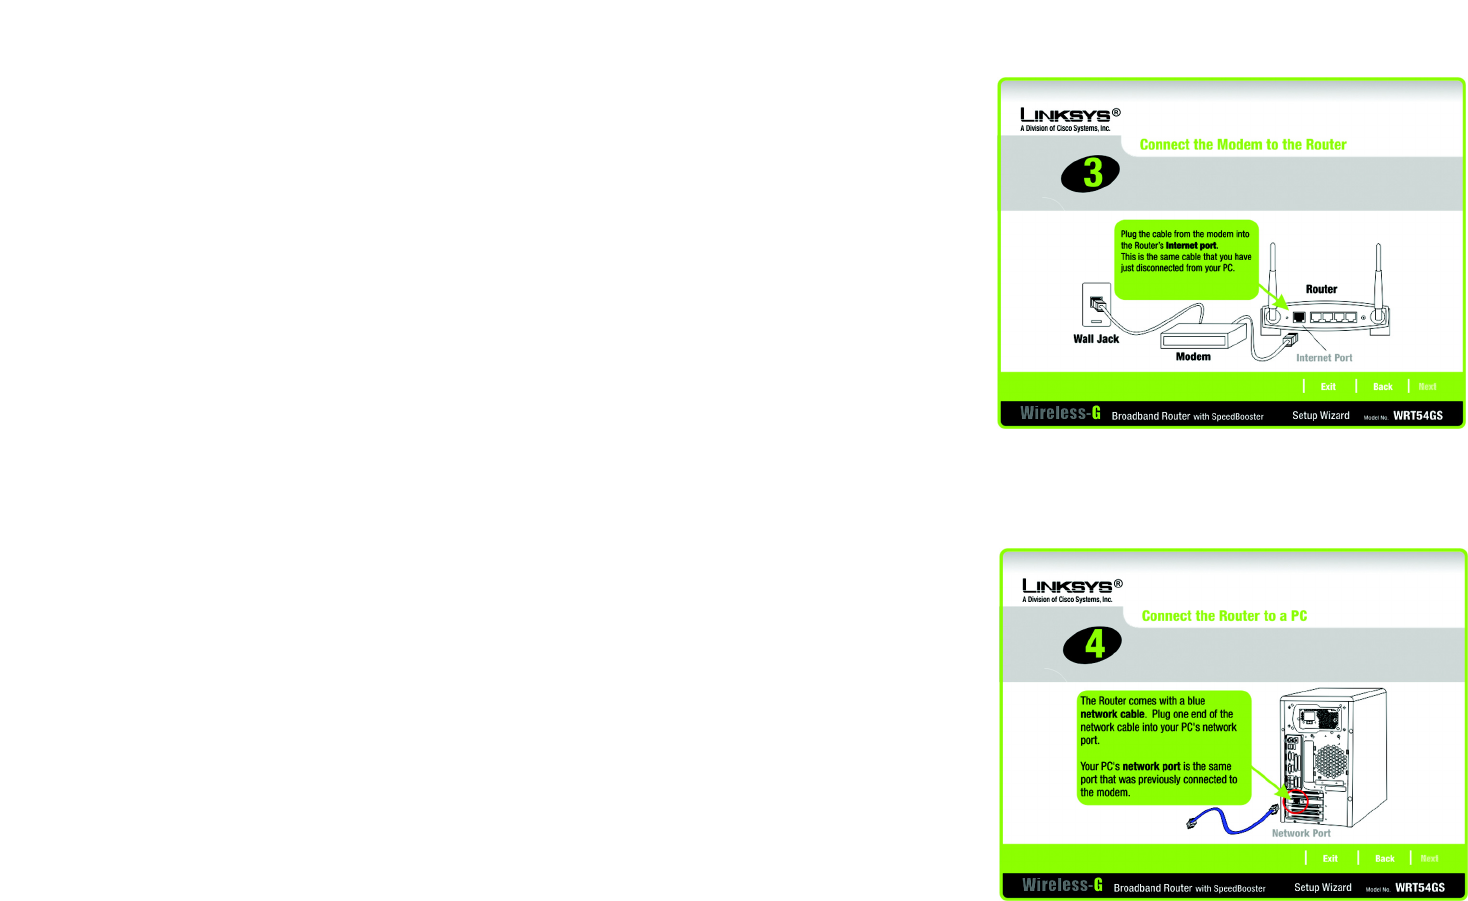
6. The Setup Wizard will ask you to connect your broadband modem to the Router. After you have done so, click
the Next button.
7. The Setup Wizard will ask you to connect a network cable to your PC. After you have done so, click the Next
button.
Figure 5-5: Setup Wizard’s Connect the Modem to the
Router Screen
Figure 5-6: Setup Wizard’s Connect a Network Cable to a
PC Screen
16
Chapter 5: Setting up the Wireless-G Broadband Router
Using the Setup Wizard
Wireless-G Broadband Router with SpeedBooster
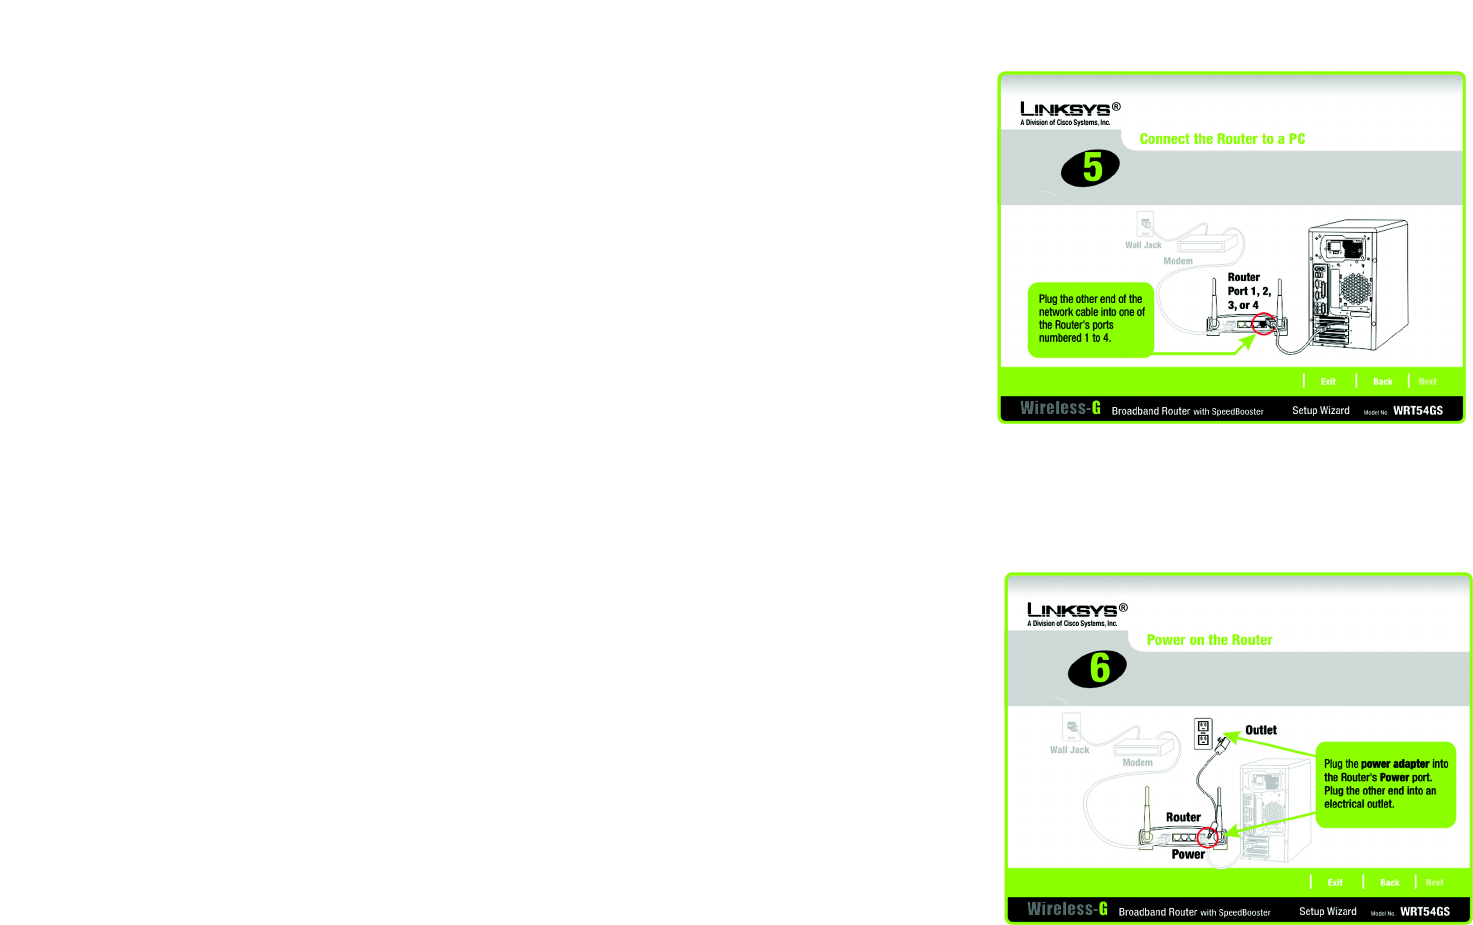
8. The Setup Wizard will ask you to connect the other end of the network cable to the Router.
Then you can also connect additional PCs to the Router.
After you have done so, click the Next button.
9. The Setup Wizard will ask you to power on the Router. After you have done so, click the Next button.
Figure 5-7: Setup Wizard’s Connect the Network Cable
to the Router Screen
Figure 5-8: Setup Wizard’s Power on the Router Screen
17
Chapter 5: Setting up the Wireless-G Broadband Router
Using the Setup Wizard
Wireless-G Broadband Router with SpeedBooster
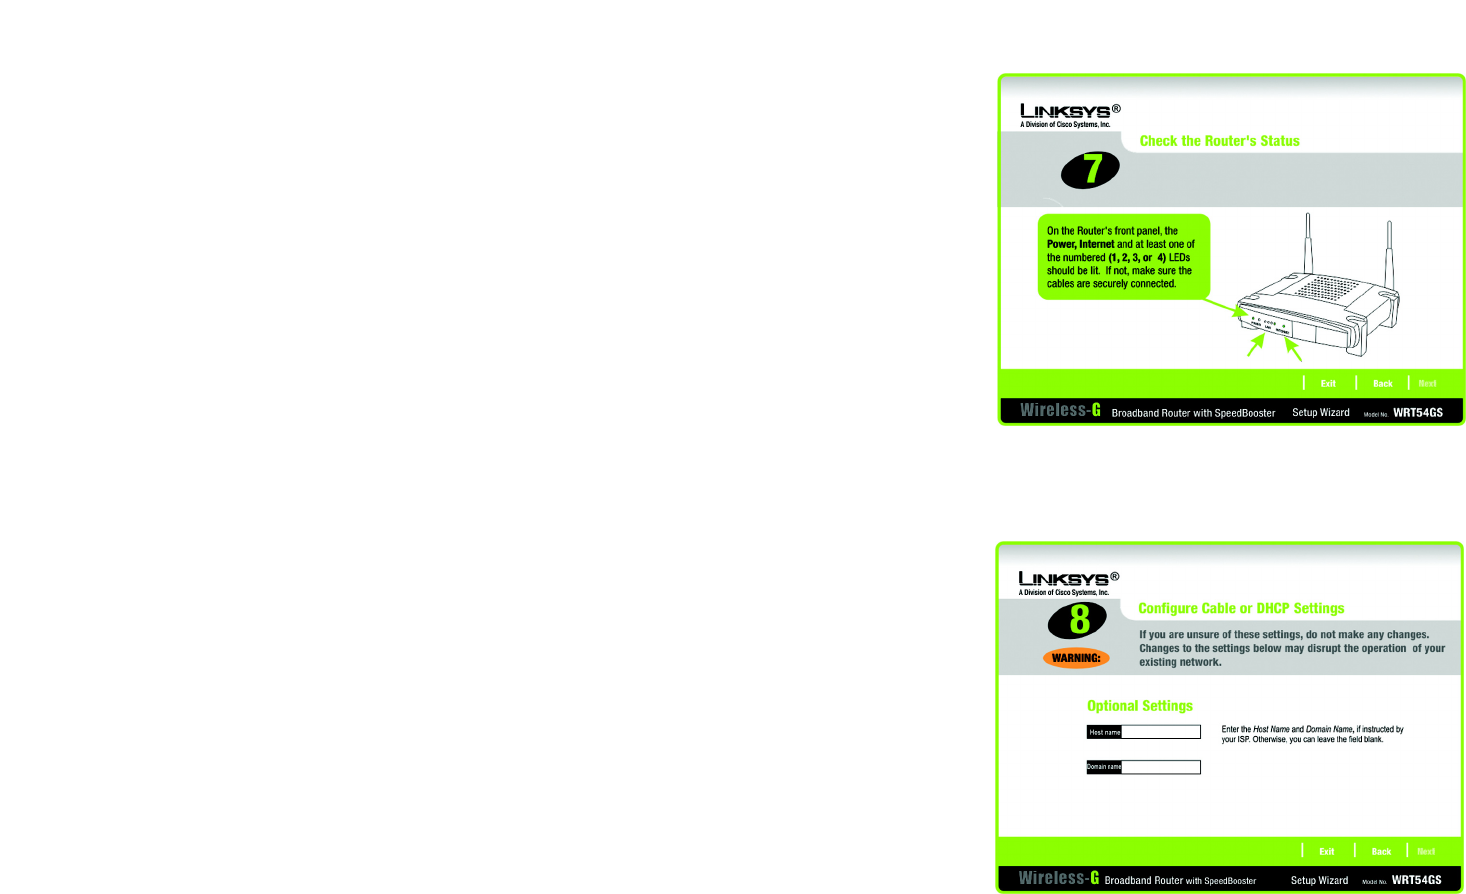
10. Make sure the Router’s Power, Internet, and numbered LEDs (depending on the number of PCs connected) are
lit on its front panel. After you have done so, click the Next button.
11. The Setup Wizard will automatically detect the Internet connection type you use: Cable or DHCP or DSL
(PPPoE). If the Setup Wizard cannot detect your Internet connection type, you will see the Advanced Internet
Settings screen, and you will be asked to select your Internet connection type: Static IP, PPTP, L2TP, or
Telstra. Proceed to the appropriate section for your Internet connection type.
Cable or DHCP
Host Name - Enter the Host Name if required by your ISP; otherwise, leave this field blank.
Domain Name - Enter the Domain Name if required by your ISP; otherwise, leave this field blank.
Click the Next button to continue or the Back button to return to the previous screen.
Figure 5-9: Setup Wizard’s Check the Router’s
Status Screen
Figure 5-10: Setup Wizard’s Configure Cable or DHCP
Settings Screen

18
Chapter 5: Setting up the Wireless-G Broadband Router
Using the Setup Wizard
Wireless-G Broadband Router with SpeedBooster
DSL (PPPoE)
User Name - Enter the User Name provided by your ISP.
Password - Enter the Password provided by your ISP.
Confirm - To confirm the Password, enter it again in this field.
Keep Alive - If you want the Router to periodically check your Internet connection, select Keep Alive. Then
specify how often you want the Router to check the Internet connection. If the connection is down, the Router
will automatically re-establish your connection.
Connect on Demand - If you want the Router to end the Internet connection after it has been inactive for a
period of time, select Connect on Demand and designate the number of minutes you want that period of
inactivity to last.
Click the Next button to continue or the Back button to return to the previous screen.
Static IP
Connection - If you are required to use a permanent IP address to connect to the Internet, select Static IP
from the drop-down menu.
IP Address - Enter the IP address provided by your ISP.
Subnet Mask- Enter the Subnet Mask provided by your ISP.
Gateway - Enter the Gateway IP address provided by your ISP.
DNS 1-2 - Enter the DNS (Domain Name System) server IP address(es) provided by your ISP. You need to enter
at least one DNS address.
Click the Next button to continue or the Back button to return to the previous screen.
Figure 5-11: Setup Wizard’s Configure DSL (PPPoE)
Settings Screen
Figure 5-12: Setup Wizard’s Advanced Internet
Settings - Static IP Screen

19
Chapter 5: Setting up the Wireless-G Broadband Router
Using the Setup Wizard
Wireless-G Broadband Router with SpeedBooster
PPTP
Connection - PPTP (Point-to-Point Tunneling Protocol) service is used in Europe only. If you are using a PPTP
connection, select PPTP from the drop-down menu.
User Name - Enter the User Name provided by your ISP.
Password - Enter the Password provided by your ISP.
Confirm - To confirm the Password, enter it again in this field.
IP Address - Enter the IP address provided by your ISP.
Subnet Mask- Enter the Subnet Mask provided by your ISP.
Gateway - Enter the Gateway IP address provided by your ISP.
Click the Next button to continue or the Back button to return to the previous screen.
Keep Alive - If you want the Router to periodically check your Internet connection, select Keep Alive. Then
specify how often you want the Router to check the Internet connection. If the connection is down, the Router
will automatically re-establish your connection.
Connect on Demand - If you want the Router to end the Internet connection after it has been inactive for a
period of time, select Connect on Demand and designate the number of minutes you want that period of
inactivity to last.
Click the Next button to continue or the Back button to return to the previous screen.
Figure 5-13: Setup Wizard’s Advanced Internet
Settings - PPTP Screen
Figure 5-14: Setup Wizard’s Keep Alive/Connect on
Demand (PPTP Continued) Screen
20
Chapter 5: Setting up the Wireless-G Broadband Router
Using the Setup Wizard
Wireless-G Broadband Router with SpeedBooster
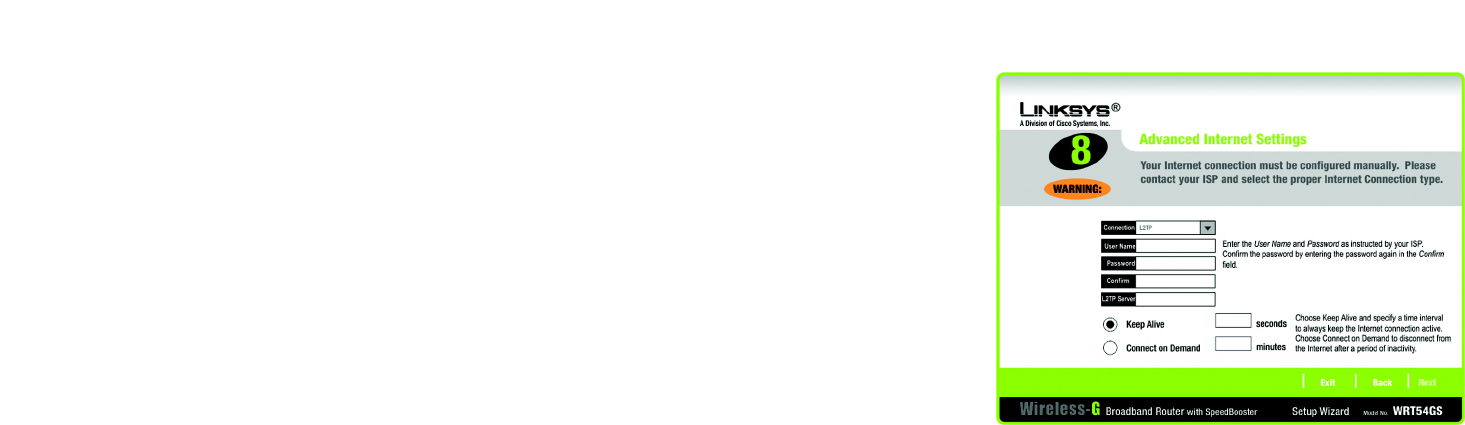
L2TP
Connection - If you are using an L2TP (Layer 2 Tunneling Protocol) connection, select L2TP from the drop-
down menu.
User Name - Enter the User Name provided by your ISP.
Password - Enter the Password provided by your ISP.
Confirm - To confirm the Password, enter it again in this field.
L2TP Server - Enter the IP address of the L2TP server you are using; this should be provided by your ISP.
Keep Alive - If you want the Router to periodically check your Internet connection, select Keep Alive. Then
specify how often you want the Router to check the Internet connection. If the connection is down, the Router
will automatically re-establish your connection.
Connect on Demand - If you want the Router to end the Internet connection after it has been inactive for a
period of time, select Connect on Demand and designate the number of minutes you want that period of
inactivity to last.
Click the Next button to continue or the Back button to return to the previous screen.
Figure 5-15: Setup Wizard’s Advanced Internet Settings -
L2TP Screen