LINKSYS WT54GV40 802.11G Broadband Router with SpeedBooster/Switch User Manual Book
LINKSYS LLC 802.11G Broadband Router with SpeedBooster/Switch Book
LINKSYS >
Contents
- 1. Users Manual 1
- 2. Users Manual 2
- 3. Users Manual 3
- 4. Users Manual 4
- 5. Users Manual 5
- 6. Users Manual 6
- 7. Users Manual 7
- 8. Users Manual 8
- 9. Users Manual 9
- 10. Users Manual 10
- 11. Users Manual 11
- 12. Users Manual 12
- 13. Users Manual 13
- 14. Users Manual 14
- 15. Users Manual 15
- 16. Users Manual 16
- 17. Users Manual 17
- 18. Users Manual 18
Users Manual 7
54
Chapter 6: Configuring the Wireless-G Broadband Router
The Administration Tab - Diagnostics
Wireless-G Broadband Router
The Administration Tab - Diagnostics
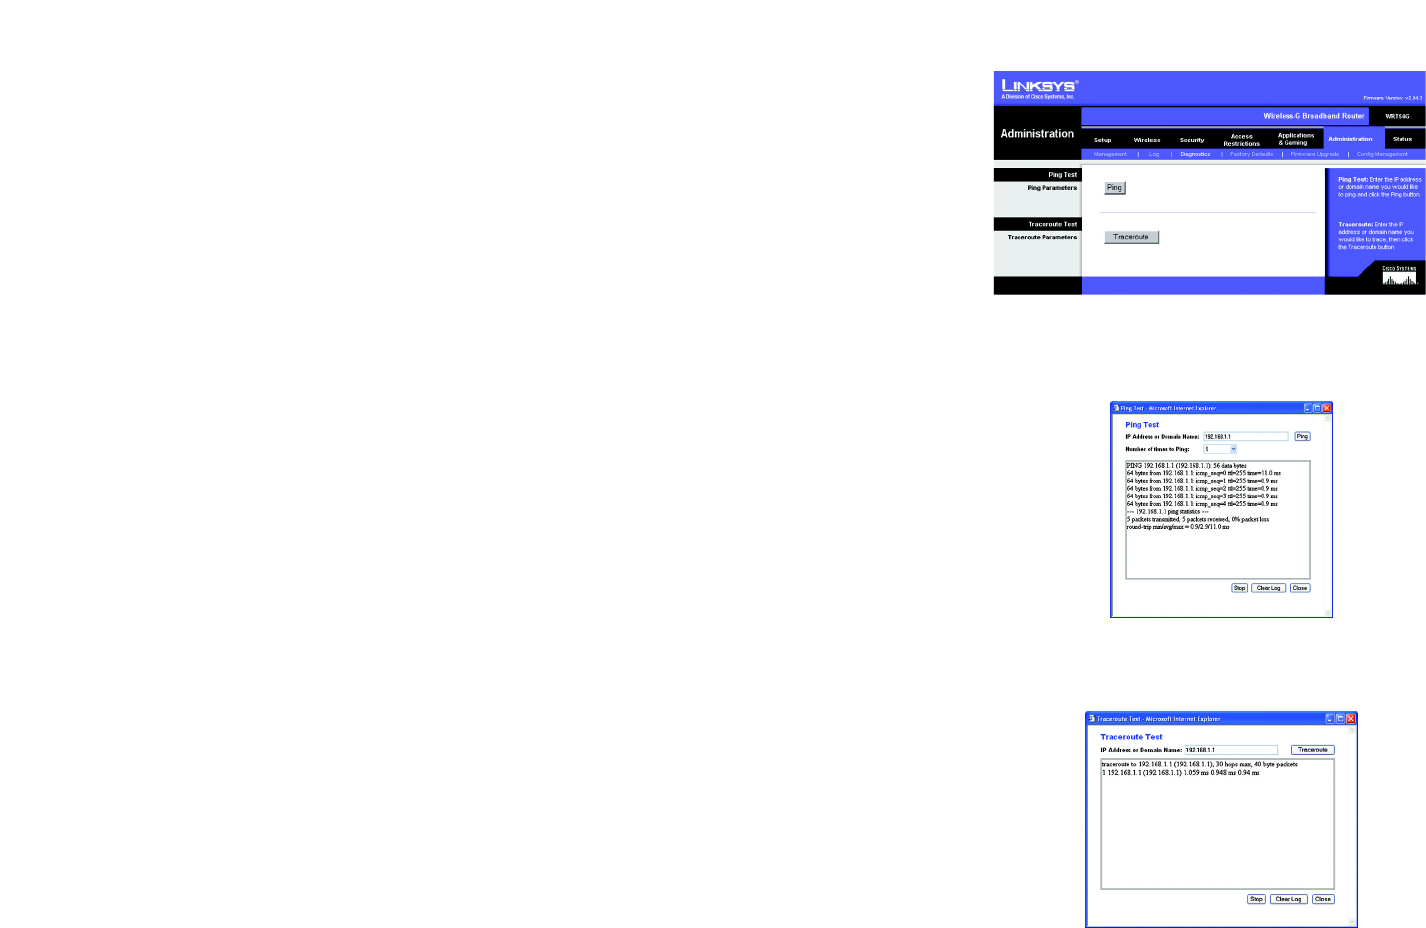
The diagnostic tests (Ping and Traceroute) allow you to check the connections of your network components.
Ping Test. The Ping test will check the status of a connection. Click the Ping button to open the Ping Test screen.
Enter the address of the PC whose connection you wish to test and how many times you wish to test it. Then,
click the Ping button. The Ping Test screen will then display the test results. To stop the test, click the Stop
button. Click the Clear Log button to clear the screen. Click the Close button to return to the Diagnostics screen.
Traceroute Test. To test the performance of a connect, click the Traceroute button. Enter the address of the PC
whose connection you wish to test and click the Traceroute button. The Traceroute screen will then display the
test results. To stop the test, click the Stop button. Click the Clear Log button to clear the screen. Click the Close
button to return to the Diagnostics screen.
Change these settings as described here and click the Save Settings button to apply your changes or Cancel
Changes to cancel your changes.
Figure 6-37: Administration Tab - Diagnostics
Figure 6-38: The Ping Test
Figure 6-39: The Traceroute Test

55
Chapter 6: Configuring the Wireless-G Broadband Router
The Administration Tab - Factory Defaults
Wireless-G Broadband Router
The Administration Tab - Factory Defaults
Click the Yes button to reset all configuration settings to their default values, and then click the Save Settings
button. Any settings you have saved will be lost when the default settings are restored. This feature is disabled by
default.
The Administration Tab - Firmware Upgrade
Firmware can be upgraded by clicking the Upgrade button after browsing for the firmware, which you can
download from the Linksys website. Do not upgrade your firmware unless you are experiencing problems with
the Router. For more information about upgrading firmware, refer to “Appendix C: Upgrading Firmware”.
The Administration Tab - Config Management
This screen is used to back up or restore the Router’s configuration file.
To back up the Router’s configuration file, click the Backup button. Then follow the on-screen instructions.
To restore the Router’s configuration file, click the Browse button to locate the file, and follow the on-screen
instructions. After you have selected the file, click the Restore button.
Change these settings as described here and click the Save Settings button to apply your changes or Cancel
Changes to cancel your changes
Figure 6-41: Administration Tab - Firmware Upgrade
Figure 6-40: Administration Tab - Factory Defaults
Figure 6-42: Administration Tab - Config Management
56
Chapter 6: Configuring the Wireless-G Broadband Router
The Status Tab - Router
Wireless-G Broadband Router
The Status Tab - Router
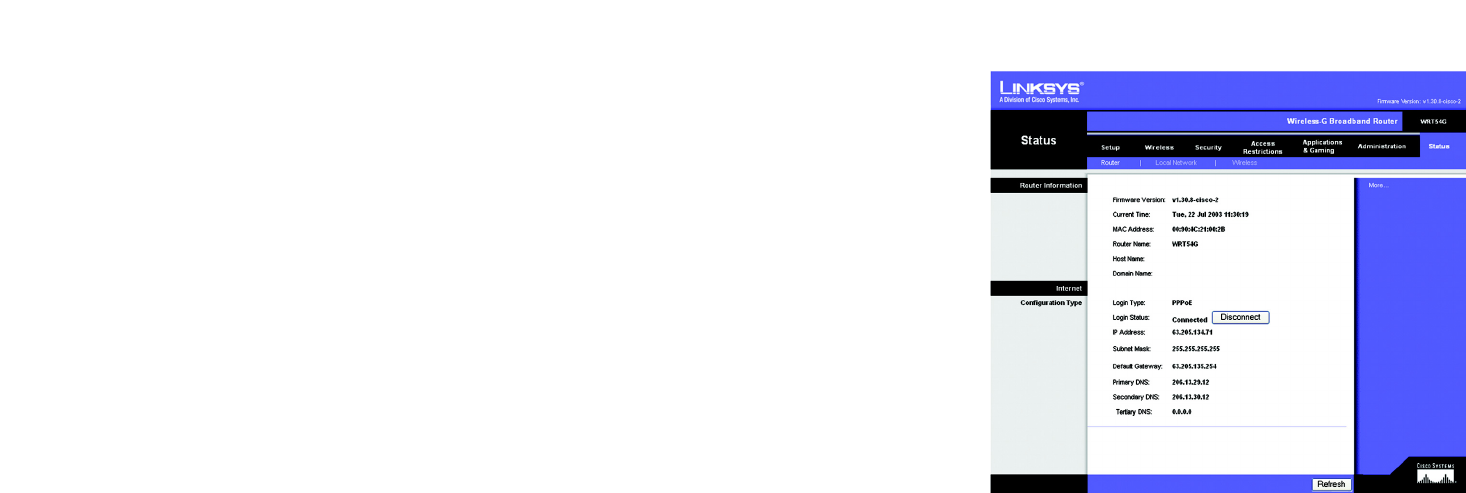
The Router screen on the Status Tab displays the Router’s current status.
Firmware Version. This is the Router’s current firmware.
Current Time. This shows the time, as you set on the Setup Tab.
MAC Address. This is the Router’s MAC Address, as seen by your ISP.
Router Name. This is the specific name for the Router, which you set on the Setup Tab.
Host Name. If required by your ISP, this would have been entered on the Setup Tab.
Domain Name. If required by your ISP, this would have been entered on the Setup Tab.
Configuration Type. This shows the information required by your ISP for connection to the Internet. This
information was entered on the Setup Tab. You can Connect or Disconnect your connection here by clicking on
that button. Figure 6-43: Status Tab - Router
57
Chapter 6: Configuring the Wireless-G Broadband Router
The Status Tab - Local Network
Wireless-G Broadband Router
The Status Tab - Local Network
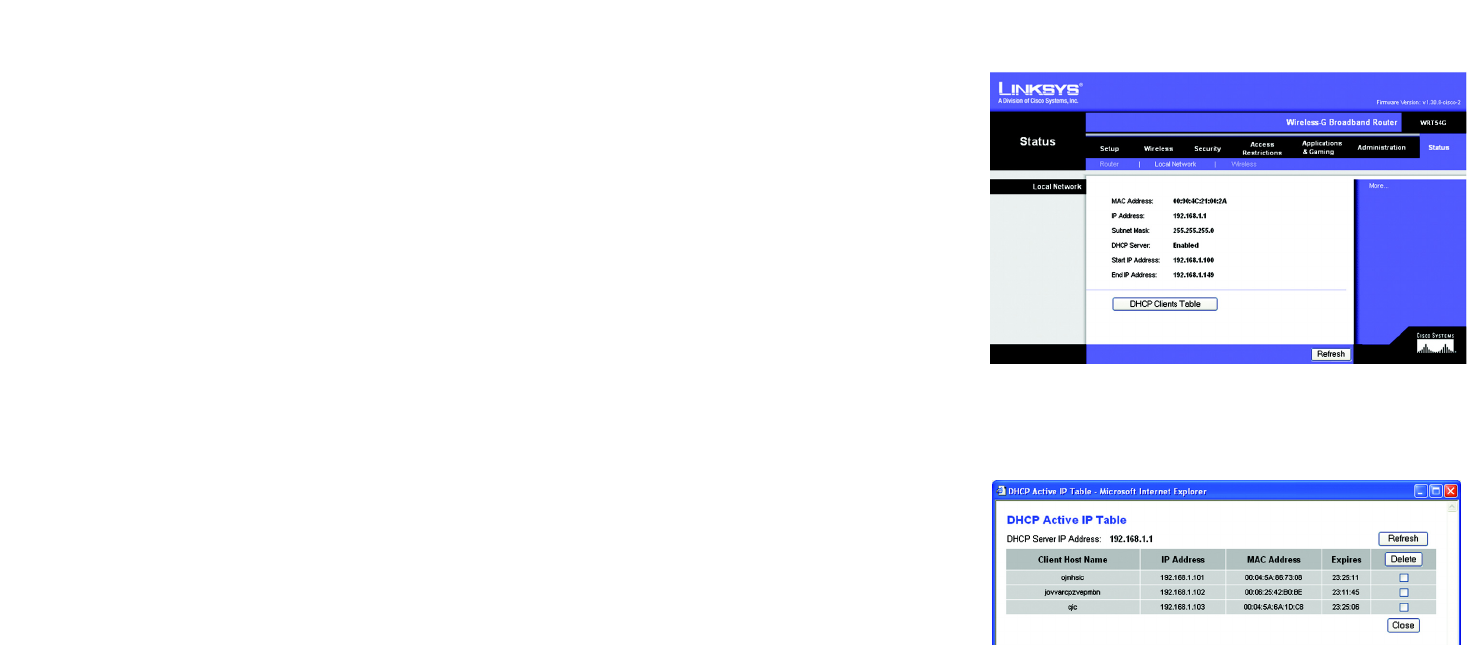
The Local Network screen on the Status Tab displays the status of your network.
MAC Address. This is the Router’s MAC Address, as seen on your local, Ethernet network.
IP Address. This shows the Router’s IP Address, as it appears on your local, Ethernet network.
Subnet Mask. When the Router is using a Subnet Mask, it is shown here.
DHCP Server. If you are using the Router as a DHCP server, that will be displayed here.
Start IP Address. For the range of IP Addresses used by devices on your local, Ethernet network, the beginning
of that range is shown here.
End IP Address. For the range of IP Addresses used by devices on your local, Ethernet network, the end of that
range is shown here.
DHCP Clients Table. Clicking this button will open a screen to show you which PCs are utilizing the Router as a
DHCP server. You can delete PCs from that list, and sever their connections, by checking a Delete box and
clicking the Delete button.
Figure 6-44: Status Tab - Local Network
Figure 6-45: DHCP Clients Table
58
Chapter 6: Configuring the Wireless-G Broadband Router
The Status Tab - Wireless
Wireless-G Broadband Router
The Status Tab - Wireless
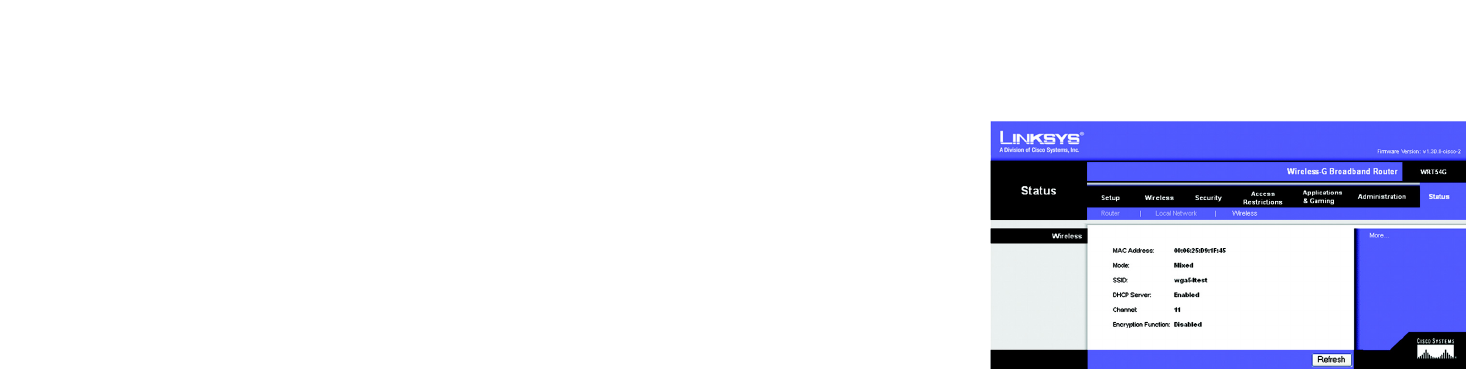
The Wireless screen on the Status Tab displays the status of your wireless network.
MAC Address. This is the Router’s MAC Address, as seen on your local, wireless network.
Mode. As selected from the Wireless tab, this will display the wireless mode (Mixed, G-Only, or Disabled) used by
the network.
SSID. As entered on the Wireless tab, this will display the wireless network name or SSID.
DHCP Server. If you are using the Router as a DHCP server, that will be displayed here.
Channel. As entered on the Wireless tab, this will display the channel on which your wireless network is
broadcasting.
Encryption Function. As selected on the Security Tab, this will display what type of encryption the Router uses
for security.
Figure 6-46: Status Tab - Wireless

59
Appendix A: Troubleshooting
Common Problems and Solutions
Wireless-G Broadband Router
Appendix A: Troubleshooting
This appendix consists of two parts: “Common Problems and Solutions” and “Frequently Asked Questions.”
Provided are possible solutions to problems that may occur during the installation and operation of the Router.
Read the descriptions below to help you solve your problems. If you can’t find an answer here, check the Linksys
website at www.linksys.com.
Common Problems and Solutions
1. I’m trying to access the Router’s Web-based Utility, but I do not see the login screen. Instead, I see a
screen saying, “404 Forbidden.”
If you are using Windows Explorer, perform the following steps until you see the Web-based Utility’s login
screen (Netscape Navigator will require similar steps):
1. Click File. Make sure Work Offline is NOT checked.
2. Press CTRL + F5. This is a hard refresh, which will force Windows Explorer to load new webpages,
not cached ones.
3. Click Tools. Click Internet Options. Click the Security tab. Click the Default level button. Make sure
the security level is Medium or lower. Then click the OK button.
2. I need to set a static IP address on a PC.
You can assign a static IP address to a PC by performing the following steps:
• For Windows 98SE and Me:
1. Click Start, Settings, and Control Panel. Double-click Network.
2. In The following network components are installed box, select the TCP/IP-> associated with your
Ethernet adapter. If you only have one Ethernet adapter installed, you will only see one TCP/IP line
with no association to an Ethernet adapter. Highlight it and click the Properties button.
3. In the TCP/IP properties window, select the IP address tab, and select Specify an IP address. Enter
a unique IP address that is not used by any other computer on the network connected to the Router.
Make sure that each IP address is unique for each PC or network device.
4. Click the Gateway tab, and in the New Gateway prompt, enter 192.168.1.1, which is the default IP
address of the Router. Click the Add button to accept the entry.
5. Click the DNS tab, and make sure the DNS Enabled option is selected. Enter the Host and Domain
names (e.g., John for Host and home for Domain). Enter the DNS entry provided by your ISP. If your
ISP has not provided the DNS IP address, contact your ISP to get that information or go to its website
for the information.
6. Click the OK button in the TCP/IP properties window, and click Close or the OK button for the Network
window.
7. Restart the computer when asked.

60
Appendix A: Troubleshooting
Common Problems and Solutions
Wireless-G Broadband Router
• For Windows 2000:
1. Click Start, Settings, and Control Panel. Double-click Network and Dial-Up Connections.
2. Right-click the Local Area Connection that is associated with the Ethernet adapter you are using, and
select the Properties option.
3. In the Components checked are used by this connection box, highlight Internet Protocol (TCP/IP),
and click the Properties button. Select Use the following IP address option.
4. Enter a unique IP address that is not used by any other computer on the network connected to the
Router.
5. Enter the Subnet Mask, 255.255.255.0.
6. Enter the Default Gateway, 192.168.1.1 (Router’s default IP address).
7. Toward the bottom of the window, select Use the following DNS server addresses, and enter the
Preferred DNS server and Alternative DNS server (provided by your ISP). Contact your ISP or go on its
website to find the information.
8. Click the OK button in the Internet Protocol (TCP/IP) Properties window, and click the OK button in the
Local Area Connection Properties window.
9. Restart the computer if asked.
• For Windows XP:
The following instructions assume you are running Windows XP with the default interface. If you are using
the Classic interface (where the icons and menus look like previous Windows versions), please follow the
instructions for Windows 2000.
1. Click Start and Control Panel.
2. Click the Network and Internet Connections icon and then the Network Connections icon.
3. Right-click the Local Area Connection that is associated with the Ethernet adapter you are using,
and select the Properties option.
4. In the This connection uses the following items box, highlight Internet Protocol (TCP/IP). Click the
Properties button.
5. Enter a unique IP address that is not used by any other computer on the network connected to the
Router.
6. Enter the Subnet Mask, 255.255.255.0.
7. Enter the Default Gateway, 192.168.1.1 (Router’s default IP address).
8. Toward the bottom of the window, select Use the following DNS server addresses, and enter the
Preferred DNS server and Alternative DNS server (provided by your ISP). Contact your ISP or go on its
website to find the information.
9. Click the OK button in the Internet Protocol (TCP/IP) Properties window. Click the OK button in the
Local Area Connection Properties window.
3. I want to test my Internet connection.
A Check your TCP/IP settings.
For Windows 98SE, Me, 2000, and XP:
• Refer to Windows Help for details. Make sure Obtain IP address automatically is selected in the settings.

61
Appendix A: Troubleshooting
Common Problems and Solutions
Wireless-G Broadband Router
B Open a command prompt.
For Windows 98SE and Me:
• Click Start and Run. In the Open field, type command. Press the Enter key or click the OK button.
For Windows 2000 and XP:
• Click Start and Run. In the Open field, type cmd. Press the Enter key or click the OK button. In the
command prompt, type ping 192.168.1.1 and press the Enter key.
• If you get a reply, the computer is communicating with the Router.
• If you do NOT get a reply, please check the cable, and make sure Obtain an IP address automatically is
selected in the TCP/IP settings for your Ethernet adapter.
C In the command prompt, type ping followed by your Internet or WAN IP address and press the Enter key.
The Internet or WAN IP Address can be found on the Status screen of the Router’s web-based utility. For
example, if your Internet or WAN IP address is 1.2.3.4, you would enter ping 1.2.3.4 and press the Enter key.
• If you get a reply, the computer is connected to the Router.
• If you do NOT get a reply, try the ping command from a different computer to verify that your original
computer is not the cause of the problem.
D In the command prompt, type ping www.yahoo.com and press the Enter key.
• If you get a reply, the computer is connected to the Internet. If you cannot open a webpage, try the ping
command from a different computer to verify that your original computer is not the cause of the problem.
• If you do NOT get a reply, there may be a problem with the connection. Try the ping command from a
different computer to verify that your original computer is not the cause of the problem.
4. I am not getting an IP address on the Internet with my Internet connection.
• Refer to “Problem #3, I want to test my Internet connection” to verify that you have connectivity.
• If you need to register the MAC address of your Ethernet adapter with your ISP, please see “Appendix E:
Finding the MAC address and IP Address for Your Ethernet Adapter.” If you need to clone the MAC address
of your Ethernet adapter onto the Router, see the System section of “Chapter 6: Configuring the
Wireless-G Broadband Router” for details.
• Make sure you are using the right Internet connection settings. Contact your ISP to see if your Internet
connection type is DHCP, Static IP Address, or PPPoE (commonly used by DSL consumers). Please refer to
the Setup section of “Chapter 6: Configuring the Wireless-G Broadband Router” for details on Internet
connection settings.
• Make sure you have the right cable. Check to see if the Internet column has a solidly lit Link/Act LED.
• Make sure the cable connecting from your cable or DSL modem is connected to the Router’s Internet port.
Verify that the Status page of the Router’s web-based utility shows a valid IP address from your ISP.
• Turn off the computer, Router, and cable/DSL modem. Wait 30 seconds, and then turn on the Router,
cable/DSL modem, and computer. Check the Status tab of the Router’s web-based utility to see if you get
an IP address.

62
Appendix A: Troubleshooting
Common Problems and Solutions
Wireless-G Broadband Router
5. I am not able to access the Setup page of the Router’s web-based utility.
• Refer to “Problem #3, I want to test my Internet connection” to verify that your computer is properly
connected to the Router.
• Refer to “Appendix E: Finding the MAC Address and IP address for Your Ethernet Adapter” to verify that
your computer has an IP Address, Subnet Mask, Gateway, and DNS.
• Set a static IP address on your system; refer to “Problem #2: I need to set a static IP address.”
• Refer to “Problem #10: I am a PPPoE user, and I need to remove the proxy settings or the dial-up pop-up
window.”
6. I need to set up a server behind my Router and make it available to the public.
To use a server like a web, ftp, or mail server, you need to know the respective port numbers they are using.
For example, port 80 (HTTP) is used for web; port 21 (FTP) is used for FTP, and port 25 (SMTP outgoing) and
port 110 (POP3 incoming) are used for the mail server. You can get more information by viewing the
documentation provided with the server you installed.
Follow these steps to set up port forwarding through the Router’s web-based utility. We will be setting up
web, ftp, and mail servers.
1. Access the Router’s web-based utility by going to http://192.168.1.1 or the IP address of the Router.
Go to the Applications & Gaming => Port Range Forward tab.
2. Enter any name you want to use for the Application.
3. Enter the Start and End Port range of the service you are using. For example, if you have a web server,
you would enter the range 80 to 80.
4. Select the protocol(s) you will be using, TCP and/or UDP.
5. Enter the IP address of the PC or network device that you want the port server to go to. For example,
if the web server’s Ethernet adapter IP address is 192.168.1.100, you would enter 100 in the field
provided. Check “Appendix E: Finding the MAC Address and IP Address for Your Ethernet Adapter” for
details on getting an IP address.
6. Check the Enable option for the port services you want to use. Consider the example below:
When you have completed the configuration, click the Save Settings button.
Application Start and End Protocol IP Address Enabled
Web server 80 to 80 Both 192.168.1.100 X
FTP server 21 to 21 TCP 192.168.1.101 X
SMTP (outgoing) 25 to 25 Both 192.168.1.102 X
POP3 (incoming) 110 to 110 Both 192.168.1.102 X
63
Appendix A: Troubleshooting
Common Problems and Solutions
Wireless-G Broadband Router
7. I need to set up online game hosting or use other Internet applications.
If you want to play online games or use Internet applications, most will work without doing any port
forwarding or DMZ hosting. There may be cases when you want to host an online game or Internet
application. This would require you to set up the Router to deliver incoming packets or data to a specific
computer. This also applies to the Internet applications you are using. The best way to get the information on
what port services to use is to go to the website of the online game or application you want to use. Follow
these steps to set up online game hosting or use a certain Internet application:
1. Access the Router’s web interface by going to http://192.168.1.1 or the IP address of the Router. Go to
the Applications & Gaming => Port Range Forward tab.
2. Enter any name you want to use for the Application.
3. Enter the Start and End Port range of the service you are using. For example, if you want to host
Unreal Tournament (UT), you would enter the range 7777 to 27900.
4. Select the protocol(s) you will be using, TCP and/or UDP.
5. Enter the IP address of the PC or network device that you want the port server to go to. For example,
if the web server’s Ethernet adapter IP address is 192.168.1.100, you would enter 100 in the field
provided. Check “Appendix E: Finding the MAC Address and IP Address for Your Ethernet Adapter” for
details on getting an IP address.
6. Check the Enable option for the port services you want to use. Consider the example below:
When you have completed the configuration, click the Save Settings button.
8. I can’t get the Internet game, server, or application to work.
If you are having difficulties getting any Internet game, server, or application to function properly, consider
exposing one PC to the Internet using DeMilitarized Zone (DMZ) hosting. This option is available when an
application requires too many ports or when you are not sure which port services to use. Make sure you
disable all the forwarding entries if you want to successfully use DMZ hosting, since forwarding has priority
over DMZ hosting. (In other words, data that enters the Router will be checked first by the forwarding
settings. If the port number that the data enters from does not have port forwarding, then the Router will send
the data to whichever PC or network device you set for DMZ hosting.)
Application Start and End Protocol IP Address Enabled
UT 7777 to 27900 Both 192.168.1.100 X
Halflife 27015 to 27015 Both 192.168.1.105 X
PC Anywhere 5631 to 5631 UDP 192.168.1.102 X
VPN IPSEC 500 to 500 UDP 192.168.1.100 X