LINKSYS WT54GV40 802.11G Broadband Router with SpeedBooster/Switch User Manual Book
LINKSYS LLC 802.11G Broadband Router with SpeedBooster/Switch Book
LINKSYS >
Contents
- 1. Users Manual 1
- 2. Users Manual 2
- 3. Users Manual 3
- 4. Users Manual 4
- 5. Users Manual 5
- 6. Users Manual 6
- 7. Users Manual 7
- 8. Users Manual 8
- 9. Users Manual 9
- 10. Users Manual 10
- 11. Users Manual 11
- 12. Users Manual 12
- 13. Users Manual 13
- 14. Users Manual 14
- 15. Users Manual 15
- 16. Users Manual 16
- 17. Users Manual 17
- 18. Users Manual 18
Users Manual 6
44
Chapter 6: Configuring the Wireless-G Broadband Router
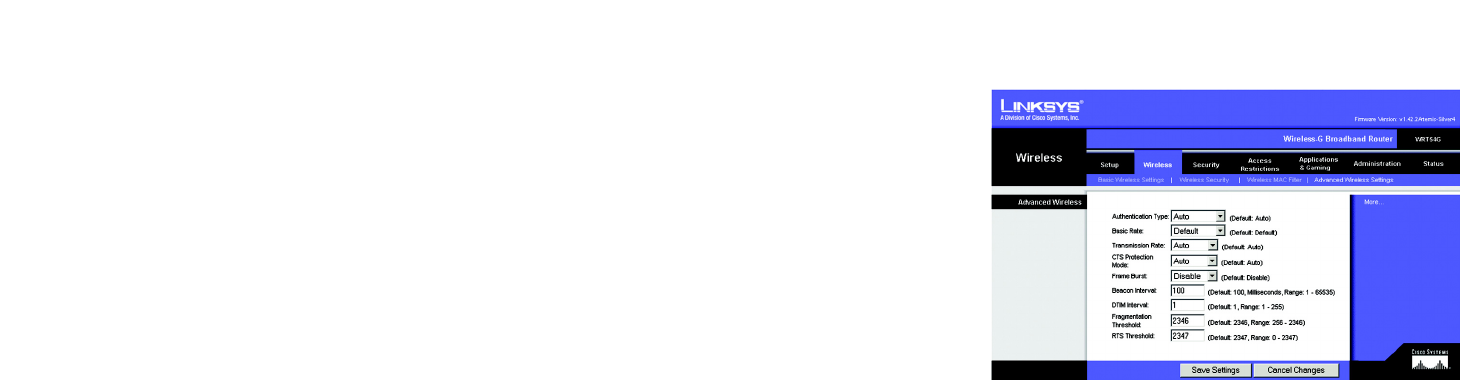
The Wireless Tab - Advanced Wireless Settings
Wireless-G Broadband Router
The Wireless Tab - Advanced Wireless Settings
This tab is used to set up the Router’s advanced wireless functions. These settings should only be adjusted by an
expert administrator as incorrect settings can reduce wireless performance.
Authentication Type. The default is set to Auto, which allows either Open System or Shared Key authentication
to be used. With Open System authentication, the sender and the recipient do NOT use a WEP key for
authentication. With Shared Key authentication, the sender and recipient use a WEP key for authentication.
Basic Rate. The Basic Rate setting is not actually one rate of transmission but a series of rates at which the
Router can transmit. The Router will advertise its Basic Rate to the other wireless devices in your network, so
they know which rates will be used. The Router will also advertise that it will automatically select the best rate
for transmission. The default setting is Default, when the Router can transmit at all standard wireless rates
(1-2Mbps, 5.5Mbps, 11Mbps, 18Mbps, and 24Mbps). Other options are 1-2Mbps, for use with older wireless
technology, and All, when the Router can transmit at all wireless rates. The Basic Rate is not the actual rate of
data transmission. If you want to specify the Router’s rate of data transmission, configure the Transmission Rate
setting.
Transmission Rate. The rate of data transmission should be set depending on the speed of your wireless
network. You can select from a range of transmission speeds, or you can select Auto to have the Router
automatically use the fastest possible data rate and enable the Auto-Fallback feature. Auto-Fallback will
negotiate the best possible connection speed between the Router and a wireless client. The default value is Auto.
CTS Protection Mode. CTS (Clear-To-Send) Protection Mode should remain disabled unless you are having
severe problems with your Wireless-G products not being able to transmit to the Router in an environment with
heavy 802.11b traffic. This function boosts the Router’s ability to catch all Wireless-G transmissions but will
severely decrease performance.
Frame Burst. Enabling this option should provide your network with greater performance, depending on the
manufacturer of your wireless products. If you are not sure how to use this option, keep the default, Disable.
Beacon Interval. The default value is 100. Enter a value between 1 and 65,535 milliseconds. The Beacon Interval
value indicates the frequency interval of the beacon. A beacon is a packet broadcast by the Router to synchronize
the wireless network.
DTIM Interval. This value, between 1 and 255, indicates the interval of the Delivery Traffic Indication Message
(DTIM). A DTIM field is a countdown field informing clients of the next window for listening to broadcast and
multicast messages. When the Router has buffered broadcast or multicast messages for associated clients, it
sends the next DTIM with a DTIM Interval value. Its clients hear the beacons and awaken to receive the broadcast
and multicast messages. The default value is 1.
Figure 6-23: Wireless Tab - Advanced Wireless Settings

45
Chapter 6: Configuring the Wireless-G Broadband Router
The Wireless Tab - Advanced Wireless Settings
Wireless-G Broadband Router
Fragmentation Threshold. This value specifies the maximum size for a packet before data is fragmented into
multiple packets. If you experience a high packet error rate, you may slightly increase the Fragmentation
Threshold. Setting the Fragmentation Threshold too low may result in poor network performance. Only minor
reduction of the default value is recommended. In most cases, it should remain at its default value of 2346.
RTS Threshold. Should you encounter inconsistent data flow, only minor reduction of the default value, 2347, is
recommended. If a network packet is smaller than the preset RTS threshold size, the RTS/CTS mechanism will
not be enabled. The Router sends Request to Send (RTS) frames to a particular receiving station and negotiates
the sending of a data frame. After receiving an RTS, the wireless station responds with a Clear to Send (CTS)
frame to acknowledge the right to begin transmission. The RTS Threshold value should remain at its default value
of 2347.
Change these settings as described here and click the Save Settings button to apply your changes or Cancel
Changes to cancel your changes.
46
Chapter 6: Configuring the Wireless-G Broadband Router
The Security Tab - Firewall
Wireless-G Broadband Router
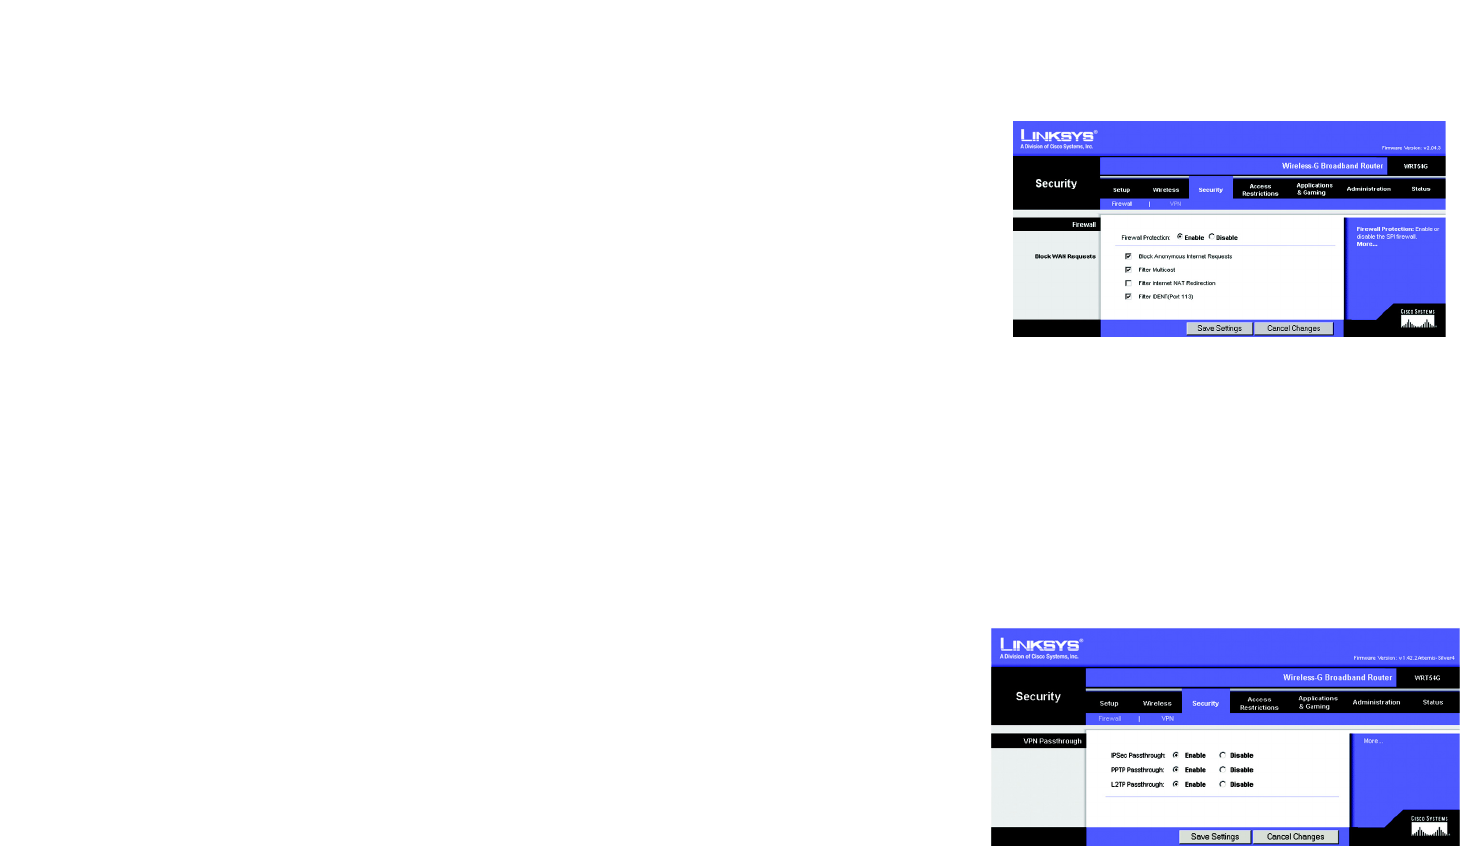
The Security Tab - Firewall
Firewall Protection. Enable this feature to employ Stateful Packet Inspection (SPI) for more detailed review of
data packets entering your network environment.
Block WAN Requests. Enable the Block WAN Request feature by checking the box beside Block Anonymous
Internet Requests and you can prevent your network from being “pinged,” or detected, by other Internet users.
The Block WAN Request feature also reinforces your network security by hiding your network ports. Both
functions of the Block WAN Request feature make it more difficult for outside users to work their way into your
network. This feature is enabled by default. Select Disabled to allow anonymous Internet requests.
Filter Multicast. Multicasting allows for multiple transmissions to specific recipients at the same time. If
multicasting is permitted, then the Router will allow IP multicast packets to be forwarded to the appropriate
computers. Select Enabled to filter multicasting, or Disabled to disable this feature.
Filter Internet NAT Redirection. This feature uses port forwarding to block access to local servers from local
networked computers. Select Enabled to filter Internet NAT redirection, or Disabled to disable this feature.
Filter IDENT (Port 113). This feature keeps port 113 from being scanned by devices outside of your local
network. Select Enabled to filter port 113, or Disabled to disable this feature.
Change these settings as described here and click the Save Settings button to apply your changes or Cancel
Changes to cancel your changes.
The Security Tab - VPN Passthrough
Use the settings on this tab to allow VPN tunnels using IPSec, PPTP, or L2TP protocols to pass through the
Router’s firewall.
IPSec Pass-through. Internet Protocol Security (IPSec) is a suite of protocols used to implement secure
exchange of packets at the IP layer. To allow IPSec tunnels to pass through the Router, click Enable. IPSec Pass-
Through is enabled by default.
PPTP Pass-through. Point-to-Point Tunneling Protocol (PPTP) allows the Point-to-Point Protocol (PPP) to be
tunneled through an IP network. To allow PPTP tunnels to pass through the Router, click Enable. PPTP Pass-
Through is enabled by default.
L2TP Pass-through. Layer 2 Tunneling Protocol is the method used to enable Point-to-Point sessions via the
Internet on the Layer 2 level. To allow L2TP tunnels to pass through the Router, click Enable. L2TP Pass-Through
is enabled by default.
Figure 6-24: Security Tab - Firewall
Figure 6-25: Security Tab - VPN Passthrough
47
Chapter 6: Configuring the Wireless-G Broadband Router
The Access Restrictions Tab - Internet Access
Wireless-G Broadband Router
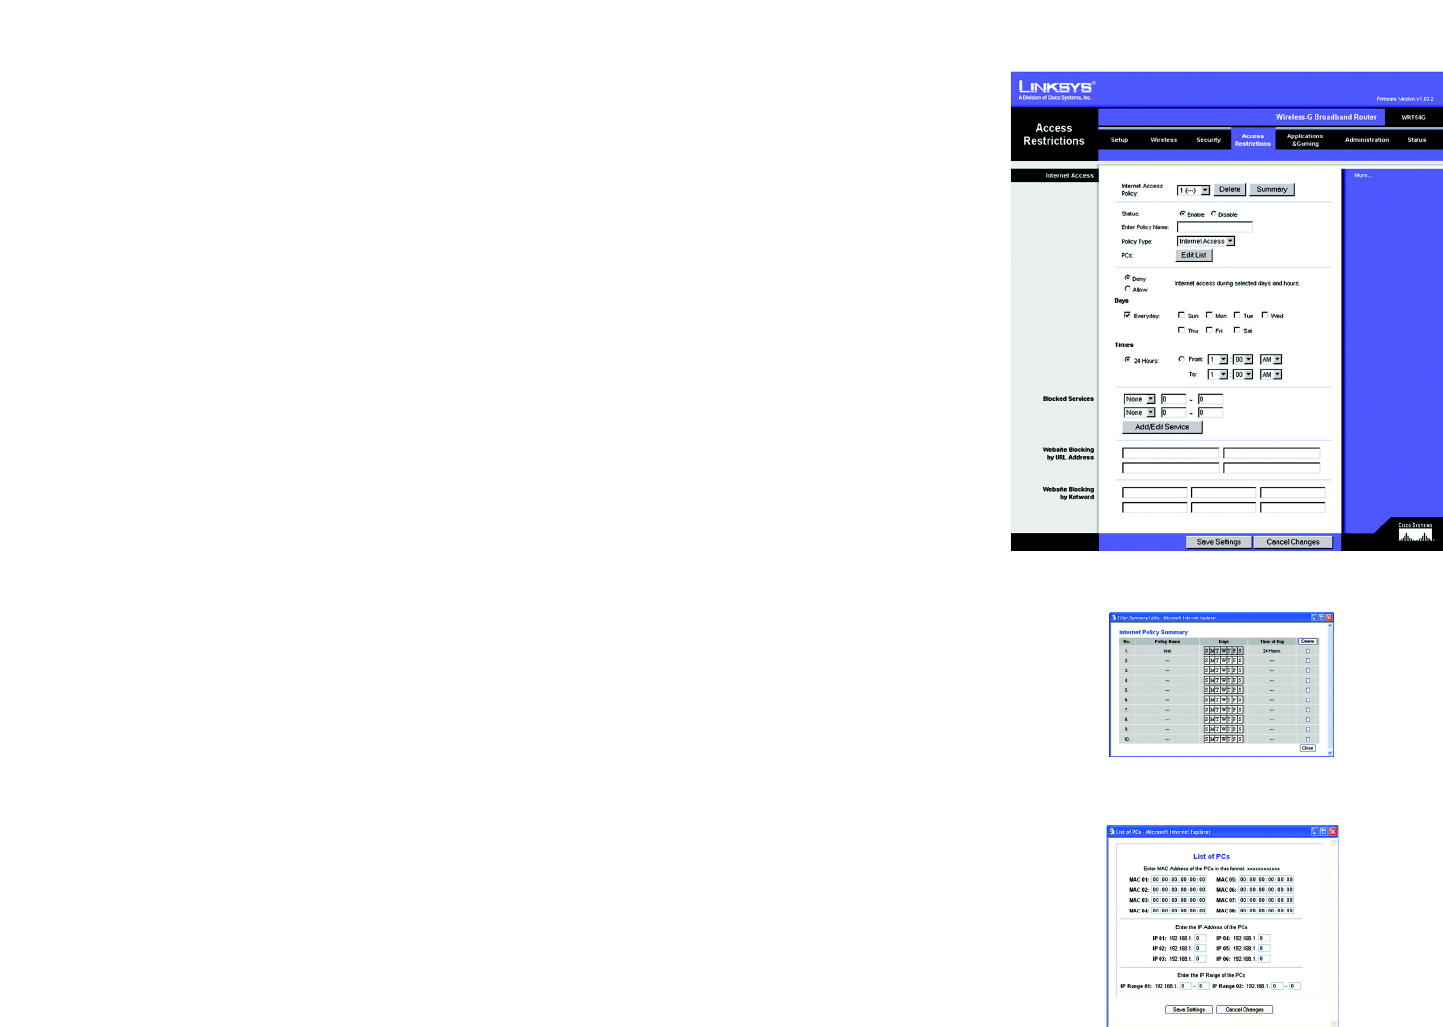
Figure 6-26: Access Restrictions Tab - Internet Access
Figure 6-27: Internet Policy Summary
Figure 6-28: List of PCs
Change these settings as described here and click the Save Settings button to apply your changes or Cancel
Changes to cancel your changes.
The Access Restrictions Tab - Internet Access
The Internet Access screen allows you to block or allow specific kinds of Internet usage and traffic, such as
Internet access, designated services, websites, and inbound traffic during specific days and times.
Internet Access Policy. Access can be managed by a policy. Use the settings on this screen to establish an
access policy (after the Save Settings button is clicked). Selecting a policy from the drop-down menu will
display that policy’s settings. To delete a policy, select that policy’s number and click the Delete button. To view
all the policies, click the Summary button. (Policies can be deleted from the Summary screen by selecting the
policy or policies and clicking the Delete button. To return to the Internet Access tab, click the Close button.)
Status. Policies are disabled by default. To enable a policy, select the policy number from the drop-down menu,
and click the radio button beside Enable.
You can create two kinds of policies, one kind to manage Internet access and another kind to manage inbound
traffic.
To create an Internet Access policy:
1. Select a number from the Internet Access Policy drop-down menu.
2. To enable this policy, click the radio button beside Enable.
3. Enter a Policy Name in the field provided.
4. Select Internet Access as the Policy Type.
5. Click the Edit List button to select which PCs will be affected by the policy. The List of PCs screen will appear.
You can select a PC by MAC Address or IP Address. You can also enter a range of IP Addresses if you want this
policy to affect a group of PCs. After making your changes, click the Save Settings button to apply your
changes or Cancel Changes to cancel your changes. Then click the Close button.
6. Click the appropriate option, Deny or Allow, depending on whether you want to block or allow Internet access
for the PCs you listed on the List of PCs screen.
7. Decide which days and what times you want this policy to be enforced. Select the individual days during
which the policy will be in effect, or select Everyday. Then enter a range of hours and minutes during which
the policy will be in effect, or select 24 Hours.
48
Chapter 6: Configuring the Wireless-G Broadband Router
The Access Restrictions Tab - Internet Access
Wireless-G Broadband Router
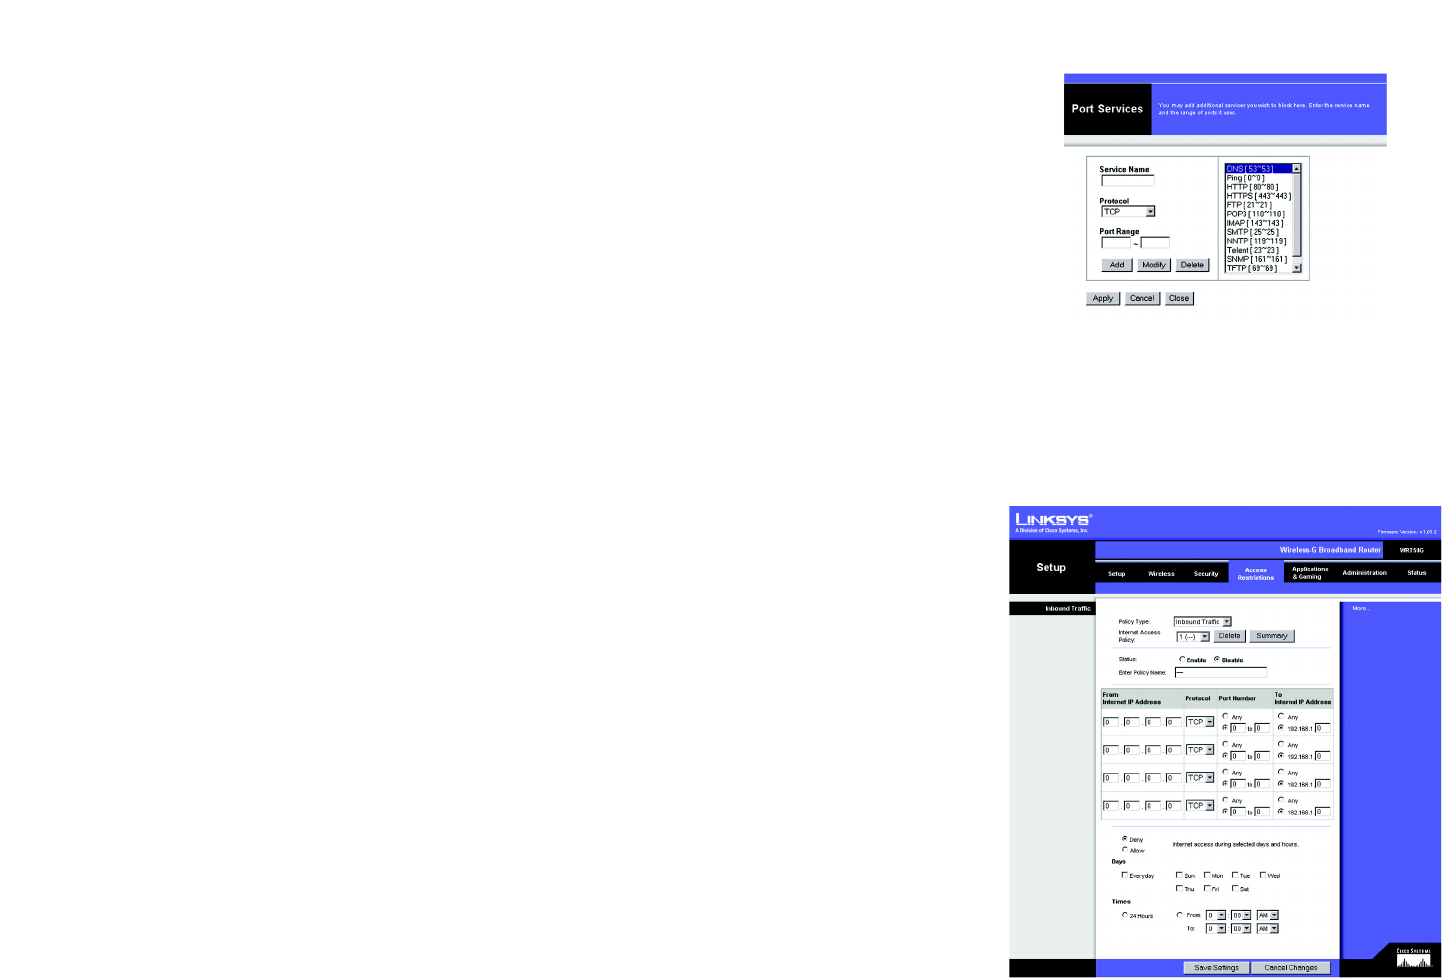
8. You can filter access to various services accessed over the Internet, such as FTP or telnet, by selecting
services from the drop-down menus next to Blocked Services. (You can block up to 20 services.)
Then enter the range of ports you want to filter.
If the service you want to block is not listed or you want to edit a service’s settings, then click the Add/Edit
Service button. Then the Port Services screen will appear.
To add a service, enter the service’s name in the Service Name field. Select its protocol from the Protocol
drop-down menu, and enter its range in the Port Range fields. Then click the Add button.
To modify a service, select it from the list on the right. Change its name, protocol setting, or port range. Then
click the Modify button.
To delete a service, select it from the list on the right. Then click the Delete button.
When you are finished making changes on the Port Services screen, click the Apply button to save changes.
If you want to cancel your changes, click the Cancel button. To close the Port Services screen and return to
the Access Restrictions screen, click the Close button.
9. If you want to block websites with specific URL addresses, enter each URL in a separate field next to Website
Blocking by URL Address.
10. If you want to block websites using specific keywords, enter each keyword in a separate field next to Website
Blocking by Keyword.
11. Click the Save Settings button to save the policy’s settings. To cancel the policy’s settings, click the Cancel
Changes button.
To create an Inbound Traffic policy:
1. Select Inbound Traffic as the Policy Type.
2. Select a number from the Internet Access Policy drop-down menu.
3. To enable this policy, click the radio button beside Enable.
4. Enter a Policy Name in the field provided.
5. Enter the source IP address whose traffic you want to manage. Select the appropriate protocol: TCP, UDP, or
Both. Enter the appropriate port range, or select Any. Enter the destination IP address whose traffic you want
to manage, or select Any.
Figure 6-29: Port Services
Figure 6-30: Access Restrictions Tab - Inbound Traffic
49
Chapter 6: Configuring the Wireless-G Broadband Router
The Applications and Gaming Tab - Port Range Forward
Wireless-G Broadband Router
6. Click the appropriate option, Deny or Allow, depending on whether you want to block or allow network traffic.
7. Decide which days and what times you want this policy to be enforced. Select the individual days during
which the policy will be in effect, or select Everyday. Then enter a range of hours and minutes during which
the policy will be in effect, or select 24 Hours.
8. Click the Save Settings button to save the policy’s settings. To cancel the policy’s settings, click the Cancel
Changes button.
Change these settings as described here and click the Save Settings button to apply your changes or Cancel
Changes to cancel your changes.
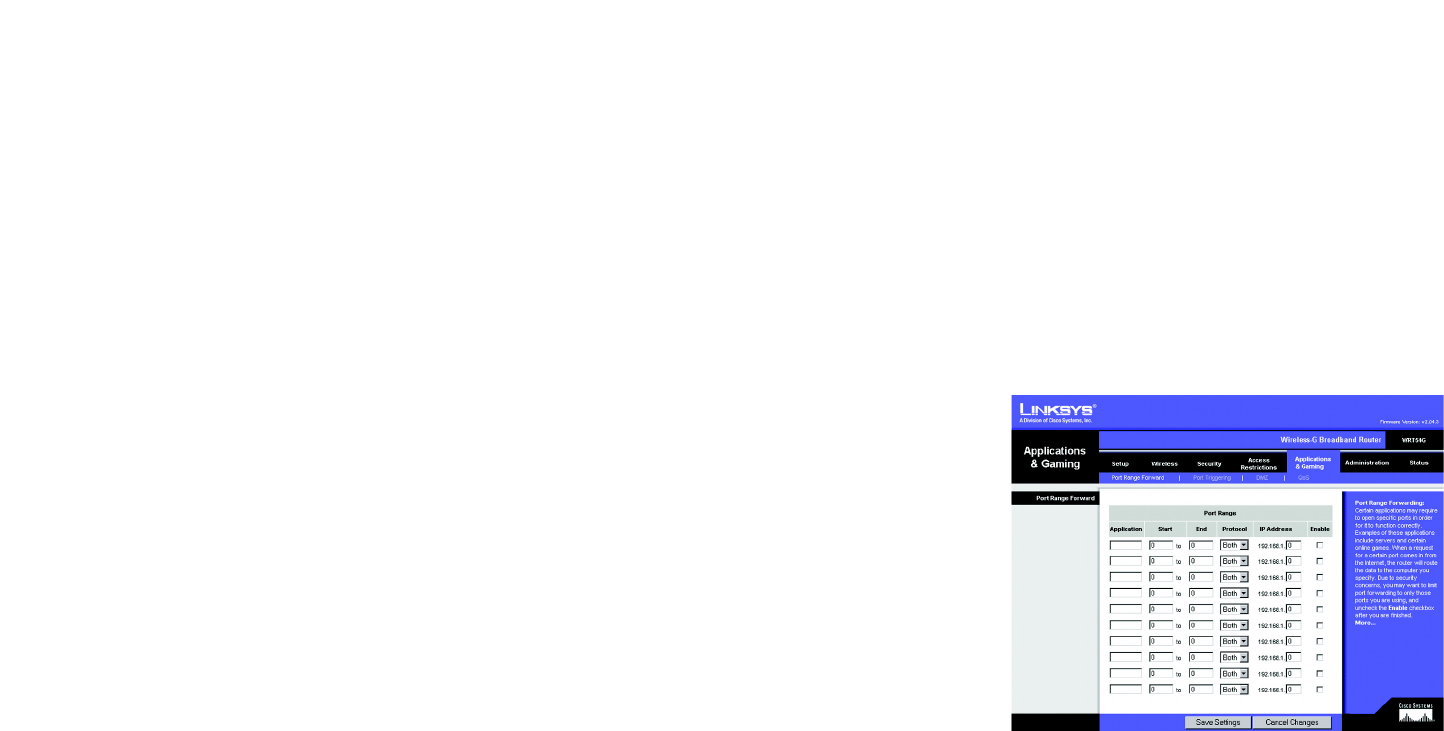
The Applications and Gaming Tab - Port Range Forward
The Applications and Gaming Tab allows you to set up public services on your network, such as web servers, ftp
servers, e-mail servers, or other specialized Internet applications. (Specialized Internet applications are any
applications that use Internet access to perform functions such as videoconferencing or online gaming. Some
Internet applications may not require any forwarding.)
To forward a port, enter the information on each line for the criteria required. The criteria are described here.
Application. In this field, enter the name you wish to give the application. Each name can be up to 12 characters.
Start/End. This is the port range. Enter the number that starts the port range under Start and the number that
ends the range under End.
Protocol. Enter the protocol used for this application, either TCP or UDP, or Both.
IP Address. For each application, enter the IP Address of the PC running the specific application.
Enable. Click the Enable checkbox to enable port forwarding for the relevant application.
Change these settings as described here and click the Save Settings button to apply your changes or Cancel
Changes to cancel your changes.
Figure 6-31: Applications and Gaming Tab - Port
Range Forward
50
Chapter 6: Configuring the Wireless-G Broadband Router
The Applications & Gaming Tab - Port Triggering
Wireless-G Broadband Router
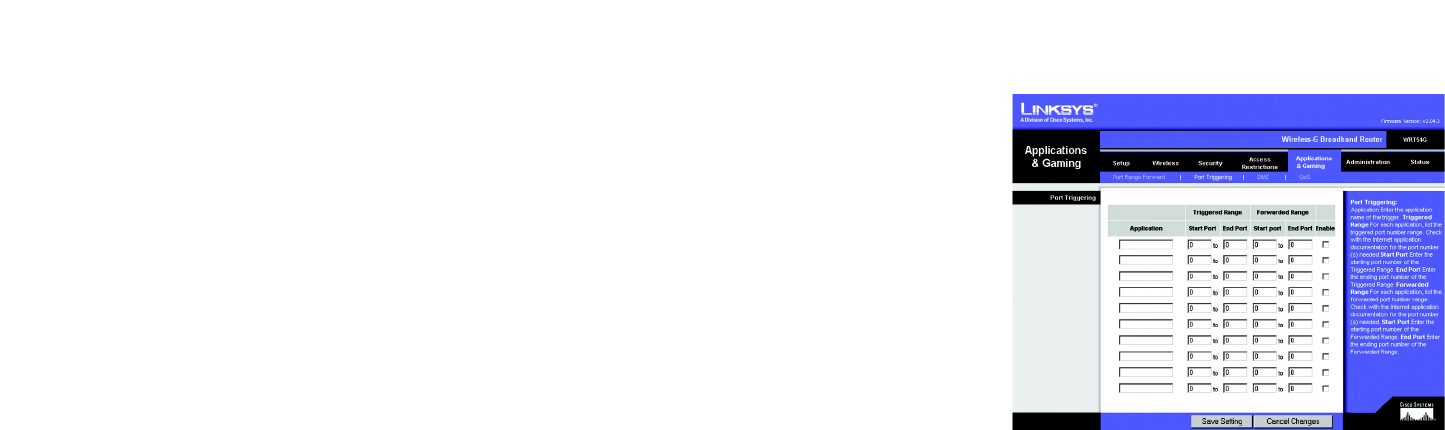
The Applications & Gaming Tab - Port Triggering
The Port Triggering screen allows the Router to watch outgoing data for specific port numbers. The IP address of
the computer that sends the matching data is remembered by the Router, so that when the requested data
returns through the Router, the data is pulled back to the proper computer by way of IP address and port mapping
rules.
Port Triggering
Application. Enter the application name of the trigger.
Triggered Range
For each application, list the triggered port number range. Check with the Internet application documentation for
the port number(s) needed.
Start Port. Enter the starting port number of the Triggered Range.
End Port. Enter the ending port number of the Triggered Range.
Forwarded Range
For each application, list the forwarded port number range. Check with the Internet application documentation for
the port number(s) needed.
Start Port. Enter the starting port number of the Forwarded Range.
End Port. Enter the ending port number of the Forwarded Range.
Change these settings as described here and click the Save Settings button to apply your changes or Cancel
Changes to cancel your changes.
Figure 6-32: Applications and Gaming Tab -
Port Triggering
51
Chapter 6: Configuring the Wireless-G Broadband Router
The Applications and Gaming Tab - DMZ
Wireless-G Broadband Router
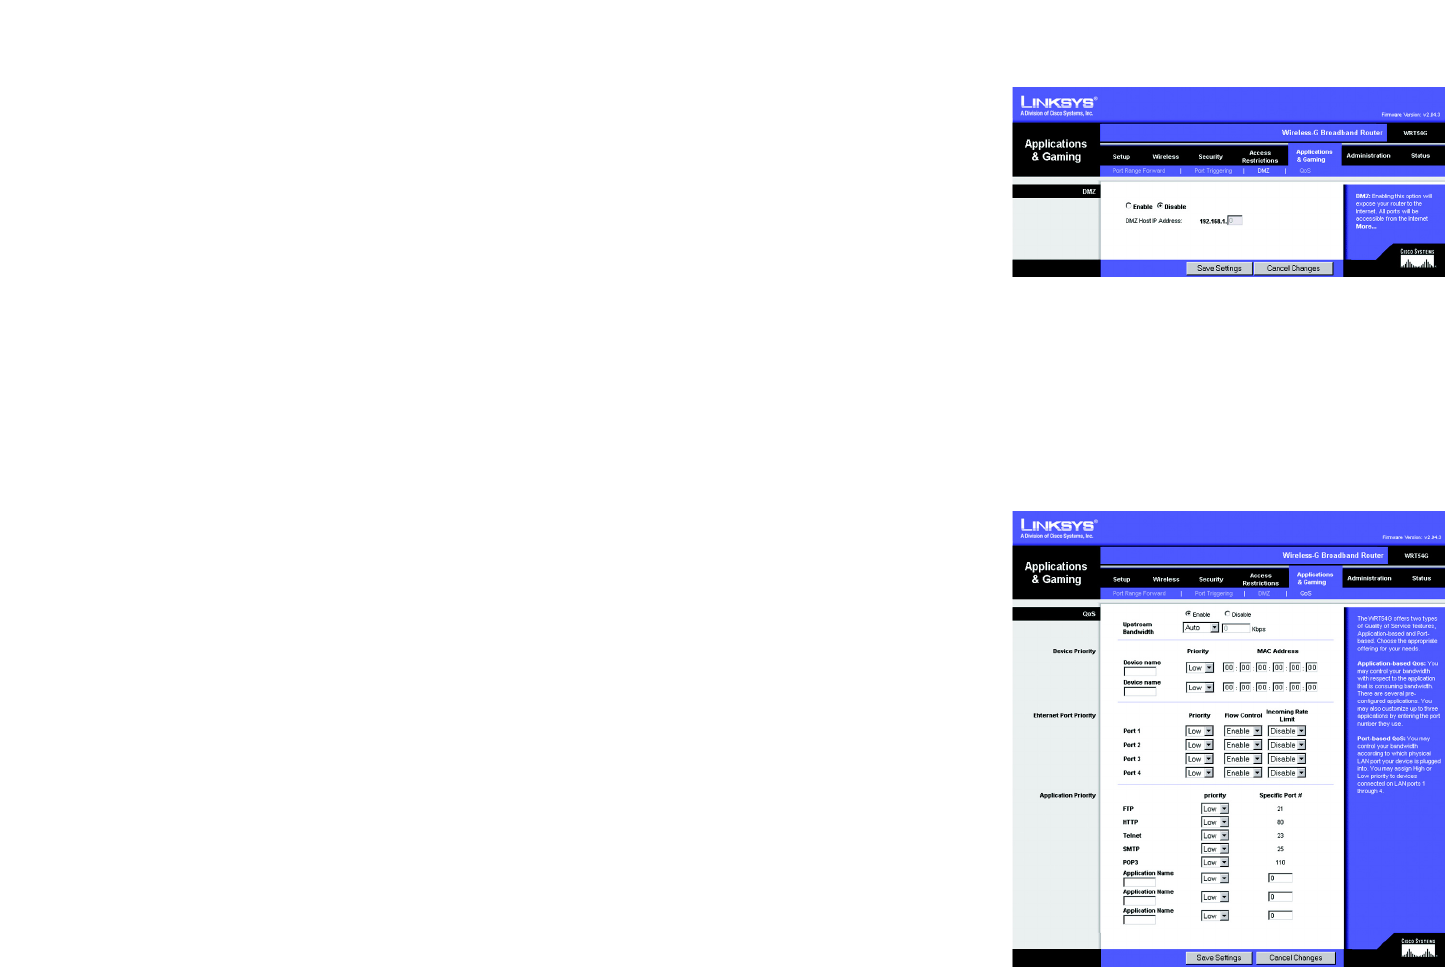
Figure 6-33: Applications and Gaming Tab - DMZ
The Applications and Gaming Tab - DMZ
The DMZ feature allows one network user to be exposed to the Internet for use of a special-purpose service such
as Internet gaming or videoconferencing. DMZ hosting forwards all the ports at the same time to one PC. The Port
Range Forward feature is more secure because it only opens the ports you want to have opened, while DMZ
hosting opens all the ports of one computer, exposing the computer to the Internet.
Any PC whose port is being forwarded must have its DHCP client function disabled and should have a new static
IP address assigned to it because its IP address may change when using the DHCP function.
To expose one PC, select Enable. Then, enter the computer's IP address in the DMZ Host IP Address field.
Change these settings as described here and click the Save Settings button to apply your changes or Cancel
Changes to cancel your changes.
The Applications and Gaming Tab - QoS
Quality of Service (QoS) ensures better service to high-priority types of network traffic, which may involve
demanding, real-time applications, such as videoconferencing.
There are three types of QoS available, Device Priority, Application Priority, and Ethernet Port Priority.
Enable/Disable. To limit outgoing bandwidth for the QoS policies in use, select Enable. Otherwise, select
Disable.
Upstream Bandwidth. Select the bandwidth to be used from the drop-down menu. This setting allows you to
limit the outgoing bandwidth for the QoS policies in use, so you can control how much bandwidth a particular
application is allowed to use.
Device Priority
Enter the name of your network device in the Device name field, enter its MAC Address, then select its priority
from the drop-down menu.
Ethernet Port Priority
Ethernet Port Priority QoS allows you to prioritize performance for four of the Router’s ports, LAN Ports 1-4. For
each of these ports, select High or Low for Priority. For Flow Control, if you want the Router to control the
transmission of data between network devices, select Enable. To disable this feature, select Disable. The
Router’s other four ports will be automatically assigned low priority. Incoming Rate Limit limits the incoming Figure 6-34: Applications and Gaming Tab - QOS

52
Chapter 6: Configuring the Wireless-G Broadband Router
The Applications and Gaming Tab - QoS
Wireless-G Broadband Router
bandwidth. To use this feature, select 8M, 4M, 2M, 1M, 512K, 256K, or 128K (M stands for Mbps, while K
stands for kbps). If you do not want to use this feature, keep the default, Disable.
Ethernet Port Priority QoS does not require support from your ISP because the prioritized ports are LAN ports
going out to your network.
Application Port Priority
Application Port Priority QoS manages information as it is transmitted and received. Depending on the settings of
the QoS screen, this feature will assign information a high or low priority for the five preset applications and three
additional applications that you specify. For each application, select High or Low for Priority. For Specific Port#,
you can add three additional applications by entering their respective port numbers in the Specific Port# fields.
FTP (File Transfer Protocol). A protocol used to transfer files over a TCP/IP network (Internet, UNIX, etc.). For
example, after developing the HTML pages for a website on a local machine, they are typically uploaded to the
web server using FTP.
HTTP (HyperText Transport Protocol). The communications protocol used to connect to servers on the World
Wide Web. Its primary function is to establish a connection with a web server and transmit HTML pages to the
client web browser.
Telnet. A terminal emulation protocol commonly used on Internet and TCP/IP-based networks. It allows a user at
a terminal or computer to log onto a remote device and run a program.
SMTP (Simple Mail Transfer Protocol). The standard e-mail protocol on the Internet. It is a TCP/IP protocol that
defines the message format and the message transfer agent (MTA), which stores and forwards the mail.
POP3 (Post Office Protocol 3). A standard mail server commonly used on the Internet. It provides a message
store that holds incoming e-mail until users log on and download it. POP3 is a simple system with little selectivity.
All pending messages and attachments are downloaded at the same time. POP3 uses the SMTP messaging
protocol.
Application Name. You can add three additional applications by entering their names in the Application Name
fields.
Change these settings as described here and click the Save Settings button to apply your changes or Cancel
Changes to cancel your changes.
53
Chapter 6: Configuring the Wireless-G Broadband Router
The Administration Tab - Management
Wireless-G Broadband Router
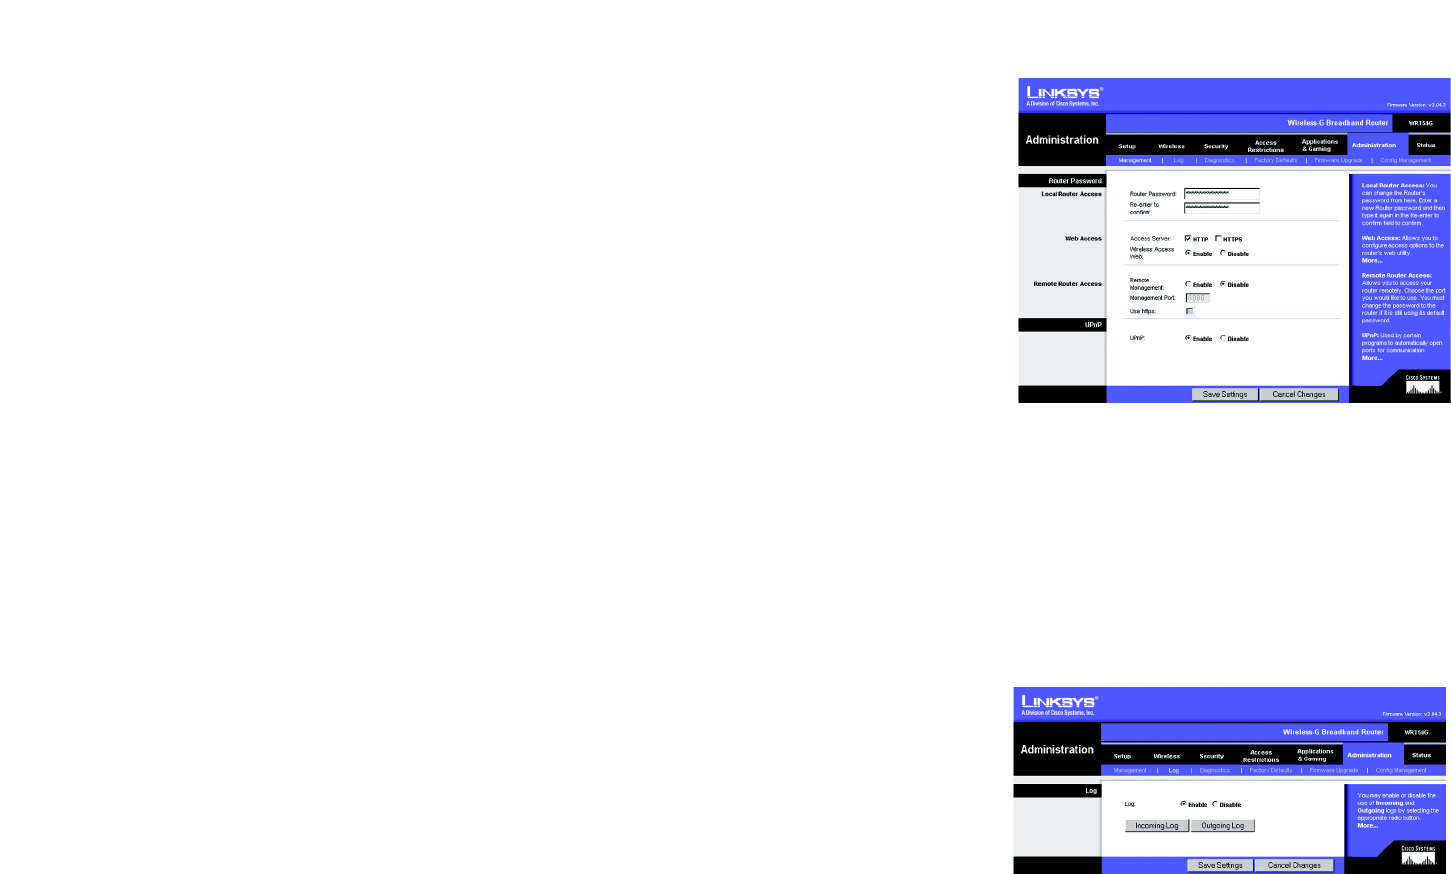
The Administration Tab - Management
This section of the Administration tab allows the network’s administrator to manage specific Router functions for
access and security.
Local Router Access. You can change the Router’s password from here. Enter a new Router password and then
type it again in the Re-enter to confirm field to confirm.
Web Access. HTTP (HyperText Transport Protocol) - The communications protocol used to connect to servers on
the World Wide Web. HTTPS - Uses SSL (Secured Socket Layer) to encrypt data transmitted for higher security.
Select HTTP or HTTPS. Wireless Access Web - If you are using your Wireless Router in a public domain where you
are giving wireless access to your guests, you can disable wireless access to the router’s web-based utility. You
will only be able to access the web-based utility via a wired connection if you disable the setting. Select Enable
to enable wireless access to the Router’s web-based utility or Disable to disable wireless access to the utility.
Remote Router Access. To access the Router remotely, from outside the network, verify that Enable is selected.
Then, enter the port number that will be open to outside access. You will need to enter the Router’s password
when accessing the Router this way, as usual.
UPnP. When using UPnP features, select Enable. Because allowing this may present a risk to security, this
feature is disabled by default.
Change these settings as described here and click the Save Settings button to apply your changes or Cancel
Changes to cancel your changes.
The Administration Tab - Log
The Router can keep logs of all traffic for your Internet connection. To disable the Log function, keep the default
setting, Disable. To monitor traffic between the network and the Internet, select Enable. When you wish to view
the logs, click Incoming Log or Outgoing Log, depending on which you wish to view.
Change these settings as described here and click the Save Settings button to apply your changes or Cancel
Changes to cancel your changes.
Figure 6-35: Administration Tab - Management
Figure 6-36: Administration Tab - Log