LINKSYS WT54GV40 802.11G Broadband Router with SpeedBooster/Switch User Manual Book
LINKSYS LLC 802.11G Broadband Router with SpeedBooster/Switch Book
LINKSYS >
Contents
- 1. Users Manual 1
- 2. Users Manual 2
- 3. Users Manual 3
- 4. Users Manual 4
- 5. Users Manual 5
- 6. Users Manual 6
- 7. Users Manual 7
- 8. Users Manual 8
- 9. Users Manual 9
- 10. Users Manual 10
- 11. Users Manual 11
- 12. Users Manual 12
- 13. Users Manual 13
- 14. Users Manual 14
- 15. Users Manual 15
- 16. Users Manual 16
- 17. Users Manual 17
- 18. Users Manual 18
Users Manual 3
14
Chapter 5: Setting up the Wireless-G Broadband Router
Using the Setup Wizard
Wireless-G Broadband Router
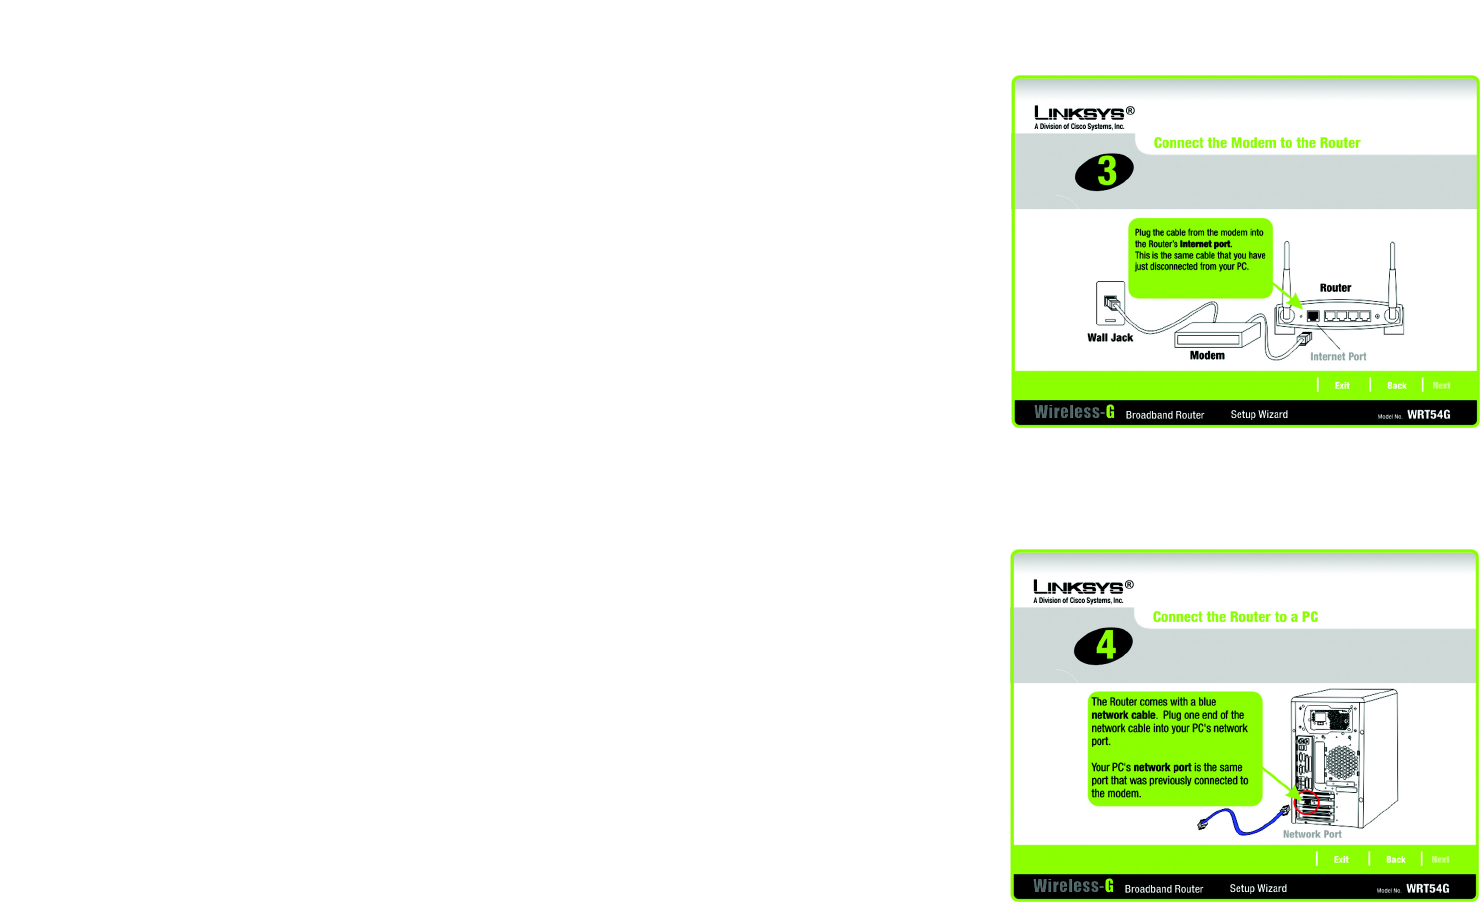
6. The Setup Wizard will ask you to connect your broadband modem to the Router. After you have done so, click
the Next button.
7. The Setup Wizard will ask you to connect a network cable to your PC. After you have done so, click the Next
button.
Figure 5-5: Setup Wizard’s Connect the Modem to the
Router Screen
Figure 5-6: Setup Wizard’s Connect a Network Cable to a
PC Screen
15
Chapter 5: Setting up the Wireless-G Broadband Router
Using the Setup Wizard
Wireless-G Broadband Router
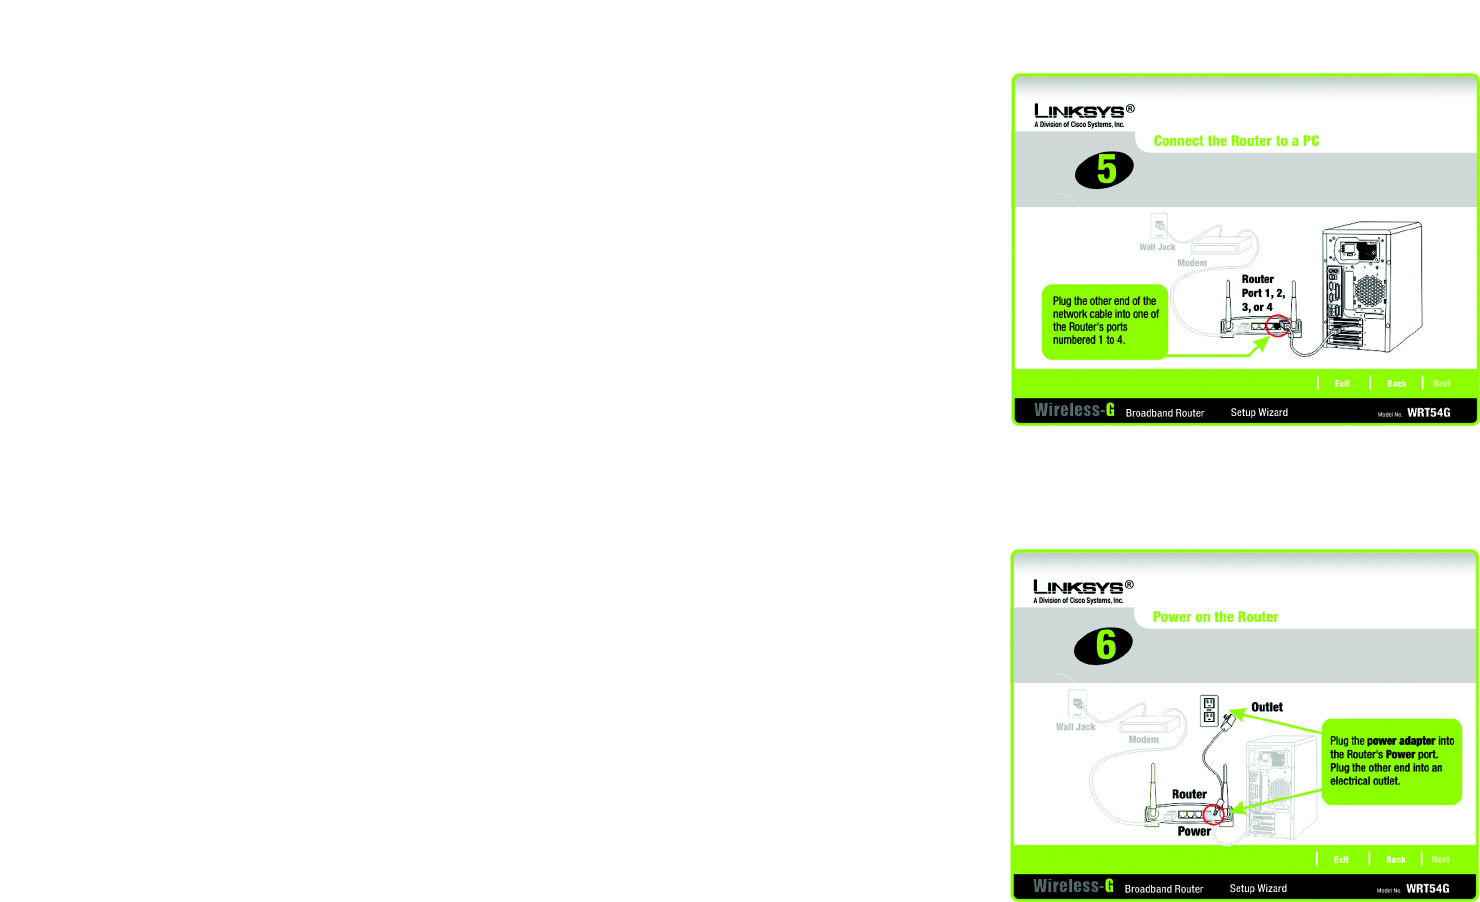
8. The Setup Wizard will ask you to connect the other end of the network cable to the Router.
Then you can also connect additional PCs to the Router.
After you have done so, click the Next button.
9. The Setup Wizard will ask you to power on the Router. After you have done so, click the Next button.
Figure 5-7: Setup Wizard’s Connect the Network Cable
to the Router Screen
Figure 5-8: Setup Wizard’s Power on the Router Screen
16
Chapter 5: Setting up the Wireless-G Broadband Router
Using the Setup Wizard
Wireless-G Broadband Router
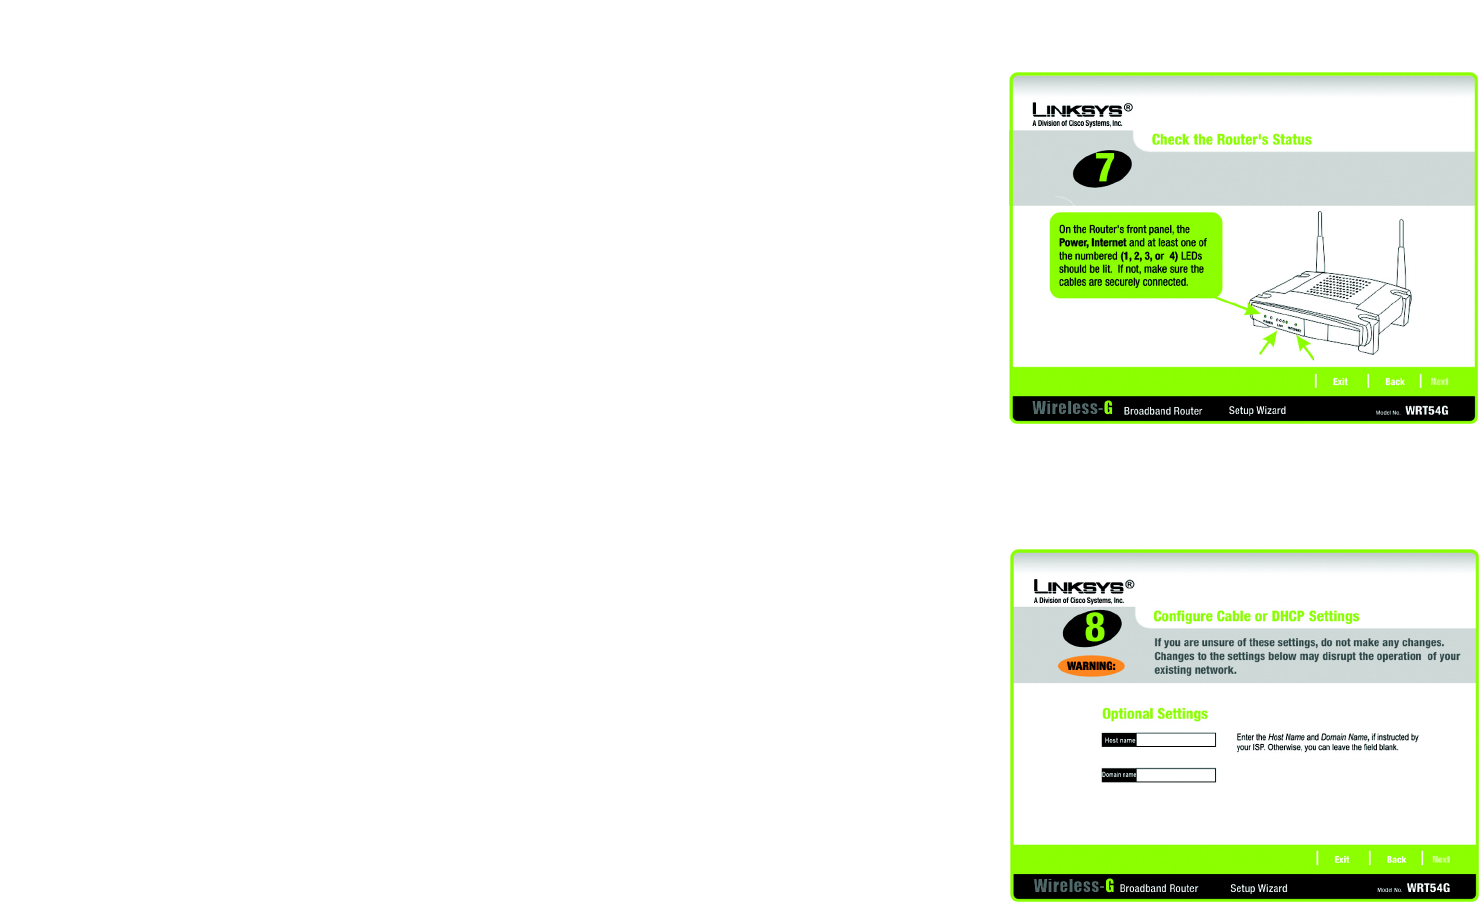
10. Make sure the Router’s Power, Internet, and numbered LEDs (depending on the number of PCs connected) are
lit on its front panel. After you have done so, click the Next button.
11. The Setup Wizard will automatically detect the Internet connection type you use: Cable or DHCP or DSL
(PPPoE). If the Setup Wizard cannot detect your Internet connection type, you will see the Advanced Internet
Settings screen, and you will be asked to select your Internet connection type: Static IP, PPTP, L2TP, or
Telstra. Proceed to the appropriate section for your Internet connection type.
Cable or DHCP
Host Name - Enter the Host Name if required by your ISP; otherwise, leave this field blank.
Domain Name - Enter the Domain Name if required by your ISP; otherwise, leave this field blank.
Click the Next button to continue or the Back button to return to the previous screen.
Figure 5-9: Setup Wizard’s Check the Router’s
Status Screen
Figure 5-10: Setup Wizard’s Configure Cable or DHCP
Settings Screen
17
Chapter 5: Setting up the Wireless-G Broadband Router
Using the Setup Wizard
Wireless-G Broadband Router
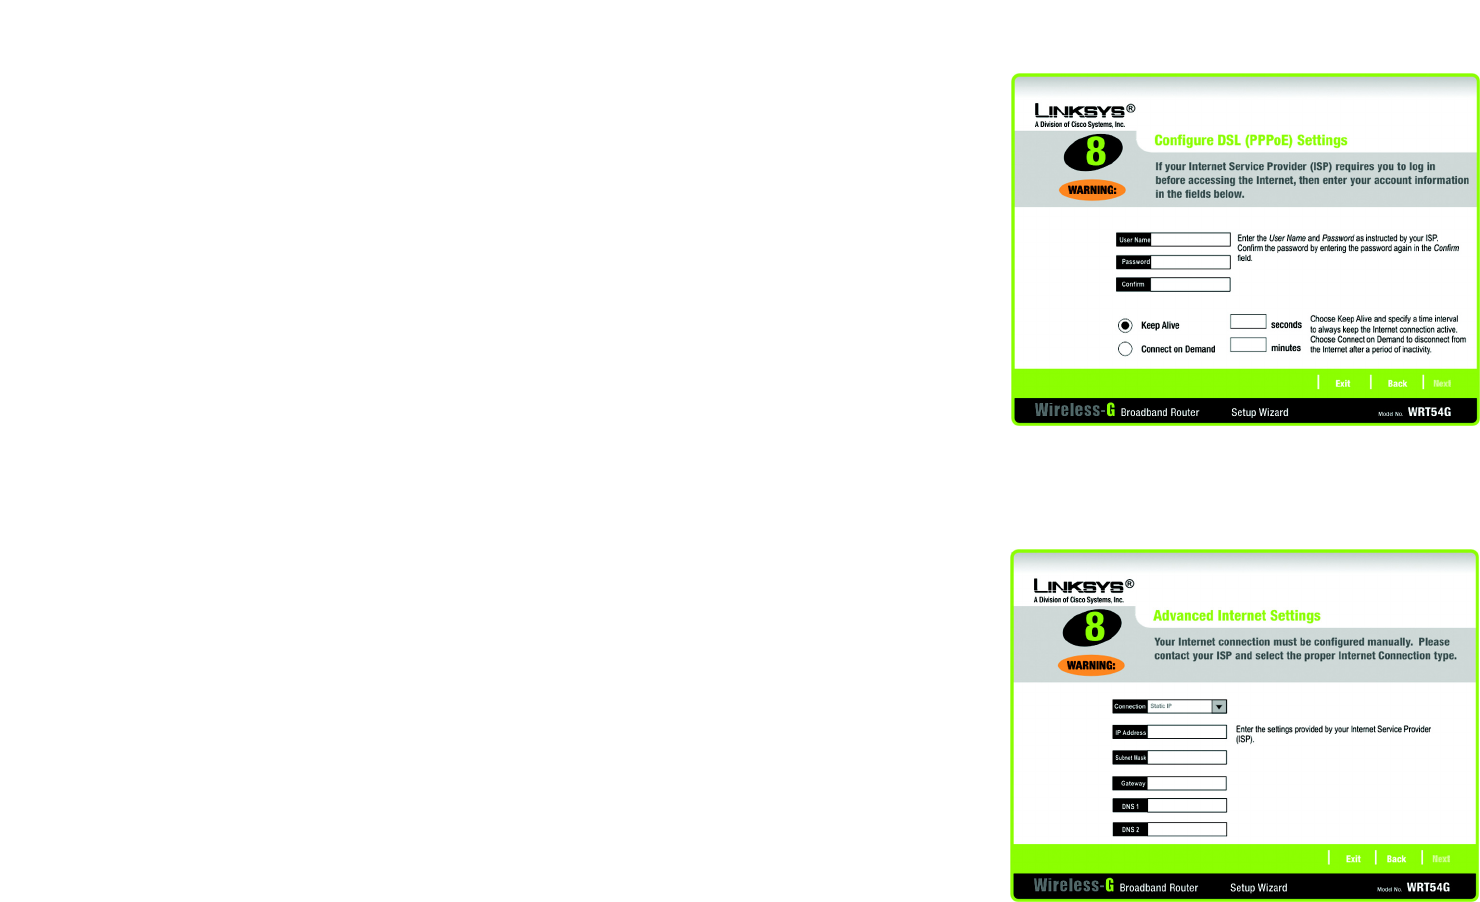
DSL (PPPoE)
User Name - Enter the User Name provided by your ISP.
Password - Enter the Password provided by your ISP.
Confirm - To confirm the Password, enter it again in this field.
Keep Alive - If you want the Router to periodically check your Internet connection, select Keep Alive. Then
specify how often you want the Router to check the Internet connection. If the connection is down, the Router
will automatically re-establish your connection.
Connect on Demand - If you want the Router to end the Internet connection after it has been inactive for a
period of time, select Connect on Demand and designate the number of minutes you want that period of
inactivity to last.
Click the Next button to continue or the Back button to return to the previous screen.
Static IP
Connection - If you are required to use a permanent IP address to connect to the Internet, select Static IP
from the drop-down menu.
IP Address - Enter the IP address provided by your ISP.
Subnet Mask- Enter the Subnet Mask provided by your ISP.
Gateway - Enter the Gateway IP address provided by your ISP.
DNS 1-2 - Enter the DNS (Domain Name System) server IP address(es) provided by your ISP. You need to enter
at least one DNS address.
Click the Next button to continue or the Back button to return to the previous screen.
Figure 5-11: Setup Wizard’s Configure DSL (PPPoE)
Settings Screen
Figure 5-12: Setup Wizard’s Advanced Internet
Settings - Static IP Screen
18
Chapter 5: Setting up the Wireless-G Broadband Router
Using the Setup Wizard
Wireless-G Broadband Router
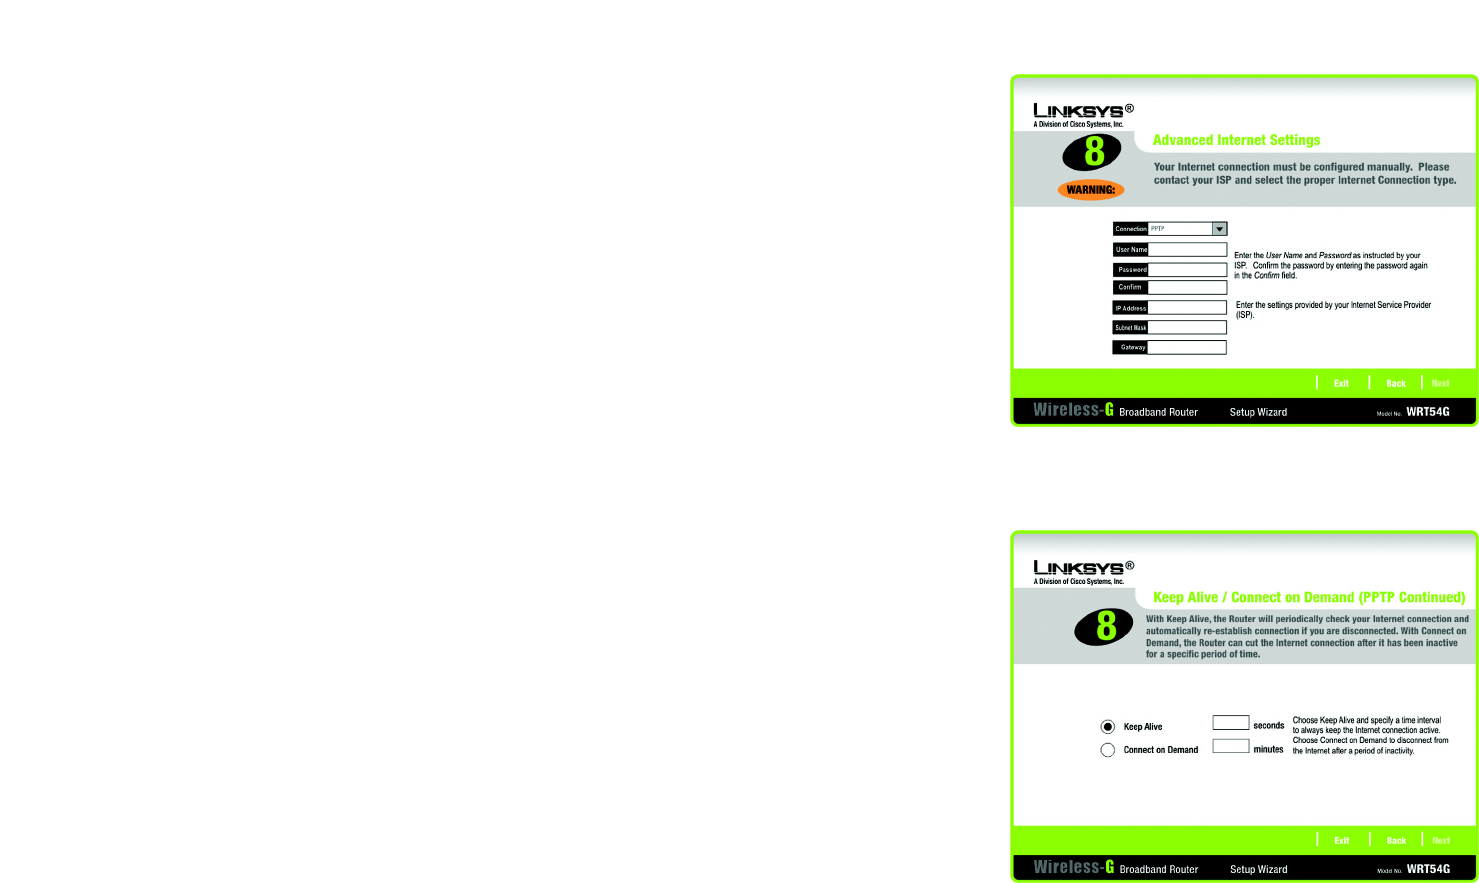
PPTP
Connection - PPTP (Point-to-Point Tunneling Protocol) service is used in Europe only. If you are using a PPTP
connection, select PPTP from the drop-down menu.
User Name - Enter the User Name provided by your ISP.
Password - Enter the Password provided by your ISP.
Confirm - To confirm the Password, enter it again in this field.
IP Address - Enter the IP address provided by your ISP.
Subnet Mask- Enter the Subnet Mask provided by your ISP.
Gateway - Enter the Gateway IP address provided by your ISP.
Click the Next button to continue or the Back button to return to the previous screen.
Keep Alive - If you want the Router to periodically check your Internet connection, select Keep Alive. Then
specify how often you want the Router to check the Internet connection. If the connection is down, the Router
will automatically re-establish your connection.
Connect on Demand - If you want the Router to end the Internet connection after it has been inactive for a
period of time, select Connect on Demand and designate the number of minutes you want that period of
inactivity to last.
Click the Next button to continue or the Back button to return to the previous screen.
Figure 5-13: Setup Wizard’s Advanced Internet
Settings - PPTP Screen
Figure 5-14: Setup Wizard’s Keep Alive/Connect on
Demand (PPTP Continued) Screen
19
Chapter 5: Setting up the Wireless-G Broadband Router
Using the Setup Wizard
Wireless-G Broadband Router
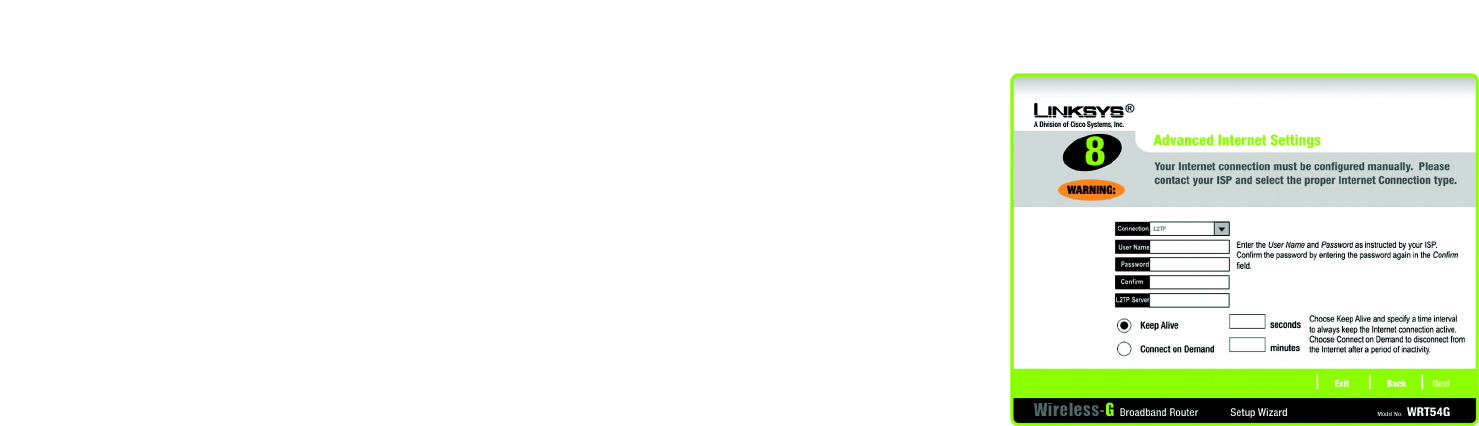
L2TP
Connection - If you are using an L2TP (Layer 2 Tunneling Protocol) connection, select L2TP from the drop-
down menu.
User Name - Enter the User Name provided by your ISP.
Password - Enter the Password provided by your ISP.
Confirm - To confirm the Password, enter it again in this field.
L2TP Server - Enter the IP address of the L2TP server you are using; this should be provided by your ISP.
Keep Alive - If you want the Router to periodically check your Internet connection, select Keep Alive. Then
specify how often you want the Router to check the Internet connection. If the connection is down, the Router
will automatically re-establish your connection.
Connect on Demand - If you want the Router to end the Internet connection after it has been inactive for a
period of time, select Connect on Demand and designate the number of minutes you want that period of
inactivity to last.
Click the Next button to continue or the Back button to return to the previous screen.
Figure 5-15: Setup Wizard’s Advanced Internet Settings -
L2TP Screen

20
Chapter 5: Setting up the Wireless-G Broadband Router
Using the Setup Wizard
Wireless-G Broadband Router
Telstra
Connection - Telstra is a service used in Australia only. If you are using this service, select Telstra from the
drop-down menu.
User Name - Enter the User Name provided by your ISP.
Password - Enter the Password provided by your ISP.
Confirm - To confirm the Password, enter it again in this field.
Heart Beat Server - Enter the IP address of the Heart Beat Server server you are using (this should be
provided by your ISP).
Keep Alive - If you want the Router to periodically check your Internet connection, select Keep Alive. Then
specify how often you want the Router to check the Internet connection. If the connection is down, the Router
will automatically re-establish your connection.
Connect on Demand - If you want the Router to end the Internet connection after it has been inactive for a
period of time, select Connect on Demand and designate the number of minutes you want that period of
inactivity to last.
Click the Next button to continue or the Back button to return to the previous screen.
Figure 5-16: Setup Wizard’s Advanced Internet Settings -
Telstra Screen

21
Chapter 5: Setting up the Wireless-G Broadband Router
Using the Setup Wizard
Wireless-G Broadband Router
12. The Router provides a Web-based Utility you can use for configuring the Router from any networked PC.
Password - Enter a password that will control access to the Utility.
Confirm - Enter the password again in the Confirm field.
Click the Next button to continue or the Back button to return to the previous screen.
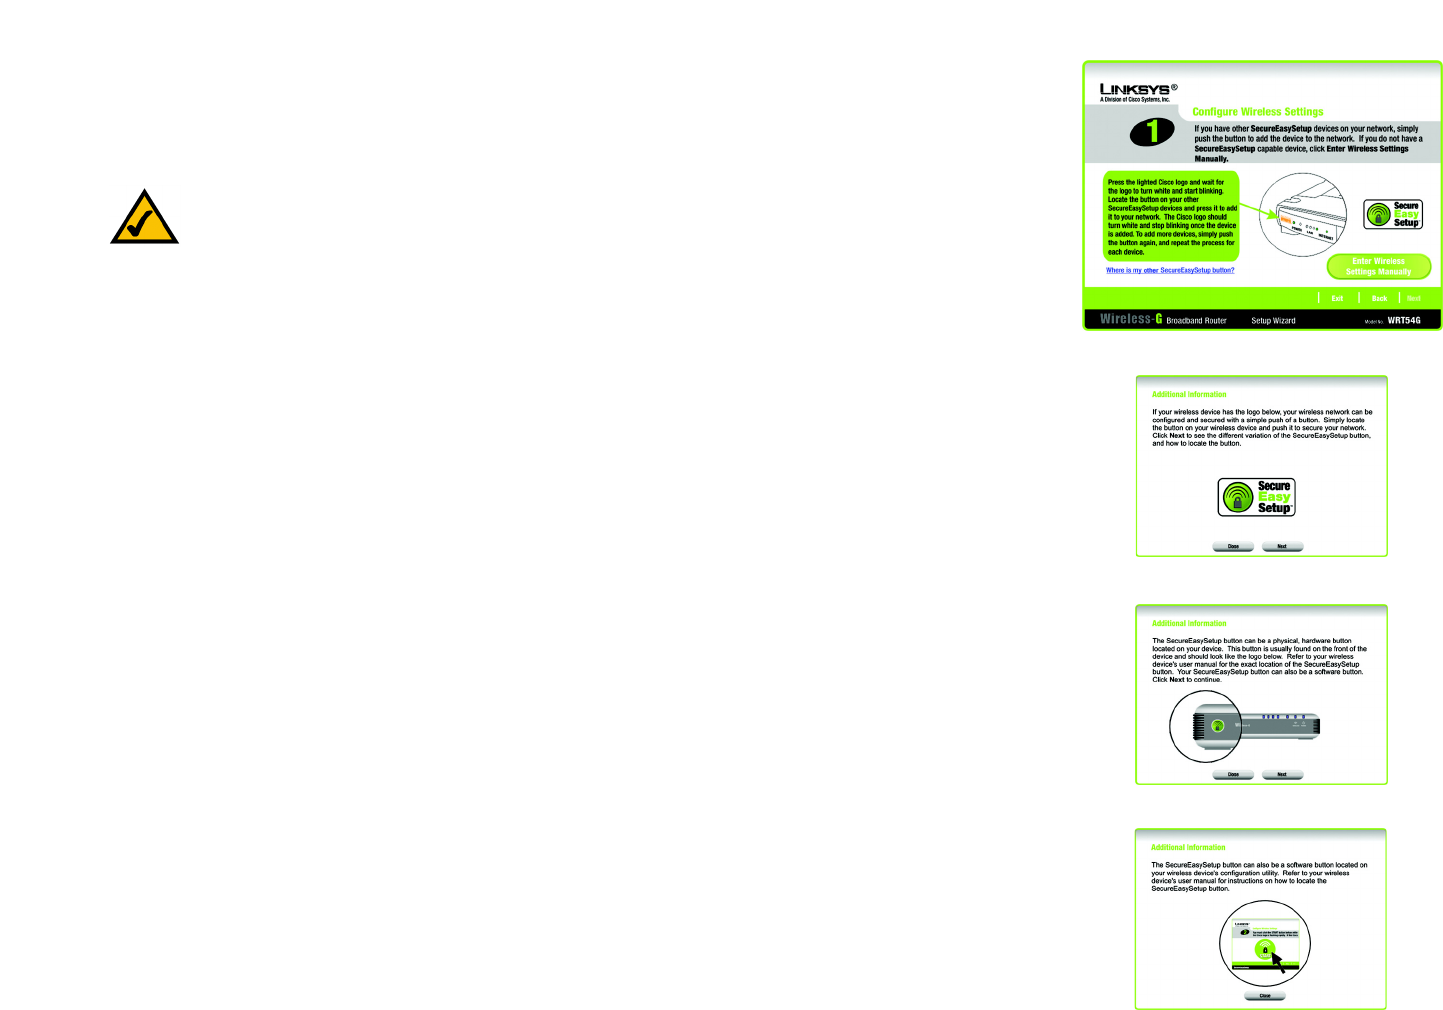
13. There are two ways to configure the Router’s wireless settings, SecureEasySetup and manual configuration.
If you have other SecureEasySetup devices, such as notebook adapters or printers, then you can use the
Router’s SecureEasySetup feature to create your wireless network. Proceed to the section, “Using the
Router’s SecureEasySetup Feature.”
If you do not have other SecureEasySetup devices, then proceed to the section, “Manually Configuring the
Router’s Wireless Settings.”
Figure 5-18: Setup Wizard’s Configure Wireless
Settings Screen
Figure 5-17: Setup Wizard’s Set the Router’s
Password Screen
22
Chapter 5: Setting up the Wireless-G Broadband Router
Using the Setup Wizard
Wireless-G Broadband Router
Using the Router’s SecureEasySetup Feature
Read these instructions before you press any SecureEasySetup buttons. You should locate the SecureEasySetup
buttons of your devices before using the Router’s SecureEasySetup feature.
1. Before you push any button, locate the SecureEasySetup button for each of your other SecureEasySetup
devices. If you are not sure where to find this button, click Where is my other SecureEasySetup button?
You will see a screen showing the SecureEasySetup logo. Click the Next button to continue or the Close
button to return to the Configure Wireless Settings screen.
You will see a screen with instructions on how to locate the SecureEasySetup hardware button. If your device
does not have a hardware button, it most likely will have a software button. Click the Next button for
instructions to locate the software button, or click the Close button to return to the Configure Wireless
Settings screen.
You will see a screen with instructions on how to locate the SecureEasySetup software button. Click the
Close button to return to the Configure Wireless Settings screen.
Figure 5-19: Setup Wizard’s SecureEasySetup Screen
Figure 5-20: SecureEasySetup Logo
Figure 5-21: Additional Information - Hardware Button
Figure 5-22: Additional Information - Software Button
NOTE: SecureEasySetup uses WPA-Personal encryption. If your current wireless devices do not
support WPA-Personal security, then you cannot use SecureEasySetup on your network. You will
need to manually configure your network security using the encryption supported by your
existing devices.
23
Chapter 5: Setting up the Wireless-G Broadband Router
Using the Setup Wizard
Wireless-G Broadband Router
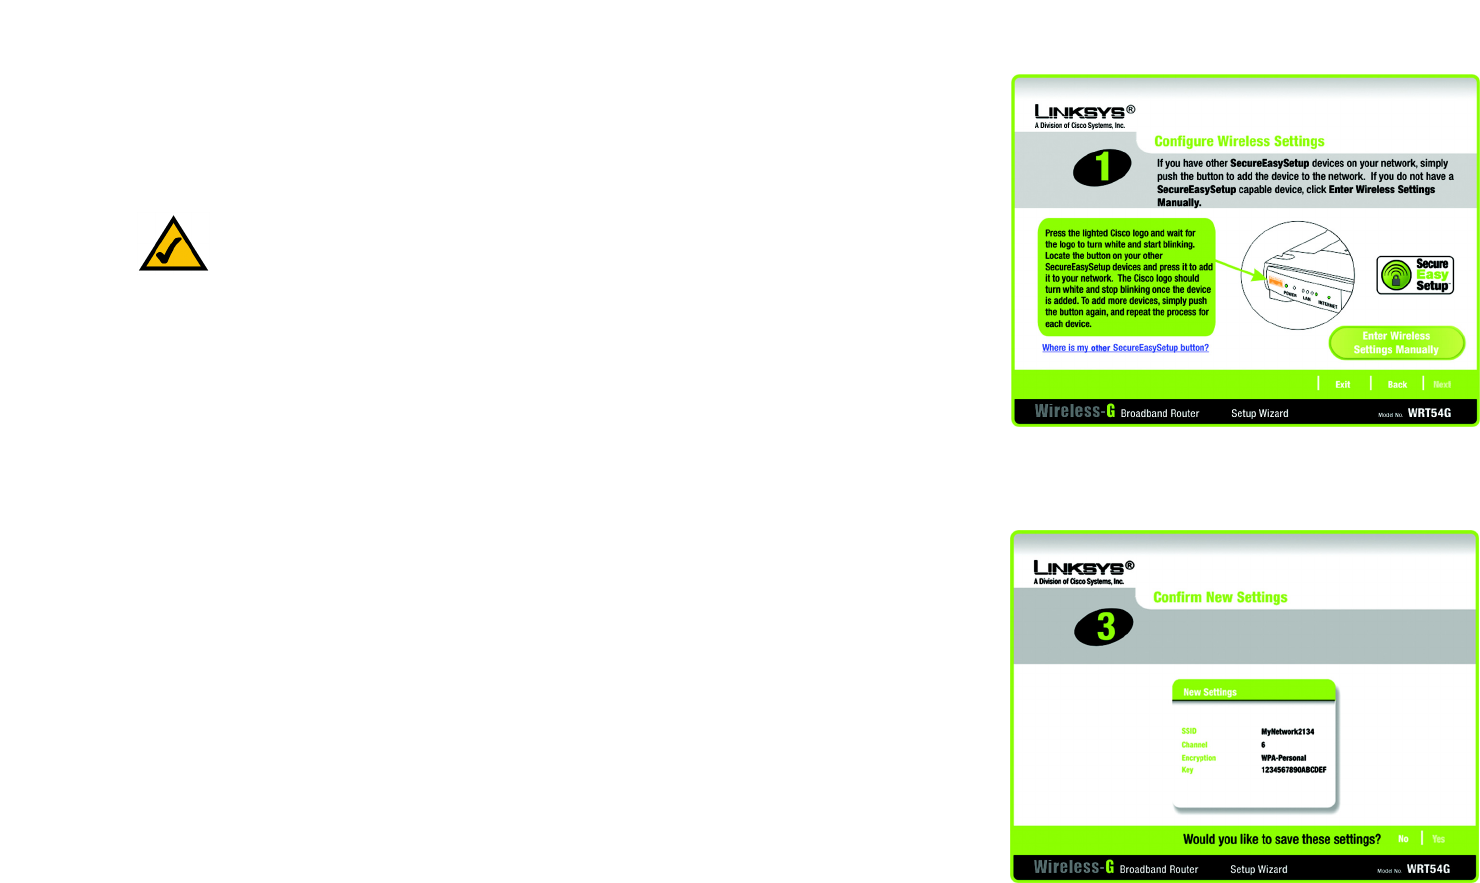
2. Press the Router’s orange Cisco logo on its front panel. When the logo turns white and begins to flash, press
the SecureEasySetup button on another device. The Router’s Cisco logo will stop flashing when the device
has been added to the network. Then repeat this procedure for each additional SecureEasySetup device.
When you have finished configuring the devices in your wireless network, click the Next button to continue.
3. The Setup Wizard will ask you to review your settings before it saves them. Write down these settings if you
need to manually configure any non-SecureEasySetup devices.
Click the Yes button if you are satisfied with your settings, or click the No button if you do not want to save
your new settings.
Figure 5-23: Setup Wizard’s Configure Wireless
Settings Screen
Figure 5-24: Setup Wizard’s Confirm New Settings Screen
NOTE: You can only add one SecureEasySetup device at a time.