LINKSYS WT54GV40 802.11G Broadband Router with SpeedBooster/Switch User Manual Book
LINKSYS LLC 802.11G Broadband Router with SpeedBooster/Switch Book
LINKSYS >
Contents
- 1. Users Manual 1
- 2. Users Manual 2
- 3. Users Manual 3
- 4. Users Manual 4
- 5. Users Manual 5
- 6. Users Manual 6
- 7. Users Manual 7
- 8. Users Manual 8
- 9. Users Manual 9
- 10. Users Manual 10
- 11. Users Manual 11
- 12. Users Manual 12
- 13. Users Manual 13
- 14. Users Manual 14
- 15. Users Manual 15
- 16. Users Manual 16
- 17. Users Manual 17
- 18. Users Manual 18
Users Manual 14

31
Chapter 5: Setting up the Wireless-G Broadband Router
Using SecureEasySetup to Configure Your Notebook
Wireless-G Broadband Router with SpeedBooster
2. The next screen will tell you to press the lighted Cisco logo on the Router. After you have pressed the logo,
click the Next button to continue.
To exit the Wireless Setup Wizard, click the Exit button. If you need more information, click the Help button.
3. Click the on-screen START button to continue.
To exit the Wireless Setup Wizard, click the Exit button. If you need more information, click the Help button.
To return to the previous screen, click the Back button.
Figure 5-37: Configure Wireless Settings #2 Screen
Figure 5-36: Configure Wireless Settings #1 Screen
32
Chapter 5: Setting up the Wireless-G Broadband Router
Using SecureEasySetup to Configure Your Notebook
Wireless-G Broadband Router with SpeedBooster
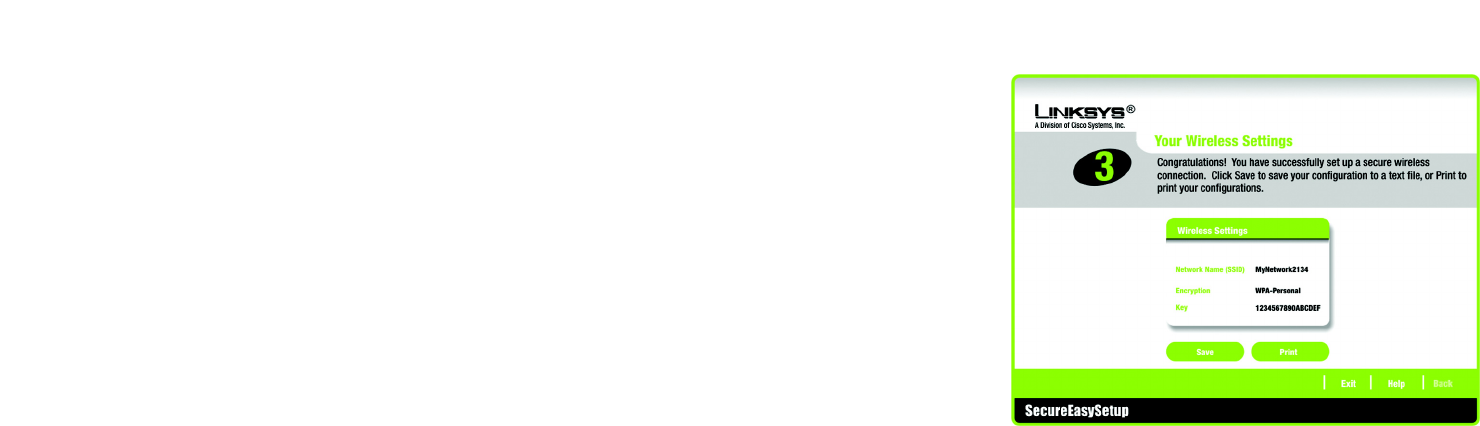
4. The Your Wireless Settings screen will appear when the wireless settings have been configured. To save your
configuration settings to a text file on your computer, click the Save button. To print your configuration
settings, click the Print button. (You may need these settings so you can manually configure any non-
SecureEasySetup devices you may have.)
To exit the Wireless Setup Wizard, click the Exit button. If you need more information, click the Help button.
To return to the previous screen, click the Back button.
Congratulations! The installation of the Wireless-G Broadband Router with SpeedBooster is complete.
If you want to make advanced configuration changes, proceed to “Chapter 6: Configuring the Wireless-G
Broadband Router with SpeedBooster.”
Figure 5-38: Your Wireless Settings Screen

33
Chapter 5: Configuring the Wireless-G Broadband Router
Overview
Wireless-G Broadband Router with SpeedBooster
Chapter 6: Configuring the Wireless-G Broadband
Router
Overview
You should always use the Setup CD-ROM when first installing the Router. If you do not wish to run the Setup
Wizard on the Setup CD-ROM, you can use the Web-based Utility to configure the Router. For advanced users, you
may configure the Router’s advanced settings through the Web-based Utility.
This chapter will describe each web page in the Utility and each page’s key functions. The utility can be accessed
via your web browser through use of a computer connected to the Router. For a basic network setup, most users
will use these two screens of the Utility:
• Basic Setup. On the Basic Setup screen, enter the settings provided by your ISP.
• Management. Click the Administration tab and then the Management tab. The Router’s default password is
admin. To secure the Router, change the Password from its default.
There are seven main tabs: Setup, Wireless, Security, Access Restrictions, Applications & Gaming, Administration,
and Status. Additional tabs will be available after you click one of the main tabs.
To access the Web-based Utility, launch Internet Explorer or Netscape Navigator, and enter the Router’s default IP
address, 192.168.1.1, in the Address field. Then, press Enter.
A password request page will appear. (Non-Windows XP users will see a similar screen.) Leave the User Name
field blank. The first time you open the Web-based Utility, use the default password admin. (You can set a new
password from the Administration tab’s Management screen.) Click the OK button to continue.
HAVE YOU: Enabled TCP/IP on your PCs? PCs
communicate over the network with this protocol.
Refer to “Appendix D: Windows Help” for more
information on TCP/IP.
NOTE: When first installing the Router, you should
use the Setup Wizard on the Setup CD-ROM. If you
want to configure advanced settings, use this
chapter to learn about the Web-based Utility.
Figure 6-1: Password Screen
34
Chapter 5: Configuring the Wireless-G Broadband Router
The Setup Tab - Basic Setup
Wireless-G Broadband Router with SpeedBooster
The Setup Tab - Basic Setup
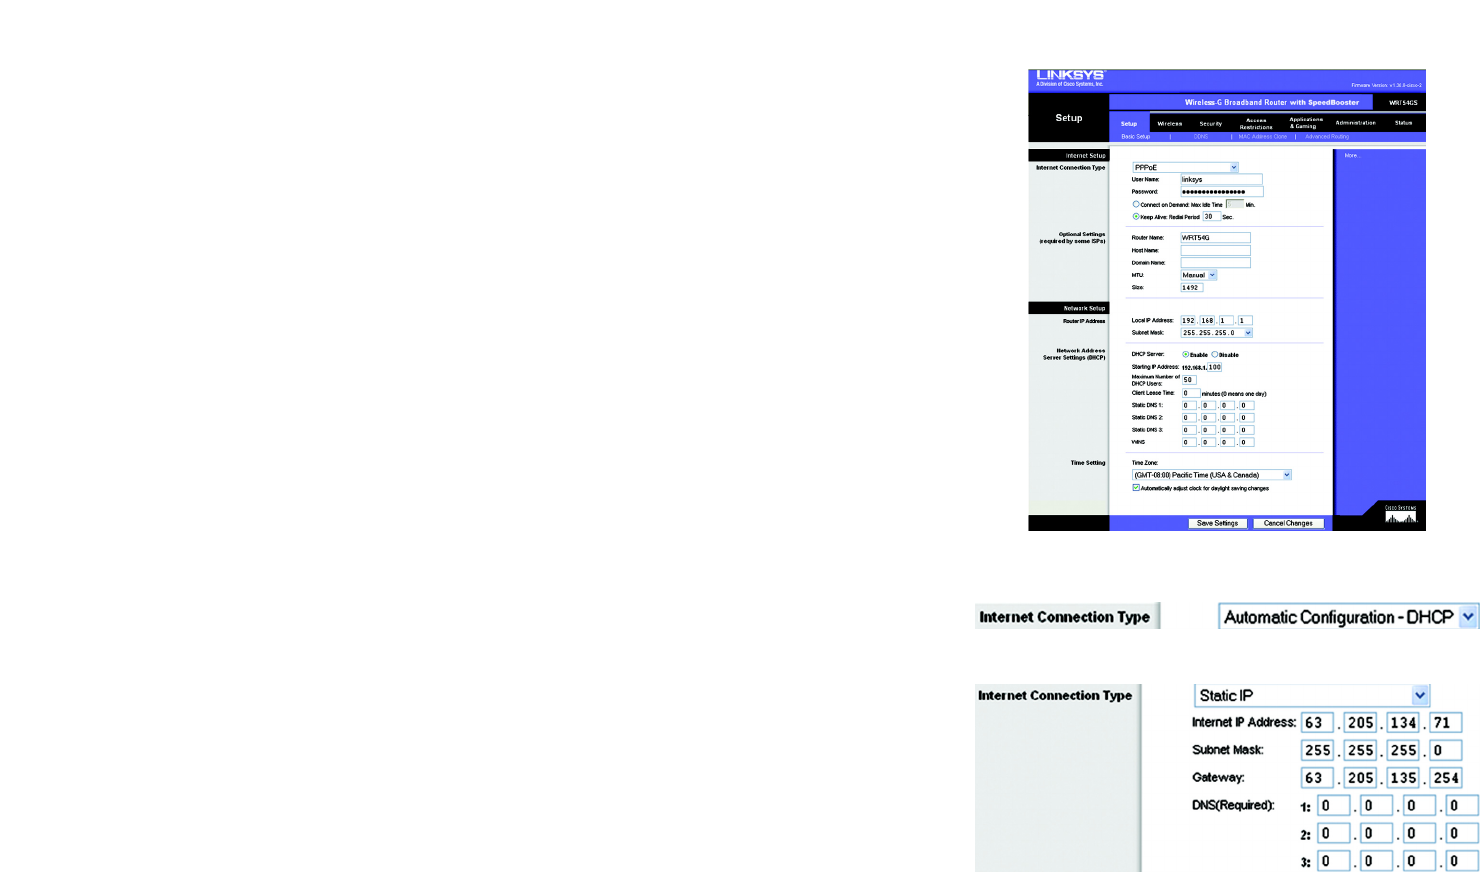
The first screen that appears displays the Setup tab. This allows you to change the Router's general settings.
Change these settings as described here and click the Save Settings button to apply your changes or Cancel
Changes to cancel your changes.
Internet Setup
The Internet Setup section configures the Router to your Internet connection. Most of this information can be
obtained through your ISP.
Internet Connection Type
Choose the type of Internet connection your ISP provides from the drop down menu.
•DHCP. By default, the Router’s Internet Connection Type is set to Automatic Configuration - DHCP, which
should be kept only if your ISP supports DHCP or you are connecting through a dynamic IP address.
•Static IP. If you are required to use a permanent IP address to connect to the Internet, select Static IP.
Internet IP Address. This is the Router’s IP address, when seen from the Internet. Your ISP will provide you
with the IP Address you need to specify here.
Subnet Mask. This is the Router’s Subnet Mask, as seen by users on the Internet (including your ISP). Your
ISP will provide you with the Subnet Mask.
Gateway. Your ISP will provide you with the Gateway Address, which is the ISP server’s IP address.
DNS. Your ISP will provide you with at least one DNS (Domain Name System) Server IP Address.
Figure 6-2: Setup Tab - Basic Setup
Figure 6-3: DHCP Connection Type
Figure 6-4: Static IP Connection Type
static ip address: a fixed address
assigned to a computer or device
connected to a network.
35
Chapter 5: Configuring the Wireless-G Broadband Router
The Setup Tab - Basic Setup
Wireless-G Broadband Router with SpeedBooster
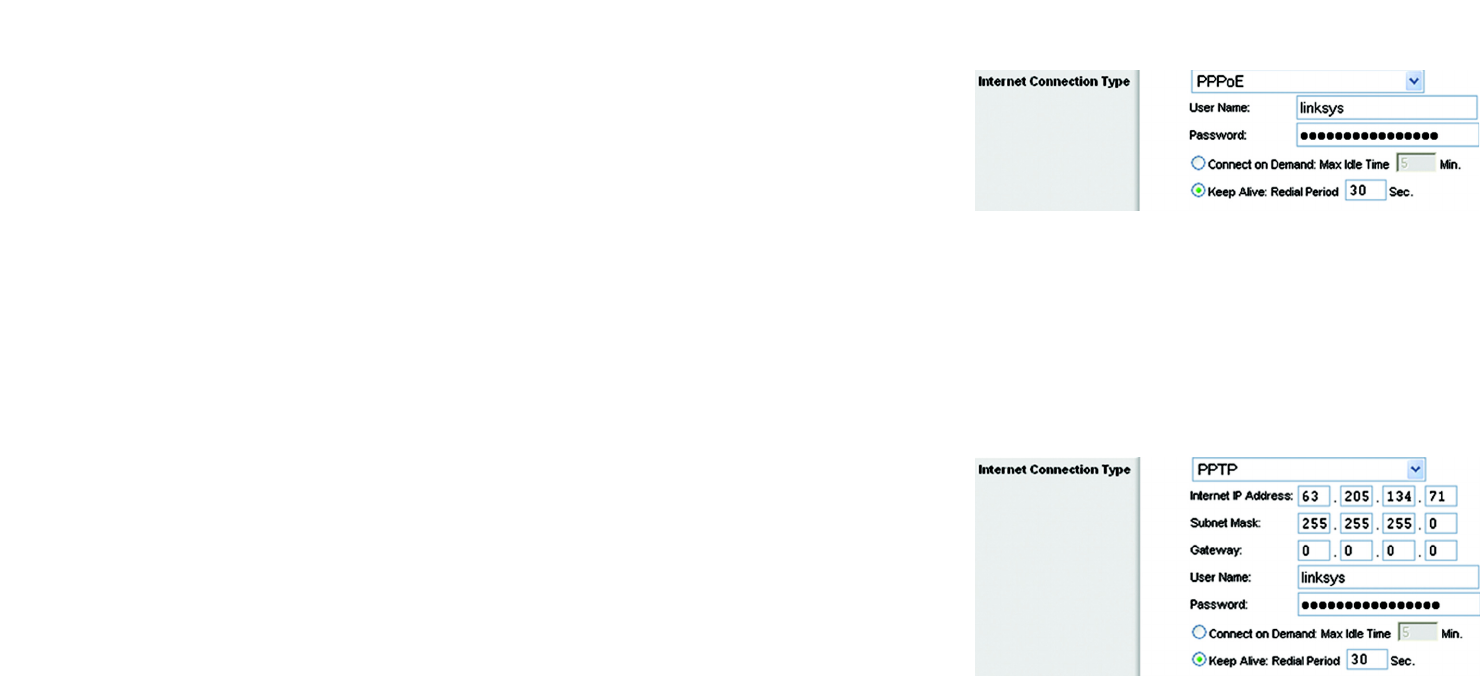
•PPPoE. Some DSL-based ISPs use PPPoE (Point-to-Point Protocol over Ethernet) to establish Internet
connections. If you are connected to the Internet through a DSL line, check with your ISP to see if they use
PPPoE. If they do, you will have to enable PPPoE.
User Name and Password. Enter the User Name and Password provided by your ISP.
Connect on Demand: Max Idle Time. You can configure the Router to cut the Internet connection after it has
been inactive for a specified period of time (Max Idle Time). If your Internet connection has been terminated
due to inactivity, Connect on Demand enables the Router to automatically re-establish your connection as
soon as you attempt to access the Internet again. If you wish to activate Connect on Demand, click the radio
button. In the Max Idle Time field, enter the number of minutes you want to have elapsed before your Internet
connection terminates.
Keep Alive Option: Redial Period. If you select this option, the Router will periodically check your Internet
connection. If you are disconnected, then the Router will automatically re-establish your connection. To use
this option, click the radio button next to Keep Alive. In the Redial Period field, you specify how often you want
the Router to check the Internet connection. The default Redial Period is 30 seconds.
•PPTP. Point-to-Point Tunneling Protocol (PPTP) is a service that applies to connections in Europe only.
Specify Internet IP Address. This is the Router’s IP address, as seen from the Internet. Your ISP will provide
you with the IP Address you need to specify here.
Subnet Mask. This is the Router’s Subnet Mask, as seen by users on the Internet (including your ISP). Your
ISP will provide you with the Subnet Mask.
Gateway. Your ISP will provide you with the Gateway Address.
User Name and Password. Enter the User Name and Password provided by your ISP.
Connect on Demand: Max Idle Time. You can configure the Router to cut the Internet connection after it has
been inactive for a specified period of time (Max Idle Time). If your Internet connection has been terminated
due to inactivity, Connect on Demand enables the Router to automatically re-establish your connection as
soon as you attempt to access the Internet again. If you wish to activate Connect on Demand, click the radio
button. In the Max Idle Time field, enter the number of minutes you want to have elapsed before your Internet
connection terminates.
Keep Alive Option: Redial Period. If you select this option, the Router will periodically check your Internet
connection. If you are disconnected, then the Router will automatically re-establish your connection. To use
this option, click the radio button next to Keep Alive. In the Redial Period field, you specify how often you want
the Router to check the Internet connection. The default Redial Period is 30 seconds.
Figure 6-5: PPPoE Connection Type
Figure 6-6: PPTP Connection Type
pppoe: a type of broadband connection that
provides authentication (username and
password) in addition to data transport
36
Chapter 5: Configuring the Wireless-G Broadband Router
The Setup Tab - Basic Setup
Wireless-G Broadband Router with SpeedBooster
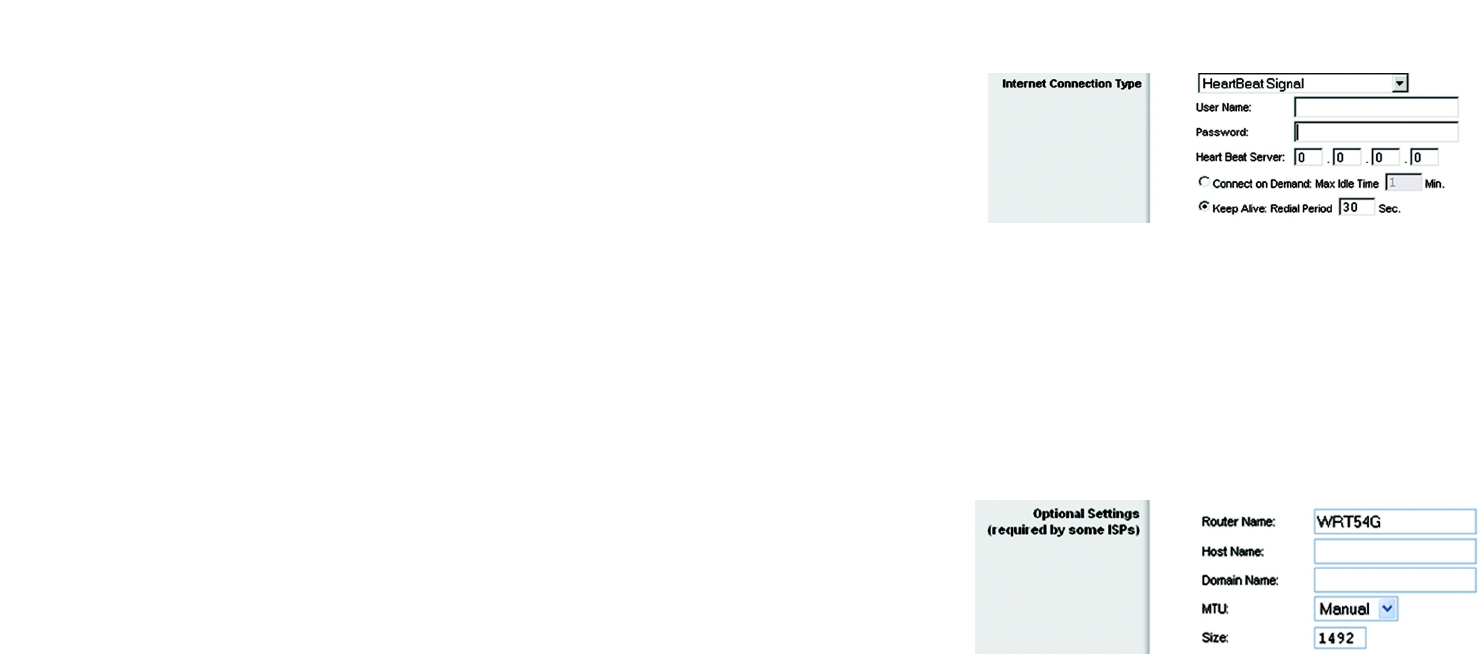
•HeartBeat Signal. HeartBeat Signal (HBS) is a service that applies to connections in Australia only.
User Name and Password. Enter the User Name and Password provided by your ISP.
Heart Beat Server. This is the IP address that the Router has, when seen from the Internet. Your ISP will
provide you with the IP Address you need to specify here.
Connect on Demand: Max Idle Time. You can configure the Router to cut the Internet connection after it has
been inactive for a specified period of time (Max Idle Time). If your Internet connection has been terminated
due to inactivity, Connect on Demand enables the Router to automatically re-establish your connection as
soon as you attempt to access the Internet again. If you wish to activate Connect on Demand, click the radio
button. In the Max Idle Time field, enter the number of minutes you want to have elapsed before your Internet
connection terminates.
Keep Alive Option: Redial Period. If you select this option, the Router will periodically check your Internet
connection. If you are disconnected, then the Router will automatically re-establish your connection. To use
this option, click the radio button next to Keep Alive. In the Redial Period field, you specify how often you want
the Router to check the Internet connection. The default Redial Period is 30 seconds.
Optional Settings
Some of these settings may be required by your ISP. Verify with your ISP before making any changes.
Router Name. In this field, you can type a name of up to 39 characters to represent the Router.
Host Name/Domain Name. These fields allow you to supply a host and domain name for the Router. Some
ISPs, usually cable ISPs, require these names as identification. You may have to check with your ISP to see if your
broadband Internet service has been configured with a host and domain name. In most cases, leaving these
fields blank will work.
MTU. MTU is the Maximum Transmission Unit. It specifies the largest packet size permitted for Internet
transmission. The default setting, Manual, allows you to enter the largest packet size that will be transmitted.
The recommended size, entered in the Size field, is 1492. You should leave this value in the 1200 to 1500 range.
To have the Router select the best MTU for your Internet connection, select Auto.
Network Setup
The Network Setup section changes the settings on the network connected to the Router’s Ethernet ports.
Wireless Setup is performed through the Wireless tab.
Figure 6-8: Optional Settings
Figure 6-7: HeartBeat Signal Connection Type
packet: a funit of data sent over a network
37
Chapter 5: Configuring the Wireless-G Broadband Router
The Setup Tab - Basic Setup
Wireless-G Broadband Router with SpeedBooster
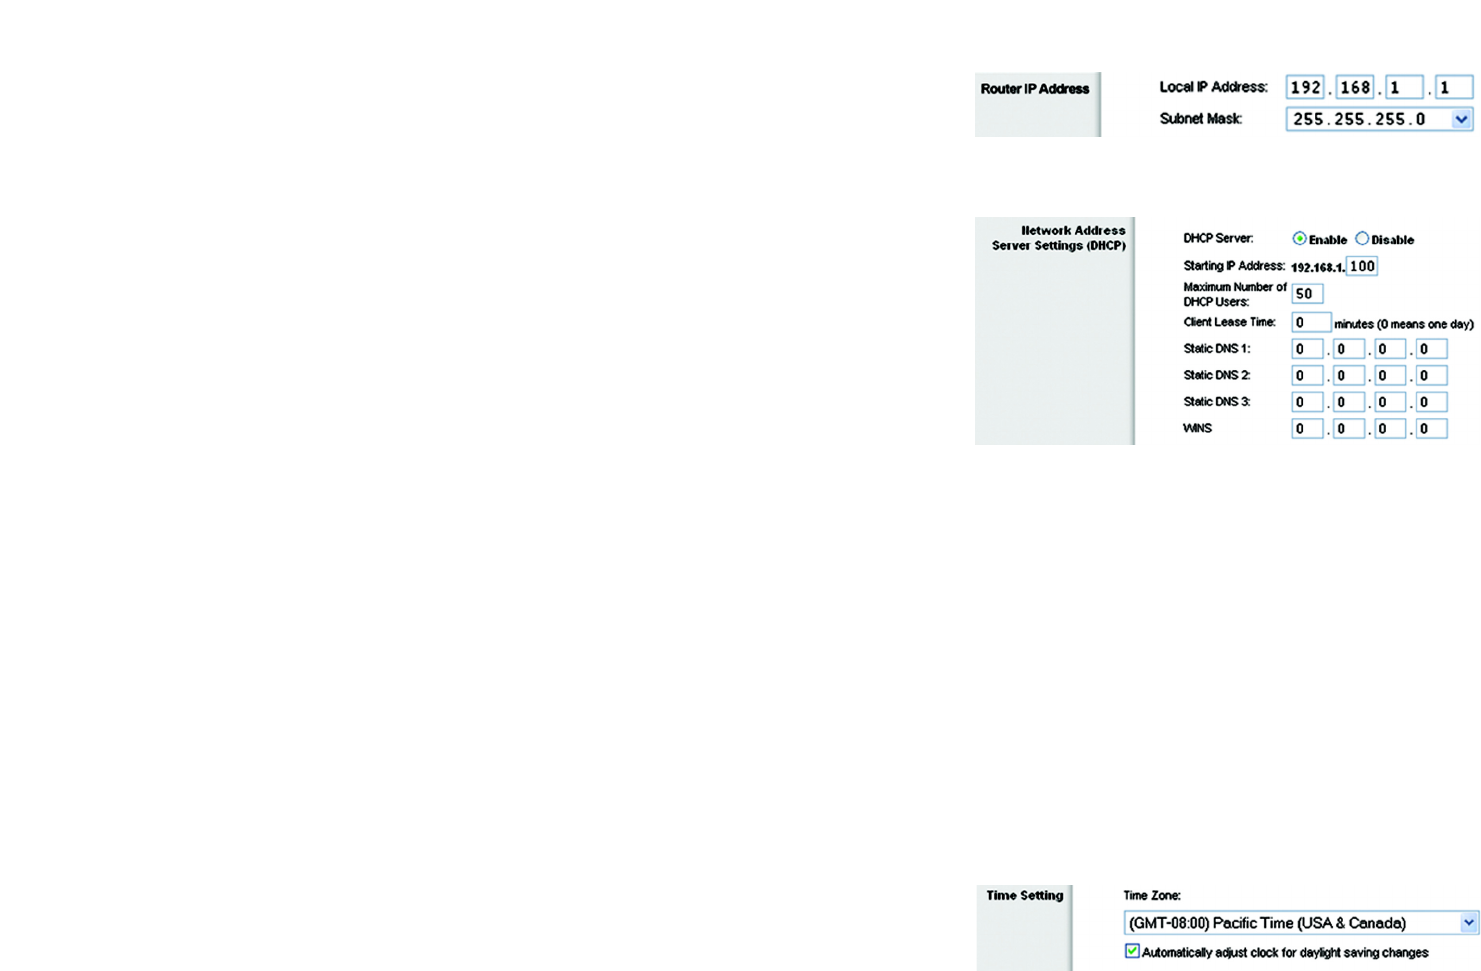
Router IP
This presents both the Router’s IP Address and Subnet Mask as seen by your network.
Network Address Server Settings (DHCP)
The settings allow you to configure the Router’s Dynamic Host Configuration Protocol (DHCP) server function.
The Router can be used as a DHCP server for your network. A DHCP server automatically assigns an IP address
to each computer on your network. If you choose to enable the Router’s DHCP server option, you must configure
all of your network PCs to connect to a DHCP server (the Router), and make sure there is no other DHCP server
on your network.
DHCP Server. DHCP is enabled by factory default. If you already have a DHCP server on your network, or you
don’t want a DHCP server, then click the Disable radio button (no other DHCP features will be available).
Starting IP Address. Enter a value for the DHCP server to start with when issuing IP addresses. Because the
Router’s default IP address is 192.168.1.1, the Starting IP Address must be 192.168.1.2 or greater, but smaller
than 192.168.1.253. The default Starting IP Address is 192.168.1.100.
Maximum Number of DHCP Users. Enter the maximum number of PCs that you want the DHCP server to assign
IP addresses to. This number cannot be greater than 253. The default is 50.
Client Lease Time. The Client Lease Time is the amount of time a network user will be allowed connection to the
Router with their current dynamic IP address. Enter the amount of time, in minutes, that the user will be “leased”
this dynamic IP address. After the time is up, the user will be automatically assigned a new dynamic IP address.
The default is 0 minutes, which means one day.
Static DNS (1-3). The Domain Name System (DNS) is how the Internet translates domain or website names into
Internet addresses or URLs. Your ISP will provide you with at least one DNS Server IP Address. If you wish to use
another, type that IP Address in one of these fields. You can type up to three DNS Server IP Addresses here. The
Router will use these for quicker access to functioning DNS servers.
WINS. The Windows Internet Naming Service (WINS) manages each PC’s interaction with the Internet. If you use
a WINS server, enter that server’s IP Address here. Otherwise, leave this blank.
Time Setting
Change the time zone in which your network functions from this pull-down menu. (You can even automatically
adjust for daylight savings time.)
Figure 6-11: Time Setting
Figure 6-10: Network Address Server Settings
Figure 6-9: Router IP
dynamic ip address: a temporary IP
address assigned by a DHCP server
38
Chapter 5: Configuring the Wireless-G Broadband Router
The Setup Tab - DDNS
Wireless-G Broadband Router with SpeedBooster
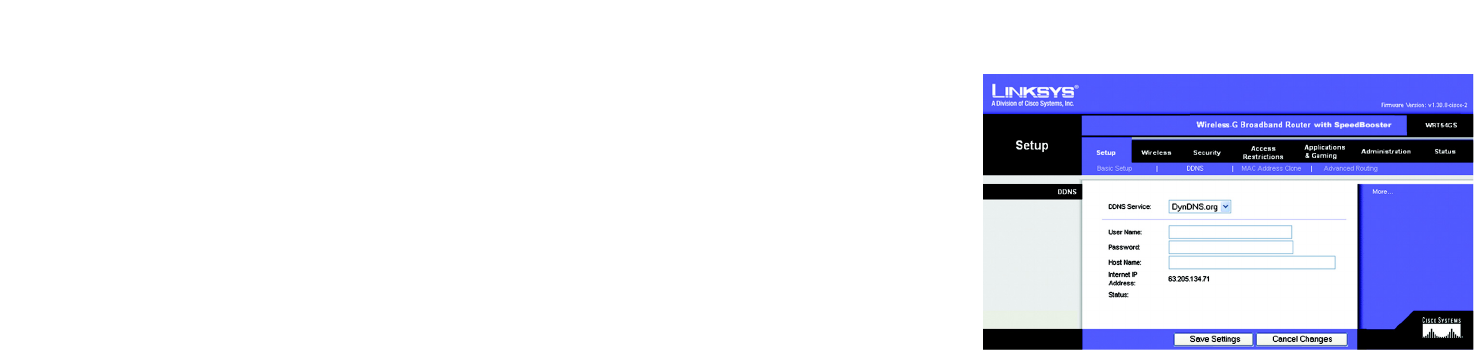
The Setup Tab - DDNS
The Router offers a Dynamic Domain Name System (DDNS) feature. DDNS lets you assign a fixed host and
domain name to a dynamic Internet IP address. It is useful when you are hosting your own website, FTP server, or
other server behind the Router. Before you can use this feature, you need to sign up for DDNS service at
www.dyndns.org or www.TZO.com, DDNS service providers.
DDNS Service. From this pull-down menu, enter the DDNS service with which you have membership.
User Name. Enter the User Name for your DDNS account
Password. Enter the Password for your DDNS account.
Host Name. The is the DDNS URL assigned by the DDNS service.
Internet IP Address. This is the Router’s current IP Address as seen on the Internet.
Status. This displays the status of the DDNS connection.
Change these settings as described here and click the Save Settings button to apply your changes or Cancel
Changes to cancel your changes.
Figure 6-12: Setup Tab - DDNS
ddns: allows the hosting of a website, FTP server, or
e-mail server with a fixed domain name (e.g.,
www.xyz.com) and a dynamic IP address
39
Chapter 5: Configuring the Wireless-G Broadband Router
The Setup Tab - MAC Address Clone
Wireless-G Broadband Router with SpeedBooster
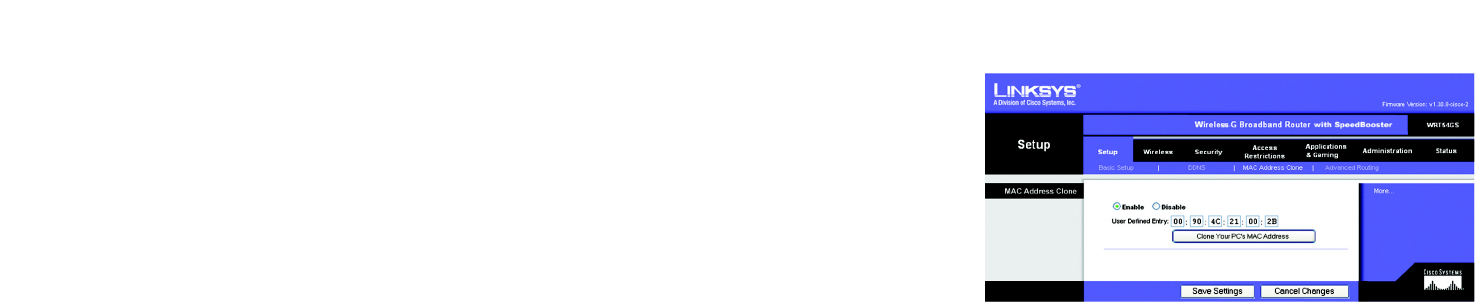
The Setup Tab - MAC Address Clone
A MAC address is a 12-digit code assigned to a unique piece of hardware for identification. Some ISPs will
require you to register a MAC address in order to access the Internet. If you do not wish to re-register the MAC
address with your ISP, you may assign the MAC address you have currently registered with your ISP to the Router
with the MAC Address Clone feature.
Enable/Disable. To have the MAC Address cloned, click the radio button beside Enable.
User Defined Entry. Enter the MAC Address registered with your ISP here.
Clone Your PC’s MAC Address. Clicking this button will clone the MAC address.
Change these settings as described here and click the Save Settings button to apply your changes or Cancel
Changes to cancel your changes.
Figure 6-13: Setup Tab - MAC Address Clone
40
Chapter 5: Configuring the Wireless-G Broadband Router
The Setup Tab - Advanced Routing
Wireless-G Broadband Router with SpeedBooster
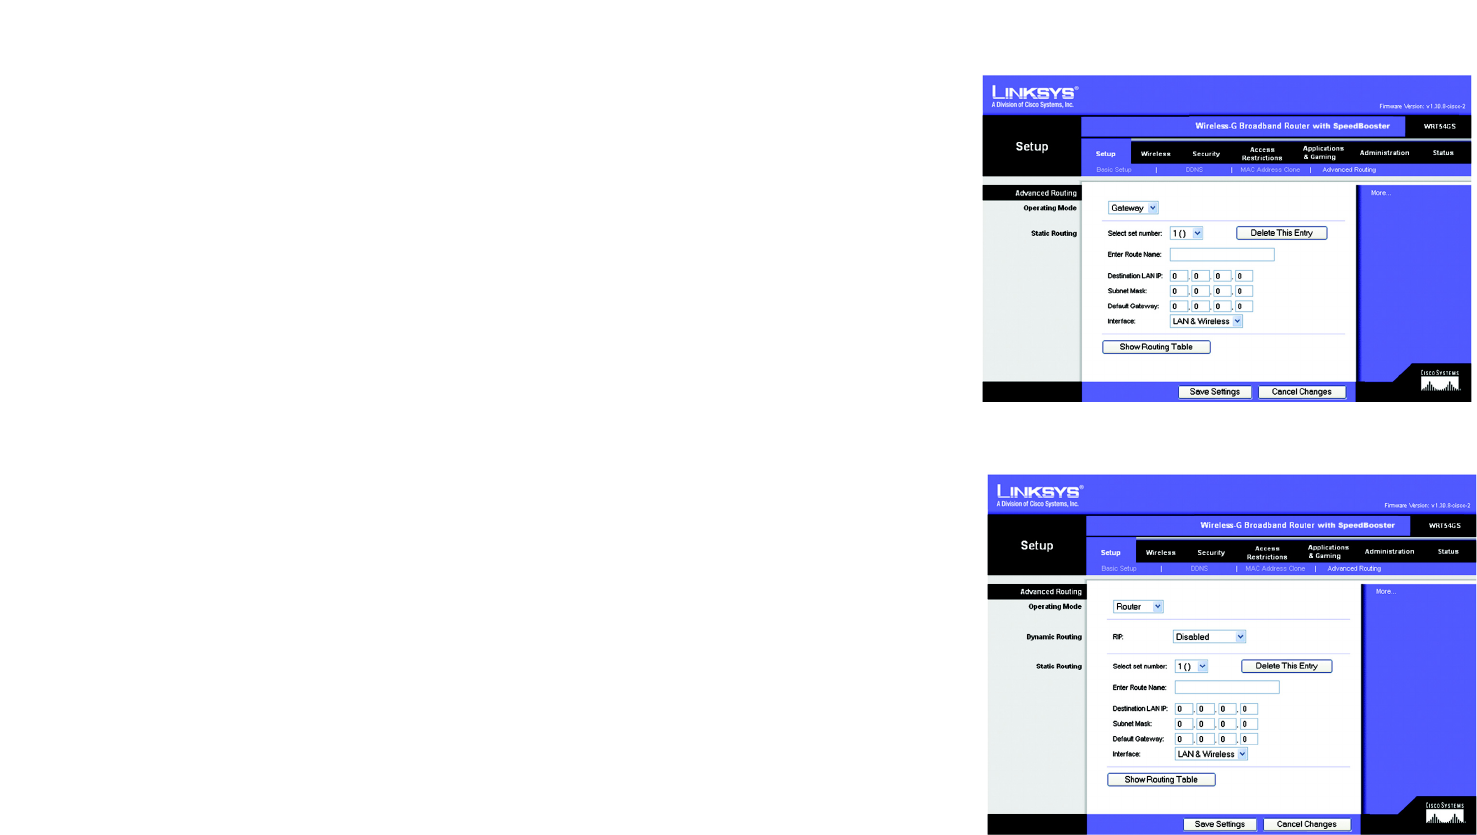
The Setup Tab - Advanced Routing
This tab is used to set up the Router’s advanced functions. Operating Mode allows you to select the type(s) of
advanced functions you use. Dynamic Routing will automatically adjust how packets travel on your network. Static
Routing sets up a fixed route to another network destination.
Operating Mode
. Select the mode in which this Router will function. If this Router is hosting your network’s
connection to the Internet, select
Gateway
. If another Router exists on your network, select
Router
. When Router is
chosen,
Dynamic Routing
will be enabled.
Dynamic Routing
. This feature enables the Router to automatically adjust to physical changes in the network’s
layout and exchange routing tables with the other router(s). The Router determines the network packets’ route
based on the fewest number of hops between the source and the destination. This feature is
Disabled
by default.
From the drop-down menu, you can also select
LAN & Wireless
, which performs dynamic routing over your
Ethernet and wireless networks. You can also select
WAN
, which performs dynamic routing with data coming from
the Internet. Finally, selecting
Both
enables dynamic routing for both networks, as well as data from the Internet.
Static Routing
. To set up a static route between the Router and another network, select a number from the Static
Routing drop-down list. (A static route is a pre-determined pathway that network information must travel to reach a
specific host or network.) Enter the information described below to set up a new static route. (Click the
Delete This
Entry
button to delete a static route.)
Enter Route Name
. Enter a name for the Route here, using a maximum of 25 alphanumeric characters.
Destination LAN IP
. The Destination LAN IP is the address of the remote network or host to which you want to
assign a static route.
Subnet Mask
. The Subnet Mask determines which portion of a Destination LAN IP address is the network
portion, and which portion is the host portion.
Default Gateway
. This is the IP address of the gateway device that allows for contact between the Router and
the remote network or host.
Interface
. This interface tells you whether the Destination IP Address is on the
LAN & Wireless
(Ethernet and
wireless networks), the
WAN
(Internet), or
Loopback
(a dummy network in which one PC acts like a network—
necessary for certain software programs).
Click the
Show Routing Table
button to view the Static Routes you’ve already set up.
Change these settings as described here and click the
Save Settings
button to apply your changes or
Cancel
Changes
to cancel your changes.
Figure 6-14: Setup Tab - Advanced Routing (Gateway)
Figure 6-15: Setup Tab - Advanced Routing (Router)
default gateway: a device that forwards
Internet traffic from your local area network