LINKSYS WT54GV40 802.11G Broadband Router with SpeedBooster/Switch User Manual Book
LINKSYS LLC 802.11G Broadband Router with SpeedBooster/Switch Book
LINKSYS >
Contents
- 1. Users Manual 1
- 2. Users Manual 2
- 3. Users Manual 3
- 4. Users Manual 4
- 5. Users Manual 5
- 6. Users Manual 6
- 7. Users Manual 7
- 8. Users Manual 8
- 9. Users Manual 9
- 10. Users Manual 10
- 11. Users Manual 11
- 12. Users Manual 12
- 13. Users Manual 13
- 14. Users Manual 14
- 15. Users Manual 15
- 16. Users Manual 16
- 17. Users Manual 17
- 18. Users Manual 18
Users Manual 4
24
Chapter 5: Setting up the Wireless-G Broadband Router
Using the Setup Wizard
Wireless-G Broadband Router
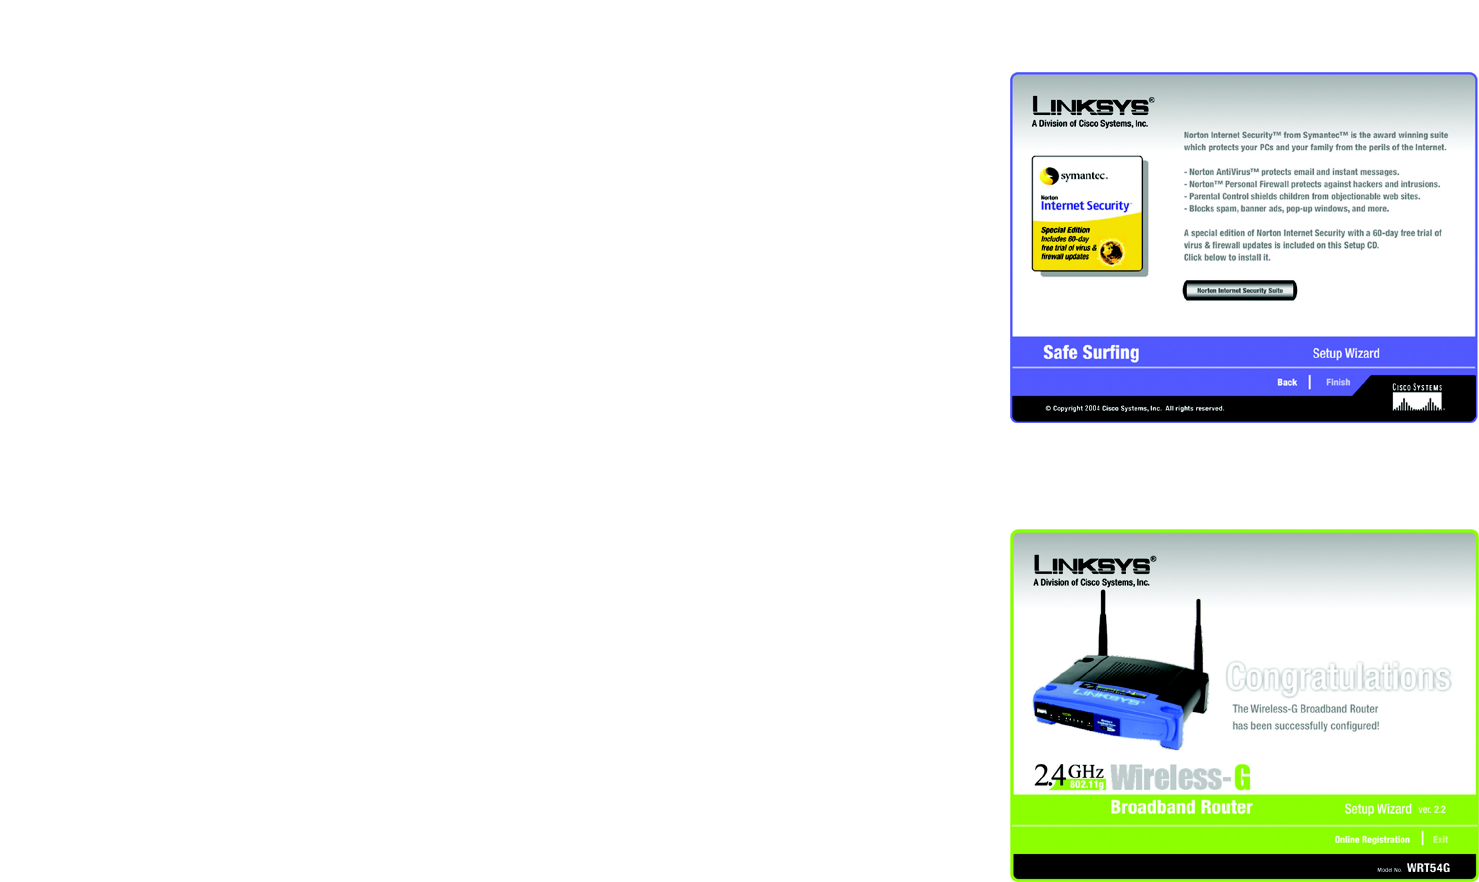
4. After the settings have been saved, the Safe Surfing screen will appear. Click the Norton Internet Security
Suite button to install the special edition of Norton Internet Security on your computer, or click the Finish
button to complete the Setup Wizard.
5. The Congratulations screen will appear. Click the Online Registration button to register the Router, or click
the Exit button to exit the Setup Wizard.
Congratulations! The installation of the Wireless-G Broadband Router is complete.
If you want to make advanced configuration changes, proceed to “Chapter 6: Configuring the Wireless-G
Broadband Router.”
Figure 5-25: Setup Wizard’s Safe Surfing Screen
Figure 5-26: Setup Wizard’s Congratulations Screen
25
Chapter 5: Setting up the Wireless-G Broadband Router
Using the Setup Wizard
Wireless-G Broadband Router
Manually Configuring the Router’s Wireless Settings
1. If you do not have other SecureEasySetup devices, then click the Enter Wireless Settings Manually button.
2. The Setup Wizard will ask you to enter the settings for your wireless network.
In the SSID field, enter the name of your wireless network. The SSID must be identical for all devices in the
network. The default setting is linksys (all lowercase).
Select the operating channel for your wireless network. All of your wireless devices will use this channel to
communicate.
From the Network Mode drop-down menu, select the wireless standards running on your network. If you have
both 802.11g and 802.11b devices in your network, keep the default setting, Mixed Mode. If you have only
802.11g devices, select G-Only. If you have only 802.11b devices, select B-Only. If you want to disable your
wireless network, select Disable.
Enter a name for the Router in the Device Name field.
Click the Next button to continue or the Back button to return to the previous screen.
NOTE: An SSID is the network name shared by all devices in a wireless network. Your network’s
SSID should be unique to your network and identical for all devices within the network.
Figure 5-27: Setup Wizard’s Configure Wireless
Settings Screen
Figure 5-28: Setup Wizard’s Wireless Settings Screen
26
Chapter 5: Setting up the Wireless-G Broadband Router
Using the Setup Wizard
Wireless-G Broadband Router
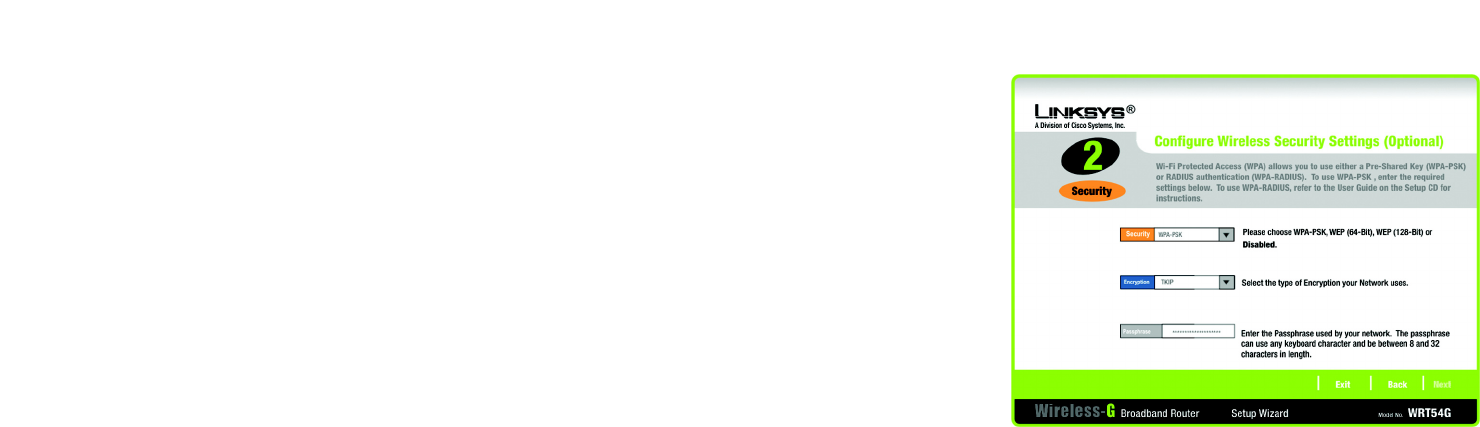
3. Select the method of security you want to use: WPA-PSK (also called WPA-Personal), WEP (64-Bit), or WEP
(128-Bit). WPA stands for Wi-Fi Protected Access, and WEP stands for Wired Equivalent Privacy. WPA is a
stronger security method than WEP. Proceed to the appropriate section for your security method.
If you want to use WPA-RADIUS (also called WPA-Enterprise), then you should select Disabled and use the
Router’s Web-based Utility to configure your wireless security settings. Click the Next button and proceed to
step 4.
If you do not want to use any wireless security method, select Disabled and then click the Next button.
Proceed to step 4.
WPA-PSK
WPA-PSK offers two encryption methods, TKIP and AES, with dynamic encryption keys. Select TKIP or AES
for encryption. Then enter a Passphrase that is 8-32 characters in length.
Encryption - Select the type of algorithm you want to use, TKIP or AES, from the Encryption drop-down
menu.
Passphrase - Enter a Passphrase, also called a pre-shared key, of 8-32 characters in the Passphrase field.
The longer and more complex your Passphrase is, the more secure your network will be.
Click the Next button to continue or the Back button to return to the previous screen.
radius (remote authentication dial-in user service): a
protocol that uses an authentication server to control
network access.
wep (wired equivalent privacy): a method of
encrypting network data transmitted on a
wireless network for greater security.
wpa (wi-fi protected access: a wireless security
protocol using TKIP (Temporal Key Integrity Protocol)
encryption, which can be used in conjunction with a
RADIUS server.
encryption: encoding data transmitted in a network.
Figure 5-29: Setup Wizard’s Wireless Security -
WPA-PSK Screen

27
Chapter 5: Setting up the Wireless-G Broadband Router
Using the Setup Wizard
Wireless-G Broadband Router
WEP (64-Bit)
Enter a passphrase or WEP key.
Passphrase - Enter a passphrase in the Passphrase field, so a WEP key is automatically generated. The
passphrase is case-sensitive and should not be longer than 16 alphanumeric characters. It must match the
passphrase of your other wireless network devices and is compatible with Linksys wireless products only. (If
you have any non-Linksys wireless products, enter the WEP key manually on those products.)
WEP Key - The WEP key you enter must match the WEP key of your wireless network. For 64-bit encryption,
enter exactly 10 hexadecimal characters. Valid hexadecimal characters are “0” to “9” and “A” to “F”.
Click the Next button to continue or the Back button to return to the previous screen.
WEP (128-Bit)
Enter a passphrase or WEP key.
Passphrase - Enter a passphrase in the Passphrase field, so a WEP key is automatically generated. The
passphrase is case-sensitive and should not be longer than 16 alphanumeric characters. It must match the
passphrase of your other wireless network devices and is compatible with Linksys wireless products only. (If
you have any non-Linksys wireless products, enter the WEP key manually on those products.)
WEP Key - The WEP key you enter must match the WEP key of your wireless network. For 128-bit encryption,
enter exactly 26 hexadecimal characters. Valid hexadecimal characters are “0” to “9” and “A” to “F”.
Click the Next button to continue or the Back button to return to the previous screen.
4. The Setup Wizard will ask you to review your settings before it saves them. Click the Yes button if you are
satisfied with your settings, or click the No button if you do not want to save your new settings.
Figure 5-30: Setup Wizard’s Wireless Security -
WEP (64-Bit) Screen
Figure 5-32: Setup Wizard’s Confirm New Settings Screen

28
Chapter 5: Setting up the Wireless-G Broadband Router
Using the Setup Wizard
Wireless-G Broadband Router
5. After the settings have been saved, the Safe Surfing screen will appear. Click the Norton Internet Security
Suite button to install the special edition of Norton Internet Security on your computer, or click the Finish
button to complete the Setup Wizard.
6. The Congratulations screen will appear. Click the Online Registration button to register the Router, or click
the Exit button to exit the Setup Wizard.
Congratulations! The installation of the Wireless-G Broadband Router is complete.
If you want to make advanced configuration changes, proceed to “Chapter 6: Configuring the Wireless-G
Broadband Router.”
Figure 5-31: Setup Wizard’s Norton Screen
Figure 5-33: Setup Wizard’s Congratulations Screen
29
Chapter 5: Setting up the Wireless-G Broadband Router
Using SecureEasySetup to Configure Your Notebook
Wireless-G Broadband Router
Using SecureEasySetup to Configure Your Notebook
This section explains how to use SecureEasySetup if you have a computer displaying the SecureEasySetup logo.
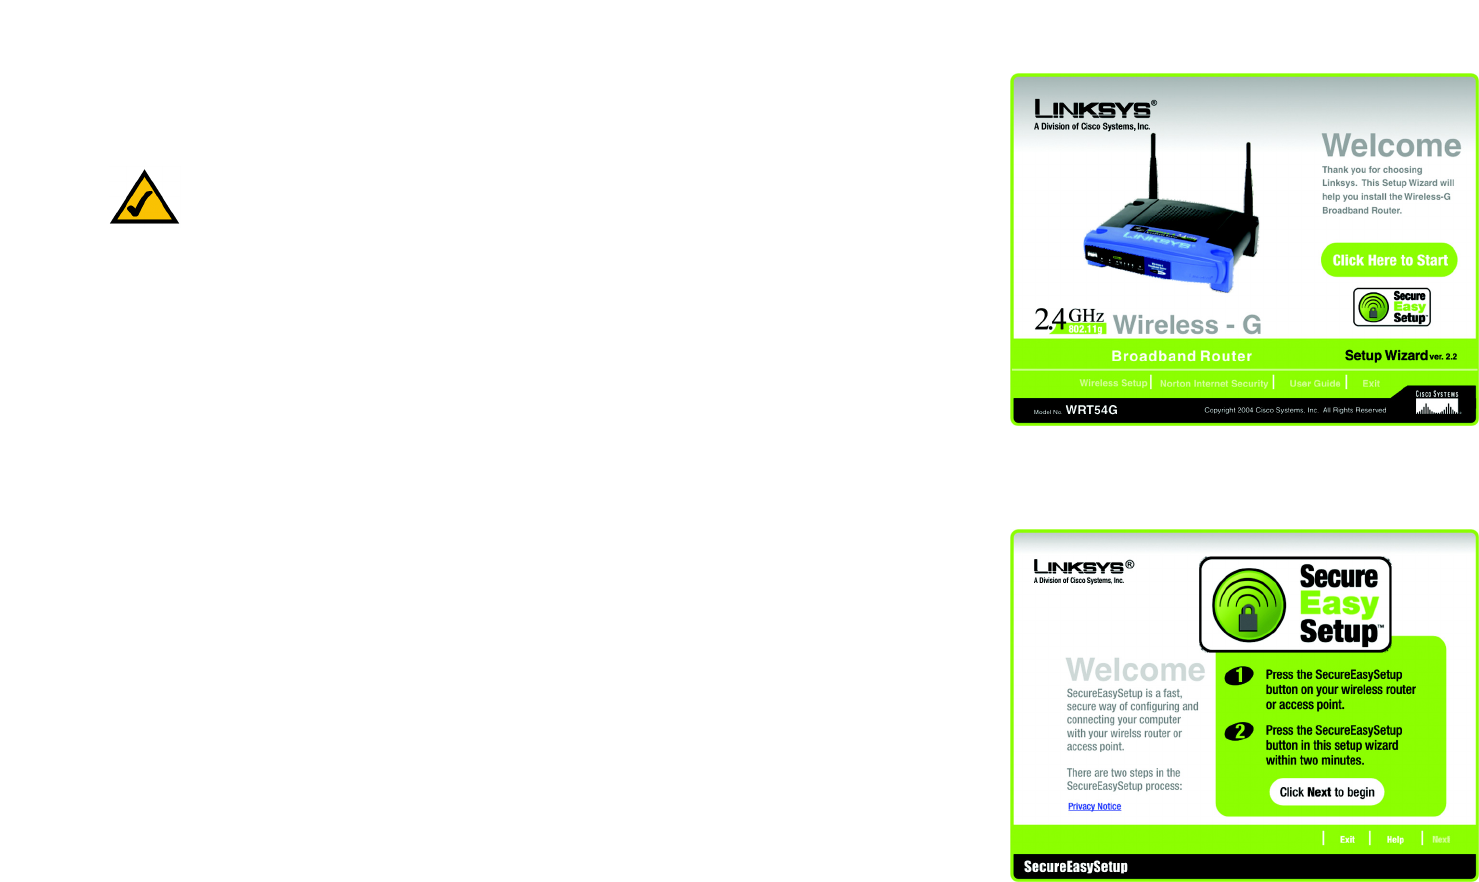
1. After you have clicked Wireless Setup on the Welcome screen, the first screen that appears will describe the
two steps you will take to configure your notebook. Click the Next button to continue.
To exit the Wireless Setup Wizard, click the Exit button. If you need more information, click the Help button.
Figure 5-35: SecureEasySetup Welcome Screen
NOTE: SecureEasySetup uses WPA-Personal encryption. If your current wireless devices do not
support WPA-Personal security, then you cannot use SecureEasySetup on your network. You will
need to manually configure your network security using the encryption supported by your
existing devices.
Figure 5-34: Setup Wizard’s Welcome - Start
Wizard Screen
30
Chapter 5: Setting up the Wireless-G Broadband Router
Using SecureEasySetup to Configure Your Notebook
Wireless-G Broadband Router
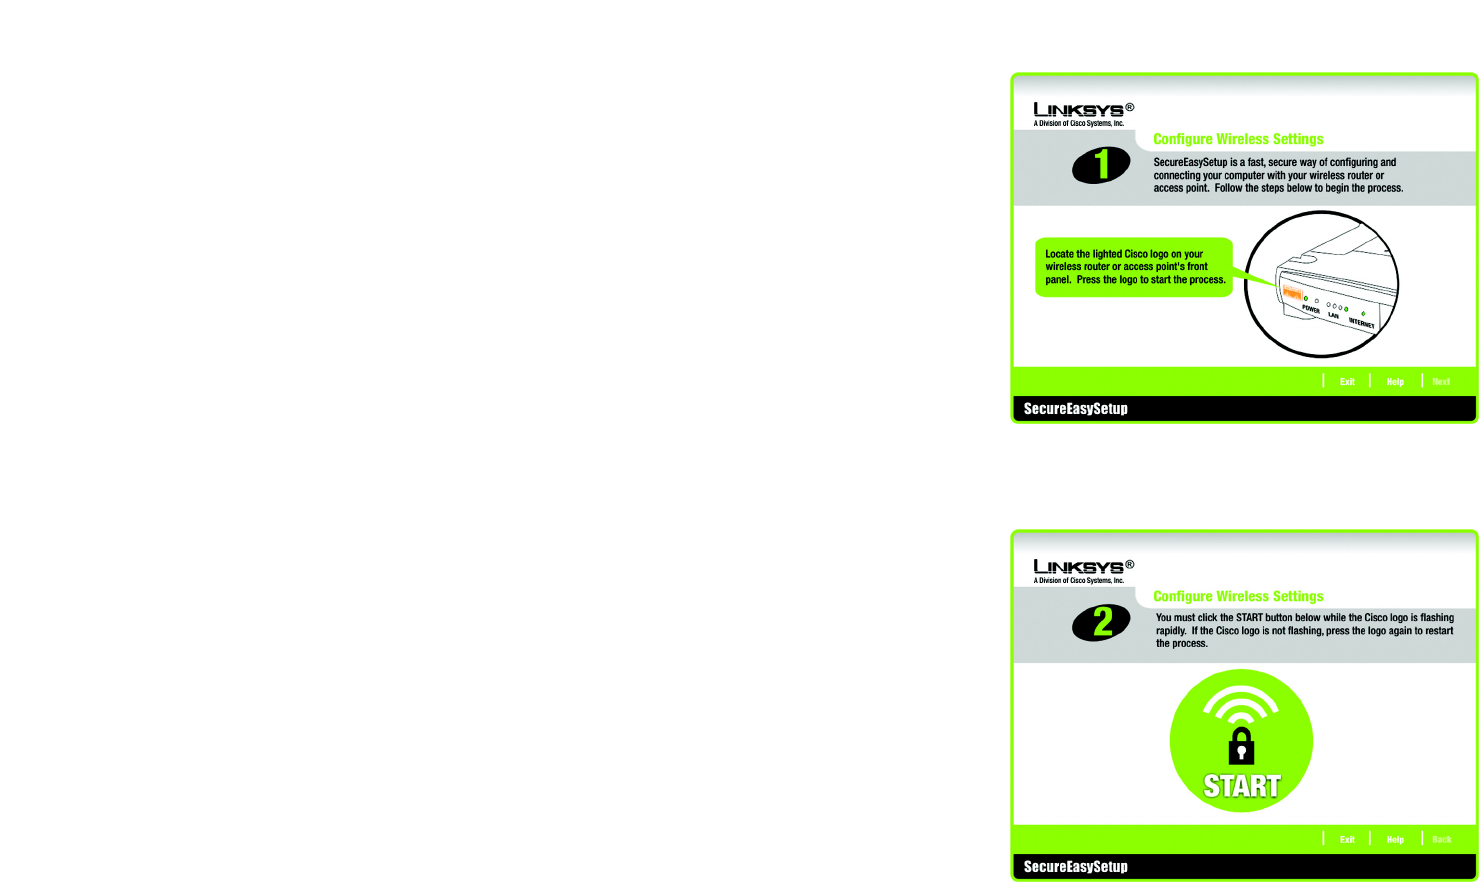
2. The next screen will tell you to press the lighted Cisco logo on the Router. After you have pressed the logo,
click the Next button to continue.
To exit the Wireless Setup Wizard, click the Exit button. If you need more information, click the Help button.
3. Click the on-screen START button to continue.
To exit the Wireless Setup Wizard, click the Exit button. If you need more information, click the Help button.
To return to the previous screen, click the Back button.
Figure 5-37: Configure Wireless Settings #2 Screen
Figure 5-36: Configure Wireless Settings #1 Screen
31
Chapter 5: Setting up the Wireless-G Broadband Router
Using SecureEasySetup to Configure Your Notebook
Wireless-G Broadband Router
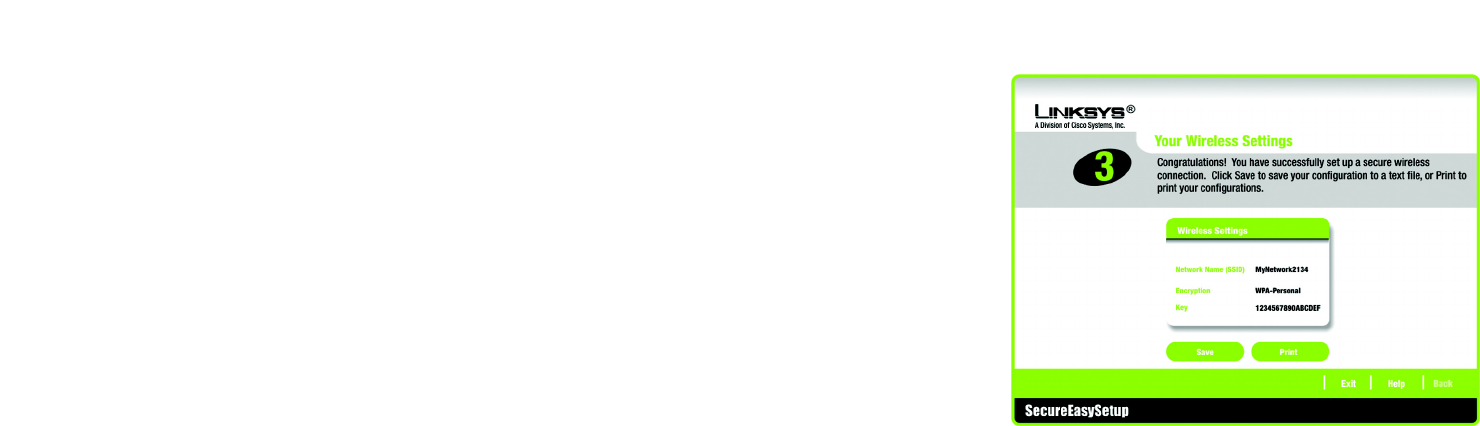
4. The Your Wireless Settings screen will appear when the wireless settings have been configured. To save your
configuration settings to a text file on your computer, click the Save button. To print your configuration
settings, click the Print button. (You may need these settings so you can manually configure any non-
SecureEasySetup devices you may have.)
To exit the Wireless Setup Wizard, click the Exit button. If you need more information, click the Help button.
To return to the previous screen, click the Back button.
Congratulations! The installation of the Wireless-G Broadband Router is complete.
If you want to make advanced configuration changes, proceed to “Chapter 6: Configuring the Wireless-G
Broadband Router.”
Figure 5-38: Your Wireless Settings Screen
32
Chapter 6: Configuring the Wireless-G Broadband Router
Overview
Wireless-G Broadband Router
Chapter 6: Configuring the Wireless-G Broadband Router
Overview
Linksys recommends using the Setup CD-ROM for first-time installation of the Router. If you do not wish to run
the Setup Wizard on the Setup CD-ROM, then you can use the Web-based Utility to configure the Router. For
advanced users, you may configure the Router’s advanced settings through the Web-based Utility.
This chapter will describe each web page in the Utility and each page’s key functions. The utility can be accessed
via your web browser through use of a computer connected to the Router. For a basic network setup, most users
will use these two screens of the Utility:
• Basic Setup. On the Basic Setup screen, enter the settings provided by your ISP.
• Management. Click the Administration tab and then the Management tab. The Router’s default password is
admin. To secure the Router, change the Password from its default.
There are seven main tabs: Setup, Wireless, Security, Access Restrictions, Applications & Gaming, Administration,
and Status. Additional tabs will be available after you click one of the main tabs.
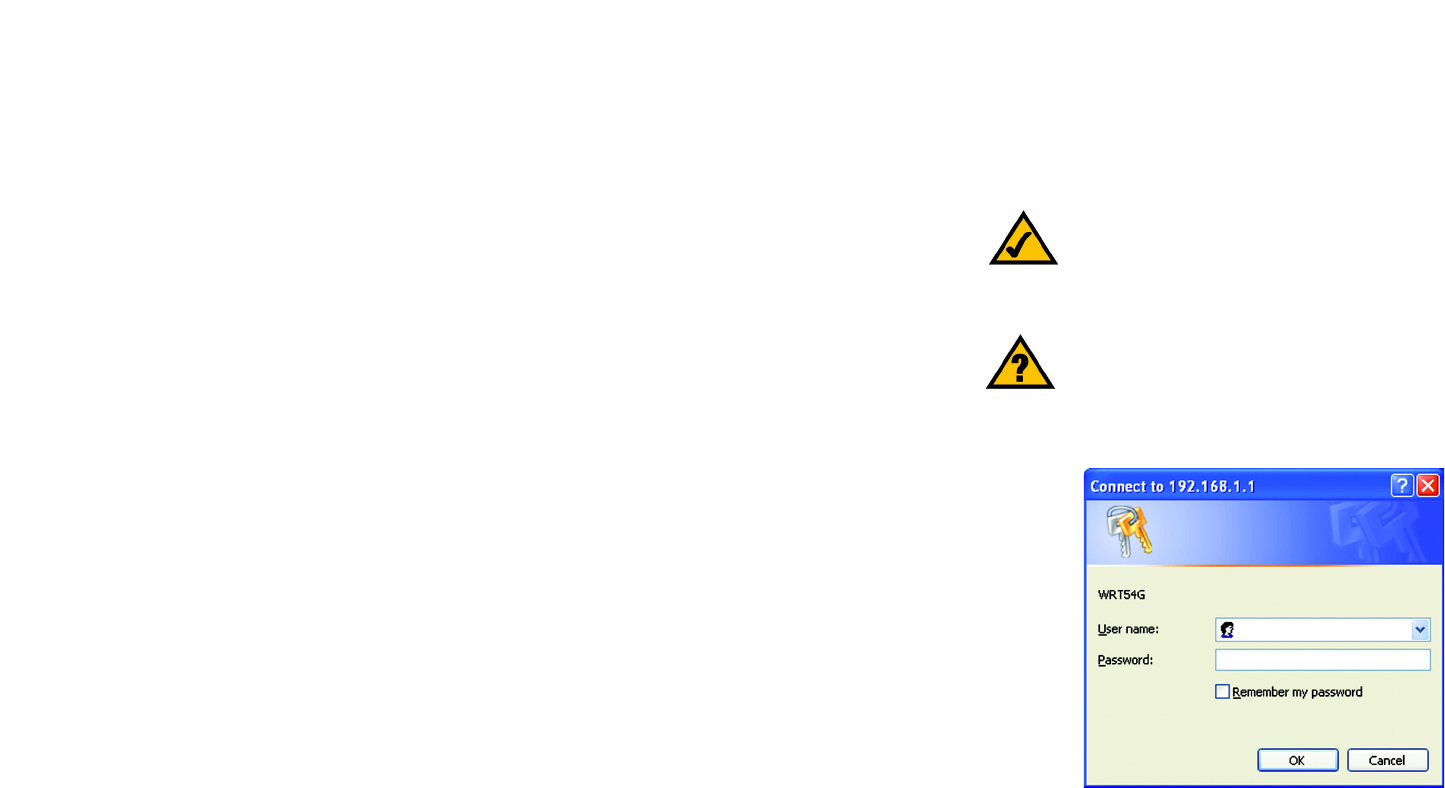
To access the Web-based Utility, launch Internet Explorer or Netscape Navigator, and enter the Router’s default IP
address, 192.168.1.1, in the Address field. Then press Enter.
A password request page, shown in Figure 6-1 will appear. (Non-Windows XP users will see a similar screen.)
Leave the User Name field blank. The first time you open the Web-based Utility, use the default password admin.
(You can set a new password from the Administration tab’s Management screen.) Then click the OK button.
HAVE YOU: Enabled TCP/IP on your PCs? PCs
communicate over the network with this protocol.
Refer to “Appendix D: Windows Help” for more
information on TCP/IP.
NOTE: For first-time installation, Linksys
recommends using the Setup Wizard on the Setup
CD-ROM. If you want to configure advanced settings,
use this chapter to learn about the Web-based Utility.
Figure 6-1: Password Screen
33
Chapter 6: Configuring the Wireless-G Broadband Router
The Setup Tab - Basic Setup
Wireless-G Broadband Router
The Setup Tab - Basic Setup
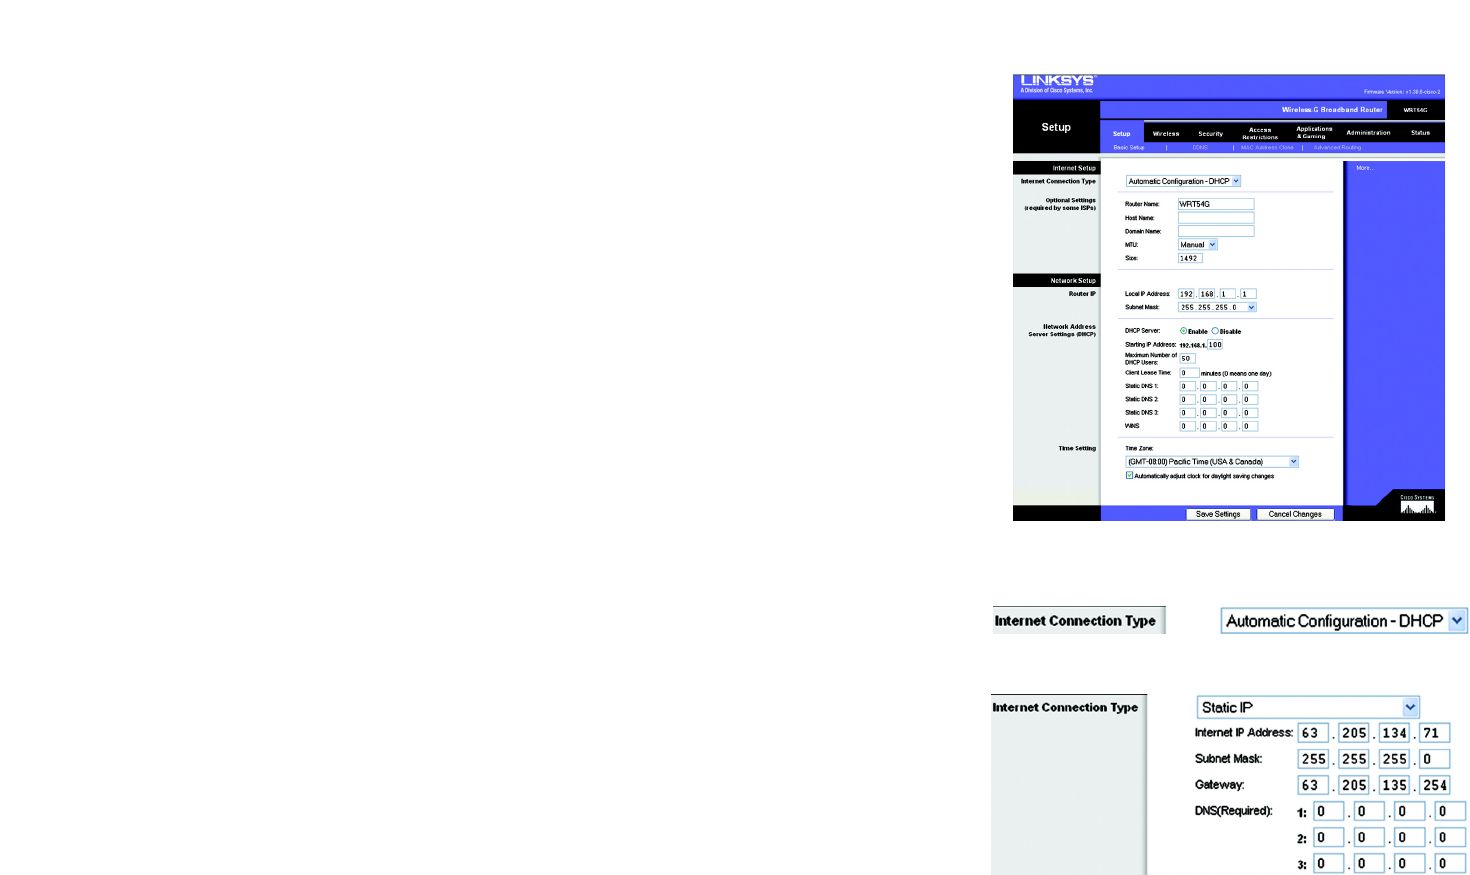
The first screen that appears displays the Setup tab. This allows you to change the Router's general settings.
Change these settings as described here and click the Save Settings button to apply your changes or Cancel
Changes to cancel your changes.
Internet Setup
The Internet Setup section configures the Router to your Internet connection. Most of this information can be
obtained through your ISP.
Internet Connection Type
Choose the type of Internet connection your ISP provides from the drop-down menu.
•DHCP. By default, the Router’s Internet Connection Type is set to Automatic Configuration - DHCP, which
should be kept only if your ISP supports DHCP or you are connecting through a dynamic IP address.
•Static IP. If you are required to use a permanent IP address to connect to the Internet, select Static IP.
Internet IP Address. This is the Router’s IP address, when seen from the Internet. Your ISP will provide you
with the IP Address you need to specify here.
Subnet Mask. This is the Router’s Subnet Mask, as seen by users on the Internet (including your ISP). Your ISP
will provide you with the Subnet Mask.
Gateway. Your ISP will provide you with the Gateway Address, which is the ISP server’s IP address.
DNS. Your ISP will provide you with at least one DNS (Domain Name System) Server IP Address.
Figure 6-2: Setup Tab - Basic Setup
Figure 6-3: DHCP Connection Type
Figure 6-4: Static IP Connection Type
Static IP address: a fixed address
assigned to a computer or device
connected to a network.