Contents
User Manual 2

PRELIMINARY
WARNINGS AND CAUTIONS:
• ON/OFFLEDforremoteloadstatus.
• Tobeinstalledand/orusedinaccordancewithappropriateelectricalcodesandregulations.
• Ifyouareunsureaboutanypartoftheseinstructions,consultanelectrician.
• Recommendedminimumwallboxdepthis2-1/2".
WARNINGS AND CAUTIONS:
•
Maximumwirelengthfromdimmertoallinstalledremotescannotexceed300ft(90m).
• Disconnectpoweratcircuitbreakerorfusewhenservicing,installingorremovingxture.
• Usethisdeviceonlywithcopperorcoppercladwire.
4-Scene Controller with Switch - Single Pole (One Location)
Cat.No.VRCS4-MR,120/240VAC,50/60Hz
Incandescent-1800W–MagneticLow-Voltage-1800VA(1440W)
ElectronicLow-Voltage-1800W–Fluorescent-1800VA–Supplemental-1/2HP
INSTALLATION INSTRUCTIONS
DI-000-VRCS4-00A-X0
Tools needed to install your device
Slotted/PhillipsScrewdriver ElectricalTape Pliers
Pencil Cutters Ruler
ONOFF
ONOFF
ONOFF
ONOFF
ONOFF
ONOFF
ONOFFONOFF
ONOFF
ONOFF
ONOFF
ONOFF
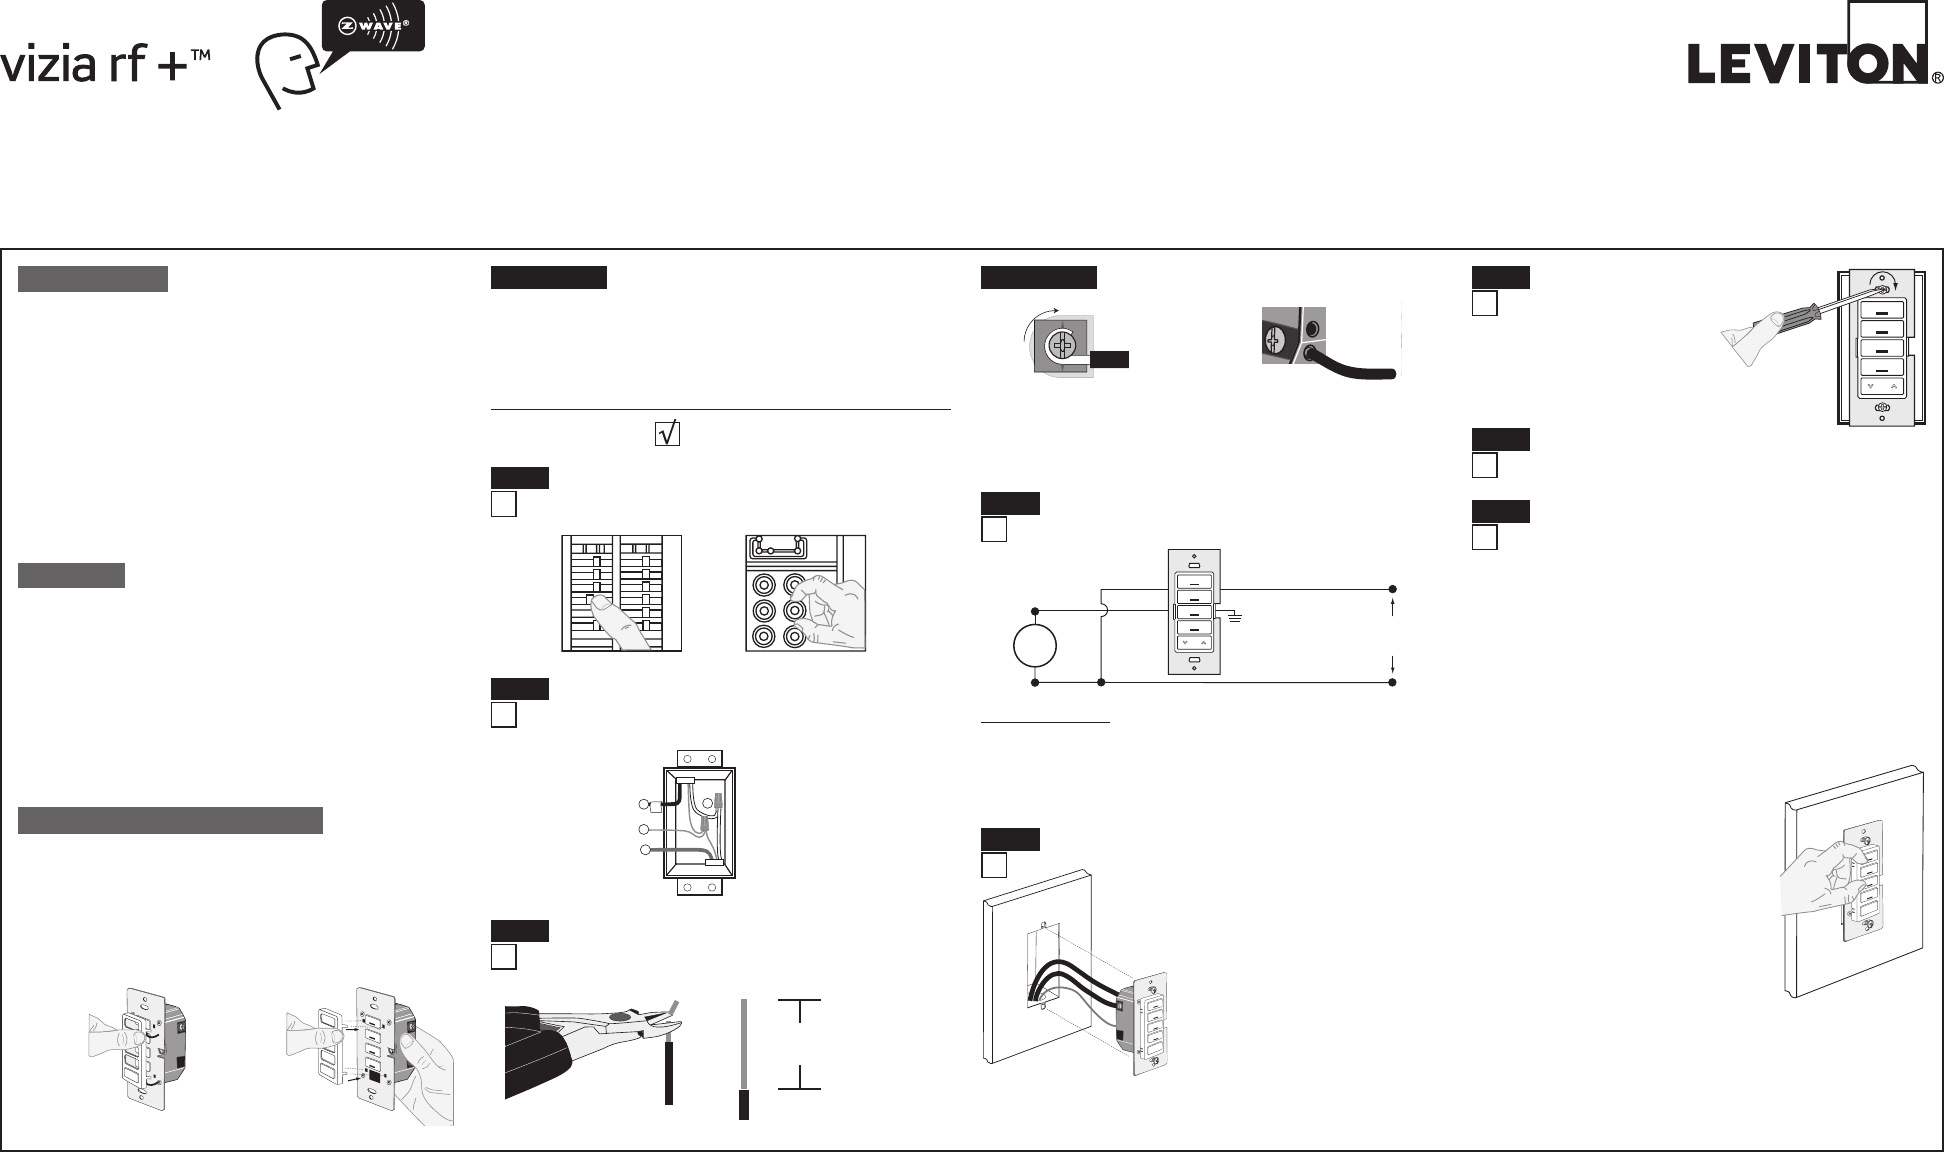
WARNING: TO AVOID FIRE, SHOCK OR DEATH; TURN
OFF POWER atcircuitbreakerorfuseandtestthatpowerisoff
beforewiring!
Step 1
Step 3
5/8"
(1.6 cm) Strip Gage
(measure bare
wire here)
Cut
(if necessary)
WIRING DEVICE:
Connect wires per WIRING DIAGRAM as follows:
• GreenorbarecopperwireinwallboxtoGreenterminalscrew.
• LineHotwallboxwiretoterminalscrewmarked"BK".
• LineNeutralwallboxwiretoterminalscrewmarked"WH".
• Loadwallboxwiretoterminalscrewmarked"RD".
Wiring Application:
Hot (Black)
Neutral (White)
Line
120VAC, 60Hz
BKWH
Green
Ground
4-Scene Controller w/ Switch
Load
RD
WH
Step 4
2
4
1
3
1.Line(Hot)
2.Neutral
3.Ground
4.Load
Identifying your wiring application (most common):
NOTE:Ifthewiringinyourwallboxdoesnotresemblethis
conguration,consultaqualiedelectrician.
Step 2
INTRODUCTION
Leviton’sViziaRF+TMcomponentsaredesignedtocommunicate
witheachotherviaRadioFrequency(RF)toprovideremotecontrol
ofyourlighting.UsingRFtechnologyallowsLevitontoprovidethe
greatestsignalintegritypossible.EachmoduleinLeviton’sViziaRF+TM
componentlineisaZ-Wave®enableddevice.InaZ-Wave®network,
eachdeviceisdesignedtoactasarouter.Theserouterswillre-transmit
theRFsignalfromonedevicetoanotheruntiltheintendeddevice
isreached.Thisensuresthatthesignalisreceivedbyitsintended
devicebyroutingthesignalaroundobstaclesandradiodeadspots.
This4-SceneControllerismeanttocontrolspecialsceneenabled
Z-Wave®products.Tocontrolgroupsofdevicesthataremixedordo
notsupportscenecommandclassusetheLeviton4-ZoneController
(VRCZ4).Settingupthisdevicerequiresspecicadvancedcontroller
functionalities,yourcontrollermustbeabletoassociatedevicetogroups
andmustbeabletocontrolthescenecontrollercongurationcommands
suchastheadvancedProgrammingRemote(VRCPG).
• SwitchON/OFF
• SceneCapable
• ThisisaZ-Wave®Controller
• Scenecontrolwithouttravelerwires
• Cancall4scenes
• Cancontrolasingleload
• ON/OFFLED
• Twowaycommunication
• RFreliability
• Easeofinstallation–Nonewwiring
• CompatiblewithotherZ-Wave®enableddevices
FEATURES NOTES:
• Ifusinganon-LevitonProgrammer/Remote,refertothe
Programmer/Remoteinstructionsheet.
• 4-ScenecontrollersincudedintoaZ-Wave®networkmustbe
updatedafteryouhaveincludedallotherdevices.
• IfusingtheVRCPGInstallChecklistfeature,gotostepC.
A) IfusingaLevitonZ-Wave®Programmer/Remote,Cat.No.VRCPG,
presstheMenubuttonandscrolldowntoSystemSetup.Press
thecenterbuttontoselectSystemSetupMenu.ChooseAdvanced
Settings.PressthecenterbuttontoselectNetwork.Pressthecenter
buttonto<IncludeNode>.
B) IfusingVRCPGProgrammer/Remote,youwillbepromptedtoplace
4-Scenecontrollerintoprogrammingmode.
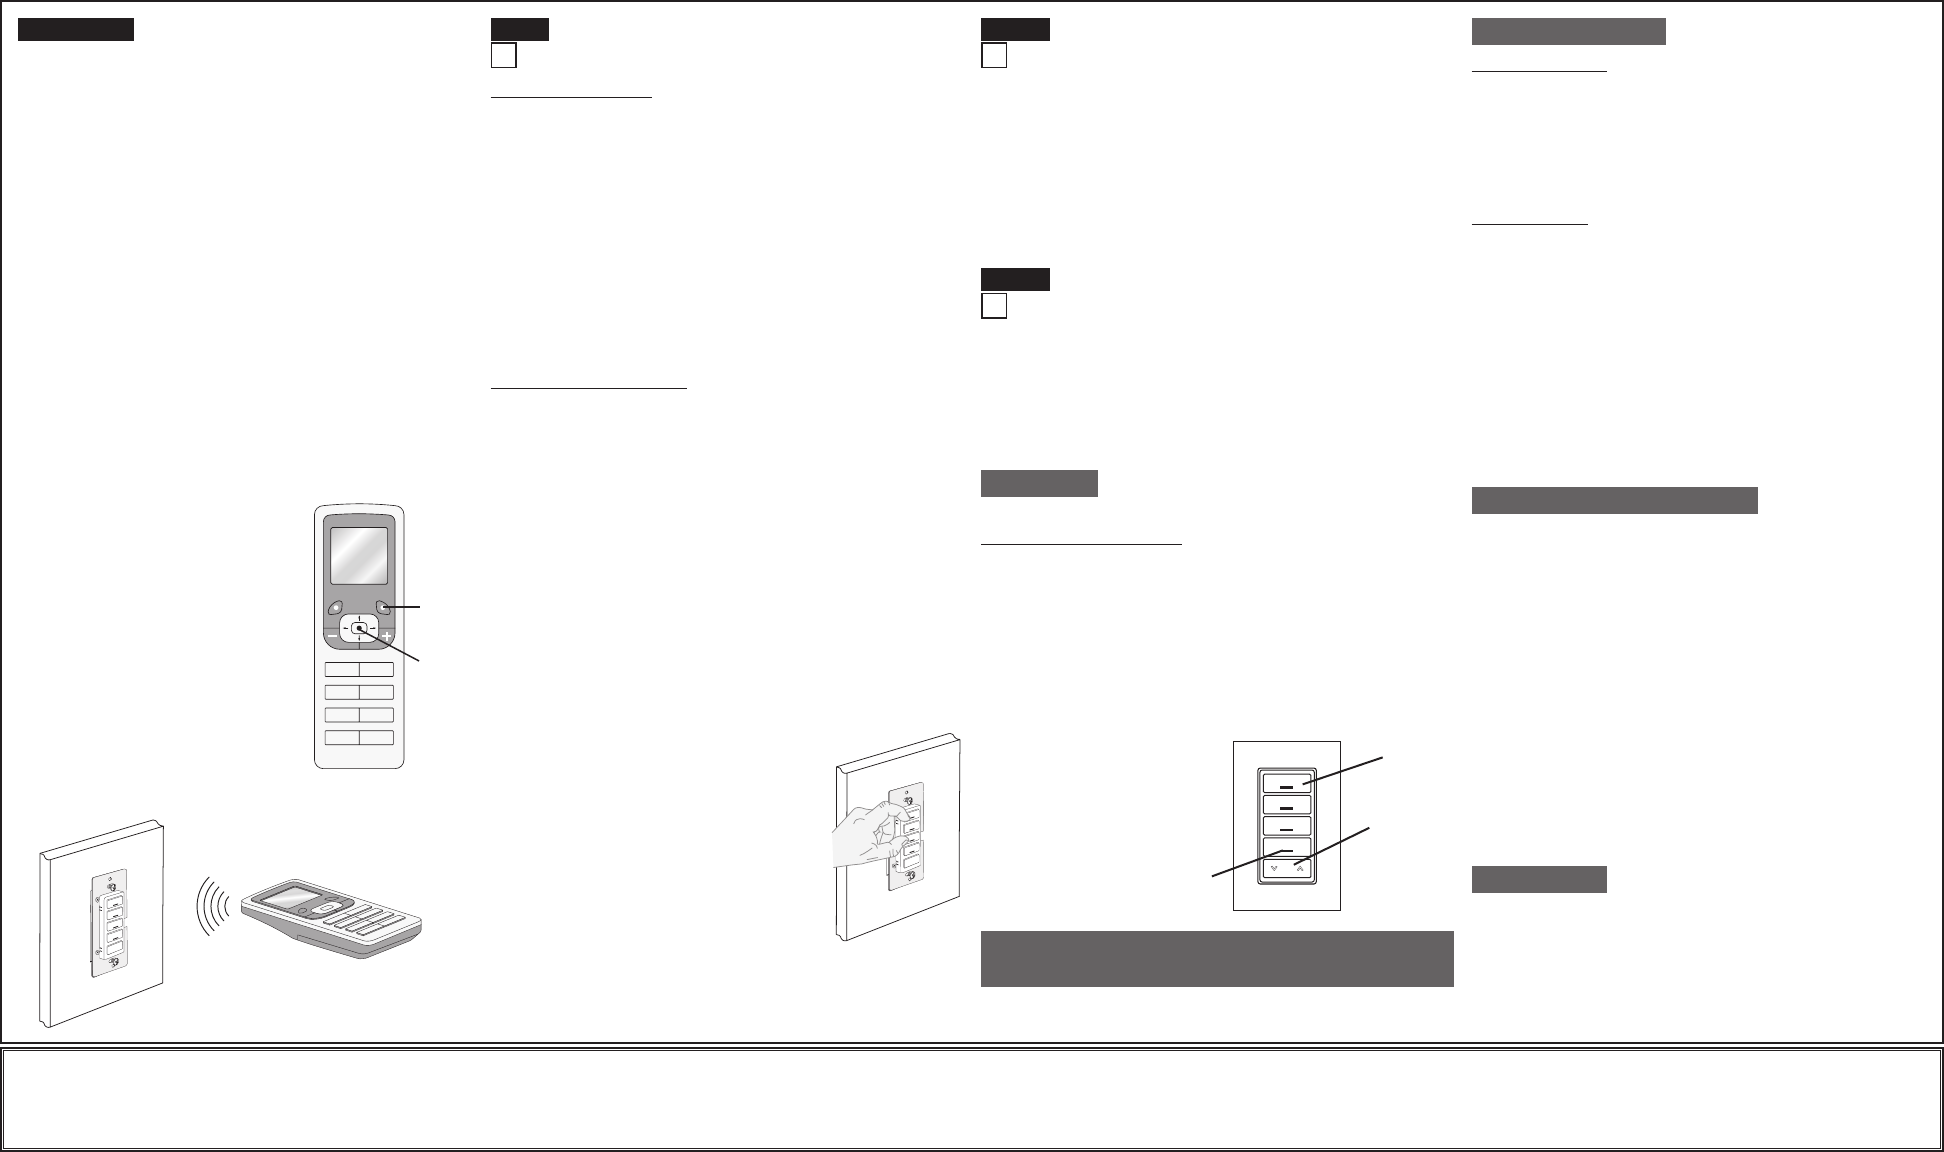
C) ToaccessProgrammode,pressandhold
buttons1and3(refer to figure).Wait
5secondsuntiltheLEDturnsAmber.
ReleasethebuttonsandtheLEDwillblink
Amber.YouarenowinProgrammingmode.
NOTE:IftheLEDonthe4-scenecontroller
turnssolidRedwhileincluding,therehas
beenacommunicationerror.
D) Whilestandingclosetothe4-Scene
controller(approximately1ft.),pressthe
centerbuttonontheProgrammer/Remote
to<Include>deviceinthenetwork.
NOTE:Onlyonedevicemaybeincludedat
anytime.
E) ThePrimaryProgrammer/RemotewillassignaHomeIDand
NodeIDforthisdevice.
NOTE:ThisinformationwillbestoredintheProgrammer/Remoteto
beusedforfuturereference.
NOTE:Youmaynameoredityourdeviceatthistime.
F)
The 4-Scene controller is now installed in the network. If using
VRCPG you will be prompted to include switch, otherwise, please
proceed to Step G to include switch.
Step 8 Including 4-Scene Controller with Switch
into Z-Wave® Network:
Changing the color of your device:
Your4-Scenecontrollerwithswitchincludesthreecoloroptions.The
controllershipswiththeWhiteframeattached.Tochangecolorofframe,
proceedasfollows:
Line up tabs
and press in
side to attach
Push in
side at tab
to release
Afterframeisremoved,removeexistingpushbuttonsandreplacethem
withdesiredcolorchangepushbuttons.TochangetheDIM/BRIGHTbutton,
beforemountingframe,pressoutDIM/BRIGHTbutton(bottom)frombackof
frameandpressinfromfrontofframenewDIM/BRIGHTbutton.TomakeIR
capable,replacewithaDIM/BRIGHTbuttonthathastheIRwindow.
INSTALLING YOUR 4-SCENE CONTROLLER W/ SWITCH
NOTE:UsecheckboxeswhenStepsarecompleted.
Preparing and connecting wires:
This4-Scenecontrollerwithswitchcanbewiredusingside
wireterminalscrewsorthroughbackwireopenings.Choose
appropriatewirestrippingspecicationsaccordingly.
• Positionallwirestoprovideroomin
outletwallboxfordevice.
• Ensurethattheword“TOP”isfacingup
ondevicestrap.
• Partiallyscrewinmountingscrewsin
wallboxmountingholes.
NOTE:Dresswireswithabendas
shownindiagraminordertorelieve
stresswhenmountingdevice.
• Restorepoweratcircuitbreakerorfuse.
• LEDshouldturnON.
• Togglebutton1ON/OFFtotestlocal
loadoperation.
If LED or LOAD does not turn ON,
refer to the TROUBLESHOOTING
section.
Testing your device prior to mounting in wall box:
Step 5
• Makesurethattheendsofthewiresfromthewallboxare
straight (cut if necessary).
Back Wire (either hole may be used)
Backwireopeningsaccept
#14-12AWGsolid wire copper only.
Side Wire Connection
Sidewireterminalsaccept#14-12
AWGsolid wire copper only.
Bl
Installationmaynowbecompletedbytightening
mountingscrewsintowallbox.Attachwallplate.
Device Mounting:
TURN OFF POWER AT CIRCUIT
BREAKER OR FUSE.
Step 6
Restore Power:
Restorepoweratcircuitbreakerorfuse.
Installation is complete.
Step 7
Step 3 cont'd Step 2 cont'd

PRELIMINARY
DI-000-VRCS4-00A-X0
©2009LevitonMfg.Co.,Inc.
LIMITED 5 YEAR WARRANTY AND EXCLUSIONS
LevitonwarrantstotheoriginalconsumerpurchaserandnotforthebenetofanyoneelsethatthisproductatthetimeofitssalebyLevitonisfreeofdefectsinmaterialsandworkmanshipundernormalandproperuseforveyearsfromthepurchasedate.Leviton’sonlyobligationistocorrectsuchdefectsbyrepairorreplacement,
atitsoption,ifwithinsuchveyearperiodtheproductisreturnedprepaid,withproofofpurchasedate,andadescriptionoftheproblemtoLeviton Manufacturing Co., Inc., Att: Quality Assurance Department, 201 North Service Road, Melville, New York 11747.Thiswarrantyexcludesandthereisdisclaimedliabilityforlabor
forremovalofthisproductorreinstallation.Thiswarrantyisvoidifthisproductisinstalledimproperlyorinanimproperenvironment,overloaded,misused,opened,abused,oralteredinanymanner,orisnotusedundernormaloperatingconditionsornotinaccordancewithanylabelsorinstructions.There are no other or implied
warranties of any kind, including merchantability and fitness for a particular purpose, but if any implied warranty is required by the applicable jurisdiction, the duration of any such implied warranty, including merchantability and tness for a particular purpose, is limited to ve years. Leviton is not liable for incidental,
indirect, special, or consequential damages, including without limitation, damage to, or loss of use of, any equipment, lost sales or profits or delay or failure to perform this warranty obligation.Theremediesprovidedhereinaretheexclusiveremediesunderthiswarranty,whetherbasedoncontract,tortorotherwise.
Including 4-Scene Controller with Switch
into Z-Wave® Network:
Step 8 cont'd Step 9 Excluding 4-Scene Controller with Switch from
a Z-Wave® Network:
For additional information, contact Leviton’s
Techline at 1-800-824-3005 or visit Leviton’s
website at www.ViziaRFplus.com
ProtectedunderU.S.PatentNumber6,388,399andpatentspending
andlicensedunderU.S.PatentsNumbers5,905,442,and5,982,103
TROUBLESHOOTING
Load Device/Switch:
• LightsFlickering
- Lamphasabadconnection.
- Wiresnotsecuredrmlyunderterminalscrewsofswitch.
• LightdoesnotturnON
- Circuitbreakerorfusehastripped.
- Lampisburnedout.
- LampNeutralconnectionisnotwired.
Controller/Scene:
• LocatorLEDoncontrollerdoesnotturnON
- Circuitbreakerorfusehastripped.
- If4-ScenecontrollerispoweredupandLEDdoesnotturnON,
checkwiring.
• SceneControllerdoesnotoperatelights
-Checkassociation.
-Ensurethatcontrollerwasproperlyupdated.
- Re-programyourscene,andensureeachlightisin
thecorrectON/OFFstate..
• LEDturnssolidRed
-Checkassociation.
-Ensurethateachdeviceinthenetworkiswithin70ft.(21m)of
anotherdevice.
Programmer/Remote
Cat. No. VRCPG
NOTE:Programmer/Remotemustbe
incloseproximityto4-Scenecontroller
whenincludinginthenetwork.
Excluding 4-Scene controller:
A) IfusingaLevitonZ-Wave®Programmer/Remote,Cat.No.VRCPG,
presstheMenubuttonandscrolldowntoSystemSetup.Pressthe
centerbuttontoselectSystemSetupMenu.ChooseAdvancedSettings.
PressthecenterbuttontoselectNetwork.Scrolldownto<Exclude
Node>andpressthecenterbutton.
B) IfusingVRCPGProgrammer/Remote,youwillbepromptedtoplace
4-Scenecontrollerintoprogrammingmode.
C) Toaccessprogrammode,pressandholdbuttons1and3(refer to
figure).Wait5secondsuntiltheLEDturnsAmber.Releasethebuttons
andtheLEDwillblinkAmber.Youarenowreadytoexclude.
NOTE:IftheLEDonthe4-ScenecontrollerturnssolidRedwhile
excluding,therehasbeenacommunicationerror.
D) Whilestandingclosetothe4-Scenecontroller(approximately1ft.),
pressthecenterbuttonontheProgrammer/Remoteto<Exclude>
devicefromthenetwork.
Factory Default:
Ifyour4-Scenecontrollerwithswitchisnotresponding,oryouareunableto
controlitafteryouhavetriedtoInclude/Excludeitmultipletimes,itmaybe
necessarytoresetthe4-Scenecontrollerwithswitchtoitsoriginalfactory
settings.Toaccomplishthis,proceedasfollows:
• Onthe4-Scenecontrollerwithswitch(refer to
figure),pressandholdbuttons1and3.Wait
approximately10secondsuntiltheLEDturns
AmberandthenturnssolidRed.AllowLED'sto
blinkredtwice,releasethebuttons.The4-Scene
controllerwithswitchisnowreset.Oncethe
controllerisreset,itwillbenecessarytoRe-
Includeittoanetworkbeforeitcanbeused.
CAUTION:SETTINGADEVICETOAFACTORY
DEFAULTDOESNOTEXCLUDETHATDEVICE
FROMANETWORK.THEEXCLUSION
PROCEDUREMUSTSTILLBEFOLLOWEDTO
REMOVETHEDEVICEFROMTHEPRIMARY
CONTROLLER’SINFORMATIONTABLE.FAILURETODOSOMAY
RESULTINSYSTEMTHATISSLOWTORESPOND,ORMAYFAILTO
RESPONDTOSOMEDEVICES.
Scene Application:
Push Button (Default settings)
Turn ON from OFF position:
Press–Sceneisactivated,SceneLEDturnsON.
LEDwillblinkuntilSceneisreached.
Turn OFF from ON position:
Press–TurnsalllightsinsceneOFF,SceneLEDturnsOFF.
DIM/BRIGHT:
PressleftsideofDim/Brightbutton–LightsinlastactivatedScenewilldim.
PressrightsideofDim/Brightbutton–LightsinlastactivatedScenewill
brighten.
NOTE:ControllerwillonlyDim/Brightdeviceslocatedwithindirectradio
frequencyrange.
NOTE:LEDwillbelitonlywhenall
lightsinscenehavereachedtheir
presetlevel.Ifthereisamanual
changetoanylightinthescene,the
LEDwillturnOFFindicatingthatyou
arenolongerinthatscene.
OPERATION
LED
Push
Button
Dim/Bright
Button
G)Including local Switch:
• RemaininAdvancedSettings.
• PressCenterbuttontoselect<IncludeNode>.
• Theremotewillpromptyoutoputthedeviceinprogramming
mode.
• PutVRCS4intoprogrammingmodefortheSwitchbypressing
buttons2and4.
• Waitapproximately5seconduntilbutton1LEDturnsAmber.
• ReleaseButtons2and4andbutton1LEDwillblinkAmber.
• WhilestandingclosetotheVRCS4(approximately1ft.)pressthe
centerbuttonontheProgrammer/Remoteto<Include>devicein
thenetwork.
• ThePrimaryProgrammer/RemotewillassignaHomeIDand
NodeIDtoyournewswitch.
• Youmaynameoreditthedeviceatthistime.
NOTE:Bydefault,switchwillbecontrolledbyButton1onyourscene
controller.
H) Afteralldevicesareincludedintothenetwork,thecontrollermustbe
updated.Toupdatecontrollerproceedasfollows:
• Ifusinganon-LevitonProgrammer/Remote,refertothe
Programmer/Remoteinstructionsheetforupdatingcontroller.
• IfusingLevitonZ-Wave®Programmer/Remote,Cat.No.VRCPG,
presstheMenubuttonandscrolldowntoSystemSetup.
PressthecenterbuttontoselectSystemSetupMenu.Choose
AdvancedSettings.Pressthecenter
buttontoselectNetwork.Pressthe
centerbuttontoselectUpdate"cntrl".
Selectthecontrollertoupdate.
PresscenterButtontobeginupdate.
Updatewillstartautomatically.
Standwithin(1ft)ofcontrollerwhile
updatingNetworktopology.
• WaituntiltheVRCPGProgrammer/
Remoteconrmscompletion.Update
isdone.
NOTE:Ifthe4-Scenecontrollerwithswitch
hasbeensuccessfullyIncludedinthe
networkandtheusertriestoInclude
itagainwithoutrstexcludingitfromthe
network,thenodeIDwillremainthesame.
Cat. No. VRCPG
1 ON
2 ON
3 ON
4 ON
OFF
OFF
OFF
OFF
Menu
Button
Center
Button
Scene Programming:
NOTE: Alldevicesassociatedtothebuttonsmustsupport
Z-Wave®scenecommand.Ifadeviceinthegroupdoesnot
supportthescenecommanditwillnotbecontrolled.
•Pressandholddesiredscenebuttonon4-SceneController
untilLEDblinksGreen.
•AdjustanyloadsassociatedtothatbuttonbyturningON/
OFForDim/Brightentheload.
•Pressbuttonagainon4-SceneControllerandtheLEDwill
stopblinking.
•Thescenehasnowbeenset.
Step 11
ThisdevicecomplieswithPart15oftheFCCRules.Operationissubject
tofollowingtwoconditions:(1)thisdevicemaynotcauseharmful
interference,and(2)thisdevicemustacceptanyinterferencereceived,
includinginterferencethatmaycauseundesiredoperationofthedevice.
Thisequipmenthasbeentestedandfoundtocomplywiththelimitsfor
aClassBDigitalDevice,pursuanttoPart15oftheFCCRules.These
limitsaredesignedtoprovidereasonableprotectionagainstharmful
interferenceinaresidentialinstallation.Thisequipmentgenerates,uses,
andcanradiateradiofrequencyenergyand,ifnotinstalledandusedin
accordancewiththeinstructions,maycauseharmfulinterferencetoradio
communications.However,thereisnoguaranteethatinterferencewill
notoccurinaparticularinstallation.Ifthisequipmentdoescauseharmful
interferencetoradioortelevisionreception,whichcanbedetermined
byturningtheequipmentOFFandON,theuserisencouragedtotryto
correcttheinterferencebyoneormoreofthefollowingmeasures:
• ReorientorrelocatethereceivingAntenna.
• Increasetheseparationbetweentheequipmentandthereceiver.
• Connecttheequipmentintoanoutletonacircuitdifferentfromthatto
whichthereceiverisconnected.
• Consultthedealeroranexperiencedradio/tvtechnicianforhelp.
FCC COMPLIANCE STATEMENT
AnychangesormodicationsnotexpresslyapprovedbyLeviton
ManufacturingCo.,Inc.,couldvoidtheuser'sauthoritytooperatethe
equipment.
FCC CAUTION
After inclusion process, you must associate Vizia RF light
switches, to button on the controllers. Refer to the Primary
Programmer/Remote instruction sheet for complete
details.
NOTE:Thissteprequiresacontrollerthatcancreateassociationliststo
specicgroups1-4.
NOTE:One(1)Z-Wave®lightswitchcanbeassociatedtomultiple
controllers(uptove(5)controllersmaximum).
NOTE:Ifusinganon-LevitonProgrammer/Remote,refertothe
Programmer/RemoteinstructionsheetforassociatingaViziaRF+light
switch.
NOTE:YourLocalswitchwillbeassociatedbydefaulttobutton1.
Device Association:
Step 10
Excluding Load Control:
A) IfusingaLevitonZ-Wave®Programmer/Remote,Cat.No.VRCPG,
presstheMenubuttonandscrolldowntoSystemSetup.Pressthe
centerbuttontoselectSystemSetupMenu.ChooseAdvancedSettings.
PressthecenterbuttontoselectNetwork.Scrolldownto<Exclude
Node>andpressthecenterbutton.
B) IfusingVRCPGProgrammer/Remote,youwillbepromptedtoplace
LocalRelaySwitchintoprogrammingmode.
C) ToExclude,pressandholdbuttons2and4(refer to figure).Wait5
secondsuntiltheLEDturnsAmber.ReleasethebuttonsandtheLED
willblinkAmber.Youarenowreadytoexclude.
NOTE:IftheLEDontheLoadcontrolturnssolidRedwhileexcluding,
therehasbeenacommunicationerror.
D) WhilestandingclosetotheLoadcontroller(approximately1ft.),press
thecenterbuttonontheProgrammer/Remoteto<Exclude>devicefrom
thenetwork.

ARTWORK PRINT SPECIFICATIONS
FOLD SCHEME / BINDERY DIAGRAM
PART NUMBER REV DESCRIPTION
Line Screen:
Angle:
Resolution:
Offset Flexo
Other
Body Material:
Bindery
Thickness:
Trim
Perfect Bind
Die cut Saddle Stitch
Drill
Fold
The information in this document is the exclusive PROPRIETARY property of LEVITON MANUFACTURING COMPANY, INC. It is disclosed
with the understanding that acceptance or review by the recipient constitues an undertaking by the recipient. (1) to hold this information in strict
confidence, and (2) not to disclose, duplicate, copy, modify or use the information for any pupose other than that for which disclosed.
© 2009 Leviton Mfg. Co., Inc.
Unpublished, All Rights Reserved
PlantApprovals:
ARN: Pilot Rev:ECO Number:
Artwork Release Date:
Artwork Print Specification Sheet Rev A04.eps
PMCQA
Artist:
Notes:
Other
Cust Other
S & A
Mktg Eng
FOR LEVITON USE ONLY
SPECIFICATIONS :
PROCESS :
MANUAL INTERIORS / BINDERY / FOLD SCHEME :
COMMENTS :
For manuals - designates cover specifications
Dimensions:
Material:
Thickness:
Finish:
:
Spot
CMYK
1:
4:
3:
2:
Color(s):over
1:
4:
3:
2:
Fonts:
Spot
CMYK
1:
4:
3:
2:
Color(s):over
1:
4:
3:
2:
Fonts:
Fold LineDie Cut Punch/Drill Hole
Glue
Kiss Cut Cellophane
Fold Line
Perforate
Die Cut
Die Line Key:
DC
H anche
lac Heletic a
nstruction sheet