Contents
User Manual 2 of 2

Single Pole (One location) or 3-Way (Multi-location)
Quiet Fan Speed Control
Cat. No. VRF
Ø
1-1L, 1.5A
120VAC, 60Hz
INSTALLATION INSTRUCTIONS
WARNINGS AND CAUTIONS:
• Tobeinstalledand/orusedinaccordancewithappropriateelectricalcodesandregulations.
• Ifyouareunsureaboutanypartoftheseinstructions,consultaqualiedelectrician.
• Toavoidoverheatingandpossibledamagetothisdeviceandotherequipment,donotinstalltocontrolareceptacle,uorescentlighting,amotorora
transformer-operatedapplianceotherthanappropriateceilingfans.
• Toreduceriskofreorelectricalshock,thiscontrolistobeusedwithceilingfansthatarerated120VAC,totalload1.5amperesmaximum.
• Foruseonceilingpaddlefanswithsplit-capacitororshadedpolemotorsonly.Pleaserefertomanufacturer’sinstructionsorratinglabelonthemotorto
conrmtype.Usewithanyothertypesofmotorsorequipmentmaycauseoverheatingand/ordamagetothemotorsorequipment.
WARNINGS AND CAUTIONS:
• ViziaRF+™fanspeedcontrolsarenotcompatiblewithstandard3-wayor4-wayswitches.
TheymustbeusedwithcompatibleVizia+TMorViziaRF+™remotesformulti-locationcontrol.
• Useonlyone(1)ViziaRF+™fanspeedcontrolinamulti-locationcircuitwithupto9coordinatingremotes(withoutLEDs)
orupto4matchingremotes(withLEDs).Theremote(s)willturnthefanonatthespeedselectedatthecontrol.
• Recommendedminimumwallboxdepthis2-1/2".
• Maximumwirelengthfromdimmertoallinstalledremotescannotexceed300ft(90m).
• Disconnectpoweratcircuitbreakerorfusewhenservicing,installingorremovingxture.
• Usethisdeviceonlywithcopperorcoppercladwire.WithaluminumwireuseonlydevicesmarkedCO/ALRorCU/AL.
DI-000-VRF01-02A
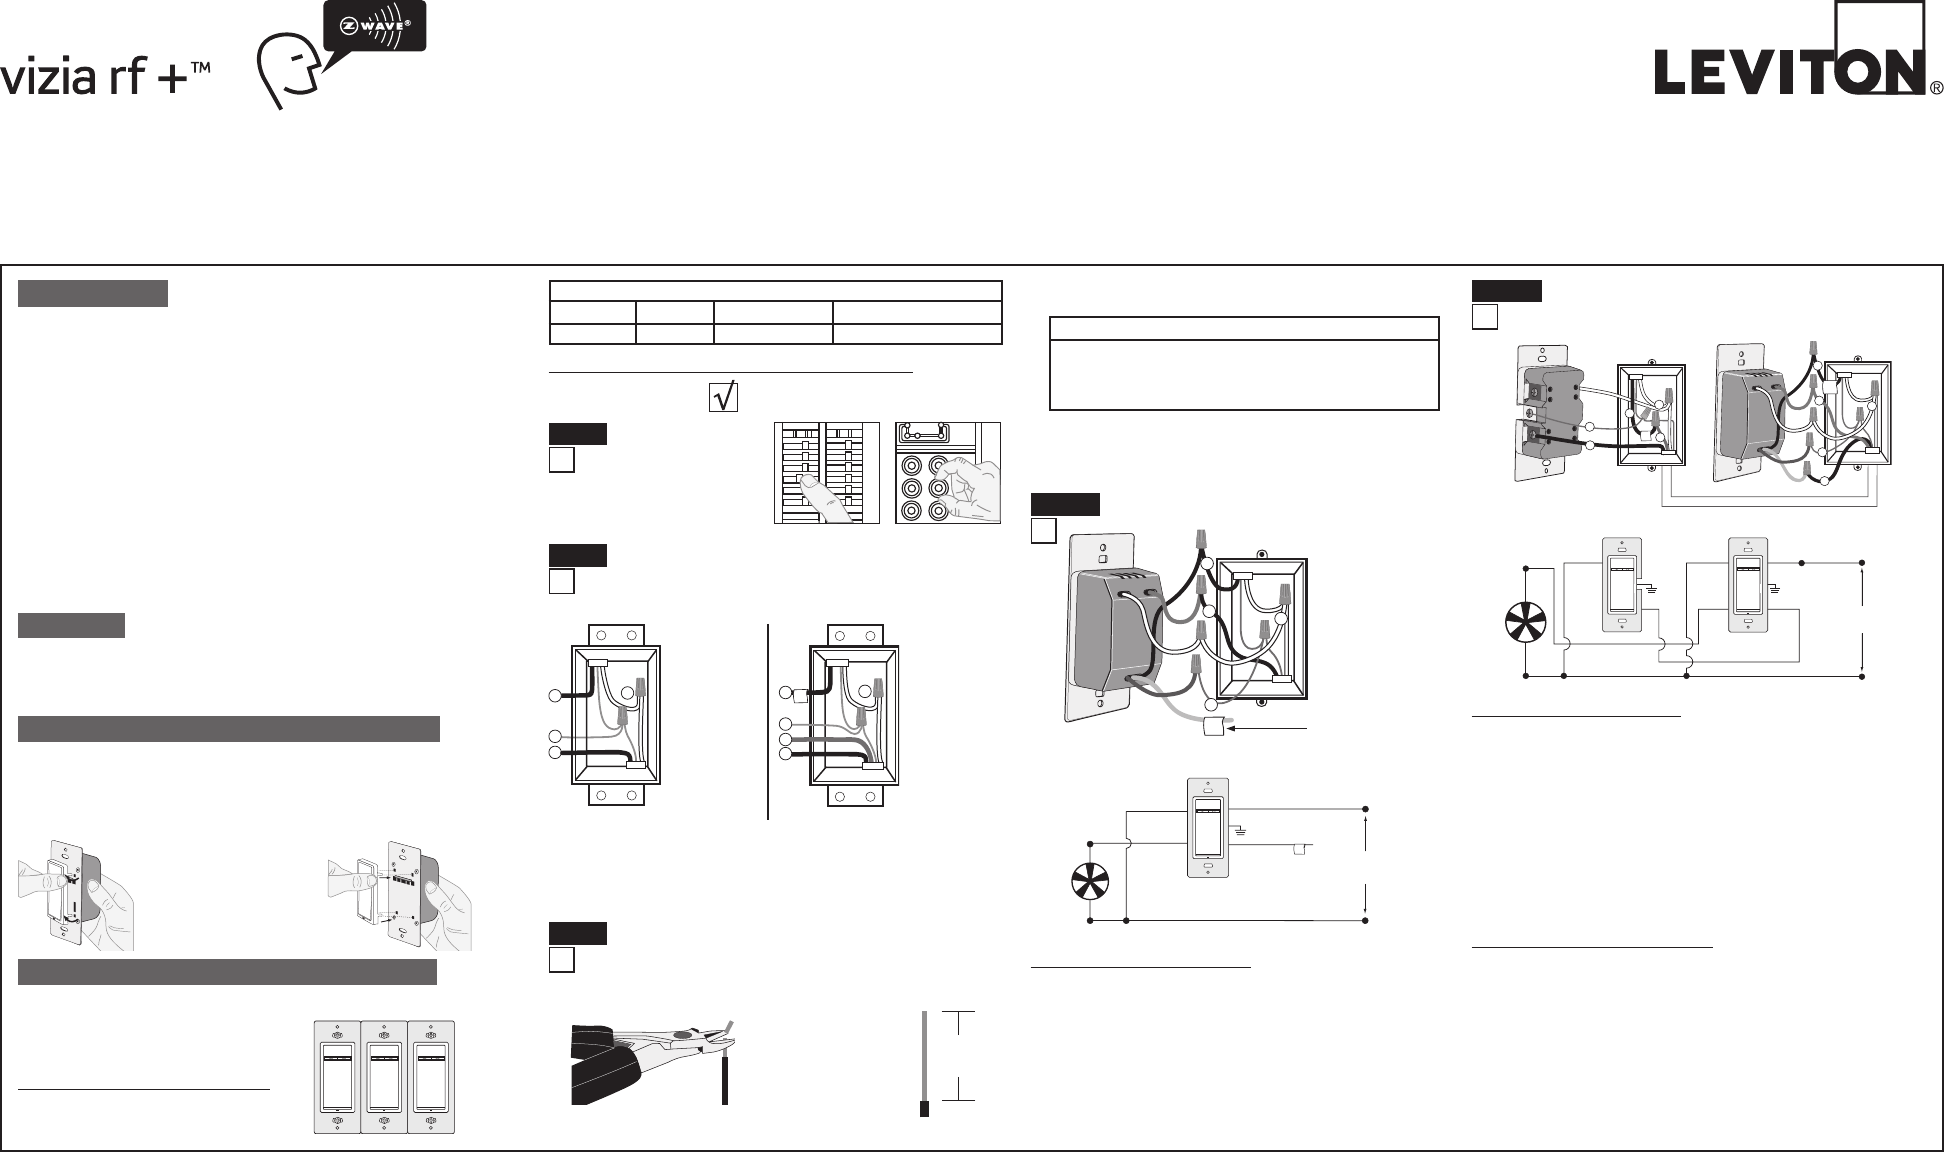
For non-standard wiring applications, refer
to Wire Nut and Connector Size Chart
1-#12w/1to3#14,#16or#18
2-#12w/1or2#16or#18
1-#14w/1to4#16or#18
2-#14w/1to3#16or#18
WIRE CONNECTOR / # OF COND. COMBINATION CHART
• ForSingle-PoleApplication,gotoStep4a.
• For3-WayCoordinatingRemote(noLEDs)Application,gotoStep4b.
• For3-WayMatchingRemote(withLEDs)Application,gotoStep4c.
Fan Speed Control
Fan
Hot (Black)
Neutral (White)
Bla c k
Bla c k
White
White
Red
Green
Ground
Line
120 V A C , 60H z
Insulating
Label
Ye llow/
Red
WIRINGFANSPEEDCONTROL:
ConnectwiresperWIRINGDIAGRAMasfollows:
• GreenorbarecopperwireinwallboxtoGreenlead.
• LineHotwallboxwiretoBlacklead.
• LoadwallboxwiretoRedlead.
• LineNeutralwallboxwiretoWhitelead.
• Yellow/RedwireshouldhaveRedinsulationlabelafxed.
NOTE:IfinsulatinglabelisnotafxedtoYellow/Redlead,use
electricaltapetocover.
• ProceedtoStep5.
Hot (Bla c k )
Neutral (White)
Fan Speed Control Coo r dinating Remote (no LEDs )
YL/RD
RD
Bla c k
BK WH
White
White Black
Yellow/Red Red
Fan Line
120 V A C , 60H z
Green
G r oun d
Green
G r oun d
(u n used )
(u n used )
Slotted/PhillipsScrewdriver ElectricalTape Pliers
Pencil Cutters Ruler
ToolsneededtoinstallyourFanSpeedControl
Changingthecolorofyourdevice:
Yourdevicemayincludecoloroptions.Tochangecoloroftheface,
proceedasfollows:
Pushinsideat
tabtorelease
Lineuptabsand
press in sides one
atatimetoattach
MULTI-DEVICEAPPLICATION
Inmulti-fanspeedcontrolinstallations,there
isnoderatingnecessary.Refertothechartfor
maximumloadperfanspeedcontrol.
Ifinstallingfanspeedcontrolinasingledevice
application,proceedwiththeINSTALLING
YOURFANSPEEDCONTROLsection.If
installingfanspeedcontrolinamulti-device
application,proceedasfollows:
InstallingFanControlbyitselforwithotherdevices
Black
Red
Yellow/Red
Green
White
InsulatingLabel:
Thiswireisusedin3-way
installationsonly. For single
pole installations, do not
removethisinsulatinglabel.
4
3
1
2
SinglePoleWiringApplication:
Step4a
2
1
4
BK
RD
YL/RD
Coo r dinating Remot e Fan Speed Control
5
3
5
Black
Red
Yellow/Red
Green
White
4
3
1
2
3-WayWiringwithCoordinatingRemote
(noLEDs)Application:
Step4b
INTRODUCTION
Leviton’s
ViziaRF+TM
componentsaredesignedtocommunicatewitheachothervia
RadioFrequency(RF)toprovideremotecontrolofyourlighting.UsingRFtechnology
allowsLevitontoprovidethegreatestsignalintegritypossible.Eachmodulein
Leviton’s
ViziaRF+TM
componentlineisaZ-Wave®enableddevice.InaZ-Wave®
network,eachdeviceisdesignedtoactasarouter.Theserouterswillre-transmit
theRFsignalfromonedevicetoanotheruntiltheintendeddeviceisreached.This
ensuresthatthesignalisreceivedbyitsintendeddevicebyroutingthesignalaround
obstaclesandradiodeadspots.TheSceneCapableQuietFanSpeedControlis
compatiblewithanyZ-Wave®enablednetwork,regardlessofthemanufacturerand
canalsobeusedwithotherdevicesdisplayingtheZ-Wave® logo.
CAUTION:RemembertoexercisegoodcommonsensewhenusingtheTimer
featuresofyourremote,especiallywhenschedulingunattendeddevices.Therecan
besomeunexpectedconsequencesifnotusedwithcare.Forexample,anempty
coffeepotcanberemotelyturnedon.Ifthatshouldhappen,yourcoffeepotcould
bedamagedfromoverheating.Ifanelectricheateristurnedonbyremotecontrol
whileclothingisdrapedoverit,arecouldresult.DO NOT USEtheremoteforthe
controlofhighpowerheatingappliancessuchasportableheaters.Thisdevicewill
notcontrollightingthatisusedwithelectroniclow-voltageandhighfrequencypower
supplytransformers,norhighpressuredischargelamps(HIDlighting).Thisincludes
mercury-vapor,sodiumvaporandmetalhalidelamps.
IMPORTANT :For3-Wayapplications,notethatoneofthescrew
terminalsfromtheoldswitchbeingremovedwillusuallybeadifferent
color(Black)orlabeledCommon.Tagthatwirewithelectricaltapeand
identifyasthecommon(LineorLoad)inboththefanspeedcontrolwall
boxandremotewallbox.
MAXIMUMLOADPERFANSPEEDCONTROLFORMULTI-DEVICEAPPLICATION
Morethan2Devices
1.5A
TwoDevices
1.5A
Single
1.5A
Cat. No.
VRF
Ø
1
/./&&
/./&&
/./&&
/./&&
/./&&
/./&&
/./&&/./&&
/./&&
/./&&
/./&&
/./&&
Preparingandconnectingwires:
Pulloffpre-cutinsulationfromfanspeedcontrolleads.Make
surethattheendsofthewiresfromthewallboxarestraight
(cutifnecessary).Removeinsulationfromeachwireinthe
wallboxasshown:
INSTALLINGYOURFANSPEEDCONTROL
NOTE:UsecheckboxeswhenStepsarecompleted.
WARNING:TO
AVOID FIRE SHOCK
OR DEATH; TURN
OFFPOWERat circuit
breakerorfuseand
testthatpowerisoff
beforewiring!
Step 1
Identifyingyourwiringapplication
(mostcommon):
NOTE:Ifthewiringinyourwallboxdoesnotresembleanyof
thesecongurations,consultaqualiedelectrician.
Step 2
Step3
2
4
3
1
2
4
1
5
3
3-Way
1. LineorLoad
(Seeimportant
instruction
below)
2. Neutral
3. Ground
4. FirstTraveler
– note color
5. SecondTraveler
– note color
Single-Pole
1. Line (Hot)
2. Neutral
3. Ground
4. Load
Strip Gage
(measurebarewire
here or use gage on
backofthedimmer)
5/8”
(1.6cm)
cut
(ifnecessary)
•
ThisisaZ-Wave
®
controller
• Scenecapable
• Twowaycommunication
• RFreliability
• ON/OFFLEDandFanSpeedlevelLED
• Easeofinstallation–Nonewwiring
• CompatiblewithotherZ-Wave®enabled
devices
FEATURES
WIRINGFANSPEEDCONTROL:
ConnectwiresperWIRINGDIAGRAMasfollows:
NOTE:WhenusingthecoordinatingremotewithoutLEDs,thefanspeed
controlcanbeinstalledoneithertheLineorLoadsideofthe3-waycircuit.
NOTE:Maximumwirelengthfromfanspeedcontroltoallinstalledremotes
cannotexceed300ft(90m).
• GreenorbarecopperwireinwallboxtoGreenlead.
• LineHot(common)wallboxwireidentied(tagged)whenremovingold
switchtoBlacklead.
• FirstTravelerwallboxwiretoRedlead(notewirecolor).
• RemoveRedinsulatinglabelfromYellow/Redlead.
• SecondTravelerwallboxwiretoYellow/Redlead(notewirecolor).This
travelerfromthefanspeedcontrolmustgototheterminalscrewonthe
remotemarked"YL/RD".
• LineNeutralwallboxwiretoWhitelead.
WIRINGCOORDINATINGREMOTE:
ConnectwiresperWIRINGDIAGRAMasfollows:
NOTE:"BK"and"RD"terminalsoncoordinatingremoteareunused.Tightenboth
screws.
NOTE:
Maximumwirelengthfromfanspeedcontroltolastremoteis300ft(90m).
• GreenorbarecopperwireinwallboxtoGreenterminalscrew.
• Loadwallboxwireidentied(tagged)whenremovingoldswitchtoFirst
Traveler(notecolorasabove).
• SecondTravelerwallboxwire(notecolorasabove)toterminalscrewmarked
"YL/RD".ThistravelerfromtheremotemustgototheYellow/Redfanspeed
controllead.
• RemoveWhiteinsulatinglabelfromterminalscrewmarked"WH".
• LineNeutralwallboxwiretoterminalscrewmarked"WH".
• ProceedtoStep5.

LIMITED5YEARWARRANTYANDEXCLUSIONS
LevitonwarrantstotheoriginalconsumerpurchaserandnotforthebenetofanyoneelsethatthisproductatthetimeofitssalebyLevitonisfreeofdefectsinmaterialsandworkmanshipundernormalandproperuseforveyearsfromthepurchasedate.Leviton’sonlyobligationistocorrectsuchdefectsbyrepairorreplacement,atitsoption,ifwithinsuchveyearperiodtheproductisreturnedprepaid,withproof
ofpurchasedate,andadescriptionoftheproblemtoLevitonManufacturingCo.,Inc.,Att:QualityAssuranceDepartment,59-25LittleNeckParkway,LittleNeck,NewYork11362-2591.Thiswarrantyexcludesandthereisdisclaimedliabilityforlaborforremovalofthisproductorreinstallation.Thiswarrantyisvoidifthisproductisinstalledimproperlyorinanimproperenvironment,overloaded,misused,
opened,abused,oralteredinanymanner,orisnotusedundernormaloperatingconditionsornotinaccordancewithanylabelsorinstructions.Therearenootherorimpliedwarrantiesofanykind,includingmerchantabilityandtnessforaparticularpurpose,butifanyimpliedwarrantyisrequiredbytheapplicablejurisdiction,thedurationofanysuchimpliedwarranty,includingmerchantabilityandtness
foraparticularpurpose,islimitedtoveyears.Levitonisnotliableforincidental,indirect,special,orconsequentialdamages,includingwithoutlimitation,damageto,orlossofuseof,anyequipment,lostsalesorprotsordelayorfailuretoperformthiswarrantyobligation.Theremediesprovidedhereinaretheexclusiveremediesunderthiswarranty,whetherbasedoncontract,tortorotherwise.
DI-000-VRF01-02A
WIRINGFANSPEEDCONTROL
(wallboxwithLoadconnection):
ConnectwiresperWIRINGDIAGRAMasfollows:
• GreenorbarecopperwireinwallboxtoGreenlead.
• Loadwallboxwireidentied(tagged)whenremovingoldswitchtoRedlead.
• FirstTravelerLineHottoBlacklead.
• RemoveRedinsulatinglabelfromYellow/Redlead.
• SecondTravelerwallboxwire(notecolorasabove)toYellow/Redlead.Thistraveler
fromthefancontrolmustgototheterminalscrewontheremotemarked"YL/RD".
• LineneutralwallboxwiretoWhitelead.
• ProceedtoStep5.
Foradditionalinformation,contactLeviton’sTechlineat
1-800-824-3005orvisitLeviton’swebsiteatwww.ViziaRFplus.com
• FandoesnotturnONandON/OFFLEDdoesnotturnON
- Circuitbreakerorfusehastripped.
- Fanhasburnedout.
- FanNeutralconnectionisnotwired.
- Conrmthatthedeviceisbeingsuppliedfroma120V,60HzACsourceONLY.
- Conrmthatunitisprogrammedproperly.Repeat“TOINSTALL”sectionto
verifythatithasbeenincludedintheZ-Wave™network.
• Remotedoesnotoperatefan
- Ensurethattotalwirelengthdoesnotexceed300ft.
TROUBLESHOOTING
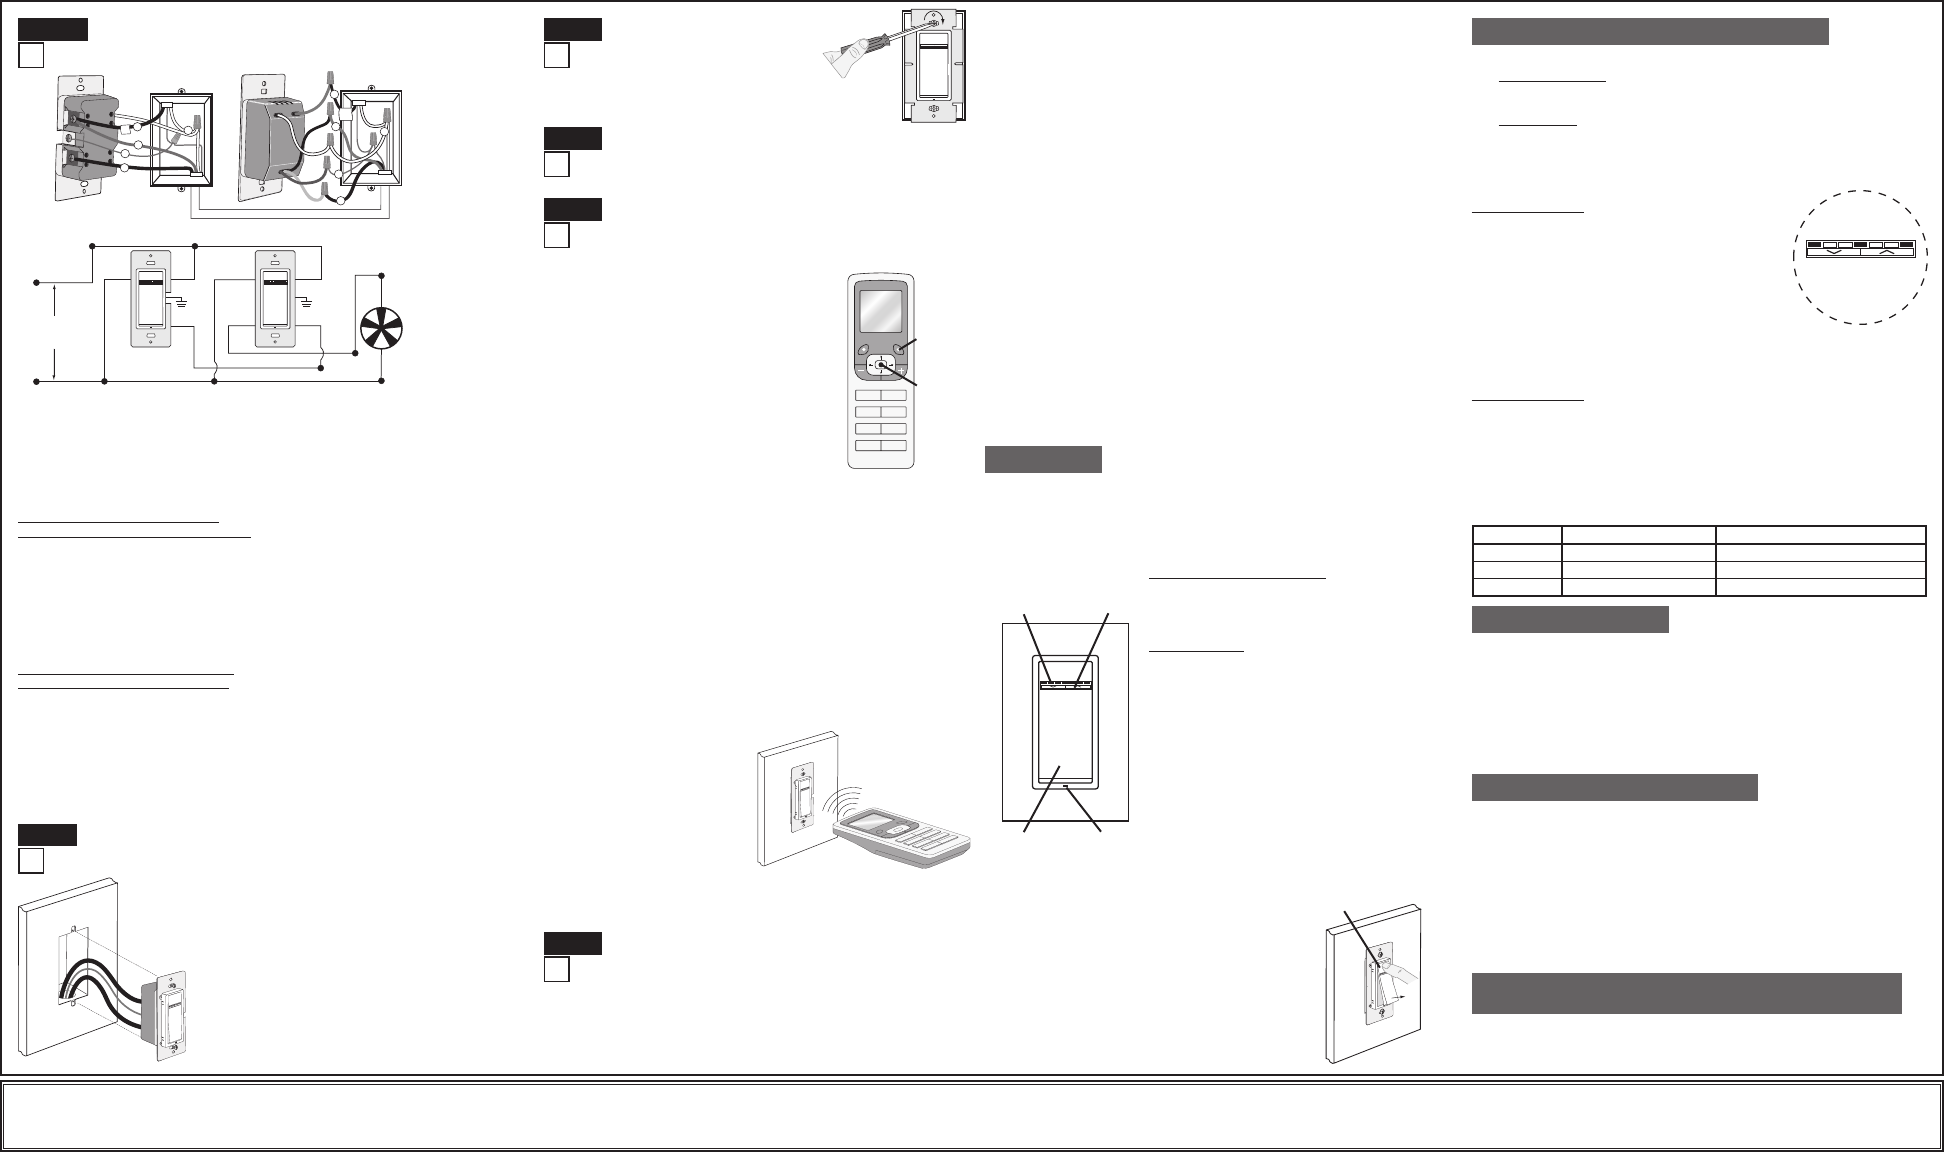
Air-GapSwitch:
OntheFanSpeedControlonly,engagethe
air-gapswitchbygentlypressingthetopofthe
PushPaduntilthebottomliftscompletelyoutof
theframeandaclickisheard(refertoFigure).
Thiswillcutpowertothexture.Afterservicingis
complete,pressthePushPadbackintoplacefor
normaloperation.
Cleaning:Cleanwithadampcloth.
DO NOTusechemicalcleaners.
NOTE:ThelocatorlightwillilluminatewhentheloadisintheOFFpositionto
facilitateaccessinthedark.
NOTE:Ifusingthefanspeedcontrolina3-wayapplication,thefanwillturn
ONatspeedsetonfan’sFanSpeedbar.Thefanspeedcanbecontrolled
fromeitherthefanspeedcontrolortheremotelocation.
PushPad(Defaultsettings)
TurnONfromOFFposition:
Tap–FanturnsONtopresetspeed.
TurnOFFfromONposition:
Tap–FanturnsOFF.
Fan Speed Bar
PressFanSpeedBarrightorlefttoincreaseor
decreasefanspeedrespectively.
Thereare3speeds-High,MediumorLow.
INCREASE:
PresstherighthalfoftheFanSpeedBarto
increasefanspeed.
DECREASE:
PressthelefthalfoftheFanSpeedBarto
decreasefanspeed.
Ifyoucontinuetohold,thefanwillreducespeedto
minimumlevelandthenturnOFF.
NOTE:Thefanspeedcanbechangedwhenthe
fanisoffusingtheFanSpeedBar.Intheeventof
poweroutageorinterruptionthefanwillresetto
thelastfanspeedwhenpowerisrestored.
Push
Pad
Locator
Light
LED Fan
Speed
Display
Fan
Speed
Bar
OPERATION
NOTE:Dresswireswithabendasshownindiagram
inordertorelievestresswhenmountingdevice.
• Positionallwirestoprovideroominoutletwallbox
fordevice.
• Ensurethattheword“TOP”isfacingupondevice
strap.
• Partiallyscrewinmountingscrewsinwallbox
mountingholes.
• Restorepoweratcircuitbreakerorfuse.
• PressPushPadandfanshouldturnON.Iffandoes
notturnON,presstherighthalfoftheFanSpeed
BaruntilthefanturnsON.
If fan still does not turn ON, refer to the
TROUBLESHOOTING section.
TestingyourFanSpeedControlpriorto
mountinginwallbox:
Step5
RestorePower:
Restorepoweratcircuitbreakerorfuse. Installation is
complete.
Step 7
Fan Speed ControlMatchingRemote
2
BK
RD
YL/RD
5
3
1
4
5
Black
Red
Yellow/Red
Green
White
4
3
1
2
Hot (Bla c k )
Neutral (White)
Fan Speed control Mat c hing Remote (with LEDs )
YL/RD
WH
BK Bla c k
Bla c k
White
White
Red Ye llow/Red Fan
Line
120 V A C , 60H z
Green
G r oun d
Green
G r oun d
3-WayWiringwithMatchingRemote
(w/LEDs)Application:
Step4c ADVANCEDPROGRAMMINGFEATURES
DenitionofAModes
A) PresetONSpeed:Setstheturnonfanspeedregardlessoftheprevious
speedset(FormerlySpeedLock).
DenitionofBModes
B) LEDOptions:SetsthetimeperiodinsecondstheLocatorLEDand
Brightnessdisplaywillstayonbeforeextinguishing.
NOTES:
• Thedevicewillexitprogrammingmodeafter3minutesofinactivity
• PressingthePushPadatanytimeduringprogrammingwilladvancethe
devicetothenextprogrammingmode.
ProgramModeA
ToenterProgramModeA:
PressandholdthePushPadandthentherighthalf
oftheFANSPEEDBar(^)for5secondsuntilthe
LocatorLEDandleftmostLED(LED1)beginstoblink.
• TheLocatorLEDwillblinkoncepersecondto
indicateProgramModeA,PresetONSpeed.To
changethecurrentPresetONSpeedfromHIGH
(LED7),MEDIUM(LED4),LOW(LED1),usethe
FANSPEEDBar.Ifthisfeatureisnotdesired,pressandholdthelefthalf
oftheFANSPEEDBar(v)untilnoLEDislit(defaultsetting).Bytapping
thePushPadthissettingwillautomaticallybesavedandthedevicewill
exitProgrammingModeA.
ProgramModeB
ToenterProgramModeB:
PressandholdthePushPadandthenthelefthalfoftheFANSPEEDBar(v)
for5secondsuntiltheLocatorLEDandrightmostLED(LED7)beginstoblink.
• TheLocatorLEDwillblinkoncepersecondtoindicateProgramModeB,
LED OptionsMode.TochangetheLED Optionssettings,usetheFAN
SPEEDBartomovetheLEDtothedesiredpresetsettingaccordingto
thechartbelow.BytappingthePushPadthissettingwillautomaticallybe
savedandthedevicewillexitProgrammingModeB.
LED Fan Speed
Display
1 4 7
LED
LED 1 (Default)
LED 4
LED 7
LED LOCATOR TIMEOUT
Active
Active
Turns off 5 seconds after use
LED BRIGHTNESS DISPLAY TIMEOUT
Active
Turns off 5 seconds after use
Turns off 5 seconds after use
Gentlypresstop
ofPushPad
NOTE:ThefanspeedcontrolmustbeinstalledinawallboxthathasaLoad
connection.ThematchingremotemustbeinstalledinawallboxwithaLineHot
connectionandaNeutralconnection.ANeutralwiretothematchingremoteneeds
tobeaddedasshown.
Ifyouareunsureaboutanypartoftheseinstructions,consultaqualiedelectrician.
NOTE:Maximumwirelengthfromfanspeedcontroltoallinstalledremotescannot
exceed300ft(90m).
WIRING MATCHING REMOTE
(wallboxwithLineHotconnection):
ConnectwiresperWIRINGDIAGRAMasfollows:
• GreenorbarecopperwireinwallboxtoGreenterminalscrew.
• LineHot(common)wallboxwireidentied(tagged)whenremovingold
switchandFirstTravelertoremoteterminalscrewmarked"BK".
• SecondTravelerwallboxwirefromfanspeedcontroltoremoteterminal
screwmarked"YL/RD"(notewirecolor).Thistravelerfromtheremote
mustgotothefancontrolYellow/Redlead.
• LineNeutralwallboxtoremoteterminalscrewmarked"WH".
FanSpeedControlMounting:
TURNOFFPOWERATCIRCUIT
BREAKER OR FUSE.
Installationmaynowbecompleted
bytighteningmountingscrewsinto
wallbox.Attachwallplate.
Step6
NOTES:
• Ifusinganon-LevitonProgrammer/Controller,
refertotheProgrammer/Controllerinstruction
sheetforIncludingadevice.
• IfusingtheVRCPG'sInstallChecklistfeature,
godirectlytoStepB.
A)IfusingaLevitonZ-Wave®Programmer/
Controller,Cat.No.VRCPG,presstheMenu
buttonandscrolldowntoSystemSetup.
ChooseAdvancedSettings.Pressthecenter
buttontoselectSystemSetupMenu.Pressthe
centerbuttontoselectNetwork.
B)Whilestandingclosetothemodule(approx.
2-5ft),pressthecenterbuttonto<Include>
deviceinthenetwork.
NOTE:Onlyonedevicemaybeincludedatatime.DO NOTput
multipledevicesintotheInclusionmodeatanytime.
C)WhiletheProgrammer/ControllerisintheInclusionmodeand
theLocatorLEDisONonthefanspeedcontrol,pushthepush
padtoturnONthefan.TheProgrammer/Controllerwillverify
inclusionandthelocatorLEDwillturnOFFonthefanspeed
control.IfthefanspeedcontrolisashingAmberwhileinthe
Inclusionmode,theProgrammer/Controllerisstilltryingto
communicatewiththefanspeedcontrol.Waituntilthedevice
stopsashing,thenpressthepushpad.
NOTE:IfthelocatorLEDonthefanspeedcontrolturnssolid
Redwhileincluding,therehasbeenacommunicationerror.
RefertoTroubleshootingsection.
D)ThePrimaryProgrammer/ControllerwillassignanodeID
number(Name)forthismodule.
NOTE:ThisIDnumber(Name)willbestoredinthecontroller
librarytobeusedforfuturereference.
NOTE:Youmayeditthename
ofthisdeviceatthistime.
E) The fan speed control is now
installed in the network.
NOTE:Ifafanspeedcontrol
hasbeensuccessfullyIncluded
inthenetworkandtheusertries
toIncludeitagainwithoutrst
excludingitfromthenetwork,the
modulewillretaintherstnode
IDithadreceivedandignorethe
second.
Programmer/Controller
Cat.No.VRCPG
Menu
Button
1
ON
2
ON
3
ON
4
ON
OFF
OFF
OFF
OFF
Center
Button
IncludingSceneCapableFanSpeed
ControlintoZ-Wave®Network:
VRCPG
Programmer/
Controller
NOTE:Remotemustbeinclose
proximitytofanspeedcontrolwhen
includinginnetwork.
FactoryDefault:
Ifyourfanspeedcontrolisnotresponding,oryouareunabletocontrolitafter
youhavetriedtoInclude/Excludeitmultipletimes,itmaybenecessaryto
resetthefanspeedcontroltoitsoriginalfactorysettings.Toaccomplishthis,
proceedasfollows:
• Onthefanspeedcontrol,engagetheair-gapswitch(refertoOperation
section)andwait5seconds.Presspushpadbackintoframeandhold
pushpaduntilthelocatorLEDturnsAmberandthenashesRed.Thefan
speedcontrolisnowreset.Oncethefanspeedcontrolisreset,itwillbe
necessarytoRe-Includeittoanetworkbeforeitcanbeused.
CAUTION:SETTINGADEVICETOAFACTORYDEFAULTDOES
NOTEXCLUDETHATDEVICEFROMANETWORK.THEEXCLUSION
PROCEDUREMUSTSTILLBEFOLLOWEDTOREMOVETHEDEVICE
FROMTHEPRIMARYCONTROLLER’SINFORMATIONTABLE.FAILURE
TODOSOMAYRESULTINASYSTEMTHATISSLOWTORESPOND,OR
MAYFAILTORESPONDTOSOMEDEVICES.
ExcludingFanSpeed
ControlfromNetwork:
NOTE:ItisveryimportanttoaccuratelyExcludedevicesfromthenetwork
whenmovingorremovingadevicefromaZ-Wave
®
network.Thisensures
thatallinformationhasbeenremovedfromyourPrimaryProgrammer/
Controller’sinformationtableandisnotcountedontobeapartofthemesh
network.
ProtectedunderU.S.PatentNumber6,388,399andpatentspending
andlicensedunderU.S.PatentsNumbers5,905,442,and5,982,103
2008©LevitonMfg.Co.,Inc.
ThisequipmenthasbeentestedandfoundtocomplywiththelimitsforaClassBDigitalDevice,
pursuanttoPart15oftheFCCRules.Theselimitsaredesignedtoprovidereasonableprotection
againstharmfulinterferenceinaresidentialinstallation.Thisequipmentgenerates,uses,andcan
radiateradiofrequencyenergyand,ifnotinstalledandusedinaccordancewiththeinstructions,may
causeharmfulinterferencetoradiocommunications.However,thereisnoguaranteethatinterference
willnotoccurinaparticularinstallation.Ifthisequipmentdoescauseharmfulinterferencetoradio
ortelevisionreception,whichcanbedeterminedbyturningtheequipmentOFFandON,theuseris
encouragedtotrytocorrecttheinterferencebyoneormoreofthefollowingmeasures:
• ReorientorrelocatethereceivingAntenna.
• Increasetheseparationbetweentheequipmentandthereceiver.
• Connecttheequipmentintoanoutletonacircuitdifferentfromthat
towhichthereceiverisconnected.
• Consultthedealeroranexperiencedradio/tvtechnicianforhelp.
FCCCOMPLIANCESTATEMENT
A)IfusingaLevitonZ-Wave
®
Programmer/Controller,Cat.No.VRCPG,pressthe
MenubuttonandscrolldowntoSystemSetup.ChooseAdvancedSettings.
PressthecenterbuttontoselectSystemSetupMenu.Pressthecenterbutton
toselectNetwork.
B)Whilestandingclosetothefanspeedcontrol,pressthecenterbuttonto
<Exclude>devicefromthenetwork.WhiletheProgrammer/Controllerisinthe
ExclusionmodeandthelocatorLEDisONonthefanspeedcontrol,press
thepushpadonthefanspeedcontrol.TheProgrammer/Controllerwillverify
ExclusionandthelocatorLEDwillturnOFFonthefanspeedcontrol.
IfthefanspeedcontrolisashingAmberwhileintheExlusionmode,the
Programmer/Controllerisstilltryingtocommunicatewiththefanspeedcontrol.
Waituntilthedevicestopsashing,thenpressthepushpad.
Step8
Step9

FOLD S
C
HEME
8.5"
14"
2.3"
4.25"
FINAL
Fold Line
DOCUMENTATION
LEVITON INSTRUCTION SHEET/MANUAL
SPECIFICATIONS
H2D 6/20/08
2008
Helvetica
DI-000-VRF01-02A
Black
N/A
Final fold size:
40 Lb. o f fse t
2.3" X 4.25"
Overall size:
14" X 8.5"
Paper size:
Part No.
(This panel)
Part No.
(This panel)