NCR RSD Atlanta 7710GA2 Electronic Pricing Transmitter User Manual Chapter 6
NCR Corporation, RSD - Atlanta Electronic Pricing Transmitter Chapter 6
Contents
- 1. Users Manual Cover
- 2. Users Manual Front
- 3. Users Manual Glossary
- 4. Users Manual Index
- 5. Users Manual Appendix A
- 6. Users Manual Appendix B
- 7. Users Manual Appedix C
- 8. Users Manual Appedix D
- 9. Chapter 1
- 10. Chapter 2
- 11. Chapter 3
- 12. Chapter 4
- 13. Chapter 5
- 14. Chapter 6
- 15. Chapter 7
- 16. Chapter 8
- 17. Chapter 9
- 18. Chapter 10
- 19. Chapter 11
- 20. Chapter 12
- 21. Chapter 13
Chapter 6
DecisioNet Software on an NCR UNIX System
System Environment for NCR UNIX
The DecisioNet System requirements are as follows:
• IBM AT Compatible PC with an Intel Pentium 90 mHz or higher
processor
• Minimum memory: 16 MB for dedicated PCs and 32 MB for all
others
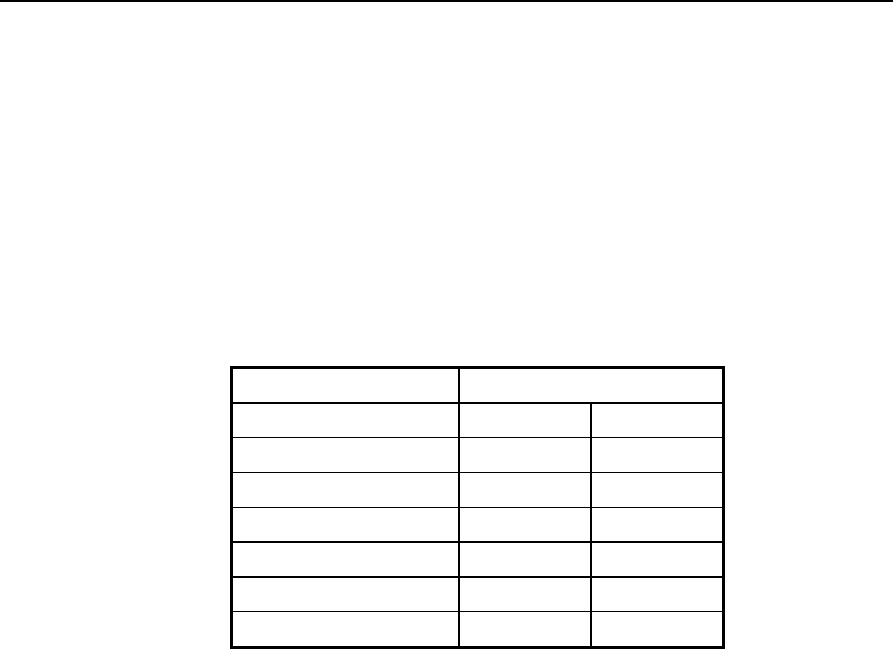
• Hard Disk - per number of SmarTalker tags:
Disk Space Required
Number of EPL Records Default Maximum
5,000 30 MB 69 MB
10,000 32 MB 73 MB
15,000 34 MB 77 MB
25,000 38 MB 84 MB
50,000 47 MB 103 MB
65,000 53 MB 114 MB
• Flex Disk Drive (FDD): 3.5” 1.4 MB High Density
• Color CRT (VGA)
• RS-232 Port
• NCR UNIX SVR 4, MP-RAS (Ver. 3.02 or later)
6
6-2 DecisioNet Software on an NCR UNIX System
DecisioNet Software for NCR UNIX
The DecisioNet software for NCR UNIX is provided on tape cartridges.
Name UNIX Package Name LPIN
EPL Base and Application Runtime for
NCR UNIX
EPL Standalone PLU Maintenance
EPL Scan Process Package
eplbaseap
saplumexe
scanproc
G370-1167-0000
EPL Price Redundancy Package PriceRed G370-1170-0000
EPL System Information Package SystmInfo G370-1173-0000
EPL Information Messaging System
Package InfoMsg G370-1176-0000
EPL ACS 4.0 POS Runtime
(For Advanced Checkout Solution only) POS-AC40 G370-1179-0000
Checking the System for Existing Packages
Note: Before installing new DecisioNet software, remove any old
DecisioNet software from the system.
Use the following procedures to list and remove existing software
packages from the system.
1. List software packages using the following command:
Pkginfo –c application
2. Remove software packages using the following command:
pkgrm <package name>

DecisioNet Software on an NCR UNIX System 6-3
Installing DecisioNet Software on an NCR UNIX System
The following sections describe how to install DecisioNet software on
an NCR UNIX system. After installation, refer to Chapter 8,
“Configuring the DecisioNet System Environment,” and Appendix D,
“Customizing the DecisioNet System,” for any additional information
you may need.
Before installing the DecisioNet software, make sure the hard disk has
at least 20 megabytes of free space in additon to the normal 10% free
space required on UNIX systems. Refer to the table on the first page of
this chapter for space recommendations.
The following instructions assume that UNIX is already installed.
Disabling UNIX Port Monitoring
Before installing the DecisioNet software, you must disable UNIX port
monitoring for the port on which you want to install the software.
1. Log in as root.
2. At the UNIX prompt, type sysadm and press Enter. While in
sysadm if you make a mistake, you can press the F7 key and
choose Cancel to back up.
3. Select Ports and press Enter.
4. Select Port Monitors and press Enter.
5. Select Disable and press Enter. Look for a port monitor with a
name matching the port to which you are going to install the
DecisioNet software. Example: /dev/term/xxxx.
6a. If there is no port monitor that matches, press the F7 key and
choose Exit to return to the UNIX prompt. You do not need to
disable a port monitor. Skip Steps 7 and 8 and go on to the
installation procedure below.

6-4 DecisioNet Software on an NCR UNIX System
6b. If there is a port monitor name, highlight that port monitor and
press F2.
7. Press Enter to disable that port monitor.
8. Press the F7 key and choose Exit to return to the UNIX prompt.
Starting the Install Process
The installation procedure uses the UNIX package add facility.
1. Put the tape containing the base application software in the tape
drive.
2. Type pkgadd -d <device name with path>.
The device corresponding to the tape drive should be in this
directory path (for example, /dev/rmt/c0t3d0s0).
3. A package list displays with a selection number in front of each
choice. These packages should be installed in this order:
1) Electronic Price Label Base Software - eplbaseap
2) EPL Standalone PLU Maintenance Software – saplumexe
3) EPL Scan Process Package – scanproc
Installing EPL Base and Application Runtime Software
(eplbaseap)
1. Type the selection number for the eplbaseap package.
The eplbaseap package install begins.
UNIX asks where to install the base application software. The
default (/appl/epl) is recommended.

DecisioNet Software on an NCR UNIX System 6-5
2. Press Enter to accept the default or type the new destination path
and then press Enter.
UNIX asks you to enter a new user ID for the eplbaseap package.
The default is epl. If you want to use a different user ID, make sure
the ID is not already in use
3. Press Enter to accept the default or type a NEW user ID and press
Enter.
UNIX asks you to specify a home directory for the new user being
added. The default is /appl/epl.
4. Press Enter to accept the default or type the new home directory
path and then press Enter.
UNIX now asks for group ID. The default is epl.
5. Press Enter to accept the default or type the new group ID, then
press Enter.
UNIX now starts the installation of eplbaseap, and gives you
messages to show progress.
If any UNIX kernel parameters for EPL are different from what is
already configured in UNIX, messages will show kernel
parameters that are being modified (tuned).
UNIX then rebuilds the operating system, if necessary. When
UNIX finishes the installation, it displays the message:
Installation of EPL base application was
successful

6-6 DecisioNet Software on an NCR UNIX System
Installing the Optional EPL Standalone PLU Maintenance
Software (saplumexe)
This optional UNIX package is on the EPL Base and Application
Runtime tape. You must install the eplbaseap package before installing
the EPL Standalone PLU Maintenance software.
1. Type pkgadd -d <device name with path>.
The device corresponding to the tape drive should be in this
directory path (for example, /dev/rmt/c0t3d0s0).
2. Type the number for the saplumexe package.
UNIX starts the installation for saplumexe, and gives messages to
show progress.
When UNIX finishes the installation, it displays the message:
Installation of saplumexe was successful
If you are installing some other POS specific item maintenance
package instead of the Standalone PLU Maintenance package, type
q and remove the tape. Follow the instructions that come with that
software.

DecisioNet Software on an NCR UNIX System 6-7
Installing the Optional EPL Scan Process Package (scanproc)
This optional UNIX package is on the EPL Base and Application
Runtime tape. You must install the eplbaseap package before installing
the EPL Scan Process software.
1. Type pkgadd -d <device name with path>.
The device corresponding to the tape drive should be in this
directory path (for example, /dev/rmt/c0t3d0s0
2. Type the number for the scanproc package.
The scanproc package install begins.
3. UNIX asks you to enter customer name.
4. Press Enter to set the default or type a new customer name and
then press Enter.
5. UNIX asks you to enter store number.
6. Press Enter to set the default or type the store number and then
press Enter.
7. UNIX asks you to enter scanner device port.
8. Press Enter to set the default or type the scanner device port and
then press Enter.
9. UNIX asks you to enter the host file name.
10. Press Enter to set the default or type the host file name and then
press Enter.
11. UNIX continues the installation for the scanproc package, and
gives messages to show progress.
When UNIX finishes the installation, it displays the message:
Installation of scanproc was successful

6-8 DecisioNet Software on an NCR UNIX System
Installing the EPL Price Redundancy Package (PriceRed)
The EPL Base and Application Runtime package (eplbaseap) must be
installed prior to installing this optional package.
1. Insert the tape with the EPL Price Redundancy package.
2. Type pkgadd -d <device name with path>.
The device corresponding to the tape drive should be in this
directory path (for example, /dev/rmt/c0t3d0s0).
3. A package list displays with a selection number in front of each
choice. The following package should be displayed:
--Electronic Price Label Price Redundancy Package (PriceRed)
4. Type the selection number for the PriceRed package.
UNIX now starts the installation for PriceRed and gives messages
to show progress.
When UNIX finishes the installation, it displays the message:
Installation of <PriceRed> was successful

DecisioNet Software on an NCR UNIX System 6-9
Installing the EPL System Information Package (SystmInfo)
The EPL Base and Application Runtime package (eplbaseap) must be
installed prior to installing this optional package.
1. Insert the tape with the EPL System Information package.
2. Type pkgadd -d <device name with path>.
The device corresponding to the tape drive should be in this
directory path (for example, /dev/rmt/c0t3d0s0).
3. A package list displays with a selection number in front of each
choice. The following package should be displayed:
--Electronic Price Label System Information Package (SystmInfo)
4. Type the selection number for the SystmInfo package.
UNIX now starts the installation for SystmInfo and gives messages
to show progress.
When UNIX finishes the installation, it displays the message:
Installation of <SystmInfo> was successful

6-10 DecisioNet Software on an NCR UNIX System
Installing the EPL Information Messaging System Package
(InfoMsg)
The EPL Base and Application Runtime package (eplbaseap) must be
installed prior to installing this optional package.
1. Insert the tape with the EPL Information Messaging System
package.
2. Type pkgadd -d <device name with path>.
The device corresponding to the tape drive should be in this
directory path (for example, /dev/rmt/c0t3d0s0).
3. A package list displays with a selection number in front of each
choice. The following package should be displayed:
--Electronic Price Label System Information Messaging System
(InfoMsg)
4. Type the selection number for the InfoMsg package.
UNIX now starts the installation for InfoMsg and gives messages to
show progress.
When UNIX finishes the installation, it displays the message:
Installation of <InfoMsg> was successful
Configuring and Customizing the DecisioNet System
After the software is installed, refer to Chapter 8, “Configuring the
DecisioNet System Environment,” for instructions on how to configure
and start the DecisioNet software. Refer to Appendix D, “Customizing
the DecisioNet System,” for information about system features that
permit modification to meet additional site-specific requirements
beyond those described in the configuration chapter.