NCR RSD Atlanta 7710GA2 Electronic Pricing Transmitter User Manual Appedix D
NCR Corporation, RSD - Atlanta Electronic Pricing Transmitter Users Manual Appedix D
Contents
- 1. Users Manual Cover
- 2. Users Manual Front
- 3. Users Manual Glossary
- 4. Users Manual Index
- 5. Users Manual Appendix A
- 6. Users Manual Appendix B
- 7. Users Manual Appedix C
- 8. Users Manual Appedix D
- 9. Chapter 1
- 10. Chapter 2
- 11. Chapter 3
- 12. Chapter 4
- 13. Chapter 5
- 14. Chapter 6
- 15. Chapter 7
- 16. Chapter 8
- 17. Chapter 9
- 18. Chapter 10
- 19. Chapter 11
- 20. Chapter 12
- 21. Chapter 13
Users Manual Appedix D

Customizing the DecisioNet System
Overview
Many features of the DecisioNet System can be customized to meet
site-specific requirements. Feature availability depends on which
software packages are installed. The features listed below can be used
with the system default settings, or the settings can be modified.
The system defaults provide basic functionality for all features except
Status Tag Manager which requires the set up of site-specific files.
• Information Messaging System Package
• Label Data Manager
• Promotional Message Verifier
• External Data Interface (with AMS capabilities)
• Automated Messaging System
• Price Redundancy Package
• Price Verifier
• Sale Price Verifier
• System Information Package
• Log Monitor
• Orphan Tag Report
• Unattended EPL Backup
• Failure Detection and Analysis
• Status Tag Manager
Two additional sections, “Windows NT Automatic Services” and
“UNIX Automatic Restart” follow the feature customization sections.
D

D-2 Customizing the DecisioNet System
Default Directories
In a default DecisioNet installation, the home directory is \epl for a
Windows NT system and /appl/epl for an NCR UNIX or SCO UNIX
system. The location of files, scripts, applications, etc. in this appendix
references the default directories. Reference the ESCONFIGDIR
environment variable to identify the home directory for your system.
DecisioNet System Start and Stop Scripts
The following table identifies the start and stop scripts used with the
DecisioNet System to control the installed applications, utilities, and
functions.
On a default DecisioNet Windows NT system, these scripts are
installed in the \epl\bin\scripts\ directory. On a default DecisioNet
UNIX system these scripts are installed in the /appl/epl/bin/scripts/
directory.
The start (S#) scripts are executed in ascending order to start the
DecisioNet System. The stop or kill (K#) scripts are executed in
ascending order to stop the DecisioNet System.
Windows NT UNIX Function
S00logger.bat S00logger Start the Logger
S05tblmgr.bat S05tblmgr Start Table Manager
S10cbsmgr.bat S10cbsmgr Start CBS Manager
s15sched.bat S15sched Start Data Scheduler
S35bedchk.bat S35bedchk Start Bedcheck
S40ldmmgr.bat S40ldmmgr Start Label Data Manager
s45plurdr.bat S45plurdr Start PLU Reader
s50bridge.bat S50bridge Start PLU Bridge
S52stat.bat S52stat Start Status Tag Manager

Customizing the DecisioNet System D-3
Windows NT UNIX Function
s55extdi.bat S55extdi Start Extended Data Interface
S55fda.bat S55fda Start Failure Detection & Analysis
S60lm.bat S60lm Start Log Monitor
S90prcchk.bat S90prcchk Start Price Checker
S90prcvrf.bat S90prcvrf Start Price Verifier
S90sprcvrf.bat S90sprcvrf Start Sale Price Verifier
S90promovrf.bat S90promovrf Start Promotion Verifier
K05ldmmgr.bat K05ldmmgr Stop Label Data Manager
K07fda.bat K07fda Stop Failure Detection & Analysis
K10bedchk.bat K10bedchk Stop Bedcheck
k11extdi.bat K11extdi Stop Extended Data Interface
k12bridge.bat K12bridge Stop the PLU Bridge
k13plurdr.bat K13plurdr Stop PLU Reader
k15prcchk.bat K15prcchk Stop Price Checker
K20prcvrf.bat K20prcvrf Stop Price Verifier
K21sprcvrf.bat K21sprcvrf Stop Sale Price Verifier
K22promovrf.bat K22promovrf Stop Promotion Verifier
k25sched.bat K25sched Stop Data Scheduler
K27stat.bat K27stat Stop Status Tag Manager
K30cbsmgr.bat K30cbsmgr Stop CBS Manager
K35tblmgr.bat K35tblmgr Stop Table Manager
K45lm.bat K45lm Stop Log Monitor
K50logger.bat K50logger Stop the Logger

D-4 Customizing the DecisioNet System
Label Data Manager
The Label Data Manager tracks changes to the selected EPL Table
record fields (Label Data Maintenance Configuration screen - PLU
Number, Price Level, Serial Number, Measure, Unit of Measure,
and/or Package Size) and PLU file description field changes. It uses
this information to create an ASCII, comma-separated, print files that
can be used to print SmarTalker labels.
How the print process is implemented depends on the print
application and the type of printer used at your store. This section
describes the available configuration options and provides a sample
ASCII, comma-separated print file.
Setting the Granularity and Records Number Options
These options are used when tracking changes to the PLU File
description field. The EPL Information Messaging System Package
must be installed to have this extended LDM functionality. To change
these options from the system default settings, edit the Label Data
Manager section of the basesw.cfg file. This file is in the
/appl/epl/data directory on a default DecisioNet UNIX system and in
the \epl\data directory on a default DecisioNet Windows NT system.
#################################################
#LABEL DATA MANAGER
#################################################
#An integer value which designates the elapsed time (seconds) between
#accesses of the PLU File to determine the descriptions which have changed
# [0]
"LDM_GRANULARITY",300
#Designates the number of EPL records processed at one time when description
#changes are checked. [100]
"LDM_RECORDS_NUMBER",100
The first parameter is the time interval (in seconds) between the times
LDM checks the PLU file for description field changes.

Customizing the DecisioNet System D-5
The second parameter specifies the maximum number of records LDM
reads at one time when checking for description field changes. The
larger this number the faster LDM performs the checks. However,
LDM reads this number of records into memory, so more memory is
required for larger values.
LDM Parameters in the Application Configuration File
The parameters set using the Label Data Manager configuration screen
in EPL Administration are in the esappl.cfg file. The following list
identifies the default parameters. Changes should only be made using
the configuration screen.
"LDI_DBIT_FLAG", "ALL"
"MAX_QKPRINT_FILES", 5
"MAX_CHGPRINT_FILES", 5
"MAX_ALLPRINT_FILES", 5
"MAX_SELPRINT_FILES", 5
"MAX_DATPRINT_FILES", 5
The following parameter is set when the EPL Information Messaging
System Package is installed to tell the system the extended LDM
functionality is present. This parameter should not be edited and
changed.
LDM_INSTALLED,1
The following parameters identify the names and locations of the start
script and stop script files and whether the start and stop scripts are
enabled for printing. In a DecisioNet Windows NT system, these files
must be created to meet your system-specific printer requirements. In a
DecisioNet UNIX system, default shell script files are provided and
must be modified to meet your system-specific printer requirements.
The enable options are set using the Label Data Maintenance screen in
EPL Maintenance application. These parameters should only be
changed through this screen
"LDI_START_SCRIPT", "C:\epl\bin\prescript.bat"
"LDI_STOP_SCRIPT", "C:\epl\bin\postscript.bat"
"LDI_START_ENABLED", 0
"LDI_STOP_ENABLED", 0

D-6 Customizing the DecisioNet System
Prescript and Postscript Files
The following two shell script files, prescript.sh and postscript.sh, are
default entries in a DecisioNet UNIX system. They are both in the
/appl/epl/bin/ directory. These files can be modified for system-
specific printing requirements.
prescript.sh
#!/usr/bin/ksh
echo "Pre-Prosessing Script"
postscript.sh
#!/usr/bin/ksh
#NOTE: This script now supports synchronous USER input/output control - 4/18/96.
echo "Post-Processing Script"
echo "The file is $1"
echo "The field is $2"
# This will cause the $1 input file to be sorted on label TYPE.
sortbyfield.sh $1 5 sorted.out n
Label Data Manager - Print File layout
The information in the sample print files below is based on the
following data.
Field Symbol Type Size
Item Number PLU alphanumeric 13
Price Level LVL numeric 2
Location LOC numeric 12
Serial Number SN alphanumeric 8
EPL Type TYPE numeric 2
Measure MEAS numeric 4
Unit of Measure UMEAS alphanumeric <=15
Package Size PKGSIZE alphanumeric 8
Description DESC alphanumeric <=30

Customizing the DecisioNet System D-7
Field Symbol Type Size
Case Size CASE alphanumeric 8
Brand BRAND alphanumeric 5
Note: The header identifies the LDM print type, date, time, and
number of records in the file.
[ALLPRINT 97/02/11 18:00:22 00000003 ]
PLU,0000000001111,LVL,00,LOC,Isle#1,SN,00054321,TYPE,01,MEAS,0
001,UMEAS,0001,PKGSIZE,1,DESC,Test Item
1111,CASE,024,BRAND,Brand x
PLU,0000000002222,LVL,00,LOC,Isle#2,SN,00054322,TYPE,01,MEAS,0
001,UMEAS,0001,PKGSIZE,1,DESC,Test Item
2222,CASE,024,BRAND,Brand y
PLU,0000000003333,LVL,00,LOC,Row#22,SN,00054323,TYPE,01,MEAS,0
001,UMEAS,0001,PKGSIZE,1,DESC,Test Item
3333,CASE,024,BRAND,Brand z
[QWKPRINT 97/02/13 14:37:12 00000004 ]
PLU,0000000001111,LVL,00,LOC,Isle#1,SN,00054321,TYPE,01,MEAS,0
001,UMEAS,0001,PKGSIZE,1,DESC,Test Item 1111,CASE,024,BRAND,
Brand x
PLU,0000000002222,LVL,00,LOC,Isle#2,SN,00054322,TYPE,01,MEAS,0
001,UMEAS,0001,PKGSIZE,1,DESC,Test Item
2222,CASE,024,BRAND,Brand y
PLU,0000000003333,LVL,00,LOC,Row#22,SN,00054323,TYPE,01,MEAS,0
001,UMEAS,0001,PKGSIZE,1,DESC,Test Item 3333,CASE,024,BRAND,
Brand z
PLU,0000000004444,LVL,00,LOC,Isle
4,SN,00054324,TYPE,01,MEAS,0001,UMEAS,0001,PKGSIZE,1,DESC,Test
Item 4444,CASE,024,BRAND, Brand w

D-8 Customizing the DecisioNet System
Promotional Message Verifier
When the optional EPL Information Messaging System package is
installed, the Promotional Message Verifier starts with the other EPL
applications. The Promotional Message Verifier ensures that the
SmarTalkers accurately display promotions by comparing the
promotion information in the EPL Item table against the promotion
information in the PLU table. In a default system, a comparison is
made every 60 minutes. To change the timing, edit the start scripts and
change the espromovrf options to meet your requirements.
Changing the Promotional Message Verifier Time Interval
The default time is 60 minutes in the S90promovrf.bat file in the
Windows NT \epl\bin\scripts directory. Edit the batch file and set the
time frame to the desired length.
@echo off
echo Starting Promotional Message Verifier
if "%1" == "startservice" goto startservice
start /min ..\espromovrf -r 60
goto finish
:startservice
..\startsrv svpromovrf
:finish
The default time is 60 minutes in the S90promovrf script in the
UNIX /epl/bin/scripts directory. Edit the batch file and set the time
frame to the desired length.
echo Starting Promotional Message Verifier
espromovrf -r 60 > $ESCONFIGDIR/ espromovrf.out 2>&1 &

Customizing the DecisioNet System D-9
The syntax and options for espromovrf are as follows:
Syntax espromovrf [-fv?] [-s<seconds>] [-r<minutes>]
where:
-? Displays release information and available options
-v Verbose mode: displays messages to standard output
-f Forces promotion updates to all tags regardless of
mismatch status
-s<x> Sets rate of promotion verification in seconds
-r<x> Sets rate of promotion verification in minutes
Examples:
• Start promotion verifications every 30 seconds
espromovrf -s30
• Start promotion verifications every 30 minutes
espromovrf -r30

D-10 Customizing the DecisioNet System
External Data Interface (with AMS)
When the optional EPL Information Messaging System package is
installed, the External Data Interface starts with the other EPL
applications. The External Data Interface audits price changes from the
scheduler and ensures that the SmarTalkers accurately display
promotions by comparing the promotion information in the EPL Item
table against the promotion information defined by the IDX (item type)
in the AMS configuration file (default file name = AMSCFG.TXT) and
user data provided by the PLU reader. The esextdi process also looks
for EDIMOD files to process and applies the PROMO data contained in
these files to the appropriate SmarTalkers by PLU number, price level,
and location.
In a default system, EDIMOD files are looked for every five minutes
(-s300). To change the timing, edit the start scripts and change the
esextdi sleep time option (-s<seconds>) to meet your requirements.
Changing the External Data Interface Time Interval
The default time is 300 seconds (5 minutes) in the S55extdi.bat file
in the Windows NT \epl\bin\scripts directory. Edit the batch file
using the –s option to set the time frame to the desired length.
@echo off
echo Starting EPL External Data Interface Application
if "%1" == "startservice" goto startservice
start /min ..\esextdi
goto finish
:startservice
..\startsrv svextdi
:finish
The default time is 300 seconds (5 minutes) in the S55extdi script in
the UNIX /epl/bin/scripts directory. Edit the batch file using the –s
option to set the time frame to the desired length.
echo Starting EPL External Data Interface
esextdi > $ESCONFIGDIR/ esextdi.out 2>&1 &

Customizing the DecisioNet System D-11
The syntax and options for esextdi are as follows:
Syntax esextdi [-?v] [-d<directory>] [-f<file name>] [-k]
[-i<messageIDX>] [-s<seconds>] [-n<retry count>]
where:
-? Displays release information and available options
-v Verbose mode: displays messages to standard output
-d<x> Directory to read EDIMOD files from
-f<x> Name of message configuration file
(default = AMSCFG.TXT)
-i<x> Message IDX: promo index used for PLU item changes
(default = all message IDXs automatic from PLU
reader)
-k Disables promo updates for price changes
-s<x> Sets sleep time in seconds
-n<x> Sets number of retries performed when updating an
EPL
Examples:
• Use a message IDX other then the default index
esextdi –i200
Note: EDI will only update PROMO info for PLU’s of the item type
200, using the IDX 200 data defined in the AMSCFG.TXT file.
• Disable promo updates for price changes
esextdi –k
Note: EDI will only not audit price change messages from the
scheduler.

D-12 Customizing the DecisioNet System
Automated Messaging System
When the optional EPL Information Messaging System package is
installed, the Automated Messaging Program (esams) is available to
automatically build any number of EDIMOD files that contain
information based on user supplied parameters. These EDIMOD files
can then be processed by the External Data Interface which applies the
PROMO data contained in the EDIMOD files to the SmarTalkers.
These user parameters include AMS configuration files, message IDX,
user files (list of PLUs), and apply date.
Running the Automated Messaging Program
Create all AMS configuration and user files to be processed. The
contents of these files must be based on specific customer
requirements. The AMS program can then be run to create EDIMOD
files for processing by the External Data Interface (EDI) at the
appropriate time, by placing them in the EPL data directory or the
directory specified by the –d option when the EDI was started. The
AMS program can then run using the appropriate parameters to create
the proper EDIMOD files for updating SmarTalker PROMO data.
The syntax and options for esams are as follows:
Syntax esams [-?v] [-f<config file>] [-p<user file>] [-i<messageIDX>]
[-t<time>]
where:
-? Displays release information and available options
-v Verbose mode: displays messages to standard output
-f<x> Name of message configuration file
(default = AMSCFG.TXT)
-p<x> Process all items in user file
(default = all in EPL table)
-i<x> Message IDX: specific promo index for items

Customizing the DecisioNet System D-13
(default = determine indexes automatically)
(999 = OVERRIDE all other indexes)
(911 = match on LOCATION in EPL table)
-t<x> Date and time (YYYYMMDDHHMM) to apply promo
data to EPLs
(default = apply promo data immediately)
Examples:
• Use a configuration file other then the default file
esams –fAMSCFGNEW.TXT
• Process only selected items in user file
esams –pBOGOPLUS.TXT
• Use a message IDX other then the default index
esams –f999
• Date and time for EDI to apply promotion data
esams –t199906132400
Note: Each example will create a separate EDIMOD.999 file. Where
999 is a number from 1 to (DEFAULT_MAX_MOD_FILES-1) defined
dynamically by esams. [#DEFINE DEFAULT_MAX_MOD_FILES
1000].

D-14 Customizing the DecisioNet System
Price Verifier
When the optional EPL Price Redundancy package is installed, the
Price Verifier starts with the other EPL applications. The Price Verifier
ensures that the SmarTalkers accurately display prices by comparing
the price information in the EPL Item table against the price
information in the PLU table. In a default system, a comparison is
made every 60 minutes. To change the timing, edit the start scripts and
change the esprcvrf options to meet your requirements.
Changing the Price Verifier Time Interval
The default time is 60 minutes in the S90prcvrf.bat file in the
Windows NT \epl\bin\scripts directory. Edit the batch file and set the
time frame to the desired length.
@echo off
echo Starting Price Verifier
if "%1" == "startservice" goto startservice
start /min ..\esprcvrf -r60 -m10000
goto finish
:startservice
..\startsrv svprcvrf
:finish
The default time is 60 minutes in the S90prcvrf script in the UNIX
/epl/bin/scripts directory. Edit the batch file and set the time frame to
the desired length.
echo Starting Price Verifier
esprcvrf -r60 > $ESCONFIGDIR/esprcvrf.out 2>&1 &
The syntax and options for esprcvrf are as follows:
Syntax esprcvrf [-vfdip?] [-m<max price>] [-r<minutes>] [-s<seconds>]
where:

Customizing the DecisioNet System D-15
-? Displays release information and available options
-v Verbose mode: displays messages to standard output
(similar to –d)
-i Enables IPC tracing: prints out debugging
information from the IPC layer
-d Enables debug tracing: prints miscellaneous
debugging information to the standard output
-f Forces price updates to all tags regardless of
mismatch status
-p Permits the Data Scheduler to purge send requests
upon completion. Normally, a request is kept in the
spool file after it has completed. When this option is
set, the ES_NONPURGE flag is be used in the
es_post_senddata function call.
-m<x> Sets maximum price in cents that the price verifier
will verify
-r<x> Sets rate of price verification in minutes
-s<x> Sets rate of price verification in seconds
Note: The -d, -i, and -v options are intended for debugging purposes
only and should not be used in a live store environment.
Examples:
• Start price verifications every 30 minutes
esprcvf -r30
• Start price verifications every 30 seconds
esprcvrf -s30

D-16 Customizing the DecisioNet System
Sale Price Verifier
When the optional EPL Price Redundancy package is installed, the Sale
Price Verifier starts with the other EPL applications. The Sale Price
Verifier ensures that the SmarTalkers accurately display sale prices by
comparing sale price information in the EPL Item table against sale
price information in the PLU table. In a default system, a comparison is
made every 60 minutes. To change the timing, edit the start scripts and
change the essprcvrf options to meet your requirements.
Changing the Sale Price Verifier Time Interval
The default time is 60 minutes in the S90sprcvrf.bat file in the
Windows NT \epl\bin\scripts directory. Edit the batch file and set the
time frame to the desired length.
@echo off
echo Starting Sale Price Verifier
if "%1" == "startservice" goto startservice
start /min ..\essprcvrf -r60
goto finish
:startservice
..\startsrv svsprcvrf
:finish
The default time is 60 minutes in the S90sprcvrf script in the UNIX
/epl/bin/scripts directory. Edit the batch file and set the time frame to
the desired length.
echo Starting Sale Price Verifier
essprcvrf -r60 > $ESCONFIGDIR/essprcvrf.out 2>&1 &

Customizing the DecisioNet System D-17
The syntax and options for essprcvrf are as follows:
Syntax essprcvrf [-vdifp?] [-r<minutes>] [-s<seconds>]
where:
-? Displays release information and available options
-v Verbose mode: displays messages to standard output
(similar to –d)
-f Forces sale price updates to all tags regardless of
mismatch status
-i Enables IPC tracing: prints out debugging
information from the IPC layer
-d Enables debug tracing: prints miscellaneous
debugging information to the standard output
-p Permits Data Scheduler to purge send requests upon
completion. Normally, a request is kept in the spool
file after it has completed. When this option is set, the
ES_NONPURGE flag is be used in the
es_post_senddata function call.
-r<x> Sets rate of sale price verification in minutes
-s<x> Sets rate of sale price verification in seconds
Note: The -d, -i, and -v options are intended for debugging purposes
only and should not be used in a live store environment.
Examples:
• Start sales price verifications every 30 minutes
essprcvf -r30
• Start sales price verifications every 30 seconds
essprcvrf -s30
D-18 Customizing the DecisioNet System
Log Monitor
The Log Monitor is designed to continuously monitor the DecisioNet
error logs, and alert a user to error conditions that require DecisioNet
System maintenance. How often the Log Monitor checks the System
Error Log is configurable by changing the default time option of 30
minutes in the logmon script. Log Monitor software can be configured
to issue alerts for specific error conditions and specify corrective
actions to eliminate the problem. Additional tasks may also be
specified to be performed when an alert occurs. These actions are
specified in the basesw.cfg file. The Log Monitor uses an audible signal
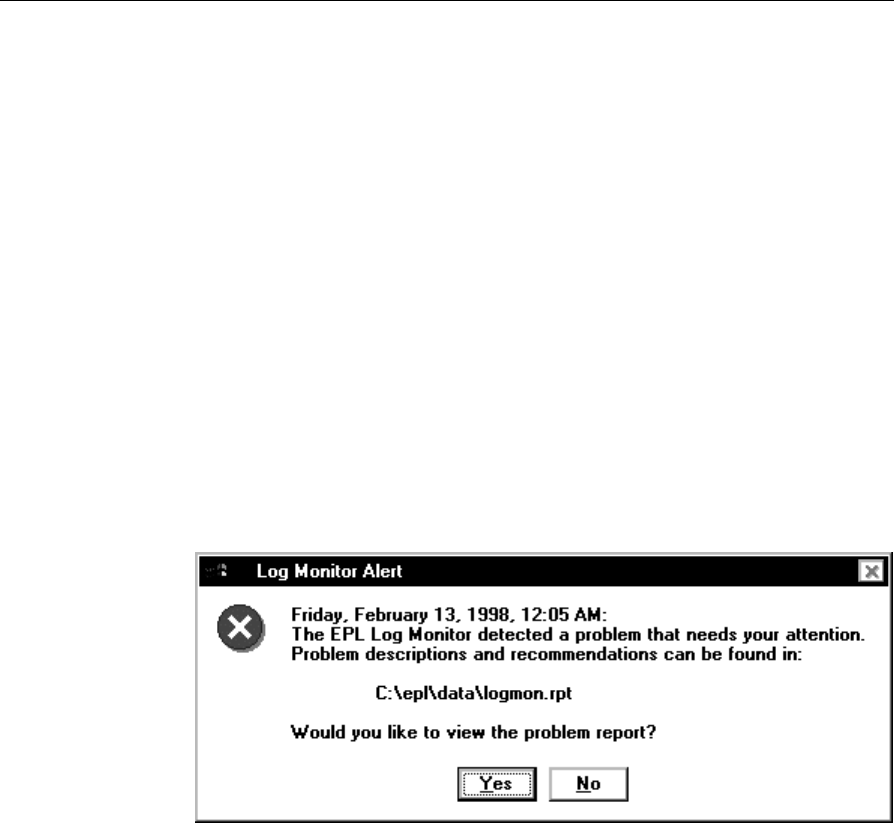
and displays a dialog box on the DecisioNet controller to issue the
alert, and requires acknowledgement of the alert. A problem report is
generated by the Log Monitor, and is saved in plain ASCII text format
to the EPL data directory. An option is provided in the alert dialog box
to immediately view the problem report or you can use an editor to
view it at a later time from the DOS or UNIX prompt.
Log Monitor Report
The Log Monitor report file (logmon.rpt) is written to the directory
pointed to by the ESCONFIGDIR environment variable. Logmon.rpt is
overwritten each time a new alert is generated. However, a history of
Log Monitor reports may be saved if the Log Monitor is invoked with
the -h option. (Each report is archived with a filename of
logmon.rpt.xxx, where xxx is a number from 001 to 999.) The problem

Customizing the DecisioNet System D-19
report consists of three sections: a summary section, a
recommendations section, and a detail section. The summary section
contains information about the severity of the errors that have
occurred, and indicates the urgency with which the user must act to
correct the problem. The summary section should also contain support
contact information. The recommendations section contains
information that helps the user to correct the problem that has been
reported, and the detail section contains the date, time, source ID, PID,
category code, and description of pertinent error log records. An
example problem report follows:
===============================================================================
Log Monitor Problem Report
===============================================================================
Note: Review EPL Logs and user guide for complete information on the following
errors
Summary
-------------------------------------------------------------------------------
EPL Price Verifier logged errors that are causing serious EPL system problems.
Immediate investigation of these problems is recommended. Call NCR field
personnel for assistance.
EPL Failure Detection and Analysis logged errors that are causing serious EPL
system problems. Immediate investigation of these problems is recommended.
Call NCR field personnel for assistance.
EPL Failure Detection and Anaysis logged warnings that may lead to EPL system
problems later. Investigation of these problems is recommended. Call NCR
field personnel for assistance.
Recommendations
-------------------------------------------------------------------------------
Connection status down error message indicates that the CBS Manager does not
know that the CBS is configured. Stop and restart the CBS Manager to correct
this problem.
Communication link not established error message indicates that the CBS is not
responding. Check CBS power and cables. Replace the CBS if the problem
persists.
RF power off error message indicates a problem with the CBS's RF board. If
problem persists, replace the CBS.
RS-485 cable error message indicates a cable integrity problem. Ensure that
there are no cable breaks and that the cable is properly attached.

D-20 Customizing the DecisioNet System
Unconfigured CBS detect good communication link error message indicates that a
CBS was improperly configured or the BASESW.CFG file was modified incorrectly.
Stop and restart the CBS Manager to correct the problem.
Power supply error message may indicate that a power supply is turned off or
that a power cable integrity problem exists. The error may also occur when too
many CBSs are attached to the power supply.
Receive antenna A off error message identifies a problem with receive antenna A
or CBS receive antenna A port. The error may also occur when receive antenna A
is improperly configured using ESADMIN.
Unconfigured receive antenna B error message indicates a hardware configuration
problem. Use the ESADMIN base config menu option to configure antenna B.
Noise level threshold error message indicates a CBS Manager thresholding
problem. Ambient noise in the environment is causing EPL communication
problems. Call your NCR Field Engineer immediately.
Signal level threshold error message indicates a CBS Manager thresholding
problem. Ambient noise in the environment is causing EPL communication
problems. Call your NCR Field Engineer immediately.
Detail
Date Time Source Description
-------------------------------------------------------------------------------
02/16/98 15:03:37 ESPRCVRF Function call es_open_plu called from open_prcvrf
failed. rc = -1108(Unable to establish IPC connection.)
02/16/98 15:16:16 ESFDA Connection status is down for CBS 3
02/16/98 15:17:26 ESFDA Comm link is not established for CBS 3
02/16/98 15:17:42 ESFDA RF power is off for CBS 2
02/16/98 15:21:44 ESFDA RS-485 cable fault detected at CBS 3
02/16/98 15:21:45 ESFDA RF power is off for CBS 2
02/16/98 15:32:05 ESFDA Master CBS link is down
02/16/98 15:38:02 ESFDA EPL communication is closed
02/16/98 15:43:25 ESFDA Unconfigured CBS 2 detected good comm link
02/16/98 15:48:43 ESFDA Unable to open configuration file
02/16/98 16:08:31 ESFDA Power supply B failure detected
02/16/98 16:18:54 ESFDA Receive antenna A failure for CBS 0
02/16/98 16:18:54 ESFDA Unconfigured receive antenna B for CBS 0
02/16/98 16:24:56 ESFDA Noise level threshold for CBS 0 is too high (65)
02/16/98 16:24:56 ESFDA Signal level threshold for CBS 0 is too high (67)
02/16/98 16:36:08 ESFDA EPL battery low error (quantity: 2 of 3)
02/16/98 16:37:08 ESFDA EPL hardware error (quantity: 2 of 3)
02/16/98 16:38:08 ESFDA EPL does not respond to existence bedcheck (quantity:
2of3)

Customizing the DecisioNet System D-21
Log Monitor basesw.cfg File Options
The following Log Monitor options are configurable in the Log
Monitor section of basesw.cfg file.
Log Monitor Editor
#Configure the Log Monitor to use the following editor
#"LOGMON_EDITOR", "editor"
The LOGMON_EDITOR parameter identifies the editor used by Log
Monitor. The editor specified must permit an argument that identifies
the file the user wishes to view. The Log Monitor initiates the editor as
follows:
editor <filename>
User-defined Actions
#User defined actions go here
"LOGMON_ALERTACTION1", "echo SW DOWN > c:\epl\data\STATMOD.001"
"LOGMON_ACKACTION1", "echo SW OK > c:\epl\data\STATMOD.001"
The LOGMON_ALERTACTIONX parameter defines an action that is
performed when an alert occurs. The action may be an executable file,
batch file, or shell script; but can not display messages on the CRT. The
action may be to send a message or file to the host processor, log an
error, or perform some meaningful action in response to the alert.
The LOGMON_ACKACTIONX parameter defines an action that is
performed after a user acknowledges an alert. The action may be to
send a message or file to the host processor, log an error, or perform
some meaningful action in response to the acknowledgement.

D-22 Customizing the DecisioNet System
Changing the Log Monitor Time Interval
The default time is 30 minutes in the S60lm.bat file in the Windows
NT \epl\bin\scripts directory. Edit the batch file and set the time
frame to the desired length by changing the -m option.
@echo off
echo Starting Log Monitor
if "%1" == "startservice" goto startservice
start /min ..\eslogmon -m30 –h10
goto finish
:startservice
..\startsrv svlogmon
:finish
The default time is 30 minutes in the S60lm script in the UNIX
/epl/bin/scripts directory. Edit the batch file and set the time frame to
the desired length by changing the -c option.
echo Starting Log Monitor
eslogmon -m30 –h10 > $ESCONFIGDIR/eslogmon.out 2>&1 &
The syntax and options for eslogmon are as follows:
Syntax eslogmon [-?vna] [-h <integer>] [-m <minutes>] [-s <seconds>]
[-f <pagewidth>]
where:
-? Displays release information and available options
-v Verbose mode: displays messages to standard output
-n No-alert mode: user-defined actions only
-a Disable audible alarm
-h<x> Maintains history of Log Monitor reports <1 - 100>
-m<x> Sets continuous mode interval time in minutes
<0 – 360>
-s<x> Sets continuous mode interval time in seconds
<0 – 360>
-f Specifies page width for Log Monitor report

Customizing the DecisioNet System D-23
Examples:
• Execute at 30-minute intervals and run in verbose mode.
eslogmon -m30 –v
• Execute at 60-minute intervals and maintain history of 10 reports.
eslogmon –m60 -h10
• Execute only once.
eslogmon
An alert may be generated if the Log Monitor is started as a service on
Windows NT; however, the service must be configured as interactive.
DecisioNet applications are set to start as manual services at install
time. To configure the Log Monitor service as interactive, select the
startup button on the Windows NT services dialog box, and click on the
allow service to interact with desktop option. If the Log Monitor service is
not configured as interactive, the service only performs user-defined
actions. If no user is logged in on the Windows NT controller, the
dialog box can not be displayed. Therefore, only an audible alarm is
generated by the Log Monitor. When a user logs in, the dialog box is
displayed, requiring the user to acknowledge the alert. Since the
Windows NT dialog box is system modal, the dialog box remains in
the foreground until the user acknowledges the alert.
An alert may be generated if the Log Monitor is started as a
background process on UNIX. A user may ignore the alert by
switching to another virtual terminal, but another alert is generated at
the next iteration of the Log Monitor.
Report information may be viewed immediately if the user selects
“yes” from the Log Monitor Alert dialog box. Report information is
displayed using the editor that has been configured in the basesw.cfg
file. The report consists of information about problems that occurred
up to the date and time that the alert was acknowledged. The
following iteration of the Log Monitor only detects problems that occur
following the user acknowledgment. If the Log Monitor is restarted,
problems that occurred prior to the user acknowledgment will not be
reported.

D-24 Customizing the DecisioNet System
Log Monitor Configuration File
The Log Monitor configuration file, logmon.cfg, is stored in the
Windows NT \epl\data directory and in the UNIX /appl/epl/data
directory in a default system. The default file is shown in Appendix C.
This file contains user-defined recommendations, and identifies which
errors cause an alert to be generated. Two sections of data may appear
in the logmon.cfg file: an alert criteria section and a corrective
action message section.
The configuration file format is as follows:
Alert Criteria section:
[SOURCE]
SEVERITY, "alert criteria message text"
SEVERITY, "alert criteria message text"
...
Corrective Action section:
ERRNUM, "corrective action message text"
...
SOURCE is the name of any process that logs error messages to the
EPL System Error log, and SEVERITY is any one of the following:
SUCCESS, INFORMATION, WARNING, or ERROR.
For each error logged in the EPL System Error log, the source and
severity are looked up in the alert criteria section of the logmon.cfg
file If a match exists, Log Monitor generates an alert for that error.
ERRNUM is the error number associated with the corrective action
message that follows. If an alert has been generated for a process
name and severity that matches the criteria in section 1, the Log
Monitor looks for a corrective action message that matches the Error
Number associated with the process severity error in section 2. The
corresponding corrective action message is added to the report.

Customizing the DecisioNet System D-25
Orphan Tag Report
In a Windows NT environment, this report is initiated from the EPL
Applications Program Group. In either UNIX environment, the report
must be initiated from the command line. The Orphan Tag Report
provides information about SmarTalkers that have become
disassociated from their PLU items. This can be the result of the
following situation:
• Removing a PLU from the PLU table and not removing or purging
the associated SmarTalker tag from the EPL table.
The actual report has two sections. The first section lists the number of
orphaned tags and the number of orphaned tags de-assigned. The
second section lists number of de-assigned tags and number of de-
assigned tags purged. Additional information in the first section
includes the orphaned tag’s serial number, location, PLU number, and
associated pricing and promotional display data. The second section
identifies the de-assigned tag’s serial number and location.
The two sections in the default report result from DesicioNet using the
esorphan script R1 and R2 options in the orphanrpt.bat file when the
Orphan Tag Report is initiated on a Windows NT system. Modify the
batch file meet your system requirements
In a UNIX environment run the esorphan program from a command
line with the desired options. The esorphan syntax and options are as
follows:
Syntax esorphan [-vrp?] [-R<1:2>] [-m<message>]
where:
-? Displays release information and available options
-v Verbose mode: displays messages to standard output
-r Disassociates orphaned EPL from PLU number in the
EPL table (this option is mutually exclusive with
‘-purge’)
-p Deletes each EPL record that is not associated with a

D-26 Customizing the DecisioNet System
PLU number (this option is mutually exclusive with
‘-remove’)
-R1 Displays current orphan EPL report
-R2 Displays current de-assigned EPL report
-m<message> Sends a promotional message to the EPL. The format
of <message> is reg1/reg2/reg3 where regX is the text
that should be displayed in promotional register X. If
there are any spaces in any of the messages, then
enclose the entire message in quotations (“”).
Examples:
• Display the currently orphaned EPL report.
esorphan -R1
• Display the currently orphaned EPL report and de-assign all
orphaned tags from their associated PLU#.
esorphan -remove -R1
• Display the currently orphaned EPL report, send a promotional
message of all blanks to every orphaned EPL, and remove from
EPL table.
esorphan -remove -m” “ -R1
• Display the currently orphaned EPL report and delete from EPL
table all de-assigned EPLs.
esorphan -purge -R1
In a Windows NT system, modify the orphanrpt.bat file in the
\epl\bin directory.
@echo off
rem
rem This batch file creates an orphan report
rem
esorphan -R1 -R2 > %TEMP%\orphan.rpt
"%SystemDrive%\Program Files\Windows NT\Accessories\wordpad" %TEMP%\orphan.rpt
del %TEMP%\orphan.rpt

Customizing the DecisioNet System D-27
Unattended EPL Backup
This feature can be implemented to automatically backup the EPL file
and the EPL Table to its pre-EPL file format at a specified interval. To
accomplish this, an AT job must be set up on a Windows NT system
and a CRON job must be set up on a UNIX system. Refer to your
Windows NT or UNIX system documentation for information about
setting up AT and CRON jobs. This backup can be performed
manually on a DecisioNet Windows NT system from either the EPL
Applications Programs group or from a DOS prompt. On a DecisioNet
UNIX system EPL Backup can be run manually from the UNIX
prompt.
There are two files associated with the Unattended EPL Backup feature
that can be customized. One file contains the list of files to be backed
up. A default list of files is included during installation. Refer to
Appendix C to see the default list. The second file is a post script that
executes to move the files from the EPL backup directory to the site-
specific backup location. Backup files are first placed in the
\epl\data\backup\<date> directory on a DecisioNet Windows NT
system and in the /appl/epl/data/backup/<date> directory on a
DecisioNet UNIX system. To prevent loss of data records, these files
should be copied to a removable device or second hard disk which can
be performed by the second configurable file posteplbackup. Whether
you are performing the backup automatically from an AT or CRON
job, or manually as described above, the posteplbackup files should be
modified to identify the removable device.
Starting EPL Backup at a DOS or UNIX Prompt
The utility to start EPL Backup is eplbackup. The only option is the
number of days to save backups in the EPL backup directory. If
existing backups exist, files older than the specified number are
deleted from the backup directory. For example, if eplbackup 3 is
used and the date is February 7, 1998; then all backup files before
February 4, 1998 are deleted.

D-28 Customizing the DecisioNet System
Backup File List
This file (eplbackup.ini) is located in the following directories:
Windows NT \epl\data\
NCR UNIX and SCO UNIX /appl/epl/data/
Edit this file to add any new files associated with your environment.
Backup File Location for Windows NT
When you start EPL File Backup from the EPL Applications Programs
group in Windows NT or use eplbackup at a DOS prompt, the
posteplbackup.cmd program is executed to determine where to copy
the backed up files after eplbackup places the backup files in the
\epl\data\backup\mmddyyyy directory.
In a Windows NT system, modify the posteplbackup.cmd file in the
\epl\bin\ directory to identify where to copy the backed up files.
@echo off
REM
REM This is a template for what this script does
REM This script accepts a single argument which identifies the directory
REM where all the backup files have been placed.
REM
REM The command below copies all the backup files to the a: drive
REM copy %1\*.* a:
REM
REM

Customizing the DecisioNet System D-29
Backup File Location for UNIX
When you use eplbackup to start EPL File Backup at a UNIX prompt,
the posteplbackup script is executed to determine where to copy the
backed up files after eplbackup places the backup files in the
/appl/epl/data/backup/mmddyyyy directory.
In a UNIX system, modify the posteplbackup script file in the
/appl/epl/bin/ to identify where to copy the backed up files.
!/bin/ksh
#
# This scripts accepts a single argument which identifies the directory
# where all the data files have been backed up to.
#
# The command below makes a cpio copy of the backup files to tape. In this #
example, it is assumed that the tape device is /dev/rmt/c0t3d0s0. Before #
copying the files to the tape drive, the file are compressed.
#
# Compress $1/*
# Find $1 –print |cpio –ocvB >/dev/rmt/c0t3d0s0
#
#
exit 0

D-30 Customizing the DecisioNet System
Failure Detection and Analysis
The Failure Detection and Analysis (FDA) software can be used as a
background service to report on the condition of DecisioNet System
hardware. FDA is one of the applications on the optional EPL System
Information Package.
When the FDA is installed, it starts along with the other EPL
applications, runs continuously, and logs errors as they occur. Reports
are sent to the console and placed in the EPL System Error Log. In a
Windows NT system, FDA also logs error conditions to the Windows
NT Event Log. Included with these entries are probable cause and
recommended action information.
Changing the Failure Detection and Analysis Time Interval
The default time is 30 minutes in the S55fda.bat file in the
Windows NT \epl\bin\scripts directory. Edit the batch file and set the
time frame to the desired length.
@echo off
echo Starting Failure Detection/Analysis
if "%1" == "startservice" goto startservice
start /min ..\esfda –m30
goto finish
:startservice
..\startsrv svfda
:finish
The default time is 30 minutes in the S55fda script in the UNIX
/epl/bin/scripts directory. Edit the batch file and set the time frame to
the desired length.
echo Starting Failure Detection/Analysis
esfda -m30 > $ESCONFIGDIR/ esfda.out 2>&1 &

Customizing the DecisioNet System D-31
The syntax and options for esfda are as follows:
Syntax esfda [-?v][-m minutes][-s seconds] [-r] [-x] [-y]
[-f filepath]
where:
-? Displays release information and available options
-v Verbose mode: displays messages to standard output
-m<x> Continuous mode interval time <0 - 360 minutes>
-s<x> Continuous mode interval time <0 - 360 seconds>
-r Reports on both hardware and software
-x Reports on hardware only
-y Reports on software only
-f<x> Saves report in file specified
Examples:
• Start hardware and/or software check every 30 minutes
esfda -m30
• Start hardware and/or software check every 30 seconds
esfda -s30

D-32 Customizing the DecisioNet System
Status Tag Manager
The DecisioNet Status Tag Manager is designed to report the status of
the DecisioNet System or any other retail store system by displaying
system status information on a group of SmarTalker tags. Status tags
may be placed strategically within the retail establishment so that key
personnel are aware when system maintenance is necessary. Status
tags must be within communication range of the DecisioNet System.
The Status Tag Manager also permits paging functions to be
accomplished within the store environment.
Up to one hundred SmarTalkers may be configured to display system
status information, but must not be allocated in the EPL Table. An
application may register a system problem with the Status Tag
Manager by writing status information to a plain ASCII text file
(defined in status.cfg). The Status Tag Manager responds by
updating the appropriate status tags. When the Status Tag Manager is
used with the Log Monitor, alerts may be sent to store personnel when
such a problem occurs.
The Status Tag Manager supports three modes of operation:
immediate, scheduled, and auto. Each status tag must be configured to
operate in one of these modes.
Immediate Mode (I):
A status tag displays messages upon demand. No scheduling or
automatic resetting of the status tag is performed. The SmarTalker’s
button may be used to reset the status tag to the prior state.
Scheduled Mode (S):
A status tag displays messages upon demand. The SmarTalker
displays the message for a configurable period of time and then
displays a default message when the specified time expires. The default
message is not sent to the status tag until the time expires. The
SmarTalker’s button may be pressed to reset the status tag to the
default message.
Customizing the DecisioNet System D-33
Auto Mode (A):
A status tag displays messages upon demand. The SmarTalker
displays the message for a configurable period of time and then
displays a default message when the specified time expires. The default
message is sent to the status tag before the time expires, and it retains this
information even when the DecisioNet System is turned off. In the case of
reporting the status of the DecisioNet System, the Status Tag Manager
updates the status tags even if the DecisioNet System suffers
catastrophic problems such as a complete power failure. The
SmarTalker’s button has no effect.
Displaying Status Information
The Status Tag Manager displays alphanumeric information on one or
more SmarTalkers. An application may configure the Status Tag
Manager to display messages on multiple SmarTalkers by allocating
more than one SmarTalker in the status.cfg file. For example, a back
office application may notify the manager of a point of sale terminal
failure by displaying a message on multiple SmarTalkers as shown in
the following illustration.

D-34 Customizing the DecisioNet System
Status Tag Configuration File Parameters
The Status Tag Manager configuration file, status.cfg, is in the
following directories on a default system. Refer to Appendix C for a
listing of the default status.cfg file.
Windows NT \epl\data\
NCR UNIX and SCO UNIX /appl/epl/data/
This file identifies which SmarTalkers are used to display system
status information, identifies the filenames of the status files, mode of
operation, and defines default system status messages and timeout
periods. The configuration file format is as follows:
[System name or alias]
MODE, “I|S|A”
FILENAME, “fully qualified pathname”
EPLID, "eplid1 eplid2 …"
DEFAULT_MSG, "message"
DEFAULT_UPMSG, "message"
DEFAULT_DOWNMSG, "message"
IDLETIME, interval time in minutes
[System name or alias]
…
The following table defines each parameter or keyword in the status
configuration file:
Parameter (Keyword) Description
System name or alias This must be a unique string of characters
to identify the system that the Status Tag
Manager is representing. “EPL SYSTEM”
must be used to identify the EPL system
status tags. EPL system status tags always
operate in mode A, and are automatically
updated to reflect the status of the EPL
system.
MODE I - immediate mode
S - scheduled mode
A - auto mode

Customizing the DecisioNet System D-35
Parameter (Keyword) Description
(Refer to the “Status Tag Manager”
introduction section for details.)
FILENAME The name of the application’s Status file.
Each application must specify its own
Status file filename in the status.cfg file.
FILENAME is case sensitive in UNIX . If
FILENAME is not specified, a default file,
STATMOD.XXX (where XXX = status file
name), must be used to update the status
tag. If you do not want to change the
status tag’s contents, do not specify a
FILENAME.
EPLID The EPLID keyword identifies the
SmarTalkers that the Status Tag Manager
uses to display status information for the
specified System name or alias. These
SmarTalkers must not be referenced in
the EPL Table. If no EPL IDs are specified
in the status.cfg file, the Status Tag
Manager does nothing.
DEFAULT_MSG If you want a status tag to always
displays the same information regardless
of the target system’s status, use the
DEFAULT_MSG keyword to identify the
default message text. If the
DEFAULT_MSG keyword is used, the
DEFAULT_UPMSG and
DEFAULT_DOWNMSG keywords are
ignored for that System name or alias.
DEFAULT_DOWNMSG A Status file normally contains status
information to display on the status tags.
However, if the Status file is present but
empty, or if it contains invalid message
data, a default message is displayed. The

D-36 Customizing the DecisioNet System
Parameter (Keyword) Description
DEFAULT_DOWNMSG keyword
specifies the default message to display
when the target system is in an error
state. If the DEFAULT_DOWNMSG
keyword is not specified, the Status Tag
Manager uses “SYS DOWN” as the
default error message.
DEFAULT_DOWNMSG must be 8
alphanumeric characters or less.
DEFAULT_UPMSG A status tag is initialized with
DEFAULT_UPMSG text. Status tag
initialization only occurs when the Status
Tag Manager starts up. If the
DEFAULT_UPMSG is not specified in the
status.cfg file, the Status Tag Manager
uses “SYS UP” as the default message.
IDLETIME This keyword is used for Modes S and A,
and defines the period of time that the
status tag displays a message before
updating the tag with
DEFAULT_DOWNMSG information. The
minimum value for IDLETIME is 60
seconds.
Sample Status file:
The following status.cfg file requires an application to generate
REGSTAT.001, REGSTAT.002, and REGSTAT.003 files to properly
display point of sale register status information on the status tags. The
EPL system status tags display “EPL SYSTEM DOWN” if the EPL
system goes down. The PAGER tags, 129e8 and 10b9a5, display status
information from the REGSTAT.004 file until their buttons are pressed,
at which time they display a “NO MSG” message.

Customizing the DecisioNet System D-37
Since REGSTAT.001 and REGSTAT.002 messages are always the same,
it is not necessary for the application to generate these files. Status tags
display REGSTAT.003 contents unless the specified IDLETIME expires
before REGSTAT.003 contents are refreshed. Refreshing the contents of
REGSTAT.003 restarts the timer. If the IDLETIME expires before
REGSTAT.003 is refreshed, the status tags display “POS SYSTEM
DOWN”.
[EPLMSG1]
MODE, I
EPLID,14e26
DEFAULT_MSG, "EPL"
[EPLMSG2]
MODE, I
EPLID,10b98c
DEFAULT_MSG, "SYSTEM"
[EPL SYSTEM]
MODE, A
EPLID,10ba2b
DEFAULT_UPMSG, "STABLE"
DEFAULT_DOWNMSG, "DOWN"
IDLETIME, 600
[POSMSG1]
MODE, I
FILENAME, “c:\epl\data\regstat.001”
EPLID,1b324
DEFAULT_MSG, "POS"
[POSMSG2]
MODE, I
FILENAME, “c:\epl\data\regstat.002”
EPLID,10ba77
DEFAULT_MSG, "SYSTEM"
[POSMSG3]
MODE, S
FILENAME, “c:\epl\data\regstat.003”
EPLID,1a12e
DEFAULT_UPMSG, "STABLE"
DEFAULT_DOWNMSG, "DOWN"
IDLETIME, 300
[PAGER]
MODE, I
FILENAME, “c:\epl\data\regstat.004”
EPLID, “129e8 10b9a5”

D-38 Customizing the DecisioNet System
DEFAULT_MSG, “NO MSG”

Customizing the DecisioNet System D-39
Starting the Status Tag Manager
The Start Status Tag Manager batch file (S52stat.bat) is in Windows
NT \epl\bin\scripts directory.
@echo off
echo Starting Status Tag Manager
if "%1" == "startservice" goto startservice
start /min ..\esstat
goto finish
:startservice
..\startsrv svstat
:finish
The Start Status Tag Manager script file (S52stat) is in the UNIX
/appl/epl/bin directory.
echo Starting Status Tag Manager
esstat > $ESCONFIGDIR/esstat.out 2>&1 &
Creating a Status File
To display information on an EPL, an application creates status files
that contain the desired alphanumeric information. The filename for
each status file is configured in the status.cfg file. Refer to “EPL Status
Tag Manager Configuration File” in Appendix C for additional
information.
The status files must be in plain ASCII text and have no more than
eight alphanumeric characters. If more than eight characters are
specified, only the first eight characters are displayed on the EPL.
Escape sequences are used to display the symbols in the following
table. Use a caret, left bracket, and equal “^[=”to specify the ESC
character, followed by the value, and terminated with a capital D.
Multiple values may be included in the same escape sequence,
separated by a semi-colon.
For example: ^[=1;4;5D specifies bar, triangle, and square symbols.

D-40 Customizing the DecisioNet System
Symbol Description Value
|Vertical bar 1
/ Slash at right/bottom side 2
/ Slash at left/top side 3
Triangle (or up arrow) 4
■Square 5
Cents C
Down arrow D
Euro E
Horizontal bar H
Left arrow L
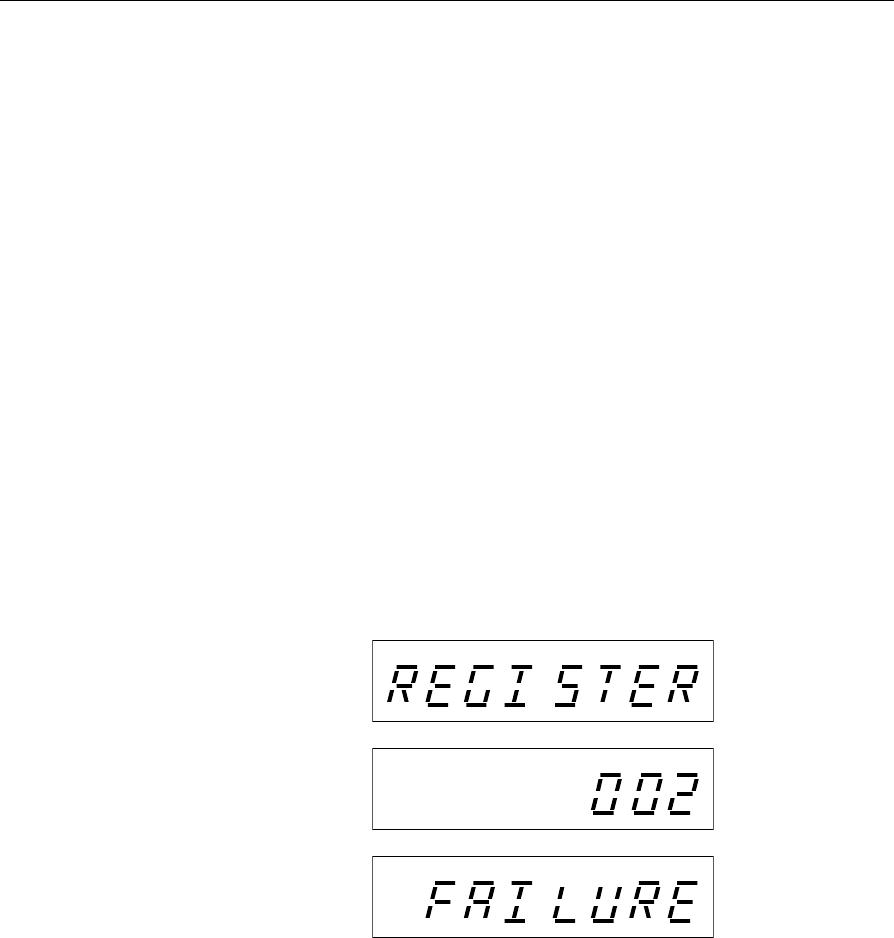
The following status files are the same files used in the sample
status.cfg file described in the “Sample Status File” section. When the
back office application is notified that POS system Register 2 has failed,
it writes the following data to the REGSTAT.001, REGSTAT.002, and
REGSTAT.003 status files. The Status Tag Manager updates the status
tags as shown in illustration in the ”Displaying Status Information”
section.
REGSTAT.001 file contents:
REGISTER
<EOF>
REGSTAT.002 file contents:
002
<EOF>
REGSTAT.003 file contents:
FAILURE
<EOF>

Customizing the DecisioNet System D-41
Windows NT Automatic Services
All DecisioNet non-user interface applications can be started as
services, either manually or automatically, as described in the section
“Configuring Windows NT Services” in Chapter 8. When started
manually at a DOS prompt or within the Windows NT Control Panel
Services dialog, command line options may be specified. The available
options are described in previous sections of this appendix.
For an application to start as an automatic service with non default
options, it must have an entry in the basesw.cfg file. If an application
does not have an entry in the basesw.cfg file, it will start with the
default options. The following syntax is used:
“SV<APPNAME>_CMDLINE”, “-option1 - option2”
The following applications require entries in the basesw.cfg file. Each
application’s default sleep time (the time an application waits between
each execution of the application process) is also shown.
"SVFDA_CMDLINE", "-m30"
"SVLOGMON_CMDLINE", "-m30 –h10"
"SVBRIDGE_CMDLINE","-s60"
"SVPRCVRF_CMDLINE","-r60"
"SVSPRCVRF_CMDLINE","-r60"
"SVPROMOVRF_CMDLINE","-r60"
"SVEXTDI_CMDLINE","-s300"
The following applications are discussed in Chapter 8 and do not
require an entry in the basesw.cfg file.
• EPL Bedcheck
• EPL Logger
• EPL Bridge
• EPL Standalone PLU Reader
• EPL Status Tag Manager
• EPL Label Data Manager

D-42 Customizing the DecisioNet System
The following table lists the applications and options that are typically
used as automatic services. To view the complete list of options for a
specific application, enter es<APPNAME> -? at the DOS or UNIX
command line.
Application Application Name Options Description
Failure Detection
and Analysis FDA -m<x>
-s<x> Sleep time in minutes
Sleep time in seconds
Log Monitor LOGMON -f<x>
-h<x>
-m<x>
-s<x>
Specify Log Monitor report page width
Maintain history of Log Monitor reports
Sleep time in minutes
Sleep time in seconds
EPL Bridge BRIDGE -n<x>
-d<x>
-s<x>
Number of retries to be performed when
updating a tag
Directory where PLUMOD files are read
Sleep time in seconds
Price Verifier PRCVRF -f
-p
-m<x>
-r<x>
-s<x>
Force price changes to all tags
Spooled price changes are purged by
data scheduler
Set maximum price in cents that the
price verifier will verify
Sleep time in minutes
Sleep time in seconds
Sale Price Verifier SPRCVRF -f
-p
-r<x>
-s<x>
Force sale prices to all tags
Spooled price changes are purged by
data scheduler
Sleep time in minutes
Sleep time in seconds
Promotional
Message Verifier PROMOVRF -f
-r<x> Force promo updates to all tags
Sleep time in minutes

Customizing the DecisioNet System D-43
Application Application Name Options Description
-s<x> Sleep time in seconds
External Data
Interface EXTDI -d<x>
-f<x>
-i<x>
-k
-s<x>
-n<x>
Directory where EDIMOD files are read
Filename = name of message
configuration file (default =
AMSCFG.TXT
MessageIDX (promo index) used for
PLU price changes (default = all
messageIDXs automatic from PLU
reader)
Disable promo updates for price changes
Sleep time in seconds
Number of retries to be performed when
updating the tag
CBS Manager CBSMGR -a
-b
-B
-c
-s
-x
-z
ACKs will be simulated from EPLs
ACK will be simulated from even
numbered EPLs
Permit broadcasting of all commands
CBS communication will be simulated
Open in SNW Master mode
Bedcheck simulation mode
Do not generate master clock

D-44 Customizing the DecisioNet System
UNIX Automatic Restart
The DecisioNet System in the UNIX environment has a script file
located in the /appl/epl/bin/ directory that runs every 30 minutes via
CRON and starts the following EPL applications that may have been
stopped.
• Logger
• CBS Manager
• EPL Scheduler
• Table Manager
Edit this file to add or delete EPL applications for your system-specific
requirements.
#############################################################################
#
# File: eplcron.sh
#
# Copyright: Copyright (c) NCR Corp., 1996
#
# Author: ncr_cmh
#
#############################################################################
# Change History:
# DATE PERSON MODIFICATION
# ---- ------- ------------
#
#############################################################################
epldir=`pkgparam eplbaseap BASDIR`
epluser=`pkgparam eplbaseap EPL_USER`
pid=`ps -e | awk ' $4 == "eslogger" { print $1 }'`
if [ -z "$pid" ]
then
su - $epluser -c "cd $epldir/bin;umask 007;scripts/S00logger &"
fi
pid=`ps -e | awk ' $4 == "escbsmgr" { print $1 }'`
if [ -z "$pid" ]
then
su - $epluser -c "cd $epldir/bin;umask 007;scripts/S10cbsmgr &"
fi
pid=`ps -e | awk ' $4 == "essched" { print $1 }'`
if [ -z "$pid" ]
then

Customizing the DecisioNet System D-45
su - $epluser -c "cd $epldir/bin;umask 007;scripts/S15sched &"
fi
pid=`ps -e | awk ' $4 == "estblmgr" { print $1 }'`
if [ -z "$pid" ]
then
su - $epluser -c "cd $epldir/bin;umask 007;scripts/S05tblmgr &"
fi