NCR RSD Atlanta 7710GA2 Electronic Pricing Transmitter User Manual Chapter 10
NCR Corporation, RSD - Atlanta Electronic Pricing Transmitter Chapter 10
Contents
- 1. Users Manual Cover
- 2. Users Manual Front
- 3. Users Manual Glossary
- 4. Users Manual Index
- 5. Users Manual Appendix A
- 6. Users Manual Appendix B
- 7. Users Manual Appedix C
- 8. Users Manual Appedix D
- 9. Chapter 1
- 10. Chapter 2
- 11. Chapter 3
- 12. Chapter 4
- 13. Chapter 5
- 14. Chapter 6
- 15. Chapter 7
- 16. Chapter 8
- 17. Chapter 9
- 18. Chapter 10
- 19. Chapter 11
- 20. Chapter 12
- 21. Chapter 13
Chapter 10
SmarTalker and Rail Installation
SmarTalkers
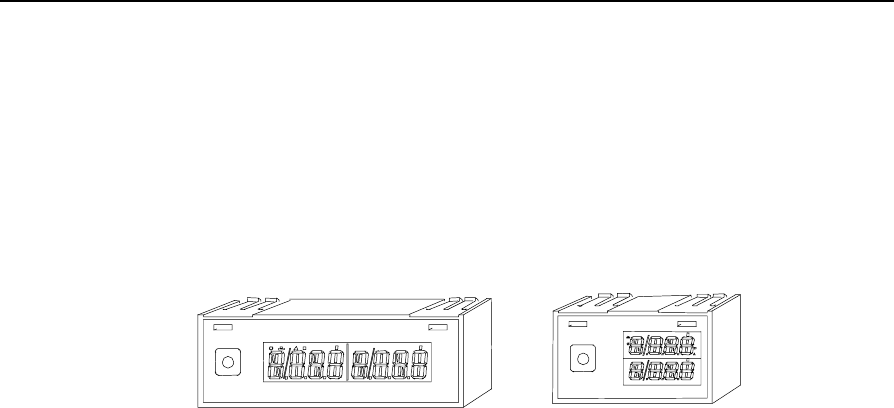
There are two types of SmarTalkers; the 8-character standard tag and
the 8-character small tag as shown in the following illustration.
1408
7
8-Character Standard
SmarTalker
8-Character Small
SmarTalker
This section provides information about:
• Attaching the rails and/or clips
• Attaching the SmarTalker tags
Attaching the Rail
Key Points
When installing a shelf rail, keep in mind that the angle the
SmarTalker will be viewed at is very important. Your completed
installation should provide the best combination of visibility and lack
of glare.
The following table provides optimum viewing angles for SmarTalker
tags. The angles are based an average person’s eye height of 1.59 m
(62.6 in.) and average shelf-viewing distance of .91 m (36 in.).
10

10-2 SmarTalker and Rail Installation
Shelf Height (in.) Optimum Angle Up (+) or Down (-) from Vertical
6.0 +57.0
12.0 +54.2
18.0 +51.0
24.0 +47.2
30.0 +42.7
36.0 +37.3
42.0 +30.9
48.0 +23.4
54.0 +14.8
60.0 +5.4
66.0 -4.2
72.0 -13.3
78.0 -21.5
84.0 -28.6
Tools for Each Installer
Tape Measure, minimum length 25 ft. 1
Large, wide-blade flat-head screwdriver with
round (not square shank) 1
EPL Puller (removal tool) for SmarTalker tags,
NCR Kit # 7710-K298-V001 (5 per kit) 1
16 oz. Metal carpenter’s claw hammer (for
hammering shelf rail pins) or fencing tool (an
integrated hammer with nail pulling pliers)
1
Nail pulling pliers or “nippers” (for shelf pin
removal) 1
Cloth or leather tool pouch with multiple
pockets (for holding small shelf rail parts) 1
Knee Pads 1 pair

SmarTalker and Rail Installation 10-3
Site Installation Tools
Band saw* or Hacksaw (not a wood saw) 1
Miter Box (for use with hacksaw) 1
Utility Knife (for cleaning cut ends of shelf
rails) 1
Tools Per Store (for On-Going Maintenance)
Band saw* or Hacksaw (not a wood saw) 1
Miter Box (for use with hacksaw) 1
Utility Knife 1
Large, wide-blade flat-head screwdriver with
round (not square) shank 1
EPL Puller (removal tool) for SmarTalker tags,
NCR Kit # 7710-K298-V001 (5 per kit) 2 kits
16 oz. Metal carpenter’s claw hammer 1
* A band saw is easier to use, but a hacksaw can be used instead.
10-4 SmarTalker and Rail Installation
Attaching SmarTalkers to C-channels
A SmarTalker can be installed into a rail that is installed into a shelf’s
C-channel. The rail may be either a fixed-angle rail or an adjustable-
angle rail.
To install a rail into a shelf’s C-channel, insert the bottom lip of the rail
into the C-channel and press the top lip into the top of the C-channel.
Flexing the mounting portion of the rail may help. Also, a tool may be
available from the rail manufacturer to help with this.
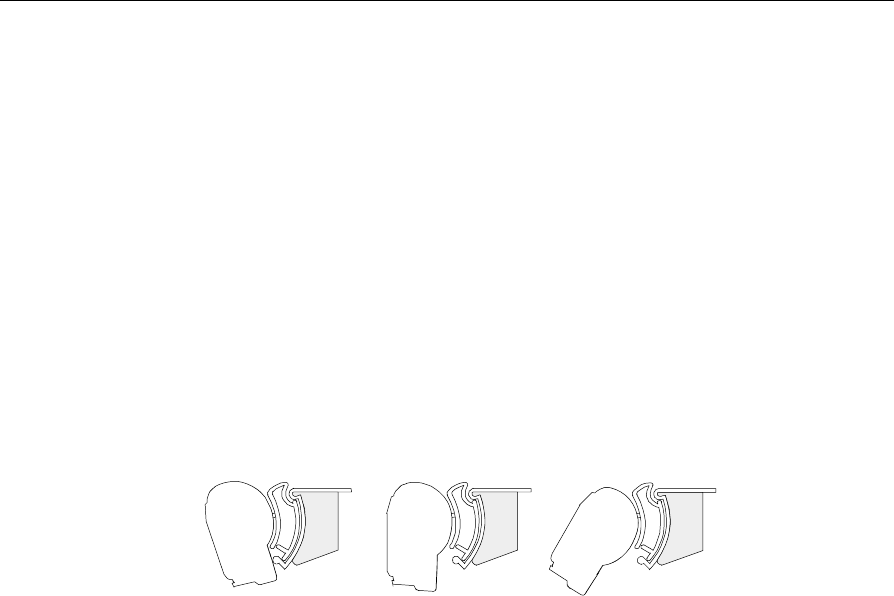
In the following illustration, an adjustable rail is installed into a shelf’s
C-channel. After installation, the angle of the rail is adjusted for the
best combination of visibility and lack of glare.
16058
Top
Shelf Middle
Shelf Bottom
Shelf
For more information, refer to the rail manufacturer’s instructions.
SmarTalker and Rail Installation 10-5
Attaching SmarTalkers to Angled Rails
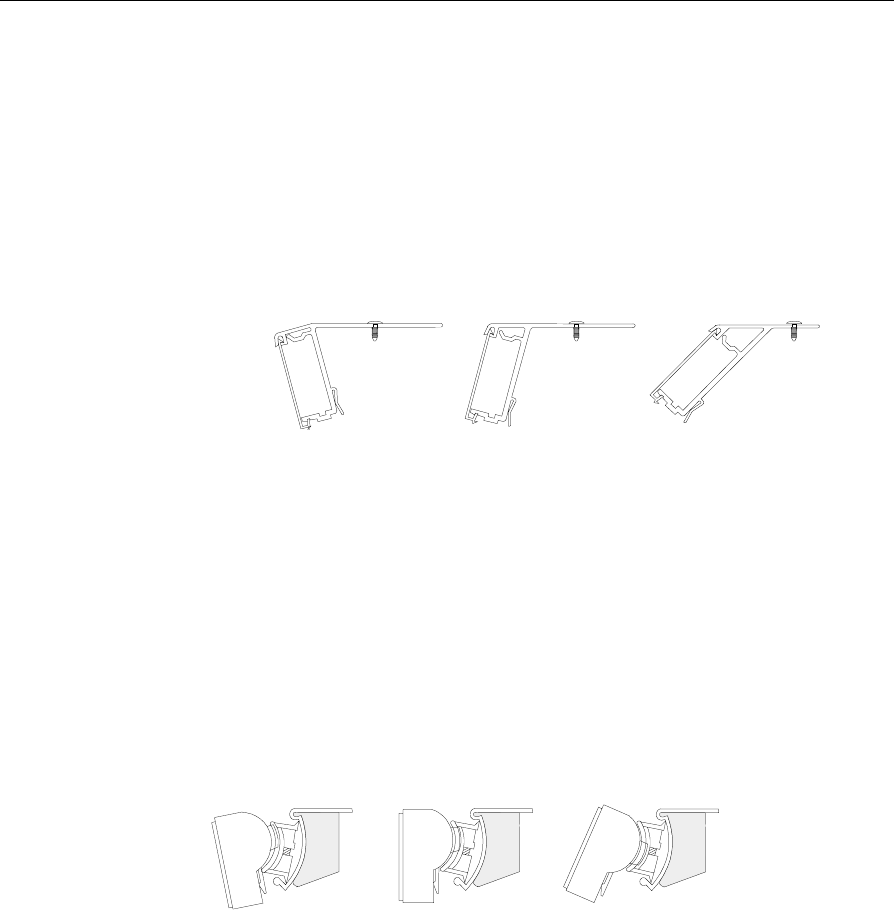
The rails in the following illustration have fixed angles and can be
easily screwed to the top of a shelf. This method of attachment
provides a rigid and durable installation.
After installing the angled rail, install the SmarTalker by opening the
front cover flap, placing the bottom of the tag into the bottom of the
rail and pressing the top of the tag into the rail until it snaps into place.
16059
Top
Shelf Middle
Shelf
Bottom
Shelf
For more information, refer to the rail manufacturer’s instructions.
Attaching SmarTalkers to Individual Clips
A SmarTalker can be installed into an individual clip that is installed
into a shelf’s C-channel. The clip may be either a fixed-angle clip or an
adjustable-angle clip.
In the following illustration, an adjustable clip is installed into a shelf’s
C-channel. After installation, the angle of the clip is adjusted for the
best combination of visibility and lack of glare.
16060
Top
Shelf Middle
Shelf Bottom
Shelf
For more information, refer to the clip manufacturer’s instructions.
10-6 SmarTalker and Rail Installation
Installing and Removing a SmarTalker
To install a SmarTalker, insert the bottom edge of the SmarTalker into
the rail and then push the top of the SmarTalker into the rail.
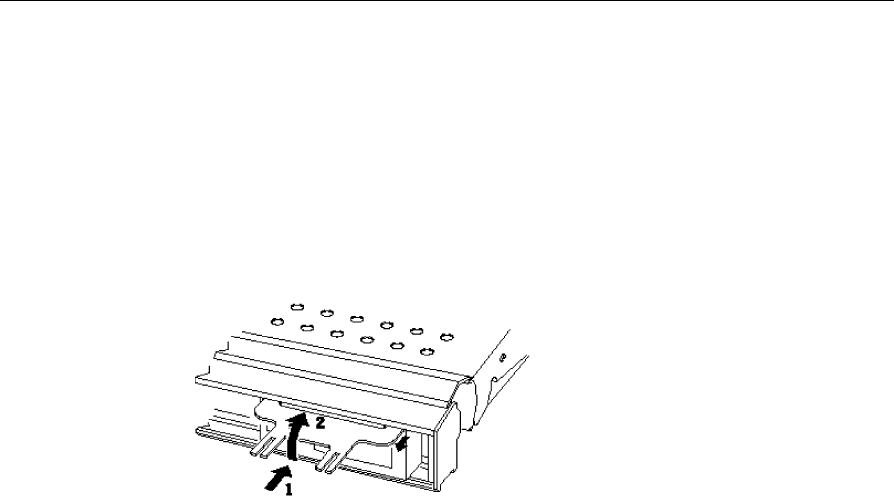
To remove a SmarTalker, a SmarTalker EPL Removal Tool (or EPL
Puller) is required. The following illustration shows how the EPL
Removal Tool is used.
1. Insert the EPL Removal Tool and push it against the rail.
2. Unhook the pawls of the SmarTalker by lifting the tool as shown
and pulling the SmarTalker out.