Psion WLPC24H User Manual 80440 2 install

Psion Inc 80440 2 install

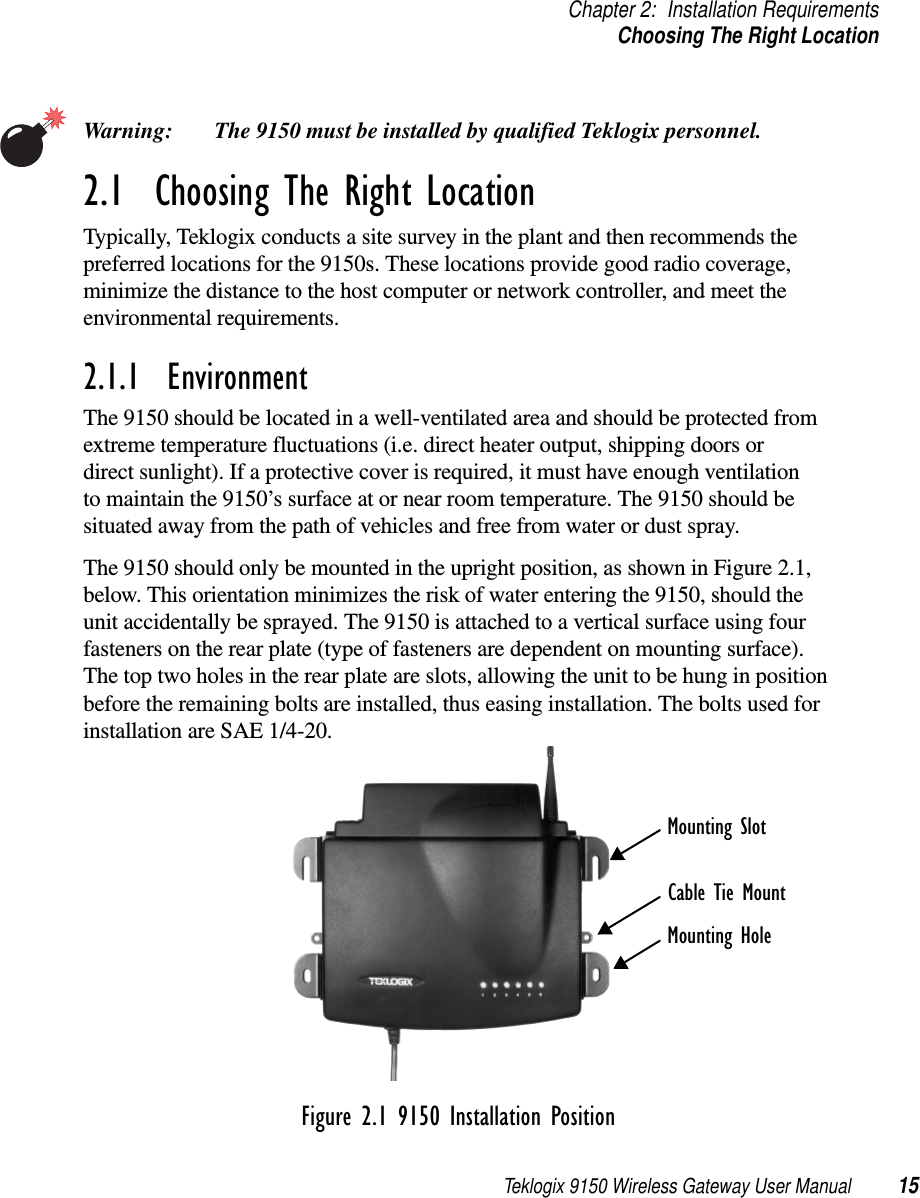
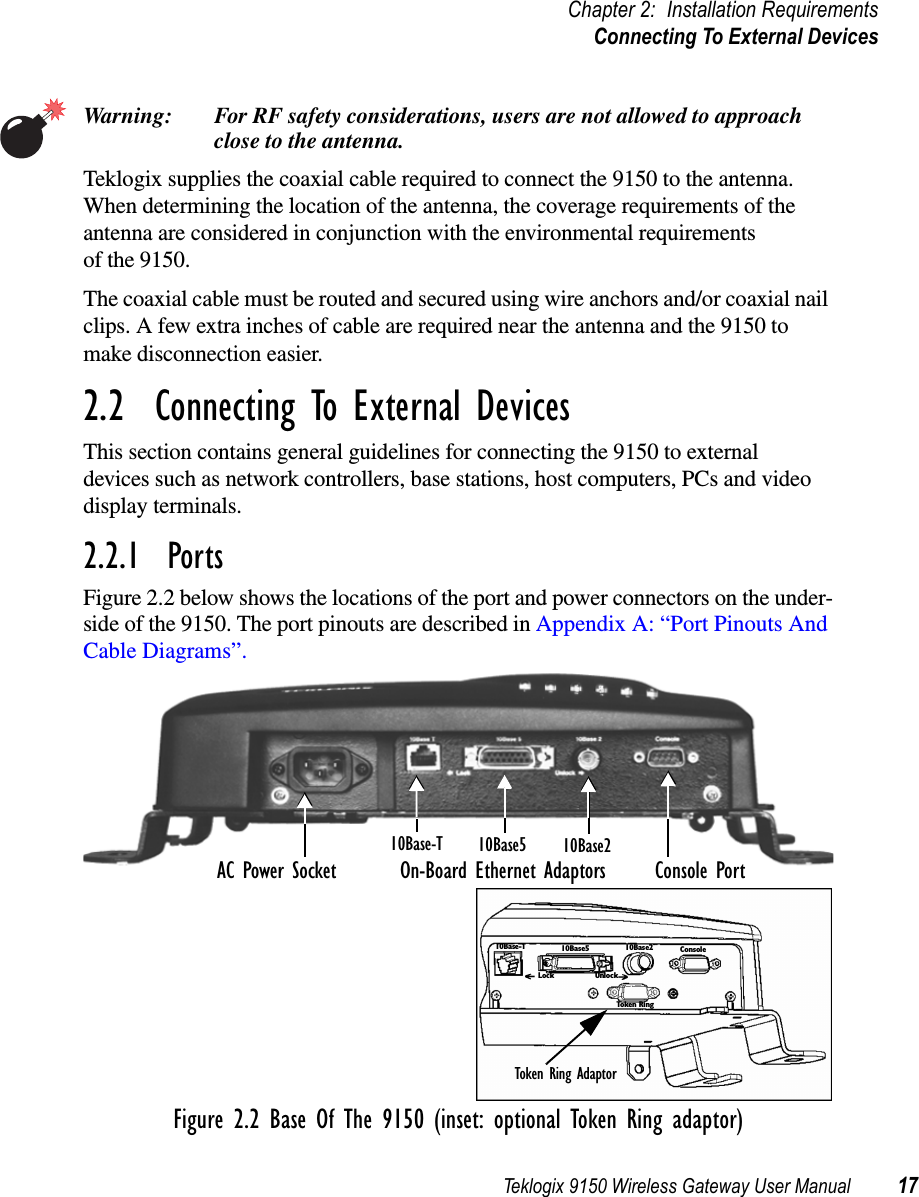
Teklogix 9150 Wireless Gateway User Manual Chapter 2 Installation Requirements

Teklogix 9150 Wireless Gateway User Manual 13INSTALLATION REQUIREMENTS 22.1  Choosing The Right Location..................152.1.1  Environment.....................152.1.2  Maintenance.....................162.1.3  Power And Antenna Cables . . . . . . . . . . . . . 162.2  Connecting To External Devices.................172.2.1  Ports.........................172.2.2  Status Indicators (LEDs). . . . . . . . . . . . . . . 182.2.3  Preparing For LAN Installation . . . . . . . . . . . 182.2.3.1  Ethernet....................192.2.3.2  Token Ring. . . . . . . . . . . . . . . . . . . 192.2.4  Preparing For Serial Installation . . . . . . . . . . . 202.2.5  Connecting A Video Display Terminal . . . . . . . 212.3  Changing The Configuration With A Web Browser.......21
Teklogix 9150 Wireless Gateway User Manual 15Chapter 2: Installation RequirementsChoosing The Right LocationWarning: The 9150 must be installed by qualified Teklogix personnel.2.1  Choosing The Right LocationTypically, Teklogix conducts a site survey in the plant and then recommends the preferred locations for the 9150s. These locations provide good radio coverage, minimize the distance to the host computer or network controller, and meet the environmental requirements.2.1.1  EnvironmentThe 9150 should be located in a well-ventilated area and should be protected from extreme temperature fluctuations (i.e. direct heater output, shipping doors or direct sunlight). If a protective cover is required, it must have enough ventilation to maintain the 9150’s surface at or near room temperature. The 9150 should be situated away from the path of vehicles and free from water or dust spray. The 9150 should only be mounted in the upright position, as shown in Figure 2.1, below. This orientation minimizes the risk of water entering the 9150, should the unit accidentally be sprayed. The 9150 is attached to a vertical surface using four fasteners on the rear plate (type of fasteners are dependent on mounting surface). The top two holes in the rear plate are slots, allowing the unit to be hung in position before the remaining bolts are installed, thus easing installation. The bolts used for installation are SAE 1/4-20.Figure 2.1 9150 Installation PositionMounting SlotCable Tie MountMounting Hole
Chapter 2: Installation RequirementsMaintenance16 Teklogix 9150 Wireless Gateway User ManualRefer to Chapter 7: “Specifications” for a more detailed description of environmen-tal requirements. Keep in mind that the long term stability of this equipment willbe enhanced if the environmental conditions are less severe than those listed inthis manual.2.1.2 MaintenanceThe 9150 has no internal option switches and does not require physical access;all configuration settings are done remotely (see Chapter 3: “9150 Main Configura-tion”). Environmental and radio communication considerations do, however,still apply.2.1.3 Power And Antenna CablesTo prevent accidental disconnection and stress on the 9150, antenna and powercables should be secured within 30 cm of the unit. Secure the cables with ties tothe cable tie mounts on the 9150 (see Figure 2.1 on page 15). A single phase poweroutlet (range 100 to 240 VAC rated 1.0A minimum) should be installed within onemetre (3.1 feet) of the 9150. The 9150 automatically adjusts to input within thatpower range. The power cable is removable and is available in the power type spe-cific to your location.Warning: To avoid electric shock, the power cord protective groundingconductor must always be connected to ground.There are several omnidirectional antennas available from Teklogix. The type ofantenna required for each installation depends on the coverage requirements andthe frequencies used. Generally, a site survey determines the appropriate antenna.Teklogix can also provide special, directional antennas. Consult Teklogix servicepersonnel for more information.Warning: Never operate the 9150 without a suitable antenna or adummy load.Connection to Outdoor Antenna: Outdoor antenna to be earthed inaccordance with International Standard EN 50083-1 (1993),“Cabled Distribution Systems for Television and Sound Signals -Safety Requirements”. The antenna must be installed by aqualified service person and installed according to local electricalinstallation codes. The antenna should be located such that it isalways at least 20 cm away from the user and other peopleworking in the area.
Teklogix 9150 Wireless Gateway User Manual 17Chapter 2: Installation RequirementsConnecting To External DevicesWarning: For RF safety considerations, users are not allowed to approachclose to the antenna.Teklogix supplies the coaxial cable required to connect the 9150 to the antenna.When determining the location of the antenna, the coverage requirements of theantenna are considered in conjunction with the environmental requirementsof the 9150.The coaxial cable must be routed and secured using wire anchors and/or coaxial nailclips. A few extra inches of cable are required near the antenna and the 9150 tomake disconnection easier.2.2 Connecting To External DevicesThis section contains general guidelines for connecting the 9150 to externaldevices such as network controllers, base stations, host computers, PCs and videodisplay terminals.2.2.1 PortsFigure 2.2 below shows the locations of the port and power connectors on the under-side of the 9150. The port pinouts are described in Appendix A: “Port Pinouts AndCable Diagrams”.Figure 2.2 Base Of The 9150 (inset: optional Token Ring adaptor)AC Power Socket Console PortOn-Board Ethernet Adaptors10Base210Base510Base-T10Base-T 10Base5 10Base2 ConsoleTo ke n R i ngLock UnlockToken Ring Adaptor
Chapter 2: Installation RequirementsStatus Indicators (LEDs)18 Teklogix 9150 Wireless Gateway User Manual2.2.2  Status Indicators (LEDs)The 9150 has six status indicators on the front of the enclosure. These numbered and coloured LEDs indicate the operating status for each port:2.2.3  Preparing For LAN InstallationBecause the 9150 provides Ethernet or Token Ring connectivity, it can be added to an existing LAN. Generally, LAN installations are handled with the help of the network administrators, as they are familiar with their network and its configuration.Once the 9150 is installed, connected and powered on, the system administrator can access the unit to check the configuration and to assign the 9150 its unique IP address. This may be done through the Console port or through the network (see “Connecting A Video Display Terminal” on page 21 and “Changing The Configura-LEDNumber Name Function Colour1 Ethernet link1 Link indicator for 10base-T: ON = good link; OFF = no link yellow2 Ethernet activity  Ethernet LAN activity (Rx/Tx) green3PC Card A status2PC Card A activity (Rx/Tx) yellow4 PC Card B status2,3 PC Card B activity (Rx/Tx; Token Ring) green5 SLIM SLIM card activity  yellow6PowerLED flashing = BIST4 running/error detectedLED On solid = BIST4 PassedLED Off = no power to unitgreen1 For 10Base2 and 10Base5: LED 1 is always OFF when these connections are used. 2 When a TekLAN 902 MHz radio is installed, the PC Card status LEDs blink only when data is received from or transmitted to a terminal. When a TRX7370 narrow band radio is installed, these LEDs blink for all received and transmitted data traffic.3 When a Token Ring PC card is installed, LED #4 shows Token Ring activity.4 Built-in Self-Test.Table 2.1 LED Functions
Teklogix 9150 Wireless Gateway User Manual 19Chapter 2: Installation RequirementsPreparing For LAN Installationtion With A Web Browser” on page 21). Subsequent changes in the network, such as the addition of stations or users, would also require that the 9150 configuration be changed.Important: Once the 9150 is configured and rebooted the first time, the “Employ bootp” parameter should be disabled (see page 38), unless the 9150 obtains its IP address from a bootp server or the system administrator intends to update the software through bootp.2.2.3.1 EthernetThe 9150 is equipped with three variations of Ethernet connection: 10Base-T (RJ-45), 10Base2 (BNC coax), and 10Base5 (Dsub 15). See Figure 2.2 on page 17 for an illustration of the connector locations. Since these ports are auto-selecting, jumper or configuration settings are not required. The maximum packet size sup-ported over the network is 1500 bytes. This parameter is not set at the 9150, but should be set at the host. For a description of port pinouts, please refer to Appendix A: “Port Pinouts And Cable Diagrams”.Note: 10Base2 termination is not required if the port is not used.2.2.3.2 Token RingTo connect a 9150 to a Token Ring network, a Madge Token Ring Smart 16/4 Ring-node Adapter Type II PC card, 4 or 16 Mbps, is pre-installed in the internal PC card slot. The connector plate shown in the inset in Figure 2.2 on page 17 is fixed to the base of the 9150 to accommodate the Token Ring Dsub9 cable. This connection supports Shielded Twisted Pair (IBM STP) cables Type 1 or 6. The maximum packet size supported over the network is 1500 bytes. This parameter is not set at the 9150, but should be set at the host. For a description of port pinouts, please refer to Appendix A: “Port Pinouts And Cable Diagrams”.
Chapter 2: Installation RequirementsPreparing For Serial Installation20 Teklogix 9150 Wireless Gateway User Manual2.2.4  Preparing For Serial InstallationThe 9150 offers serial connection as an option when a local area network is not used. Data cables are generally prepared after the site survey report is available and should be in place before the equipment arrives so that Teklogix can install them. The type of data cable used depends on the type of port required at the site. The type of port depends on the location of the 9150 and whether it is to be connected to a host computer or a network controller. Modems can be used to better accommodate long distances between the 9150 and the host computer or network controller.Port options include RS-232 Plus and Current Loop. Connector pinouts are listed in Appendix A: “Port Pinouts And Cable Diagrams”. The baud rate and the maximum length of the cable for each type of port is tabulated in Table 2.2, below. The cable lengths are based on a quality, 2-pair shielded cable (Belden #8723). The default baud rate for the 9150 serial connection is 19.2k. Each method of connection has different advantages and capabilities:•RS-232/Current Loop – This is a standard RS-232 asynchronous port with extra lines for synchronous communication. Cable length is limited by the RS-232 specification of 2500pF on the capacitance of the receiving stations. An optional current loop is available to extend the limits of this connection.•Optically isolated RS-232-Plus – This is a standard RS-232 asynchronous port with an RS-423 driver. Cables connected to this port can span longer distances at higher baud rates than the RS-232/Current Loop option.Table 2.2 Maximum Cable Lengths For RS-232 Plus And Current LoopPort Options Cable Part No. Baud Rate Max. LengthRS-232 Plus(asynchronous communications only)16590, 16598, 19387up to 19.2k 2250 ft.38.4k 2000 ft.Current Loop20 mA (asynchronous communications only)165992400 6250 ft.9600 3250 ft.19.2k 1500 ft.38.4k 1000 ft.
Teklogix 9150 Wireless Gateway User Manual 21Chapter 2: Installation RequirementsConnecting A Video Display TerminalWarning: Installation using an outdoor data cable between two buildings requires that transient protection (a lightning arrestor) be addedto the data cable. The RS-232 Plus port is recommended in thissituation because it provides optical isolation between the cable and the controller.To avoid ground problems (on the data cables), the 9150 should be connected to the same transformer/voltage distribution system as the network controller. If this is not possible, use Current Loop ports or a pair of modems.2.2.5  Connecting A Video Display TerminalAn ANSI compatible video display terminal (e.g., DEC VT220 or higher), or a PC running terminal emulation, is used for diagnostic purposes and to configure the IP address for the first time before the 9150 can be accessed using a Web Browser (see “Configuring The IP Address” on page 25).The terminal is connected to the port labelled “Console” on the 9150 (see Figure 2.2 on page 17). This port is normally set to operate at 19,200 baud, 8 bits, 1 stop bit, no parity. To comply with Part 15 of the FCC rules for a Class B computing device, only the cable supplied (Part no. 19387) should be used.2.3  Changing The Configuration With A Web BrowserThe 9150 Flash memory can be reconfigured remotely via the network using a stan-dard HTML Web Browser such as Netscape Navigator (version 4.05 or later) or MS Internet Explorer (version 4.0 or later). See Chapter 3: “9150 Main Configuration” for instructions on changing the parameters.When setting up the 9150 as an access point device, refer to Chapter 6: “Access Point Configuration” for additional information. When setting up the 9150 as a base station, please refer to Chapter 4: “Base Station Configuration” for additional information.When setting up the 9150 as a mini-controller, please refer to Chapter 5: “Mini-Controller Configuration” for additional information.

Navigation menu