Alcatel Canada 24T28A01D22C 7390 24 GHz Co-Pol RBS User Manual BS Manual pages 247 to 276
Alcatel Canada Inc 7390 24 GHz Co-Pol RBS BS Manual pages 247 to 276
Contents
- 1. BS Manual pages 1 to 16
- 2. BS Manual pages 17 to 30
- 3. BS Manual pages 31 to 40
- 4. BS Manual pages 41 to 45
- 5. BS Manual pages 46 to 50
- 6. BS Manual pages 51 to 55
- 7. BS Manual pages 56 to 60
- 8. BS Manual pages 61 to 70
- 9. BS Manual pages 71 to 76
- 10. BS Manual pages 77 to 125
- 11. BS Manual pages 126 to 182
- 12. BS Manual pages 183 to 190
- 13. BS Manual pages 191 to 228
- 14. BS Manual pages 229 to 246
- 15. BS Manual pages 247 to 276
- 16. BS Manual pages 277 to 280
- 17. BS Manual pages 281 to 284
- 18. BS Manual pages 285 to 302
BS Manual pages 247 to 276

3CC12424AAAA TQ BJA 01 Issue 01 - April 2001 - Draft 04 247/302
252
Appendix 1 – Installation sheet
A.1.1 – 7390DBS
General information:Operator................. Date.......... Visa..........
Equipment characteristics
Name
Address
........................................................................................
No ......... Street......................................................
Bld......... Stair................... Floor.................
Town .............................................................
Country .........................................................
Operator
Site identification
Name of Base Station
Version
Designation Reference ICS Serial No.
Subrack
Fan
PSU 1
PSU 2
CPL
IBS 1
IBS 2
IBS 3
IBS 4
IBS 5
IBS 6
IBS 7
IBS 8

248/302 Issue 01 - April 2001 - Draft 04 3CC12424AAAA TQ BJA 01
252
Equipment characteristics and onboard software
Designation Part number ICS Serial No. Downloaded software
ANT 1
ANT 2
TNT 1
TNT 2
TNT 3
TNT 4
AMD 1
AMD 2
AMD 3
AMD 4
AMD 5
AMD 6
AMD 7
AMD 8

3CC12424AAAA TQ BJA 01 Issue 01 - April 2001 - Draft 04 249/302
252
A.1.2 – 7390 RBS
General information:Operator.................. Date............. Visa..........
Equipment characteristics
Initial configuration (1+0):
Name
Address
...................................................................................
No ......... Street................................................
Bld......... Stair................... Floor...........
Town .............................................................
Country .........................................................
Operator
Site identification
Name of Base Station
Version
Designation 1 2 3 4
Mains
Reference
ICS
Serial No.
Tx level
Band
Sub-band
Onboard software
version
Type of cable
Length of cable
Tilt
Azimuth
Height of RBS
Type of Mounting

250/302 Issue 01 - April 2001 - Draft 04 3CC12424AAAA TQ BJA 01
252
Redundancy (1+1):
Designation 5 6 7 8
Mains
Reference
ICS
Serial No.
Tx level
Band
Sub-band
Onboard software
version
Type of cable
Length of cable
Tilt
Azimuth
Height of RBS
Type of Mounting
3CC12424AAAA TQ BJA 01 Issue 01 - April 2001 - Draft 04 251/302
252
A.1.3 – Check point list for BS commissioning
CHECKING THE SAFETY REGULATIONS:
–Equipment ground wire OK NOK
–Differential protection OK NOK
–Fire protection OK NOK
CHECKING THE RADIO INSTALLATION:
–No contaminants or possible outflow on the antennas and radio OK NOK
–No personnel allowed in the antenna fields OK NOK
–Use of torque wrenchs for the radio assembly OK NOK
–Mast rigidity and absence of vibration OK NOK
–Antenna clearance in immediate vicinity OK NOK
–Check that the ET390998 coaxial cable is installed OK NOK
–Radio grounding OK NOK
CHECKING THE WIRING BETWEEN RBS AND DBS:
–No crushed cables OK NOK
–Observance of the minimum bend radius OK NOK
–Quality of cable ground wire installation OK NOK
–Sealing of ground relays on the cable OK NOK
CHECKING THE DBS INSTALLATION:
–Min Max temperature of the premises containing the DBS (-5º to +55ºC) OK NOK
–Check air inlets and outlets of the DBS backplane OK NOK
–Check the 48 Volt polarity OK NOK
–Check the ground wire of the DBS backplane OK NOK
–Check that all the client access cables are shielded OK NOK
–On the DBS panel, J101, J104 and J113 must not be connected OK NOK
–Check the optical fiber routing OK NOK
–Check the connection sequence of the RBS cables on the panel OK NOK

252/302 Issue 01 - April 2001 - Draft 04 3CC12424AAAA TQ BJA 01
252
PAGE INTENTIONALLY LEFT BLANK
3CC12424AAAA TQ BJA 01 Issue 01 - April 2001 - Draft 04 253/302
268
Appendix 2 – Installation of 7390LT software
A.2.1 – Requirements
1. Microsoft Windows NT operating system running (Service Pack 5 or above)
2. A7390 LT installation Kit
3. User account with Administrator privileges to log-on with
Note: Users without Administrator privileges will not be able to install SNTP service, required to run
properly the A7390LT.
A.2.2 – Installation Procedure
1. Be sure you have administrator rights
2. Close all the aplications before start the 7390LT Installation
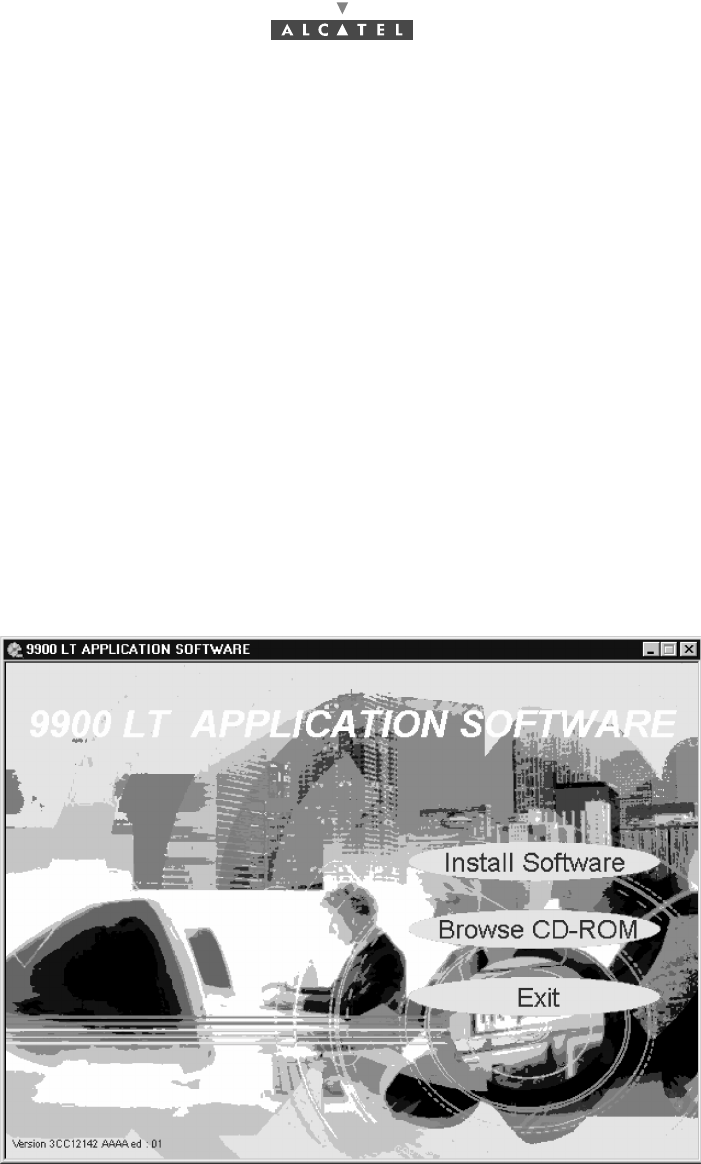
3. Insert the CD " 7390LT Application Software"
•The 7390LT Application Software screen appears
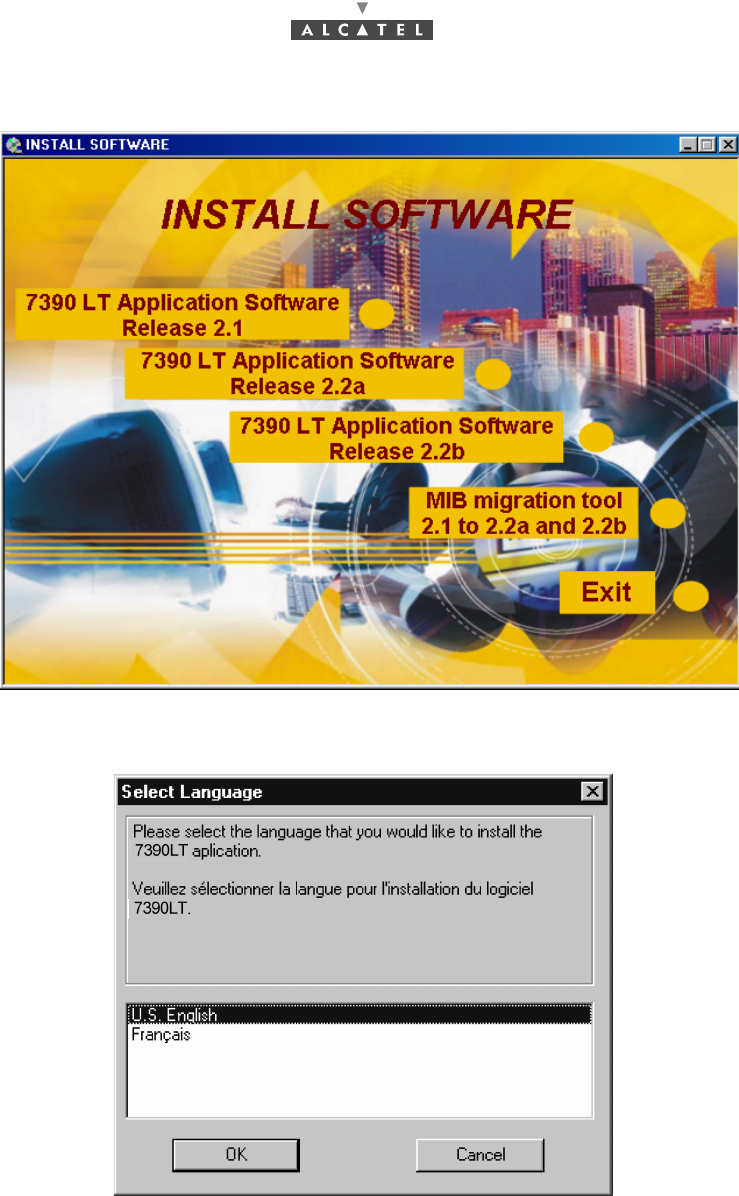
•Click on «Install Software»
•The Install Software screen appears
254/302 Issue 01 - April 2001 - Draft 04 3CC12424AAAA TQ BJA 01
268
•Click on «7390LT Application Software Release 2.2a»
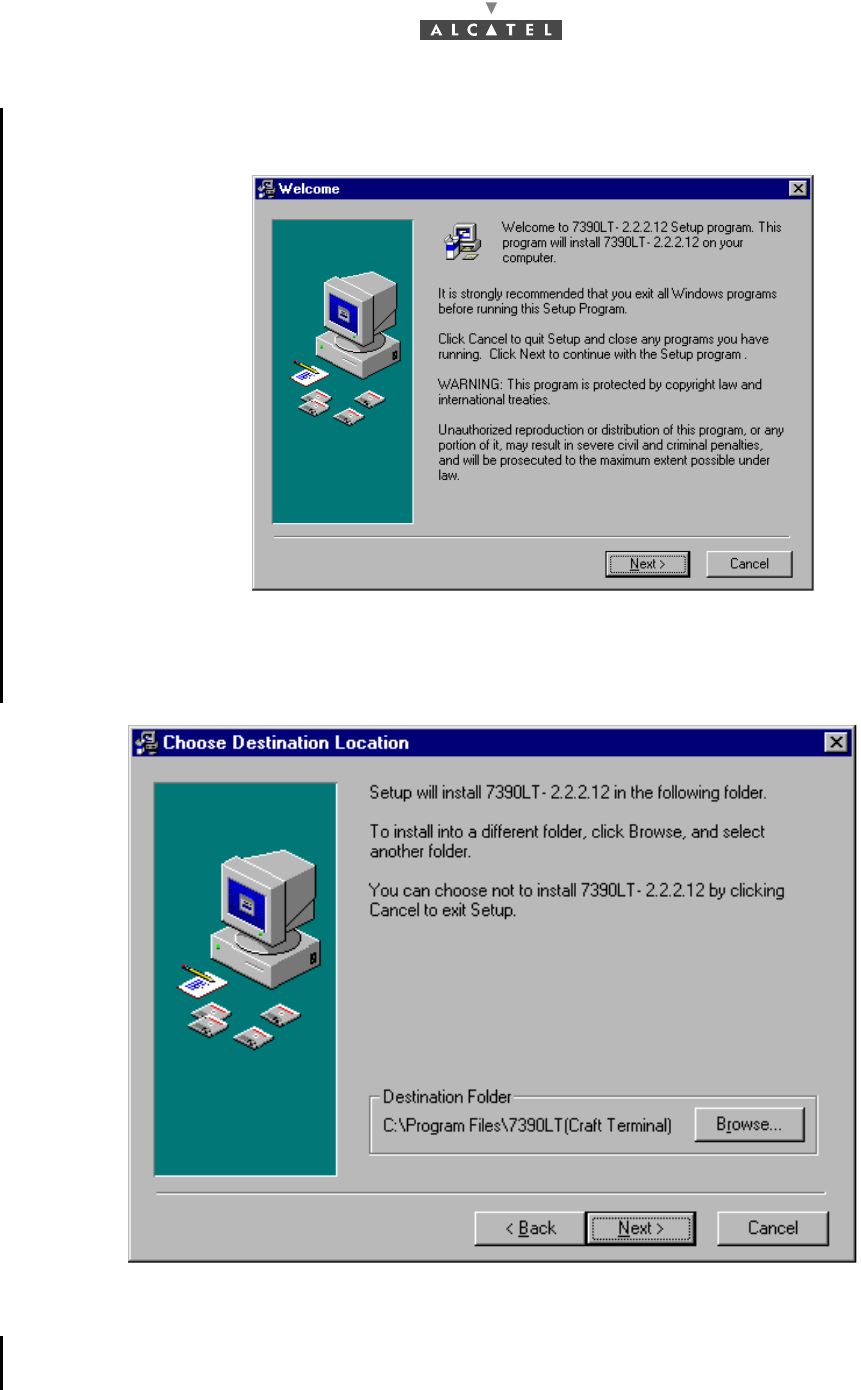
4. Select the language you prefer for the installation messages and click on the «OK» button.
3CC12424AAAA TQ BJA 01 Issue 01 - April 2001 - Draft 04 255/302
268
5. When the Welcome screen appears (see below), click on the «Next» button to continue the
installation procedure or press «Cancel» to exit the installation program.
6. The Choose Destination Location screen appears (see below). If you agree with the default
destination folder, click on the «Next» button. If you disagree, you can change it by clicking on the
«Browse» button and selecting the desired destination folder.
Note :
–If you always use the default directory, un-install the previous LT version before.
–If you want to install several LT versions on the same computer, use different folders each time.
256/302 Issue 01 - April 2001 - Draft 04 3CC12424AAAA TQ BJA 01
268
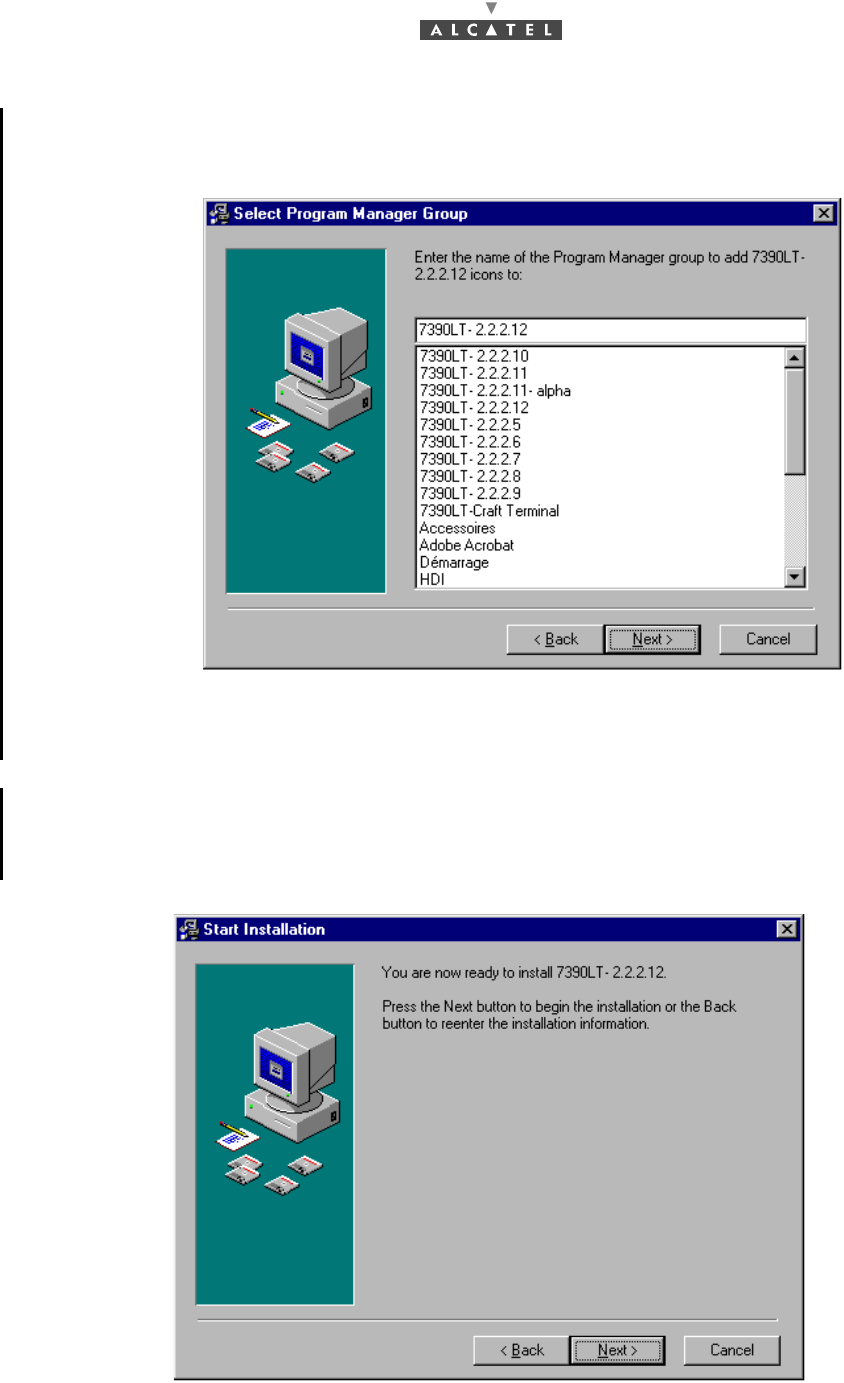
7. The Select Program Manager Group screen appears (see below). If you agree with the default
group name, click on the «Next» button. If you disagree, you can change it by typing the desired
name.
Note: If you want to install several LTs on the same computer use different names for the Program
group.
8. The Start Installation screen appears (see below). Now, you are ready to install the A7390LT (Craft
Terminal) in your computer. Click on the «Next» button to install it. You can cancel the LT installation
by clicking on the «Cancel» button or you can change some of the choosen options by clicking on
the «Back» button.
3CC12424AAAA TQ BJA 01 Issue 01 - April 2001 - Draft 04 257/302
268
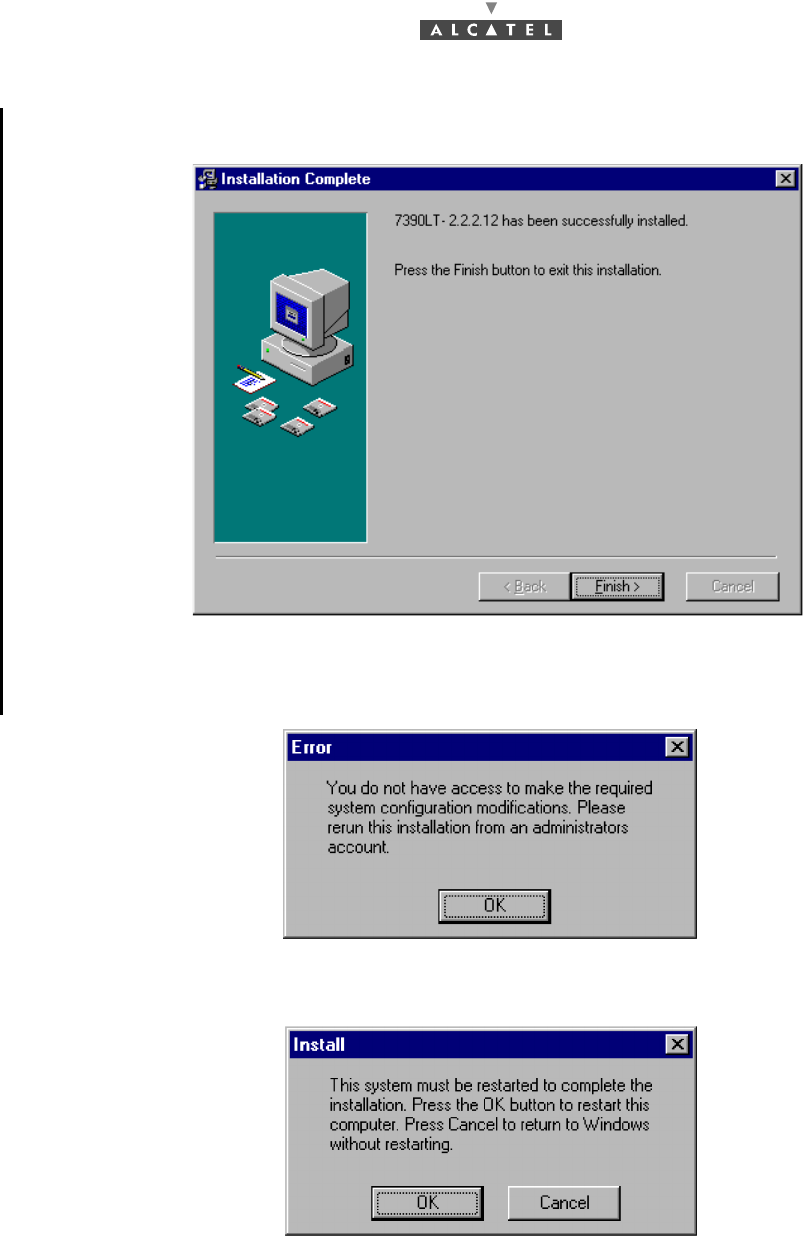
9. The following window appears indicating that the LT installation is complete.
10. If you dont’t have administrator rights, the following window appears. The LT installation has not
been completely succesful, so you have to get administrator rights and start again.
11. The installation has been completed. The following window appears. Press on «OK» to restart your
computer.
12. After copying files, the Simple Network Time Protocol (SNTP) service is installed and started. After
this, the installation process is complete.
13. Now, you are ready to run the 7390LT application.
258/302 Issue 01 - April 2001 - Draft 04 3CC12424AAAA TQ BJA 01
268
A.2.3 – License the .OCX files
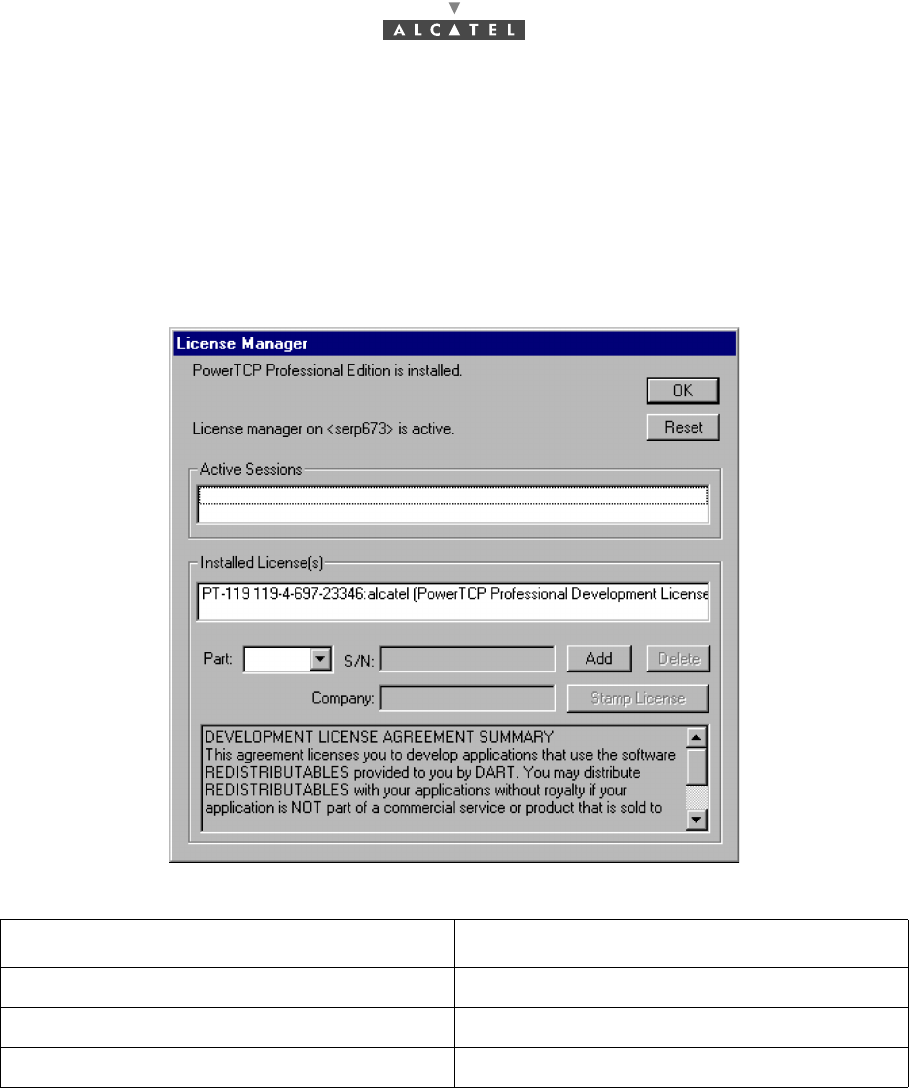
1. Run the Ptlic32.exe file located in :
C:\Program_files\7390LT-Craft Terminal\Ptlic32.exe
The Power TCP screen appears.
2. Click on the «Licensing» button
The following window appears:
3. Enter the following values
4. Click on «Add»
The license is printed in the box "Installed License"
5. Click on the license
6. Click on the «Stamp License» button
7. Select the following OCX file to stamp the license:
C:\WinNT\System32\ptsnmp32.ocx
A window appears on the screen mentioning that the licensing has been done succesfully.
8. Move back to the main window (see window above), click on the license detailed in the box "Installed
License", and then click on the «Delete» button.
Field Value
Part PT-119
S/N 119-4-697-23346
Company Alcatel CIT

3CC12424AAAA TQ BJA 01 Issue 01 - April 2001 - Draft 04 259/302
268
A.2.4 – Craft.ini configuration
In the Craft.ini file (C: \ProgramFiles\7390LT\Craft.ini) enter the following values :
A.2.5 – Running 7390LT
1. From the "Start menu->programs", click on «7390LT-Craft terminal»
2. See the User manual to operate the application.
A.2.6 – NFS Server installation
This step is necessary to implement the 7390LT "Software download" functionality.
If the NFS server installation was done, move on to the next section.
A.2.6.1 – NFS server product references
Parameter Value
IP Address BS IP address
Local Port 161 (port from where SNMP instructions are sent
from the 7390LT)
Remote port 161 (port from where SNMP responses are
received on to the 7390LT)
Trap port 161 (port where SNMP Trap messages are
received on to the 7390LT)
Reference Description
Product Omni-NFS Server for NT/98/95 - Xlink Technology
Version 4.01 / 4.10 / 4.11 / 4.12
Serial Number/Password Cf. certificate of Authenticity
Documentation Omni-NFS for Windows 98/95 & NT - User Guide
260/302 Issue 01 - April 2001 - Draft 04 3CC12424AAAA TQ BJA 01
268
A.2.6.2 – Installation of NFS server
–Depending of the NFS versions, screens can change from a version to another (following screens
are NFS versions 4.01).
–Log on to an account with administrator rights
From the Windows NT Explorer:
–Click on the D: drive
–Double-click on the Setup.exe program
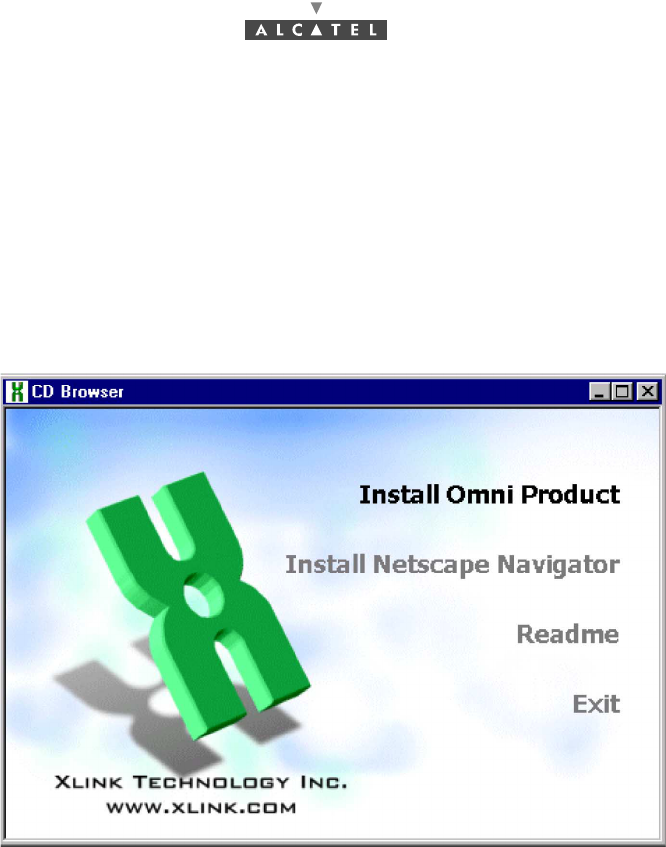
The following window is displayed:
–Click on the menu: "Install Omni Product"
A window requesting the product serial number and a password appears.
–Enter the requested information (see A.2.6.1 – NFS server product references) and click OK
A window containing the following phrase appears:
"This program requires a member of Administrator group to setup"
–Click on «YES»
A window entitled Omni-NFS, full screen is displayed along with a small Welcome window
–Click on «Next»
A window entitled Software License Agreement appears
–Click on «YES»
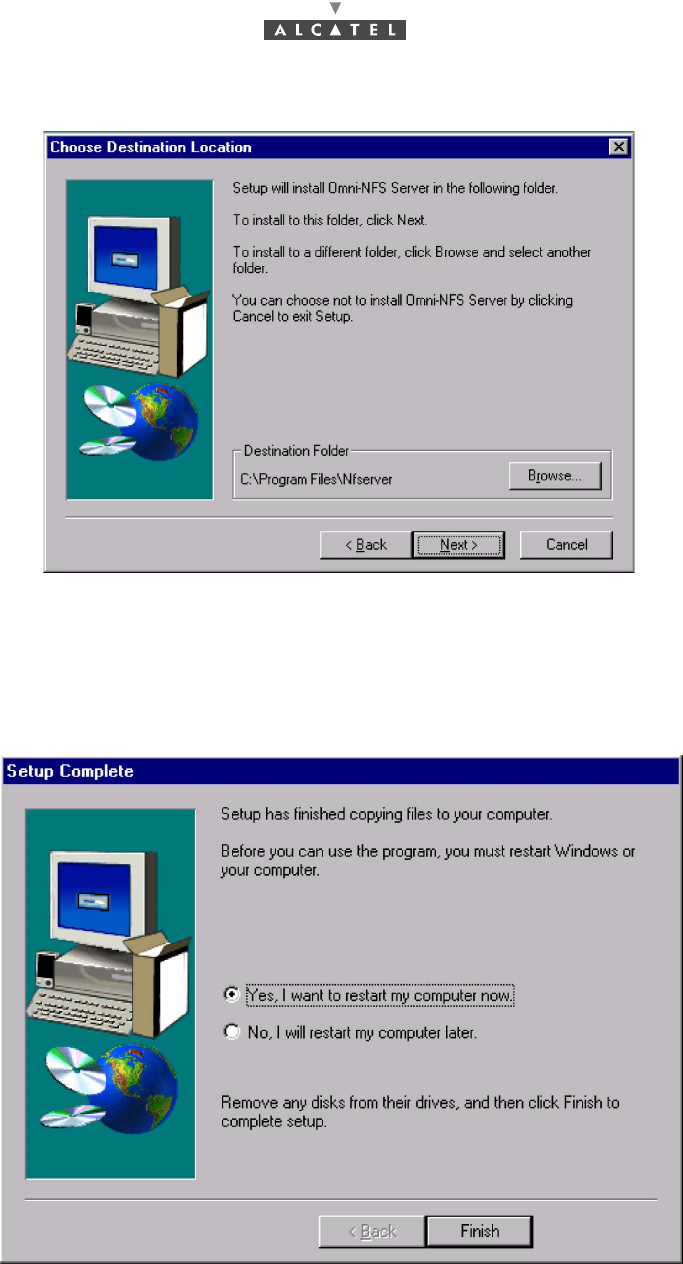
The following window appears:
3CC12424AAAA TQ BJA 01 Issue 01 - April 2001 - Draft 04 261/302
268
–Click on «Next»
A window titled "Select Program Folder" appears.
–Click on «Next»
Installation begins.
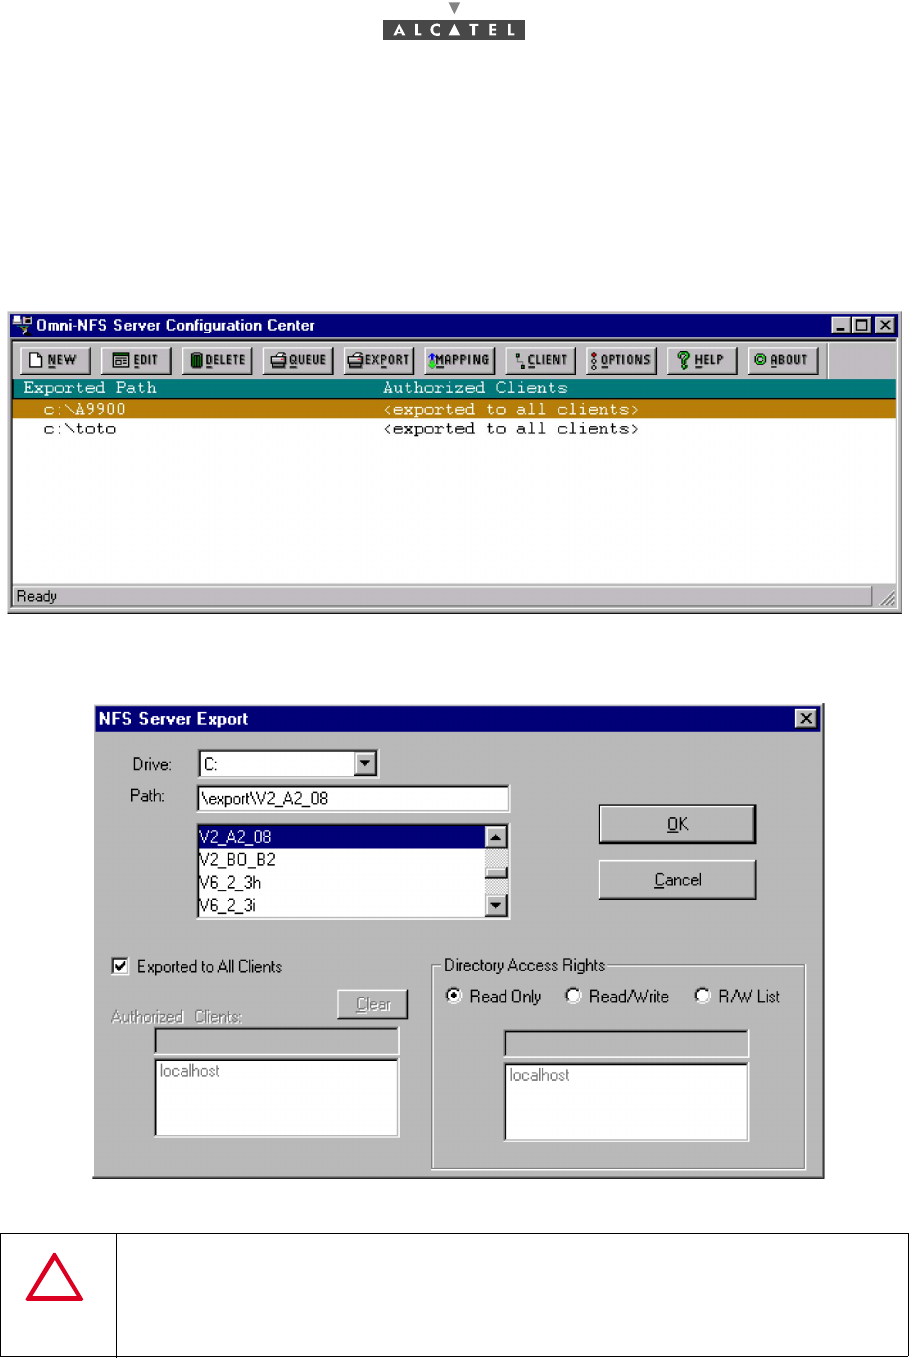
After about ten seconds, the following window appears:
–Click on «Yes, I want to restart my computer now», then on «Finish»
The PC reboots.
–Log on to an Administrator account before going to stage A.2.6.3 – Configuring the NFS server.
262/302 Issue 01 - April 2001 - Draft 04 3CC12424AAAA TQ BJA 01
268
A.2.6.3 – Configuring the NFS server
Note: You must be logged on the PC as a member of the administrator group in order to configure NFS
server.
–Run the wnfsd.exe program: C:\Program_files\nfserver\wnfsd.exe
Note: another possible path is: Start - Programs - Omni-NFS Server for Win NT-98-95 - NFS Server
Configuration.
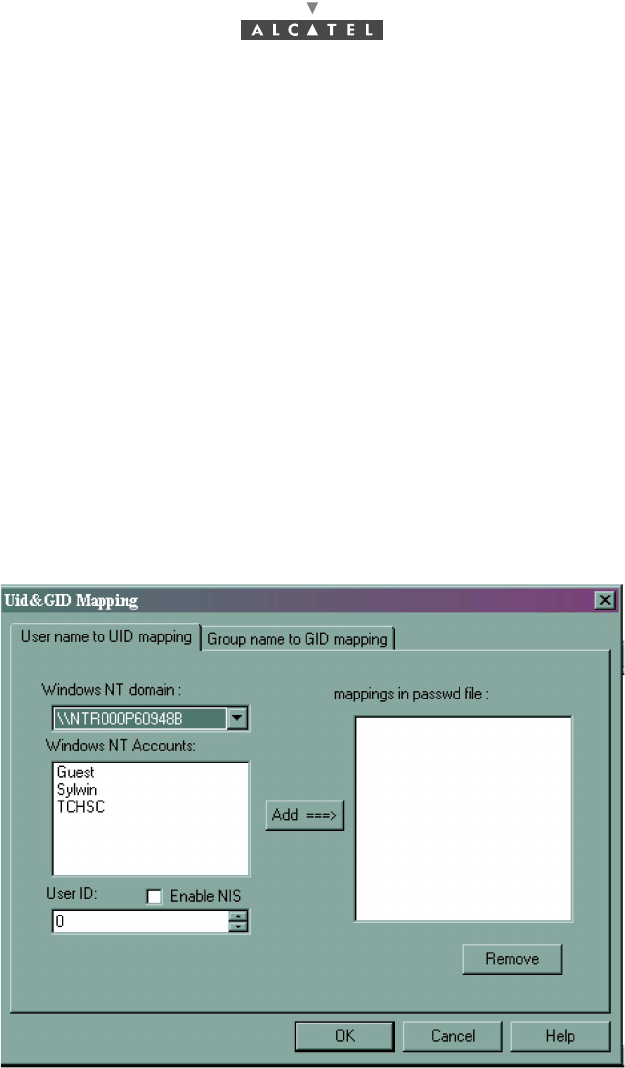
A window similar to the following one appears:
–Click on «New» in the tool bar
The following window appears:
For the path, select the directory where the Craft Terminal software packages are to be installed.
The directory chosen for installation of the software packages must be in CAPITAL
LETTERS. The complete path of the directory must be exported. Example:
C:\export\V2-A2-08.
A nonexistent directory can appear to be exported without any problem but this
does not mean that it has been consequently created.
3CC12424AAAA TQ BJA 01 Issue 01 - April 2001 - Draft 04 263/302
268
Choose the following options:
–Exported to All Clients
–Directory Access Rigths: Read only for the software Package directory
Read / Write for the Backup / Restore directory
Read / Write for the Mib Migration directory (C: \A7390WW)
Click on «OK».
Note: In case of access error to a sub-directory of an exported directory, export each of the directories
containing a package.
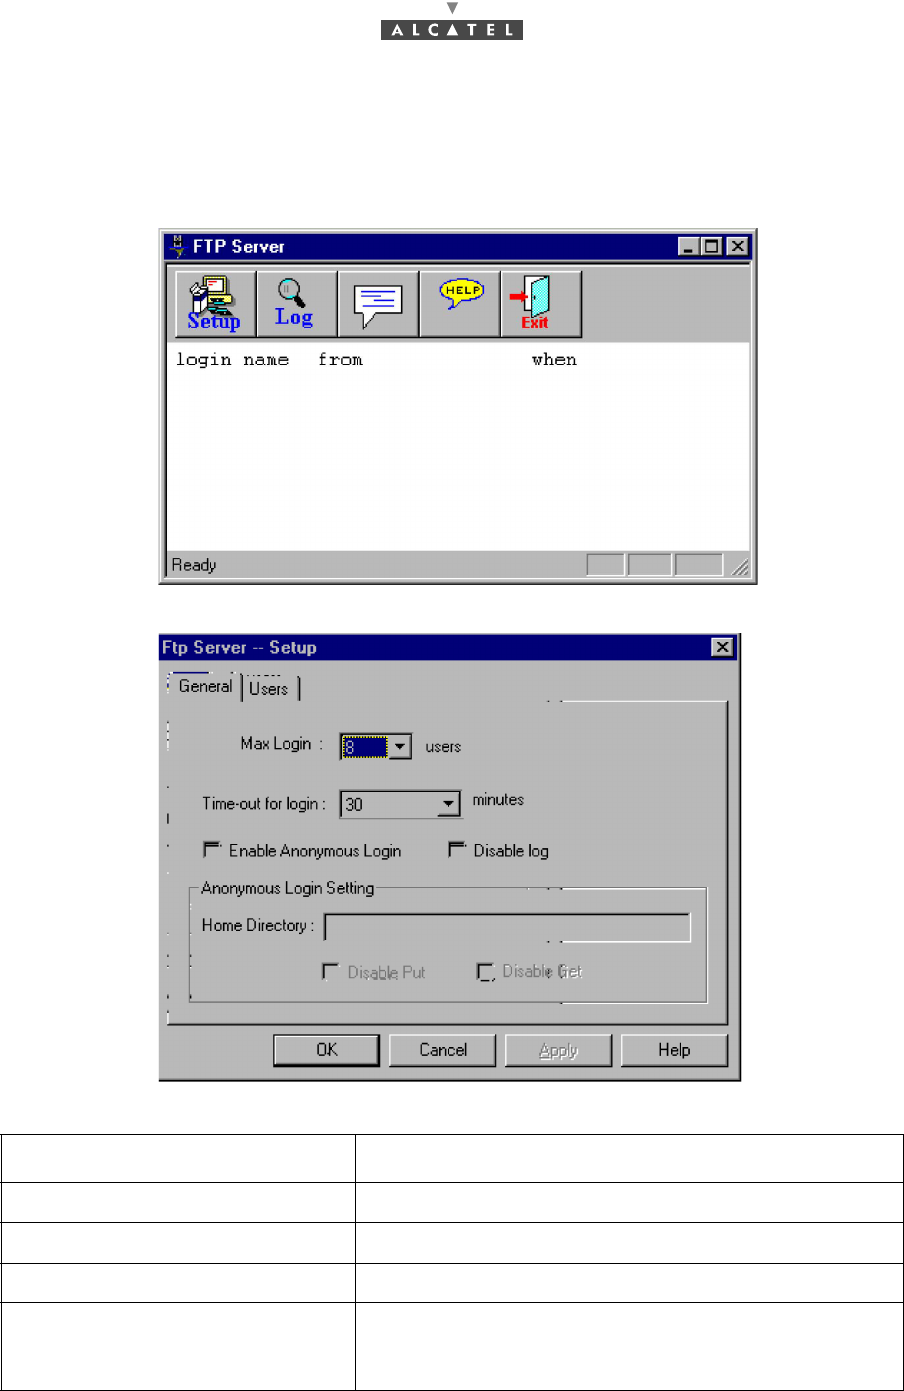
The "MAPPING" step is absolutely mandatory.
Click on the «MAPPING» button
–In the Windows NT Accounts screen, select the NT account in which we logged in.
–Enter User ID 851 (because the user ID of the ANT board is 851).
–Click on the «Add==>» button.
–Click on «OK»
A.2.7 – Installation of Software Packages
From Windows NT Explorer, copy the directories containing the software packages to be downloaded to
the NFS assembly directory and export each of them.
264/302 Issue 01 - April 2001 - Draft 04 3CC12424AAAA TQ BJA 01
268
A.2.8 – FTP Server configuration
1. From the "start" menu select "programs->Omni-NFS->FTP Server"
2. The following window will appear. Click on the «Setup» button.
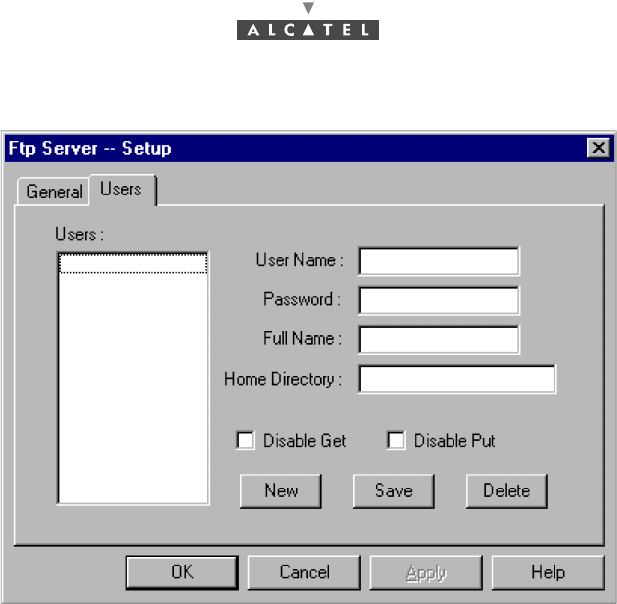
3. The following window will appear. Click on «Users».
4. Fill the window with the values showed in the following table.
Parameter Value
User Name ANT7390 (it depends on the FTP client in the agent)
Password ww7390 (it depends on the FTP client in the agent)
Full Name
Home directory ../7390LT-craft terminal/FTP
Nota: The local folder depends on the destination folder
chosen to install the LT software.
3CC12424AAAA TQ BJA 01 Issue 01 - April 2001 - Draft 04 265/302
268
A.2.9 – How to remove the 7390LT
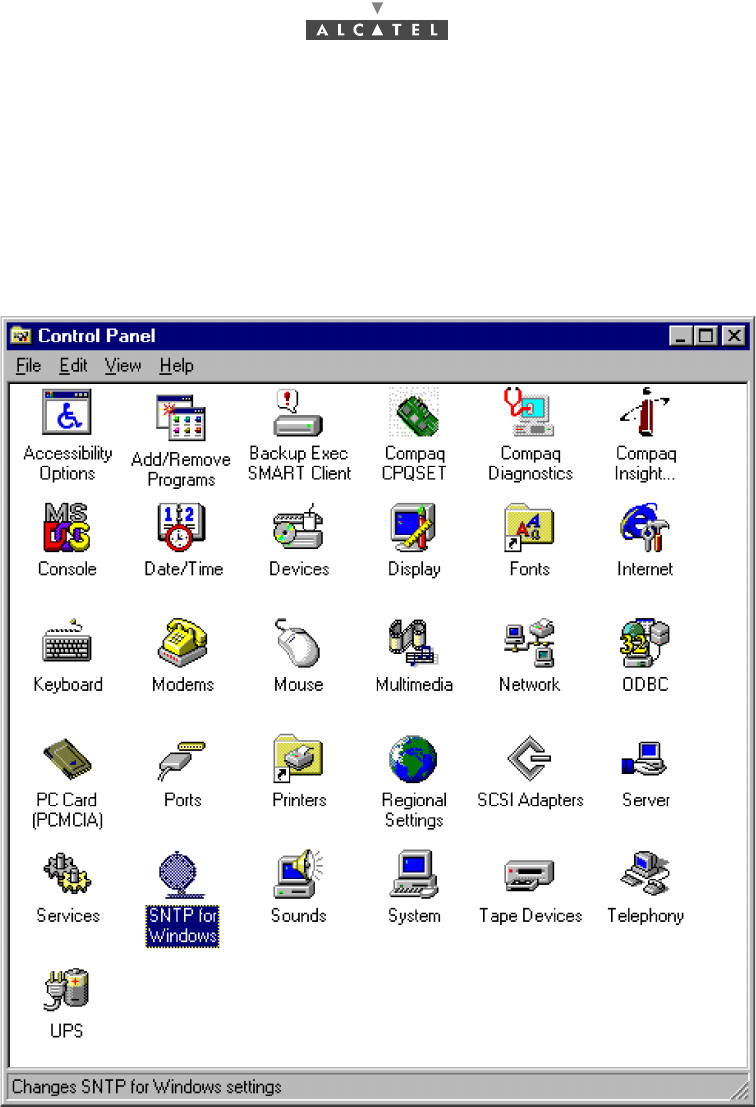
From the Windows NT office desk, click successively on the following icons:
•Workstation
•Configuration panel
•Add/Suppress programs
•In the Add/remove programs properties screen, select the 7390LT
•Click on «Add/remove»
•Confirm the deletion of the program.
Note: If a message window appears saying that some components were not removed properly from the
PC:
•Click on «OK»
•Click on «OK» from the Add/remove programs properties screen
•With the Windows NT explorer, remove the following folder :
..\..\7390LT -Craft Terminal
266/302 Issue 01 - April 2001 - Draft 04 3CC12424AAAA TQ BJA 01
268
A.2.10 – SNTP Service Control
A.2.10.1 – SNTP Configuration
In order to check the SNTP client configuration, follow the next steps:
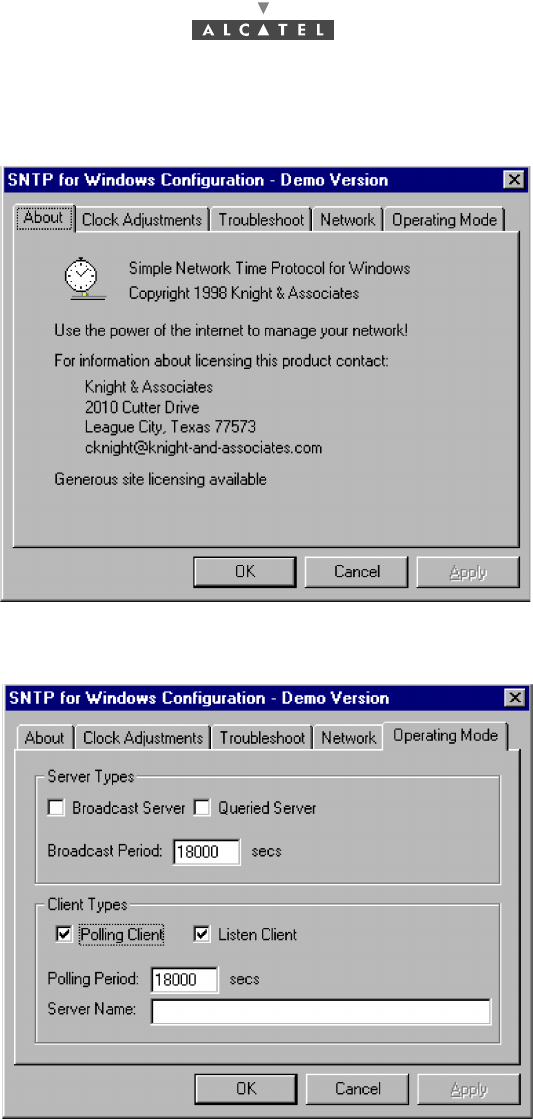
1. From the " Start " menu, click on the «Control Panel» menu.
The following window appears:
3CC12424AAAA TQ BJA 01 Issue 01 - April 2001 - Draft 04 267/302
268
2. Click on the «SNTP for windows" icon:
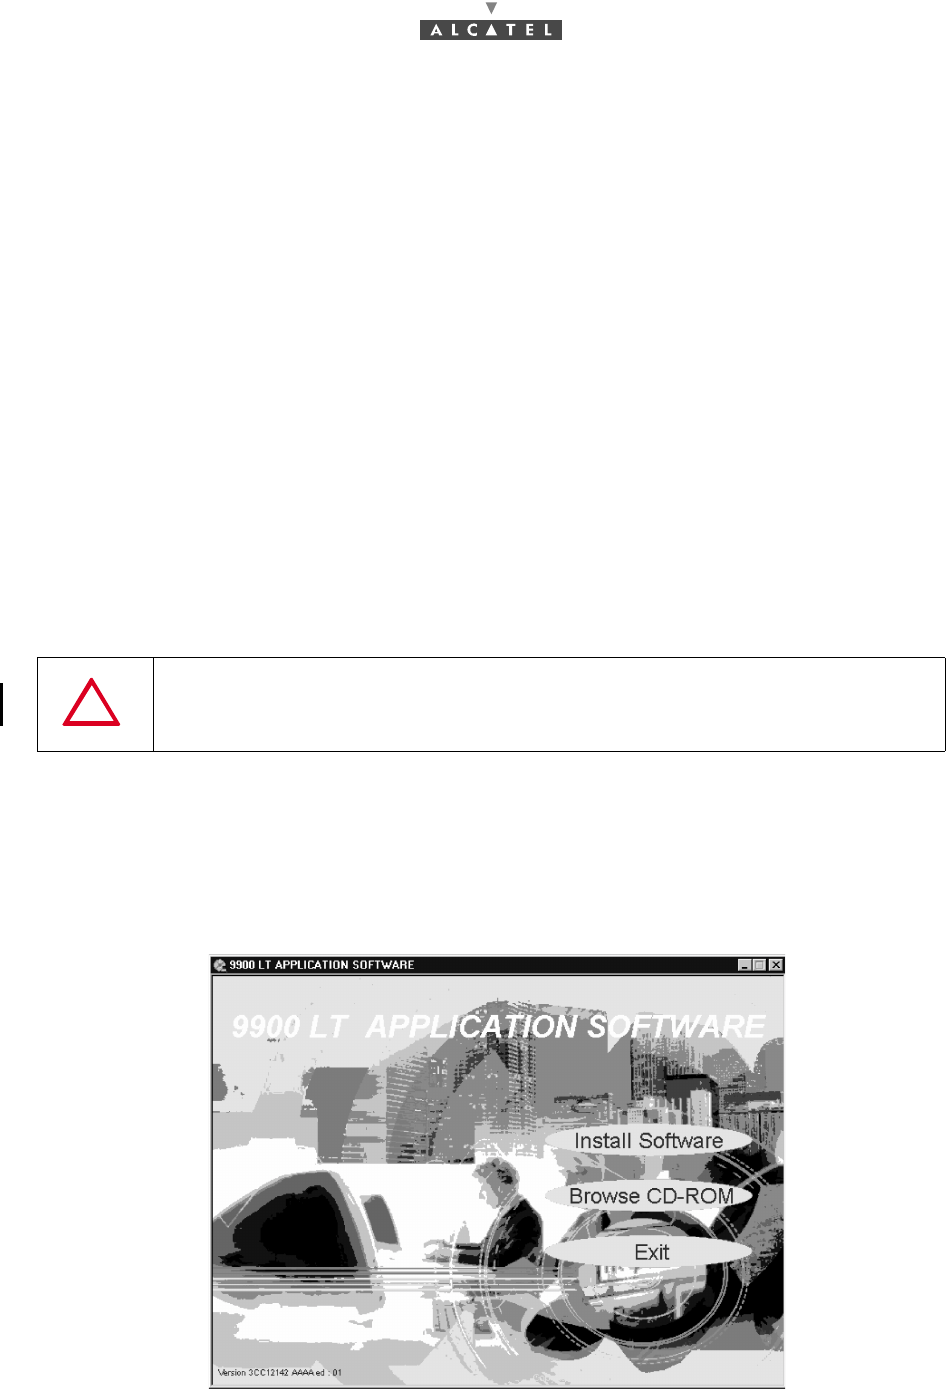
The following window appears:
3. Click on the «Operating mode»" button.
The following window appears.
4. Verify that the window is filled as showing in the previous image.
Note that the "polling period" field has to be the polling period that you have configured from the
LT.
5. Click on the «OK» button : the window is then closed.
SNTP SERVICE ACTIVATED
In order to check that the SNTP service is activated, follow the next steps:
1. Select from the "start->configuration Panel->", the "service" menu option
2. Look for the "Simple network time protocol" into the service-screen, and check that it is started.

268/302 Issue 01 - April 2001 - Draft 04 3CC12424AAAA TQ BJA 01
268
PAGE INTENTIONALLY LEFT BLANK
3CC12424AAAA TQ BJA 01 Issue 01 - April 2001 - Draft 04 269/302
276
Appendix 3 – Installation of MIB migration tool
A.3.1 – Requirements
–Microsoft Windows NT operating system running (Service Pack 5 or above),
–MIB migration CD.
If "Python" version 1.5.2 is already installed on your PC, you do not need to re-install it! (go to A.3.2 – If
Python is already installed).
Otherwise, you need to install "Python" (see A.3.3 – Python installation procedure).
A.3.2 – If Python is already installed
If "Python" version 1.5.2 is already installed on your system:
–Insert the CD in the CD driver.
–Copy its contents (the directory "mibconv") on the hard disk of the PC (directly under C:).
Note: By default, the LT will search the MIB migration CD content in the directory "C:\mibconv". If you
copy the CD in another directory you’ll have to modify the LT configuration file ("craft.ini") (see
A.3.4 – LT configuration file modification).
Note: MIB migration CD is copied on the PC where the LT will be launched.
A.3.3 – Python installation procedure
Note: You need a user account with Administrator privileges to log-on with for this procedure.
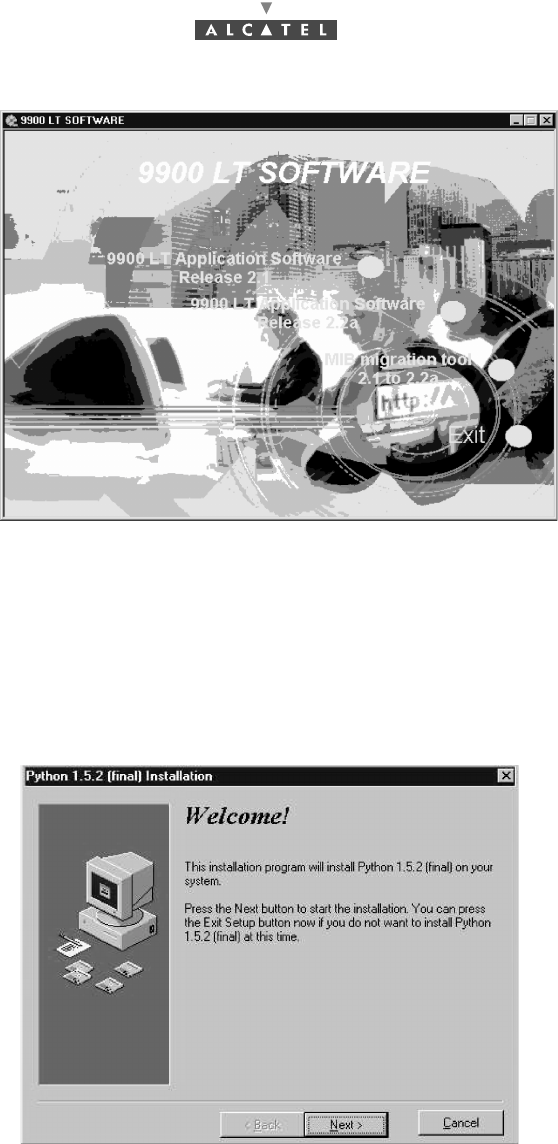
–Insert the CD " 7390LT Application Software"
–The 7390LT Application Software screen appears
IF YOU INSTALL «MIB» MIGRATION TOOL IN ANOTHER DIRECTORY THAN
«C:/mibconv», DO NOT USE SPACE CHARACTERS IN THE DIRECTORY NAME
270/302 Issue 01 - April 2001 - Draft 04 3CC12424AAAA TQ BJA 01
276
–Click on «Install Software»
–The 7390LT Software screen appears
–Click on «MIB Migration tool 2.1 to 2.2a»
–A window appears, read it carefully and just press a key.
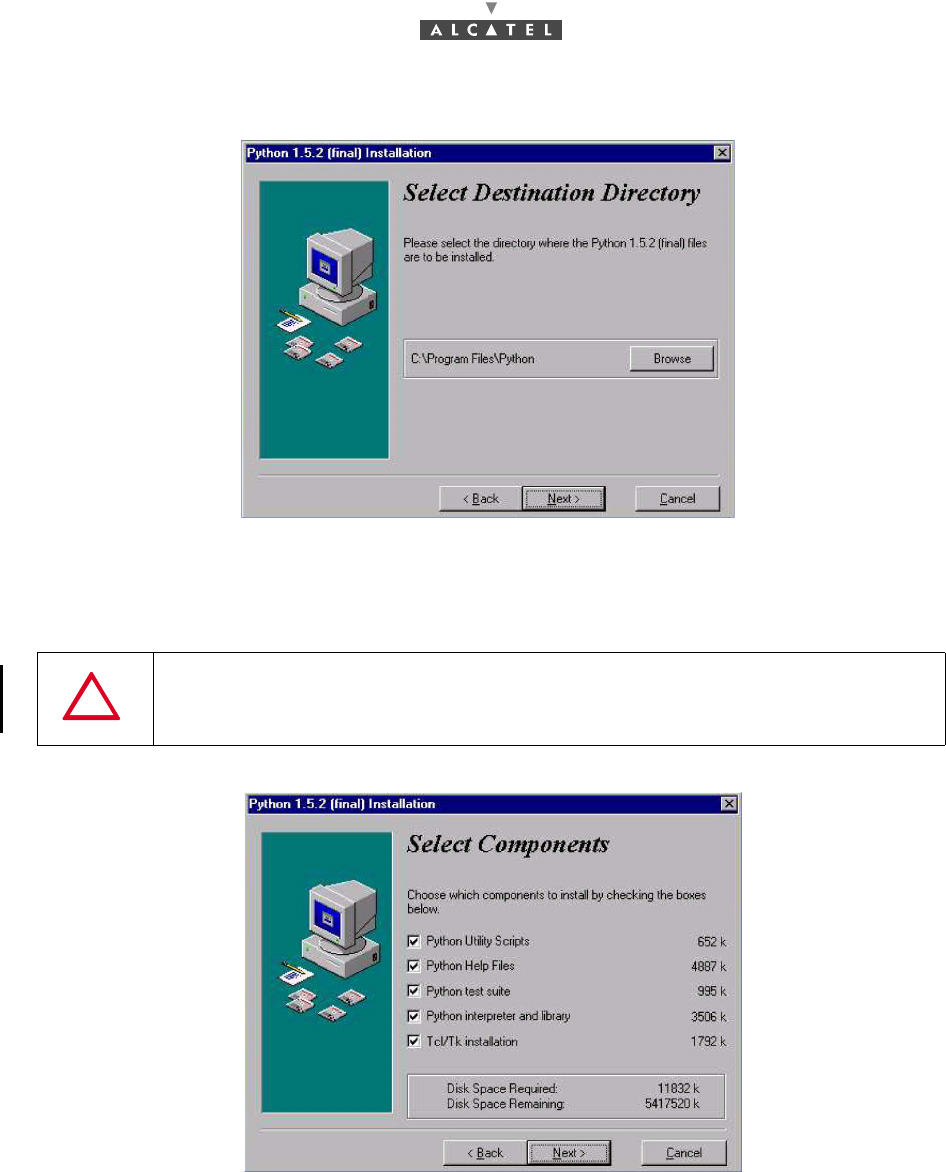
–When the Welcome! screen appears, click on the «Next» button to continue the installation pro-
cedure:
3CC12424AAAA TQ BJA 01 Issue 01 - April 2001 - Draft 04 271/302
276
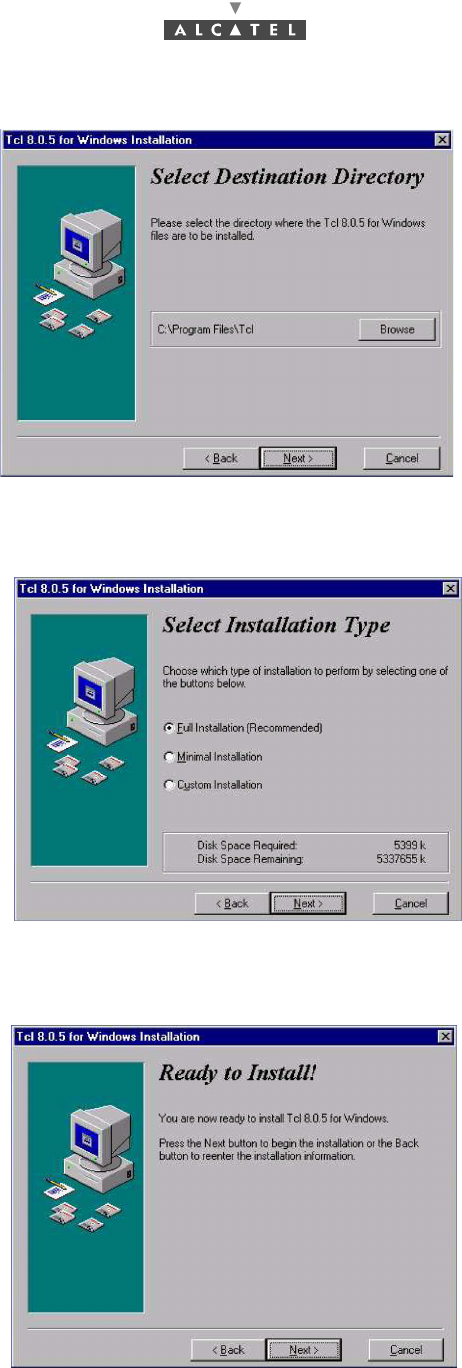
–The Select Destination Directory screen appears:
–If you agree with the default destination folder, click on the «Next» button. If you disagree, you can
change it by clicking on the «Browse» button and selecting the desired destination folder. In this
case, you must modify the LT configuration file ("craft.ini") (see A.3.4 – LT configuration file mo-
dification).
–The Select Components screen appears:
–For the Mib Migration tool, you will deselect all boxes except "Python interpreter and library" (other
options are useless).
–Then, click on the «Next» button to continue the installation procedure.
–The Select Start Menu Group screen appears:
AT THE EXCEPTION OF DIRECTORY NAME «PROGRAM FILES», OTHER PYTHON
INSTALLATION DIRECTORY MUST NOT CONTAIN SPACE CHARACTERS,
OTHERWISE MIB MIGRATION WILL FAIL

272/302 Issue 01 - April 2001 - Draft 04 3CC12424AAAA TQ BJA 01
276
–If you agree with the default group, click on the «OK» button to continue the installation procedure.
If you disagree, you can change it by typing the desired name.
–The Ready to install screen appears. Now you are ready to install "Python" in your computer.
Click on the «Next» button to install it.
–The Installing screen appears (progress bar) and is completed (at the end of the installation, you
will click on the «Finish» button).
–If you don't have the administrator rights, an error message will appear.
–If in the previous screen you have selected "Tcl/Tk installation", the Install Tcl/Tk screen will ap-
pear:
–Select «No» and the installation will finish.
–If you select «Yes», Tcl/Tk will be installed (it's useless but there is no risk for the system) and the
Welcome screen appears.
–Click on the «Next» button to continue the Tcl/Tk installation procedure.
3CC12424AAAA TQ BJA 01 Issue 01 - April 2001 - Draft 04 273/302
276
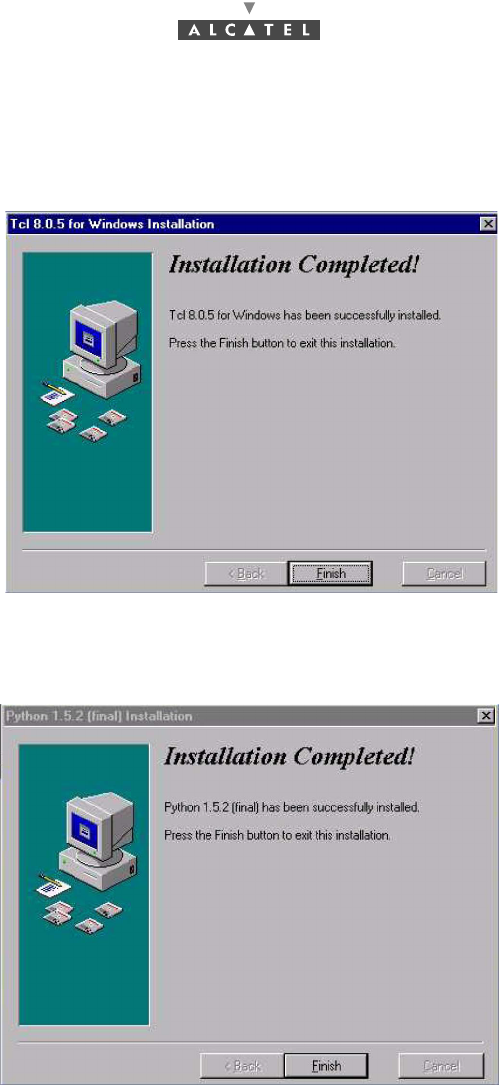
–The Select Destination Directory screen appears.
–If you agree with the default destination folder, click on the «Next» button. If you disagree , you
can change it by clicking on «Browse» button and selecting the desired destination folder.
–The Select Installation Type screen appears.
–Select the default type (Full installation) or select another one (Minimal or customized installa-
tion).). Click on the «Next» button to continue.
–The Ready to Install screen appears.
274/302 Issue 01 - April 2001 - Draft 04 3CC12424AAAA TQ BJA 01
276
–Now you are ready to install "Tcl/Tk" in your computer. Click on the «Next» button to install it .
–The Installing screen appears (progress bar).
–The installation has been completed. The Installation Completed screen will appear.
–Press «Finish».
–A window appears to show that Tclsh is added in the "Start menu group".
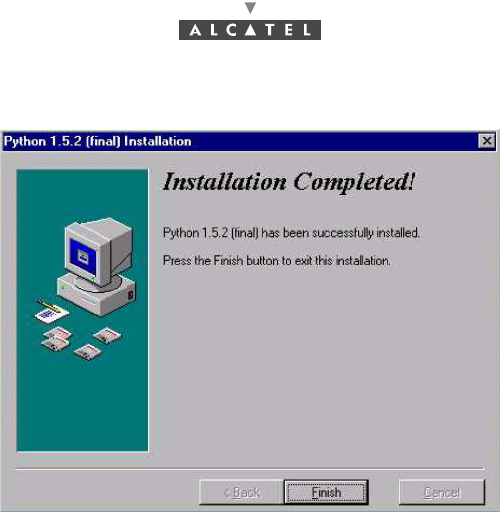
–The installation has been completed. The Installation Completed! screen will appear:
3CC12424AAAA TQ BJA 01 Issue 01 - April 2001 - Draft 04 275/302
276
–Press «Finish».
–Now you are ready to use Python for the MIB migration.
A.3.4 – LT configuration file modification
If the MIB migration CD content has not been copied in the default directory ("C:"), you need to edit the
LT configuration file (C:\ProgramFiles\7390LT\Craft.ini) and modify the following parameter:
MIB_MIGRATION_SCRIPT_PATH="C:\mibconv"
If "Python" has not been installed in the default directory, you need to edit the LT configuration file
(C:\ProgramFiles\7390LT\Craft.ini) and modify the following parameter:
MIB_MIGRATION_PYTHON_EXE="C:\Program Files\Python\Python.exe"

276/302 Issue 01 - April 2001 - Draft 04 3CC12424AAAA TQ BJA 01
276
PAGE INTENTIONALLY LEFT BLANK