Furuno USA 9ZWRTR104 Transceiver for Radar Sensor DRS4DL User Manual
Furuno USA Inc Transceiver for Radar Sensor DRS4DL
Contents
- 1. User Manual I
- 2. User Manual II Part 1
- 3. User Manual II Part 2
- 4. User Manual II Part 3
- 5. User Manual II Part 4
- 6. User Manual II Part 5
- 7. User Manual II Part 6
- 8. User Manual II Part 7
- 9. User Manual II Part 8
- 10. User Manual II Part 9
- 11. User Manual II Part 10
- 12. User Manual II Part 11
- 13. User Manual II Part 12
User Manual II Part 1

i
IMPORTANT NOTICES
General
How to discard this product
Discard this product according to local regulations for the disposal of industrial waste. For disposal
in the USA, see the homepage of the Electronics Industries Alliance (http://www.eiae.org/) for the
correct method of disposal.
How to discard a used battery
Some FURUNO products have a battery(ies). To see if your product has a battery, see the chapter
on Maintenance. Follow the instructions below if a battery is used. Tape the + and - terminals of
battery before disposal to prevent fire, heat generation caused by short circuit.
In the European Union
The crossed-out trash can symbol indicates that all types of batteries
must not be discarded in standard trash, or at a trash site. Take the
used batteries to a battery collection site according to your national
legislation and the Batteries Directive 2006/66/EU.
In the USA
The Mobius loop symbol (three chasing arrows) indicates that Ni-Cd
and lead-acid rechargeable batteries must be recycled. Take the fin-
ished batteries to a battery collection site according to local laws.
In the other countries
There are no international standards for the battery recycle symbol. The number of symbols can
increase when the other countries make their own recycle symbols in the future.
• This manual has been authored with simplified grammar, to meet the needs of international users.
• The operator of this equipment must read and follow the descriptions in this manual. Wrong oper-
ation or maintenance can cancel the warranty or cause injury.
• Do not copy any part of this manual without written permission from FURUNO.
• If this manual is lost or worn, contact your dealer about replacement.
• The contents of this manual and equipment specifications can change without notice.
• The example screens (or illustrations) shown in this manual can be different from the screens you
see on your display. The screens you see depend on your system configuration and equipment
settings.
• Save this manual for future reference.
• Any modification of the equipment (including software) by persons not authorized by FURUNO will
cancel the warranty.
• The microSDXC logo is a trademark of the SD Card Association.
• Apple, App Store, iPhone, iPod, iPad are registered trademarks of Apple Inc, registered in the USA
and other countries.
• Android, Google and Google Play are registered trademarks of Google, Inc.
• FLIR is a registered trademark of FLIR Systems, Inc.
• OceanView is a registered trademark of Ocean Optics, Inc.
• Fusion-Link is a registered trademark of FUSION Electronics, Ltd.
• All brand and product names are trademarks, registered trademarks or service marks of their re-
spective holders.
Cd
ii
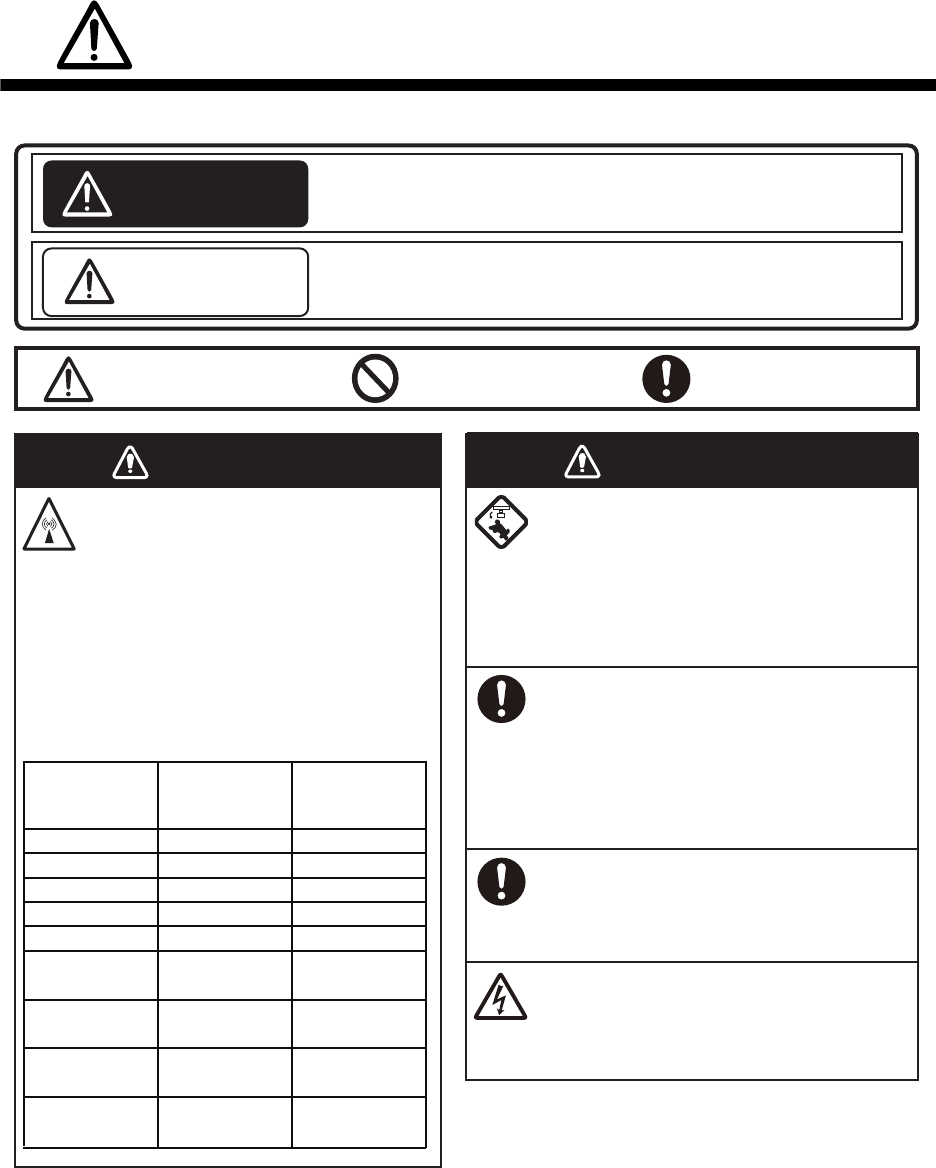
SAFETY INSTRUCTIONS
WARNING
CAUTION
Warning, Caution Prohibitive Action Mandatory Action
WARNING
The front panel of the display unit is
made of glass. Handle it with care.
Injury can result if the glass breaks.
Please review these safety instructions before you operate the equipment.
Indicates a condition that can cause death or serious injury
if not avoided.
Indicates a condition that can cause minor or moderate
injury if not avoided.
The radar antenna emits
electromagnetic radio frequency
(RF) energy. This energy can be
dangerous to you, especially
your eyes. Do not look at the
radiator or near the antenna
when the antenna is rotating.
The distances at which RF radiation
levels of 100 W/m2 and 10 W/m2
exist are shown in the table.
Check that no person is near the
radar antenna before you turn on
the radar.
Serious injury or death can occur if a
person is hit by a rotating radar
antenna.
Turn off the power immediately at
the switchboard if water leaks into
the equipment or smoke or fire is
coming from the equipment.
Failure to turn off the equipment can
cause fire or electrical shock.
Do not open the equipment.
Only qualified persons can work inside
the equipment.
N/A 1.2 m
1.1 m
1.2 m
0.1 m 1.4 m
Antenna
Model
Distance to
100 W/m2 point
Distance to
10 W/m2 point
DRS25A
w/XN13A
DRS25A
w/XN12A
DRS12A
w/XN13A
DRS12A
w/XN12A
DRS6A
DRS4DL
DRS4A
DRS2D
0.2 m
0.2 m
0.5 m
0.4 m
0.4 m
2.4 m
1.9 m
5.3 m
4.4 m
DRS4D
N/A
N/A
N/A
WARNING
SAFETY INSTRUCTIONS
iii
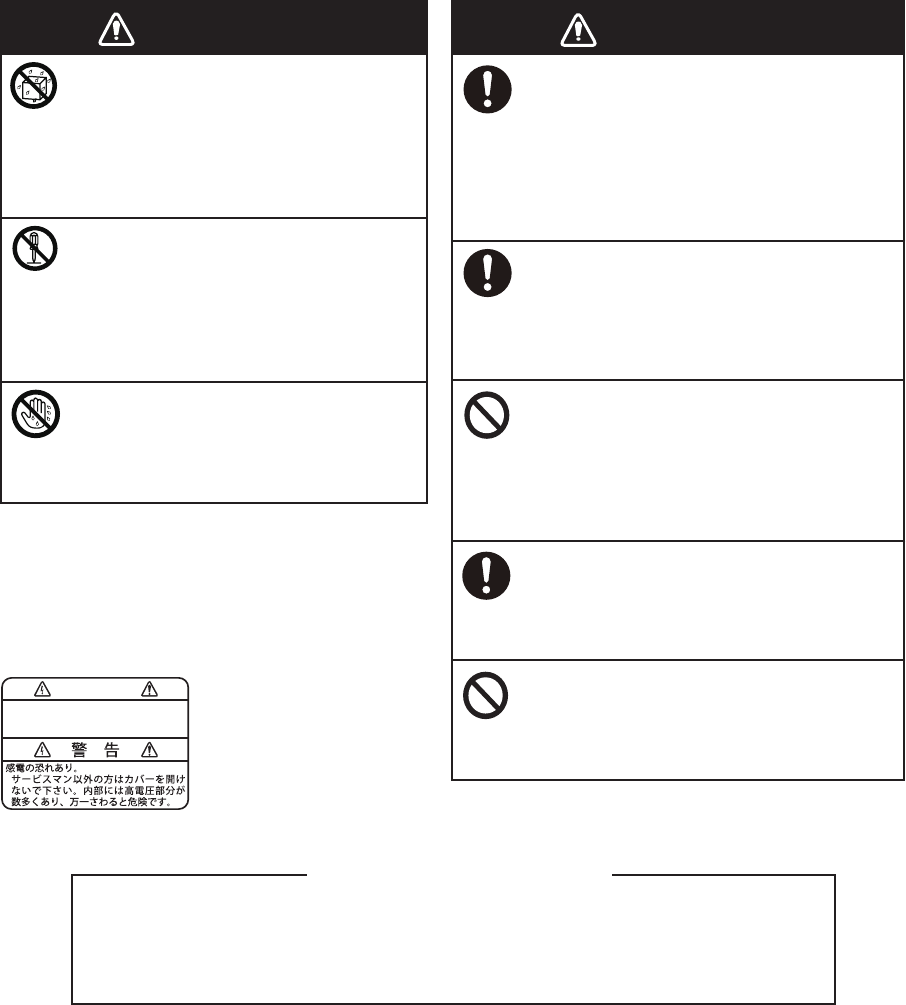
WARNING
Keep units other than the radar
antenna away from rain and
water.
Fire or electrical shock can occur if
water gets inside the equipment.
Do not disassemble or modify the
equipment.
Fire or electrical shock can occur if
the equipment is disassembled or
modified.
Do not operate the equipment with
wet hands.
Electrical shock can occur.
WARNING
Do not depend on one navigation
device for the navigation of the
vessel.
Always check your position against all
available aids to navigation, for the
safety of vessel and crew.
A radar is an excellent anti-collision
aid, but remember to keep watch for
possible collision conditions.
Always keep a watch while underway.
Do not leave any objects near the
radar antenna.
Fire, electrical shock or injury can
result if something gets caught in the
radar antenna.
Use the correct fuse.
A wrong fuse can cause fire or serious
damage to the equipment.
Do not maneuver the vessel based
on the depth indication alone.
Grounding can occur.
The TFT LCD is constructed using the latest LCD techniques, and displays
99.99% of its pixels. The remaining 0.01% of the pixels may drop out or blink,
however this is not an indication of malfunction.
About the TFT LCD
A safety label is attached to the display unit. Do
not remove the label. If the label is missing or
damaged, contact a FURUNO agent or dealer
about replacement.
Name: Warning Label (1)
Type: 86-003-1011-3
Code No.: 100-236-233-10
Safety Labels
WARNING
To avoid electrical shock, do not
remove cover. No user-serviceable
parts inside.

iv
TABLE OF CONTENTS
FOREWORD ....................................................................................................................x
SYSTEM CONFIGURATION .........................................................................................xii
1. SYSTEM INTRODUCTION ................................................................................... 1-1
1.1 Controls......................................................................................................................1-2
1.2 Remote Control Unit MCU-002 (Option) ....................................................................1-5
1.3 How to Turn the Power On or Off...............................................................................1-6
1.4 How to Adjust the Brilliance of the Display, the Power Indicator and the Hue ...........1-7
1.5 Home Screen .............................................................................................................1-8
1.6 How to Select a Display .............................................................................................1-9
1.6.1 How to select a display from the home screen ..............................................1-9
1.6.2 How to select a display from the quick page................................................1-10
1.7 How to Edit the Display Icons ..................................................................................1-11
1.7.1 How to add a new display icon.....................................................................1-11
1.7.2 How to edit or remove a display icon ...........................................................1-12
1.8 Hidden Functions .....................................................................................................1-13
1.9 Data Area .................................................................................................................1-15
1.9.1 How to change the order of the data............................................................1-15
1.9.2 How to change the contents of a data box...................................................1-16
1.9.3 How to add data to a data area....................................................................1-16
1.9.4 How to delete a data box .............................................................................1-17
1.9.5 How to switch an indication between analog (graphic) and digital...............1-18
1.9.6 How to adjust the transparency of the data area .........................................1-18
1.10 Micro SD Cards........................................................................................................1-19
1.11 Plotter Introduction ...................................................................................................1-21
1.12 Radar Introduction....................................................................................................1-22
1.13 Sounder (Fish Finder) Introduction ..........................................................................1-23
1.14 Settings Menu ..........................................................................................................1-24
1.15 Function Gesture......................................................................................................1-27
1.16 Language .................................................................................................................1-28
1.17 Man Overboard (MOB).............................................................................................1-29
1.18 Wireless LAN Settings .............................................................................................1-30
1.18.1 How to connect the existing LAN .................................................................1-30
1.18.2 How to create a local wireless network ........................................................1-31
1.18.3 How to forget all wireless LAN .....................................................................1-31
1.18.4 Operation by wireless terminal.....................................................................1-32
2. PLOTTER .............................................................................................................. 2-1
2.1 Chart Type .................................................................................................................2-1
2.2 Display Range............................................................................................................2-2
2.3 Orientation Mode........................................................................................................2-3
2.4 How to Move the Chart ..............................................................................................2-3
2.5 The Boat Icon.............................................................................................................2-4
2.6 How to Find the Position, Range, Bearing of an Object.............................................2-6
2.7 How to Find the Range and Bearing Between Two Locations...................................2-6
2.8 Chart Object Information ............................................................................................2-7
2.9 Multiple Plotter Displays.............................................................................................2-8
2.10 Cartographic Text and Objects on Vector Charts ......................................................2-9
2.10.1 Control visibility of text and object information in vector charts......................2-9
2.10.2 Control visibility of cartographic objects in S-52 charts................................2-10
2.11 Alarms ......................................................................................................................2-12
2.11.1 XTE alarm ....................................................................................................2-13
TABLE OF CONTENTS
v
2.11.2 Depth alarm ................................................................................................. 2-13
2.11.3 SST alarm.................................................................................................... 2-13
2.11.4 Speed alarm ................................................................................................ 2-14
2.11.5 Anchor watch alarm..................................................................................... 2-15
2.11.6 Other Alarm menu items.............................................................................. 2-15
2.11.7 How to show the Alarms list ........................................................................ 2-16
2.12 Track........................................................................................................................ 2-16
2.12.1 How to start, stop recording the track.......................................................... 2-16
2.12.2 How to show or hide the track display ......................................................... 2-16
2.12.3 Track interval ............................................................................................... 2-17
2.12.4 Track color................................................................................................... 2-17
2.12.5 Track thickness............................................................................................ 2-20
2.12.6 How to delete tracks .................................................................................... 2-20
2.12.7 How to find number of track points used ..................................................... 2-21
2.13 Plotter Menu ............................................................................................................ 2-21
2.14 NAVpilot-700 Series Auto Pilot................................................................................ 2-23
2.14.1 How to enable use of the navpilot ............................................................... 2-23
2.14.2 How to show the NAVpilot control box in the data area .............................. 2-23
3. 3D DISPLAY, OVERLAYS ....................................................................................3-1
3.1 3D Display ................................................................................................................. 3-1
3.1.1 How to activate the 3D display ...................................................................... 3-2
3.1.2 How to make the 3D view clearer.................................................................. 3-3
3.2 Overlays .................................................................................................................... 3-4
3.2.1 Depth shading overlay................................................................................... 3-4
3.2.2 Satellite photo overlay ................................................................................... 3-6
3.2.3 Radar overlay ................................................................................................ 3-6
3.2.4 Tide info overlay ............................................................................................ 3-8
3.2.5 Tidal current overlay .................................................................................... 3-10
4. POINTS ..................................................................................................................4-1
4.1 About Points .............................................................................................................. 4-1
4.2 How to Enter a Point, Event Mark ............................................................................. 4-1
4.2.1 How to put a point at selected position.......................................................... 4-1
4.2.2 How to put an event mark (at own ship position)........................................... 4-2
4.3 How to Display Point, Event Mark Information .......................................................... 4-2
4.4 Default Point Settings ................................................................................................ 4-4
4.5 How to Find Number of Points Used ......................................................................... 4-5
4.6 How to Move a Point ................................................................................................. 4-5
4.6.1 How to move a point on the screen ............................................................... 4-5
4.6.2 How to move a point from the points list........................................................ 4-5
4.7 How to Delete a Point................................................................................................ 4-6
4.7.1 How to delete a point on the screen .............................................................. 4-6
4.7.2 How to delete a point from the points list....................................................... 4-6
4.7.3 How to delete all points ................................................................................. 4-6
4.8 How to Edit a Point .................................................................................................... 4-7
4.8.1 How to edit a point on the screen .................................................................. 4-7
4.8.2 How to edit a point from the points list........................................................... 4-8
4.9 How to Move a Point to the Screen Center ............................................................. 4-10
4.10 How to Show or Hide All Points or Points Names ................................................... 4-10
4.11 How to Go to a Point ............................................................................................... 4-10
4.11.1 How to go to an on-screen point.................................................................. 4-11
4.11.2 How to go to a position selected on screen................................................. 4-12
4.11.3 How to go to a point selected from the points list ........................................ 4-13
4.11.4 How to use the NAVpilot to steer to a point................................................. 4-13
4.11.5 How to display the point information for the active goto point (route).......... 4-14
TABLE OF CONTENTS
vi
4.12 How to Restart or Cancel Navigation to a Point.......................................................4-15
4.12.1 How to restart navigation to a point..............................................................4-15
4.12.2 How to cancel navigation to a point .............................................................4-15
5. ROUTES................................................................................................................ 5-1
5.1 What is a Route?........................................................................................................5-1
5.2 How to Create a Route...............................................................................................5-1
5.2.1 How to create a new route from the plotter screen ........................................5-1
5.2.2 How to create a new route from a point .........................................................5-2
5.2.3 How to create a route from the points list.......................................................5-2
5.2.4 How to insert a route point on a route ............................................................5-3
5.2.5 How to move a route point on a route ............................................................5-3
5.2.6 How to delete a point or route point on a route ..............................................5-3
5.2.7 How to remove a point from a route...............................................................5-4
5.2.8 How to extend a route ....................................................................................5-4
5.3 Routes List .................................................................................................................5-4
5.4 How to Find Number of Routes Created ....................................................................5-6
5.5 How to Find a Route on the Chart..............................................................................5-6
5.6 How to Delete a Route ...............................................................................................5-7
5.6.1 How to delete a route on the screen ..............................................................5-7
5.6.2 How to delete a route from the routes list ......................................................5-7
5.6.3 How to delete all routes..................................................................................5-7
5.7 How to Show or Hide All Routes ................................................................................5-7
5.8 How to Follow a Route ...............................................................................................5-8
5.8.1 How to follow an on-screen route...................................................................5-8
5.8.2 How to follow a route selected from the routes list.........................................5-9
5.8.3 How to start navigation from a route point .....................................................5-9
5.8.4 How to show the detailed information about a route ....................................5-10
5.9 Operations When You Follow a Route.....................................................................5-10
5.9.1 How to restart navigation .............................................................................5-10
5.9.2 How to follow a route in the reverse direction ..............................................5-10
5.9.3 How to stop following a route .......................................................................5-10
5.9.4 How to skip a go to point on a route.............................................................5-10
5.9.5 Waypoint switching mode ............................................................................5-11
5.9.6 Route auto zoom..........................................................................................5-11
5.9.7 XTE lines......................................................................................................5-12
5.9.8 Waypoint arrival notification .........................................................................5-12
5.9.9 End of route notification ...............................................................................5-12
5.9.10 Steering a route with the NAVpilot ...............................................................5-13
5.10 Routes Menu............................................................................................................5-14
6. RADAR.................................................................................................................. 6-1
6.1 How to Transmit, Set the Radar in Stand-by..............................................................6-1
6.2 Tuning ........................................................................................................................6-1
6.3 How to Adjust the Gain ..............................................................................................6-2
6.4 How to Reduce the Sea Clutter..................................................................................6-3
6.5 How to Reduce the Rain Clutter.................................................................................6-4
6.6 Range Scale...............................................................................................................6-4
6.7 Orientation Mode........................................................................................................6-5
6.8 How to Measure the Range and Bearing from Your Ship to a Target........................6-6
6.8.1 How to display the range rings.......................................................................6-6
6.8.2 How to set the number of the range rings to show.........................................6-6
6.8.3 How to select the range rings mode...............................................................6-7
6.8.4 How to measure the range and bearing.........................................................6-8
6.8.5 How to measure the range with the VRM ......................................................6-8
6.8.6 How to measure the bearing with the EBL...................................................6-10
TABLE OF CONTENTS
vii
6.8.7 How to select the EBL reference ................................................................. 6-11
6.9 How to Measure the Range and Bearing Between Two Targets ............................ 6-12
6.10 How to Off-center the Picture .................................................................................. 6-12
6.11 Heading Line ........................................................................................................... 6-13
6.12 How to Reduce Radar Interference ......................................................................... 6-13
6.13 Guard Zone ............................................................................................................. 6-13
6.13.1 How to set the guard zone........................................................................... 6-13
6.13.2 How to activate or deactivate the guard zone ............................................. 6-14
6.13.3 How to hide the guard zone......................................................................... 6-14
6.14 Watchman ............................................................................................................... 6-14
6.15 How to Show, Hide or Cancel an Active Route ....................................................... 6-15
6.16 How to Show or Hide the Own Ship Icon ................................................................ 6-15
6.17 Echo Color............................................................................................................... 6-15
6.18 Background Color.................................................................................................... 6-16
6.19 Radar Overlay Range Link ...................................................................................... 6-16
6.20 Dual-Range Display................................................................................................. 6-17
6.21 Radar Menu............................................................................................................. 6-18
6.22 How to Interpret the Radar Display ......................................................................... 6-19
6.22.1 False echoes ............................................................................................... 6-19
6.22.2 Search and rescue transponder (SART) ..................................................... 6-21
6.22.3 Racon (Radar Beacon)................................................................................ 6-21
6.23 ARPA Operation ...................................................................................................... 6-22
6.23.1 How to show or hide the ARPA display ....................................................... 6-22
6.23.2 How to manually acquire a target ................................................................ 6-23
6.23.3 How to automatically acquire a target ......................................................... 6-23
6.23.4 How to display target data ........................................................................... 6-24
6.23.5 How to stop tracking targets ........................................................................ 6-24
6.23.6 How to clear a lost target............................................................................. 6-24
6.23.7 CPA/TCPA alarm......................................................................................... 6-25
7. FISH FINDER (SOUNDER) ...................................................................................7-1
7.1 How the Fish Finder Operates................................................................................... 7-1
7.2 How to Select a Display............................................................................................. 7-2
7.2.1 Single frequency display................................................................................ 7-2
7.2.2 Dual frequency display .................................................................................. 7-3
7.2.3 Zoom displays ............................................................................................... 7-3
7.2.4 A-scope display (display only) ....................................................................... 7-5
7.2.5 Bottom discrimination display ........................................................................ 7-6
7.3 Automatic Fish Finder Operation............................................................................... 7-7
7.3.1 How the automatic fish finder operates ......................................................... 7-7
7.3.2 How to select an automatic fish finder mode................................................. 7-7
7.4 Manual Fish Finder Operation ................................................................................... 7-7
7.4.1 How to select the manual mode .................................................................... 7-7
7.4.2 How to select the display range..................................................................... 7-7
7.4.3 How to shift the range.................................................................................... 7-8
7.4.4 How to adjust the gain ................................................................................... 7-8
7.4.5 How to reduce the clutter............................................................................... 7-9
7.5 Picture Advance Speed ............................................................................................. 7-9
7.6 How to Reduce Interference.................................................................................... 7-10
7.7 How to Measure Range, Depth to an Object........................................................... 7-10
7.8 Echo History Display ............................................................................................... 7-11
7.9 How to Balance Echo Strength................................................................................ 7-11
7.10 Fish Finder Alarms .................................................................................................. 7-12
7.10.1 How to set an alarm..................................................................................... 7-12
7.10.2 How to activate or deactivate an alarm ....................................................... 7-13
7.10.3 Alarm sensitivity........................................................................................... 7-13
TABLE OF CONTENTS
viii
7.11 ACCU-FISH™...........................................................................................................7-13
7.11.1 How to set ACCU-FISH™.............................................................................7-14
7.11.2 Fish size correction ......................................................................................7-15
7.11.3 How to turn the fish symbol indication on or off ...........................................7-15
7.11.4 How to display the fish information ..............................................................7-15
7.12 How to Enter an Event Mark, Go to an Event Mark or a Position ............................7-16
7.13 Temperature Graph..................................................................................................7-16
7.14 Sounder Menu .........................................................................................................7-17
7.15 Interpreting the Display ............................................................................................7-20
8. FILE OPERATIONS .............................................................................................. 8-1
8.1 File Format .................................................................................................................8-1
8.2 How to Export Points and Routes ..............................................................................8-2
8.3 How to Import Points and Routes ..............................................................................8-2
8.4 How to Import or Export Track ...................................................................................8-3
8.5 How to Backup the Equipment Settings.....................................................................8-3
8.6 How to Load the Equipment Settings.........................................................................8-4
9. CAMERA/VIDEO/FUSION-Link............................................................................ 9-1
9.1 How to Display a Video Image ...................................................................................9-1
9.2 Video Signal Type ......................................................................................................9-2
9.3 How to Set the Video Display.....................................................................................9-2
9.3.1 How to set the video signal ............................................................................9-2
9.3.2 How to adjust the image size .........................................................................9-3
9.3.3 How to switch your video inputs.....................................................................9-4
9.3.4 How to adjust the video image .......................................................................9-4
9.4 Control of FLIR Camera .............................................................................................9-5
9.5 Tracking Active Waypoint, MOB ................................................................................9-5
9.6 Touch Control on the Camera Display .......................................................................9-5
9.7 FUSION-Link..............................................................................................................9-6
9.7.1 How to access the FUSION screen and controls...........................................9-6
10. INSTRUMENT DISPLAY..................................................................................... 10-1
10.1 How to Show the Instrument Display .......................................................................10-1
10.2 Instrument Displays..................................................................................................10-2
10.2.1 Full screen displays......................................................................................10-2
10.2.2 Split screen displays ....................................................................................10-3
10.2.3 How to switch between instrument displays.................................................10-4
10.3 How to Edit the Instrument Display ..........................................................................10-5
10.3.1 How to arrange the indications in the instrument display.............................10-5
10.3.2 How to edit, remove an indication in the instrument display ........................10-5
10.3.3 How to add an indication to the instrument display......................................10-6
10.4 Instrument Theme ....................................................................................................10-6
11. WEATHER........................................................................................................... 11-1
11.1 Weather Display Introduction ...................................................................................11-1
11.2 NavCenter Weather .................................................................................................11-2
11.2.1 How to set up for NavCenter weather ..........................................................11-2
11.2.2 How to download the NavCenter weather data............................................11-3
11.2.3 How to display the NavCenter data..............................................................11-5
11.2.4 How to load a weather file............................................................................11-5
11.3 Sirius Weather..........................................................................................................11-6
11.3.1 How to set up for Sirius weather ..................................................................11-6
11.3.2 How to display the Sirius data......................................................................11-7
11.4 Weather Icons (Sirius Weather) ...............................................................................11-8
11.5 Weather Data (NavCenter or Sirius) ........................................................................11-9
TABLE OF CONTENTS
ix
12. AIS, DSC MESSAGE...........................................................................................12-1
12.1 What is AIS?............................................................................................................ 12-1
12.2 How to Show or Hide the AIS Symbols ................................................................... 12-1
12.3 AIS Target Symbols................................................................................................. 12-1
12.4 Proximity AIS Target Alarm ..................................................................................... 12-3
12.5 How to Ignore Slow Moving AIS Targets................................................................. 12-3
12.6 How to Hide AIS Targets ......................................................................................... 12-3
12.7 How to Display AIS Target Data.............................................................................. 12-4
12.8 How to Show or Hide the Target IDs ....................................................................... 12-4
12.9 AIS List ....................................................................................................................12-5
12.10How to Register an AIS or DSC Target to the Buddies List.................................... 12-6
12.11AIS Transponder FA-30, FA-50 .............................................................................. 12-7
12.12DSC Message Information...................................................................................... 12-8
12.12.1DSC message notification ........................................................................... 12-8
12.12.2How to go to a DSC point ............................................................................ 12-8
12.12.3How to display DSC information.................................................................. 12-9
12.12.4The DSC list .............................................................................................. 12-10
13. OTHER FUNCTIONS...........................................................................................13-1
13.1 General Menu.......................................................................................................... 13-1
13.2 Units Menu .............................................................................................................. 13-3
13.3 Initial Setup Menu.................................................................................................... 13-4
13.4 Facsimile Receiver FAX-30 ..................................................................................... 13-8
13.5 Software Update...................................................................................................... 13-9
13.6 How to Manage Your Charts ................................................................................. 13-10
13.6.1 How to view your charts ............................................................................ 13-10
13.6.2 How to update or add charts ..................................................................... 13-11
13.6.3 How to delete charts.................................................................................. 13-11
14. MAINTENANCE, TROUBLESHOOTING ............................................................14-1
14.1 Maintenance ............................................................................................................ 14-1
14.2 Fuse Replacement .................................................................................................. 14-2
14.3 Life of the Parts ....................................................................................................... 14-2
14.4 Troubleshooting....................................................................................................... 14-3
14.4.1 General troubleshooting .............................................................................. 14-3
14.4.2 Radar troubleshooting ................................................................................. 14-3
14.4.3 Plotter troubleshooting................................................................................. 14-4
14.4.4 Fish finder troubleshooting .......................................................................... 14-4
APPENDIX 1 MENU TREE .......................................................................................AP-1
APPENDIX 2 RADIO REGULATORY INFORMATION ..........................................AP-10
SPECIFICATIONS ..................................................................................................... SP-1
INDEX ......................................................................................................................... IN-1

x
FOREWORD
A Word to the Owner of the TZTL12F, TZTL15F
Congratulations on your choice of the TZTL12F, TZTL15F Multi Function Display, members of the
NavNet TZtouch2 family of multi-function displays. We are confident you will see why the FURU-
NO name has become synonymous with quality and reliability.
Since 1948, FURUNO Electric Company has enjoyed an enviable reputation for innovative and
dependable marine electronics equipment. This dedication to excellence is furthered by our ex-
tensive global network of agents and dealers.
Your equipment is designed and constructed to meet the rigorous demands of the marine envi-
ronment. However, no machine can perform its intended function unless properly installed and
maintained. Please carefully read and follow the operation and maintenance procedures set forth
in this manual.
We would appreciate feedback from you, the end-user, about whether we are achieving our pur-
poses.
Thank you for considering and purchasing FURUNO.
Features
The NavNet TZtouch2, equipped with a touch screen with multi touch capacity, is a networked
navigation system that gives you radar, plotter, fish finder, AIS receiver, etc. Information is trans-
ferred between NavNet TZtouch2 units through Ethernet or NMEA 2000. The plug-and-play for-
mat allows expansion and you can connect a maximum of four NavNet TZtouch2 units. Also, you
can control the NavNet TZtouch2 units and display their data on an iPhone, iPod, iPad, or An-
droid™ device.
Main features
• Intuitive touch control operation.
• Remote control, monitoring from smartphone, tablet. The NavNet TZtouch2 units can be con-
trolled and monitored from the following applications*.
* Free applications from the App Store™, Google Play™ for Android™.
• Instrument display provides comprehensive navigation with connection of appropriate sensors.
• Built in wireless LAN to update program and download weather data via the internet. (NavNet
TZtouch2 units sold in China do not have wireless LAN capability.)
• Points, routes, etc. are transferred and shared between NavNet TZtouch2 units via Ethernet.
• Large memory stores 30,000 track points, 30,000 points, and 200 routes (500 points per route).
• Optional Card Unit SDU-001 writes and reads data (points, routes, etc. on Micro SD cards.
Application Capability iOS Android™
NavNet Remote Operate, monitor
NavNet TZtouch2.
Operation: iPad only
Monitor: Other iOS
devices
Yes
Operation: 4 inch or larger
Monitor: 3.9 or smaller
NavNet Viewer Display nav data,
sounder picture.
Yes Yes
NavNet Controller Remote control of
NavNet TZtouch2.
No Yes
FOREWORD
xi
• Built in GPS receiver and antenna
• Built in fish finder
• AIS function (requires connection of AIS transponder) receives AIS data from other vessels,
shore stations and navigational aids and displays this data.
• ACCU-FISH™ provides at-a-glance estimation of length and depth of individual fish.
• Bottom discrimination display helps identify probable bottom composition with graphics and col-
ors.
• Dual-range radar display for watch on short and long distances at the same time.
• DSC (Digital Selective Calling) message information feature provides the MMSI no. and posi-
tion of vessels that have transmitted a DSC message to you. (Requires DSC capable radiotele-
phone.)
• Camera (FLIR™, OceanView™) monitors area around the vessel.
• Control audio of FUSION-Link™ equipment.
• HDMI output (type A receptacle)
xii
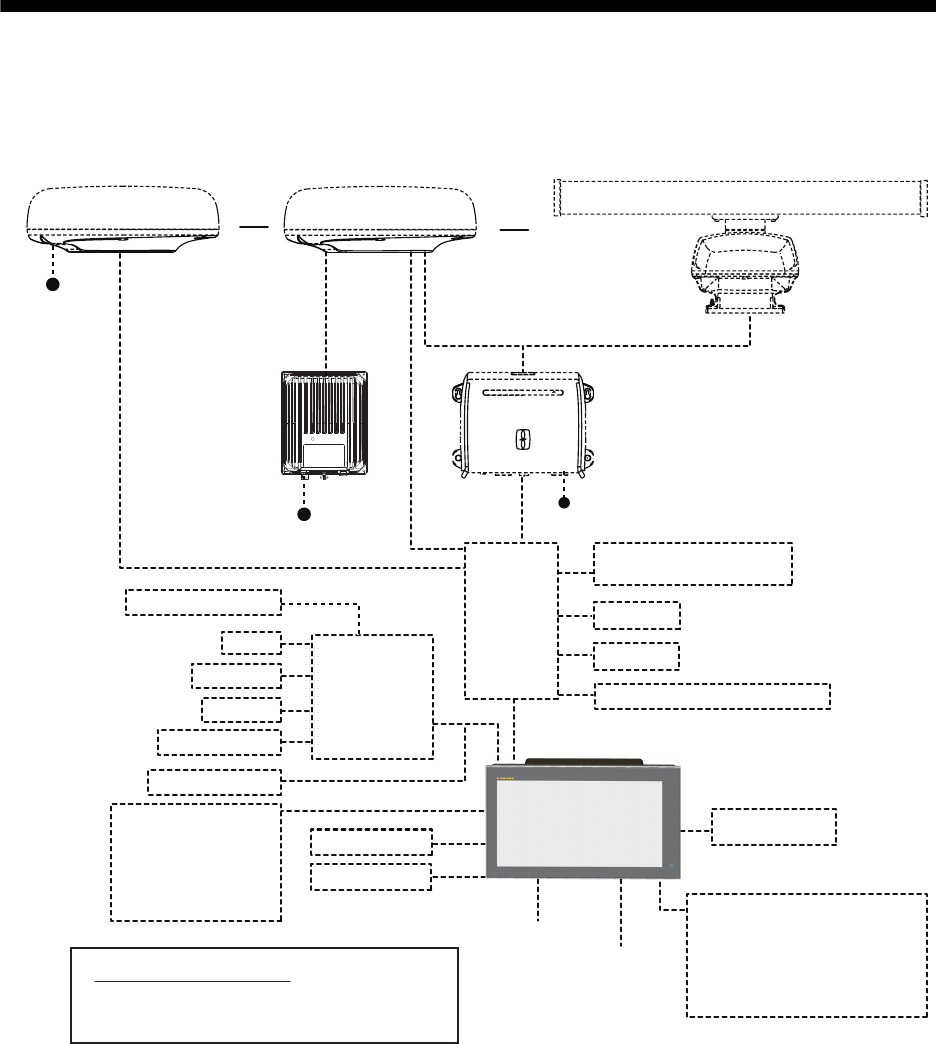
SYSTEM CONFIGURATION
Basic configuration is shown with solid lines. Optional equipment is denoted with dashed lines.
Note: When connecting an external monitor to the multi function display, use a monitor whose as-
pect ratio is the same as that of the multi function display (16:9). The pictures may be stretched
or shrunk with a different aspect ratio. Output to an HPD (Hot Plug Detect) monitor is not possible.
DRS2D/DRS4D
DRS4DL
(Available in Spring 2015)
OR OR
DRS4A/DRS6A/DRS12A/DRS25A
CCD Camera
CCD Camera
FI-5002
SC-30
GP-330B
NAVpilot-700
FI-50/70
IF-NMEA2K1/2
12/24 VDC
Event SW
External Buzzer
Operator Fitness
Power input for NMEA2000
NMEA0183 out
Echo Sounder
(BBDS1, DFF series)
Environmental category
Radar antenna: Exposed to the weather
All other units: Protected from the weather
AIS Transponder
12-24 VDC
POWER
SUPPLY
UNIT*
1
PSU-017
*1 Radar sensor other than the DRS4DL requires a power supply unit.
*2 FUSION Electronics MS-700 series only (as of 12/2014).
*3 Max. 4 NavNet TZtouch2 units (Connected via Ethernet hub).
HUB -101 FA-30/50
FAX-30
FUSION-Link Equipment*
2
Wide Monitor
12-24 VDC
POWER SUPPLY UNIT*
1
PSU-012/PSU-013
Remote Controller
MCU-002
or
SD Card Unit
SDU-001
Multi Function Display*3
TZTL12F
or
TZTL15F
Multi Function Display*3
TZTL12F
or
TZTL15F
Transducer
RADOME-TYPE RADAR SENSORS OPEN-TYPE RADAR SENSOR
For PSU-017
12-24 VDC

1-1
1. SYSTEM INTRODUCTION
This chapter provides the information necessary to get you started using your system.
Standards used in this manual
• Key names are shown in boldface type. For example, ENT key (on the MCU-002).
• Menu items, on-screen indications and window names are shown in brackets. For
example, the [Settings] menu.
• On-screen messages are shown in quotations. For example, "No Network Connect-
ed".
• The [Settings] menu is comprised of several sub menus. When you are asked to se-
lect one of its sub menus, “[Settings]” is followed by a hyphen and the sub menu
name. For example, "Tap [Settings] - [General]”.
• The colors mentioned in this manual are the default colors. Your colors may be dif-
ferent.
• Most of the screenshots in this manual are from the TZTL12F. The layout is slightly
different on the TZTL15F.
1. SYSTEM INTRODUCTION
1-2
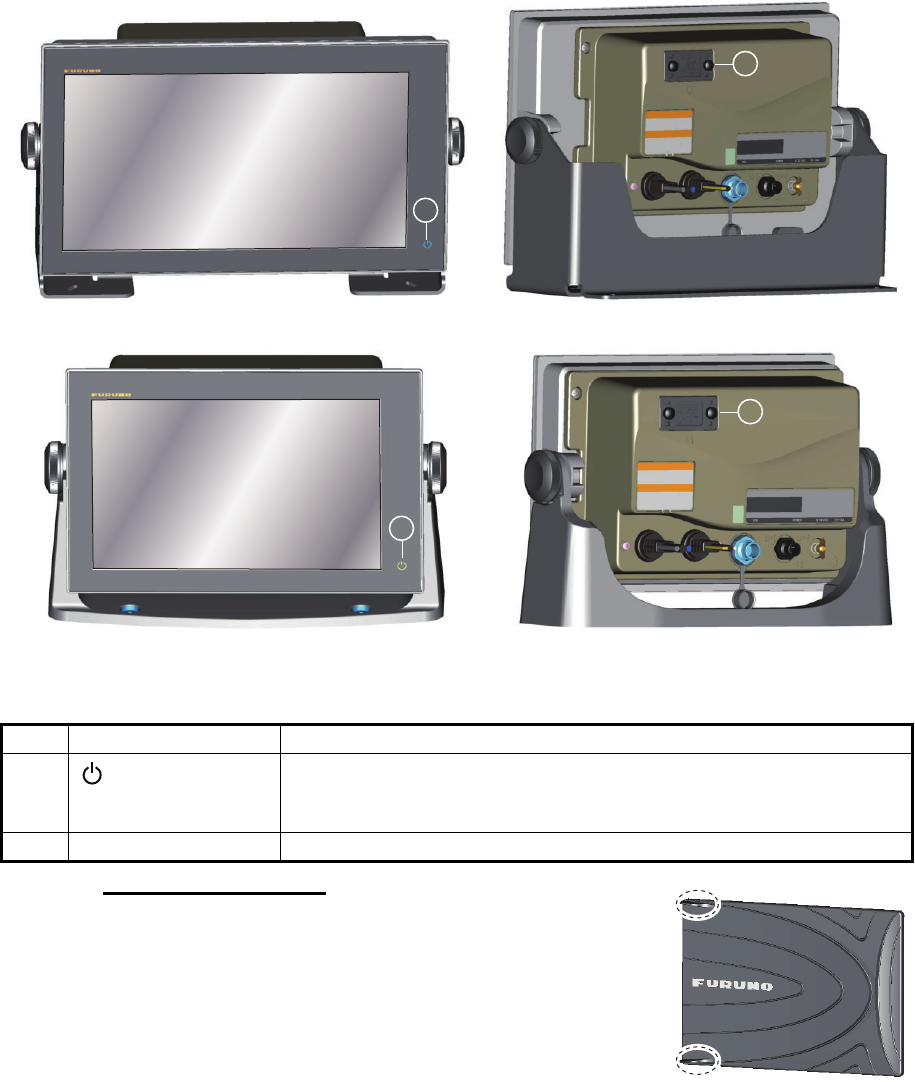
1.1 Controls
The TZTL12F and TZTL15F are operated by a power switch and touch controls.
You operate the plotter, radar, fish finder, etc. with
Your unit has one key on its front panel, a power/brilliance controlling button. The mi-
cro SD card slot, which is used for chart data, is on the rear panel.
TZTL multi function display units (shown in optional hanger)
About the soft cover
The supplied soft cover protects the LCD when the dis-
play unit is not in use. To remove the cover, grasp the
cover at the locations circled in the right figure and pull
forward.
• Touch control • Pop-up menus and hidden functions, where
you select options
• Menus, where you select options • Lists, where you can edit items
No. Item Function
1
(Power switch)
• Turns the power on.
• Adjust the brilliance and hue of the display.
• Turns the power off (device or network).
2 Micro SD card slot Slot for chart micro SD chart cards.
1
2
TZTL15F
TZTL12F
1
2
1. SYSTEM INTRODUCTION
1-3
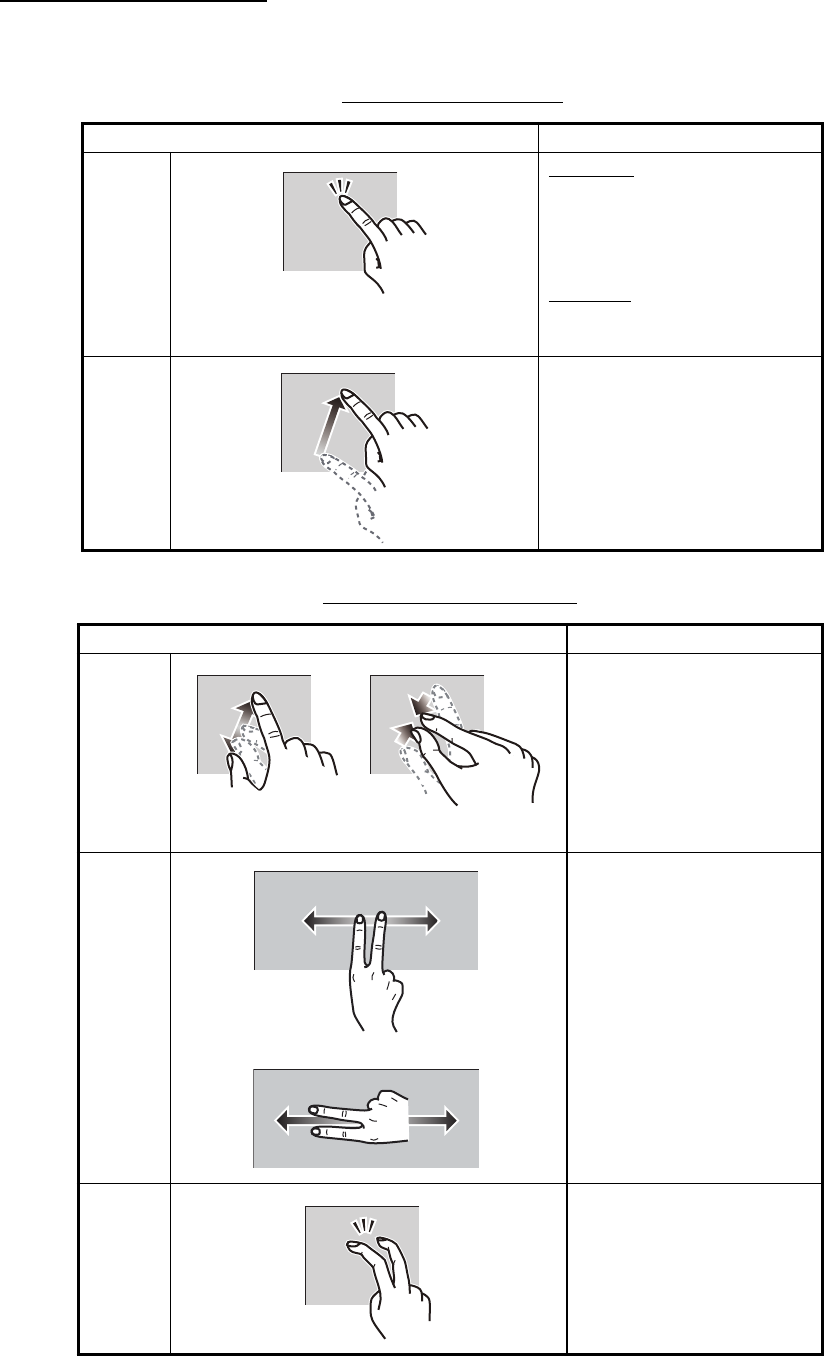
Touchscreen operations
The tables which follow outline the touchscreen operations.
Operation with a finger
Operation with two fingers
Operation with a finger Function
Tap Short tap
• Select a menu item.
• Select an object or posi-
tion to display the corre-
sponding pop-up menu.
Long tap
• Edit display icon (on home
screen).
Drag • Pan the charts.
• Scroll the menu.
Operation with two fingers Function
Pinch • Zoom in or out the dis-
play range in the 2D/
3D modes or weather
display.
• Select radar range on
the radar display.
Drag Change 3D viewing point.
Tap Do the function assigned
to [Function Gesture],
which is in the ([Settings]
- [General] menu. See
section 1.15.
Zoom in Zoom out
or

1. SYSTEM INTRODUCTION
1-4
Notes on touch control operations
• Waterdrops on the screen can cause mis-operation and slow touch response. Wipe
the screen with a dry cloth to remove the water.
• This equipment uses a capacitive touch screen. Tap the screen with your fingertips
directly. Do not use sharp objects (needle, pen, nail) or a stylus pen. Be careful not
to scratch the screen.
• The touchscreen cannot be operated while wearing gloves.
• Do not put objects (adhesive-backed paper, etc.) on the screen. Objects attached
to the screen can cause mis-operation.
• Keep the equipment away from a radio antenna, fluorescent light, solenoid valve
and electronic devices to prevent unintended operation by noise.
• The front panel is made of glass. If the front panel is damaged, do not try to repair
it yourself. Unauthorized repair will void the warranty. Contact your dealer about re-
pair or replacement.
1. SYSTEM INTRODUCTION
1-5
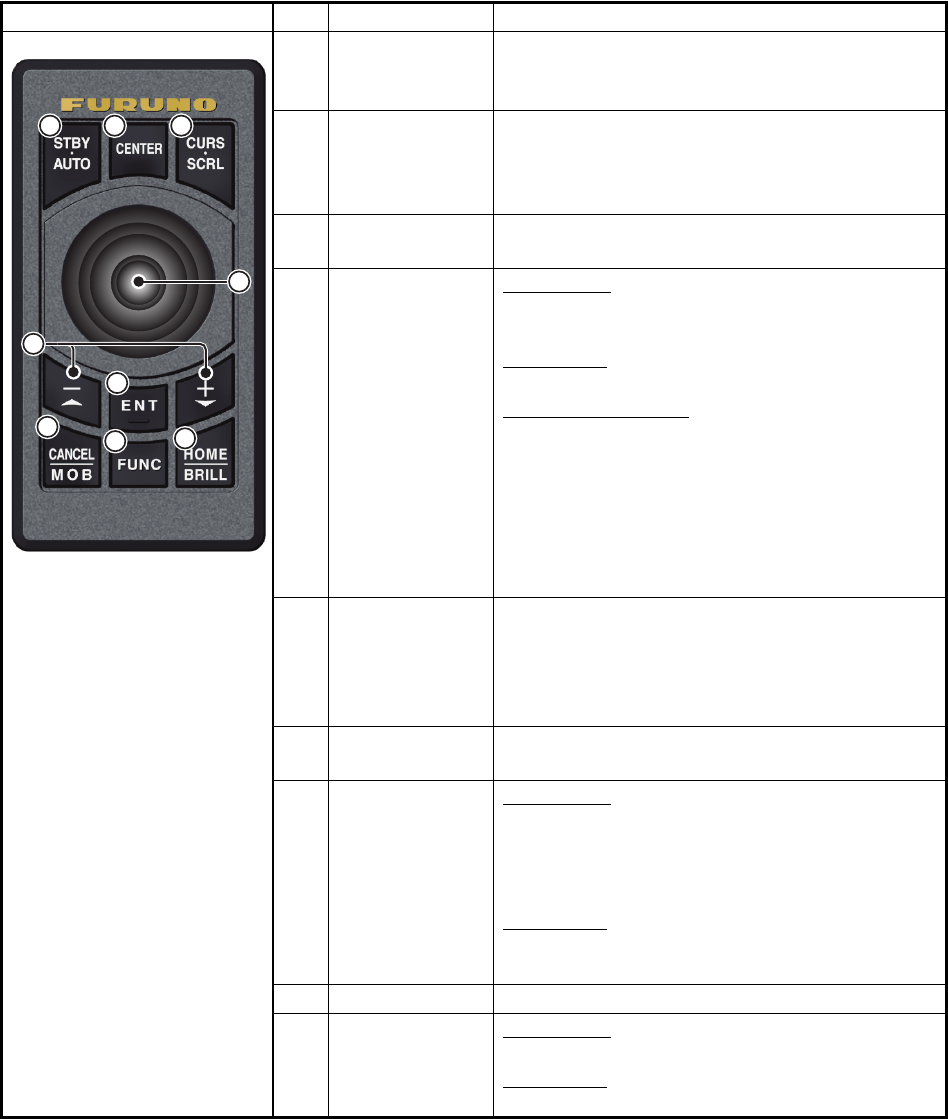
1.2 Remote Control Unit MCU-002 (Option)
The Remote Control Unit MCU-002 lets you operate the system without touching the
screen.
* When you switch the steering mode with the STBY.AUTO key, a beep sounds and
then one of the messages shown below appears. The message does not appear on
the home screen.
- STBY mode AUTO mode: "NAVpilot is engaged."
- AUTO mode STBY mode: "NAVpilot is disengaged."
No. Key Function
1STBY•AUTO
key
Switches the steering mode of the FURUNO
NAVpilot-700 series Autopilot between the
STBY and AUTO modes*.
2CENTER key • Returns own ship to the center of the screen
(Plotter/Weather/Radar display).
• Cancels the echo history (Fish finder dis-
play).
3CURS•SCRL
key
Switches the joystick gesture between the cur-
sor mode and scroll mode.
4 Joystick Short press: Works same as tap gesture.
• Opens the pop-up menu.
• Activates the item selected by the cursor.
Long press: Works same as long tap gesture.
• Opens the detail pop-up menu.
Operate the joystick:
Cursor mode operation
• Moves the cursor.
Scroll mode operation
• Pans the display (Plotter/Weather/Radar dis-
play).
• Shifts the range and scrolls back the picture
(Fish finder display).
5+, - key • Selects an item from the slide-out/main/pop-
up menu.
• Zooms in (+) and out (-).
• Raises (+) and lowers (-) the brilliance on the
[Power & Brilliance] window.
6ENT key • Activates a selected item.
• Opens the slide-out menu.
7CANCEL/MOB
key
Short press:
• Closes the menu or dialog box.
• Stops the aural alarm.
• Ends the tool mode (End Route, End Move,
etc.).
Long press:
• Enters the MOB mark (at the own ship’s po-
sition).
8FUNC key Does the function set at [Function Gesture].
9HOME/BRILL
key
Short press:
• Opens the home screen.
Long press:
• Opens the [Power & Brilliance] window.
1 2 3
4
5
6
789
1. SYSTEM INTRODUCTION
1-6
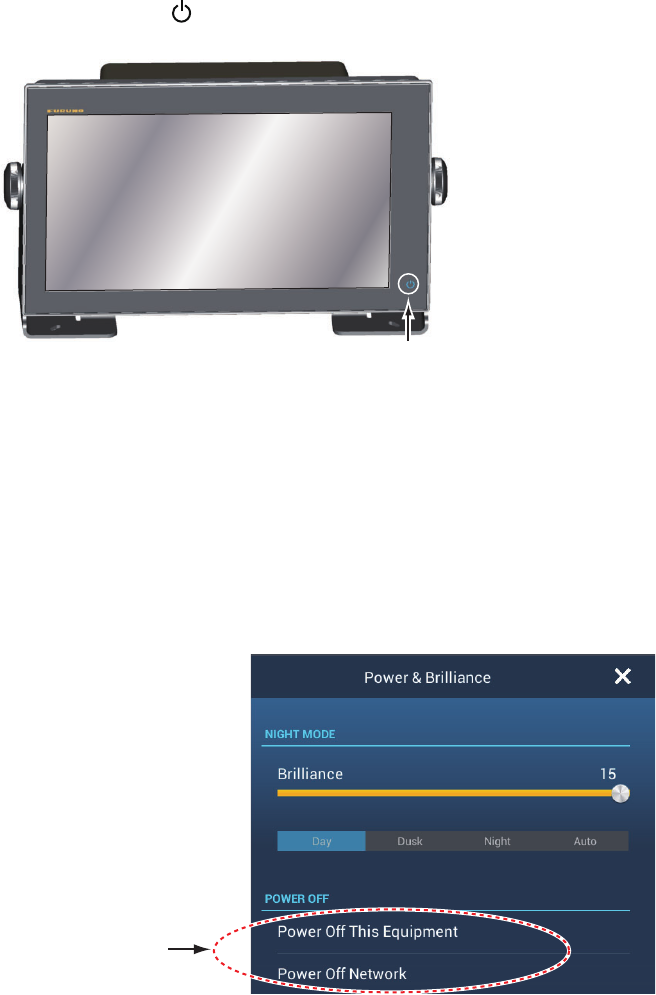
1.3 How to Turn the Power On or Off
The power switch ( ) on the front panel controls the power.
When you turn on the power, the equipment beeps twice and the start-up screen ap-
pears. After the startup process is completed, the [NAVIGATION WARNING] screen
appears. Read the warning, then tap [OK]. The last-used display appears.
The color of the lamp in the power switch changes according to equipment state.
Green: Equipment is powered.
Orange: Equipment is not powered but power is flowing to the equipment.
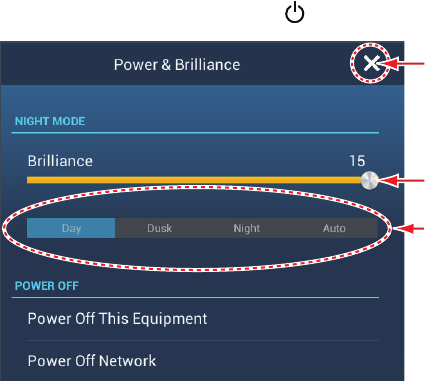
To turn off the power, tap the power switch to show the [Power & Brilliance] window.
Tap [Power Off This Equipment] or [Power Off Network], then tap [OK].15 seconds af-
ter the screen goes blank, the power turns off. (The power is on for this 15 seconds.)
Note 1: If you cannot turn off the power as shown above or the display freezes, long
push the power switch until the screen goes blank.
Note 2: Do not turn off the power during the start-up. Wait until the start-up is complet-
ed before you turn the power off.
Note 3: The screen refreshes slower in low ambient temperature.
POWER
switch
Select either of
the two.
1. SYSTEM INTRODUCTION
1-7
1.4 How to Adjust the Brilliance of the Display, the
Power Indicator and the Hue
With the power applied, press to show the [Power & Brilliance] window.
Drag the slider or tap the slider bar to adjust the brilliance of both the display and the
power indicator.
The [Day], [Dusk], [Night] and [Auto] options (below the slider bar) set the hue accord-
ing to selection. The [Auto] option automatically sets the hue according to time of day.
Adjust the display brilliance.
Close the window.
Hue options
1. SYSTEM INTRODUCTION
1-8
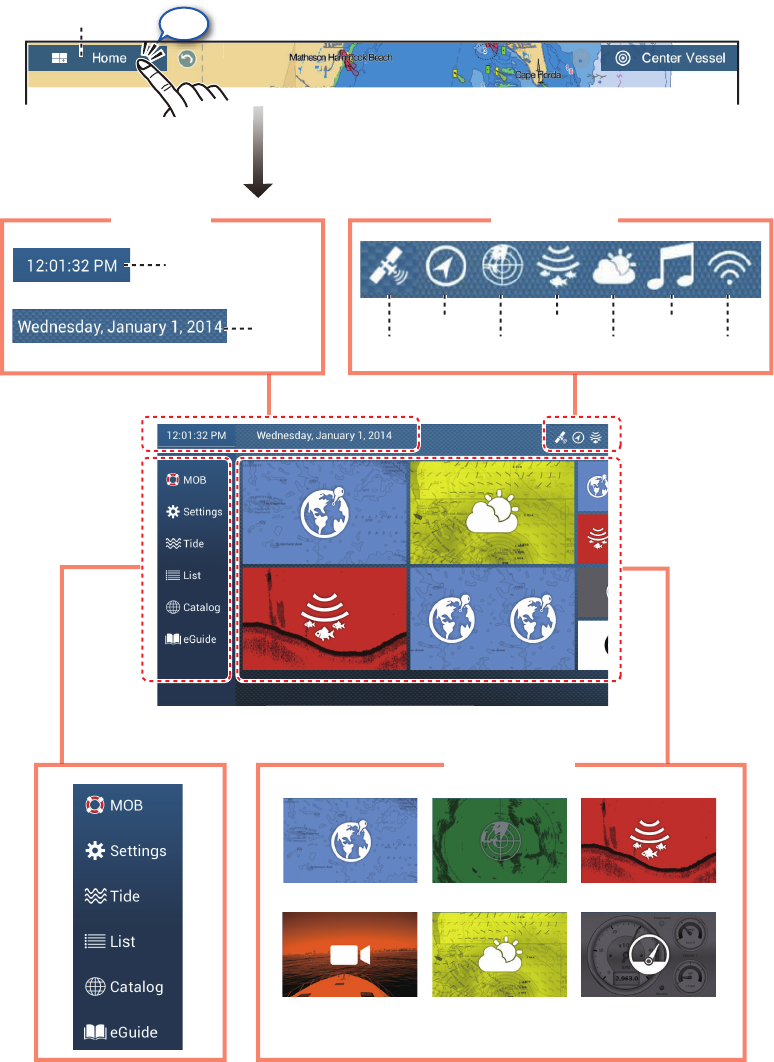
1.5 Home Screen
The home screen is where you access functions and menus, select displays and
check sensor status. Tap the [Home] icon at the top left corner to show the home
screen. The home screen is automatically closed, and the previous operation display
restored, when no operation is detected for approx. one minute.
The sensor icons denote what sensors are connected in the system and their status.
The color of an icon changes according to sensor status.
White: Sensor normal
Red: Sensor error
Gray: Sensor inactive (stopped)
Plotter Radar Sounder
Camera Weather Instrument
Time
Date
GPS
Heading
Radar
Sounder
Sirius
Fusion
WiFi
Functions
Functions
Tap
Home screen
Home screen
Time, date
Time, date
Sensor icons
Sensor icons
Display icons
Display icons
Home icon
1. SYSTEM INTRODUCTION
1-9
The functions section provide the following features:
[MOB]: Puts the MOB mark (to mark man overboard location on the plotter and radar
displays. See section 1.17.
[Settings]: Menus (plotter, radar, sounder, etc.) for customization of the system. See
section 1.14.
[Tide]: Opens the tide graph.
[List]: Opens the routes, points, AIS and DSC lists.
[Catalog]: Opens the list of charts installed in your system.
[eGuide]: Opens the abbreviated operator’s manual. You can get the latest version of
the operator’s manual by accessing the quick response code provided in the introduc-
tion section of the guide.
The display icons select corresponding displays. See the next section for details.
1.6 How to Select a Display
You have two methods from which to select a display, the quick page and the home
screen.
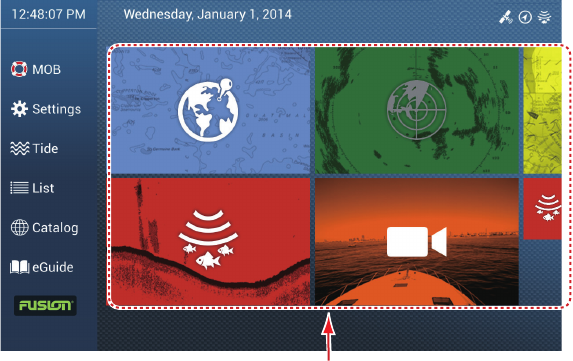
1.6.1 How to select a display from the home screen
Tap the [Home] icon to show the home screen. Tap the applicable display icon. (It may
be necessary to swipe the screen if you have programmed a number of display icons.)
Display icons
1. SYSTEM INTRODUCTION
1-10
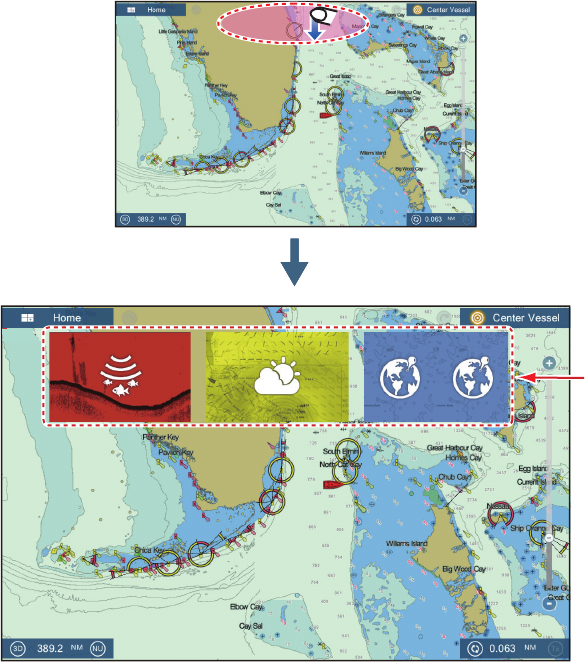
1.6.2 How to select a display from the quick page
The quick page, which carries all the “large size” display icons shown on the home
screen, lets you select a display from the current display.
To show the quick page, swipe the top of the screen downward. Tap desired display
icon to change the display. (It may be necessary to scroll the display icons if you have
programmed some icons.)
Swipe
Swipe
Quick page