Furuno USA 9ZWRTR104 Transceiver for Radar Sensor DRS4DL User Manual
Furuno USA Inc Transceiver for Radar Sensor DRS4DL
Contents
- 1. User Manual I
- 2. User Manual II Part 1
- 3. User Manual II Part 2
- 4. User Manual II Part 3
- 5. User Manual II Part 4
- 6. User Manual II Part 5
- 7. User Manual II Part 6
- 8. User Manual II Part 7
- 9. User Manual II Part 8
- 10. User Manual II Part 9
- 11. User Manual II Part 10
- 12. User Manual II Part 11
- 13. User Manual II Part 12
User Manual II Part 8
6. RADAR
6-23
6.23.2 How to manually acquire a target
You can manually acquire a target from both the radar display and the radar display
overlay.
1. Tap the target to acquire to show the pop-up menu.
2. Tap [Acquire].
After you acquire a target, the radar marks the target with a broken square and a vec-
tor appears within 30 s. The vector indicates the direction of the target. Within 90 s
after you acquire the target, the first tracking step is finished and the target is tracked
continuously. At this point, the broken square changes to a solid circle.
Note 1: For successful acquisition, the target must be within 0.05 to 16 NM from your
ship and not hidden in sea or rain clutter.
Note 2: When the capacity for manual acquisition is reached, you cannot acquire
more targets. Cancel tracking of non-threatening targets to acquire additional targets
manually.
6.23.3 How to automatically acquire a target
Any target that enters the ARPA acquisition area is acquired and tracked automatical-
ly. When a target enters the area, the buzzer sounds.
1. Create a guard zone referring to section 6.13.
2. Tap a line on the guard zone to show the pop-up menu. Turn on [Auto Acquire].
The dotted lines for the guard zone turn into solid lines.
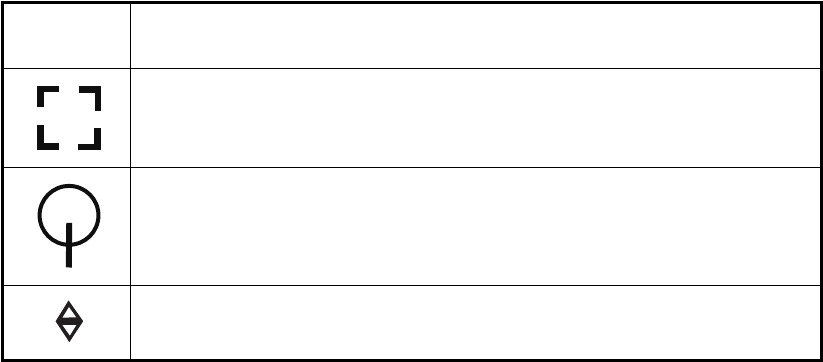
ARPA
Symbol Meaning
At acquisition of the target.
30 s after the acquisition, the plotting symbol changes to a small circle,
which indicates steady-state tracking. A vector appears to show the direc-
tion of the target.
A lost target is indicated by a diamond symbol, created from two equal tri-
angles.
6. RADAR
6-24
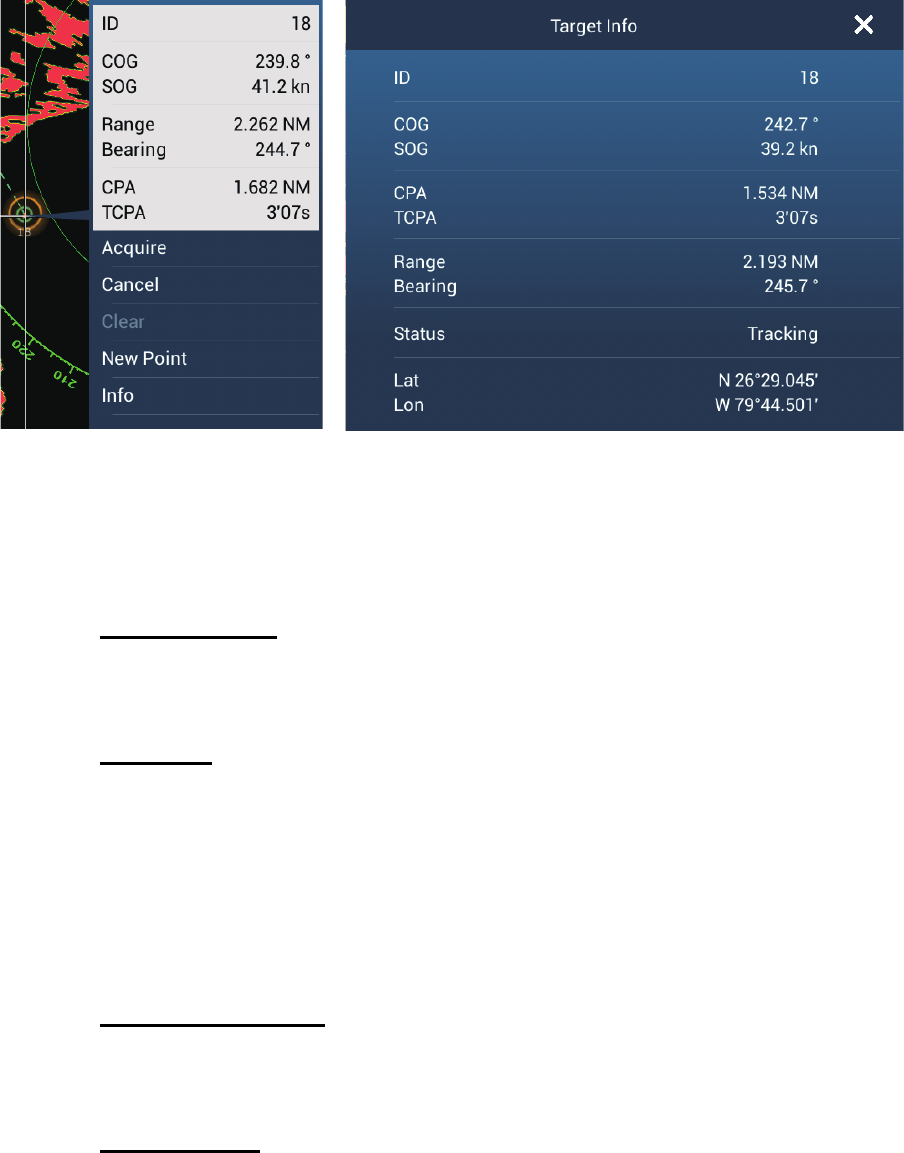
6.23.4 How to display target data
You can find the bearing, range, etc. of an ARPA target. Tap the ARPA target to get
its information. For detailed information, tap the ARPA target to display the pop-up
menu then tap [Info]. The detailed information display can also be shown by selecting
the simple information display.
6.23.5 How to stop tracking targets
You can stop tracking ARPA targets separately or all together.
Individual target
1. Tap the ARPA target to display the pop-up menu.
2. Tap [Cancel] to delete the target from the screen.
All targets
1. Tap the screen to show the pop-up menu then tap [Targets].
2. Tap [Cancel All] to delete all targets from the screen.
6.23.6 How to clear a lost target
An ARPA target not detected in five scans becomes a lost target. You can clear lost
targets separately or all together.
Individual lost target
1. Tap the lost target to display the pop-up menu.
2. Tap [Clear] to delete the lost target from the screen.
All lost targets
1. Tap the screen to show the pop-up menu then tap [Targets].
2. Tap [Clear Lost] to delete all lost targets from the screen.
Simple information Detailed information
S

6. RADAR
6-25
6.23.7 CPA/TCPA alarm
This alarm helps you keep your ship away from collision by warning of targets on a
collision course. The ARPA continuously monitors the predicted range at the Closest
Point of Approach (CPA) and predicted time to CPA (TCPA) of each tracked target.
When the predicted CPA or TCPA is less than their set values, the alarm sounds and
the message "CPA/TCPA Alarm" appears and flashes at the top of the screen.
Make sure that the gain, sea and rain controls are correctly adjusted before you use
this alarm.
CPA/TCPA alarm ranges must be set correctly according to the size, tonnage, speed,
turning performance and other characteristics of your ship.
How to set the CPA/TCPA alarm
1. Open the home screen, then tap [Settings] - [Targets].
2. Turn on [CPA/TCPA Alarm].
3. Tap [CPA Alarm Value] or [TCPA Alarm Value] to display the software keyboard.
4. Set the value, then tap to confirm.
5. Tap the close button to finish.
How to acknowledge the CPA/TCPA alarm
The CPA/TCPA alarm sounds when the CPA and TCPA of an ARPA target are within
the CPA/TCPA alarm range. The alarm indication "CPA/TCPA Alarm" appears and
flashes at the top of the screen. To acknowledge the alarm and stop the audio alarm
and flashing of the indication, tap the indication "CPA/TCPA Alarm" (see
paragraph 2.11.7). (The ARPA vector must be displayed at least 30 seconds to calcu-
late CPA and TCPA.)
How to deactivate the CPA/TCPA alarm
1. Open the home screen, then tap [Settings] - [Targets].
2. Turn off [CPA/TCPA Alarm].
3. Tap the close button to finish.
6. RADAR
6-26
This page is intentionally left blank.
7-1
7. FISH FINDER (SOUNDER)
This chapter describes the functions of the built-in fish finder.
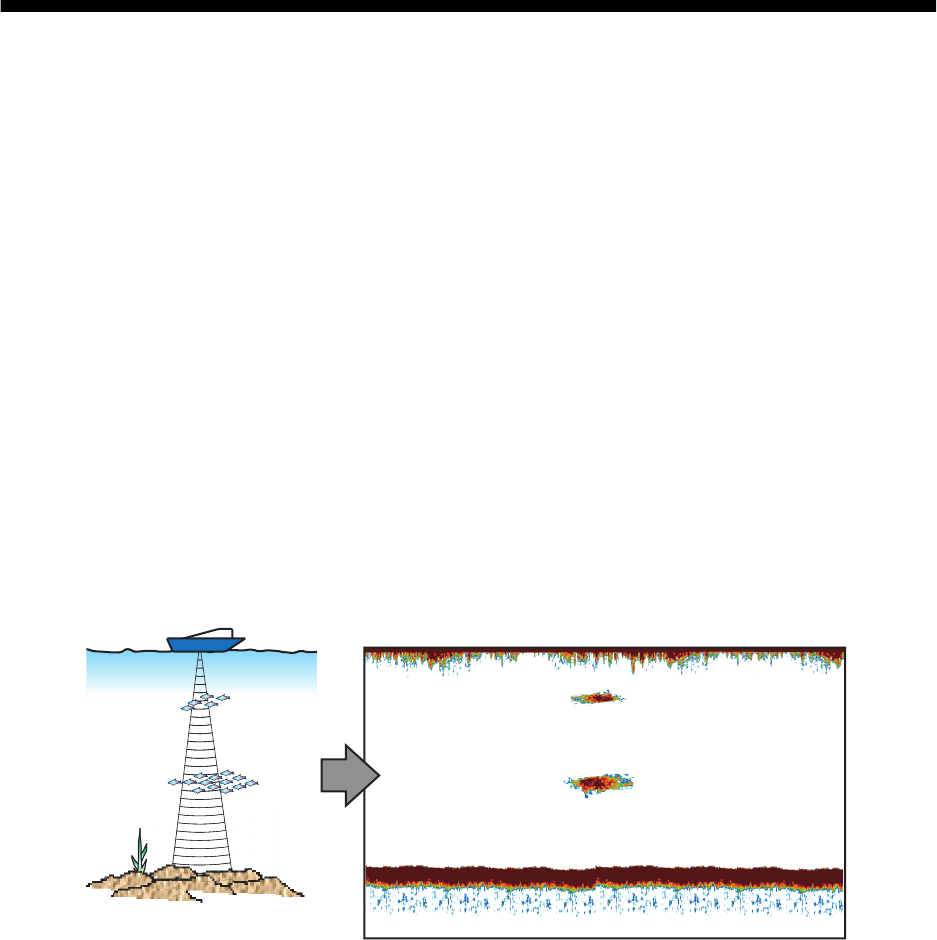
7.1 How the Fish Finder Operates
The fish finder calculates the distance between its transducer and underwater objects
like fish, lake bottom or seabed. The results are shown in different colors or shades of
gray according to echo strength.
The ultrasonic waves transmitted through water move at a constant speed of approx-
imately 4800 feet (1500 meters) per second. When a sound wave “hits” an underwater
object like fish or sea bottom, part of the sound wave is reflected toward the source.
To find the depth to an object, the fish finder calculates the time difference between
the transmission of a sound wave and the time the reflected sound wave is received.
The picture displayed by the fish finder contains a series of vertical scan lines. Each
line is a "picture" of the objects under the boat. The series of pictures are put side-by-
side across the screen to show the contours of the bottom and echoes from fish. The
amount of history of objects that have moved under the boat can be less than a minute
to more than one minute depending on the picture advance speed.
7. FISH FINDER (SOUNDER)
7-2
7.2 How to Select a Display
Your fish finder has six display modes. These modes are single frequency, dual fre-
quency, bottom zoom, bottom lock, A-scope, and bottom discrimination.
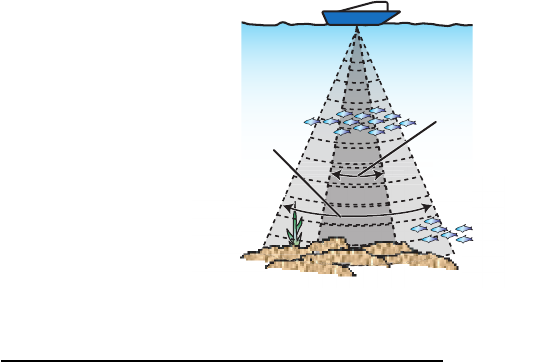
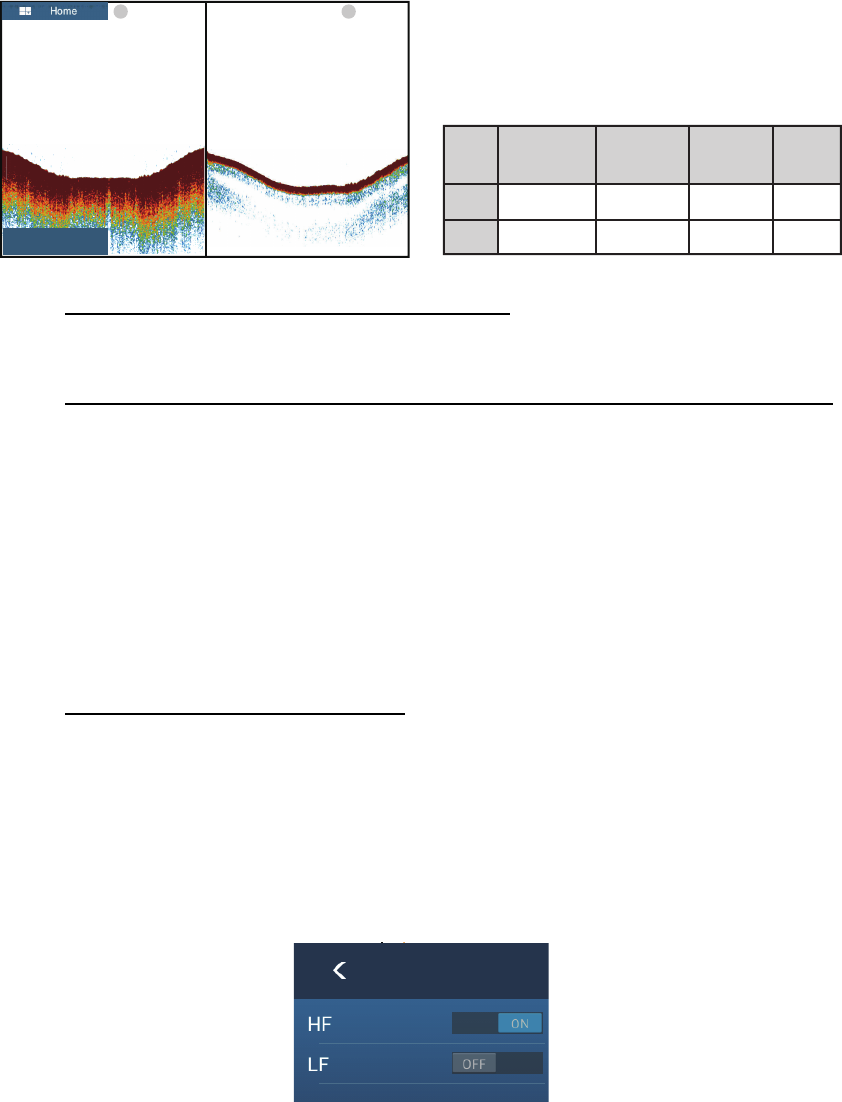
7.2.1 Single frequency display
The single frequency display shows either the low-frequency or high-frequency picture
on all the screen. Select a frequency according to your purpose.
• A low frequency gives a wide detection area. Use the low frequency for general
search and to find bottom conditions.
• A high frequency gives better resolution. Use the high frequency to inspect a school
of fish.
Detection area
How to select a single frequency display
1. Tap the screen to show the pop-up menu.
2. Tap [Mode].
3. Turn on [Single Freq.].
4. Tap [Frequency].
5. Turn on [HF] (high frequency) or [LF] (low frequency).
High
frequency
Low
frequency
7. FISH FINDER (SOUNDER)
7-3
7.2.2 Dual frequency display
The dual frequency display provides both low and high frequency pictures. Use the
dual frequency display to compare the same picture with two different sounding fre-
quencies.
How to select the dual frequency display
Tap the screen to show the pop-up menu. Tap [Mode], [Dual Freq.].
How to reverse the display pictures between low and high frequencies
In the default setting, the low frequency picture is on the left, and the high frequency
is on the right. To reverse the pictures between low and high frequencies, tap the
screen to show the pop-up menu, then tap [Frequency] and [LF]. The picture for the
frequency option ([HF] or [LF]) selected here is displayed on the right.
7.2.3 Zoom displays
Zoom mode expands selected area of the single frequency picture. Two modes are
available: bottom lock and bottom zoom.
How to activate a zoom display
Tap the screen to open the pop-up menu. Tap [Mode], then turn [Bottom Lock] or [Bot-
tom Zoom] on or off.
To quit the zoom display and go to the single frequency display, tap [Mode], [Single
Freq.] on the pop-up menu.
You can switch the frequency for the zoom displays from the pop-up menu. Tap the
screen, then tap [Frequency] and [HF] or [LF].
Low
frequency
High
frequency
RADAR
DAR
DAR
AR
AR
R
R
R
R
R
R
R
Freq.
(kHz)
Low
High
Beamwidth Resolution Detection
range
Bottom
tail
Wide
Narrow
Low
High
Deep
Shallow
Long
Short
ft HF 40.4
7. FISH FINDER (SOUNDER)
7-4
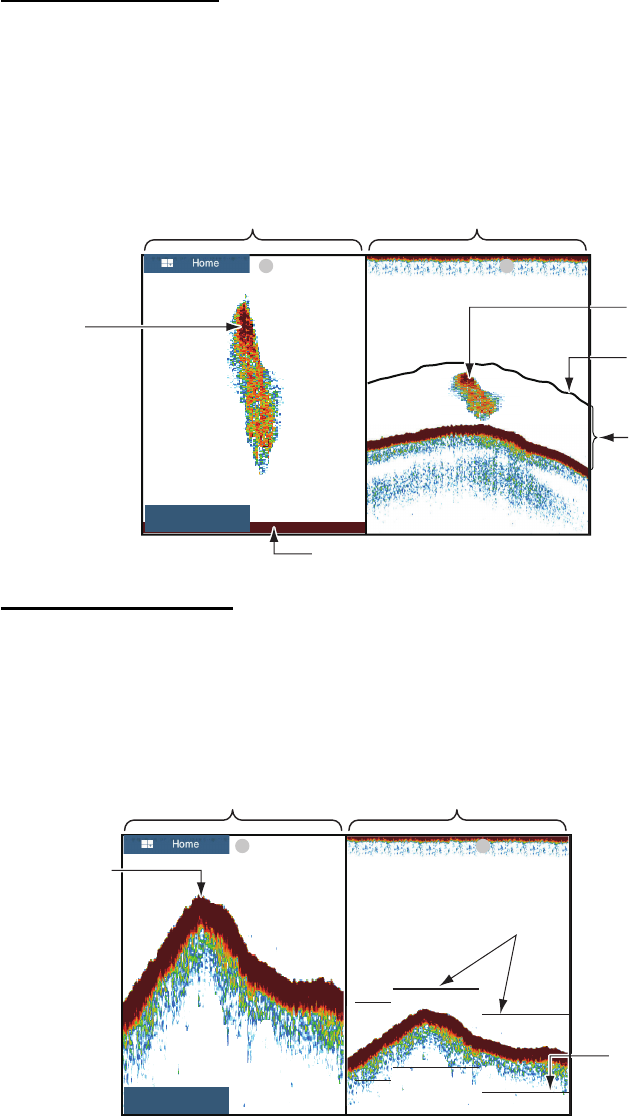
Bottom lock display
The bottom lock display provides a compressed normal picture on the right half and a
7 to 400 feet (2 to 120 meter) wide layer in contact with the bottom is expanded on the
left half. This display helps you separate the fish near the bottom from the bottom
echo. You can select the bottom lock range with [Bottom Lock Range Span] in the
[Settings] - [Sounder] menu.
Bottom zoom display
The bottom zoom display expands the bottom and the fish near the bottom according
to the zoom range selected on [Zoom Range Span] in the [Settings] - [Sounder] menu.
This display helps you find the density of the bottom. A short echo tail normally indi-
cates a soft bottom (sand bottom, etc.). A long echo tail indicates a hard bottom.
Zoomed
school of fish
Bottom lock display Single freq. display
Zoom marker
School of fish
This area zoomed
and displayed on
left 1/2 of screen.
Bottom shown as a straight line
ft HF 40.4
Zoom marker
automatically
follows change in
depth.
Bottom zoom display
Bottom
Single freq. display
Zoom marker
ft LF 40.4
7. FISH FINDER (SOUNDER)
7-5
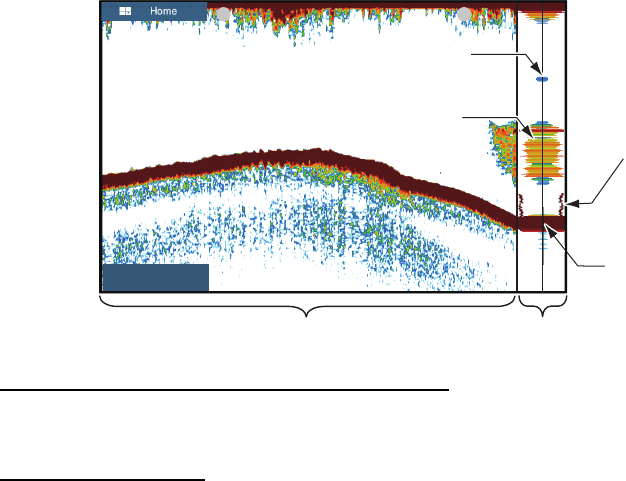
7.2.4 A-scope display (display only)
The A-scope display appears at the right of the screen and is available in any fish find-
er mode. This display shows the echoes at each transmission with the amplitudes and
tone in balance with their intensities. This display helps you identify possible fish spe-
cies and bottom structure.
How to show or hide the A-scope display
Tap the screen to show the pop-up menu, then turn [A-Scope] on or off.
A-scope peak hold
You can show the "normal" A-scope display plus the peak-hold amplitude picture for
the last five seconds in dots.
1. Open the home screen, then tap [Settings] - [Sounder].
2. Turn on [A-Scope Peak Hold].
3. Tap the close button to finish.
A-scope display
Fish echo
Single frequency display
"Peak"
shows past
amplitude
with dots.
Strong
reflection
(bottom)
Weak reflection
(small fish or noise)
ft HF 40.4
7. FISH FINDER (SOUNDER)
7-6
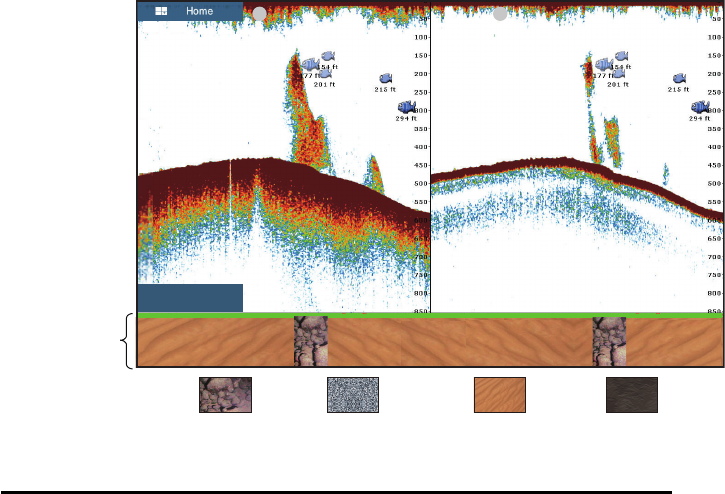
7.2.5 Bottom discrimination display
The bottom discrimination display, which requires a bottom discrimination capable
transducer or Bottom Discrimination Sounder BBDS1 or Network Fish Finder DFF1-
UHD, identifies probable bottom composition. The display is available in all screen di-
visions, single or dual frequency mode, and occupies the bottom 1/6 of the screen in
the full screen display.
Use this feature with ship speed 10 knots or less and depths between 5 and 100 m.
How to active or deactivate the bottom discrimination display
1. Open the home screen, then tap [Settings] - [Sounder].
2. Tap [Fish Finder Source].
3. Tap [TZTL] (internal sounder), [BBDS1] or [DFF1-UHD] as applicable.
4. Tap the close button to finish.
5. To activate or deactivate the bottom discrimination display, turn [Bottom] on or off
from the pop-up menu.
Bottom
discrimination
display
Rock Gravel Sand Mud
Sand and rock are the most likely bottom type in this example.
ft LF 576

7. FISH FINDER (SOUNDER)
7-7
7.3 Automatic Fish Finder Operation
Your fish finder can be adjusted automatically to let you do other tasks.
7.3.1 How the automatic fish finder operates
The automatic fish finder function automatically adjusts the gain, clutter, TVG, echo
offset and range. The main features of the automatic mode are as shown below.
• Gain adjusts the sensitivity of the receiver to show the bottom echo in reddish-
brown (default color arrangement).
• Clutter automatically reduces low-level noise like plankton.
• The TVG function is automatically adjusted.
• The echo offset balances the gain on high and low frequencies.
• Range is adjusted automatically to show the bottom echo.
7.3.2 How to select an automatic fish finder mode
There are two types of automatic fish finder modes: [Auto Fishing] and [Auto Cruising].
[Auto Fishing] searches for schools of fish, and [Auto Cruising] tracks the bottom.
[Auto Cruising] uses a higher clutter removal setting than [Auto Fishing]. Do not use
[Auto Cruising] when your purpose is to find fish, because the clutter removal circuit
can erase weak echoes.
To select an automatic fish finder mode, tap the screen to open the pop-up menu,
tap [Adjust] then tap [Auto Fishing] or [Auto Cruising]
7.4 Manual Fish Finder Operation
Use the manual operation to see schools of fish and the bottom echo with a fixed gain
setting. The gain, range and range shift functions let you select the depth you can see
on the screen.
7.4.1 How to select the manual mode
Tap the screen to open the pop-up menu. tap [Adjust] then tap [Manual].
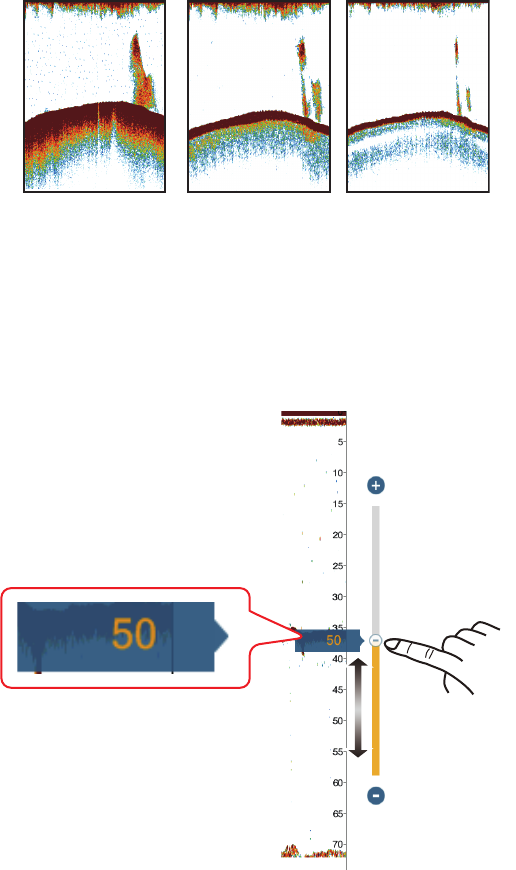
7.4.2 How to select the display range
Manual range setting
Pinch the fish finder screen or use the slider bar.
How to turn on or off the auto range
The range can be selected automatically or manually. tap the screen to open the pop-
up menu, then turn [Auto Range] on or off.
7. FISH FINDER (SOUNDER)
7-8
7.4.3 How to shift the range
The basic range and range shift functions let you select the depth you can see on the
screen. This function is not available when [Auto Range] is active.
1. Open the home screen, then tap [Settings] - [Sounder].
2. Tap [Range Shift] to open the software keyboard.
3. Set the range then tap to confirm.
4. Tap the close button to finish.
7.4.4 How to adjust the gain
The gain controls how echoes of different strengths are displayed. Set the gain to
show a slight amount of noise on the screen. Increase the gain for greater depths and
lower the gain for shallow waters.
Note: This function is not available in the auto mode.
1. Tap the screen to open the pop-up menu, then tap [Adjust].
2. Tap [HF Gain] or [LF Gain].
3. Drag the slider to set the gain, as shown in the figure below.
Gain too high Gain proper Gain too low
Drag slider
to set.
Current setting
7. FISH FINDER (SOUNDER)
7-9
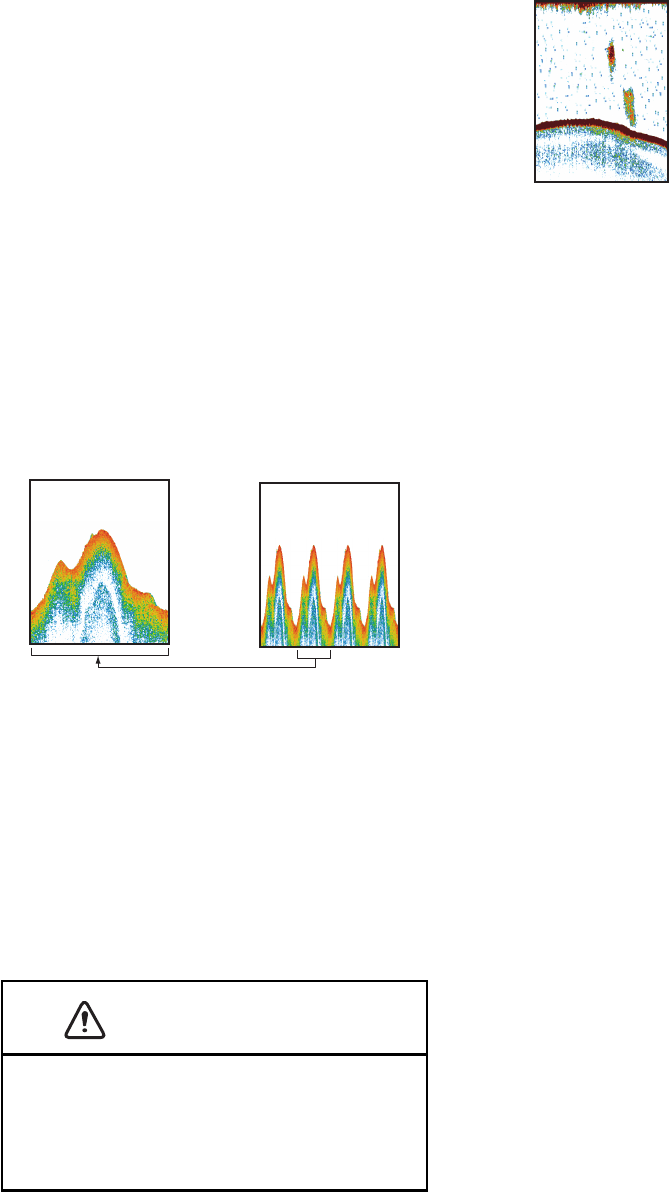
7.4.5 How to reduce the clutter
Low intensity “spots” of noise appear over most of the screen like in
the illustration shown below. These spots are caused by sediment in
the water or noise. You can reduce this type of noise.
Note: This function is not available in the auto mode.
1. Open the home screen, then tap [Settings] - [Sounder].
2. Drag the slider at [Clutter] to set the level. The larger the setting
value, the greater the degree of reduction.
3. Tap the close button to finish.
7.5 Picture Advance Speed
The picture advance speed controls how quickly the vertical scan lines move across
the screen. A fast advance speed expands the size of a school of fish horizontally on
the screen. A slow advance speed shortens the school of fish. Use a fast advance
speed to see the hard bottom. Use a slow advance speed to see the smooth bottom.
1. Open the home screen, then tap [Settings] - [Sounder].
2. Tap [Picture Advance].
3. Tap a picture advance speed. The options in the window indicate the number of
scan lines made per transmission. For example, [1/2] creates one scan line per
two transmissions. [1/16] is the slowest advance speed and [4/1] is the fastest
speed. [Stop] stops picture advance, and is useful for taking a photo or screenshot
of the screen.
4. Tap the close button to finish.
CAUTION
The picture is not refreshed when picture
advancement is stopped.
Maneuvering the vessel in this state in shallow
waters may ground the vessel.
Fast Slow
7. FISH FINDER (SOUNDER)
7-10
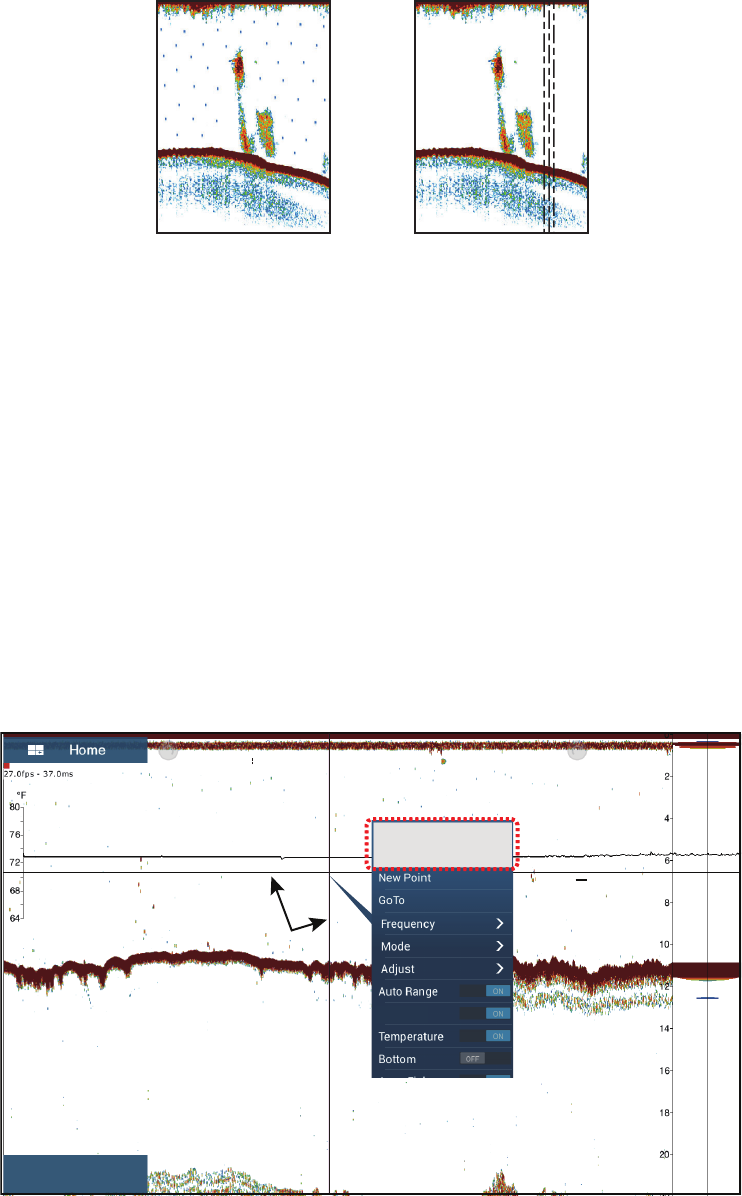
7.6 How to Reduce Interference
Interference from other fish finders and electrical equipment appears on the screen as
shown in the illustration. When these types of interference appear on the screen, use
the interference rejector to reduce the interference. Turn off the interference rejector
when there is no interference, so that you do not erase weak echoes.
1. Open the home screen, then tap [Settings] - [Sounder].
2. Turn on [Interference Rejection].
3. Tap [Low], [Medium], [High] or [Auto]. [High] provides the greatest interference re-
jection. [Auto] automatically selects suitable interference setting.
4. Tap the close button to finish.
To deactivate the interference rejection, tap [Off] at step 3.
7.7 How to Measure Range, Depth to an Object
You can measure the range and depth to an object with the VRM. For example, you
can measure how many minutes ago an echo appeared.
Tap an object to display the VRM. Read the range and depth in the pop-up menu.
Interference from
other sounder
Interference from
electrical equipment
ON
Range and depth
to VRM
ON
Range 1.395 NM
Depth 6.3 m
VRM
ft HF 11.1
A-Scope
7. FISH FINDER (SOUNDER)
7-11
7.8 Echo History Display
You can view past echoes which are off the screen. Swipe the screen to the right to
display past echoes. To return to the active display, tap [Cancel Hist.] at the top right-
hand corner of the screen.
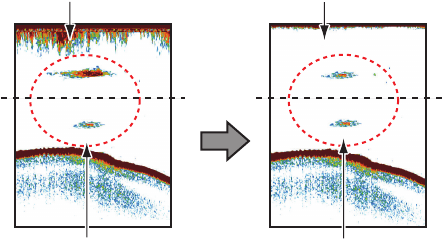
7.9 How to Balance Echo Strength
A school of fish at a depth deeper than a school of equal strength in shallow water ap-
pears in weaker colors. This condition is caused by the attenuation of the ultrasonic
wave. To display the schools of fish in the same colors, use the TVG. The TVG auto-
matically increases the gain with depth so that echoes of the same strength and dif-
ferent depths are shown in the same colors. In the illustration shown below, for
example, the TVG is set for 300 ft and the TVG level is adjusted. Unnecessary echoes
at a distance less than 300 ft are deleted and echoes at depths greater than 300 ft are
not adjusted.
Note: This function is not available in the auto mode.
1. Open the home screen, then tap [Settings] - [Sounder].
2. Drag the slider in [TVG HF] (high frequency) or [TVG LF] (low frequency) to set
the level. Raise the TVG to increase the gain difference between near and far dis-
tances.
3. Tap the close button to finish.
Unwanted echoes
Unwanted echoes
are erased.
Echoes of the same size
are displayed in different
sizes and colors
depending on depth.
Echoes of the same size
are displayed in same
sizes and colors.
0 ft
300 ft 300 ft
0 ft

7. FISH FINDER (SOUNDER)
7-12
7.10 Fish Finder Alarms
Two types of fish alarms release audio and visual alarms to tell you that echoes from
fish are in the area you selected. These alarms are [Fish Alarm] and [Fish Alarm for
Bottom Lock].
The [Fish Alarm] function tells you when an echo above some strength (selectable) is
within the alarm range you specify.
The [Fish Alarm for Bottom Lock] function tells you when fish are within some distance
from the bottom. The bottom lock display must be active to use this alarm.
7.10.1 How to set an alarm
1. Open the home screen, then tap [Settings] - [Sounder]. Scroll the menu to show
the fish finder alarms section.
2. Fish alarm: Tap [Range Minimum Value] or [Range Maximum Value] below [Fish
Alarm] to display the software keyboard.
Bottom lock fish alarm: Tap [Range Minimum Value] or [Range Maximum Val-
ue] below [Fish Alarm for Bottom Lock] to display the software keyboard.
3. Set the start depth in [Range Minimum Value], the end depth in [Range Maximum
Value].
4. Tap the close button to finish.
[Range Minimum
Value]
(from sea
surface)
[Range Maximum
Value]
(from sea
surface)
[Range
Maximum Value]
(from bottom)
[Range Minimum
Value]
(from bottom)
Fish Alarm for Bottom Lock
Alarm Range
Fish Alarm
Surface
Bottom
Alarm
Range
Alarm
Range
A
larm
R
Fish
7. FISH FINDER (SOUNDER)
7-13
7.10.2 How to activate or deactivate an alarm
Fish alarm
1. Open the home screen, then tap [Settings] - [Sounder].
2. Turn [Fish Alarm] on or off.
The fish alarm can also be activated or deactivated with [Fish Alarm] on the pop-up
menu.
Bottom lock fish alarm
Open the home screen, then tap [Settings] - [Sounder]. Turn [Fish Alarm for Bottom
Lock] on or off.
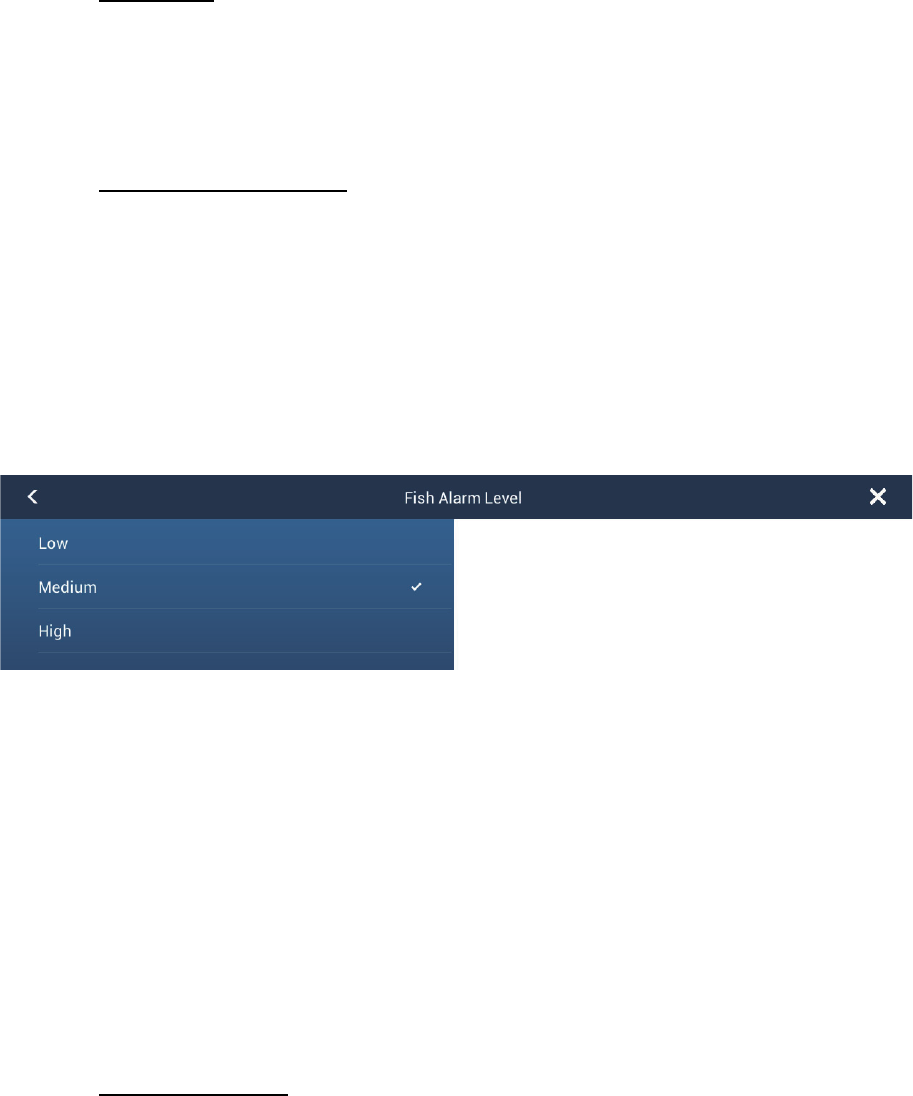
7.10.3 Alarm sensitivity
You can select the echo strength that releases the fish alarms.
1. Open the home screen, then tap [Settings] - [Sounder].
2. Tap [Fish Alarm Level].
3. Tap which echo strength releases the fish and bottom lock alarms.
[Low]: Light-blue or stronger echoes
[Medium]: Yellow or stronger echoes
[High]: Red and reddish-brown echoes
4. Tap the close button to finish.
7.11 ACCU-FISH™
The ACCU-FISH™ feature, which requires an ACCU-FISH™ capable transducer or
Bottom Discrimination Sounder BBDS1 or Network Fish Finder DFF1-UHD, identifies
probable bottom composition estimates the length of each fish and shows a fish sym-
bol and depth value or fish length.
Usage guidelines
• The information given by this feature is intended for reference only.
• ACCU-FISH™uses both low and high frequency echoes for the measurements re-
gardless of the frequency mode in use.
• The intensity of an echo depends on fish species. If the indicated length is different
from the true length, you can apply an offset in the [Sounder] - [ACCU-FISH Size
Correction] menu of the menu.
• 50 kHz and 200 kHz beams are transmitted alternately without reference to the cur-
rent display mode.
7. FISH FINDER (SOUNDER)
7-14
• Use this feature with ship speed of 10 knots or less and depth between 5 and 100 m.
• The signal attenuation on the inside-hull transducer is different between 50 kHz and
200 kHz. This attenuation causes some fish to get ignored and the fish length indi-
cated can be shorter than the true length.
• Echoes from a school of fish can be in more than one layer, which can cause wrong
length indication.
• The fish symbol indication is not shown when the bottom echo does not appear on
the screen.
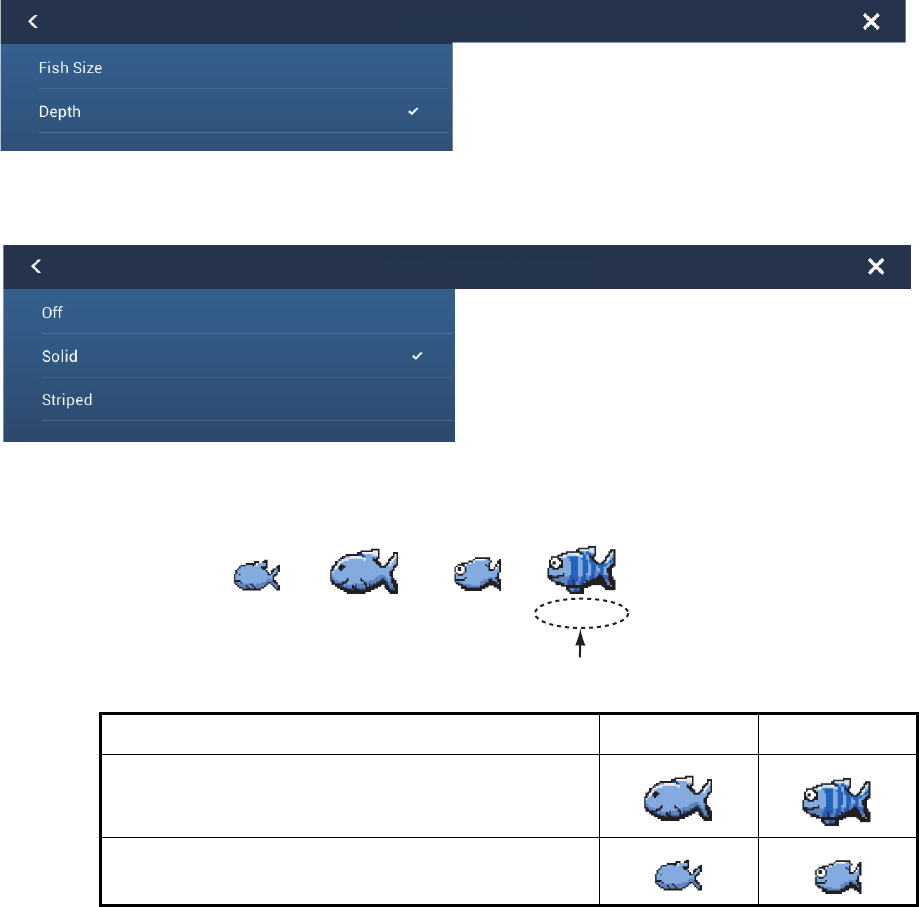
7.11.1 How to set ACCU-FISH™
1. Open the home screen, then tap [Settings] - [Sounder].
2. Tap [ACCU-FISH Info].
3. Tap [Fish Size] or [Depth].
4. Tap [ACCU-FISH Symbols].
5. Tap [Solid], [Striped] or [Off] (turn off fish symbol).
6. Tap the close button to finish.
Fish size Solid Striped
Large fish symbol (more than 51 cm (20.08 inch))
Small fish symbol (10 to 50 cm (3.9. to 19.69 inch))
ACCU-FISH Info
ACCU-FISH Symbols
Depth (or Fish Size)
Solid
(small)
237 ft154 ft 237 ft154 ft
Solid
(large)
Striped
(small)
Striped
(large)
7. FISH FINDER (SOUNDER)
7-15
7.11.2 Fish size correction
The fish size shown on the screen can be different from the true size. If the size is
wrong, add an offset to the measured value to get a more accurate indication on the
screen.
1. Open the home screen, then tap [Settings] - [Sounder].
2. Drag the slider at [ACCU-FISH Size Correction] to set correction percentage (set-
ting range: -80% to 100%).
3. Tap the close button to finish.
7.11.3 How to turn the fish symbol indication on or off
Tap the screen to open the pop-up menu. Turn [ACCU-FISH] on or off. Fish symbols
and their depth values or fish lengths appear on the screen. If you selected [Off] at
step 5 in paragraph 7.11.1, the fish symbols are hidden and only the depth values or
fish lengths appear.
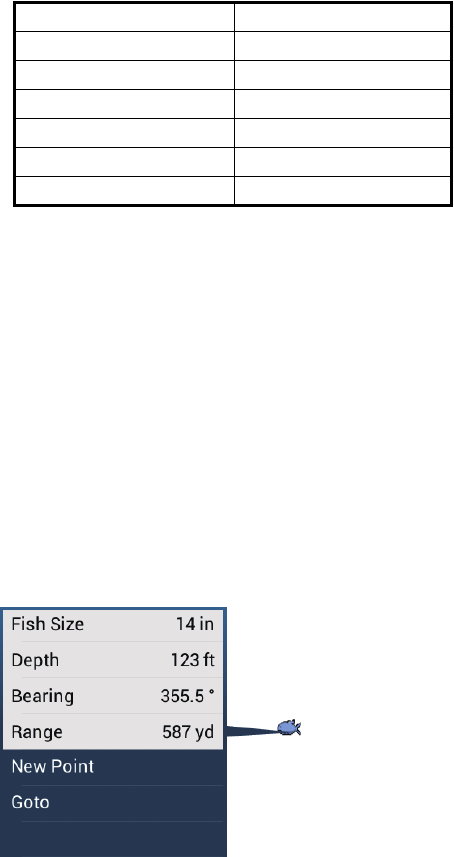
7.11.4 How to display the fish information
Tap a fish symbol (only in the ACCU-FISH™mode) to display the information (size,
depth, bearing and range) about the fish.
Setting Revised size
+100 Two times
+50 1.5 times
-50 1/2
-65 1/3
-75 1/4
-80 1/5