Furuno USA 9ZWRTR104 Transceiver for Radar Sensor DRS4DL User Manual
Furuno USA Inc Transceiver for Radar Sensor DRS4DL
Contents
- 1. User Manual I
- 2. User Manual II Part 1
- 3. User Manual II Part 2
- 4. User Manual II Part 3
- 5. User Manual II Part 4
- 6. User Manual II Part 5
- 7. User Manual II Part 6
- 8. User Manual II Part 7
- 9. User Manual II Part 8
- 10. User Manual II Part 9
- 11. User Manual II Part 10
- 12. User Manual II Part 11
- 13. User Manual II Part 12
User Manual II Part 10
9. CAMERA/VIDEO/FUSION-Link
9-7
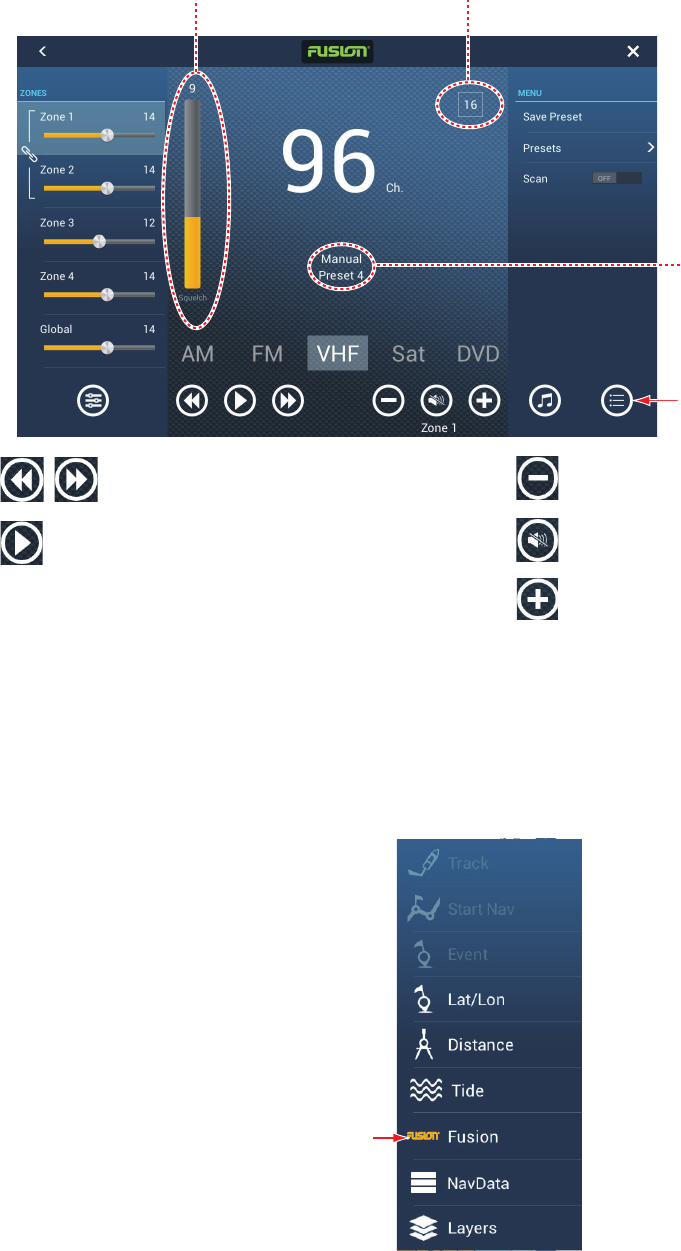
Example2: VHF in the full screen
Note: For details, see the manual for the FUSION-Link equipment.
Method 2: Slide-out menu (for minimized window)
Tap [Fusion] to display the audio control bar on each display. The illustration on then
next page shows the audio control bar for iPod and VHF on the plotter display.
Tap: Switch channel selection mode between
preset and manual.
Long tap: After selecting channel in manual mode,
long tap to register the channel as preset channel.
Select channel. Lower volume.
Raise volume.
Mute/unmute.
Drag bar to adjust squelch. Tap to select CH16.
Channel
selection
mode
Hide or
show
menu.
Tap to show or hide
FUSION audio bar.
9. CAMERA/VIDEO/FUSION-Link
9-8
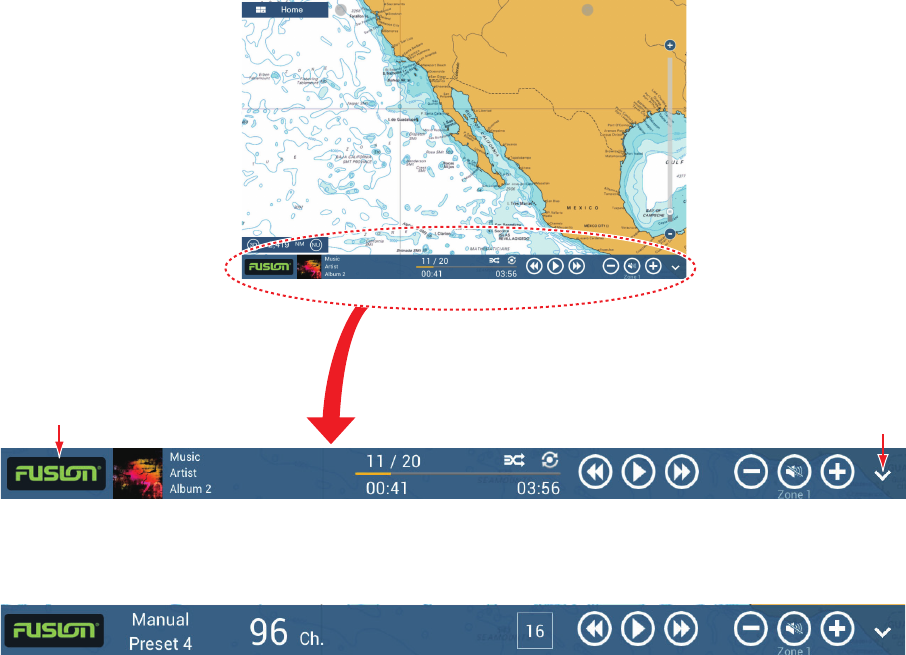
Method 3: Tap two fingers on the screen.
Preset [Function Gesture] for [Fusion] (for full window) or [Fusion Bar] (for minimized
window) (see section 1.15). Once you have done this preset, simply tap the screen
with two fingers to access the FUSION controls.
Tap to go to full screen
FUSION display. Tap to hide bar.
For iPod
For VHF
10-1
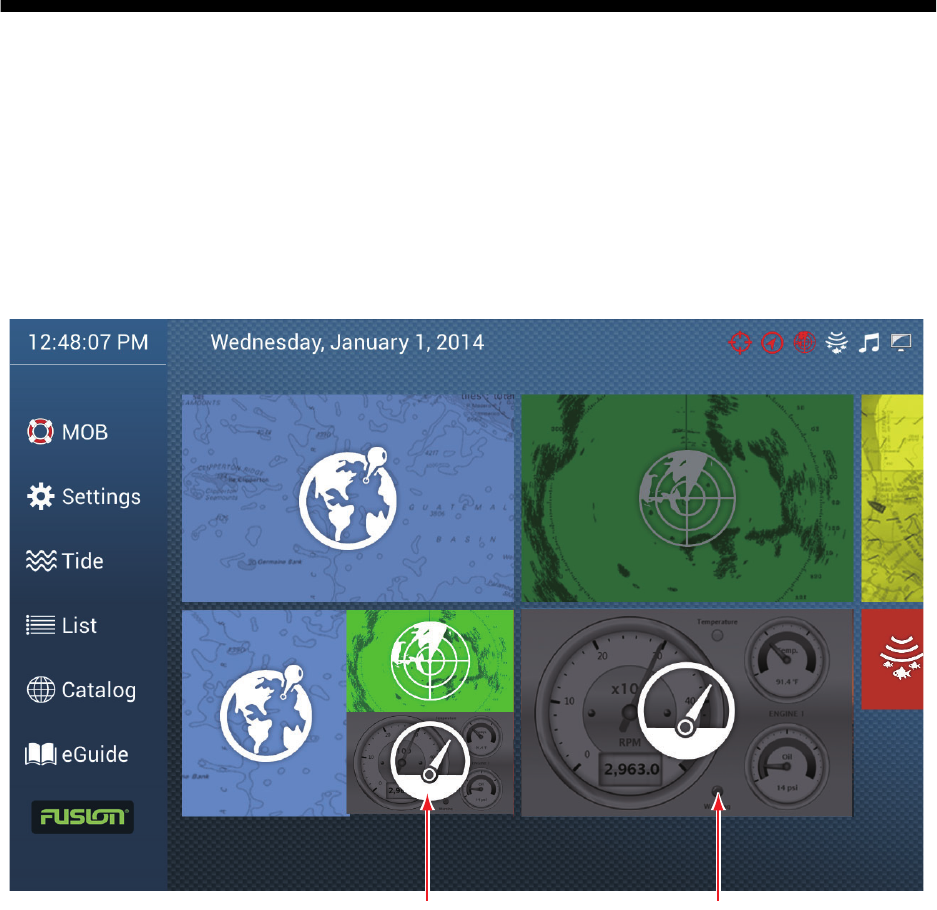
10. INSTRUMENT DISPLAY
The instrument display gives you with navigation and environment display. The instru-
ment display can be programmed to a full screen or three-way split screen. Applicable
sensors are required.
10.1 How to Show the Instrument Display
Set the instrument display on the home screen referring to paragraph 1.7.1. Tap the
instrument display icon.
Instrument display
(full screen)
Instrument display
(3-way screen)
10. INSTRUMENT DISPLAY
10-2
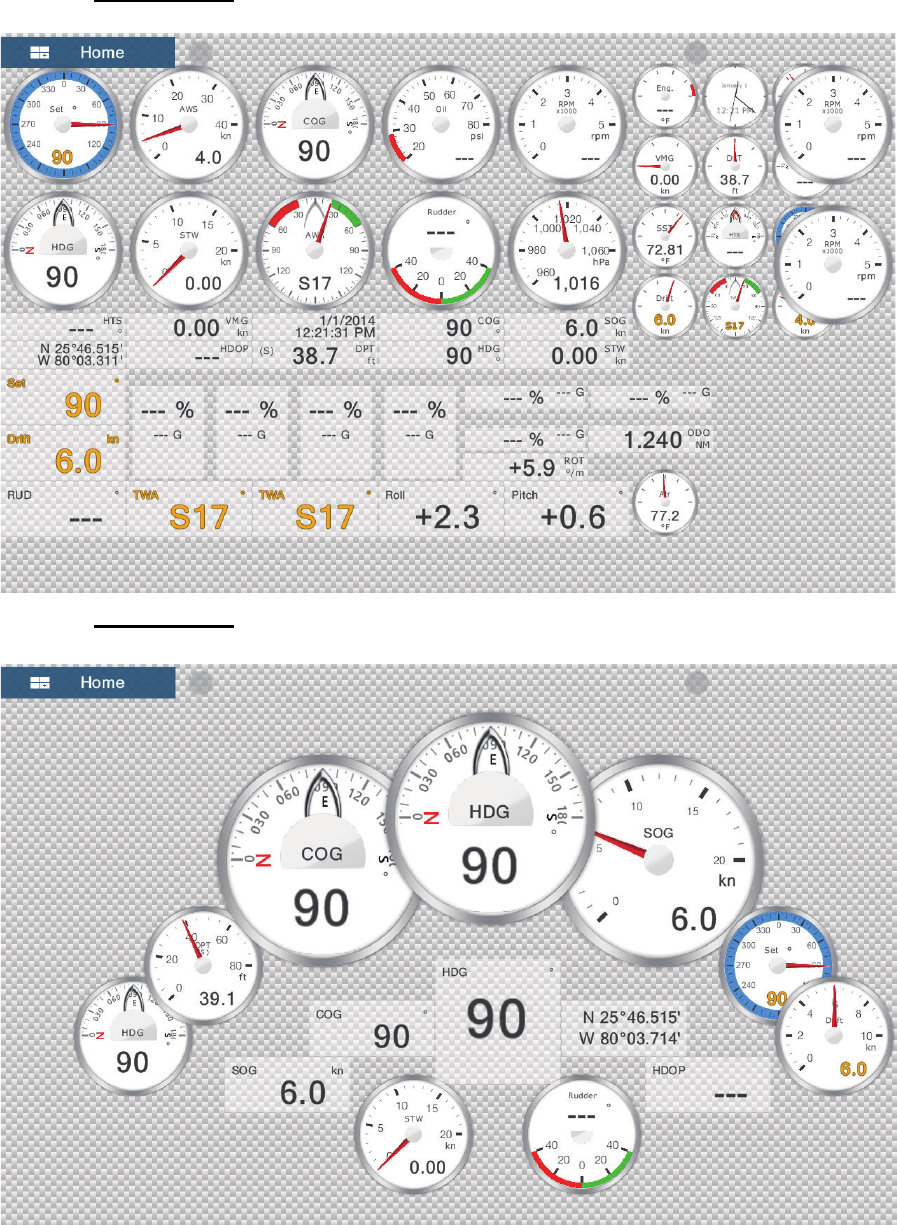
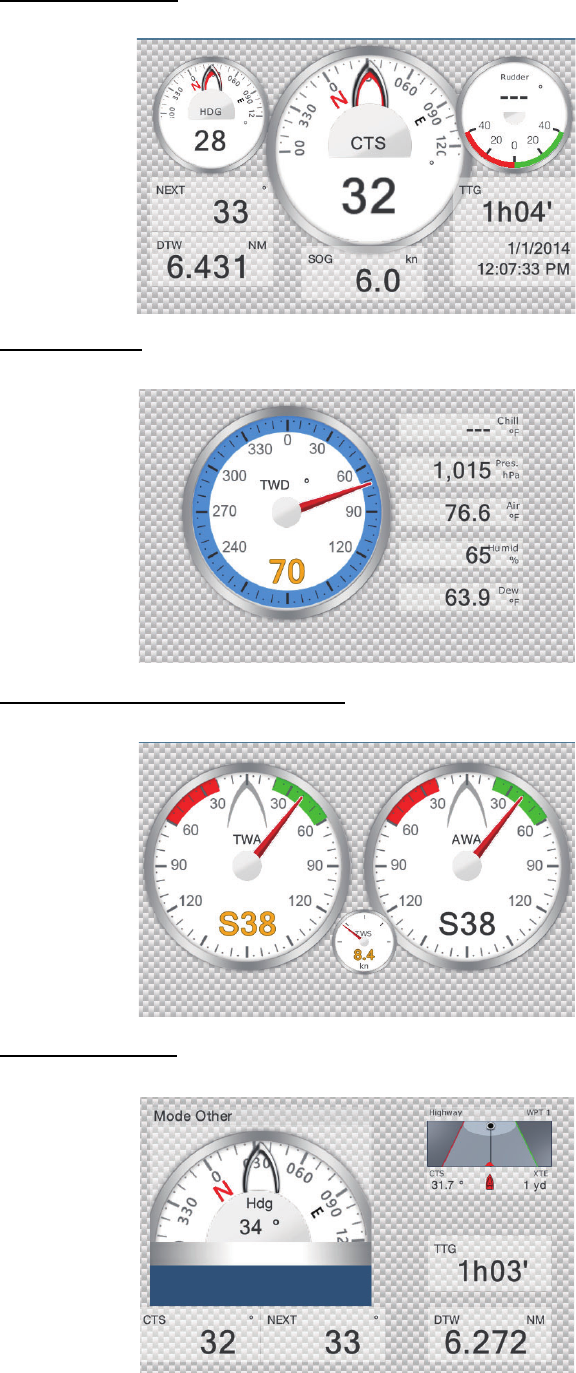
10.2 Instrument Displays
This section provides examples of the various instrument displays. Your displays may
be different.
10.2.1 Full screen displays
Full 1 screen
Full 2 screen
10. INSTRUMENT DISPLAY
10-3
10.2.2 Split screen displays
Steering display
Wind display
True and apparent wind display
Navpilot display
10. INSTRUMENT DISPLAY
10-4
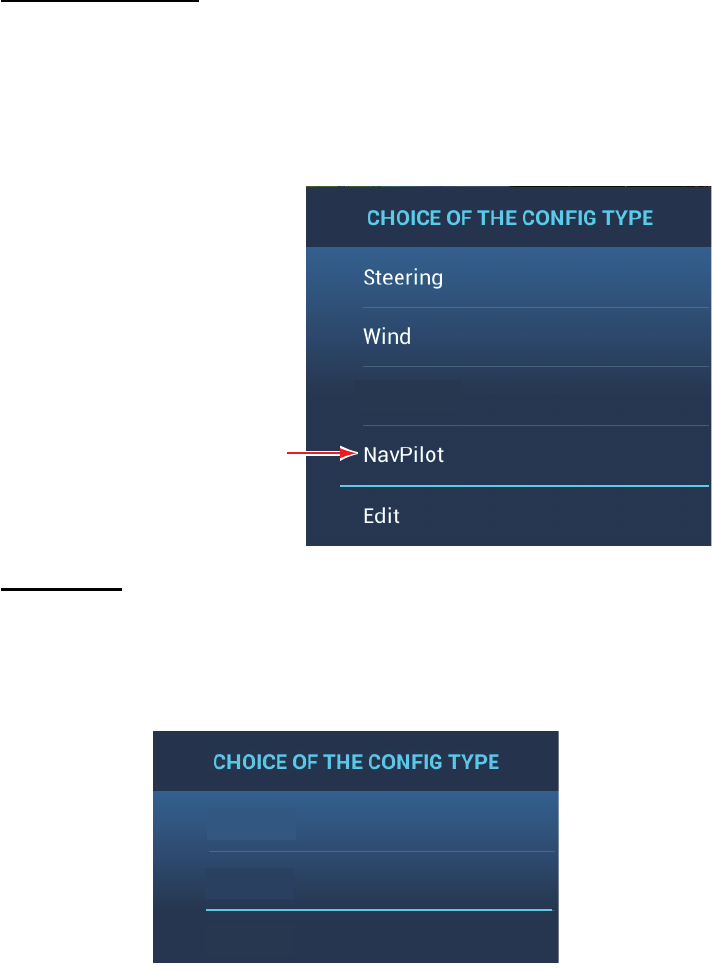
10.2.3 How to switch between instrument displays
3-way split screen
You can choose from four basic instrument screens in the 3-way split screen: steering,
wind, true and apparent wind, and NavPilot*.
* Requires 700 series NavPilot.
Tap the instrument display to show the pop-up menu. Tap the display of your choice.
Full screen
Two full screen instrument displays are available: [Full 1] and [Full 2]. You can switch
between them by swiping downward at the bottom of the display, or tapping the screen
to display the window shown below.
True & App Wind
Requires connection of Navpilot.
Not shown otherwise.
Full 1
Full 2
Edit
10. INSTRUMENT DISPLAY
10-5
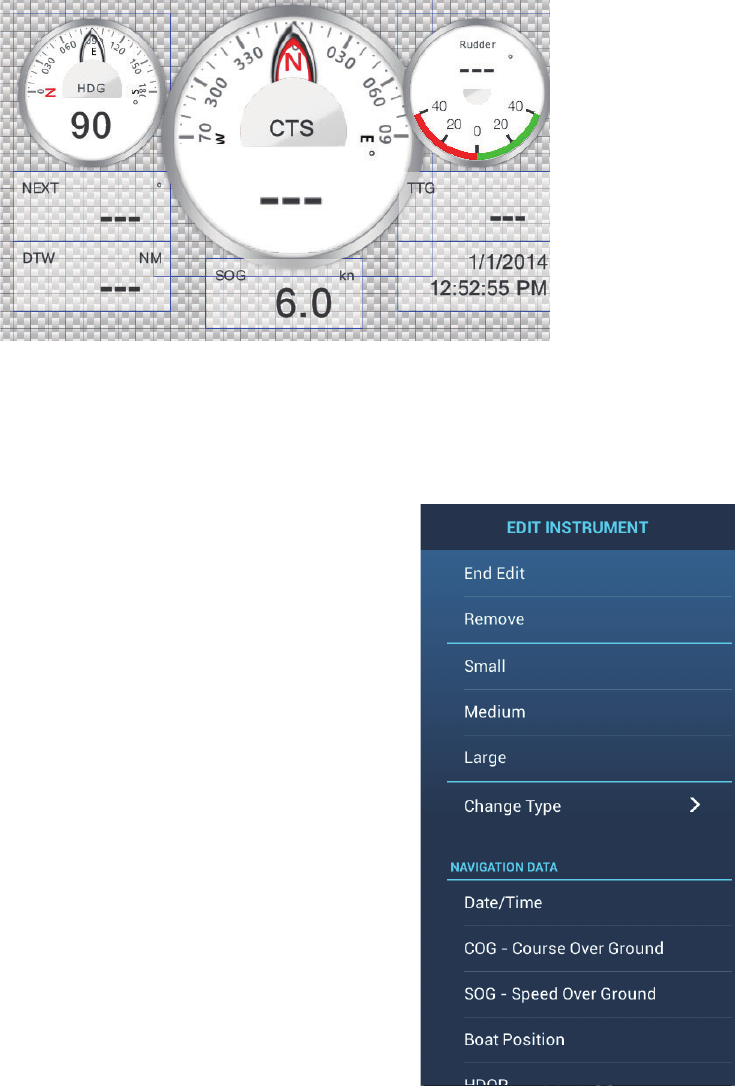
10.3 How to Edit the Instrument Display
The procedures below show you how to edit an instrument display that is part of a
three-way split screen. The procedure for the full screen instrument display is similar.
To start the editing process, tap anywhere on the instrument display, then select [Edit]
from the pop-up menu, or long tap the instrument display. A thin blue line is drawn
around each indication in the display. Edit or add indications as required, referring to
the procedures in this section. To save your changes, tap anywhere on the instrument
display, then select [End Edit] from the pop-up menu, or long tap the display.
10.3.1 How to arrange the indications in the instrument display
Drag and drop the indications.
10.3.2 How to edit, remove an indication in
the instrument display
Tap the indication to process to show the [EDIT
INSTRUMENT] window. Select the appropriate
action, referring to the instructions below.
Remove indication: Tap [Remove].
Change indication type: Tap [Change Type] to
show the [EDIT INSTRUMENT] window. Tap a
size in [Graphic], [Numeric], [Highway], or [Navpi-
lot].
Change indication: Tap required data, in the
[NAVIGATION DATA] section.
10. INSTRUMENT DISPLAY
10-6
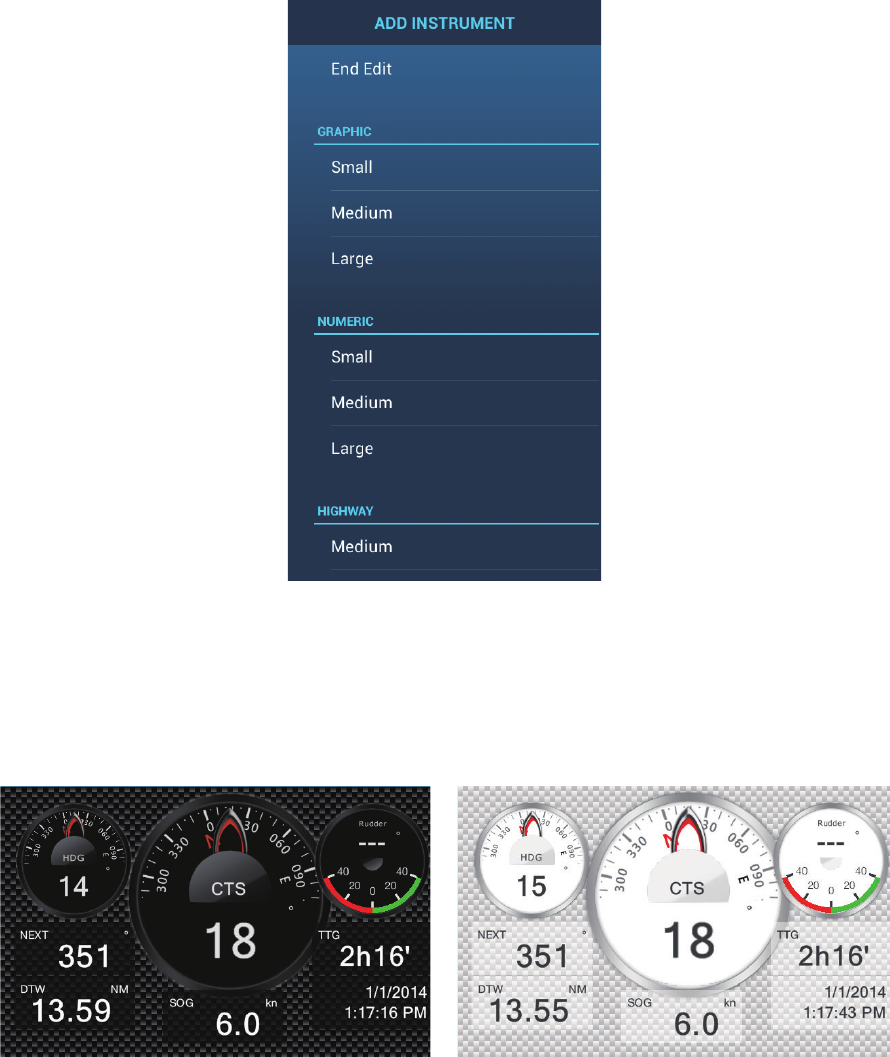
10.3.3 How to add an indication to the instrument display
Tap an unoccupied position in the instrument display to show the [ADD INSTRU-
MENT] window. Tap a size in [Graphic], [Numeric], [Highway], or [NavPilot]. Edit the
indication as shown in paragraph 10.3.2.
10.4 Instrument Theme
The instrument theme is available in black or white. On the home screen, open [Set-
tings] - [General]. Set [Instrument Theme] to [Black] or [White].

11-1
11. WEATHER
This equipment provides the weather information (Sirius (only U.S.) and NavCenter
(worldwide)). When connected to the Sirius Weather Receiver BBWX2, the weather
radar information can be displayed.
Sirius weather receiver
• Purchase the Sirius Weather Receiver BBWX2.
• Purchase a Sirius weather service subscription. Contact Sirius Satellite Radio INC.,
for additional information.
• Connect the BBWX2 and the NavNet TZtouch2 displays then turn on both of those
units. Your unit then receives WX data from the BBWX2, which takes approximately
30 minutes.
• During the installation of the equipment, the Installation Wizard checks if the BB-
WX2 is connected to this NavNet TZtouch2 unit. If the unit cannot find the BBWX2,
check the connections between the two units.
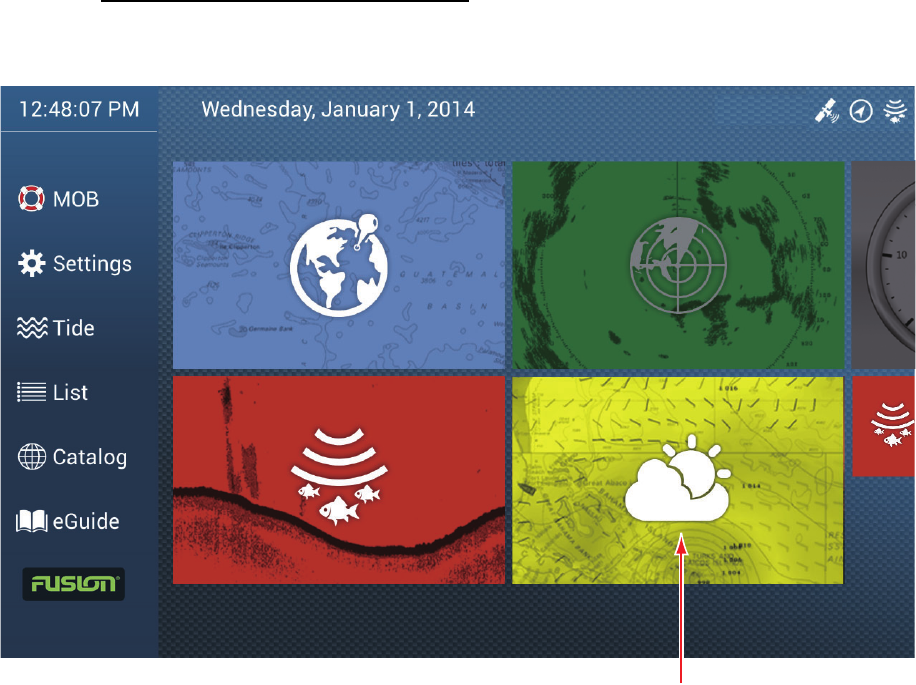
11.1 Weather Display Introduction
Your system displays the current and forecasted weather information for your area.
The weather information is updated in real time so that you have current weather in-
formation for your area and any area in the U.S.
Information provided by the Sirius Marine Weather service is advisory in nature. You,
the customer, agree to release FURUNO ELECTRIC CO., LTD., Sirius Satellite Radio
Inc., Navcast Inc. and WSI Corporation from any problems that occur from this ser-
vice. And you acknowledge that you have read the conditions of your subscription
agreement and agree to all the conditions of the subscription. If you do not have the
subscription agreement, got to www.sirius.com/marineweatheragreement or call 1-
800-869-5480 to have a copy sent to you.
You can put a point on the weather display. Tap the screen where to put a point, then
tap [New Point] on the pop-up menu.
11. WEATHER
11-2
How to select the weather display
The weather display is overlaid on the 2D plotter display. Select the weather display
on the home screen.
11.2 NavCenter Weather
You can download the NavCenter data from the internet via Wireless LAN. See
section 1.18 for how to connect to the internet.
Note: Data which is downloaded by a NavNet TZtouch2 unit can be shared with other
NavNet TZtouch2 units via the network. Data is shared automatically; no operation is
required.
11.2.1 How to set up for NavCenter weather
1. Open the home screen, then tap [Settings] - [Weather].
2. Tap [Load Weather File].
Note: The option [Sirius] appears when connecting BBWX2.
3. Tap [NavCenter] then tap < to return to the menu.
Weather display
11. WEATHER
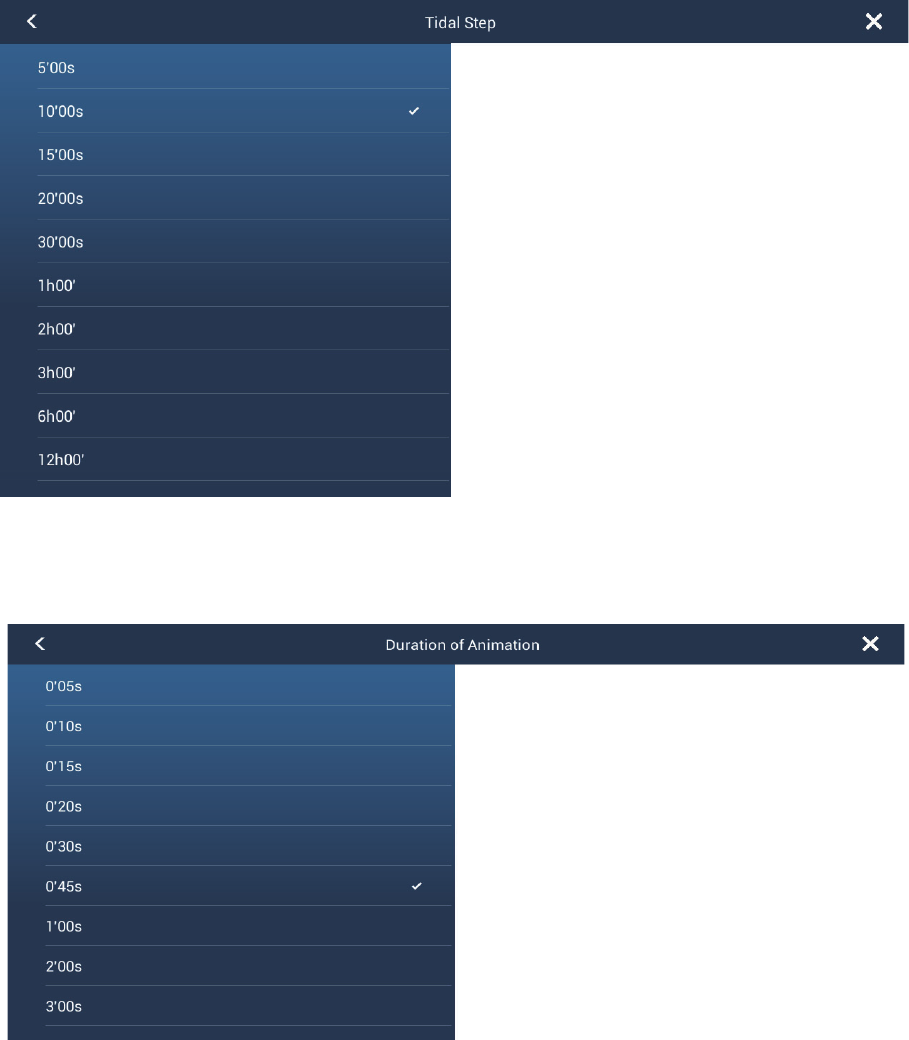
11-3
4. Tap [Tidal Step].
5. Tap the update interval (which determines how often tidal data are captured) for
the tide icon.
6. Tap [Duration of Animation].
7. Tap the update interval for the animation. The larger the time, the slower the ani-
mation moves.
11.2.2 How to download the NavCenter weather data
1. Open the home screen, then tap [Settings] - [General].
2. Tap [Wireless LAN Settings].
3. Turn on [Wireless].
4. After the internet connection is established, Tap the close button to exit.
11. WEATHER
11-4
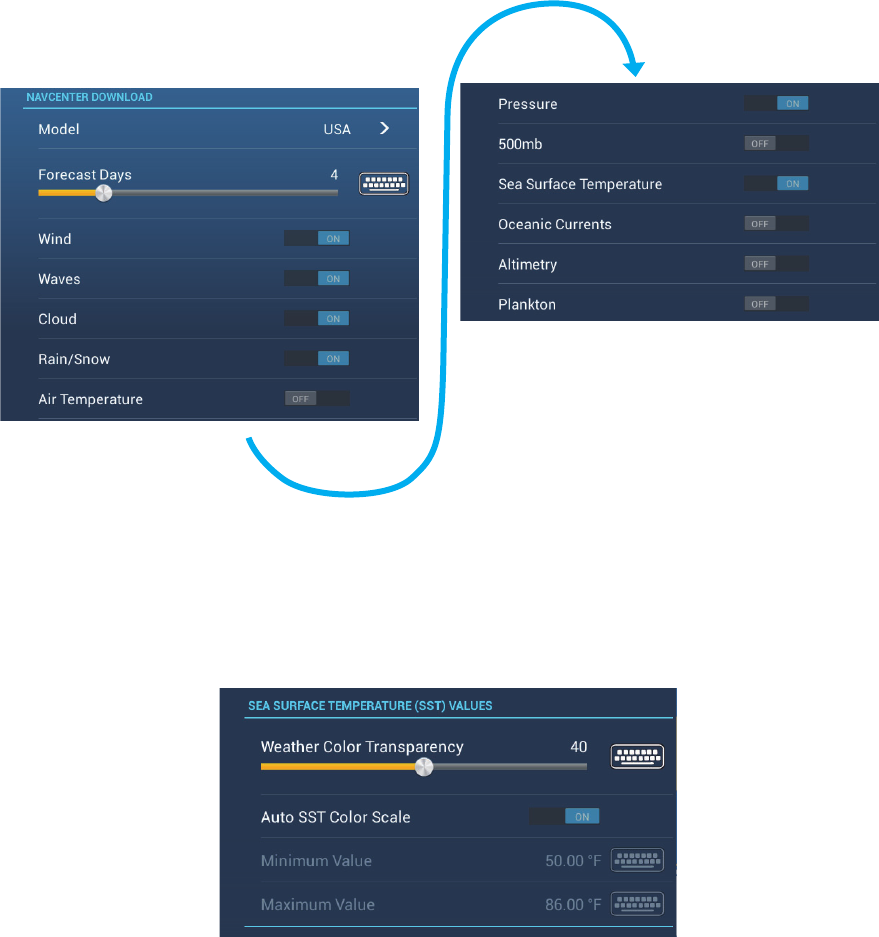
5. Open the home screen, then tap [Settings] - [Weather].
6. Tap the data model from [Model] in the [NAVCenter Download] section. (The op-
tions are [USA] and [Worldwide].)
7. Drag the slider in [Forecast Days] to select how many days’ data to download.
8. Turn on the items to receive, from [Wind] to [Plankton].
9. For [Sea Surface Temperature], set the following menu items.
[Weather Color Transparency]: Adjust the degree of transparency for the weath-
er overlay. Use a large figure to increase the degree of transparency.
[Auto SST Color Scale]: Activate this feature to adjust the SST color scale auto-
matically according to the sea surface temperature.
[Minimum Value]: Set the minimum value for the SST color when [Auto SST Col-
or Scale] is deactivated.
[Maximum Value]: Set the maximum value for the SST color when [Auto SST
Color Scale] is deactivated.
10. Tap the close button to finish.
11. Open the weather display, then tap the screen to show the pop-up menu. Tap [Get
Latest Wx].
The notification bar at the top of the screen flashes "Weather Update in Progress"
during the downloading. If the downloading was successful, the message " DOWN-
LOAD SUCCEEDED" appears. Tap [OK] to finish.
11. WEATHER
11-5
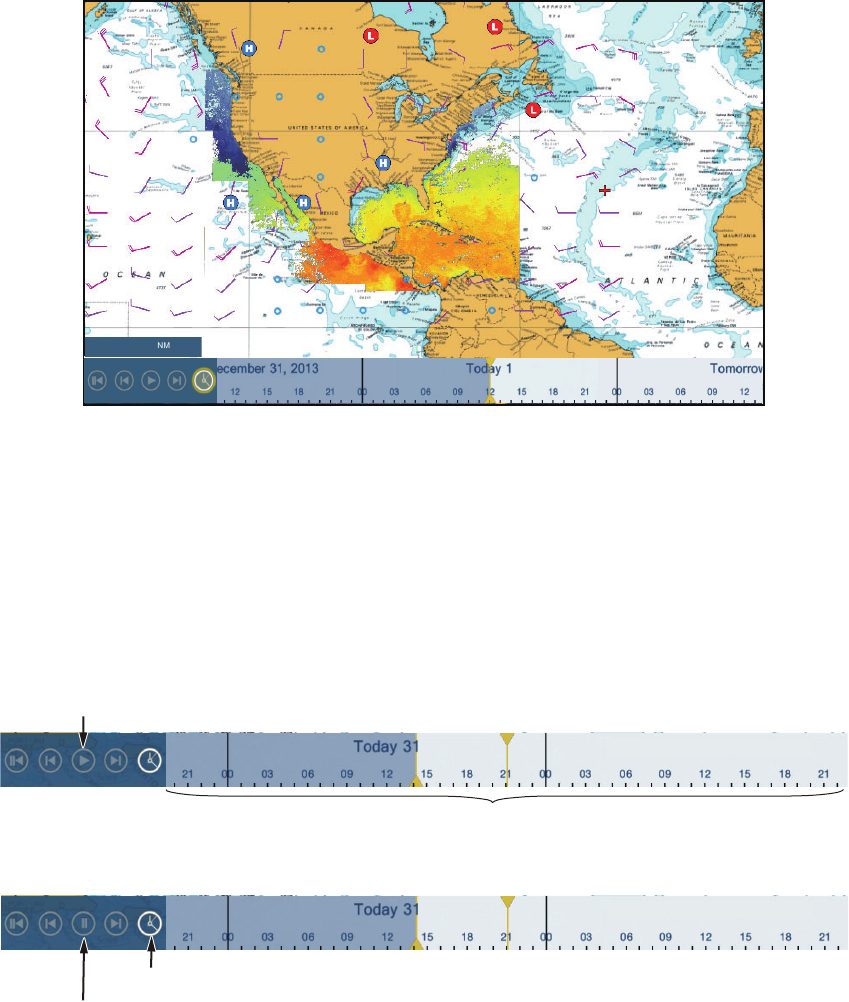
11.2.3 How to display the NavCenter data
The NavCenter data display provides forecast data that includes [Wind], [Waves],
[SST] (sea surface temperature), [Cloud], [Rain], [Pressure], [500mb], [Air Temp],
[Currents], [Altimetry], [Plankton].
1. Tap the screen to show the pop-up menu then tap [Wx Data].
2. Tap a menu item to display its data.
3. Repeat steps 1 and 2 to select all menu items required.
4. Tap [Anim Forecast] on the pop-up menu. The animation forecast is displayed for
a specified-day period. To stop the animation display, tap [End Anim] at the top
right-hand corner of the screen.
You can operate the animation display with the animation bar at the bottom of the
screen.
11.2.4 How to load a weather file
You can load a weather file saved on a micro SD card.
1. Set the applicable micro SD card in the SD card unit.
2. Open the home screen, then tap [Settings] - [Weather].
3. Tap [Load Weather File]. Tap the data to load then tap [OK].
4. After the equipment has loaded the selected data, tap the close button to finish.
6,695
The time scale moves.
Tap to start or restart the animation display.
Tap to suspend the animation display.
Tap to set the time scale to the current time and display the current data.
Saturday, January 1, 2014
Saturday, January 1, 2014

11. WEATHER
11-6
11.3 Sirius Weather
Sirius weather radar information and advanced weather information are available in
North America with connection of the Sirius Weather Receiver BBWX2.
11.3.1 How to set up for Sirius weather
1. Open the home screen, then tap [Settings] - [Weather].
2. Tap [Weather Data Server].
3. Tap [Sirius] then tap < to return to the menu.
4. Tap [Sirius Weather Radar].
5. Tap the Sirius weather radar to use, [US Now Radar] (USA) or [CanadRad] (Can-
ada). [US Now Radar] shows the type and level of precipitation. The amount of
precipitation increases with level.
Precipitation indication on USNowRadar.
Precipitation indication on CanadianRadar
6. Tap the close button to finish.
Weather radar color Precipitation type Level
Light green Rain 15-19 dBz
Medium green Rain 20-29 dBz
Dark green Rain 30-39 dBz
Yellow Rain 40-44 dBz
Orange Rain 45-49 dBz
Light red Rain 50-54 dBz
Dark red Rain over 55 dBz
Light blue Snow 5-19 dBz
Dark blue Snow over 20 dBz
Light pink Mixed 5-19 dBz
Dark pink Mixed over 20 dBz
Weather radar color Level (mm per hour)
Transparent (low precipitation) 0.00 to 0.20 mm/hr
Light green 0.21 to 1.00 mm/hr
Medium green 1.01 to 4.00 mm/hr
Dark green 4.01 to 12.00 mm/hr
Yellow 12.01 to 24.00 mm/hr
Orange 24.01 to 50.00 mm/hr
Light red 50.01 to 100 mm/hr
Dark red over 100.01 mm/hr
11. WEATHER
11-7
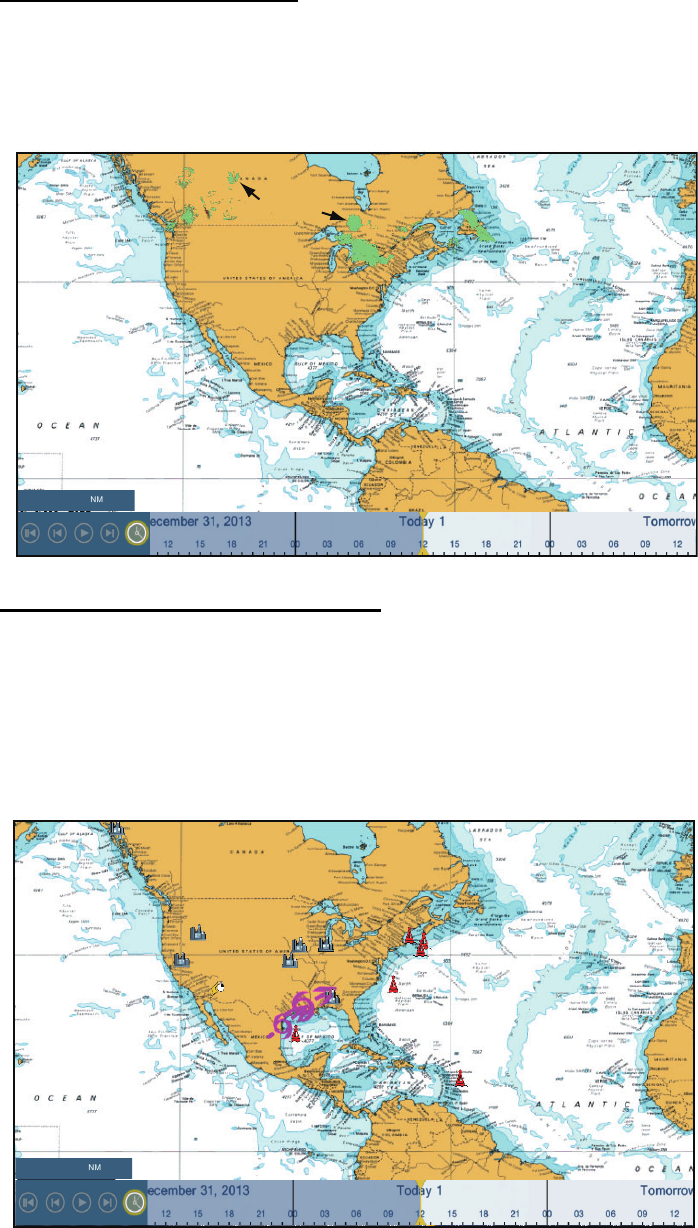
11.3.2 How to display the Sirius data
[Wx Radar] (Weather radar)
NOWRAD and Canadian weather radar information are put on top of your chart (see
paragraph 11.3.1). This display lets you see possible storm fronts to help you identify
the clouds from possible sea clutter. To display the weather radar, turn on [Wx Radar]
from the pop-up menu.
[Adv Wx Data] (Advanced weather)
The advanced weather display provides the weather data; [Buoys], [City], [Storm],
[Lighting] or [Storm Tracks]. For the icons of these data, see section 11.4.
1. Tap the screen to show the pop-up menu, then tap [Adv Wx Data].
2. Tap a menu item to display its data.
3. Repeat steps 1 and 2 to select all menu items desired.
Wx radar
display
6,695
6,695
11. WEATHER
11-8
[Anim Radar] (Animation radar)
The animation radar display provides the past weather radar information. To show the
animation radar display, tap [Anim Radar] on the pop-up menu. To stop the animation
display, tap [End Anim] at the top right-hand corner of the screen.
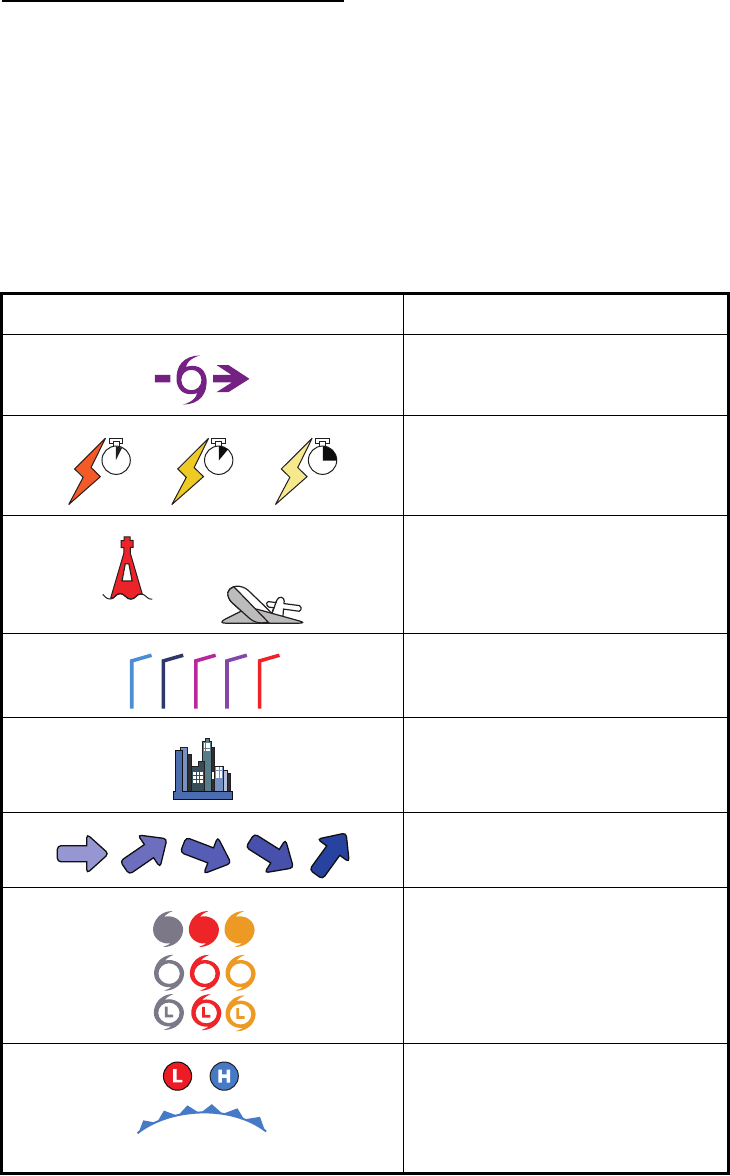
11.4 Weather Icons (Sirius Weather)
The table below shows the weather icons that appear on the Sirius weather display.
You can show or hide these icons from the pop-up menu, with [Wx Data].
Icon Meaning
Storm cast
Lightning
Surface observation stations
Wind
City
Currents
Storm tracks
Surface pressure
Buoy or
CMAN sta.
etc.