Honeywell LXE4830P 802.11g COMPACT FLASH MODULE User Manual HX2 User s Guide
Honeywell International, Inc. 802.11g COMPACT FLASH MODULE HX2 User s Guide
Contents
- 1. Manual HX1 rev3
- 2. Manual MX3X rev3
- 3. Manual MX5X rev3
- 4. Manual MX7 rev3
- 5. User Manual HX2
- 6. User Manual MX7
- 7. users manual
- 8. USERS MANUAL
- 9. User Manual MX3X
- 10. User Manual VX3X
- 11. User Manual VX6 part 1
- 12. User Manual VX6 part 2
- 13. User Manual VX7 part 1
- 14. User Manual VX7 part 2
- 15. Users Manual F300
- 16. Users Manual MX9
users manual
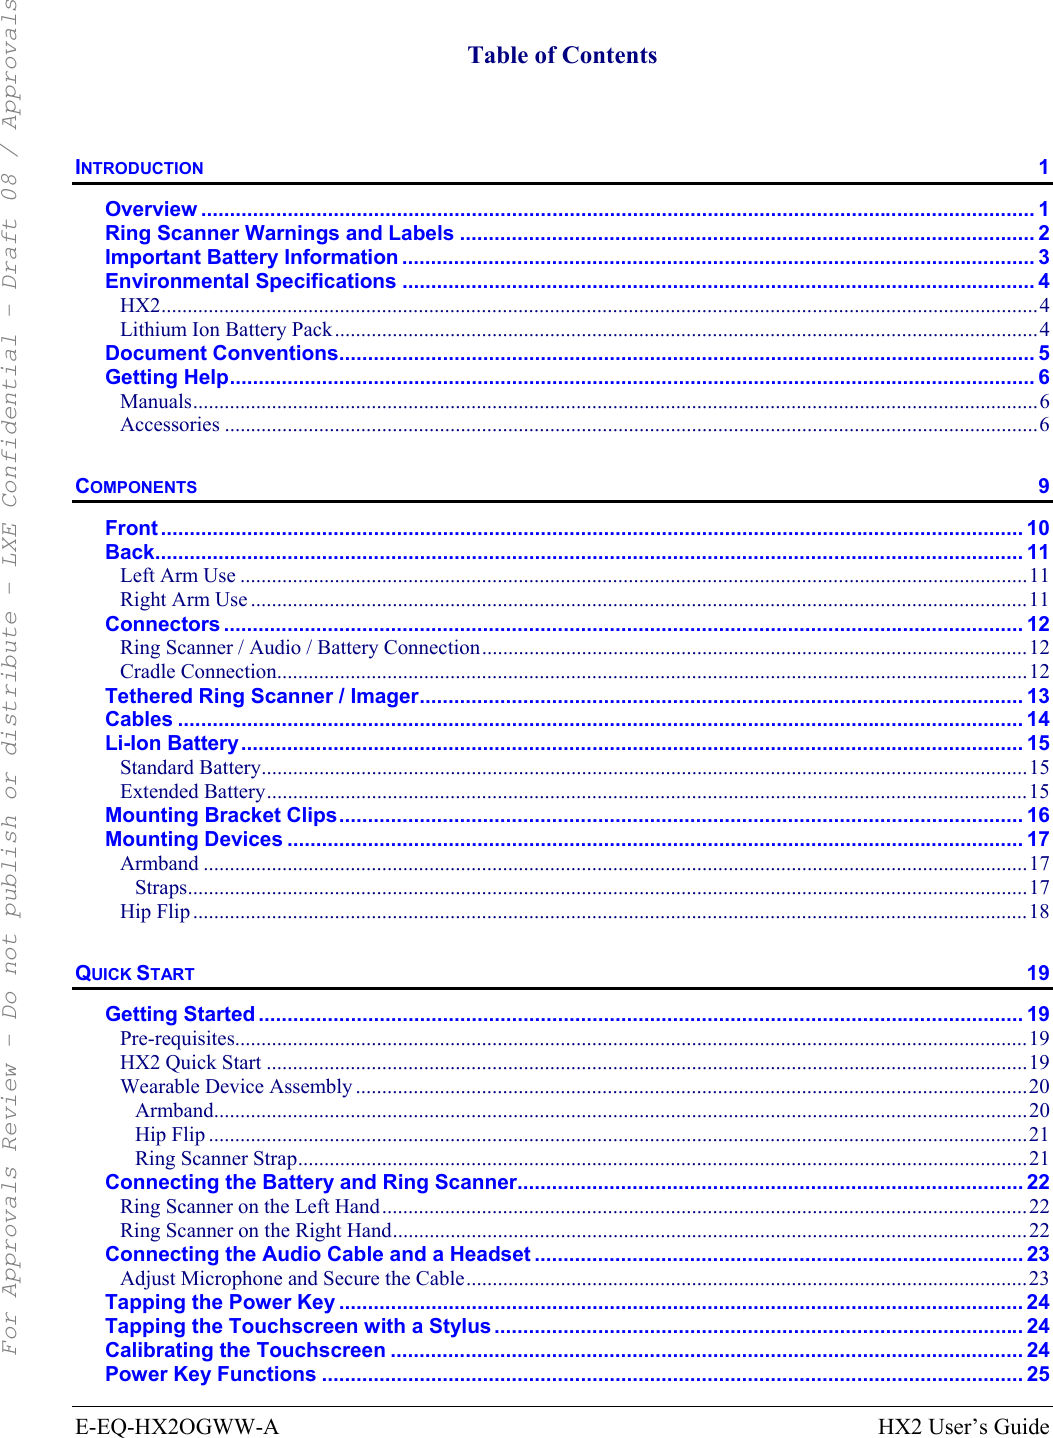
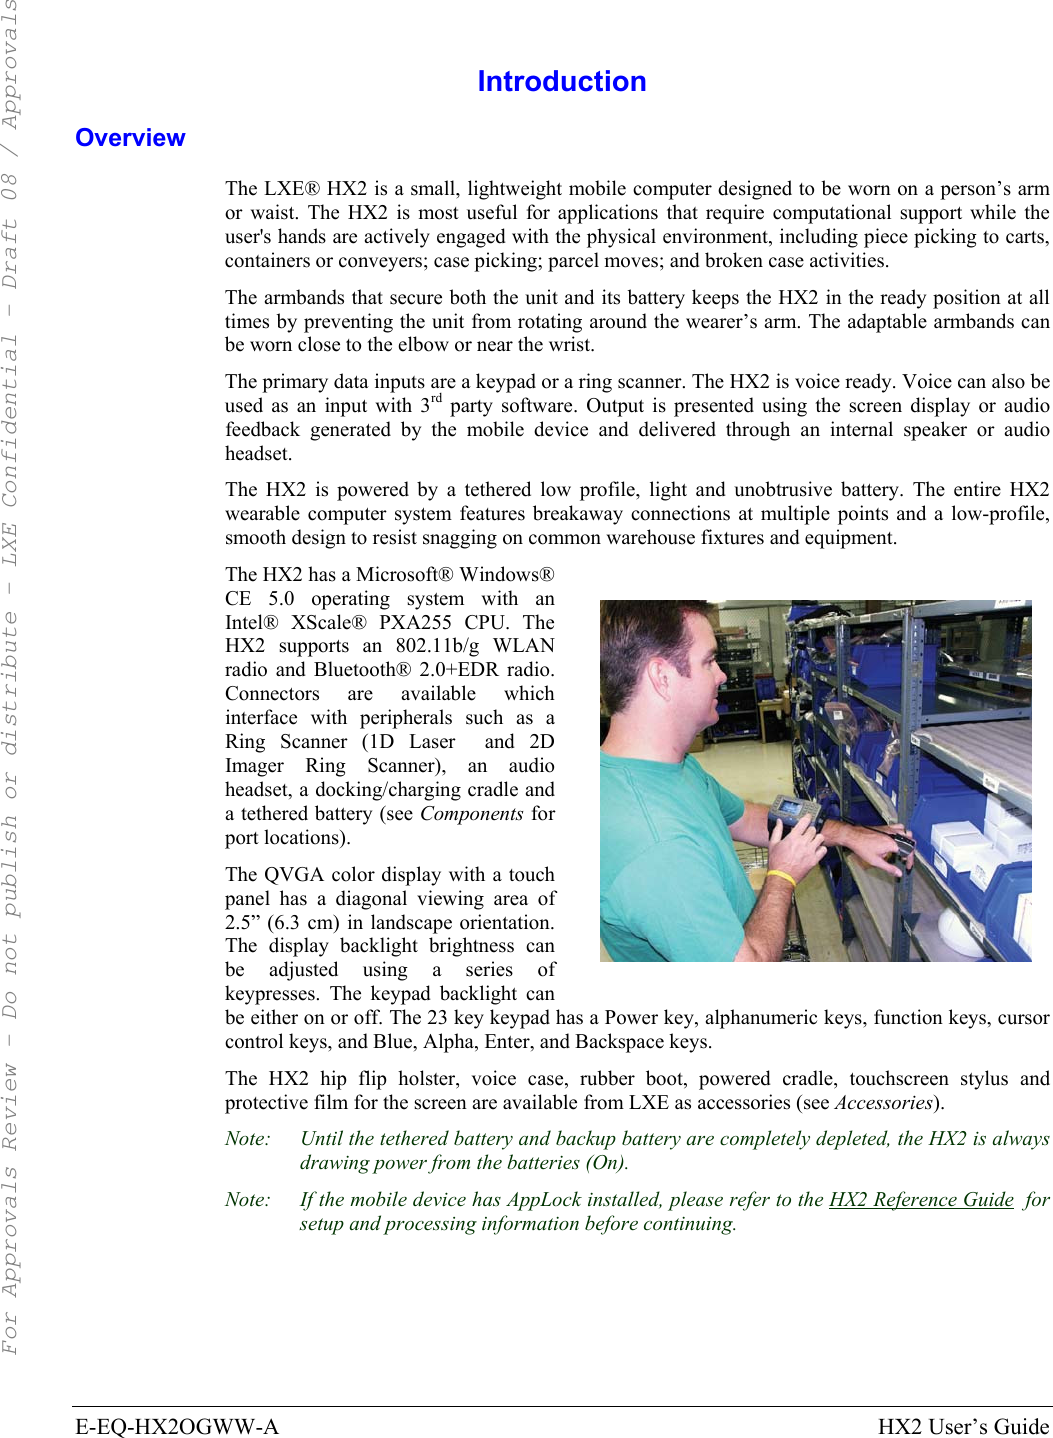

![4 Environmental Specifications HX2 User’s Guide E-EQ-HX2OGWW-A Environmental Specifications HX2 Operating Temperature 14°F to 122°F (-10°C to 50°C) [non-condensing] Storage Temperature -4°F to 158°F (-20°C to 60°C) [non-condensing] Water and Dust IEC 60529 compliant to IP54 Operating Humidity 5% to 90% non-condensing at 104°F (40°C) Display Readability Indoor readable Wireless Compatibility WiFi, CCX, LXE-delivered/certified access points Bluetooth Range 32.8 feet (10 meters) Direct line of sight only. Lithium Ion Battery Pack Note: Battery packs can only be charged when their temperature is between 50°F (10°C) and 113°F (45°C). Operating Temperature -4°F to 120°F (-20°C to 50°C) [non-condensing] Storage Temperature -4°F to 160°F (-20°C to 70°C) [non-condensing] Water and Dust IEC 60529 compliant to IP54 Operating Humidity 5% to 90% non-condensing at 104°F (40°C) mAh Standard battery pack: 2000 mAh Extended battery pack: 4000 mAh Charge Time Standard battery pack: 4 hours Extended battery pack: 8 hours Discharge Time Standard battery pack: 8 hours Extended battery pack: 16 hours Dimensions Standard battery pack: 1.7” Width x 0.6” Height x 4.9” Length Extended battery pack: 1.7” Width x 1.0” Height x 4.9” Length For Approvals Review - Do not publish or distribute - LXE Confidential - Draft 08 / Approvals](https://usermanual.wiki/Honeywell/LXE4830P.users-manual/User-Guide-821065-Page-10.png)


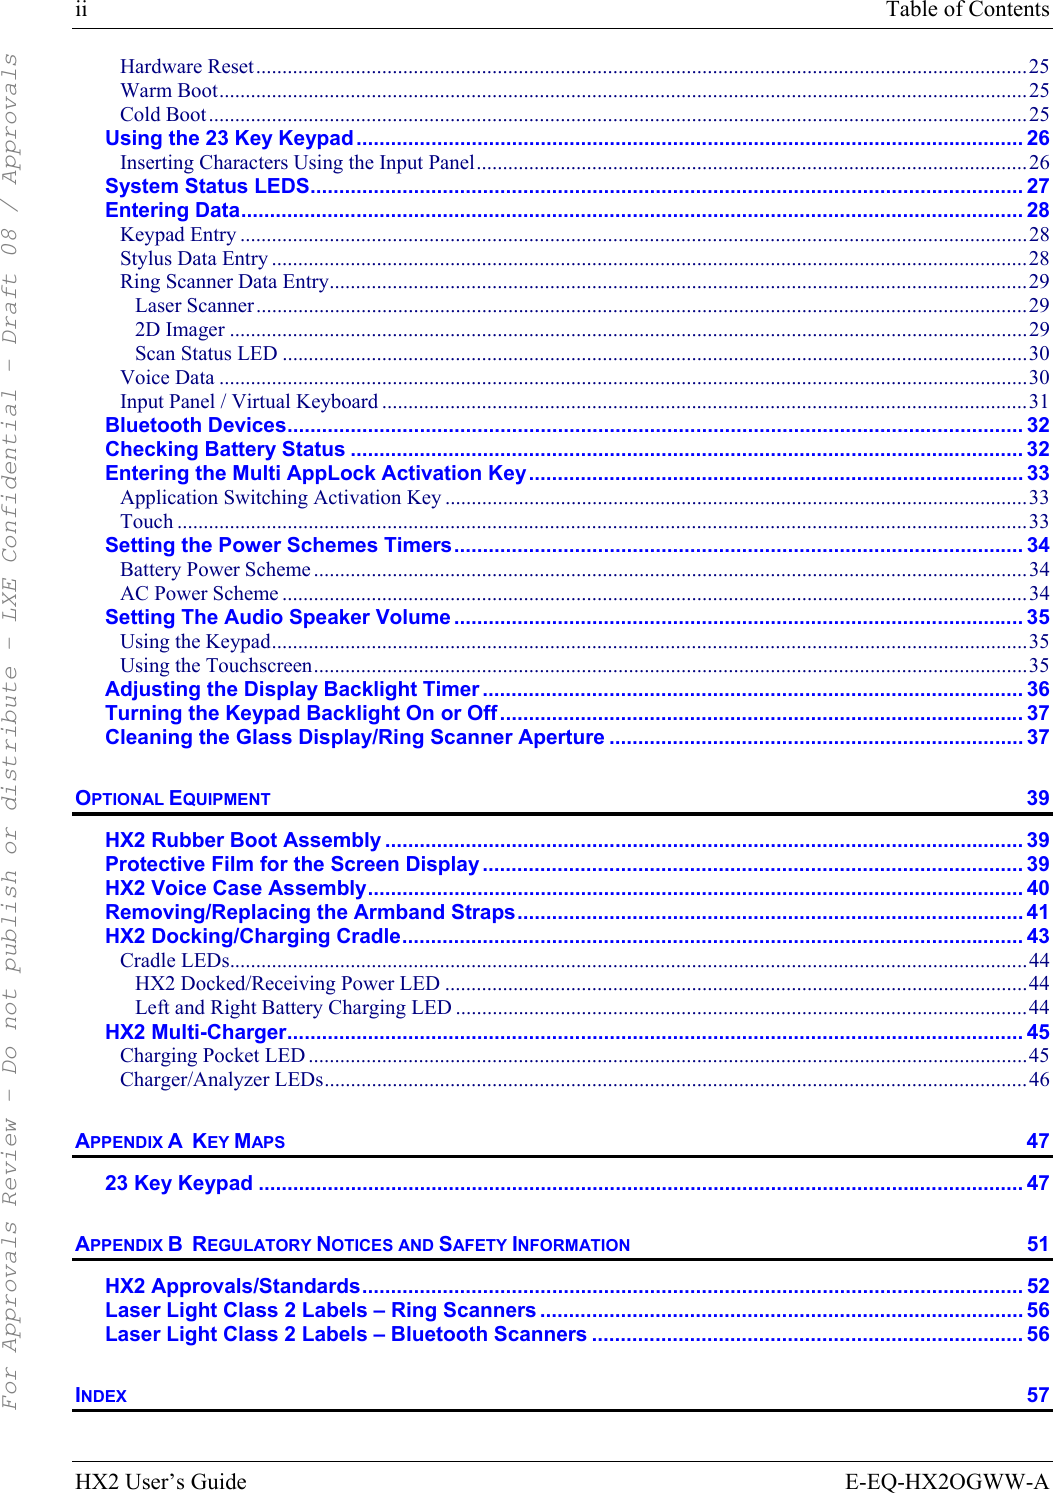
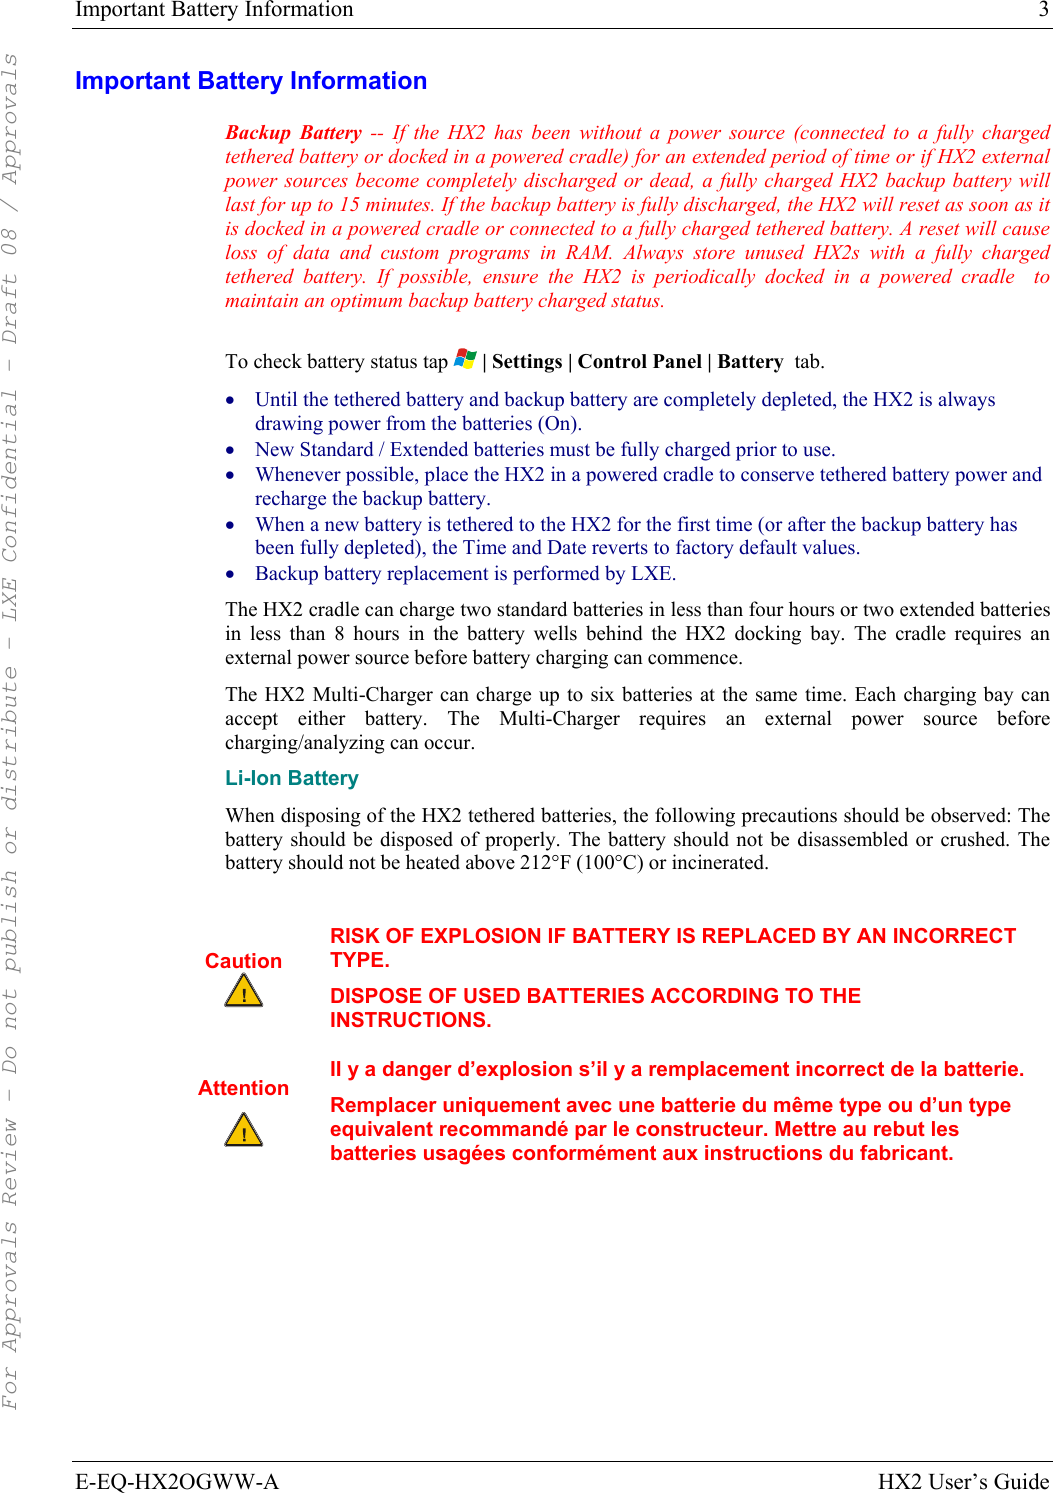
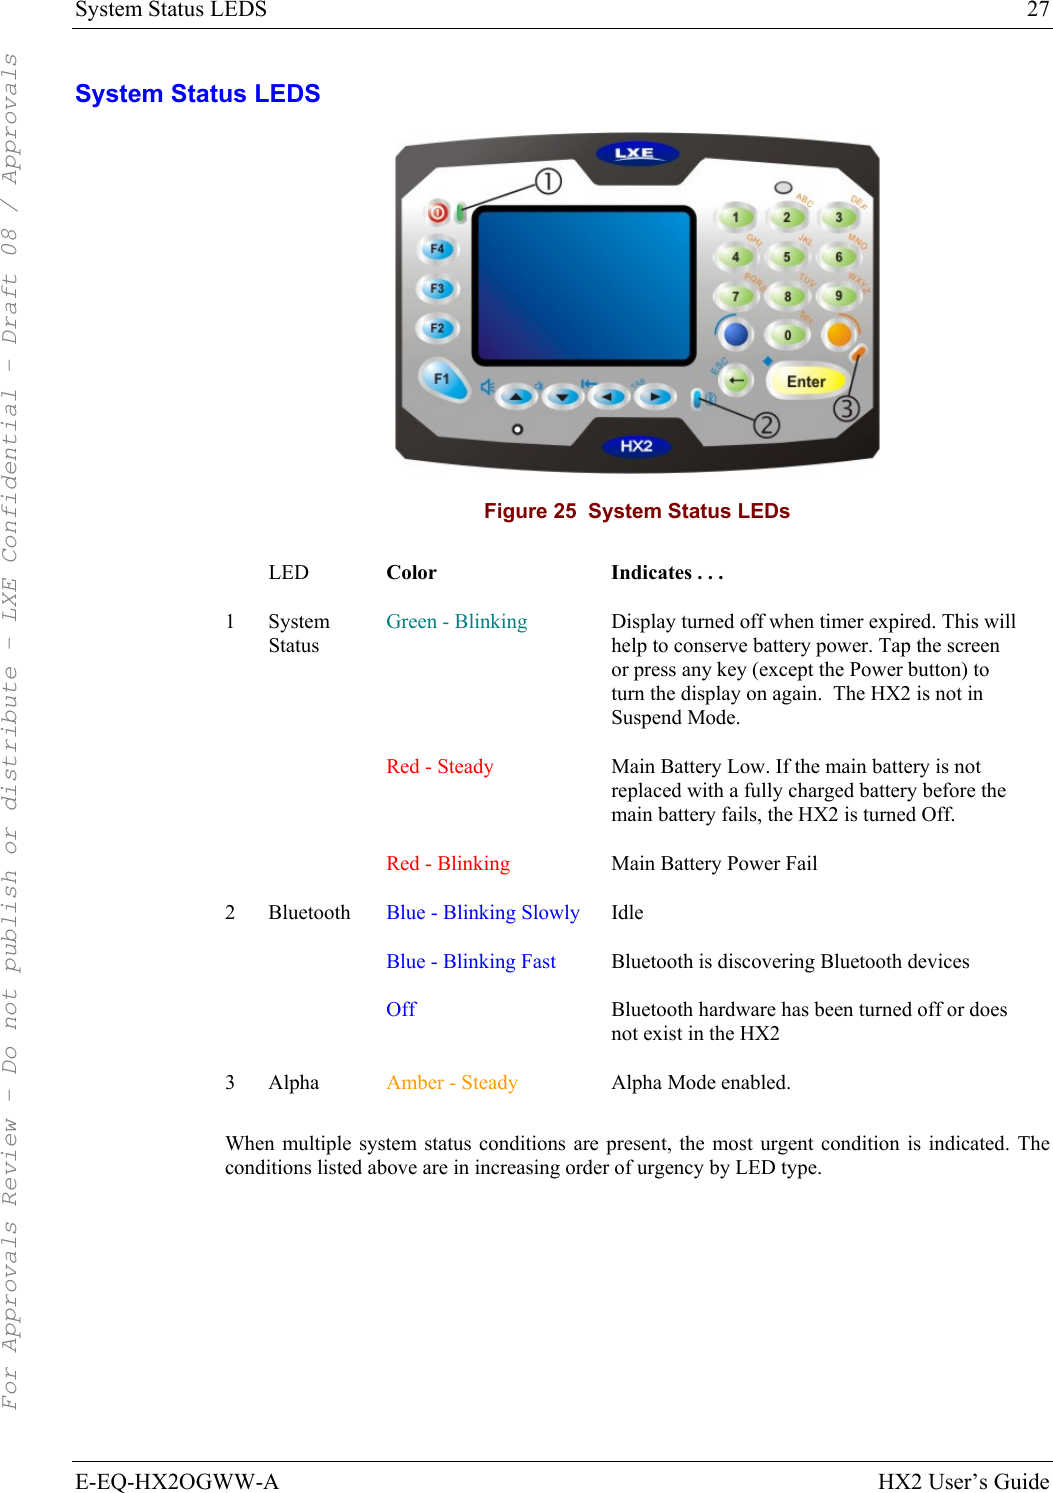
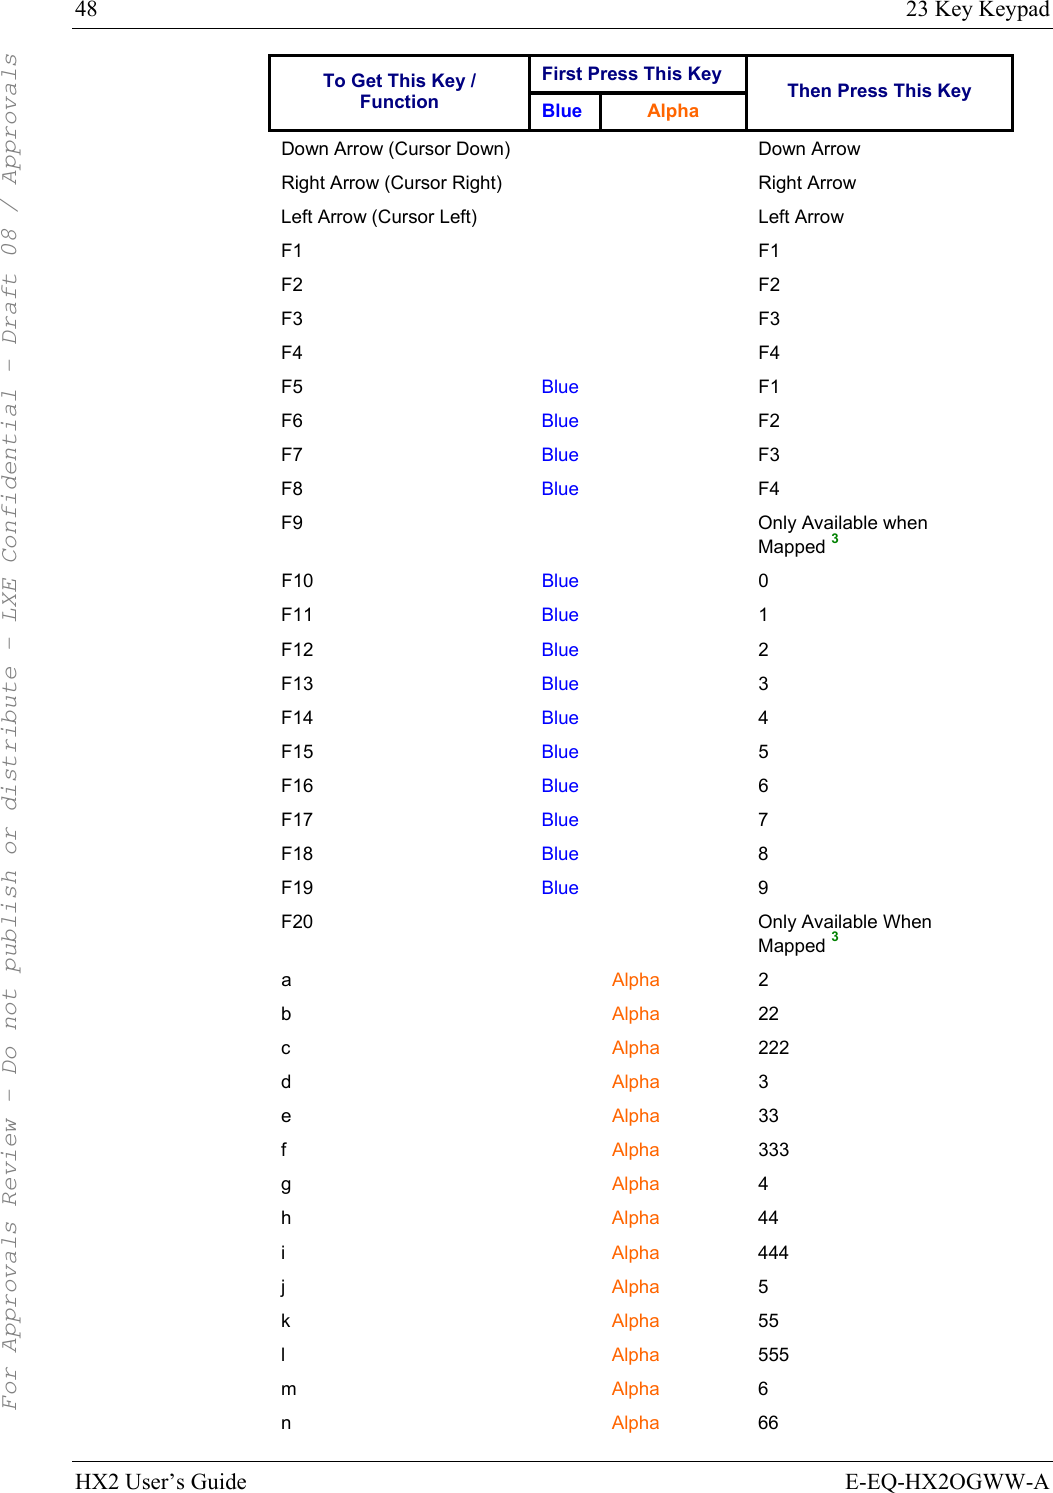
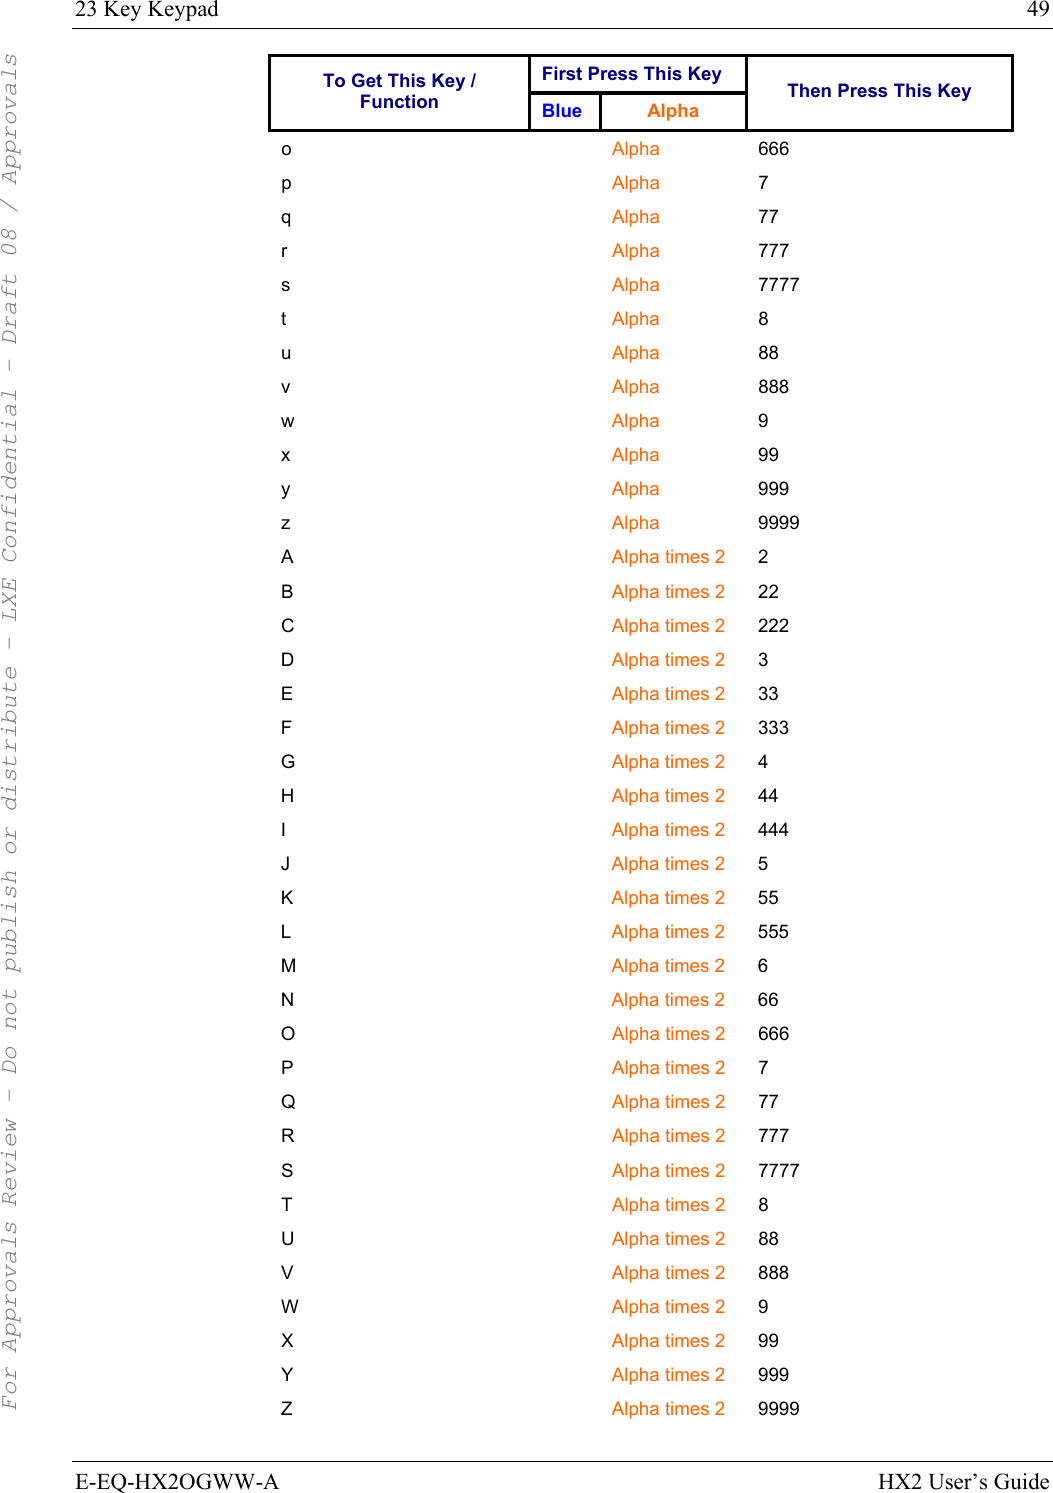
![26 Using the 23 Key Keypad HX2 User’s Guide E-EQ-HX2OGWW-A Using the 23 Key Keypad Figure 24 The 23 Key Keypad • When using a sequence of keys that require an alphabet key, first press the Alpha key to force Alpha mode on the numeric keys. See Alpha Modifier Key in the HX2 Reference Guide. • Double tap the Alpha key for upper case alphabetic characters (similar to CapsLock. Single tap the Alpha key to exit CapsLock mode). • Single tap the Alpha key to enter and exit Alpha mode. • Default Alpha mode produces lower case alphabetic characters when numeric keys are pressed. • Pressing the Alpha key forces “Alpha” mode for all keys. • To create a combination of numbers and letters before pressing Enter, remember to tap the Alpha key to toggle between Alpha and Numeric mode. • Use the Input Panel to enter characters that are not available using the 23-key keypad. • When using a sequence of keys that do not include the Alpha key (Orange) but does include a sticky key (Blue), press the Blue key in sequence. Inserting Characters Using the Input Panel You can use the Input Panel to insert the following characters: < > { } [ ] ( ) _ + : ; “ ‘ ? / ~ ` ! @ # $ % ^ & | See Input Panel later in this guide. See Appendix A Key Maps for instruction on the specific keypresses to access all allowed keypad functions. For Approvals Review - Do not publish or distribute - LXE Confidential - Draft 08 / Approvals](https://usermanual.wiki/Honeywell/LXE4830P.users-manual/User-Guide-821065-Page-32.png)


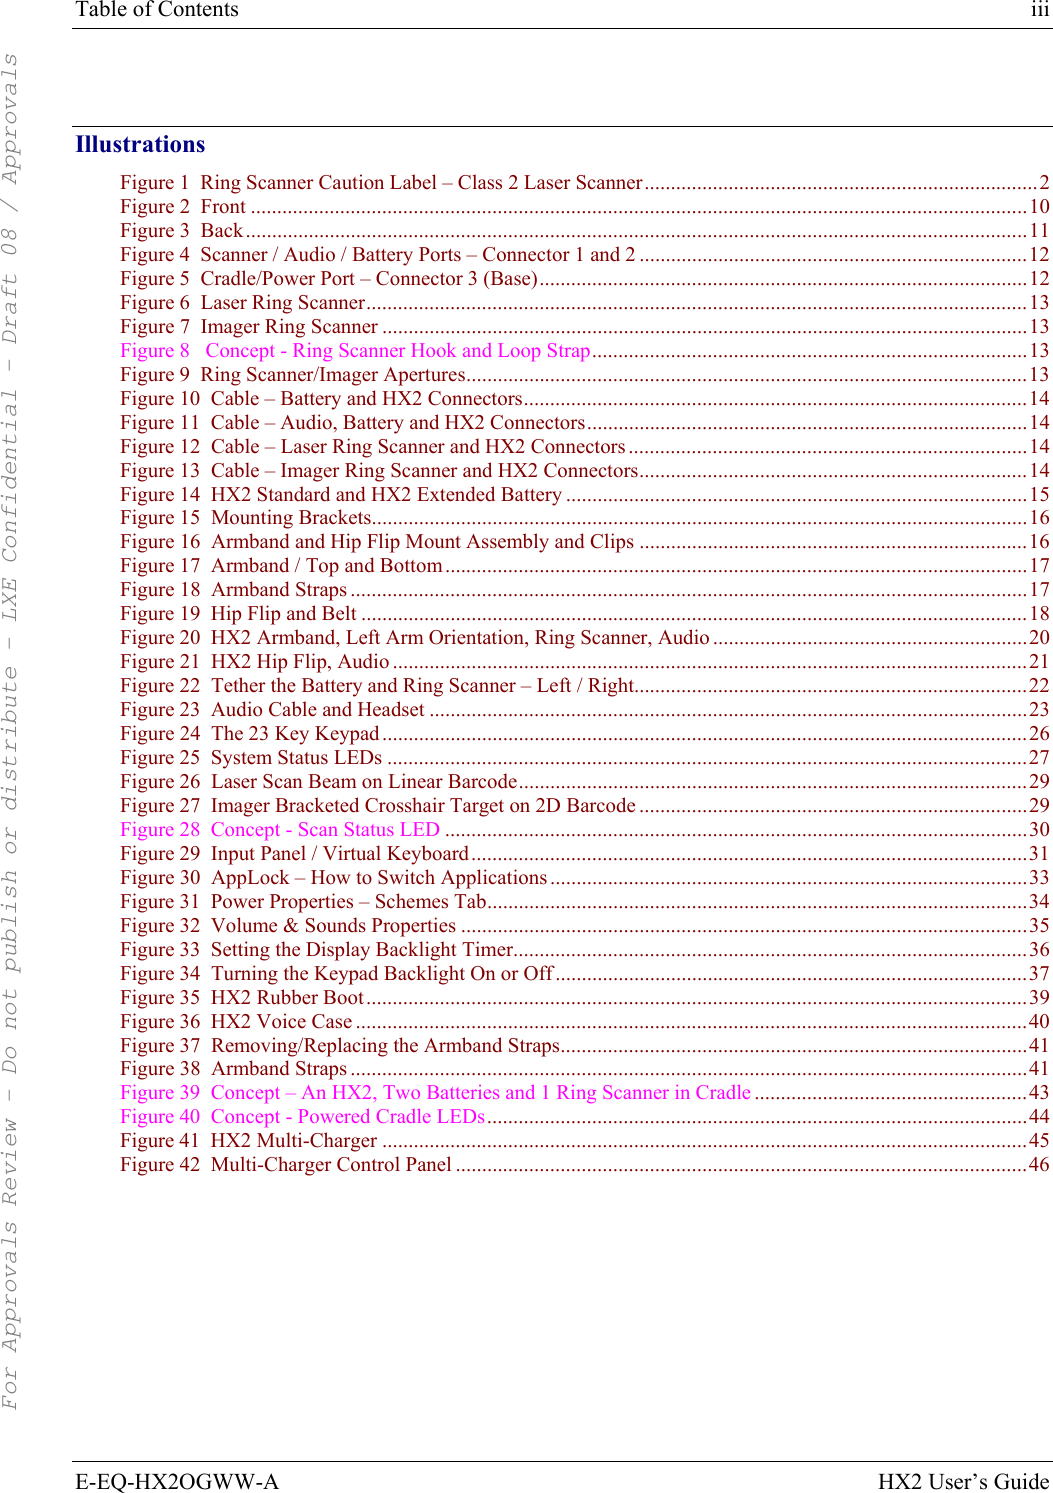
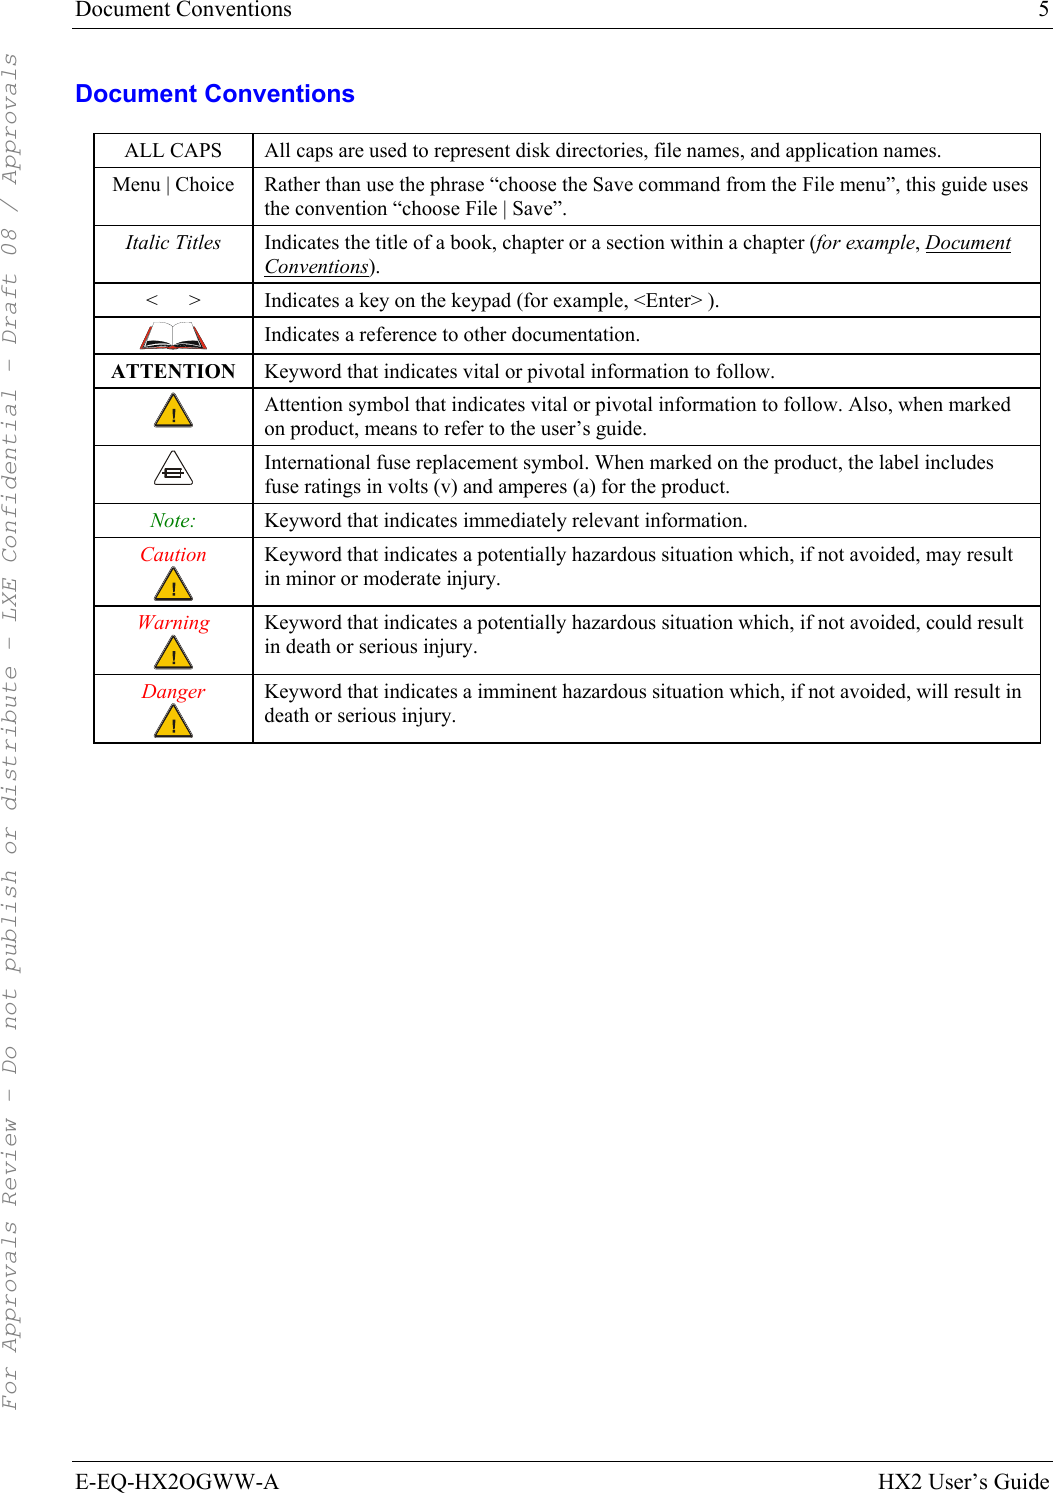
![50 23 Key Keypad HX2 User’s Guide E-EQ-HX2OGWW-A First Press This Key To Get This Key / Function Blue Alpha Then Press This Key 1 1 and 11111 (Alpha Mode) 2 2 and 2222 (Alpha Mode) 3 3 and 3333 (Alpha Mode) 4 4 and 4444 (Alpha Mode) 5 5 and 5555 (Alpha Mode) 6 6 and 6666 (Alpha Mode) 7 7 and 77777 (Alpha Mode) 8 8 and 8888 (Alpha Mode) 9 9 and 99999 (Alpha Mode) 0 0 and 00 (Alpha Mode) . (period) Alpha 1 \ Alpha 11 * (asterisk) Alpha 111 - (dash or minus sign) Alpha 1111 < > Use Input Panel [ ] Use Input Panel { } Use Input Panel ( ) Use Input Panel _ (underscore) Use Input Panel + (plus sign) Use Input Panel : ; Use Input Panel “ ‘ Use Input Panel ? / Use Input Panel ` ` Use Input Panel ! Use Input Panel @ Use Input Panel # Use Input Panel $ Use Input Panel % Use Input Panel ^ Use Input Panel & Use Input Panel | Use Input Panel For Approvals Review - Do not publish or distribute - LXE Confidential - Draft 08 / Approvals](https://usermanual.wiki/Honeywell/LXE4830P.users-manual/User-Guide-821065-Page-56.png)
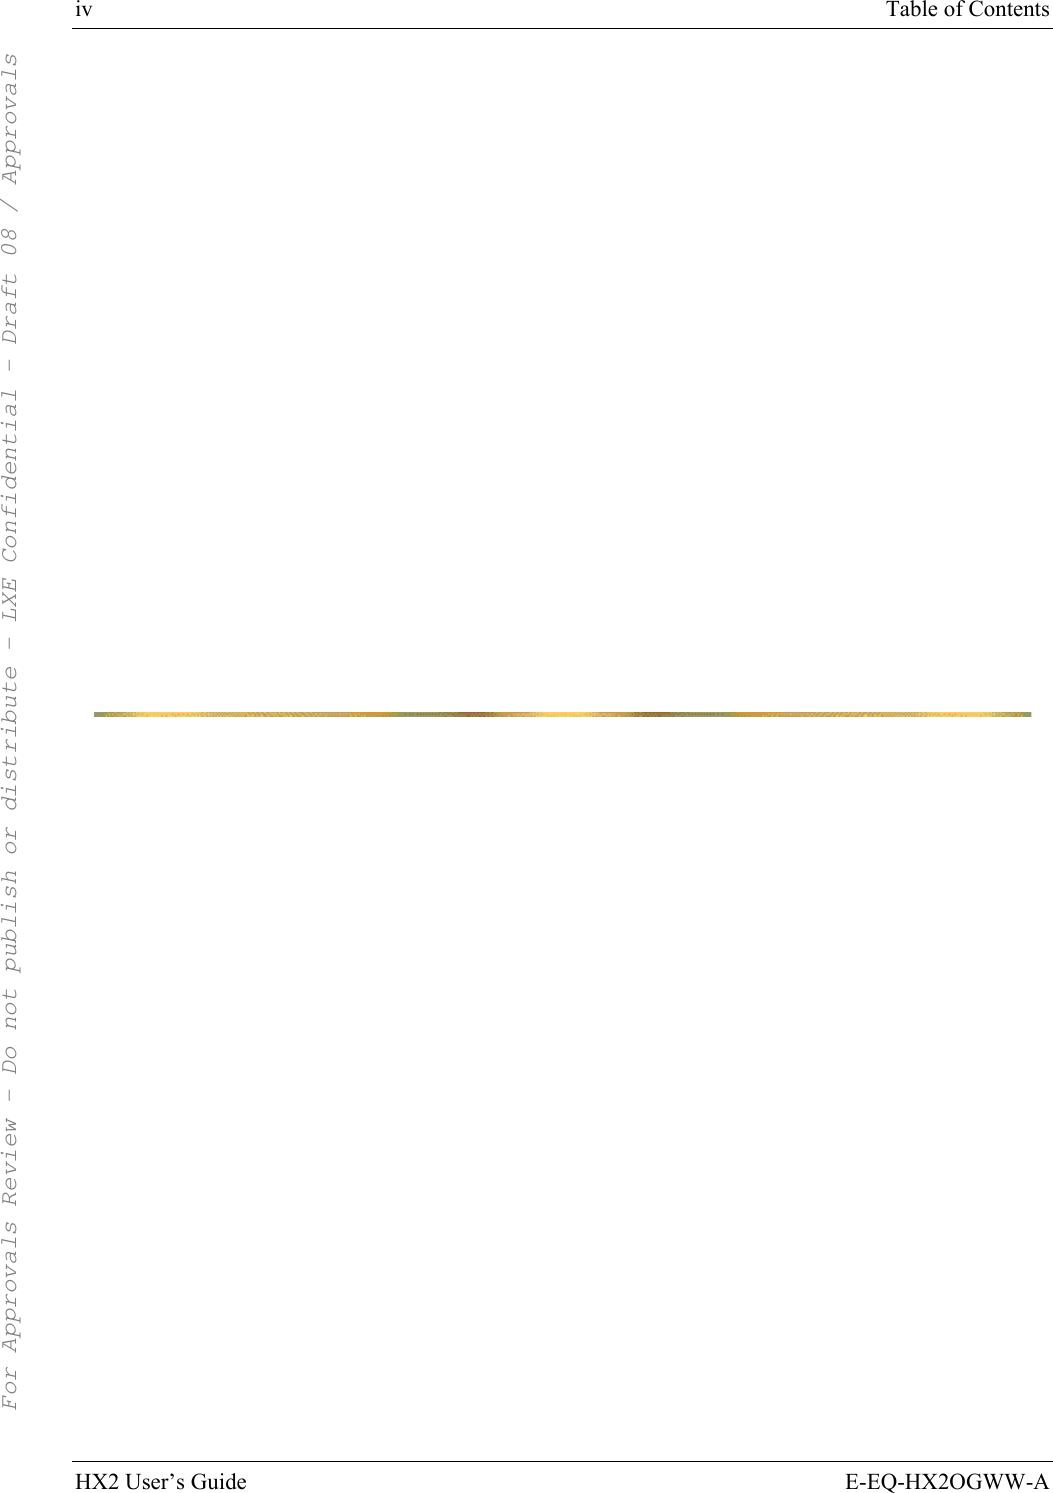
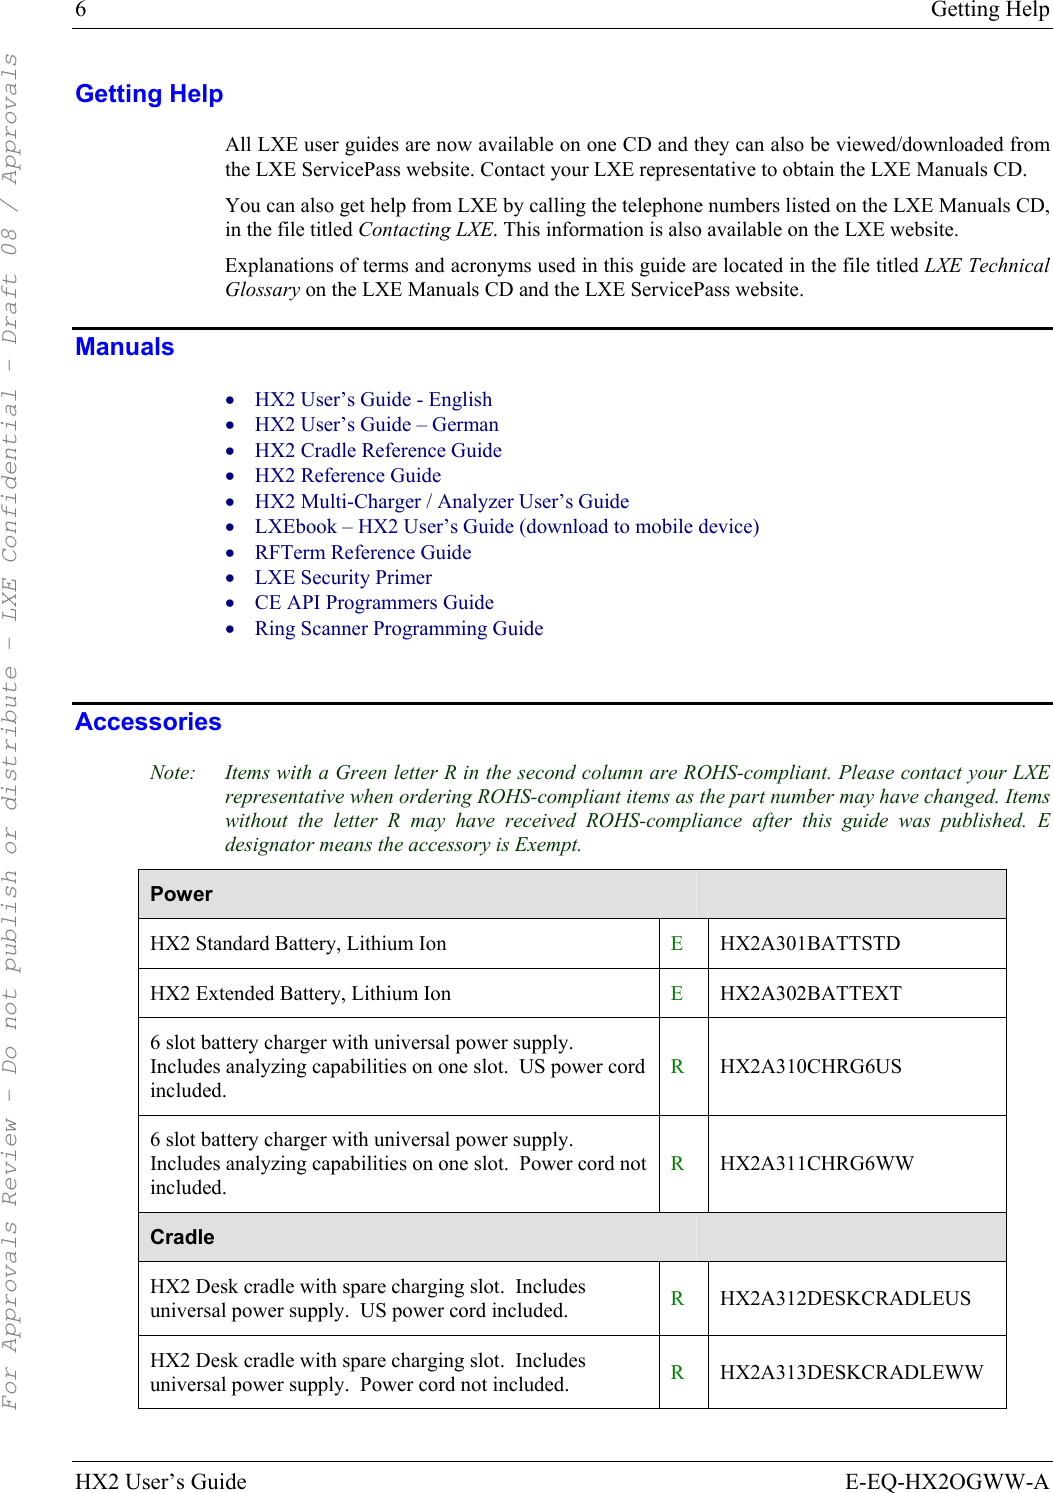
![52 Index HX2 User’s Guide E-EQ-HX2OGWW-A R&TTE Directive Requirements (Applies only to equipment operated within the EU/EFTA) Information to User A label on the exterior of the device should resemble one of the labels shown below (the label contains the LXE part number of the installed radio card). The labels shown below and affixed to the device, identify where the device may be used and where its use is restricted. Use of a device is prohibited in countries not listed below or otherwise identified by the label. (May or may not include the 0560 Notifed Body No. Substitute 4 digit Notified Body No. may also be applied.) Permitted for use in: Austria, Belgium, Denmark, Finland, Germany, Greece, Hungary, Iceland, Italy, Ireland, Liechtenstein, Luxembourg, Netherlands, Norway, Portugal, Spain, Sweden, Switzerland, and the United Kingdom Permitted for use in France. WEEE Statement Important: This symbol is placed on the product to remind users to dispose of Waste Electrical and Electronic Equipment (WEEE) appropriately, per Directive 2002-96-EC. In most areas, this product can be recycled, reclaimed and re-used when properly discarded. Do not discard labeled units with trash. For information about proper disposal, contact LXE through your local sales representative, or visit www lxe com. HX2 Approvals/Standards Product EMI / EMC Standards Safety Standards HX2 FCC Part 15 Subpart B, Class B EN 55022 Class B (CISPR 22) EN 55024:1998 AS/NZS 3548, Class B (CISPR 22) UL 60950 / CSA C22.2 No. 60950 IEC/EN 60950-1 CDRH: 21 CFR 1040.10 IEC/EN 60825-1 Transceiver: Transceiver RF (2.4 GHz) standards RF Safety Standards HX2 with 802.11b/g [Summit Client] FCC Part 15.247, Subpart C FCC Bulletin OET-65 EN 300 328 IC-RSS 210 IC-RSS 102 Unlicensed Operation Unlicensed Operation Requires License for Outdoor Use This device contains transmitter Module FCC ID: KDZLXE4830P RF Safety Notice (Summit Client) Caution This portable device with its antenna complies with FCC’s and Industry Canada’s RF exposure limits set for an uncontrolled environment. This equipment has shown compliance with FCC and Industry Canada Specific Absorption Rate (SAR) limits. Highest reported SAR for the HX2 is .641W/kg on body. Any accessories not provided by LXE should not be used with this device. This device must not be co-located or operating in conjunction with any other antenna or transmitter. For Approvals Review - Do not publish or distribute - LXE Confidential - Draft 08 / Approvals](https://usermanual.wiki/Honeywell/LXE4830P.users-manual/User-Guide-821065-Page-58.png)