Sintai Optical CWFB124 Wi-Fi module User Manual 2 of 2
Sintai Optical (Shenzhen) Co., Ltd. Wi-Fi module 2 of 2
Contents
- 1. User Manual.pdf
- 2. User Manual Part 1.pdf
- 3. User Manual Part 2.pdf
- 4. User Manual Part 3.pdf
- 5. User Manual Part 4.pdf
- 6. User Manual Part 5.pdf
- 7. User Manual Part 6.pdf
- 8. User Manual Part 7.pdf
- 9. User Manual Part 8.pdf
- 10. User Manual Part 9.pdf
- 11. User Manual 1.pdf
- 12. User Manual 2.pdf
- 13. User Manual (1 of 4).pdf
- 14. User Manual (2 of 4).pdf
- 15. User Manual (3 of 4).pdf
- 16. User Manual (4 of 4).pdf
- 17. User Manual (1 of 2).pdf
- 18. User Manual (2 of 2).pdf
- 19. User Manual (1 of 5).pdf
- 20. User Manual (2 of 5).pdf
- 21. User Manual (3 of 5).pdf
- 22. User Manual (4 of 5).pdf
- 23. User Manual (5 of 5).pdf
User Manual (2 of 2).pdf
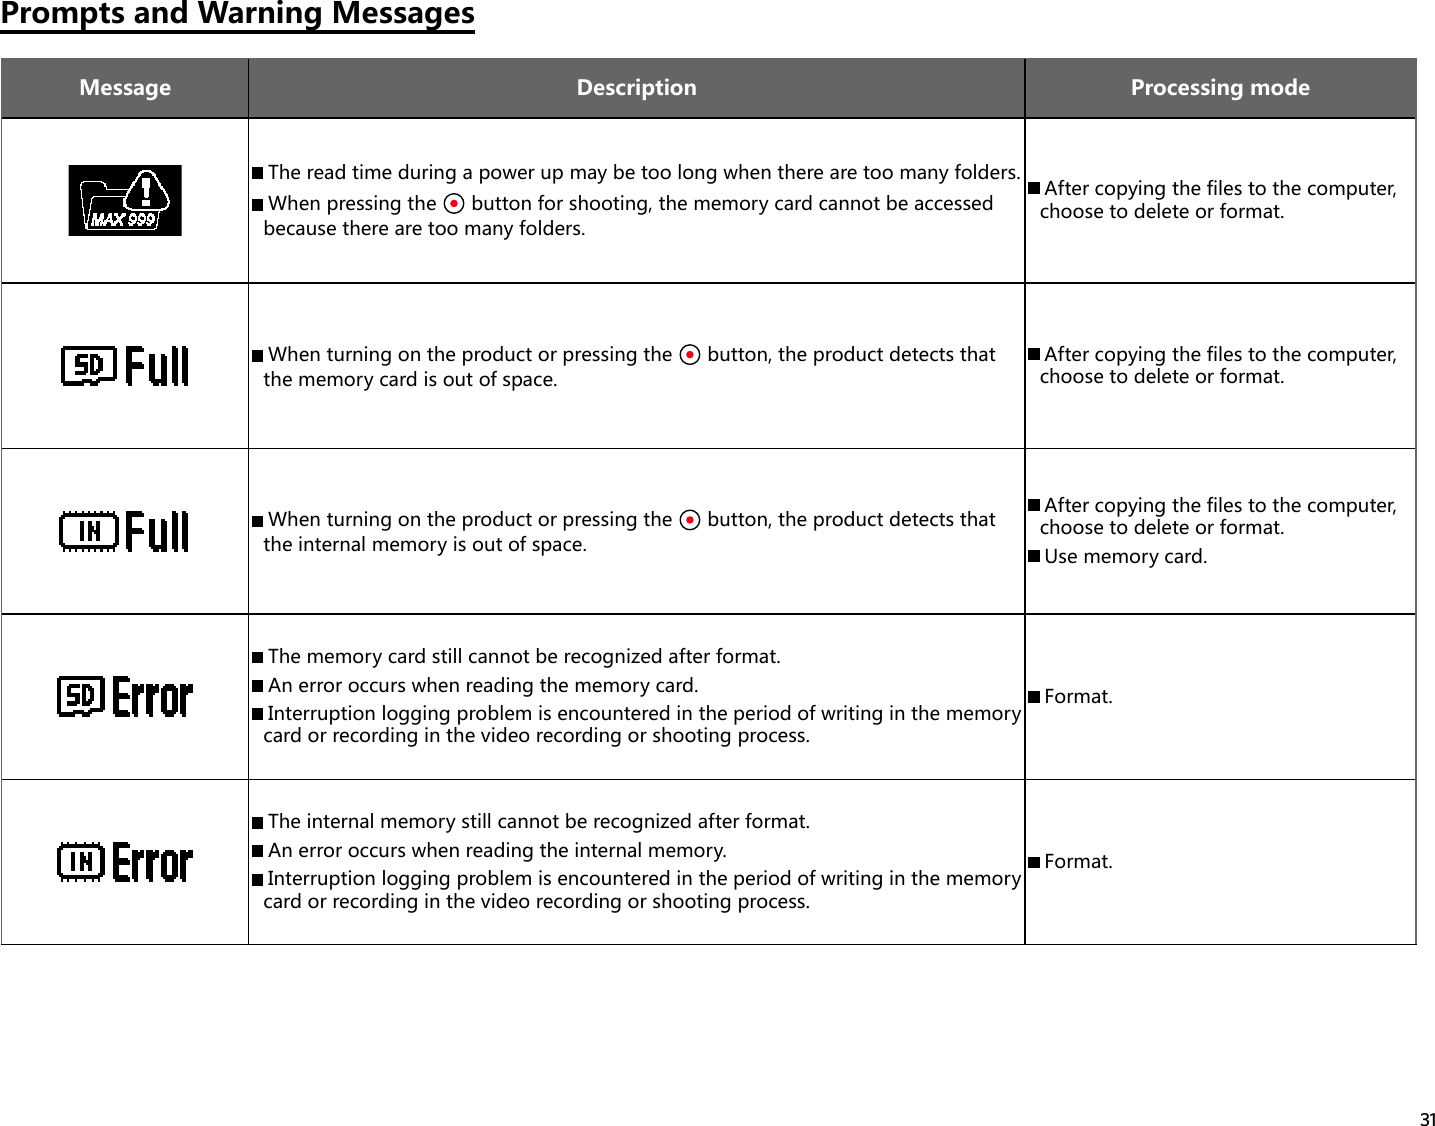
![29AppendicesSpecifications Design and specifications are subject to change without notice.Image SensorType 1/2.3" BSI CMOSEffective Pixels 16.38 MegapixelsTotal Pixels 16.79 MegapixelsLensFocal Length 0.805mmEquivalent to 35mm film 16.8mmF number F2.8Lens Construction 7 groups 9 elementsOptical Zoom Fix Focus, 214 DegreeFocusing Range 50cm~ ∞Anti-Handshake Electronic Image StabilizationNumber of Recording PixelsPhoto size10M : 3264×3264(1:1) 5M : 2592×1944(4:3) 2M : 1920×1080(16:9)Movie size1920×1080(30fps) 1440×1440(30fps) 1072×1072(30fps) 1280×960(50fps) 1280×960(30fps) 1280×720(60fps) 1280×720(30fps) 848×480(60fps) High Speed Movie : 848×480(120fps)File FormatPhoto Exif 2.3 (JPEG)Movie MP4 [Image: H.264; Audio: AAC(Stereo)]Modes Wi-Fi,Movie,Shooting,Looprecording,TimeLapse,Burstshot](https://usermanual.wiki/Sintai-Optical/CWFB124.User-Manual-2-of-2-pdf/User-Guide-2301569-Page-10.png)
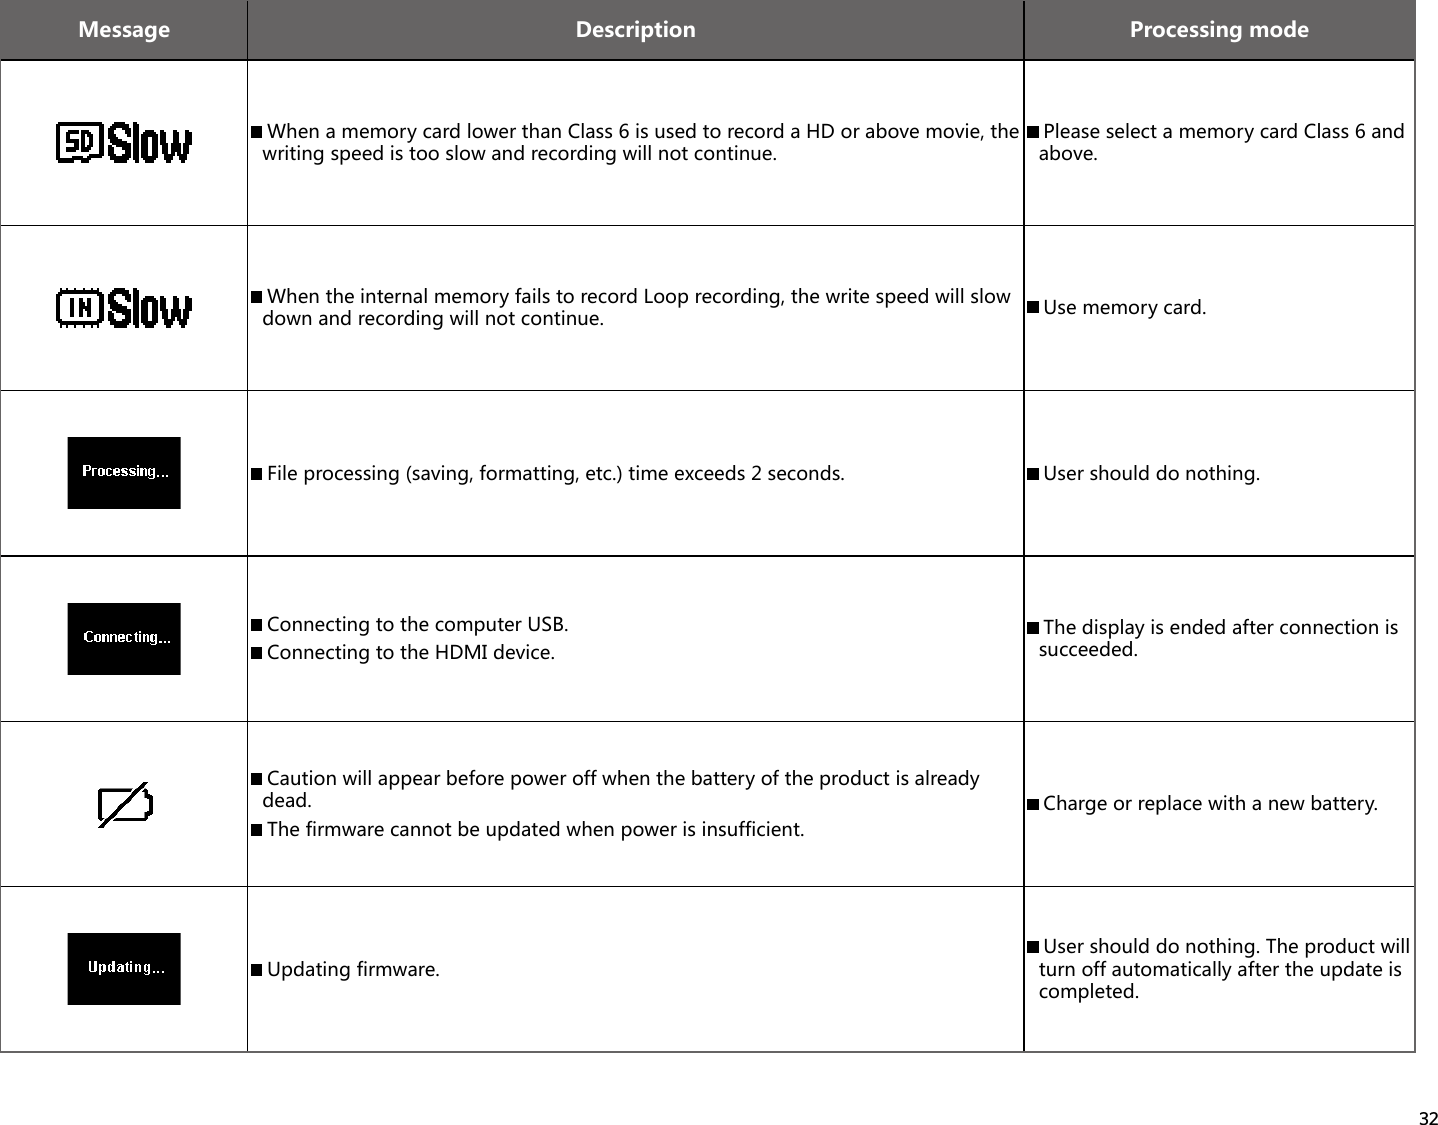
![30Waterproof Equivalent to JIS/IEC IPX5(Body)Shockproof Up to 2mDustproof Equivalent to JIS/IEC (IP6X)Freeze-proofing -10℃LCD 1.0 inch TN LCDLevel Gauge 2-axisISO Sensitivity Auto (100~800)Exposure Metering Method Artificial Intelligence AE (AiAE)Exposure Control Method Program AEBurst shot SupportedWhite balance Auto (AWB), Daylight, Cloudy, Fluorescent, Under waterRecording MediaInternal Memory: Approx. 8MBmicroSD/microSDHC Card (Up to 32GB Support) [MMC Card Not Supported]Language EnglishInterface USB 2.0 ( Micro 5 pin USB ) , HDMI ( Type D )Wi-Fi Supported(802.11b/g/n)NFC SupportedRemote Viewfinder Supported (via smart device)Power Rechargeable Li-ion Battery LB-080, 3.6V 1250mAh, In-Action Cam ChargingShooting Capability (Battery Performance) Approx. 350Shots (Based on CIPA Standards) Approx. 160min for Video (@1080p/30fps)Operation Environment Temperature:-10~40℃ ,Humidity:0~90%Dimensions (W×H×D) Approx.41.1×50.0×38.0mm (Based on CIPA Standards)Weight Approx. 103g (Body Only)](https://usermanual.wiki/Sintai-Optical/CWFB124.User-Manual-2-of-2-pdf/User-Guide-2301569-Page-11.png)