Sintai Optical CWFB124 Wi-Fi module User Manual 2 of 2
Sintai Optical (Shenzhen) Co., Ltd. Wi-Fi module 2 of 2
Contents
- 1. User Manual.pdf
- 2. User Manual Part 1.pdf
- 3. User Manual Part 2.pdf
- 4. User Manual Part 3.pdf
- 5. User Manual Part 4.pdf
- 6. User Manual Part 5.pdf
- 7. User Manual Part 6.pdf
- 8. User Manual Part 7.pdf
- 9. User Manual Part 8.pdf
- 10. User Manual Part 9.pdf
- 11. User Manual 1.pdf
- 12. User Manual 2.pdf
- 13. User Manual (1 of 4).pdf
- 14. User Manual (2 of 4).pdf
- 15. User Manual (3 of 4).pdf
- 16. User Manual (4 of 4).pdf
- 17. User Manual (1 of 2).pdf
- 18. User Manual (2 of 2).pdf
- 19. User Manual (1 of 5).pdf
- 20. User Manual (2 of 5).pdf
- 21. User Manual (3 of 5).pdf
- 22. User Manual (4 of 5).pdf
- 23. User Manual (5 of 5).pdf
User Manual (2 of 2).pdf
20
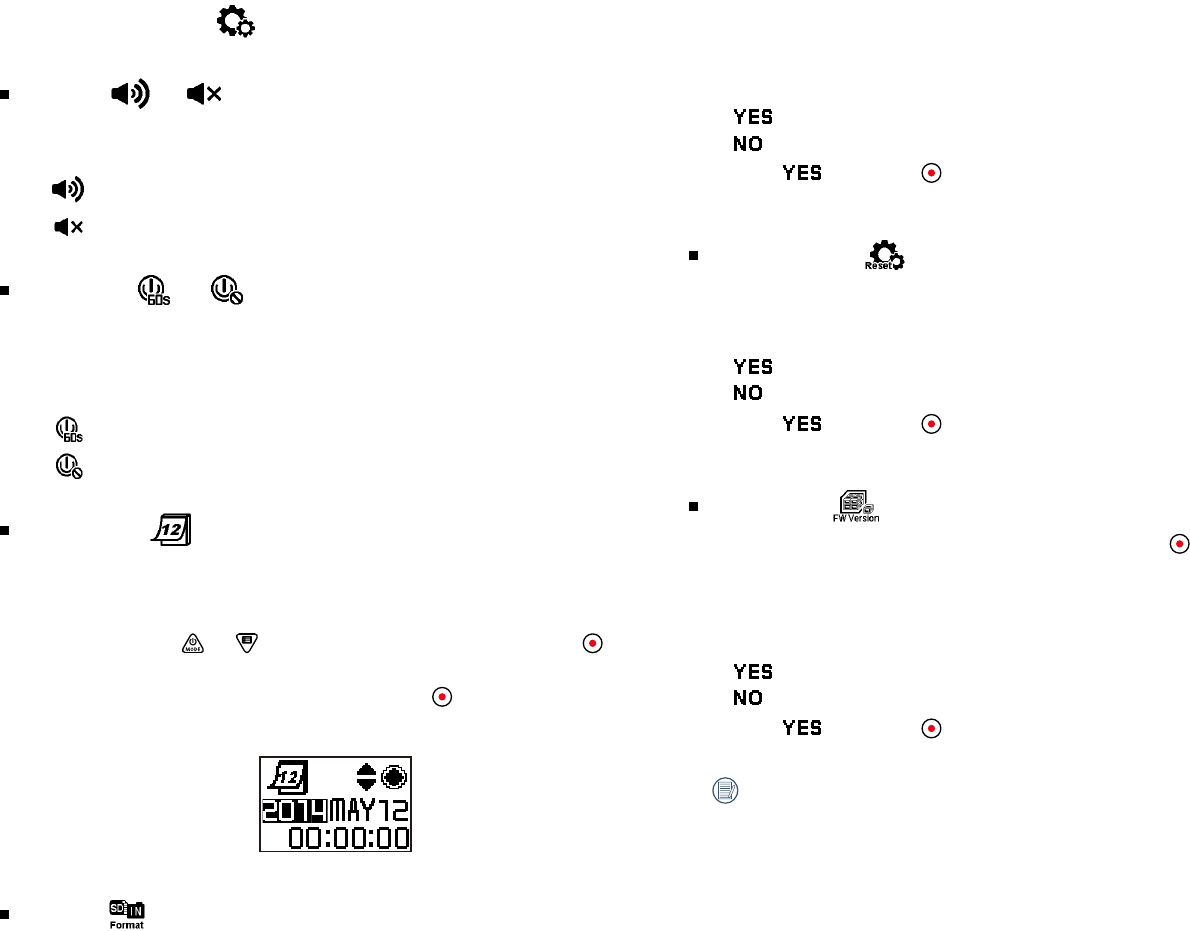
General Settings
Volume /
Set the volume of the product.
There are 2 options:
• Enable
• Off
Power off /
When this function is enabled, if there are no actions taken within a set
time frame (except while recording or connected to Wi-Fi), the product will
automatically shut down.
There are 2 options:
• 60 seconds
• Off
Date / Time
Setthedateandtimeoftheproduct。
1. The display shows the date and time setting screen, "Y M D hh:mm:ss";
2. The item to be adjusted will be highlighted with a black background
color, press the or button to adjust the value, press the button
to confirm;
3. After adjusting the "minute" value, press the button to enter the
secondary level menu interface.
Format
Format can clear all data stored in the memory card or the internal
memory.
When a memory card is inserted, only the card can be formatted. If you
need to format the internal memory, remove the memory card first.
There are 2 options:
• Confirm
• Cancel
If select , press the button to start formatting, and back to the
secondary level menu interface after finishing.
Reset settings
Reset settings can recover all product settings to the factory defaults (except
for date and time).
There are 2 options:
• Confirm
• Cancel
If select , press the button to start resetting, and back to the
secondary level menu interface after finishing.
FW version
FW version can display the current version. Press the button to back to
the secondary level menu interface.
When a new version is stored in the memory card, the firmware can be
updated.
There are 2 options in the update firmware interface:
• Confirm
• Cancel
If select , press the button to start updating, and the product will
automatically shut down after finishing.
If the low battery warning is shown, charge the battery before updating
the firmware.
21
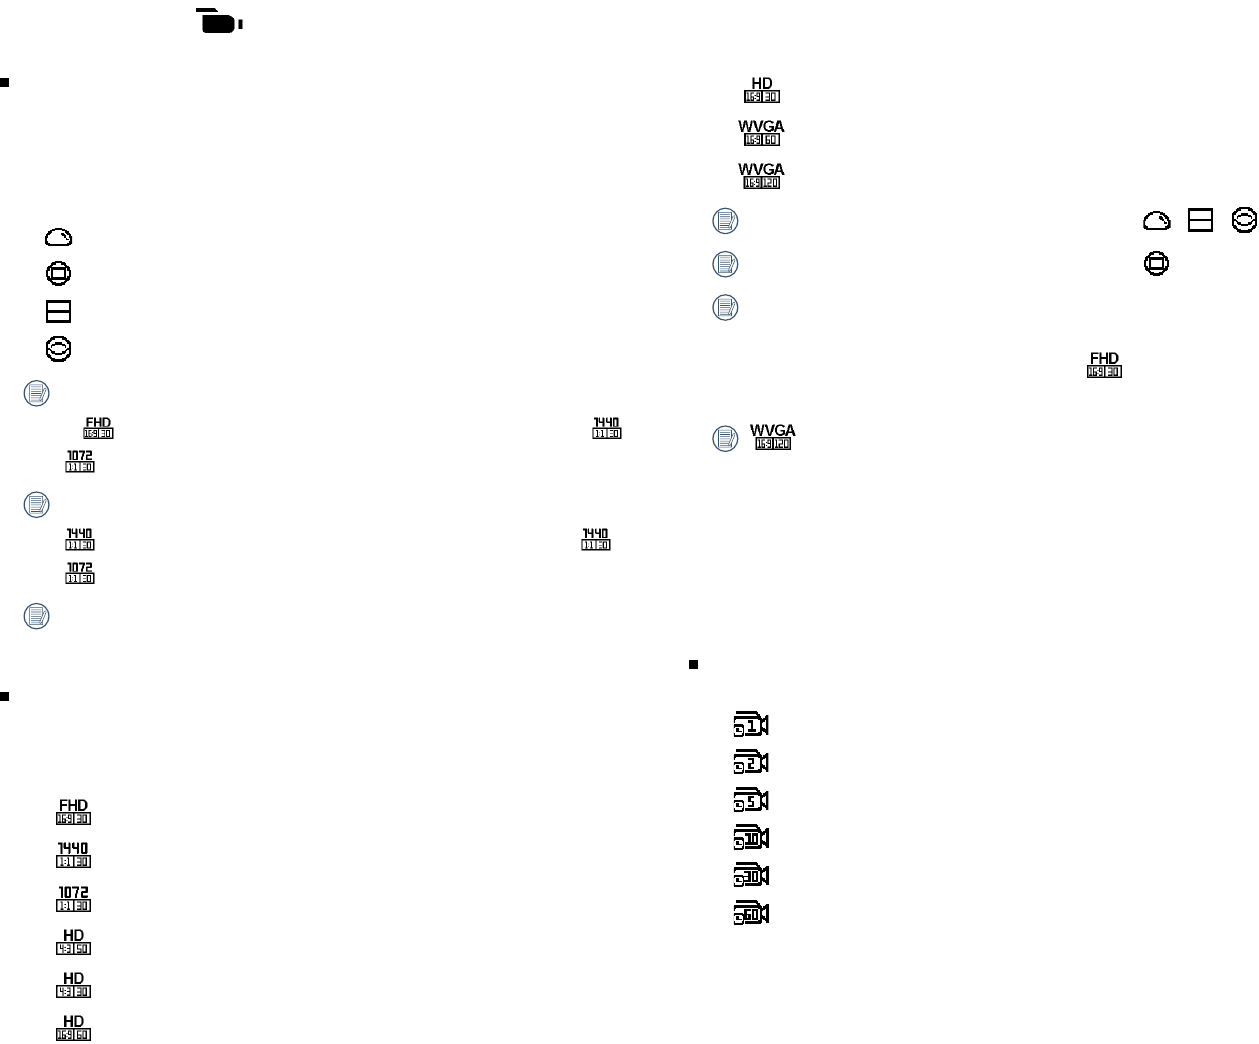
Movie Settings
Unfold mode (for Movie mode / Loop recording mode / Time
Lapse mode)
An Image unfold mode with several different effects has been provided for
you. This function only modifies the unfold effect of a file instead of saving
the display effect as a new file or replacing the original file.
There are 4 options:
• Dome *1
• Front *2
• Seg *1
• Ring *1
*1 indicates that the default movie size corresponding to this option
is , which is not displayed when the movie size is set to or
.
*2 indicates that the default movie size corresponding to this option is
, which is only displayed when the movie size is set to or
.
The movie size will automatically be restore to its default when
switching between the *1 and *2 options.
Movie size (for Movie mode / Loop recording mode / Time
Lapse mode)
Movie size refers to the image resolution during recording.
There are 9 options:
• 1920×1080(30fps) *1
• 1440×1440(30fps) *2
• 1072×1072(30fps) *2
• 1280×960(50fps) *1
• 1280×960(30fps) *1
• 1280×720(60fps) *1
• 1280×720(30fps) *1
• 848×480(60fps) *1 *3
• 848×480(120fps) *1 *3
*1 indicates that the display is available in the / / status.
*2 indicates that the display is available in the status.
*3 indicates that the selection is unavailable in the Loop recording or
Time Lapse modes. If such a movie size is set while in Movie mode, the
movie size will be automatically set to when switching to Loop
recording or Time Lapse modes.
Highspeedmovie:
① The product shoots ultra high speed movies, and plays back with
normal 30fps speed, in order to capture visually indistinguishable
moments easily.
② The maximum recordable time is 60 seconds, when the time reaches
60 seconds, the product will automatically stop recording
③ The sound cannot be recorded.
④ Motion detection is invalid.
Time Lapse (for Time Lapse mode)
There are 6 options:
• 1 second
• 2 seconds
• 5 seconds
• 10 seconds
• 30 seconds
• 60 seconds
22
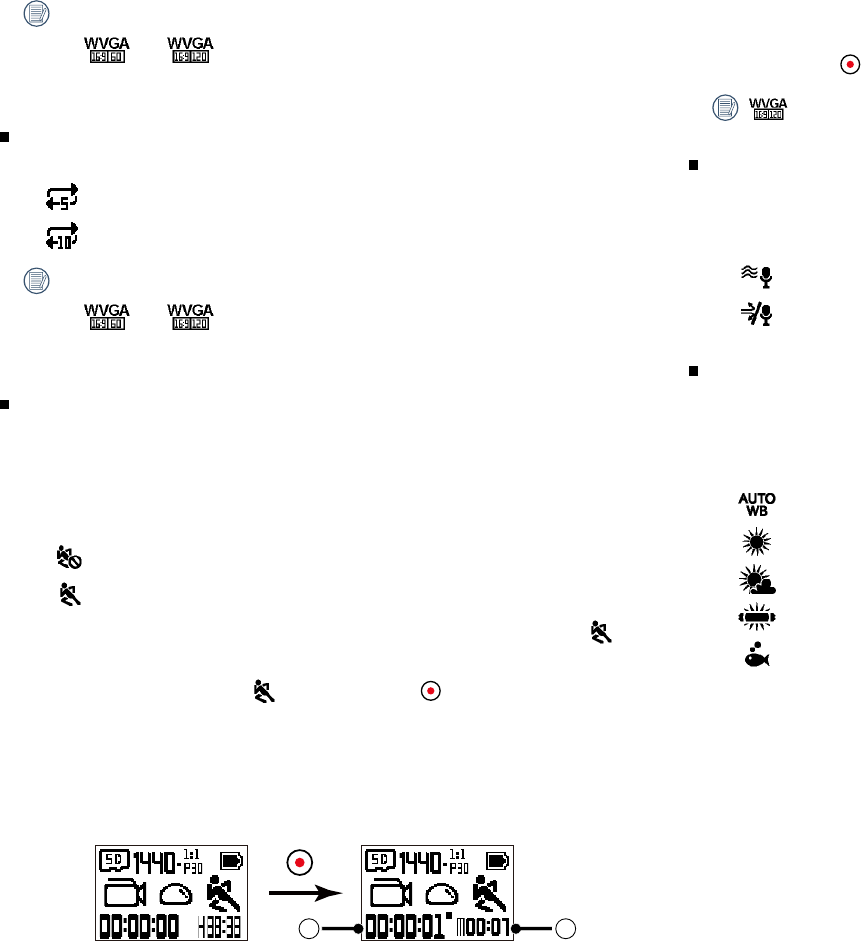
TimeLapsemode:
① or cannot be selected.
② Motion detection is invalid.
Loop recording (for Loop recording mode)
There are 2 options:
• 5 minutes
• 10 minutes
Looprecordingmode:
① or cannot be selected.
② Motion detection is invalid.
Motion detection (for Movie mode)
Motion detection means that if the product detects moving objects
entering into the LCD screen, it will automatically start recording. During
the recording process, if there is no moving object detected for 10
continuous seconds, the recording will be automatically paused.
There are 2 options:
• Off
• Enable
1.EnterthetertiarymenuinterfaceofMotiondetection,select ,and
back to main screen.
2. The display shows the icon. Press the button, the product start
detecting. If the product detects moving objects, it will automatically
start recording
3. The product will stop recording when there is no change in the image
within 10 seconds. When the image changes again, the product will start
recording automatically, and this time it will regenerate a video file.
1 2
①Indicatesthetotaltimeofrecording
②IndicatesthetotaltimefromenabletheMotiondetection
4. Repress the button to stop recording and detecting.
cannot be selected when the Motion detection is enable.
Wind cut (for Movie mode / Loop recording mode / Time Lapse
mode)
Wind cut refers to the reduction of noise caused by wind.
There are 2 options:
• Enable
• Off
White balance (for Movie mode / Loop recording mode / Time
Lapse mode)
White balance means that the user adjusts the color temperature under
differentlightsourcestoensurethatthecolorsarereproducedcorrectly.。
There are 5 options:
• Auto white balance
• Daylight
• Cloudy
• Fluorescent
• Under water
23
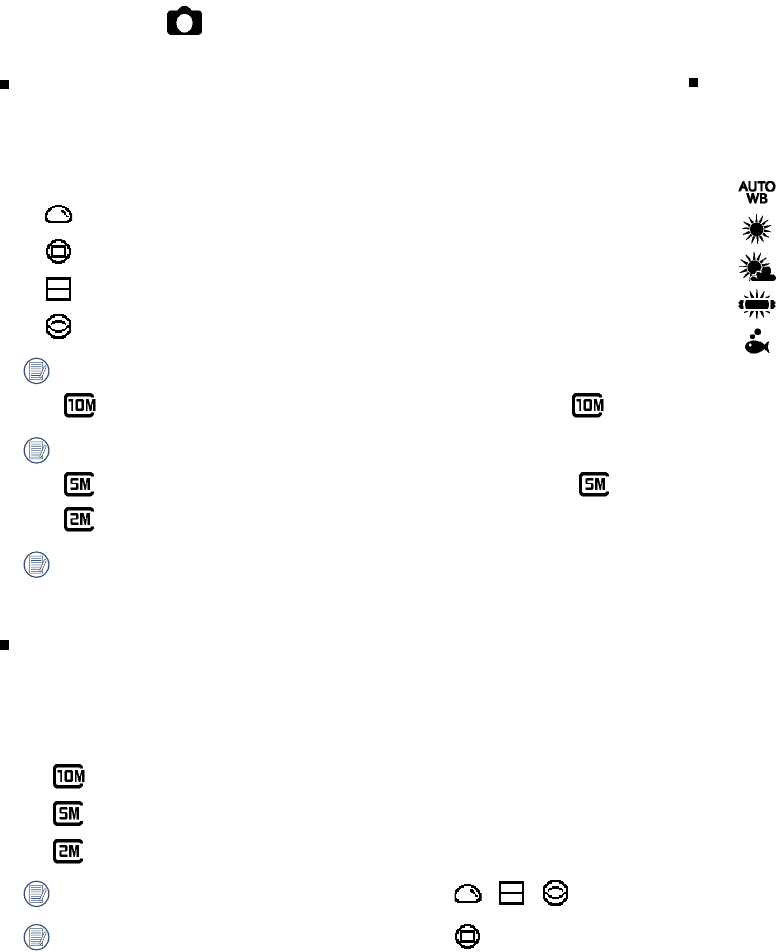
Still Settings
Unfold mode(for Shooting mode / Burst shot mode)
An Image unfold mode with several different effects has been provided for
you. This function only modifies the unfold effect of a file instead of saving
the display effect as a new file or replacing the original file.
There are 4 options:
• Dome *1
• Front *2
• Seg *1
• Ring *1
*1 indicates that the default photo size corresponding to this option is
, which is not displayed when the photo size is set to .
*2 indicates that the default photo size corresponding to this option is
, which is only displayed when the photo size is set to or
.
The photo size will automatically be restore to its default when
switching between the *1 and *2 options.
Photo size(for Shooting mode / Burst shot mode)
Photo size indicates the number of pixels used to capture the images. A
photo having higher image resolution contains more details and is capable
of better meeting big-screen fine photo printing requirements.
There are 3 options:
• 3264×3264(1:1) *1
• 2592×1944(4:3) *2
• 1920×1080(16:9) *2
*1 indicates that the display is available in the / / status.
*2 indicates that the display is available in the status.
White balance(for Shooting mode / Burst shot mode)
White balance means that the user adjusts the color temperature under
differentlightsourcestoensurethatthecolorsarereproducedcorrectly.。
There are 5 options:
• Auto white balance
• Daylight
• Cloudy
• Fluorescent
• Under water

24
Operational Applications
The User Manuals for the Applications "PIXPRO SP360" (for smart device and for PC) are available at the website location below:
http://kodakpixpro.com/AsiaOceania/cn/support/downloads.php
Please review the following items before your first connection:
1. Please do not use in places having high intensity magnetic field, electrostatic and electric wave interference (for example near a microwave oven), which
may cause failure in receiving signals.
2. Please do not use Wi-Fi or NFC connection functionality on a plane.
3. To maintain a connection, please keep Action Cam within 20 meters (65 feet) without signal shielding interference.
4. Action Cam and the smart device can only be connected one to one.
5. Action Cam and PC only be connected one to one.
Connect with Smart Device
Your smart device operating system version needs to be iOS 6 or higher, or Android 4.0 or higher.
Download and Install App
Download the App installation package (App name: PIXPRO SP360) toyoursmartdevicefromthepathbelow,andinstallitfollowingtheinstructionson
the interface.
For Android devices, search and download the App "PIXPRO SP360" in Google play, and install it following the instructions on the interface.
For Apple devices, search and download the App "PIXPRO SP360" in App store, and install it following the instructions on the interface.
Wi-FiConnectionMethod(AndroidSystemandiOSSystem):
1. Action Cam: check SSID (PIXPRO-SP360_XXXX) and password (the initial password: 12345678) indicated on the label in the battery compartment of the
Action Cam. In the main interface, press the button to switch to Wi-Fi mode.
2. Smart device: enable Wi-Fi mode, it will automatically search the nearby Wi-Fi hotspots. Select the one with the same SSID (PIXPRO-SP360_XXXX) and input
the password. Upon connection, you can tap App icon to start using the App.
NFCConnectionMethod(AndroidSystem)::
1. Enable NFC mode on your smart device.
2. Use your smart device to slightly touch the NFC mark on the Action Cam; if the smart device has a prompt tone or vibration, it means the connection is
successful.

25
3. The APP will open automatically on your smart device.
The NFC feature will be available only when your smart device's screen is unlocked.
After successful connection of your smart device with Action Cam, if you use another Action Cam to touch the smart device, the previous connection will
be replaced.
Connect with Computer
Your computer operating system version needs to be Mac OS X10.7 or higher, or Window 8/7 or higher.
Installing the Application
Put the CD-ROM, one of the accessories, into the CD-ROM drive of the computer. The installation interface will appear after the driver operates automatically,
click the icon on the interface and then complete installation according to hints on the interface. After a successful installation, an icon will appear
on the desktop.
1.The Wi-Fi Connection (for Remote Viewfinder / Playback & Edit):
1.1. Action Cam: check SSID (PIXPRO-SP360_XXXX) and password (the initial password: 12345678) indicated on the label in the battery compartment of the
Action Cam. In the main interface, press the button to switch to Wi-Fi mode.
1.2. PC: enable Wi-Fi mode, it will automatically search the nearby Wi-Fi hotspots. Select the one with the same SSID (PIXPRO-SP360_XXXX) as the Action
Cam and input the password. Upon connection, you can double click the App icon on the desktop to start using the App.
2.The USB Connection (for Playback & Edit):
2.1. Use a Micro USB cable to connect a computer (the computer should already be on) to the Action Cam. During the connection process, the Action Cam
will display "Connecting ...", and the computer will automatically detect the Action Cam.
2.2. Double-click the application icon on the desktop to begin using.
3.Read Image Data in Computer Disk:
3.1. Use a Micro USB cable to connect a computer (the computer should already be on) to the Action Cam. During the connection process, the Action Cam
will display "Connecting ...", and the computer will automatically detect the Action Cam.
3.2. Open the folder of the product on the computer and copy the data you need to the computer. After transmission is completed, please cancel the USB
connection by safely pulling out the USB device from the computer system.
3.3. Pull out the Micro USB cable. The product will automatically shut down.
3.4. Double-click the application icon on the desktop to begin using.
26
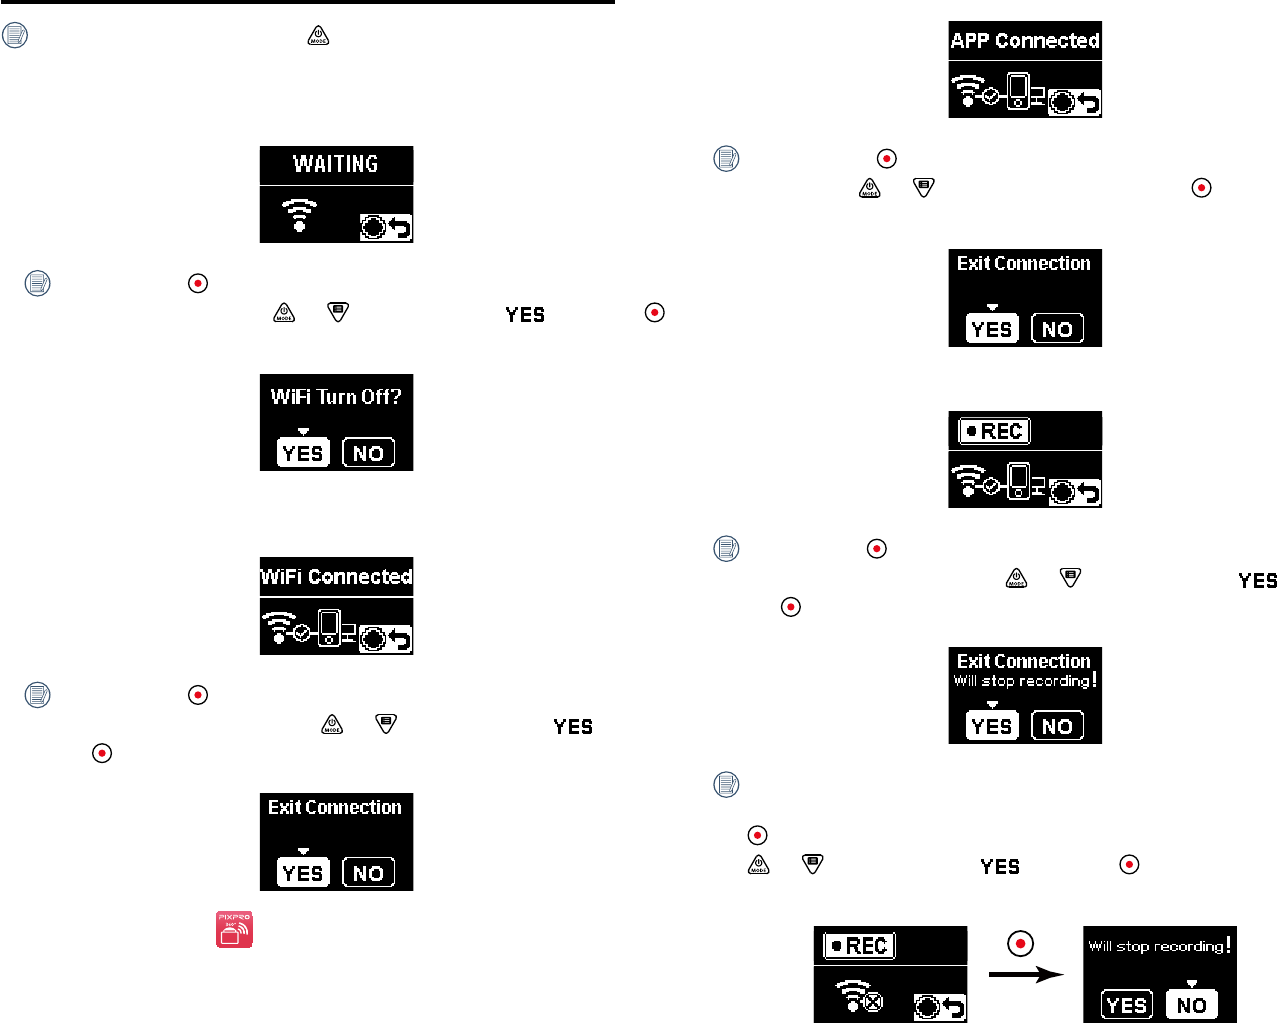
Action Cam operations when in Wi-Fi mode
When in Wi-Fi mode, press the button to immediately disconnect and
exit Wi-Fi mode.
1. The Action Cam will enter the Waiting for Connection interface after
entering Wi-Fi mode:
Now press the button in order to choose whether or not to turn off
Wi-Fi. After pressing the or buttons to select , press the
button to exit Wi-Fi mode.
2. When the Wi-Fi connection is successful, enter the Wi-Fi connection
interface.
Now press the button in order to choose whether or not to
disconnect. After pressing the or buttons to select , press
the button to wait for the Connection interface
3. When "PIXPRO SP360 " is enabled on a smart device or computer,
enter the App connected interface.
Now press the button to select whether or not to disconnect. After
pressing the or buttons to select , press the button to wait
for the Connection interface.
4. Enter the Recording interface after the remote control starts recording.
Now press to button to select whether or not to disconnect (stop
recording). After pressing the or buttons to select , press
the button to wait for the Connection interface.
If connection is cut off while recording, the Action Cam will continue to
record and enter the Connectionless recording interface.Now press the
button to select whether or not to stop recording. After pressing the
or buttons to select , press the button to wait for the
connection interface.
27
Use an interface
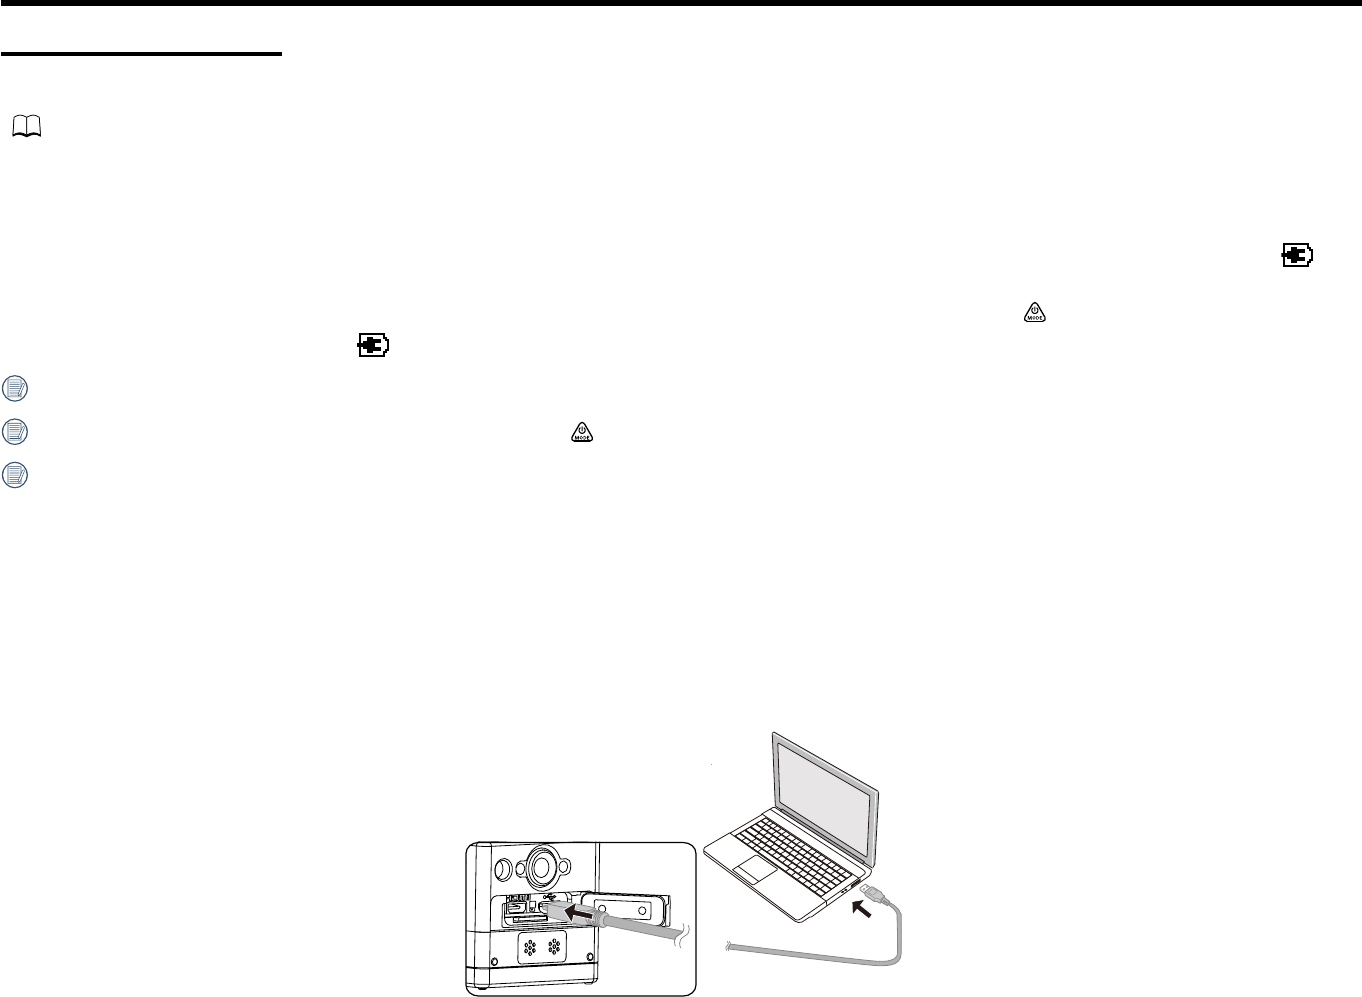
Micro USB interface
Charging
( 13)
Using an external power supply
In case of low battery power, or when a long-term power supply needed, an external power supply (AC adapter, vehicle power supply, portable power supply
or other power unit) can be used instead of a battery. At this time, the setting of functions, photography, and other operations can be performed.
When powered on, use a Micro USB cable to connect the Action Cam to an external power supply. When connected with an external power supply, " " will
be displayed on the LCD, but the battery will not be charged.
When powered off, use a Micro USB cable to connect the Action Cam to the external power supply. Press and hold the button to power on. When
connected to an external power supply, " " will be displayed on the LCD, but the battery will not be charged.
Requirements for the external power supply: output power supply of 5 V, output current of 1 A.
When powered on with a battery inserted, press ahd hold the button to shut down and begin charging the battery.
In a shutdown state where the Action Cam was set to the Loop recording mode before shutdown, use a Micro USB cable to connect the Action Cam to the
AC adapter (or an external power supply). The Action Cam will automatically start up and start recording. (For example: when the Action Cam is connected
to a vehicle power supply, it will start and record automatically when the automobile starts. And stop recording after the automobile shuts down, the
Action Cam will shut down automatically after saving the recorded files.)
Data transmission
Use a Micro USB cable to connect the Action Cam to a computer and copy files from the Action Cam to the computer.
The steps are as follows:
1. Use a Micro USB cable to connect a computer (the computer should be on) to the Action Cam. During the connection, the Action Cam will display
"Connecting ...", and the computer will automatically detect the Action Cam.
2. Open the Action Cam folder on the computer to copy the needed files to the computer. After the transmission is completed, please unplug the USB
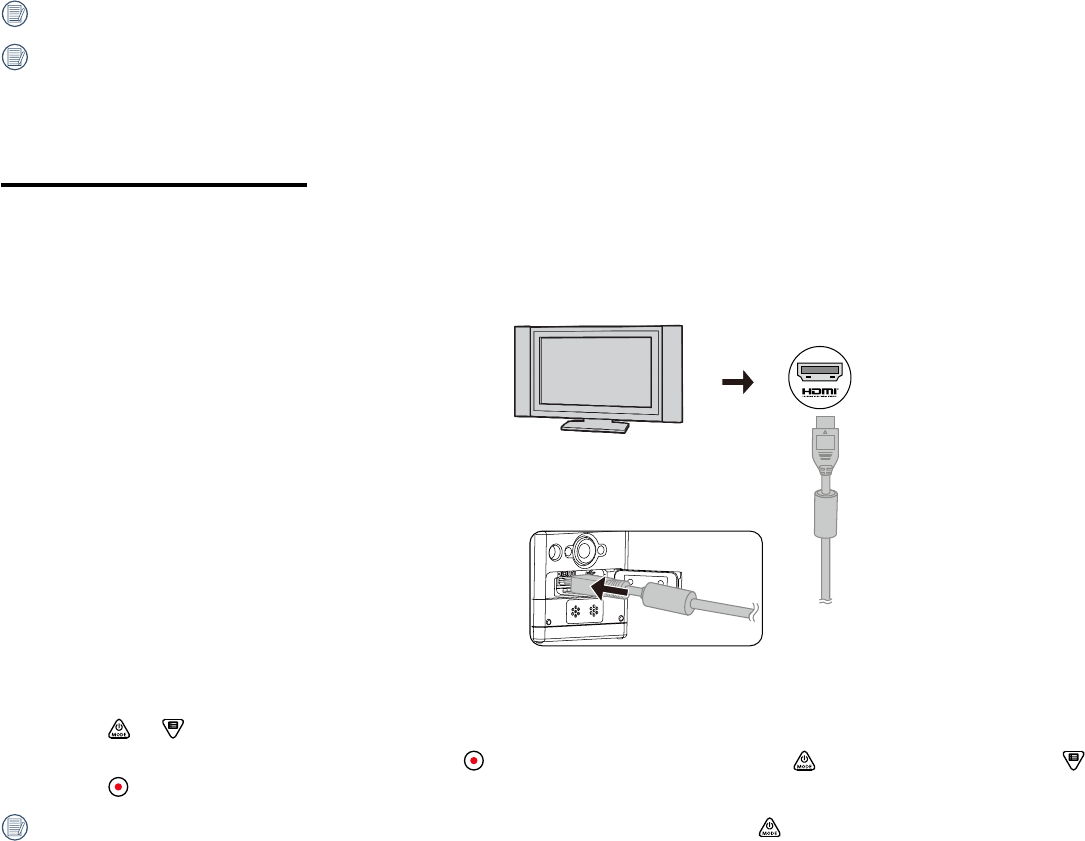
28
connection in a safe manner according to the computer's settings.
3. Unplug the Micro USB cable and the Action Cam will automatically shut down.
The Action Cam supports Windows 8/7 and Mac OS X (V10.6.8~V10.9) systems.
If there is a memory card inserted into the Action Cam, only files in the memory card will be read. If you want to read files in the internal memory, please
remove the memory card before connecting to the computer.
Micro HDMI interface
The Action Cam can play back videos and photos on a TV through a Micro HDMI cable.
Steps are as follows:
1. Use a Micro HDMI cable (to be purchased separately) to connect an HDMI-compliant TV and the Action Cam (the Action Cam and the TV need to be
powered on);
2. "Connecting ..." will be displayed on the Action Cam. After the connection is successful, files in the intelnal memory or the memory card will be displayed
on the TV.
3. Press the or buttons browse the files to be switched.
4. When a video file appears on the screen, press the button to start playback, press the button to rewind, press the button to fast forward, and
press the button again to pause playback.
When the Action Cam is connected to the TV while powered off, press and hold the button to power on.

29
Appendices
Specifications
Design and specifications are subject to change without notice.
Image Sensor
Type 1/2.3" BSI CMOS
Effective Pixels 16.38 Megapixels
Total Pixels 16.79 Megapixels
Lens
Focal Length 0.805mm
Equivalent to 35mm film 16.8mm
F number F2.8
Lens Construction 7 groups 9 elements
Optical Zoom Fix Focus, 214 Degree
Focusing Range 50cm~ ∞
Anti-Handshake Electronic Image Stabilization
Number of Recording Pixels
Photo size
10M : 3264×3264(1:1)
5M : 2592×1944(4:3)
2M : 1920×1080(16:9)
Movie size
1920×1080(30fps)
1440×1440(30fps)
1072×1072(30fps)
1280×960(50fps)
1280×960(30fps)
1280×720(60fps)
1280×720(30fps)
848×480(60fps)
High Speed Movie : 848×480(120fps)
File Format
Photo Exif 2.3 (JPEG)
Movie MP4 [Image: H.264; Audio: AAC(Stereo)]
Modes Wi-Fi,Movie,Shooting,Looprecording,TimeLapse,Burstshot

30
Waterproof Equivalent to JIS/IEC IPX5(Body)
Shockproof Up to 2m
Dustproof Equivalent to JIS/IEC (IP6X)
Freeze-proofing -10℃
LCD 1.0 inch TN LCD
Level Gauge 2-axis
ISO Sensitivity Auto (100~800)
Exposure Metering Method Artificial Intelligence AE (AiAE)
Exposure Control Method Program AE
Burst shot Supported
White balance Auto (AWB), Daylight, Cloudy, Fluorescent, Under water
Recording Media
Internal Memory: Approx. 8MB
microSD/microSDHC Card (Up to 32GB Support) [MMC Card Not Supported]
Language English
Interface USB 2.0 ( Micro 5 pin USB ) , HDMI ( Type D )
Wi-Fi Supported(802.11b/g/n)
NFC Supported
Remote Viewfinder Supported (via smart device)
Power Rechargeable Li-ion Battery LB-080, 3.6V 1250mAh, In-Action Cam Charging
Shooting Capability (Battery
Performance) Approx. 350Shots (Based on CIPA Standards) Approx. 160min for Video (@1080p/30fps)
Operation Environment Temperature:-10~40℃ ,Humidity:0~90%
Dimensions (W×H×D) Approx.41.1×50.0×38.0mm (Based on CIPA Standards)
Weight Approx. 103g (Body Only)
31
Prompts and Warning Messages
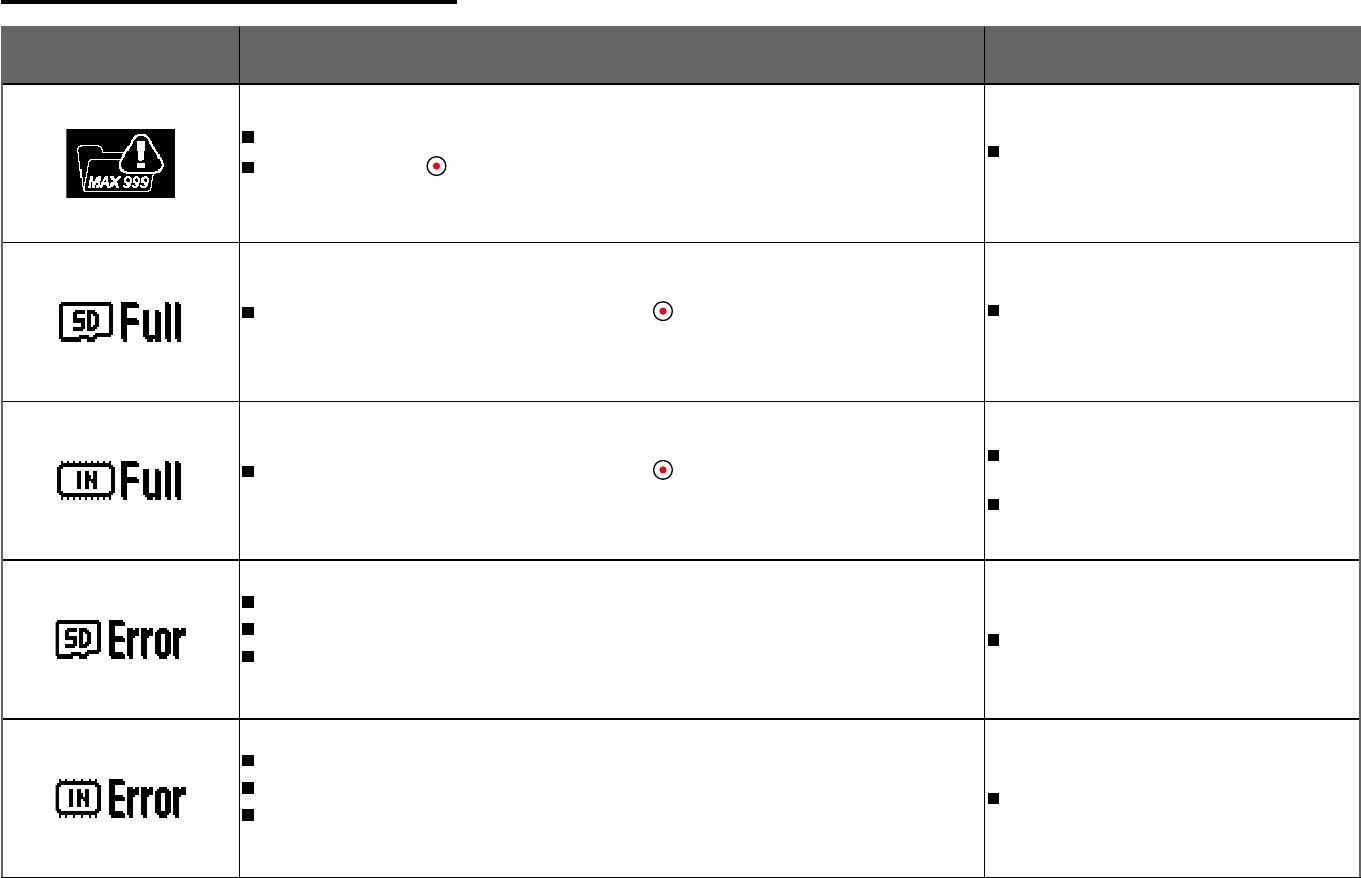
Message Description Processing mode
The read time during a power up may be too long when there are too many folders.
When pressing the button for shooting, the memory card cannot be accessed
because there are too many folders.
After copying the files to the computer,
choose to delete or format.
When turning on the product or pressing the button, the product detects that
the memory card is out of space.
After copying the files to the computer,
choose to delete or format.
When turning on the product or pressing the button, the product detects that
the internal memory is out of space.
After copying the files to the computer,
choose to delete or format.
Use memory card.
The memory card still cannot be recognized after format.
An error occurs when reading the memory card.
Interruption logging problem is encountered in the period of writing in the memory
card or recording in the video recording or shooting process.
Format.
The internal memory still cannot be recognized after format.
An error occurs when reading the internal memory.
Interruption logging problem is encountered in the period of writing in the memory
card or recording in the video recording or shooting process.
Format.
32
Message Description Processing mode
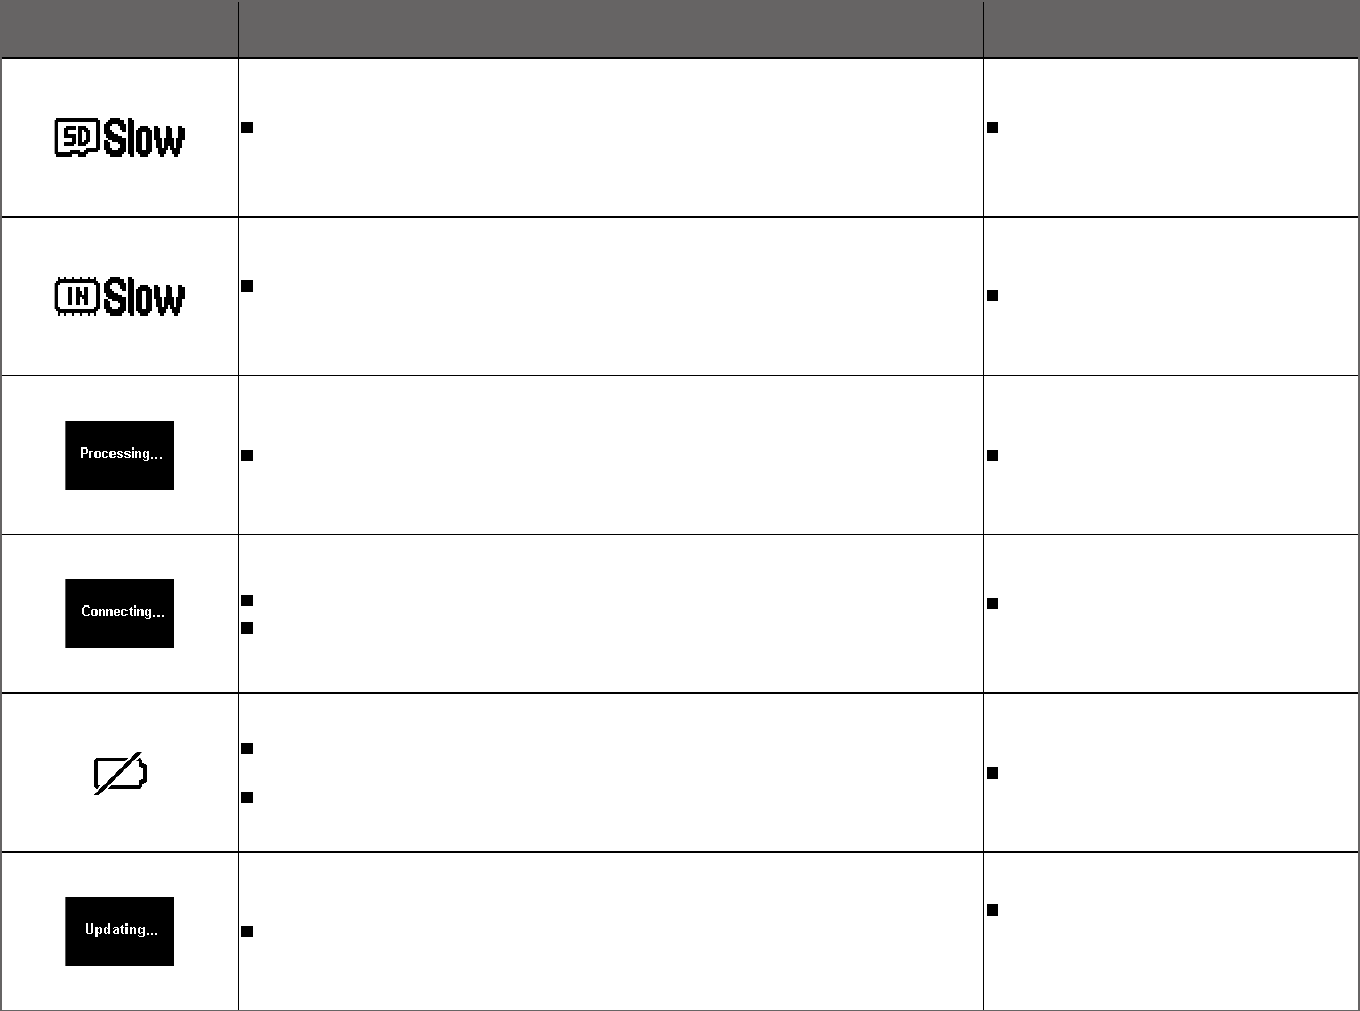
When a memory card lower than Class 6 is used to record a HD or above movie, the
writing speed is too slow and recording will not continue.
Please select a memory card Class 6 and
above.
When the internal memory fails to record Loop recording, the write speed will slow
down and recording will not continue. Use memory card.
File processing (saving, formatting, etc.) time exceeds 2 seconds. User should do nothing.
Connecting to the computer USB.
Connecting to the HDMI device.
The display is ended after connection is
succeeded.
Caution will appear before power off when the battery of the product is already
dead.
The firmware cannot be updated when power is insufficient.
Charge or replace with a new battery.
Updating firmware.
User should do nothing. The product will
turn off automatically after the update is
completed.

Licensed
Product
The Kodak trademark and trade dress are used under license from Kodak.
© 2014 by JK Imaging Ltd. All rights reserved.
JK Imaging Ltd. 1411 W. 190th Street, Suite 550, Gardena, CA 90248, USA
www.kodakpixpro.com
Ver.1