Sintai Optical CWFB124 Wi-Fi module User Manual Part 8
Sintai Optical (Shenzhen) Co., Ltd. Wi-Fi module Part 8
Contents
- 1. User Manual.pdf
- 2. User Manual Part 1.pdf
- 3. User Manual Part 2.pdf
- 4. User Manual Part 3.pdf
- 5. User Manual Part 4.pdf
- 6. User Manual Part 5.pdf
- 7. User Manual Part 6.pdf
- 8. User Manual Part 7.pdf
- 9. User Manual Part 8.pdf
- 10. User Manual Part 9.pdf
- 11. User Manual 1.pdf
- 12. User Manual 2.pdf
- 13. User Manual (1 of 4).pdf
- 14. User Manual (2 of 4).pdf
- 15. User Manual (3 of 4).pdf
- 16. User Manual (4 of 4).pdf
- 17. User Manual (1 of 2).pdf
- 18. User Manual (2 of 2).pdf
- 19. User Manual (1 of 5).pdf
- 20. User Manual (2 of 5).pdf
- 21. User Manual (3 of 5).pdf
- 22. User Manual (4 of 5).pdf
- 23. User Manual (5 of 5).pdf
User Manual Part 8.pdf

126 127
Image Edit:
Multiple edit can be repeated under
image edit mode. Only one picture is
saved nally.
Under the 1:1 single playback mode,
select a picture and then press the up
arrow button to enter image edit and
start detecting face.
Press the up arrow button to do HDR
editing.
Press the down arrow button to delete
one picture.
Press the left and right arrow buttons
to edit the color. 12 effects in total for
selection.
The following beautier touch-up
functions cannot be enabled until a face
is detected. You may press relative color
buttons to edit.
: Skin Soften
: Eye Enlargement
: Eye Brightening
Edit tings corresponding to each type of les
can be tabled.
O Available; X Non-available
HDR Color Beautier Delete
Normal
(face) O O O O
Normal (no
face) O O X O
Panorama X X X O
Time-lapse X X X O
Video X X X O

126 127
HDMI CEC Connection
Function Full Size
Playback
Zoom-in
Playback
Index
Playback
Video/Time-lapse
Movie Play
Cont.
Group
Play
Panoramic
File Play
Zoom In O
O (Movable to
four directions
during
zoom-in)
X X X X
Zoom Out X O X X X X
Rotate O (turn left
only)
O (turn left
only) X X X X
Play Slide
Show O X X O O O
Edit Image O
*1
X X O O O
Info Hiding/
Display O O X O
*2
O
*2
O
*2
Delete O X X O
*3
O
*3
O
*3
*1 After entering the image edit, relative operation of the beautier cannot appear until a face
is detected.
*2 It is available before and in playing and during pause.
*3 The function of Delete One cannot work until the camera enters image edit mode.

128 129
128 129
Smart Device APP Operating Method
Position Service Function
If your smart device supports GPS, APP can record GPS location on picture les. This function
is non-available for video les.
Android system:
1. There will appear a prompt that ["PIXPRO Remote Viewer" Would Like to Use Your GPS
services !!] in your rst time of enabling APP. If GPS of your smart device is off, you may
select enabling or disabling it according to the prompt on the screen.
2. If GPS is on in your second time of or later enabling APP, your device will directly enter the
home page of APP; if GPS is off, you may select enabling or disabling it according to the
prompt on the screen.
10

128 129
128 129
iOS system:
1. When the APP is enabled for the rst time, if the position service is enabled, it will prompt
whether to not「PIXPRO Remote Viewer wants to share your current location」; if the
position service is disabled, it will prompt「Turn on Location services to allow "PIXPRO
Remote Viewer" to determine Your Location.」; and if clicking 「setting」, the smart device
position service setting interface will appear.
2. When the APP is enabled for the second time or later, status of position service:
Position service
state selected at the
rst-time enabling of
the APP
The second-time or later enabling of the APP
The position service
is enabled The position service is Off
Enable Enable the position
service
A prompting message 「Turn on
Location services to allow "PIXPRO
Remote Viewer" to determine Your
Location」will appear; and if clicking
「setting」, the smart device position
service setting interface will appear.
Off
A prompting message that「Location Service is disabled
for "PIXPRO Remote Viewer" Please exit PIXPRO SP1,
then go to ‘Settings; General; Location Services’ and enable
the service for "PIXPRO Remote Viewer"」; and if clicking
「Conrm」, the APP home interface will appear. Besides,
the position service will be automatically disabled.

130 131
After connecting Wi-Fi, click the icon
on the smart device interface and enter
into APP homepage after setting the global
positioning function.
•[Playback]: Enter playback state
•[Remote Viewnder]:
Camera shooting is
controlled through
intelligent device.
•[About]: Check the version of
the APP.
In the interface of the APP, click to
back to the previous stage of interface.
But in index Playback and Remote
Viewnder states, click to back to
the APP home directly.
APP Home
Click [Remote Viewnder] in APP homepage
to enter the shoot mode, use intelligent
device to control the camera's recording.
Intelligent device shooting image:
EV-3.0 ISO400 F3.5 1/2000
12345
16M
1
2
3
4
5
6
7
8
9
10 12
11
13
14
15
16
17
18
19
1. Enter the index playback state on the
camera
Remote Viewnder
130 131
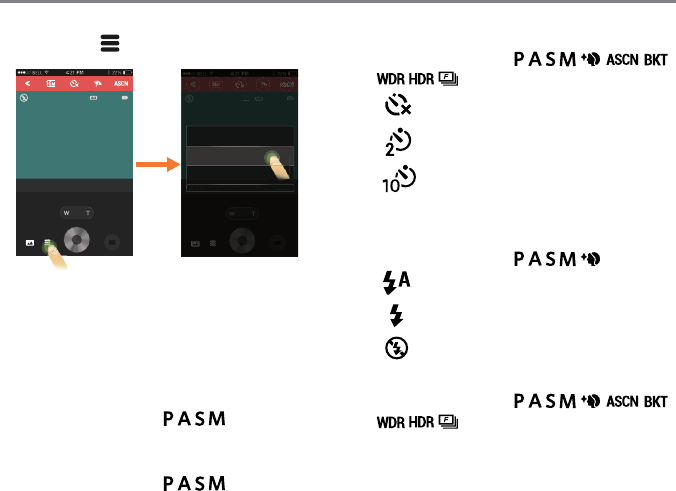
7. Self-timer
Can be adjusted in
mode.
: Off
: 2s
: 10s
8. Zoom display Bar
9. Flash mode display
Can be adjusted in mode.
: Flash auto
: Fill ash
: Force Off
10. Image size
Can be adjusted in
mode.
4:3
16MP: 4640×3480
10MP: 3648×2736
4MP: 2336×1752
3MP: 2048×1536
0.3MP: 640×480
2. Enter into menu.
EV-3.0 ISO400 F3.5 1/2000
12345
16M
(9 ,62 )
0
(
0
(
9
,62
)
(
(
Format
Menu
Reset
• Click the blank space outside menu to
exit.
3. Zoom control (T: zoom in, W: zoom out)
4. ISO value options: Auto, 200, 400, 800,
1600, 3200, 6400, 12800.
Can be adjusted in mode.
5. Exposure compensation
(scope: +3.0~-3.0)
Can be adjusted in mode.
6. Touch focus display
132 133
12. ASCN automatically adjusts a proper
exposure mode to make sure a clear
focus for good photos.
1 Click ASCN to enter menu setting
interface.
EV-3.0 ISO400 F3.5 1/2000
12345
16M
AE Bracketing
WDR
HDR
Continuous shooting
Mode
ASCN
2 Select the sub-menu and save it.
3 Click the blank space outside menu to
exit.
13. Battery life
14. Available shots
15. No SD Card in Camera side
16. Shutter speed (scope: 1/4000 ~ 30s)
Can be adjusted in mode.
3: 2
14MP: 4608×3072
16: 9
12MP: 4608×2592
2MP: 1920×1080
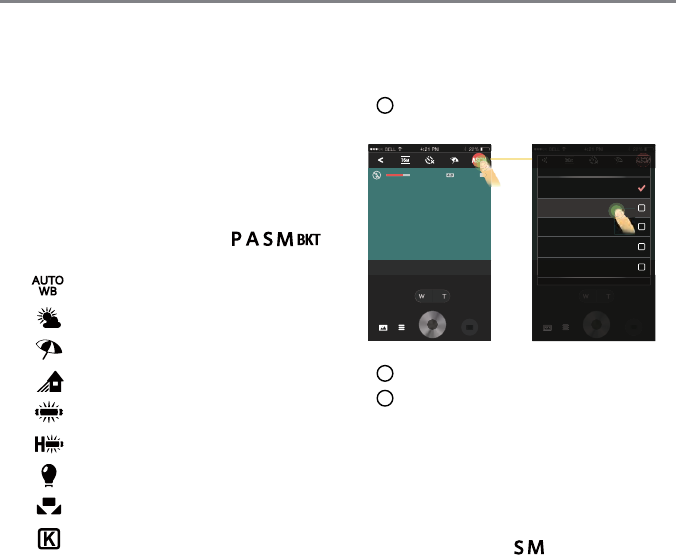
11. White balance allow the users to adjust
the color temperature in different light
sources to make sure color will appear
correctly. Can be adjusted in
mode.
: AWB
: Daylight
: Cloudy
: Shadow
: Fluorescent
: Fluorescent H
: Tungsten
: Custom
: Color temperature compensation
(1900K~10000K)
132 133
17. Aperture value (scope: F3.5 ~ F5.6,
divided by the equipped lens.
Can be adjusted in mode.
18. Shoot photos
19. Switch shooting mode to record mode.
All les in APP shooting are saved in
the camera.
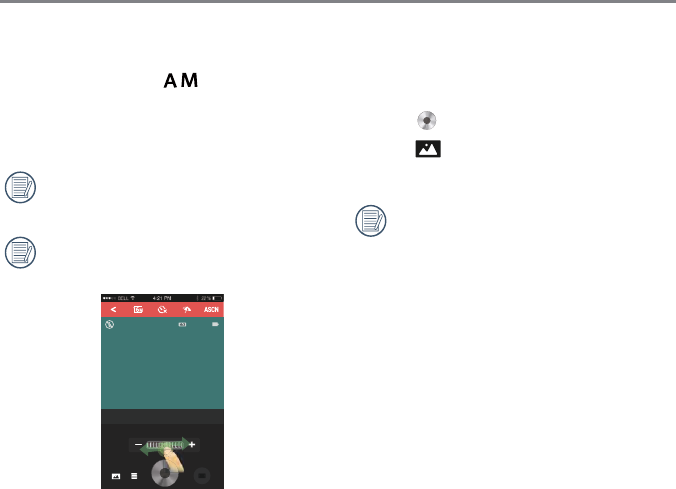
Slide the roller to change the values for
EV, ISO, aperture and shutter.
EV-3.0 ISO400 )
12345
16M
Shooting mode method of operation:
1. Click icons at the top of the interface to
set corresponding parameters.
2. Click to shoot photos.
3. Click to enter the index playback
state.
In capture mode, the touch shooting
function defaults to ON, the camera
focuses at touch point before shooting
and take shots whether it fails or not.
134 135
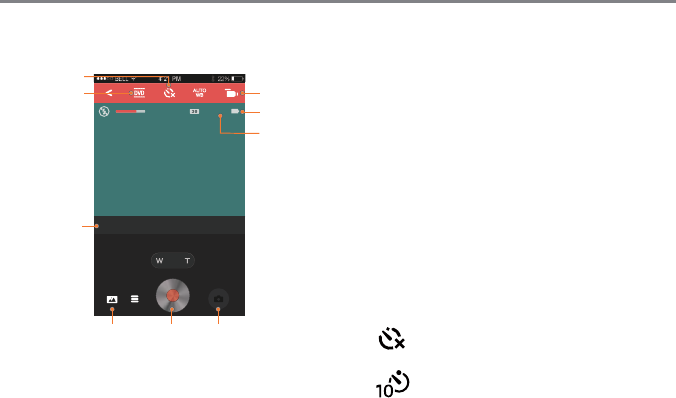
5. Video size setup
16:9
1080p30 (1920×1080@30fps)
720p60 (1280×720@60fps)
720p30 (1280×720@30fps)
4:3
VGA (640×480@30fps)
640×480 (120fps)
6. Self-timer
: Off
: 10s
7. Video icon
8. Battery life
9. Record time
Smart device recording image:
EV-3.0
'9'
123
6
5
4
9
7
8
1. Switch shooting mode to record mode
2. Start video recording
3. Enter the index playback state on the
camera
4. EV: adjust the animation brightness.
Adjustment range: +3.0~-3.0

134 135
Video mode method of operation:
1. Click icons at the top of the interface to
set corresponding parameters.
2. Click to start video recording, and click
to stop video recording.
3. Click to enter the index playback
state.
Playback
Click「playback」in the APP Home to enter
the playback state.
There are two options in playback mode.
• Index playback (camera/smart device)
• Single playback (video/photo)
136 137
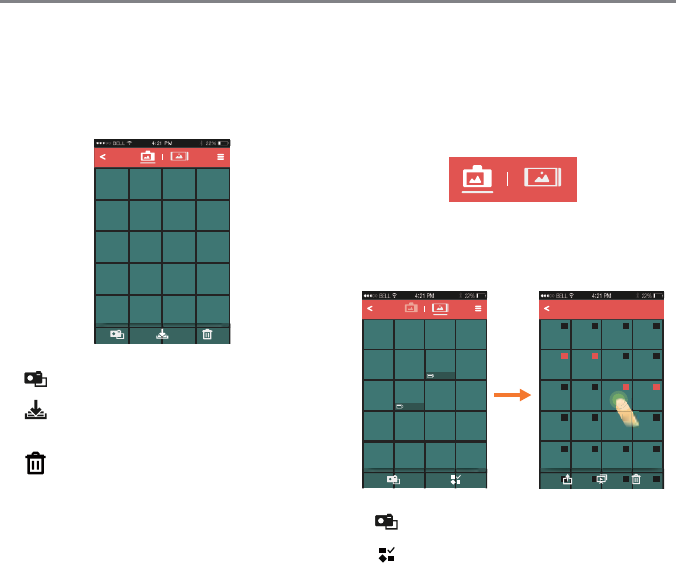
Index playback (Camera / smart device)
1. In the APP Home, click「playback」to
enter the index playback state, and enter
the photo album of the camera in default.
• : Enter the shooting status
• : Download the les in the camera
into the smart devices
• : Select multiple les to delete
2. The index playback interfaces of the
smart device and the camera can be
switched by shifting a red dot on the
interface of the smart device.
3. The index playback interface of the smart
device displays les downloaded from the
camera to the smart device.
4 item slected
• : Enter the shooting status
• : Multiple photos selection

136 137
Enter the selection interface after selecting
, and click thumbnails so that les can be
selected. Clicking the same thumbnail for the
second time will cancel selection.
• : Share les directly to social
networks
• : Play back in the form of slide show
• : Delete the selected les
Setting function
Click at the right upper corner of the
interface so that the setting interface can
appear.
• In Android system, the download
size can be set and cookies can be
deleted.
• In iOS system, the download size can
be set and cookies can be deleted.
And the iOS 5 system has log-in and
log-out functions. But for iOS 6 system
or above, the account log-in is decided
by the device system.
138 139
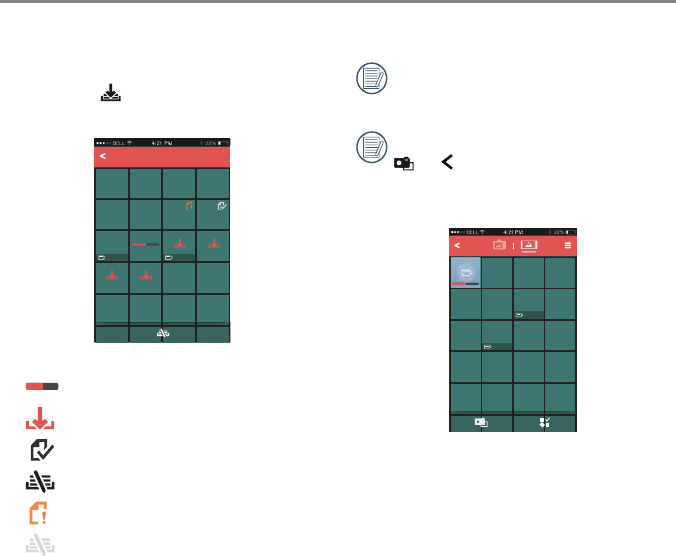
Download function
In the index playback interface of the
camera, click to enter the download
mode. Select a le to begin downloading.
Ј忍
: Downloading
: Wait downloading
: The download is complete
: Cancel download
: Fail in downloading
: Grey and inaction
The currently selected les, including
the les being downloaded and wait for
downloading, can't be more than 20.
In the index playback interface, clicking
or will pause downloading.
Download will restart when the
playback interface appears again.
138 139
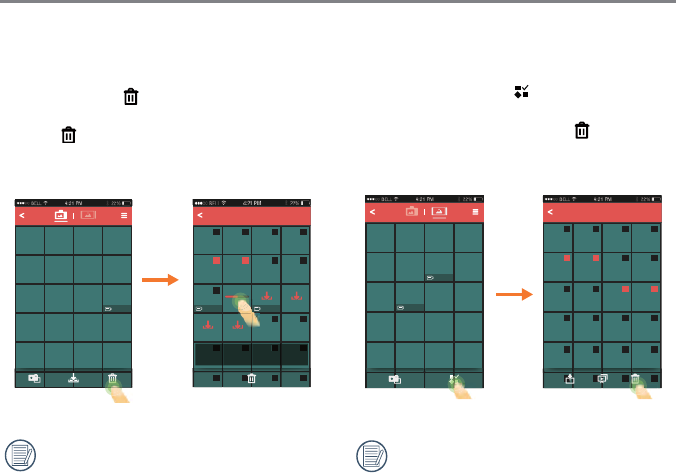
Delete function
1. In the index playback interface of the
camera, click to enter the selection
interface, select the les to be deleted,
click again to delete the les, and
select whether or not to delete in the
delete prompting interface.
<
2 item slected
Current file being loaded or waiting
for being loaded can not be deleted.
The les which are being downloaded
and wait downloading cannot be
deleted.
2. In the index playback interface of the
smart device, click to enter the
selection interface, select the les
needing to be deleted, click to delete
the les, and select whether or not to
delete in the delete prompting interface.
4 item slected
No select box is displayed on the le
which is being downloaded.

140 141
Slide play function
1. In the index playback interface of the
smart device, click to enter the
selection interface.
2. Firstly, select the les to be played, and
then click to start slide play.
3. If no le is selected, directly click so
that all les will be played.
4 item slected
Clicking a photo in slide play will stop
slide play and the single photo
interface will appear.
When playing movie in a slide, only
the rst frame is displayed; clicking
the movie will stop slide play and the
movie play interface will appear.