Sintai Optical CWFB124 Wi-Fi module User Manual Part 5
Sintai Optical (Shenzhen) Co., Ltd. Wi-Fi module Part 5
Contents
- 1. User Manual.pdf
- 2. User Manual Part 1.pdf
- 3. User Manual Part 2.pdf
- 4. User Manual Part 3.pdf
- 5. User Manual Part 4.pdf
- 6. User Manual Part 5.pdf
- 7. User Manual Part 6.pdf
- 8. User Manual Part 7.pdf
- 9. User Manual Part 8.pdf
- 10. User Manual Part 9.pdf
- 11. User Manual 1.pdf
- 12. User Manual 2.pdf
- 13. User Manual (1 of 4).pdf
- 14. User Manual (2 of 4).pdf
- 15. User Manual (3 of 4).pdf
- 16. User Manual (4 of 4).pdf
- 17. User Manual (1 of 2).pdf
- 18. User Manual (2 of 2).pdf
- 19. User Manual (1 of 5).pdf
- 20. User Manual (2 of 5).pdf
- 21. User Manual (3 of 5).pdf
- 22. User Manual (4 of 5).pdf
- 23. User Manual (5 of 5).pdf
User Manual Part 5.pdf
66 67
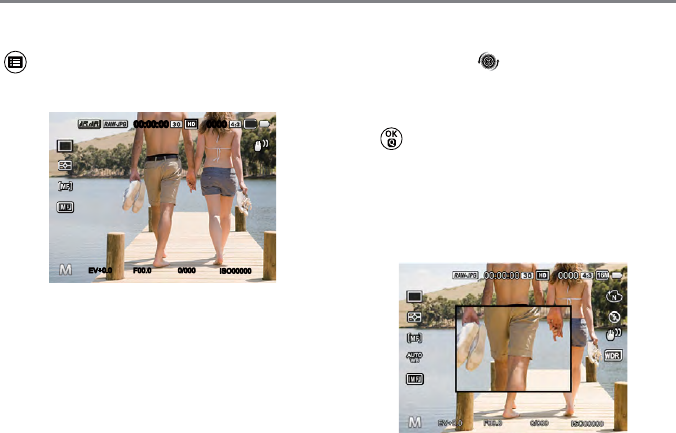
The MF assist needs to be enabled with the
button. (See P79 for details)
After enabling manual focus (non AF+MF):
ISO00000
0/000F00.0EV
00:00:00 0000
16M
+0.0+0.0
If the lens focus ring is operated or the
jog dial is rolled [ ] again, the AF
enlargement frame will appear on the LCD
screen. After a best position you want is
obtained through manual adjustment, press
the button to close the AF enlargement
frame and make the camera back to normal
shooting screen. Semi-pressing the shutter
button will have no effect; you need to fully
press the shutter button to take a normal
photo.
66 67
The focus frame displayed after enabling the
auto + manual focus depends on the settings
of AF area (center-AF/multi-AF).
0/000F00.0
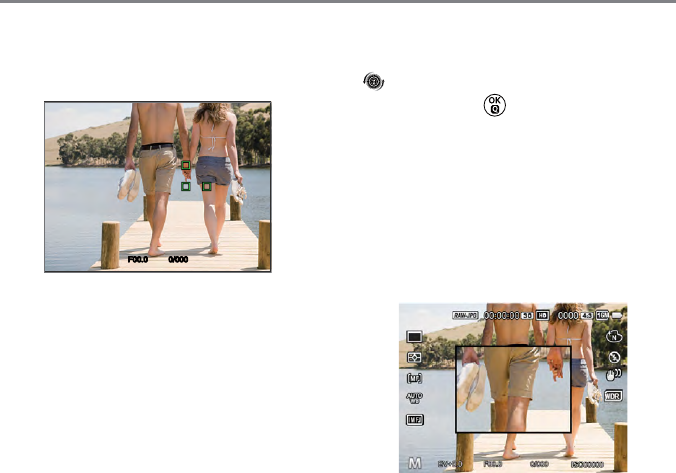
Semi-press the shutter button for auto focus
and then rotate the lens focus ring or the
[ ], to focus on areas enlarged on the
screen. Press the button to close the AF
enlargement frame and make the camera
back to normal framing screen and then
press the shutter to take a normal photo.
After semi-pressing the shutter, shooting will
be carried out mainly based on manual focus
settings. If the shutter is semi-pressed again
for AF after completion of manual focus,
shooting will be carried out mainly based on
the nal AF settings.
68 69
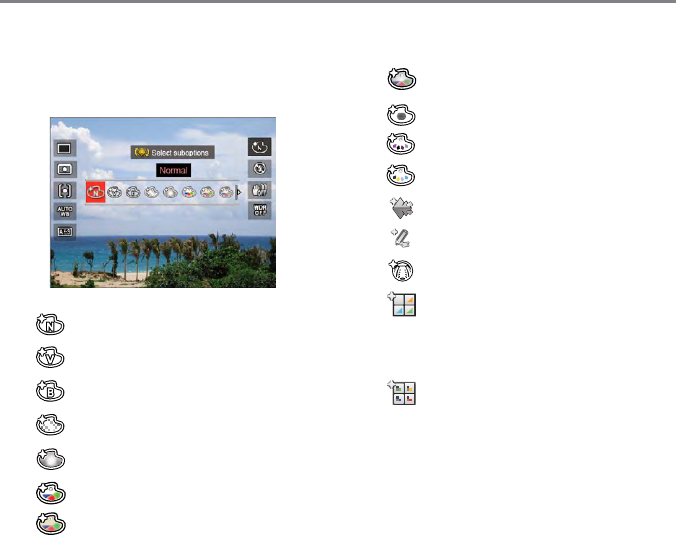
Picture Effect
Picture effect allows user to select different
color effects.
• Normal
• Vivid
• Black and White
• Dreamy
• Vignetting
• Ektachrome
• Kodachrome
• Kodacolor
• Salon
• Punk
• Negative
• Reection
• Sketch
• Fish Eye
• 4 Grids - Stylish (2M)
Four combined effects: Fine +
Warm Yellow + New Japanese +
Cold Green
• 4 Grids - Partial Color (2M)
Four partial colors of blue, yellow,
green and red to form combined
effects.
68 69
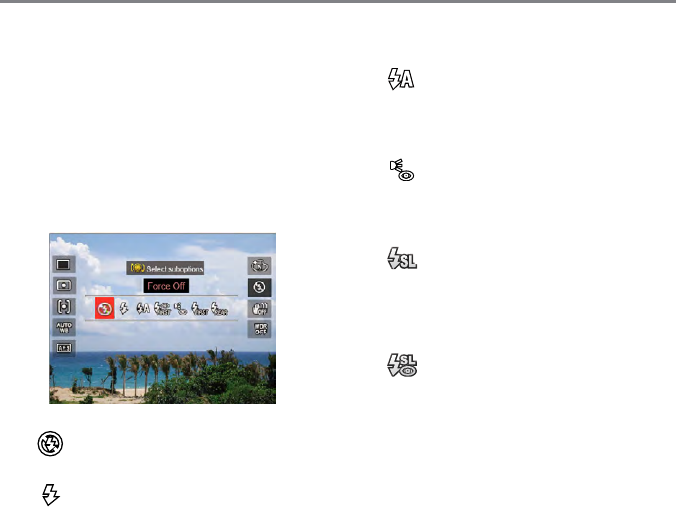
Flash Mode
The ash is mainly for supplementing light
for the scene. The ash is usually used in
shooting against the light to highlight the
object shot through lightening the object
while darkening the background; it is also
suitable for metering and shooting in darker
scenes through exposure. (For installation
steps of the ash, please refer to P23.)
• Force Off
Flash is turned off.
• Force Flash
For ll ash at the moment of
taking a picture.
• Flash Auto
Camera ash goes off
automatically based on existing
light conditions.
• Red-Eye Reduction
The camera emits a brief pre-ash
before the picture is taken to
reduce red-eye effects.
• Slow Sync.
Flash rst to make the object
photic and then expose for a long
time to make the background
brighter.
• Slow Sync. + Red-Eye Reduction
The camera uses both slow sync.
And red-eye reduction in ashing.
70 71
• Rear curtain sync
Press the shutter to make it on
normally, and then the ash
gives a ash to expose at the
moment that the shutter closes.
(Mainly used to shoot fast-moving
objects.)
If the ash is disconnected or closed,
its default mode is DISABLE and isn't
optional.
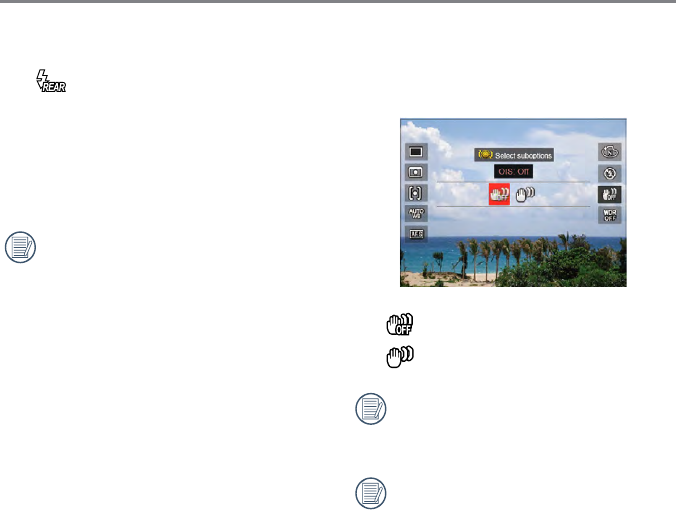
OIS
This mode can help reduce photo blur
caused by unintentional hand shake.
• OIS: Off
• OIS: On
Use Stabilization Mode in dark
environments or when using a slower
shutter speed.
The effect of OIS may be
unsatisfactory when shooting with
erce shake of camera (e.g. in the
running vehicle).
70 71
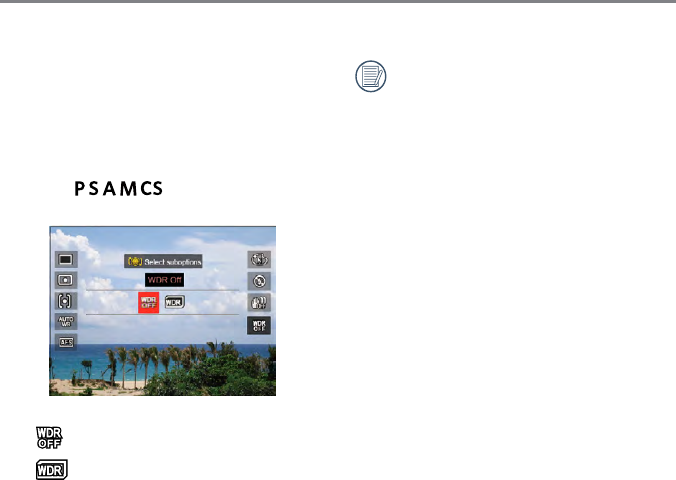
WDR
When the camera detects that there is a big
contrast in brightness between scenes and
such scenes are against the light, it will use
DSP to automatically adjust the brightness
and saturation to make pictures taken
restore the scene more closely. (Adjustable
under the mode)
• WDR Off
• WDR On
WDR is mutually exclusive with RAW/
RAW+JPG. When WDR works, the
quality will automatically change from
RAW or RAW+JPG to default JPG.
72 73
Mode:
1. Press the button to enter the menu.
2. Press the [
] / [
]
button to select.
8 options in「 Menu」:
• Fn Settings
• Shoot Settings 1
• Shoot Settings 2
2
• Playback Menu
(See P100 for details)
• Normal Settings
• File & Firmware Settings
• Connection Settings
(See P112 for details)
• Wi-Fi (See P44 for details)
Functions that can be enabled are
different under each mode.
Introduction on Functions of Menu Button
3. Press the [ ] / [ ] button to
select the setting options and the Press
the button to enter the menu.
4. Press the [ ] / [ ] button
to select and the Press the button to
conrm.
Please refer to the sections below to know
details of each option.
72 73
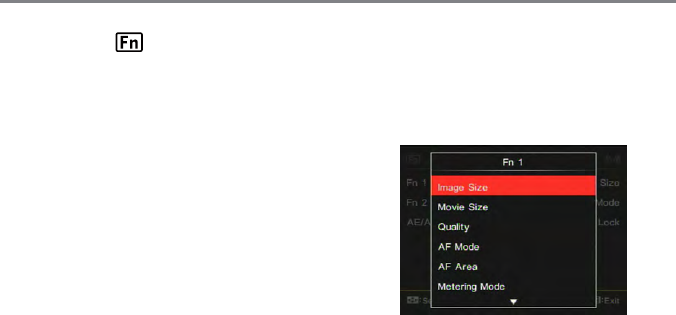
Fn1/Fn2 Settings
This function can be used to customize the
quick access with Fn1 or Fn2 button.
After saving the functions of Fn1 or Fn2
button, the camera goes back to the
shooting status. Pressing Fn1 or Fn2 button
can quickly enable relative functions.
Fn Settings
3 options in 「Fn Settings」:
• Fn1
• Fn2
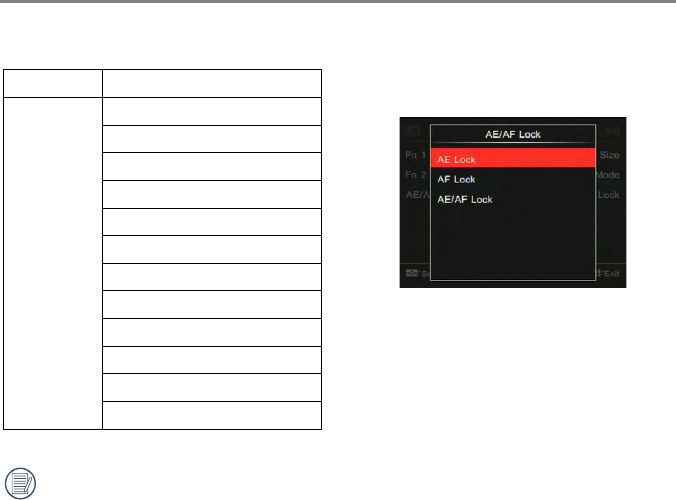
• AE/AF Lock
74 75
AE/AF Lock
For simultaneously locking current AE value
and AF range.
• [AE-L]: AE Lock
For locking the current AE value. (Only
the AE lock works in shooting with
manual focus.)
• [AF-L]: AF Lock
For locking the current AF value. (Only
the AF lock works in shooting under
manual exposure mode.)
• [AE/AF-L]: AE/AF Lock
For simultaneously locking the current
AE value and the AF range.
Button Functions (Referred Pages)
Fn1/Fn2
Image Size (P81)
Movie Size (P82)
Quality (P83)
Focus Mode (P65)
AF Area (P62)
Metering Mode (P62)
Flash mode (P69)
Picture Effect (P68)
Beautier (P40)
WB Mode (P63)
WDR (P71)
OIS (P70)
Fn1 is for picture effect while Fn2 for
AF Area by default.
74 75
Shoot Settings 1
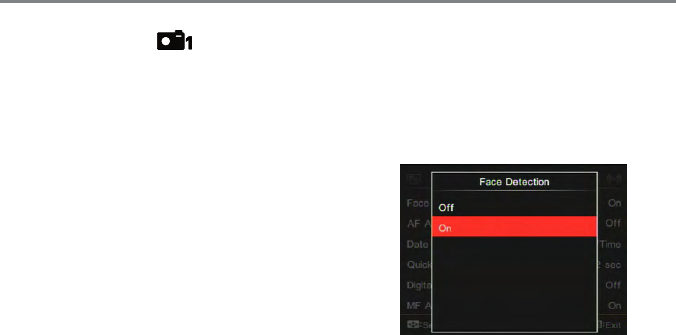
6 options in 「Shoot Settings 1」:
• Face Detection
• AF Assist Beam
• Date Imprint
• Quick Review
• Digital Zoom
• MF Assist
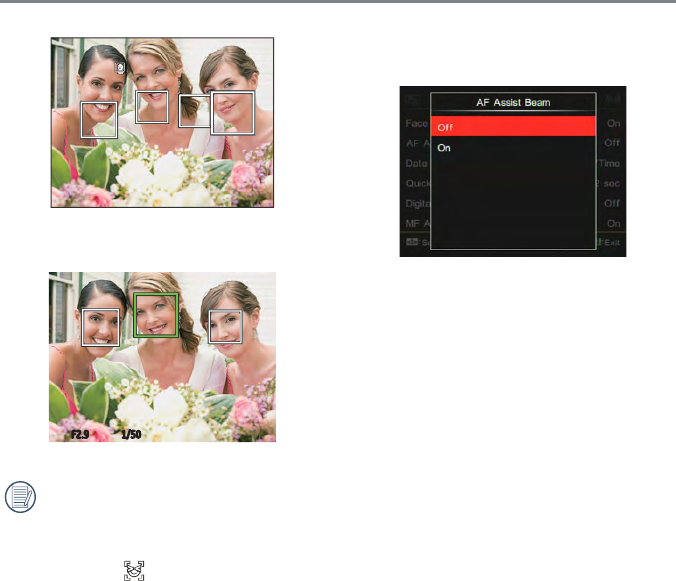
Face Detection
For detecting and focusing on faces to make
all faces as much as clear under the photo
mode.
1. Hold the camera steadily and then focus
on the object to detect its face. A focus
frame will appear at the face on the
screen when a face is detected.
76 77
AF Assist Beam
In a darker environment, AF Assist Beam
can be turned on for better focus.
• Off
• On
2. Aim at the object and then semi-press the
shutter button to focus.
1/50F2.9
3. Press the shutter button to take a picture.
The closed eyes detection is usually
on. If the camera detects in the course
of quick review there is a face with
eyes closed, a prompt of closed eyes
will appear .
76 77
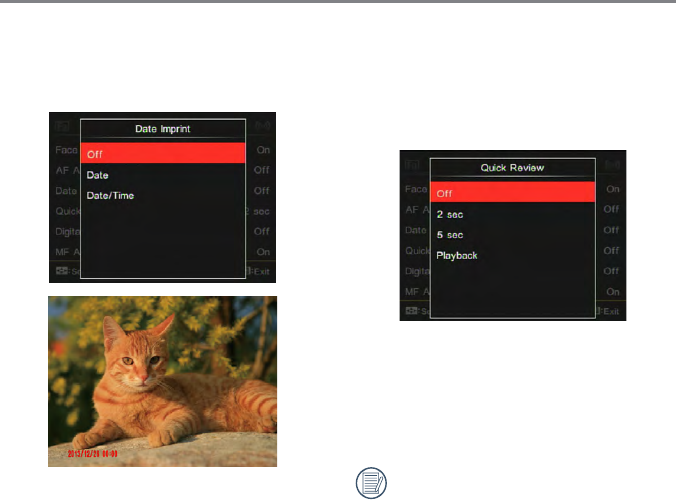
Date Imprint
Include a Date/Time imprint on the photo
image.
• Off
• Date
• Date/Time
Quick Review
This option can provide you immediate quick
review on pictures after taking. Each picture
will be displayed on the LCD screen at the
time of being selected.
• Off
• 2 sec
• 5 sec
• Playback
If you select playback, the camera will
directly enter PLAYBACK mode after
each time of picture taking.

78 79
Quick Review – each shooting mode
supports a corresponding album for quick
review of pictures.
O-the number of seconds can be set;
X-the number of seconds cannot be set.
Quick Review
for 2 secons
or 5 seconds
Quick Review
Playback *1
Closed Eyes
Detection *2
Cat/Dog
Self-timer
Fixed 2 sec X X
Smile Fixed 2 sec X O
Panorama O O X
Continuous Shot Fixed 2 sec X X
Cont. Shot-Fast Fixed 2 sec X X
Con. Time-lapse
Shot
Fixed 2 sec X X
Video X X X
HDR O O O
WDR O O O
Color O O O
WB Bracketing O *3 O X
EV Bracketing Fixed 2 sec X X
Time-lapse Movie X X X
Others
O O O
Remarks:
*1 A common quick review on pictures
should be done before playback.
The time of review depends on
saving time.
*2 The closed eyes detection needs to
enable the face detection rst.
*3 The last picture can be reviewed
as per settings of quick review. The
total time of quickly reviewing the
rst two pictures is about 1 second.
78 79
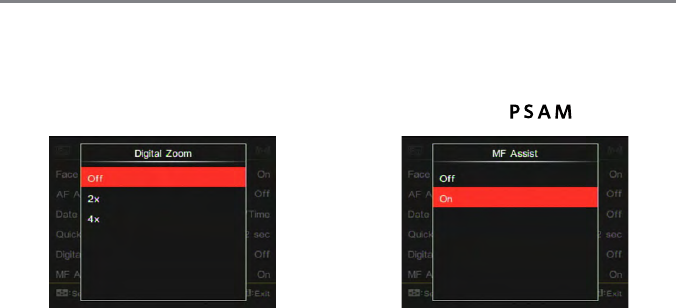
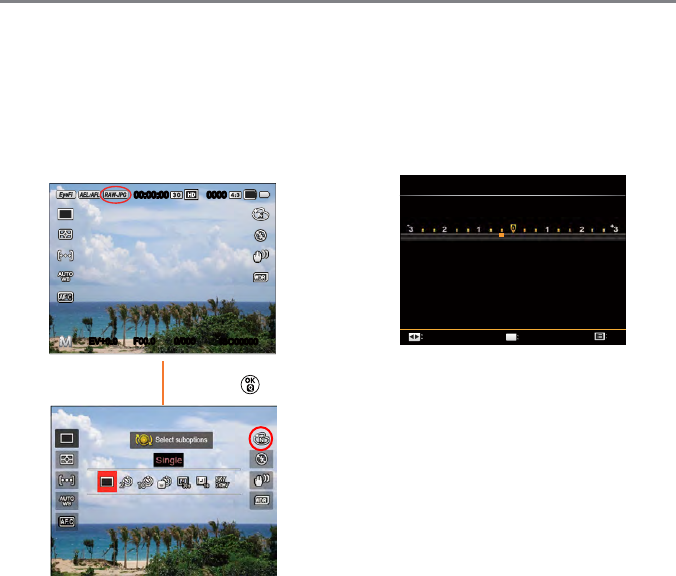
Digital Zoom
This setting is for adjusting digital zoom. If
this function is disabled, only optical zoom
can be used.
• Off
• 2x
• 4x
MF Assist
For manually focusing on the object by
operating the lens focus ring through manual.
(Adjustable under the mode)
• Off
• On
80 81
Shoot Settings 2
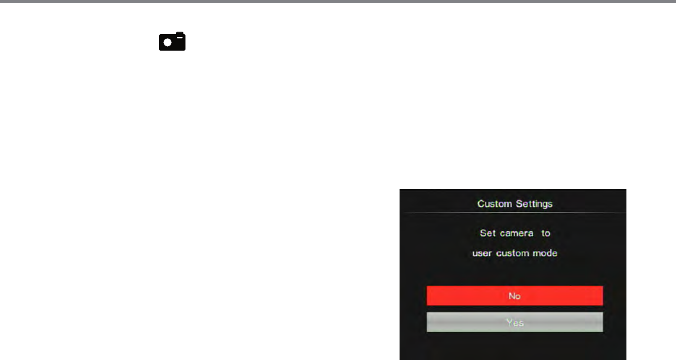
Custom Settings
Custom Settings stores the current photo
shooting mode and its parameters. The
stored mode and parameters are directly
invoked in Custom Settings mode.
• No
• Yes
5 options in 「Shoot Settings 2」:
• Custom Settings
• Image Size
• Movie Size
• Quality
• Flash Exp. Comp.
2
80 81
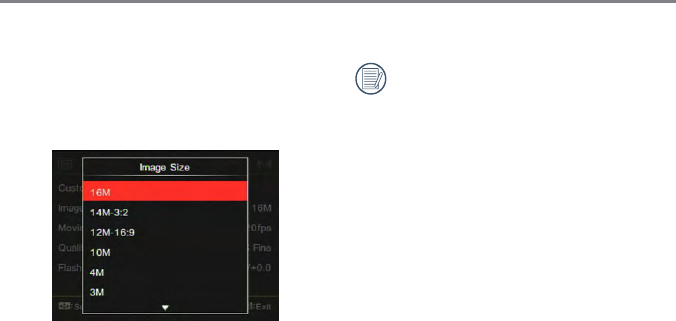
Image Size
The size setting refers to the image resolution
in pixels. A higher image resolution allows
you to print that image in larger sizes without
degrading the image quality.
• 16M: High quality printing
• 14M-3:2: Full size printing
• 12M-16:9: display
• 10M: Poster printing
• 4M: A3 printing
• 3M: A4 printing
• 2M-16:9: 4"x 6" printing
• VGA: E-Mail
The bigger the number of recorded
pixels is, the better the image quality
becomes. As the number of recorded
pixels lessen, you will be able to record
more images on a memory card.
82 83
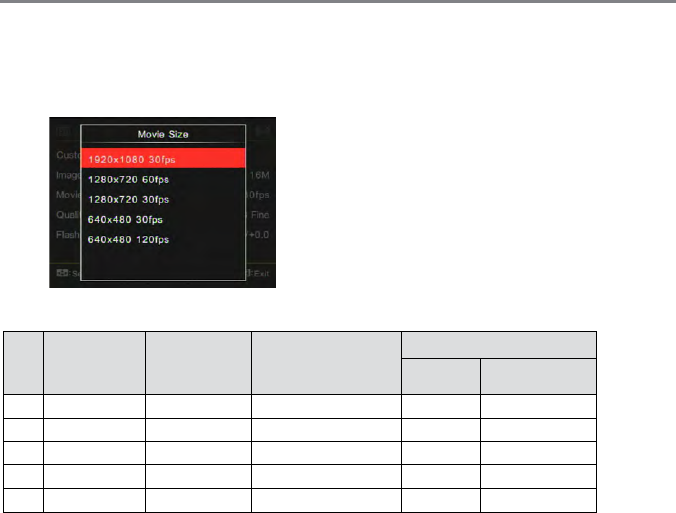
Movie Size
Set the image resolution used during video
recording.
Time recorded in videoing with HD:
No. Image Pixel Frame (fps) Recommendation
Recording time (about )
(4GB) (8GB)
1 1920x1080 30 Class 6 30min 60min
21280x720 60 Class 6 32min 65min
31280x720 30 Class 4 59min 117min
4 640x480 30 Class 4 120min 250min
5 640x480 120 Class 6 54min 107min
Movie Size:
• 1920x1080: record with Full HD. The
aspect ratio is 16:9.
• 1280x720: record with HD. The
aspect ratio is 16:9.
• 640x480: record with standard
denition. The aspect ratio is 4:3.
82 83
Recording time limit above 1280x720
30 fps format is under 29 minutes.
When recording in higher pixel
resolutions for extended periods of
time, this can cause the camera to
generate heat. This is not a camera
malfunction.
If 640x480 30fps is selected, you may
be required to save the video le in
another disk when it reaches 4GB.
When the video format is set as
640x480 (120fps), shooting time is 30
seconds, playback time is 2 minutes.
Sound recording is disabled when
640x480 120fps is chosen.
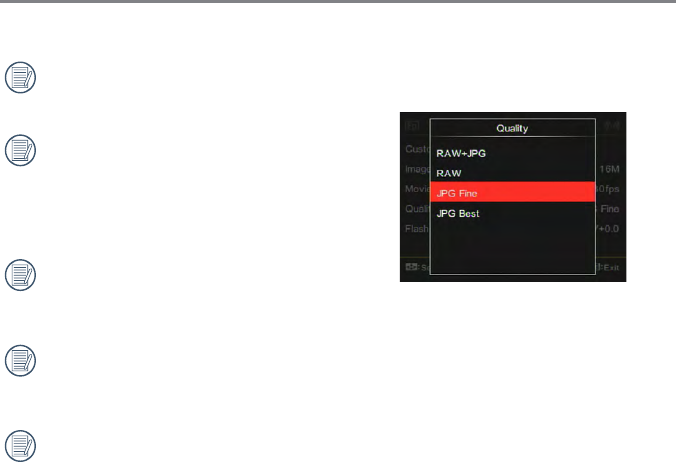
Quality
The Quality Setting can be used to adjust
the image compression ratio.
• RAW+JPEG Best
Creates two images: one in RAW
and the other in JPEG best. (Average
le size under 16M image size:
29.1MB+6.0MB)
• RAW
More data can be left on image.
Serve the purpose of editing on
computer. (Average le size under
16M image size: 29.0MB)
• JPEG Best (average le size under
16M image size: 2.6MB)
• JPEG Fine (average le size under
16M image size: 5.9MB)
84 85
The quality is on:
If RAW or RAW+JPEG is rst on, the
settings of Picture Effect, Continuous Shot,
Cont. Shot-Fast, HDR, HDRPRO and AE
Bracketing all cannot be adjusted.
ISO00000
0/000F00.0EV
00:00:00 0000
16M
+0.0+0.0
Press the button
Flash Exp. Comp.
The ash exposure compensation is for
adjusting ash volume so as to improve
the brightness of background of the object.
(Range from -3.0EV to +3.0EV, with 1/3EV
as the increment.)
Flash Exp. Comp.
Select
Exit
Set
OK
The ash exposure compensation cannot
be adjusted if the ash is disconnected or
closed.
84 85
Normal Settings
6 options in [ Normal Settings ] :
• Sound Settings
• Power Saver
• LCD Brightness
• Language
• World Time
• Date & Time
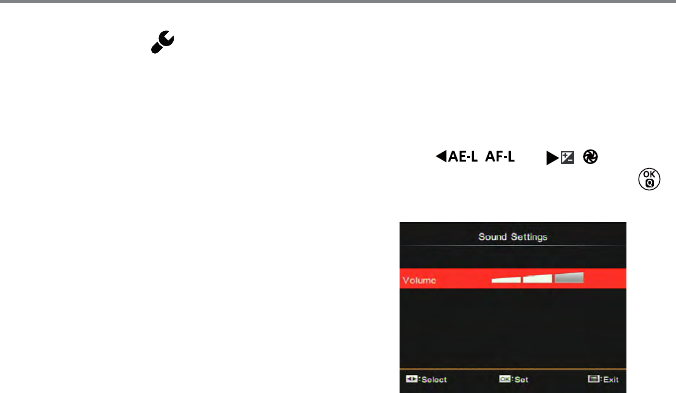
Sound Settings
With this setting you may adjust the volume
of sound in pressing buttons.
Press the [
] / [
] button
to adjust the volume and then press the
button to conrm your setting.
86 87
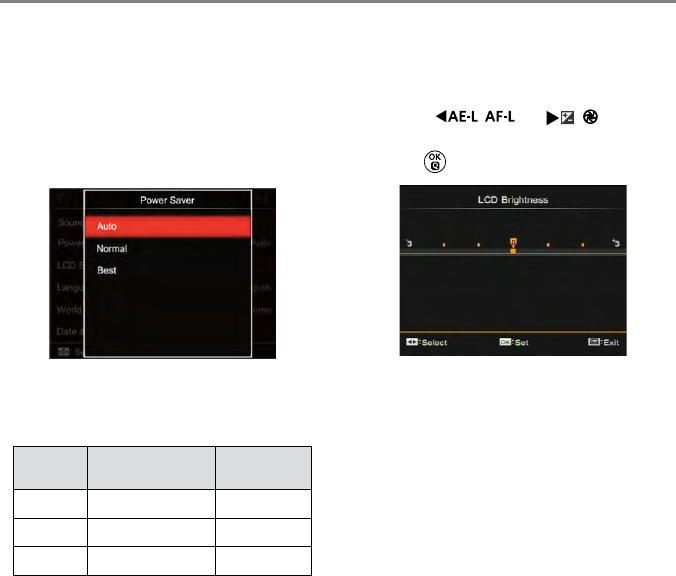
Power Saver
Power Saver This setting allows you to
save power and get the maximum possible
running time for your camera's batteries.
Follow the steps below to turn the LCD
screen and camera off automatically after a
consecutive period of inactivity.
• Auto
• Normal
• Best
Power
Saver
LCD power off
time
Turn off
time
Auto 3 min 5 min
Normal 1 min 3 min
Best 30 s 1 min
LCD Brightness
Use this setting to adjust the brightness of
your LCD screen.
Press the [
] / [
] button
to adjust the brightness of screen and then
press the button to conrm your setting.
Language
Refer to the “Reset your language” section
on page 30.

86 87
World Time
When traveling abroad, you may use this
function to display local time on the screen.
1. Press the [ ] / [ ] button to
select the places of departure ( ) and
destination ( ) .
2. Press the [
] / [
]
button to select a city with same time
shown in the eld and then press the
button to conrm your setting.
Date & Time
Refer to the “Reset Date/Time” section on
page 31.
File & Firmware Settings
6 options in [File & Firmware Settings] :
• Format
• Copy to Card
• File Numbering
• Reset Settings
• FW Version
• Cleaning Mode
88 89
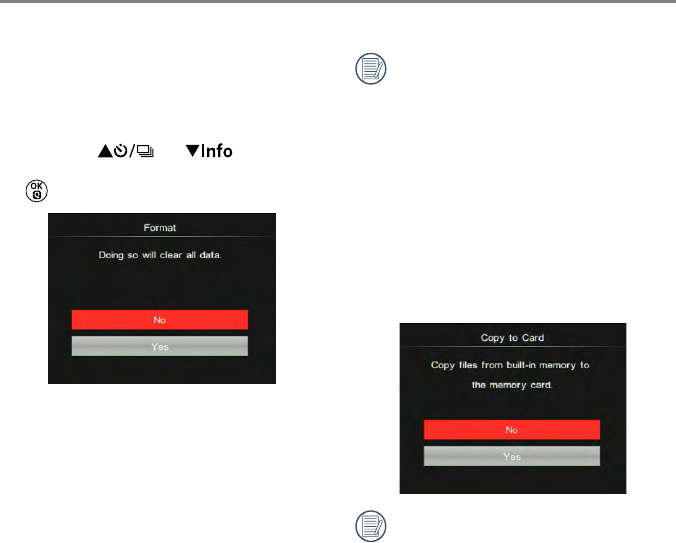
Format
Please note: formatting enables you to
delete all contents in the memory card and
built-in memory, including protected photo
and movie les.
1. Press the ] / [ ] button to
select [ Yes ] or [ No ] and then press the
button to conrm your setting.
2. If you select「Ye s」the camera formats
its memory.
Note that when you perform the Format
Memory function, it only formats the
active memory. If a memory card is
inserted, the memory card is active and
will be formatted. If there is no memory
card, the internal memory is active and
the internal memory will be formatted.
Formatting the memory card will not
automatically format the internal
memory.
Copy to Card
Use this setting to copy the les stored in the
internal memory to a memory card.
If there is no card available in the
camera, this function will not be
displayed.

88 89
File Numbering
After you complete taking pictures or videos,
the camera will automatically save them as
les and number them with serial numbers.
You may use this function to decide whether
a picture is numbered by following the
previous picture number or renumbered
and then saved in another new folder in the
memory card.
Reset Settings
Use this setting to restore the camera to its
original default settings.
90 91
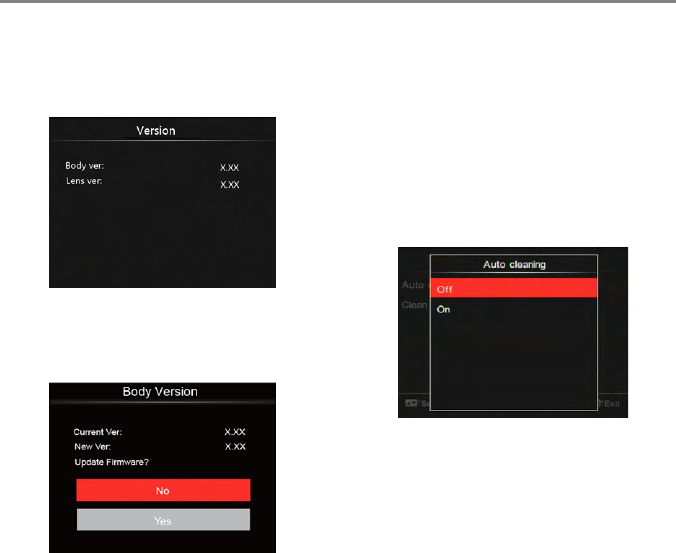
Version
You may use this option to check the
camera current FW version.
Enter Setting of camera and select FW
Version. There is a new version of FW in the
memory card for updating:
Cleaning Mode
For clearing dust and debris on the sensor
through high speed vibration.
Automatic
Press the Power button to make the camera
on after selecting 「On」and then the
camera starts automatically cleaning the
sensor.