Koden Electronics RB719A Marine Radar RA55 User Manual C10 5 2 NavMenu 1
Koden Electronics Co., Ltd Marine Radar RA55 C10 5 2 NavMenu 1
Contents
C10
44 RA51/52/53/54/55 INSTRUCTION MANUAL – 05
5.5.2 Nav (Navigation) Menu xxx = keys to press
Press the "MENU" key and select "NAV" from the four displayed menus by using the left or
right arrows on the cursor pad. The contents of the selected MENU will reveal beneath its
name when it's highlighted.
MENU Left/Right
(Select NAV)
5.5.2.1 Changing display mode (MODE)
(1) Select MODE from the pull-down display items using the up-down cursor key, and press
the "ENT" key.
(2) When the selection box is displayed beside the MODE item, select the appropriate mode
with the up-down cursor keys and press the "ENT" key.
(3) The display mode you selected will be shown at the upper-left of the screen.
UP/DOWN ENT UP/DOWN
(Select MODE) (Select HU) ENT HU (Head up)
(Select HS) ENT HS (Head set)
(Select NU) ENT NU (North up)
(Select CU) ENT CU (Course up)
(Select TM) ENT TM (True motion)
Note 1: Your radar must be connected to Heading information data source in order to use
the NU, CU and TM modes.
2: In the TM mode you will either need NMEA speed data input present or you will have
to manually input your boat's speed.
3: TM works only on PPI screen, NU is used automatically for the other screens.
4: EBL1 must be ON in order to use the HS mode.
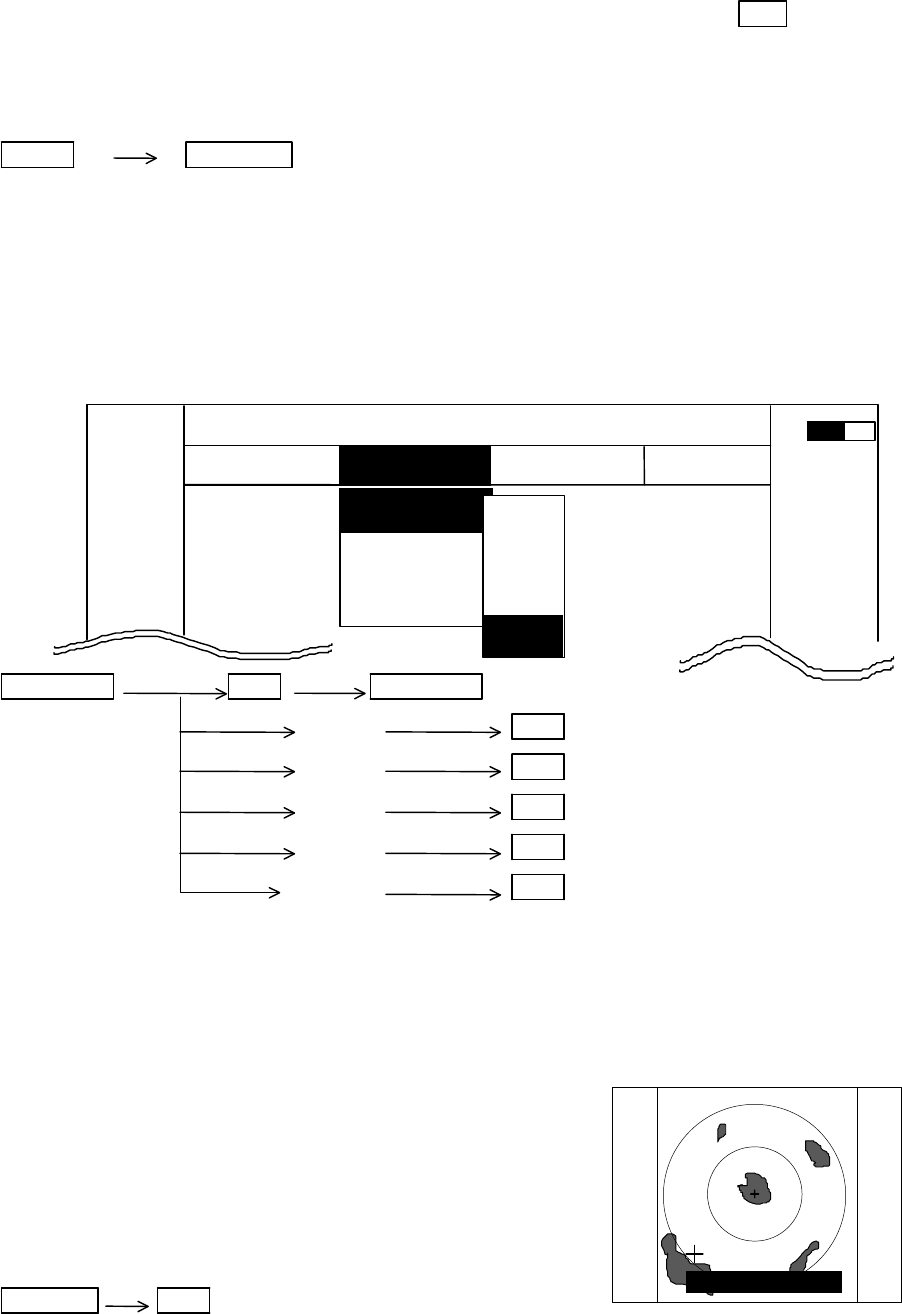
5.5.2.2 Guard Zone (GZ)
This function sets a guard zone around your boat of any
distance and any angle range, and sounds an alarm when either
echoes enter it or (IN MODE) leave it (OUT MODE). You can
also select the sensitivity level to detect echoes entering or
leaving the zone.
Setting guard zone
Up/Down ENT ---------- ON/OFF sign is displayed.
(1) Select GZ from the NAV menu and turn it on.
(2) The mode setting will be displayed on the left side of the screen as GZ IN. A small cross
cursor for setting the guard zone will show at the screen center, and "SET CENTER
POINT" is displayed at the bottom.
(3) Use the up-down and left-right cursor keys to move the cross cursor to the center of the
warning zone to be set, and press the "ENT" key.
(4) From the cross cursor position you set as the center, expand the guard zone as follows:
GZ IN
SET CENTER POINT
MARK
MODE >
GZ >
OFF-C >
SLEEP >
.75
.25
HU L
NAV ECHO SETUP
NAVIGATION
>>>
0.23NM
AT
HU
HS
NU
CU
TM
RA51/52/53/54/55 INSTRUCTION MANUAL – 05 45
(5) After setting the guard zone, press "ENT". To turn off the GZ function, use the menu or
press the "GZ" soft key.
ENT Up/Down &Left/Right ENT Up/Down &Left/Right ENT -----------------Setting completed
(Setting the center of GZ) (Setting the scope of GZ)
To turn off the alarm when it sounds, press any key except the "GZ" soft key to stop it. The
guard zone function will remain on. To select between the IN or OUT mode, Go to the Menu
and select SETUP>CUSTOM>PRESET2>GZ MODE. To adjust the level of detection, select a
GZ LVL or 1 through 7 on the same menu screen.
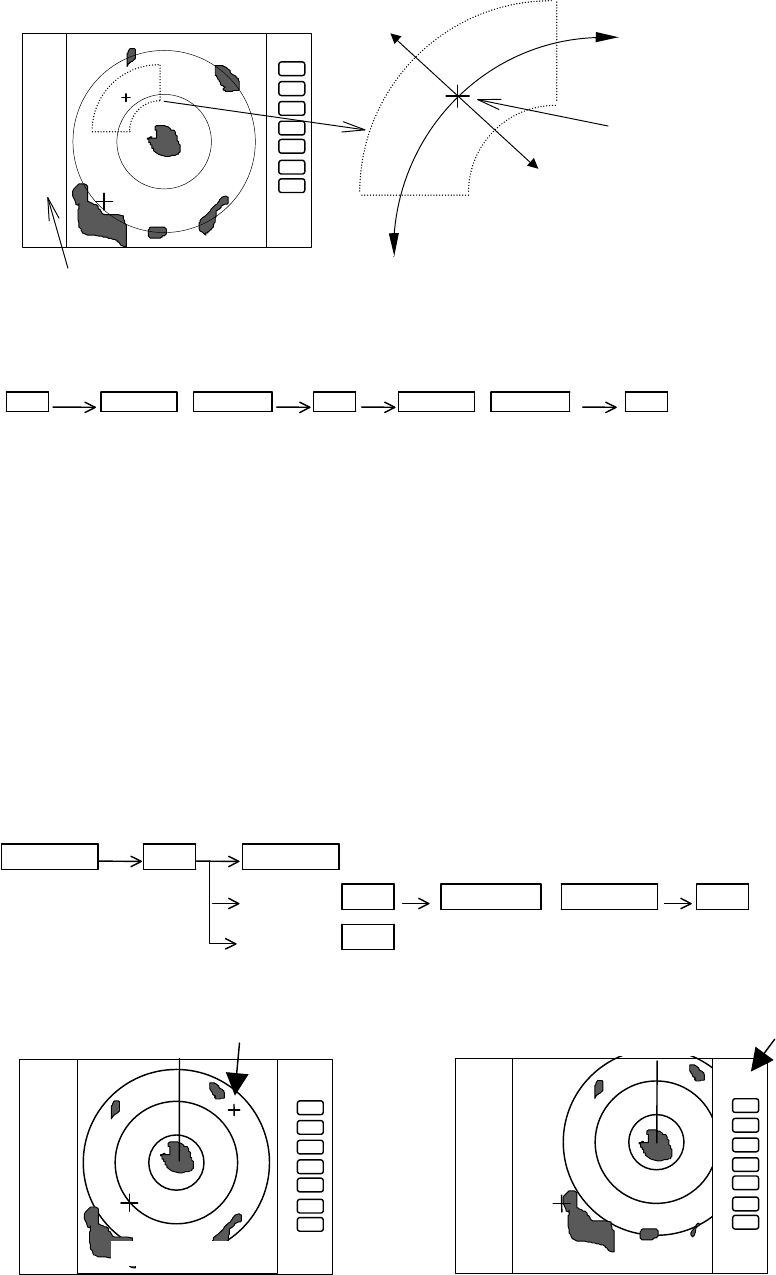
5.5.2.3 Off centering the screen display (OFF-C)
This function allows you to position the cross cursor at the boat's location off center to any point
on the screen.
(1) Select OFF-C from the NAV menu and turn it on.
(2) OFF-C is displayed in the upper right corner and "SET OFF CENTER POINT" appears at
the bottom of the screen. Move the cross cursor with the cursor pad to the intended
location, and press the "ENT" key. Your boat's location will now be displayed at the
cursor's location.
(3) To cancel the OFF-C function, use the menu or press the "OFF-C" soft key.
Up/Down ENT Up/Down
(Select OFF-C) (Select ON) ENT Left/Right &Up/Down ENT ---- Set OFF-C
(Select OFF) ENT ----------------------------------------------------Cancel OFF-C
Note : FL VRM2 and FL EBL2 start point do not follow the OFF-C function. They are fixed to the set point on the
screen.
5.5.2.4 Setting of the SLEEP function (SLEEP)
The SLEEP function allows you to initiate a 30-second transmission at predetermined intervals,
then allow the radar to go into standby mode and make the display go dark to conserve power.
You can set the "SLEEP" function for a 5-, 10- or 15-minute interval. Two minutes before a
specified transmission time, the screen backlighting turns on and the warm-up timer starts.
With this point as the center, the guard
zone depth and angle can be changed
with the cursor keys
Expand the
zone angle with the right
cursor key. Use the left cursor key to
make the zone smaller.
Expand the depth from the center with the up cursor
key. Use the down cursor key to decrease the depth.
The mode (IN or OUT) is displayed when GZ is ON.
GZ IN
.75
.25
HU
.75
.25
HU
SET OFF-C POINT
OFF-C
Move the cross cursor
Indicates "OFF
-
C" state is entered
46 RA51/52/53/54/55 INSTRUCTION MANUAL – 05
The transmitter will then run for 30 seconds and shut down. The sequence repeats continually
until you override it by pressing any key on the keypad.
To turn on the SLEEP function go to the NAV menu, select SLEEP, then select the time
interval.
Up/Down ENT Up/Down (Select OFF) ENT -------------------------SLEEP function is turned OFF
(Select SLEEP) (Select 5min.) ENT POWER -------30-second-transmission every 5 min.
(Select 10min.) ENT POWER -------30-second-transmission every 10 min.
(Select 15min.) ENT POWER -------30-second-transmission every 15 min.
Transmission
Setting completed
Action after setting
SLEEP setting (5min.) (Operation)
↓
↑(Under Tx) ↑ (Under power-saving mode) ↑ (2min. timer in use) ↑(Under Tx) ↑ (Under power-saving mode)
0 sec. 30 sec. 3 min. 5min. 5and a half min. (Time used)
TX Start TX OFF Backlight ON Tx Start TxOFF (Action)
Countdown start
What happens if a key is pressed after a SLEEP mode setting?
a) If a key is pressed during the power-saving mode, the SLEEP function is canceled and the
2-minute timer starts.
b) If a key is pressed while the 2-minute timer is in use, or during transmission, the SLEEP
function is canceled.
What happens if a key is pressed during the SLEEP mode?
a) If you press a key during the power-saving mode, the SLEEP function will be canceled and
the 2-minute timer starts.
b) If you press a key while the 2-minute timer is in active, or during transmission, the SLEEP
function will be canceled.
5.5.2.5 Activating Automatic Tracking Aid (ATA)
This function allows you to automatically track up to ten
targets and determine their distance and bearing. You can
also set an alarm to sound if any are on a collision course
with your boat. It can only be used in the PPI or ALL PPI
mode. If ATA is turned on and you switch to another mode,
target tracking will continue, but you will not see ATA
symbols or data on screen.
Before using ATA, you must set its parameters. They are found in the MENU under
SETUP>CUSTOM>ATA PRESET.
(1) Set the CPA to the closest point of approach you want to be before the alarm sounds.
(2) Set the TCPA to the minimum time to collision you want before the alarm sounds.
(3) Set the time length of the vector showing the target's course.
(4) Select between a relative or true vector.
(5) Turn the ATA function on or off.
To activate the ATA function, once parameters are set:
(1) Select a target to track by placing the cursor directly on it.
(2) Under the NAV menu, select ACQ and press "ENT". The target will be identified by a
number from 0 through 9 and a vector showing its course will appear on screen.
(3) If you want CPA and TCPA data displayed on screen, select "ON" from the "DATA" menu
item.
(4) If you have several targets displayed and you would like to track, select a vacant number
with “TGT NUM” function. The number using is displayed upper right on the screen. Select
"TGT NUM" from the Menu then press "ENT". Reverse character of the target number will
move to next position. Then, repeat from (1) to (4).
(5) To discontinue tracking a target, select the target number with “TGT NUM” function, then
select "DEL" from the menu. To discontinue tracking all targets, select "ALL DEL".
Setting Initial Value
CPA SET 3.0 NM
TCPA SET 3 MIN
VECT SET 6 MIN
VECT MODE TRUE
ATA ON