Koden Electronics RB719A Marine Radar RA55 User Manual C8 4SoftKey 2
Koden Electronics Co., Ltd Marine Radar RA55 C8 4SoftKey 2
Contents
C8
RA51/52/53/54/55 INSTRUCTION MANUAL – 05 31
5.4 Soft Key Functions ________________________________________
xxx = Keys to press
Various functions are assigned to keys numbered "1" through "7". There can be a total of 4 sets of
functions assigned to them. Switching among the sets is done by pressing the "NEXT" soft key.
Soft keys can be assigned any function you like by accessing the "KEY ASSIGNMENT" function
in the "CUSTOM" menu of the "SETUP".
5.4.1 Bearing measurement (EBL1)
When the "EBL1" key is pressed, a dotted electronic bearing line (EBL1) appears from the center
to the top of the screen. Initially it overlays the boat's heading line. By rotating the control knob,
you can change the bearing of this line. The angle from the boat's heading will appear in a
highlighted display at the lower left of the screen. Press the "EBL1" key again to make the line
disappear.
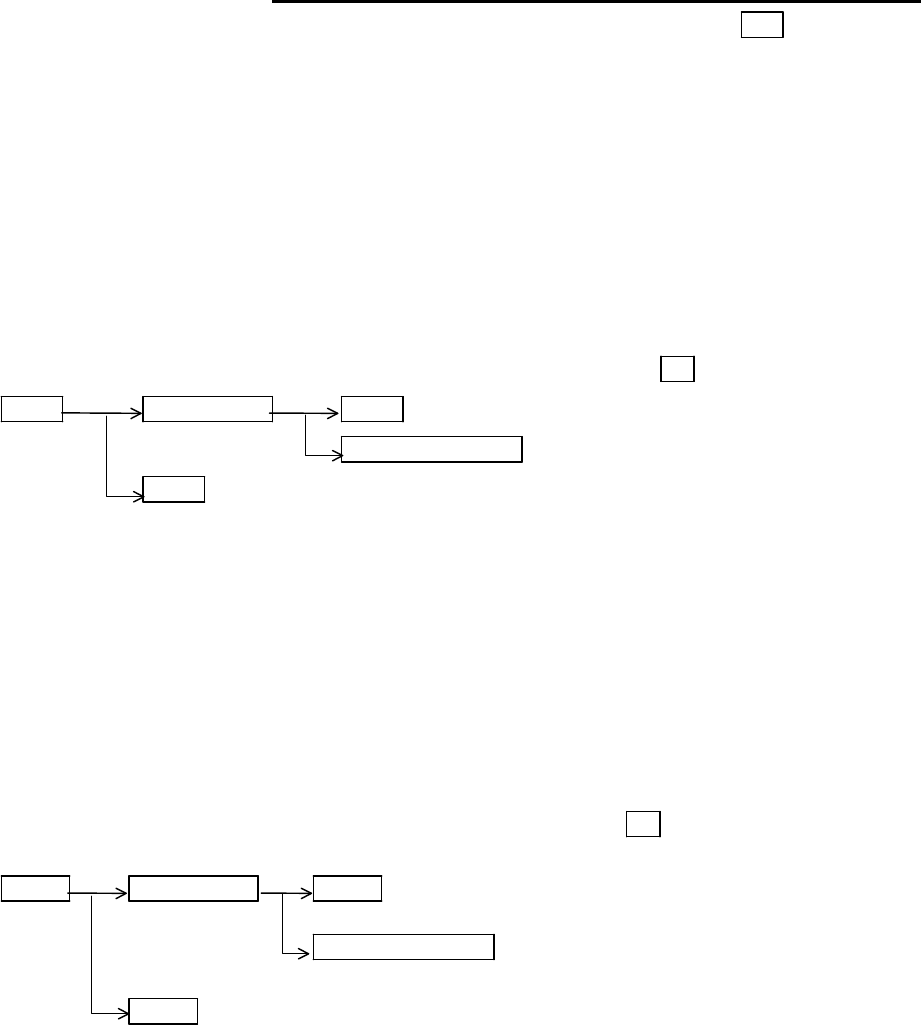
Note: 1 xxx.x o indicates EBL1.
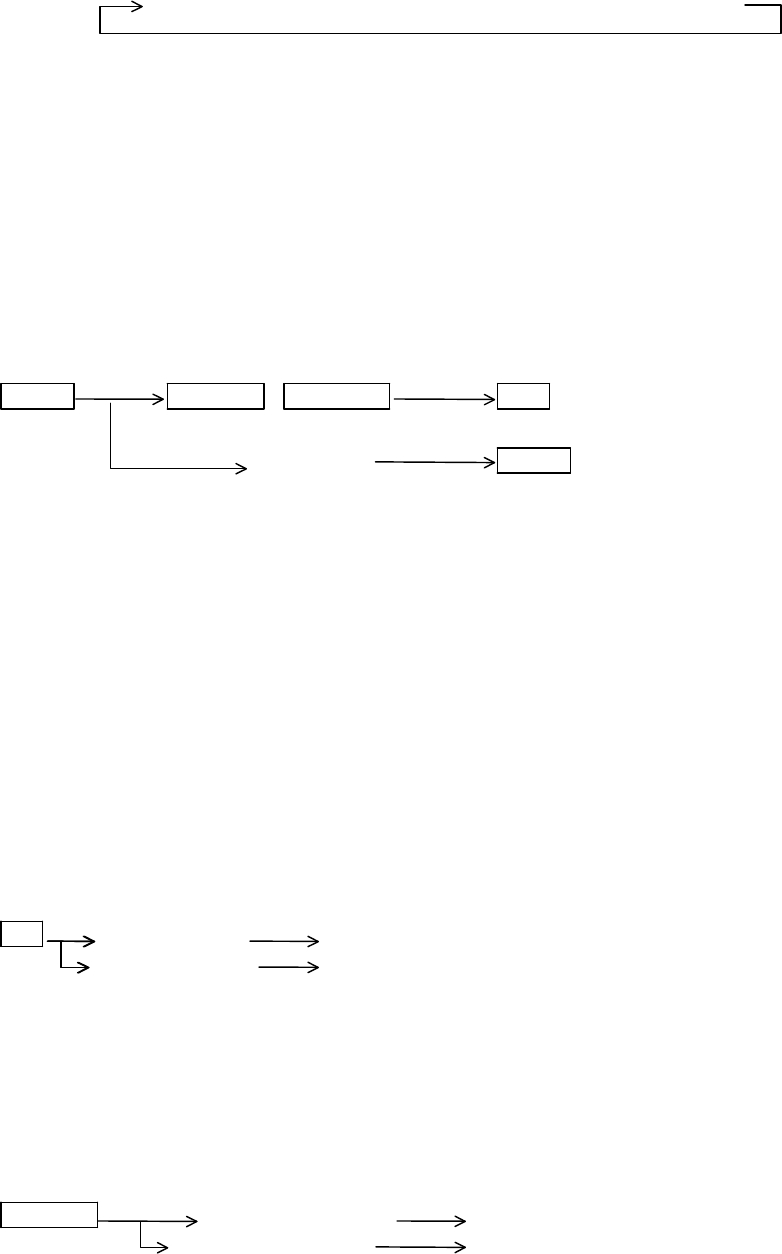
EBL1 Control knob EBL1 EBL1 is displayed and the process is finished.
Other function key EBL1 is displayed and the function is shifted.
EBL1 EBL1 is turned off.
5.4.2 Bearing measurement (EBL2)
Your radar is equipped with two electronic bearing lines. Press the "EBL2" soft key to display the
second one. The EBL2 angle will appear in a highlighted display at the lower right of the screen.
5.4.3 Distance measurement (VRM1)
When the "VRM1" key is pressed, a variable range marker (VRM1) appears as a dotted-line
circle.
You can adjust the distance of this line from your boat's position by rotating the control knob.
This distance is displayed in reverse characters at the lower left of the screen.
Note: 1 xxx.x NM indicates VRM1.
VRM1 Control knob VRM1 The VRM1 distance is displayed and the VRM operation
is ineffective.
Other function key VRM1 is displayed and the effective function shifts to
other function.
VRM1 VRM1 is turned off.
5.4.4 Distance measurement (VRM2)
A second variable range marker is also available when you press the "VRM2" soft key. The VRM2
distance will appear in a reverse display at the lower right of the screen.
5.4.5 Measuring the angle between two points (FL EBL2)
The angle relative to your boat's heading between two points anywhere on the screen can be
measured using the floating electronic bearing line or "FL EBL2" soft key. When you press the
key,
“SET START POINT” is displayed at the bottom of the screen and a small cross mark appears.
Use the cursor pad to position the cross mark on one of the echoes, and then press "ENT". Press
"EBL2", then rotate the control knob until the electronic bearing line is centered on the second
echo. The angle of a line between the two objects relative to your boat's heading will be displayed
32 RA51/52/53/54/55 INSTRUCTION MANUAL – 05
in the lower right corner of the screen. If you want to keep the floating electronic bearing line you
have just created, presses "ENT", otherwise, press "EBL2" and it will disappear.
5.4.6 Measuring the distance between two points (FL VRM2)
You can measure the distance between any two points on the screen by using the floating
variable range marker or "FL VRM2" soft key. When you press the key, “SET START POINT” is
displayed at the bottom of the screen and a small cross mark appears. Use the cursor pad to
position the cross mark on one of the echoes, and then press "ENT". Press "VRM2", then rotate
the control knob until the electronic bearing line is centered on the second echo. The distance
between the two objects will be displayed in the lower right corner of the screen. If you want to
keep the floating variable range marker you have just created, presses "ENT", otherwise, press
"VRM2" and it will disappear.
5.4.7 Changing the Soft Key function grouping (NEXT)
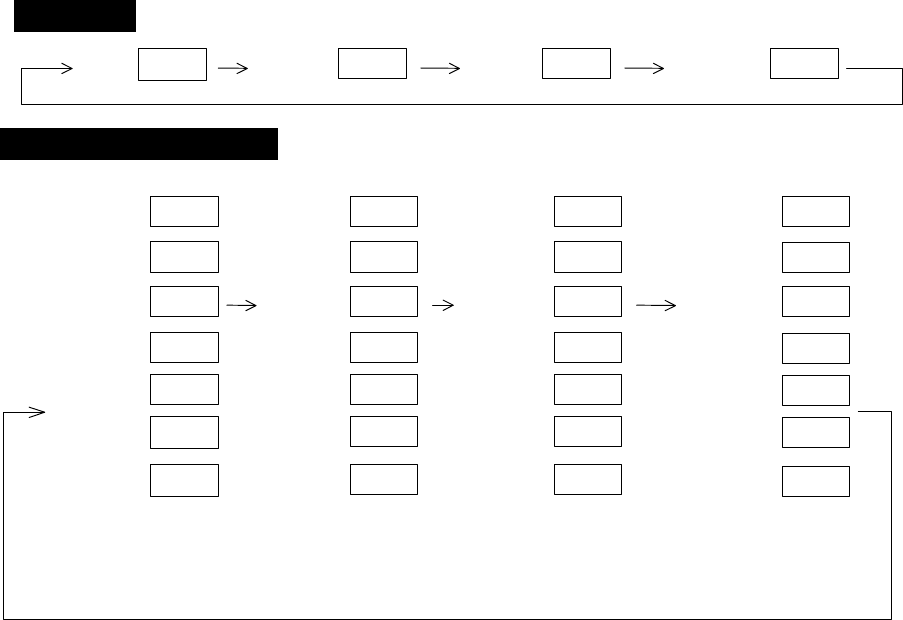
The soft key functions are pre-assigned to default values in four groups, as indicated below.
These groups can be accessed by pressing the “NEXT” soft key. The “NEXT” key is assigned to
the bottom, or #7, soft key.
The soft keys may be re-assigned functions as per the requirements of the operator, thus allowing
quick access to functions not provided in the default setup. This is accomplished through the
“SETUP” menu, by selecting “CUSTOM” and then “KEY ASSIGN”.
Operation_
_Soft Key Setting Example_
SET1 SET2 SET3 SET4
The function can be changed at the "KEY ASSIGNMENT" function in the "CUSTOM" menu of the "SETUP".
1
3
4
5
2
1
3
4
5
2
1
3
4
5
2
6 6
6
EBL1
VAR RNG
TRACK
TARGET
VRM1
EBL2
FL EBL2
FL VRM2
GZ
VRM2
DATA
ZOOM
DEL
SEL WIN
OFF-C
PICTURE
7
7
7
NEXT
NEXT
NEXT
1
3
4
5
2
6
PPI
PPI/PPI
PPI/NAV
ALL PPI
PPI/3D
ALL PPI2
7
NEXT
7
7
7
NEXT
NEXT
NEXT
7
NEXT
ALL DEL
TRACK
RA51/52/53/54/55 INSTRUCTION MANUAL – 05 33
5.4.8 Temporarily erasing heading marker (HDG OFF)
The heading marker is temporarily removed from the screen by holding down the “HDG OFF”
key.
5.4.9 Using parallel cursors (///CSR)
Press the “///CSR” key and parallel cursors will appear on the screen. As you move the EBL, the
parallel cursors also move. To cancel the function, press "///CSR" key once more.
5.4.10 Establishment of the indication of the RANGE RINGS (RINGS)
Press the “RINGS” key to make range rings appear on the screen. Press again to remove them.
5.4.11 Variable range function (VAR RNG)
The "RANGE UP" and "RANGE DOWN" keys change the range of the radar in steps, but this can
be done in a continuously variable mode by using "VAR RNG". When you press the key, VAR will
be displayed at the upper left of the screen (beside MODE). Pressing the up and down cursor
arrows changes the display. To exit this function, press "VAR RNG" again.
5.4.12 Changing display modes (MODE)
Pressing the "MODE" key will step you through the various screen display modes: heads up (HU),
heading set (HS), North up (NU), course up (CU), and true motion (TM). Heading data from a
compass is needed for NU, CU and TM to function. TM is only displayed on a PPI screen. The
mode will automatically change to NU on other screens.
5.4.13 Guard Zone (GZ)
A guard zone can be created around your boat at any distance and any angle range. Whenever
another vessel enters the zone, an alarm sounds. This is called the IN MODE. You can also set an
OUT MODE that monitors when a target leaves the guard zone. The guard zone is set using the
"GZ" soft key. IN MODE or OUT MODE must be selected via the "MENU" key under the "NAV"
heading.
To set a guard zone, press the "GZ" soft key. Set a center point for the zone by moving the cross
with the cursor pad, then press "ENT". Next set the area with the cursor pad and press "ENT"
again. The guard zone will remain in effect until you press the "GZ" key twice. While a guard
zone is on, the text "GZ IN" will appear at the left of the screen.
When the alarm sounds, press either the "MENU" or "ENT" key to turn it off. Select between the
IN MODE and OUT MODE by pressing "MENU", then selecting SETUP>CUSTOM>PRESET2.
The volume level of the alarm can also be set in the same place.
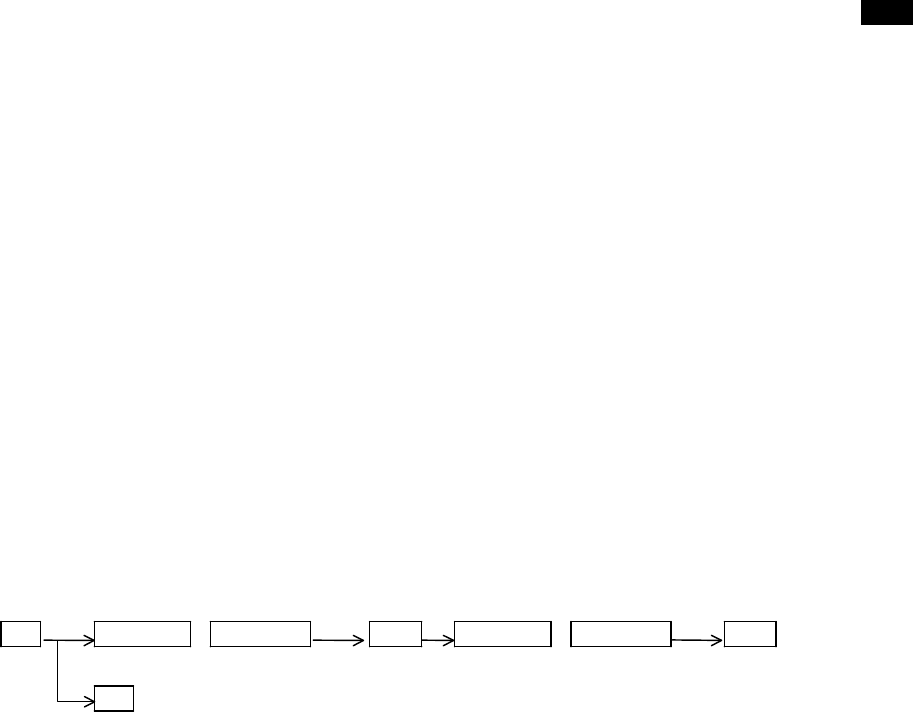
GZ Up/Down &Left/Right ENT Up/Down &Left/Right ENT Setting completed
(Setting the center of GZ) (Setting the scope of GZ)
GZ ------------------------------------------------------------------------------------------- Canceling GZ
5.4.14 Off Center (OFF-C)
You can set the screen display so that it just shows what's directly in front of your boat while
underway, or it only displays a portion of the entire scanner sweep in any direction. Press the
"OFF-C" soft key and use the cursor pad to set an off-center point on the screen for the boat's
location. Press "ENT" and your boat's location will now be moved to the new cursor position. The
text "OFF-C" will be displayed at the upper right of the screen. To cancel the off-center function,
press "OFF-C" again.
Note: *VRM2 and EBL2 start point do not follow the OFF-C function during a floating state. VRM2
and EBL2 functions will work in the OFF-C mode.
34 RA51/52/53/54/55 INSTRUCTION MANUAL – 05
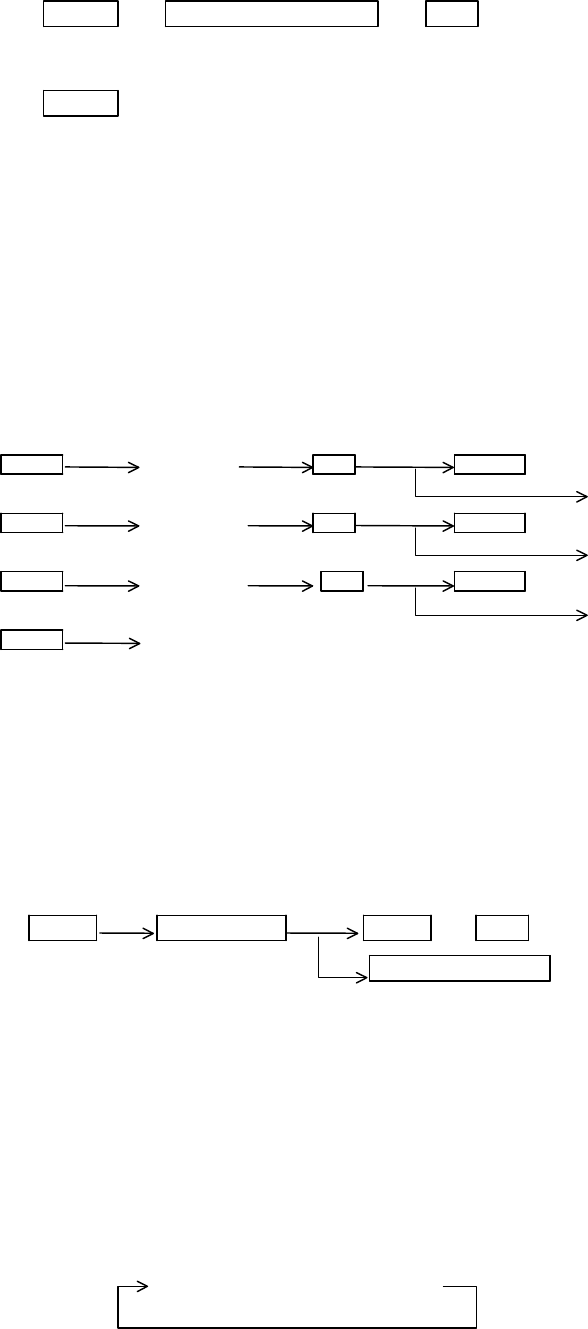
To set off-centering point, press relevant keys as follows:
OFF-C→Up/Down & Left/Right →ENT Fixes the off-centering point and exit the off-centering state.
To cancel the OFF-C function, press the OFF-C key again.
OFF-C The "OFF-C" display at the upper right disappears and function returns to the ordinary state from the Off
Center state.
5.4.15 Setting the SLEEP mode (SLEEP)
The SLEEP mode allows you to initiate a 30-second transmission at predetermined intervals,
then allow the radar to go into standby mode and the display will go dark to conserve power.
Press the "SLEEP" soft key once for a 5-minute interval, twice for a 10-minute interval, or three
times for a 15-minute interval. Pressing the key a fourth time will exit the sleep mode. Two
minutes before a specified transmission time, the screen backlighting turns on and the warm-up
timer starts. The transmitter will then run for 30 seconds and shut down. The sequence repeats
continually until you override it by pressing any key on the keypad.
Setting procedure
SLEEP (Select 5min.) ENT POWER 30-second-transmission every 5 min.
Transmission ON
SLEEP (Select 10min.) ENT POWER 30-second-transmission every 10 min.
Transmission ON
SLEEP (Select 15min.) ENT POWER 30-second-transmission every 15 min.
Transmission ON
SLEEP (Select OFF)------------------------------------------------------------------ SLEEP function is turned OFF
Setting completed
5.4.16 Tuning adjustment (TUNE)
(1) When the "TUNE" soft key is pressed, the TUNE display on the upper right side of the
screen will be highlighted.
(2) Turn the control knob to adjust the tuning to the desired level. The display will move in a
range of 0 and 99.
(3) When you are through, press the "ENT" key to exit. Pressing any other key will also exit and
move you to that function.
TUNE Control knob TUNE or ENT --------The adjustment state is ended.
(Tuning adjustment) Other function key -----Shift to other functions
Note: Use the "MENU" to return auto-tuning state.
5.4.17 Echo expansion (ST)
When the "ST" key is pressed, "ST1" is displayed in the middle left side of the screen and the echo
expansion function is turned on. This changes the target image by showing echoes expanding in
the direction away from the boat, thereby making smaller ones easier to see. Two levels of echo
expansion are available. Press the "ST" key repeatedly to alternate between them and to turn off
the function.
Note: Refer to "5.5.3.5 Echo expansion (ST)".
ST1 → ST2 → OFF
(Expansion rate ST1 < ST2 )
RA51/52/53/54/55 INSTRUCTION MANUAL – 05 35
5.4.18 Displaying track of targets (TRACK)
When the "TRACK" key is pressed, "TK 15SEC" is displayed on the left side of the screen and
track mode is entered. Use this function to determine the direction another boat or ship is moving
relative to your boat's course. The display characters indicate the length of the track, in this case,
where the other boat has been during the past 15 seconds.
Note: Refer to "5.5.3.6 Displaying track of targets (TRACK)".
Every time this key is pressed, the course length increases as follows:
15 sec → 30 sec → 1 min → 3 min → 6 min → CONT → OFF
Note: The "OFF" state will not be displayed on the screen and the "TK xx " display will
disappear.
5.4.19 Enlarging a selected area (ZOOM)
This function lets you double the video image centering around an adjustable point on the screen.
Press the "ZOOM" key. A small cross cursor for setting appears the center of the screen and "SET
ZOOM POINT" is displayed at the bottom. Use the cursor pad to move the cross cursor to the
point to be magnified, and press the "ENT" key. The area around the cross cursor is displayed in
2x magnification, and a blinking "ZM" is displayed at the upper right of the screen. To cancel the
ZOOM function, press the "ZOOM" key again or change the range scale.
Note: Refer to "5.5.3.7 Enlarging a selected area (ZOOM)".
ZOOM Up/Down &Left/Right ENT ------------------------ ZOOM setting
(Move cross cursor)
(Select OFF) ZOOM ---------------------- ZOOM canceled
Note 1: *VRM2 and EBL2 start point do not follow the OFF-C function during a floating state. VRM2
and EBL2 functions will work in the OFF-C mode.
2: Normal screen returns when you change the range scale.
3: ZOOM function is unusable in 3D/PPI screen.
4: ZOOM function is unusable in OFF-C.
5: Center of ZOOM can be set to any desired position within the set range.
5.4.20 Increasing transmitter average power (S/L)
The pulse width is automatically changed as you change the range. However, if you want to
increase sensitivity, you can choose sensitivity from two pulse lengths. The short pulse (SHORT)
gives you sharp images with high distance resolution. The long pulse (LONG) provides higher
average transmit power and shows targets in large size for easy identification, although distance
resolution is reduced.
Press the "S/L" key to select the Pulse length (LONG or SHORT). The pulse length changes L
(Long) and S (Short) alternately.
Note: Refer to "5.5.3.8 Increasing transmitter average power(S/L)".
S/L (Select SHORT) Set to short pulse
or (Select LONG) Set to long pulse
5.4.21 Switching the screen (SEL WIN)
When in the PPI+PPI 2-screen mode, press the "SEL WIN" key to switch between screens. The
range numbers at the upper edge of the active screen will be highlighted. Any function keys you
press will affect that screen only. If you turn on the VRM1, VRM2, EBL1 or EBL2 function on one
screen, it will stay on in the other screen when you press "SEL WIN".
Note: Refer to "5.5.4.2 Switching screens on PPI/PPI screen ( SEL WIN )".
SEL WIN (Select right screen) Right screen activated
or (Select left screen) Left screen activated
36 RA51/52/53/54/55 INSTRUCTION MANUAL – 05
5.4.22 Reversing the screen (PICTURE)
The LCD display readability is affected by ambient light conditions. In some cases, specifically at
night, you may find the display is easier to view when the entire screen is reversed. Press the
"PICTURE " key to change it. The color of the screen will be changed on color model.
Note: Refer to "5.5.4.3 Reversing the screen (PICTURE)".
5.4.23 Change to PPI screen ( PPI )
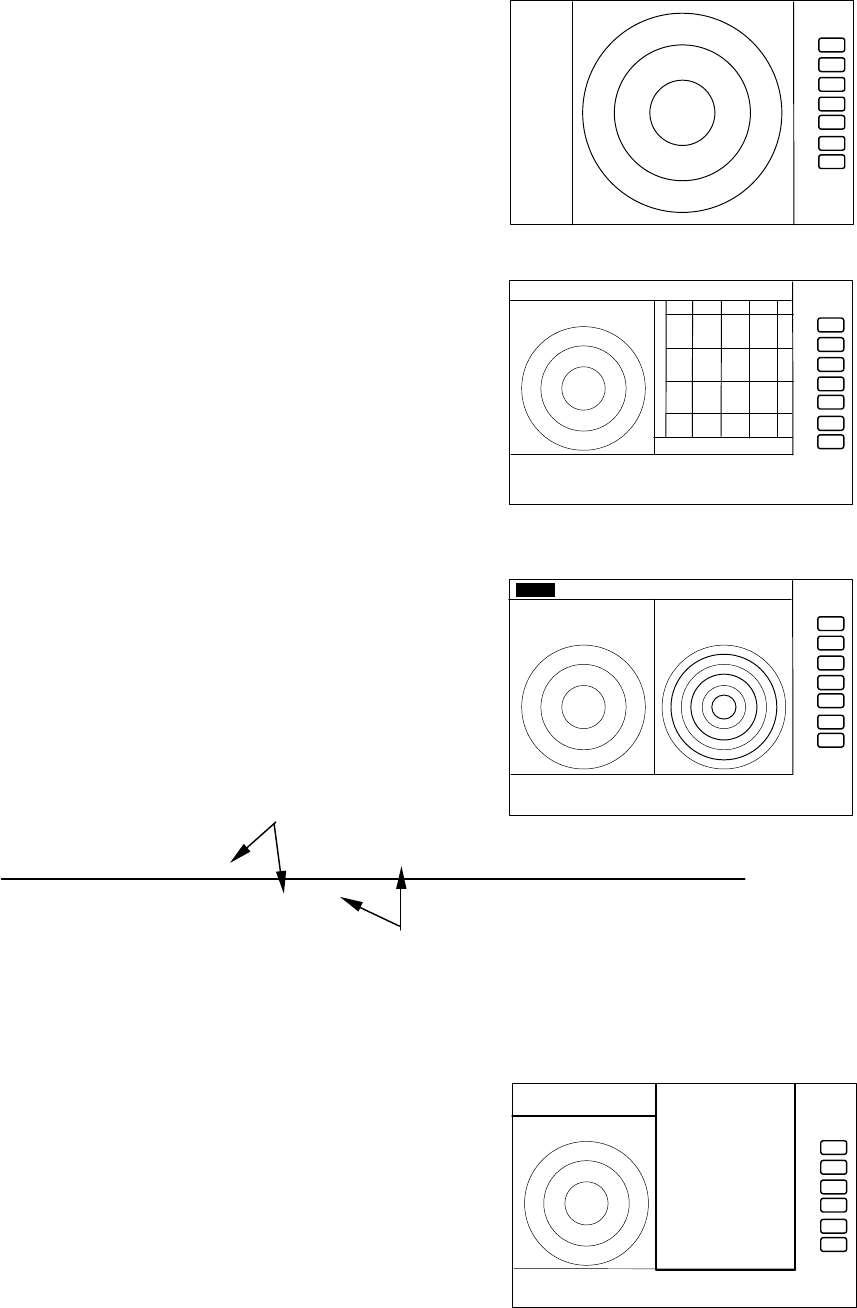
Press the "PPI" soft key, and the screen will change to a
single PPI screen. All of the radar's functions will work
normally in this mode.
5.4.24 Change to SEMI3D/PPI screen ( SEMI3D )
Press the "SEMI3D" soft key. The screen will split between
the SEMI3D view and a PPI screen. All controls, such as
EBLs, VRMs, affect both screens. The ZOOM, OFF-C, FL
EBL2, and FL VRM2 cannot be used in this mode. The
SEMI3D screen always displays the boat's heading at its
center.
5.4.25 Change to PPI/PPI screen ( PPI/PPI )
Press the "PPI/PPI" soft key and the screen will split
between two identical PPI screens. You can use this mode to
view targets at two different range settings. The range
numbers of the currently selected window will be highlighted.
Each radar image is refreshed sequentially over time,
alternating between the two.
LEFT screen /---------/********/---------/********/---------/******** time→
RIGHT screen ********/---------/********/---------/********/---------/
The ZOOM, OFF-C, FL EBL2, and FL VRM2 functions cannot be used in the PPI/PPI mode. The
range, GAIN, STC, FTC and GZ controls, however, can be set independently for each selected
window. Press "SEL WIN" to move between them. Any functions using the cross cursor can only
be controlled on the selected window.
5.4.26 Change to PPI/NAV screen ( PPI/NAV )
Press the "PPI/NAV" key and the screen will split between a
PPI window and a navigation data window. The ZOOM,
OFF-C, FL EBL2, and FL VRM2 functions cannot be used in
this mode.
Refreshing radar picture
Holding previous picture
. 75
.25
HU
+
PPI screen
.75
.25 HU S
24
6
+
G 55/35
S 35/AT
F 35/AT
PPI/PPI screen
.75
.25 HU S
+
280 320 000 040 080
SEMI3D/PPI screen
.75
.25 HU s
+
PPI/NAV screen
NAV DISPLAY
WAY P 123.4°
6.8NM
COURSE 2.38NM
XTE <<<<
HDG 267.3°T
SPD 12.8KT
TEMP 20.8°C
DEPTH 58.3M
LAT/LON
34° 08. 22N
138° 02. 53E
RA51/52/53/54/55 INSTRUCTION MANUAL – 05 37
5.4.27 Change to ALL PPI screen ( ALL PPI )
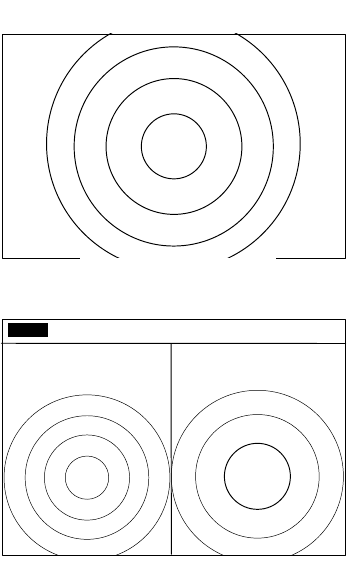
Press the "ALL PPI" key and all data elements and soft keys
will disappear from the screen, displaying a full-frame radar
image. The range, ring interval and display mode are shown
in the upper left corner. The only controls that have any
effect in this mode are the "RANGE UP", "RANGE DOWN",
"MENU" and POWER buttons, along with the cursor pad.
Pressing any other keys will exit ALL PPI and return the
display to the normal PPI screen mode.
5.4.28 Change to ALL PPI/PPI screen ( ALL PPI2 )
When you press the "ALL PPI2" key, all data elements and
soft keys will disappear from the screen, and two identical
PPI windows will appear side-by-side. The range, rings
interval, display mode are displayed on the upper left of each
window. The only controls that have any effect in this mode
are the "RANGE UP", "RANGE DOWN", "MENU" and
POWER buttons, along with the cursor pad. Pressing any
other keys will exit ALL PPI2 and return the display to the
normal PPI/PPI screen mode. The radar pictures are
refreshed with separate, alternating scanning intervals for
each screen. The right screen picture is frozen during the
refresh period for the left screen, and vice versa. We
recommend when cruising at higher speeds to use a single
PPI screen for continuous image refreshing.
.75
.25 HU S
.25 .
125
+
ALL PPI/PPI screen
.75
.25
HU
+
ALL PPI screen