Yaesu Musen 20345X40 AMATEUR RADIO WITH SCANNING RECEIVER User Manual OM
Yaesu Musen Co., Ltd. AMATEUR RADIO WITH SCANNING RECEIVER OM
Contents
- 1. User Manual
- 2. User Manual 1
- 3. User Manual 2
- 4. User Manual 3
- 5. User Manual 4
- 6. User Manual 5
- 7. User Manual 6
- 8. User Manual 7
- 9. User Manual 8
- 10. User Manual 9
- 11. User Manual 10
- 12. User Manual 11
- 13. User Manual 12
- 14. User Manual 13
- 15. User Manual 14
- 16. User Manual 15
- 17. User Manual 16
- 18. User Manual 17
- 19. User Manual 18
- 20. User Manual 19
- 21. User Manual 20
- 22. User Manual 21
User Manual 7
70
Using the Memory
UsingtheMemory
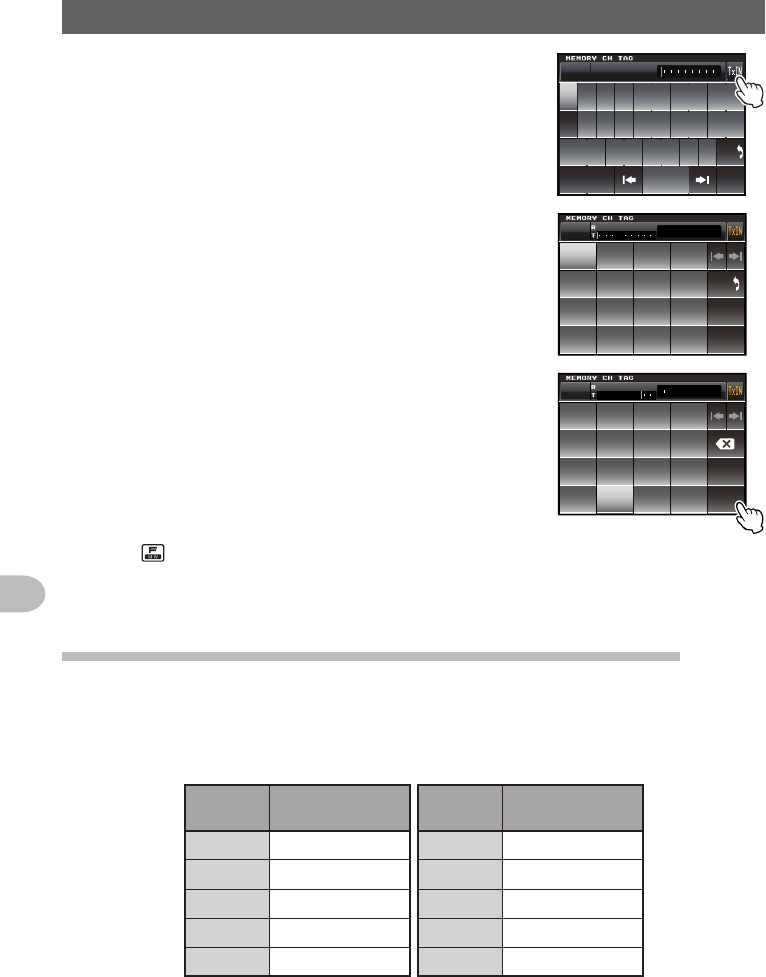
4 Touch [TXIN]
The number input screen will be displayed.
39'46;7+12
#5&()*,-.
<:%8$0/
#$% 5RCEG
%CRU
'06
@
ᲹᲺ
$#%-
ᲺᲹ ᲹᲽᲸᲾᲸᲸ
5 Enter the transmit frequency
The entered frequency will be displayed on the right
side of [T] at the top of the screen.
ᲹᲺ
ᲽᲾ
Ჿ᳀᳁
᳂
#
$
%
&
5RCEG
'06
$#%-
ᲺᲸᲸ
Ჹ ᲹᲽᲸᲾ
6 Touch [ENT]
The display will return to the memory list.
ᲹᲺ
ᲽᲾ
Ჿ᳀᳁
᳂
#
$
%
&
5RCEG
'06
ᲸᲾ
ᲹᲽᲸᲾ
ᲺᲸᲸ
Ჹ ᲹᲽ
7 Press to save the transmit frequency
When memory writing is complete, the receive frequency will be shown in the
display.
ReceivingWeatherBroadcastChannels(USAversiononly)
This radio includes the preprogrammed VHF Weather Broadcast Station Memory
Channel Bank, and can receive the broadcast or the weather alert by recalling or
scanning a desired channel.
The following channels are stored in the weather station memory bank of this radio.
Channel
No.
Frequency Channel
No.
Frequency
WX01 162.550 MHz WX06 162.500 MHz
WX02 162.400 MHz WX07 162.525 MHz
WX03 162.475 MHz WX08 161.650 MHz
WX04 162.425 MHz WX09 161.775 MHz
WX05 162.450 MHz WX10 163.275 MHz
This “WX” function can only be used through the programmable keys [P1] to [P4] on the
microphone.
Application for FCC / IC
FCC ID: K6620345X40 / IC: 511B-20345X40

71
Using the Memory
UsingtheMemory
Assigningthe“WX”functiontoaprogrammablekeyonthemicrophone
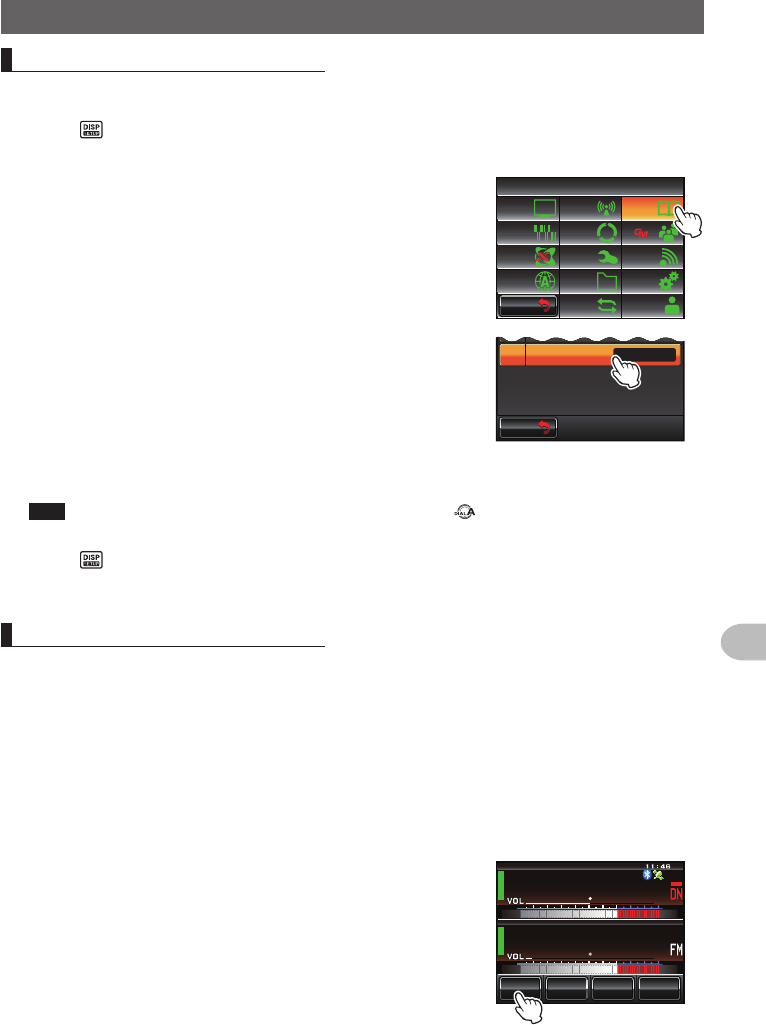
1 Press for one second or longer
The set-up menu will be displayed.
2 Select and touch [CONFIG]
The menu list will be displayed.
3 Select and touch [10MICPROGRAMKEY]
The setting screen for programmable keys on the microphone will be displayed.
4 Touch the key name (P1 to P4) where the WX function is going to be assigned
The functions that can be assigned will be displayed.
When the [WX] is not displayed, turn to scroll the display.
5 Select and touch [WX]
6 Touch [BACK]
The display will return to the setting screen for programmable keys.
Recallingtheweatherchannels
Example:When“WX”isassignedto[P1]
1 Press [P1] on the microphone
The WX function is activated, and the weather channel selected last time the WX
function was activated will be displayed on the screen.
2 Turn to select the other channels
3 Press the [PTT] button on the microphone to search for louder stations
Scanning of the channels stored in the weather station memory bank will start.
When the scanning pauses on a station, press the [PTT] button once to halt the
scan, or press it twice to restart the scan.
4 Press the [PTT] button to finish the scan
5 Press [P1]
The WX function will be inactivated and the display will return to the previous screen.
Listeningtheweather alert
In the event of extreme weather disturbances, such as storms and hurricanes, the
NOAA (National Oceanic and Atmospheric Administration) sends a weather alert
accompanied by a 1050 Hz tone and subsequent weather report on one of the
NOAA weather channels. You may disable to receive the weather alert tone using
[SIGNALING]→[9WXALERT] in the set-up menu.
Application for FCC / IC
FCC ID: K6620345X40 / IC: 511B-20345X40
72
Scanning
Scanning
SignalSearch
The FTM-400XDR/DE transceiver is equipped with a scanning function to search for
memory channels and VFO frequencies for active signals.
Scanning can be performed using the following four methods:
VFO scan
Scan for all memory channels
Scan for specified memory channels
Scanning the programmable memories
Tip
The band scope function can be used to search for active channels and show a graph.
When [SCOPE] in the screen is touched, the strengths of the channels will be displayed in a graph,
with the current frequency located in the center of the screen ( P.47).
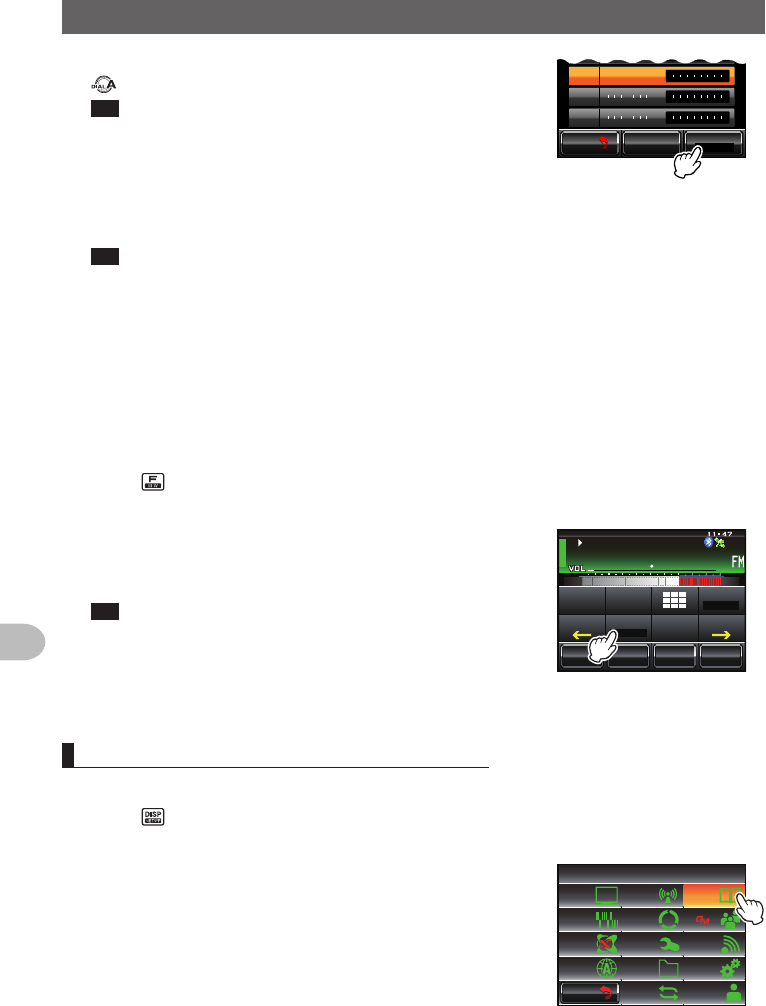
VFOscan
1 Select the band to be scanned, and switch to the VFO mode
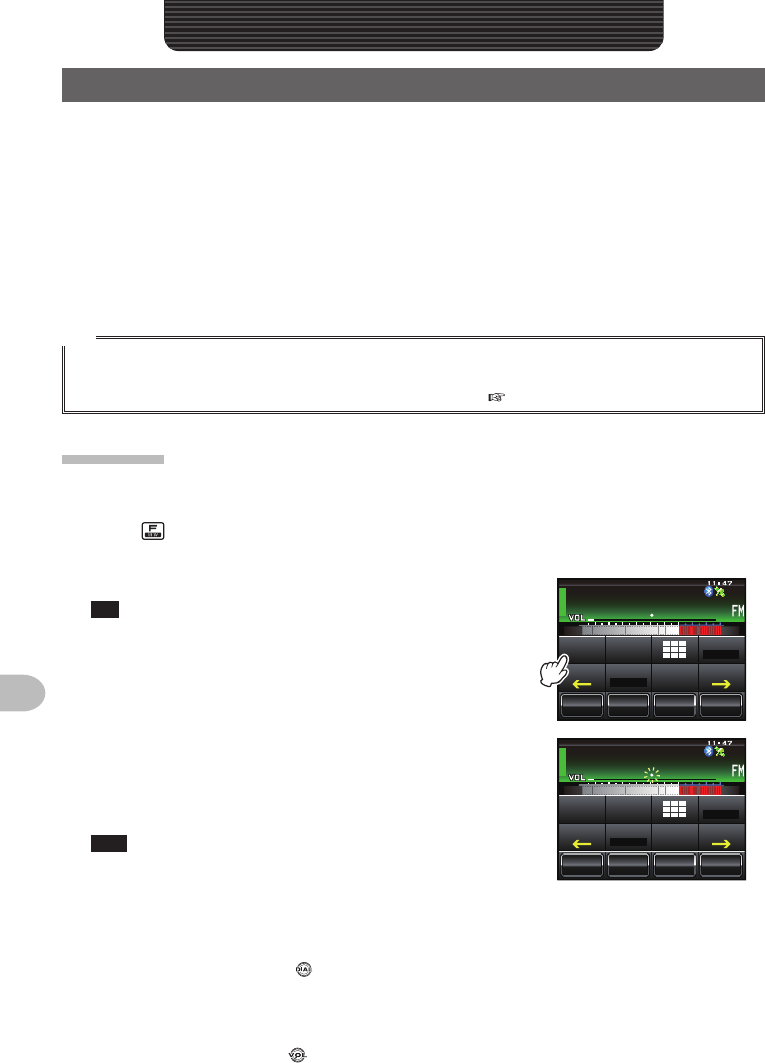
2 Press briefly
The function menu will be displayed.
3 Touch [SCAN]
Tip When [SCAN] is not displayed in the function menu,
touch [BACK] and [FWD] to switch the menu.
The scan will start from low to high frequency.
ᲹᲽᲾᲸᲸ
ᲹᲺ᳀;1-1*#/#
ᲸᲸᲸ
/76'
5%12'
/853.
8(1
5-+25'.
1((
&9
6Z294
*+
5%#0 4'8
(9&$#%-
During scanning, the decimal point of the frequency
display will blink.
When a signal is received, the scan will stop for three
seconds before starting to scan again.
Tips • The scan can also be started by pressing the [UP] or
[DWN] button on the microphone for one second or
longer.
ᲹᲽᲾᲸᲸ
ᲹᲺ᳀;1-1*#/#
ᲸᲸᲸ
/76'
5%12'
/853.
8(1
5-+25'.
1((
&9
6Z294
*+
5%#0 4'8
(9&$#%-
• The scanning direction (UP/DOWN) can be set using [SCAN]→[2SCANDIRECTION] in the
set-up menu.
• The scanning direction can also be changed by pressing the [UP] or [DWN] button on the
microphone or turning during scanning.
• The action used to stop the scanning may be set using [SCAN]→[3SCANRESUME] in the
set-up menu (refer to the next page).
• The squelch level may be adjusted using the following procedure during scanning.
Touch [SQL] → Turn .
Application for FCC / IC
FCC ID: K6620345X40 / IC: 511B-20345X40
73
Scanning
SignalSearch
●Tostopthescanning
To stop the scanning, either touch [SCAN] or press the microphone [PTT] button (the
radio will not transmit in this case).
Settingthereceiveoperationwhenthescanningstops
Any of the following three methods can be selected as the action to be taken after the
scanning stops.
(1) Restarts the scanning after receiving for the set amount of time. Select from one,
three or five seconds.
(2) Continues receiving until the signal disappears and then restart the scanning two
seconds after the signal disappears (BUSY).
(3) Stops the scanning to receive at that frequency (HOLD).
1 Press for one second or longer
The set-up menu will be displayed.
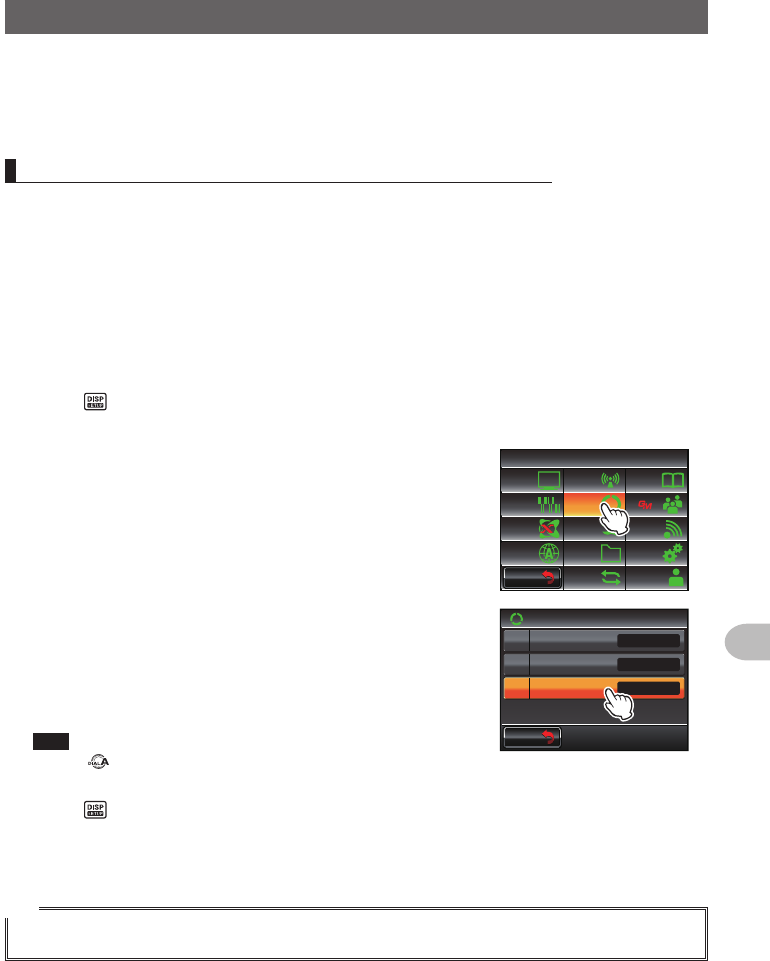
2 Touch [SCAN]
The menu list will be displayed.
$#%-
$#%-
6:4:
5'672/'07
4'5'6
%.10'
%10(+)9Ჰ4'5
5%#0
&+52.#;
5+) 0#.+0)
#245 126+10
5&%#4&
/'/14;
#
%#..5+) 0
3 Touch [3SCANRESUME] to select the reception
method
The reception method will change in the following
order each time the screen is touched.
“BUSY” → “HOLD” → “1sec” → “3sec” → “5sec”
Tips • The reception method can also be selected by pressing
.
• Factory default value: 3 sec
$#%-
$#%-
UGE
5%#0
5%#04'57/'
5%#0&+4'%6+10
Ჹ
Ჺ
#761
&7#.9#6%*5612
72
4 Press for one second or longer
The reception method when the scanning stops will be set and the display will return
to the previous screen.
Tip
The settings here are applicable to “VFO Scan”, “Memory Scan” and “Programmable Memory Scan”.
Application for FCC / IC
FCC ID: K6620345X40 / IC: 511B-20345X40
74
Scanning
SignalSearch
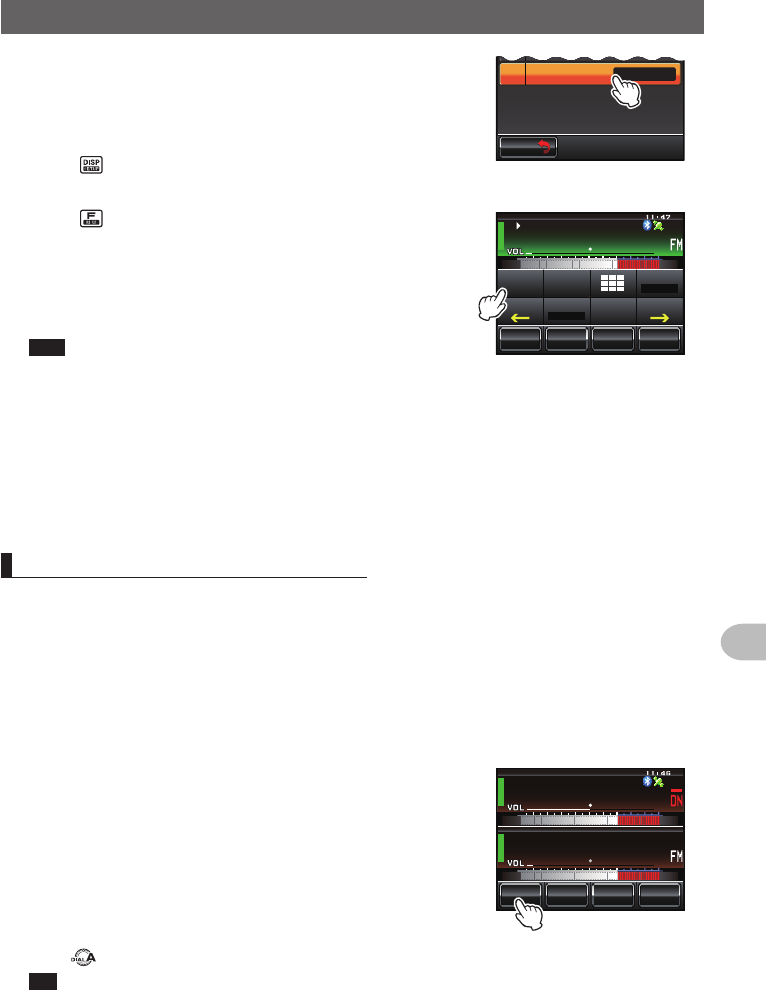
Memoryscan
The FTM-400XDR/DE transceiver will scan the frequencies registered in the memories
in the order of the memory channel number.
1 Switch to the memory mode
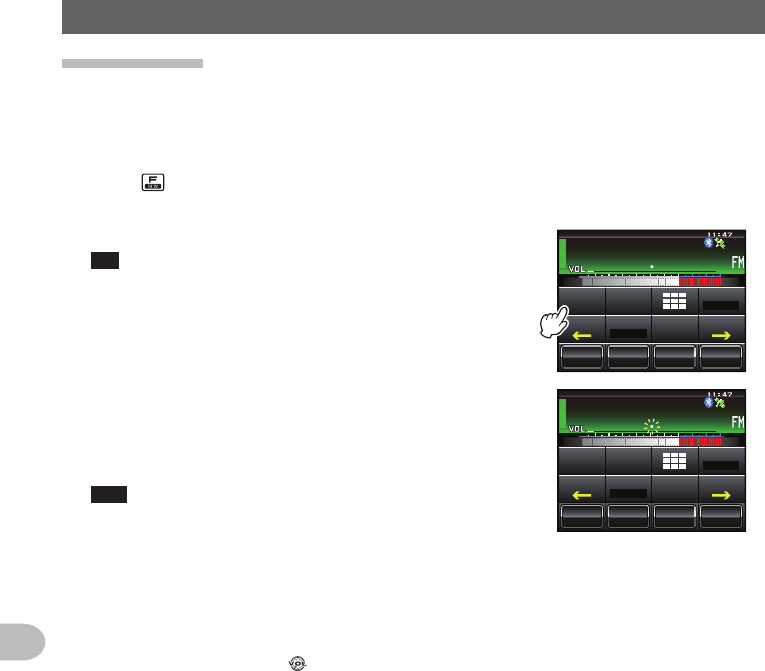
2 Press briefly
The function menu will be displayed.
3 Touch [SCAN]
Tip When [SCAN] is not displayed in the function menu,
touch [BACK] or [FWD] to switch the menu.
The scanning will start from the lowest to the highest
memory channel number.
ᲹᲽᲾᲸᲸ
ᲹᲺ᳀;1-1*#/#
᳀ᲾᲸ
ᲽᲸᲸ61-;1Ჺ
/76'
5%12'
/8 53.
5-+25'.
1((
&9
6Z294
*+
5%#0 4'8
(9&$#%-
During scanning, the decimal point of the frequency
display will blink.
When a signal is received, the scan will stop for three
seconds before starting to scan again.
Tips • The scan can also be started by pressing the [UP] or
[DWN] button on the microphone for one second or
longer.
ᲹᲽᲾᲸᲸ
ᲹᲺ᳀;1-1*#/#
᳀ᲾᲸ
ᲽᲸᲸ61-;1Ჺ
/76'
5%12'
/8 53.
5-+25'.
1((
&9
6Z294
*+
4'8
(9&$#%-
5%#0
• The scanning direction (UP/DOWN) can be set using [SCAN]→[2SCANDIRECTION] in the
set-up menu.
• The action to be taken when scanning is stopped can be set using [SCAN]→[3SCAN
RESUME] in the set-up menu (refer to the previous page).
• The squelch level may be adjusted using the following procedure during scanning.
Touch [SQL] → Turn
●Tostopthescanning
To stop the scanning, either touch [SCAN] or press the microphone [PTT] button (the
radio will not transmit in this case).
Application for FCC / IC
FCC ID: K6620345X40 / IC: 511B-20345X40
75
Scanning
SignalSearch
Selectingthescanningmethod
The scanning may be set for all memories or only specified memories.
1 Press for one second or longer
The set-up menu will be displayed.
2 Touch [MEMORY]
The menu list will be displayed.
$#%-
$#%-
6:4:
5'672/'07
4'5'6
%.10'
%10(+)9Ჰ4'5
5%#0
&+52.#;
5+) 0#.+0)
#245 126+10
5&%#4&
/'/14;
#
%#..5+) 0
3 Touch [2MEMSCANTYPE] to select the scanning
method
The setting will switch between “ALL MEM” and
“SELECT MEM” each time it is touched.
$#%-
$#%-
.#4)'Ჹ
Ჺ/'/5%#06;2'
#.2*#6#)5+<'
#../'/
ALL MEM: Scan all memories.
SELECT MEM: Scan only specified memories.
Tips • The scanning method can also be selected by pressing .
• Factory default value: ALL MEM
4 Press for one second or longer
The scanning method will be set and the display will return to the previous screen.
Settingthespecified memories
Specify the memories to be scanned when “2 MEM SCAN TYPE” is set to “SELECT
MEM” in the set-up menu.
The memory can be specified using either of the following two methods:
(1) Selects channels using the memory list screen
(2) Specifies individual channels using the function menu screen
(1)Specifymemorychannelsusingthememorylistscreen
1 Touch [V/M] for 2 to 3 seconds (until the beep
sounds)
The memory list screen will be displayed.
ᲹᲽᲾᲸᲸ
ᲹᲺ᳀;1-1*#/#
᳀ᲾᲸ
ᲽᲸᲸ61-;1Ჺ
/76'
5%12'
/8 53.
Application for FCC / IC
FCC ID: K6620345X40 / IC: 511B-20345X40
76
Scanning
SignalSearch
2 Select the memory channel to be specified by turning
Tip The memory channel may also be selected by touching it
on the screen.
3 Touch [SKIP/SEL] to display “SELECT”
The setting displayed under [SKIP/SEL] will change
in the following order each time it is touched.
“OFF” → “SKIP” → “SELECT”
Ჹ ᲸᲽᲸᲸ
ᲹᲹᲽᲸᲾ
ᲹᲸᲸ
ᲺᲸᲸ
ᲸᲸ
ᲸᲸᲸ
$#%-
$#%-
5-+25'.
1((
&'.&'.
Tip Repeat Steps 2 and 3 to specify the other memories next.
4 Touch [BACK]
Return to the previous screen, and “” will be displayed on the left side of the
memory channel number.
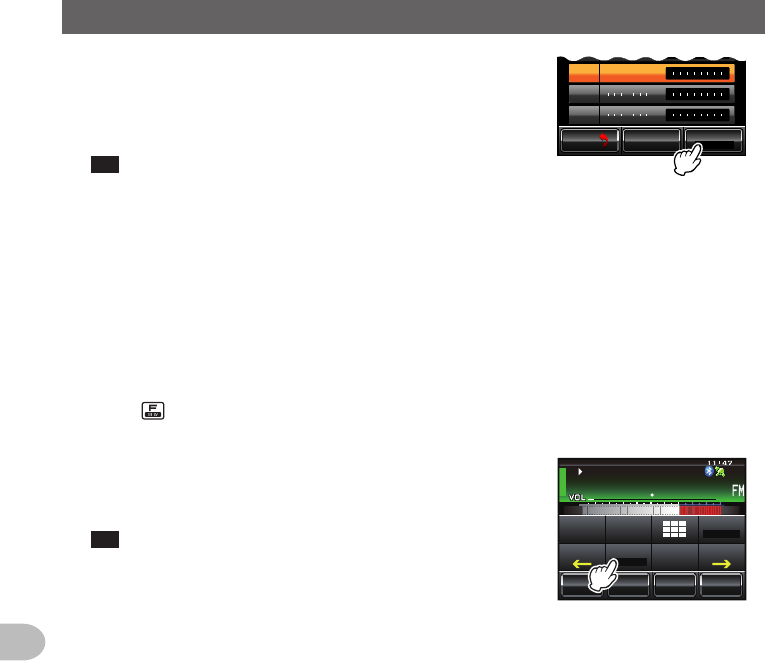
(2)Specifyindividuallyusingthefunctionmenuscreen
1 Switch to the memory mode, and recall the memory channel to be set as the
specified channel
2 Press
The function menu will be displayed.
3 Touch [SKIP/SEL] to display “SELECT”
“” will be displayed on the left side of the memory
channel number.
Tip When [SKIP/SEL] is not displayed in the function menu,
touch [BACK] or [FWD] to change the menu.
The setting displayed under [SKIP/SEL] will change
in the following order each time it is touched.
“OFF” → “SKIP” → “SELECT”
ᲹᲽᲾᲸᲸ
ᲹᲺ᳀;1-1*#/#
᳀ᲾᲸ
ᲽᲸᲸ61-;1Ჺ
/76'
5%12'
/8 53.
5-+25'.
1((
&9
6Z294
*+
5%#0 4'8
(9&$#%-
Scanonlythespecifiedmemorychannels
1 First, select the band to be scanned, before switch to the memory mode
2 Press for one second or longer
The set-up menu will be displayed.
3 Touch [MEMORY]
The menu list will be displayed.
$#%-
$#%-
6:4:
5'672/'07
4'5'6
%.10'
%10(+)9Ჰ4'5
5%#0
&+52.#;
5+) 0#.+0)
#245 126+10
5&%#4&
/'/14;
#
%#..5+) 0
Application for FCC / IC
FCC ID: K6620345X40 / IC: 511B-20345X40
77
Scanning
SignalSearch
4 Touch [2MEMSCANTYPE] and select “SELECT
MEM”
The setting will switch between“ALL MEM” and
“SELECT MEM” each time it is touched.
5 Press for one second or longer
The display will return to the previous screen.
$#%-
$#%-
.#4)'Ჹ
Ჺ/'/5%#06;2'
#.2*#6#)5+<'
#../'/
6 Press
The function menu will be displayed.
7 Touch [SCAN]
The scan only those memory channels that have
been set to “SELECT” will be started.
Tips • The scan can also be started by pressing the [UP] or
[DWN] button on the microphone for one second or
longer.
ᲹᲽᲾᲸᲸ
ᲹᲺ᳀;1-1*#/#
᳀ᲾᲸ
ᲽᲸᲸ61-;1Ჺ
/76'
5%12'
/8 53.
5-+25'.
5'.'%6
&9
6Z294
*+
5%#0 4'8
(9&$#%-
• The scan will be performed in increasing order of the memory channel number.
• When a signal is received, the scanning stops for three seconds and then the scanning starts
again.
• To stop the scanning, either touch [SCAN] or press the microphone [PTT] button (the radio
will not transmit in this case).
Settingthememoriestobeskipped
Memory channels which you do not wish to receive can be skipped during scanning.
The channels to be skipped can be set using the following two methods:
(1) Designate channels using the memory list screen
(2) Sets channels individually using the function menu screen
(1)Designatingchannelstobeskippedusingthememorylistscreen
1 Touch [V/M] for two to three seconds (until the beep
sounds)
The memory list screen will be displayed.
ᲹᲽᲾᲸᲸ
ᲹᲺ᳀;1-1*#/#
᳀ᲾᲸ
ᲽᲸᲸ61-;1Ჺ
/76'
5%12'
/8 53.
2 Turn to select the memory to be skipped
Tip The memory can also be selected by touching it directly.
Application for FCC / IC
FCC ID: K6620345X40 / IC: 511B-20345X40
78
Scanning
SignalSearch
3 Touch [SKIP/SEL] to display “SKIP”
The setting displayed under [SKIP/SEL] will change
in the following order each time it is touched.
“OFF” → “SKIP” → “SELECT”
Tip Repeat Steps 2 and 3 to specify the other memories
next.
Ჹ ᲸᲽᲸᲸ
ᲹᲹᲽᲸᲾ
ᲹᲸᲸ
ᲺᲸᲸ
ᲸᲸ
ᲸᲸᲸ
$#%-
$#%-
5-+25'.
1((
&'.&'.
4 Touch [BACK]
Return to the previous screen, and a blinking “” will be displayed on the left side of
the memory channel number.
(2)
Settingchannelstobeskippedindividuallyusingthefunctionmenuscreen
1 Switch to the memory mode, and recall the memory channels that have been set to
be skipped
2 Press
The function menu will be displayed.
3 Touch [SKIP/SEL] to display “SKIP”
A blinking “” will be displayed on the left side of the
memory channel number.
Tip When [SKIP/SEL] is not displayed in the function menu,
touch [BACK] or [FWD] to change the menu.
The setting displayed under [SKIP/SEL] will change
in the following order each time it is touched.
“OFF” → “SKIP” → “SELECT”
ᲹᲽᲾᲸᲸ
ᲹᲺ᳀;1-1*#/#
᳀ᲾᲸ
ᲽᲸᲸ61-;1Ჺ
/76'
5%12'
/8 53.
5-+25'.
1((
&9
6Z294
*+
5%#0 4'8
(9&$#%-
Application for FCC / IC
FCC ID: K6620345X40 / IC: 511B-20345X40

79
Scanning
SignalSearch
Scanningtheprogrammablememories(PMS)
Using the dedicated memory channel, only the frequencies within the specified
frequency range will be scanned.
The frequency range is registered beforehand in the PMS memory channel.
Writingintotheprogrammablememory
Nine pairs (P1L/P1U through P9L/P9U) of frequency ranges can be set up in the PMS
memory channels.
Register the lower limit of the frequency range to be scanned into the memory channel
“PL” and the upper limit into the memory channel “PU”.
Memories with the same channel number “” (a number from 1 to 9) are handled as
one pair of PMS channel “P”.
Example:SetupaPMSchannelbyregisteringalowerfrequencyof433.200MHz
andanupperfrequencyof433.700MHzintheP1memorychannel
1 Switch to the VFO mode
2 Select the frequency (433.200) to be set for the lower
limit, using
Caution The frequency to be set as the lower limit (P1L)
must be lower than the upper limit (P1U).
3 Press for one second or longer
The memory writing screen will be displayed.
ᲸᲸ
ᲺᲸᲸ
8(1
/76'
5%12'
/853.
8(1
ᲹᲽᲾ
4 Turn to select [P1L]
The memory channel can also be selected by
touching it directly.
Tip The memory channel can be assigned with an alpha-tag
name ( P.66).
Ჸ
ᲺᲸᲸ
ᲽᲸ
72Ჹ
.2Ჹ
$#%-
$#%-
5-+2 5'.
1((
&'.&'.
5 Press
The display will return to the previous screen, and the memorized frequency and
memory channel number will be displayed.
6 Switch to the VFO mode
7 Select the frequency (433.700) to be set for the
upper limit, using
8 Press for one second or longer
The memory writing screen will be displayed.
/76'
5%12'
/853.
ᲸᲸ
ᲿᲸᲸ
8(1
8(1
ᲹᲽᲾ
9 Turn to select [P1U]
The memory channel can also be selected by
touching it directly.
Tip The memory channel can be assigned with an alpha-tag
name ( P.66).
Ჸ
ᲿᲸᲸ
ᲺᲸᲸ
ᲽᲸ
72Ჹ
.2Ჹ
$#%-
$#%-
5-+2 5'.
1((
&'.&'.
Application for FCC / IC
FCC ID: K6620345X40 / IC: 511B-20345X40